
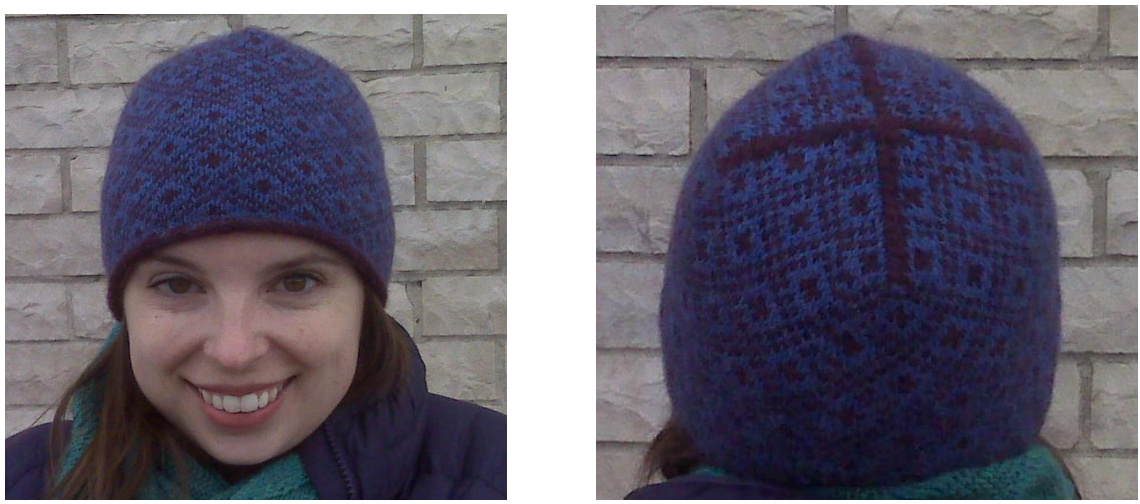
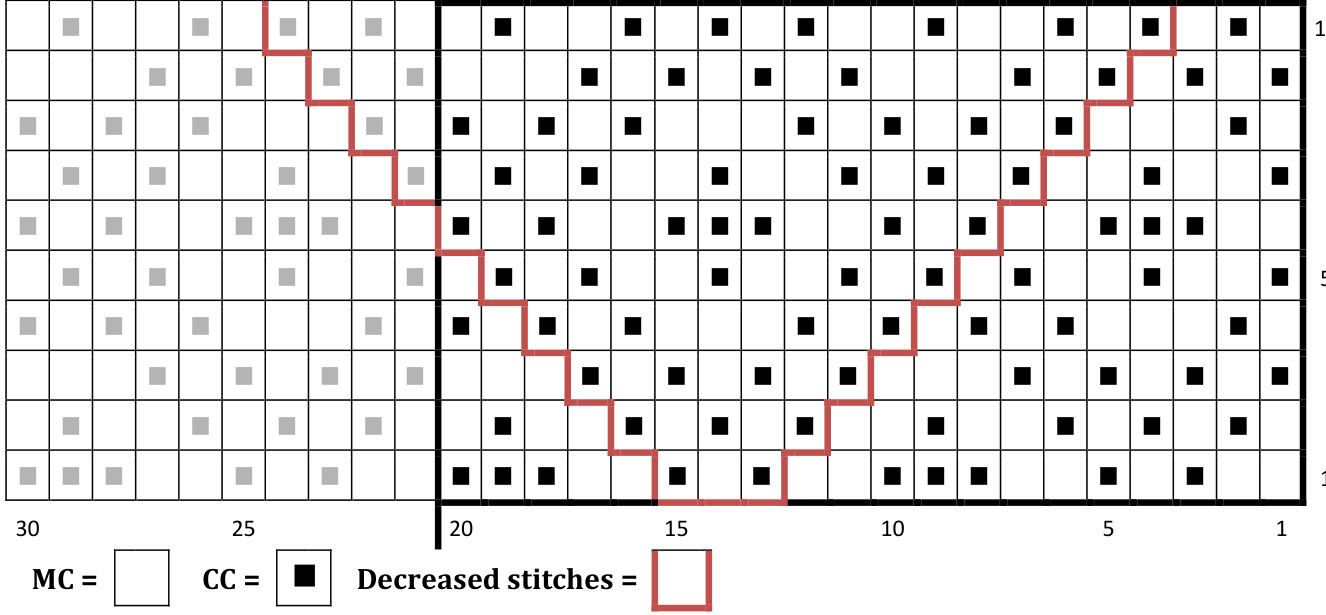
Yarn: Berroco Utra Alpaca (or otherlight worsted yarn) - about 100 yards $(?)$ in each of two contasting colors. My Hat: MC -Light dusty blue; CC-Very dark wine red Needles: US Size 5: one circular of smaller circumference than the hat, and one set of DPNs Gauge: about 6 sts and 7.5 rows per inch before blocking Hat Siz: Whnd slghly sethd, t fits nclye $21^{\,,}$ circumference nogin and reaches $8^{\circ}$ from the crown of my head over my ears. Before blocking Notions and otherstuff: 6 stitch markers withone in a diffrnt colr, blocking fom, ${<}1$ yard fleece, darning needle, sewing needle, thread. Hand-Sewing References: http://www.perestroika.ca/html2/vest/handstitching.php http://techknitting.blogspot.com/2008/05/part-2-handsewing-for-handknitters.html http://techknitting.blogspot.com/2008/05/best-way-to-attach-lining-fabric-to.html Stitch Pattern (from Eunny Jang's Endpaper Mitts) - 20 st/10 row repeat:
Pattern:
Using the circular needle CO 120 stitches, using 2-Color Long Tail Cast On and join to work in the round without twisting. Row 1: \*\*Work 20sts of Stitch Pattern, $\mathrm{PM^{**}}$ repeat 6 times, using differently-colored marker last, to indicate the beginning of the round. Continue stitch patern until piece measures about 6 inches from edge, completing row 9 of the chart Set-up row - Row 10 of chart: Continue in pattern, removing markers and replacing them as follows: work 15 sts, PM, work 30 sts, PM, work 30 sts, PM, work 30 sts, P(different)M, work to end (15 more sts). Note that, from this point, the “beginning of the round" will have shifted 5 stitches to the right, but it won't really matter. Just continue working in the pattern as indicated. Decrease row: \*\*Work to 3 sts before marker, work a double-decrease", remove marker, work 1 st, place marker\*\* repeat to end of round Continue working decrease row every round, changing to DPNs when necessary, until you have 4 sts. Break yarn, thread through remaining sts and pull tight Using CC, work 3 st Applied I-Cord around bottom edge and sewing last stitches onto first stitches. I didn't bother with a provisional cast on to graft the stitches at the end, but you could. Work in all yarn ends. Block the hat so that it is slightly looser than you would normally make a hat. Cut a piece of fleece that is about $2.5^{,}$ tall and $23{-}24^{\circ}$ long. Wrap around your head from your neck and Over your ears to your forehead, pinning so that it is slightly snug over your ears. Sew vertically, with running stitch, at th point where the two ends are pinned together to reate a irl f fleece. Cut excess fleece, leaving about a $^{1}\!/\!_{4}\!>\!7$ extra. Pin fleece lining into hat, just below the I-Cord on the inside of the hat. I recommend pinning the seam of the fleece, then pinning the half-way point of the fleece to the half-way point of the hat (1-oclock and 6- 0'clock). Then pin half-way in between those pins on each side (3-o'clock and 9-o'clock), and continue until you fel comfortable that you wont end up withany gaps when you ae sewing.Youmay need t r-pin a few times, since the flece willikelybe a slightly smaller circumference than the hat. The key is todistribute the extra hat material evenly around the fleece. Sew bottom edge of fleece into first round of normal stitches (below I-cord), using Overcast Stitch. Turn hat inside ut. Straighten ot feece tuging entlyupwards tobe sure that it counteracts anyurling at the bottom edge of the knitting. Pin if necessary. Blanket Stitch upper fleece edge to hat. Turn right-side out and wear proudly! \*To make the hat just as it's pictured in the photo, you will ned to work one stitch on either side of the 3 double decrease stitches in CC, regardless of the pattern. This will mean that on the next round, all of the 3 stitches involved in the decrease will be the same color, making the seam a solid color. I worked a Centered Double Decrease: slip first st, K2tog, pass slipped st over new st. However, you could work a Vertical Double Decrease (see YouTube), and then you wouldn't need to make sure the two surrounding stitches were worked in the CC. You could just always work the decrease stitch in CC, and the seam would be thinner, and a solid color. Too bad I learned about a VDD after I started the decreases for this hat!


