Captain America Knit Hoodie
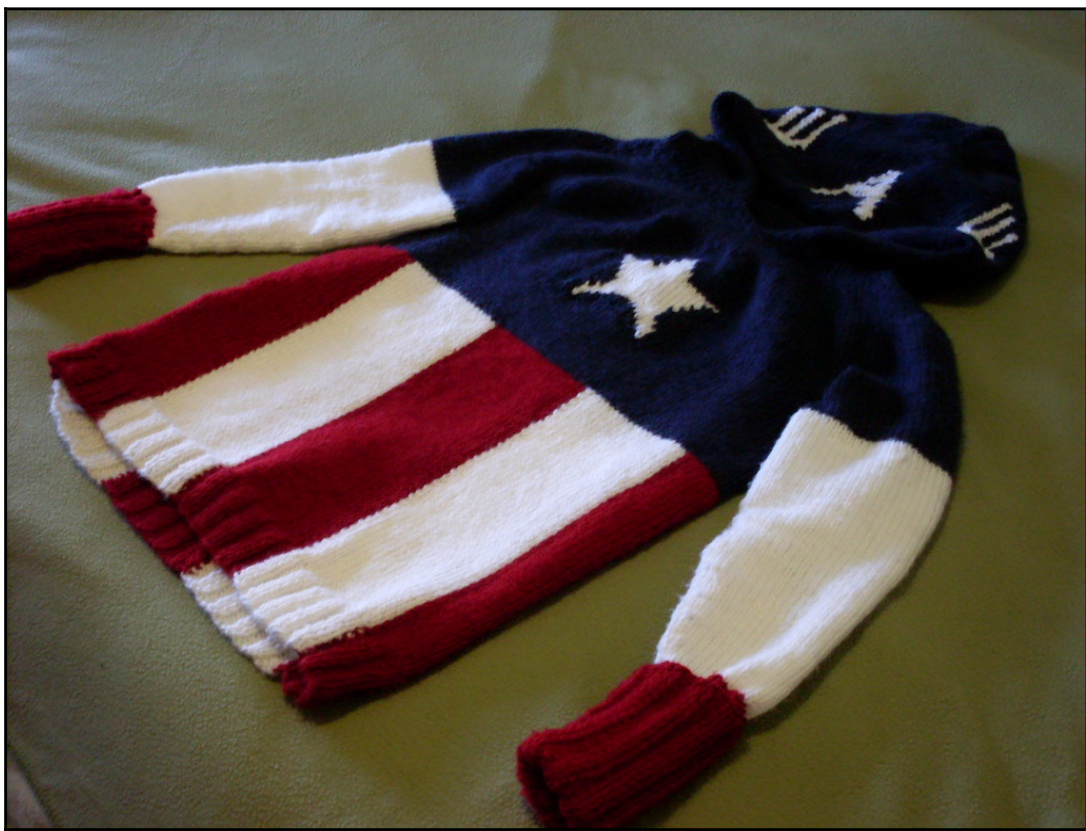
This hoodie is made in three parts: the body and two sleeves, with the hood knit on after the sleeves are joined. Instructions are also given for completing the sweater with a crewneck collar instead of a hood. It is based on Elizabeth Zimmermann's Seamless Yoke Sweater from her Knitting Workshop TV series. The pattern for the hood was borrowed from Amy Swenson's “Janda" sweater. A list of links to information about the seamless yoke sweater, the “Janda" Hoodie, and various intarsia tutorials can be found at the end of this document. Note about the Seamless Yoke Sweater: EZ's instructions for this sweater are given so that it can be made using any kind of yarn on any size needle for any size body. You only need to know two things: A) your gauge with the materials you're using and B) how wide around you want your sweater to be. Everything else is worked out using a formula of percentages based on that width. The instructions below are for a medium-sized sweater (about a 36" bust) that hits at the mid-to-lower hip. For a shorter sweater, reduce the length of the striped section.
Materials
3 skeins Lion Brand Vanna's Choice White (A) 3 skeins Lion Brand Vanna's Choice Cranberry (B) 4 skeins Lion Brand Vanna's Choice Navy (C) US 7 29" circular needle US 7 16" circular needles (2) Tapestry needle
Gauge
17 sts/24 rows = 4"X 4" in stockinette
SWEATERBODY
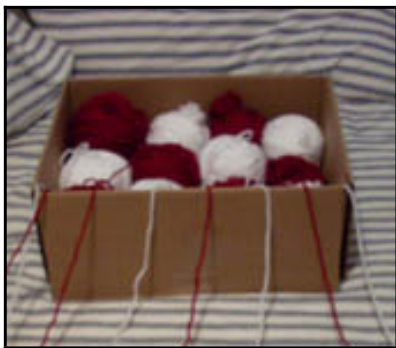
Eight stripes (four white and four red) are worked flat on a 29" circular needle. To prepare for working the vertical stripes, I wound each skein of (A) and (B) into two center-pull balls (for a total of six balls in each color), and set them up in a conveniently-sized box so that the colors alternated. Yarn must be twisted as for intarsia at each color change. CO 144 sts as follows: [18 sts (A), 18 sts (B)], rep 3 times. You should have 4 sets of CO sts in alternating colors. Row 1: (k2, p2) across, twisting yarn at color changes as for intarsia. Continue working back and forth in (k2, p2) rib, twisting yarn at color changes, until work measures 2". End with ws row. Increase row: (k1, kfb, k14, kfb, k1) 8 times, twisting yarn at color changes. 160 sts. (20 sts in each stripe). Next row: sl 1, then purl plain across, twisting yarn at color changes. Next row: sl 1, knit plain across, twisting yarn at color changes. Cont working back and forth in st st, slipping the first st of each row and twisting yarn at color changes, until work measures 12-3/4" (including ribbing). End with ws row.
box set up with alternating colors twistedstitc because I realized that I really did need the ease an extra inch or so would give me. It's up to you.) Join to work in round and knit a few rounds to hold everything together. Seam the striped section using mattress stitch.
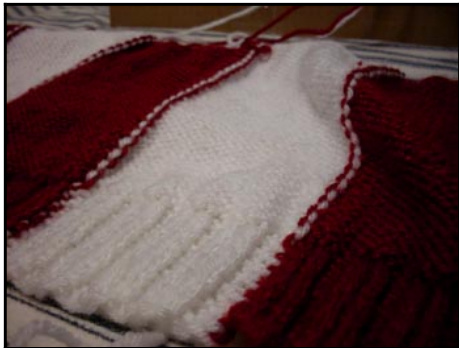
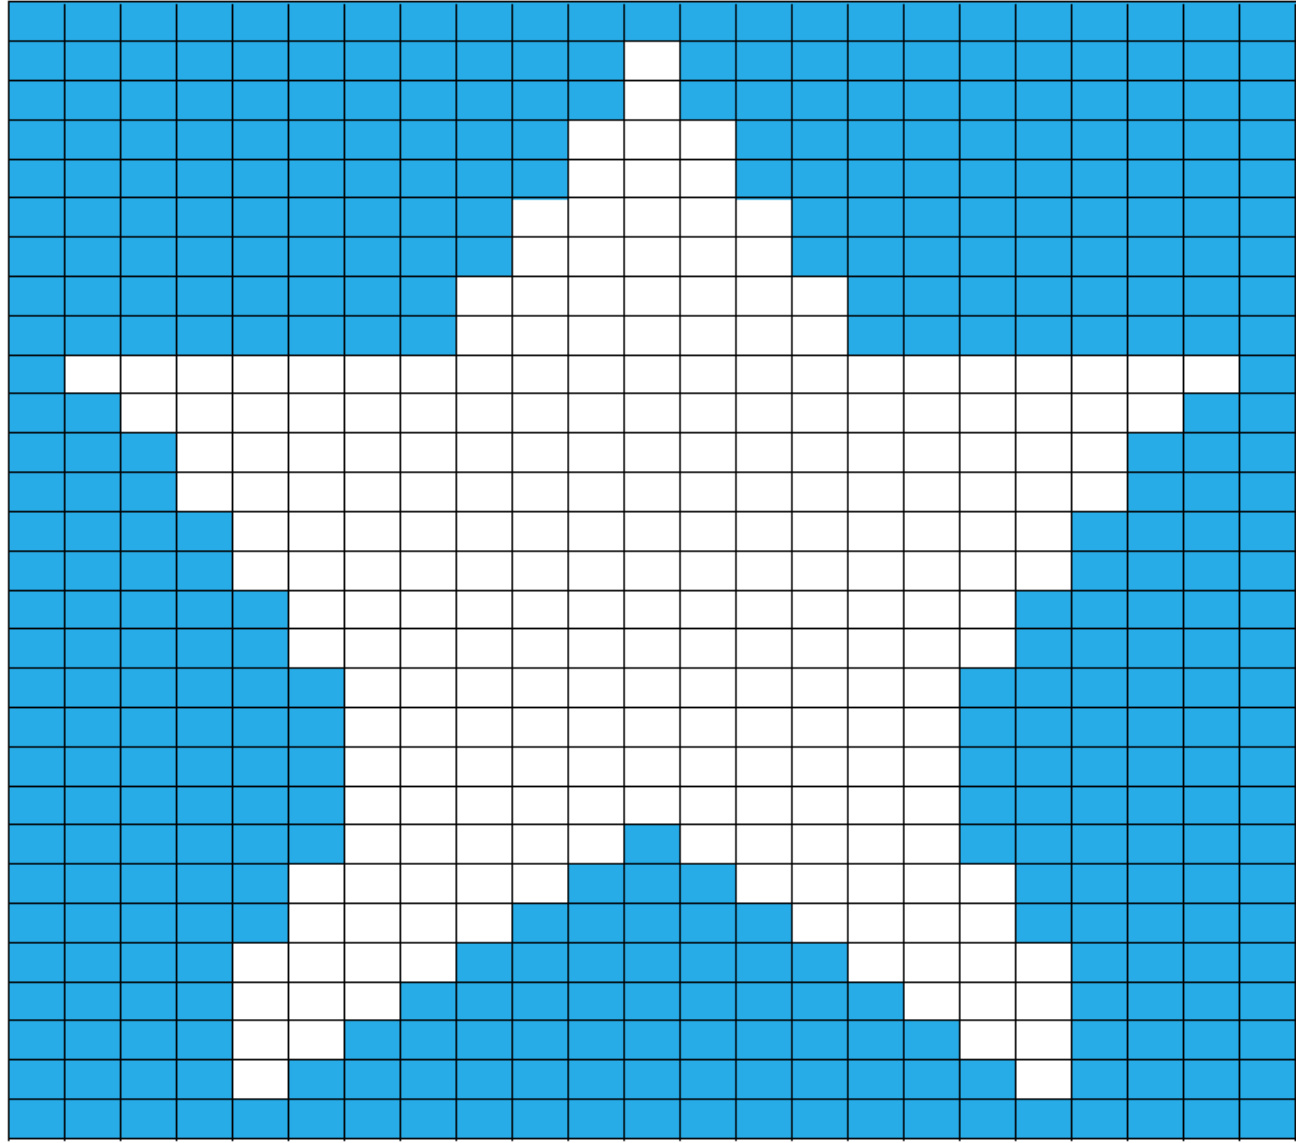
Figuring out the Front and Back, and where you want the stripes: At this point your sweater body is a simple tube, but now is the time to decide where you want your stripes to lay, because in order to complete the sweater you need to identify the Front and Back. I wanted red stripes on the sides (slimming!) so I placed one marker 10 stitches into the first red stripe and a second marker 10 stitches into the third red stripe. Continue working in (C) for 2-3/4" at the Front. Work in 3 sets of short rows (6 additional rows total) using wrap & turns on the Back. End with WS row. Start working the intarsia chart Center Front for the star at this 2-3/4" point. (Charts are at the end of this document.) Work the chart for the star back and forth on the same circular needle. This will leave a gap on one side where your round begins, which you will seam later. The seam will be hidden in the underarm so it won't be obtrusive. Figuring out where on the Front to start the chart: The chart is set up with an odd number of stitches across. Find the center front of your sweater and pm. If you have an even number of stitches across the front, pick one of the two center front stitches; otherwise, that center stitch is the center column of your star. Once you've reached a point 6" from the start of color (C), pm to mark 13 sts on each side of sweater body for underarms. This will be about two-thirds of the way through the chart for the star. Leave the sweater body on the needle and set aside while you work the sleeves.
SLEEVES (make 2)
CO 32 sts onto US 8 16" circular needle in color (B). Work flat in k2, p2 rib for 12". This will give you a cuff long enough to fold back on itself and go up the forearm about5". Break (B), join (A). K1, Kfb, K to last 2 sts, Kfb, K1. Join to work in the round. Knit 4 more rounds st st. On next round (Row 6), K1, Kfb, K to last 2 sts, Kfb, K1. Cont in st st, increasing 2 stitches every 6th round, to 50 sts. Cont in st st until work in (A) measures 11" (23" total). Break (A), join (C). Cont in st st for a further 4" (27" total). Break (C) and pm to mark 13 sts for underarm (6 on one side of the start/end of the round and 7 on the other).
YOKE
Attach sleeves as for classic EZ seamless yoke sweater. Work intarsia “in the round" to complete the star at center front. Once star is completed, rejoin to work in round and work another 1" plain. Working intarsia "in the round": While attaching the sleeves, I knitted around to the center back and began working back and forth from there: I decided that if there was going to be a noticeable join, I'd put it along the spine, where there's a natural ridge anyway. I knit flat, wrapping-and-turning the first stitch on the opposite needle (i.e., the first stitch of what normally be the next round). Then I picked it up the w&t when I came to it on the other side, and did a wrap-and-turn of the first stitch on the other needle. My end result was a little wonky. Not wonky enough to make me redo it, but if I tried something with intarsia-in-the-round again, I'd just work it flat back-and-forth, and then seam it afterwards. The thing I like about working in the round is how quickly the work goes when all you have to do is knit; since that doesn't happen with intarsia, there's no real benefit (that I can see) in faking the in-the-round-ness of it all. With a regular seam, there'd still be a noticeable ridge, but it'd be a nice clean one. As it is, the hood (when wearing it down) covers up the wonky area, and the navy color is dark enough that it doesn't show toomuch. Once you have 1" of solid blue completed above the star, work the first decrease. (K1, SKP) around. Knit plain for a further 2", adding in 1 set of short rows. Make 2"d decrease row: (K1, SKP) around. Next, on Back sts ONLY, K 1" plain in st st, working +1 Front stitch at the end of each row, with a wrap-and-turn. (These back stitches are worked back and forth, not in the round.) This inch adds length to the back and also helps shape the neck opening. To complete the yoke (and therefore the sweater) without the hood: Once the extra inch in Back is complete, begin next round, working K1, P1 rib on all sts. Add short rows at Back to increase the height of the collar as desired. (I found that a further extra inch worked best for me.) When collar depth in Front is such that the height above & below the star is visually equivalent, break yarn and bind off loosely. For collars, I recommend EZ's sewn bind off, which is surprisingly sturdy given how stretchy it is.
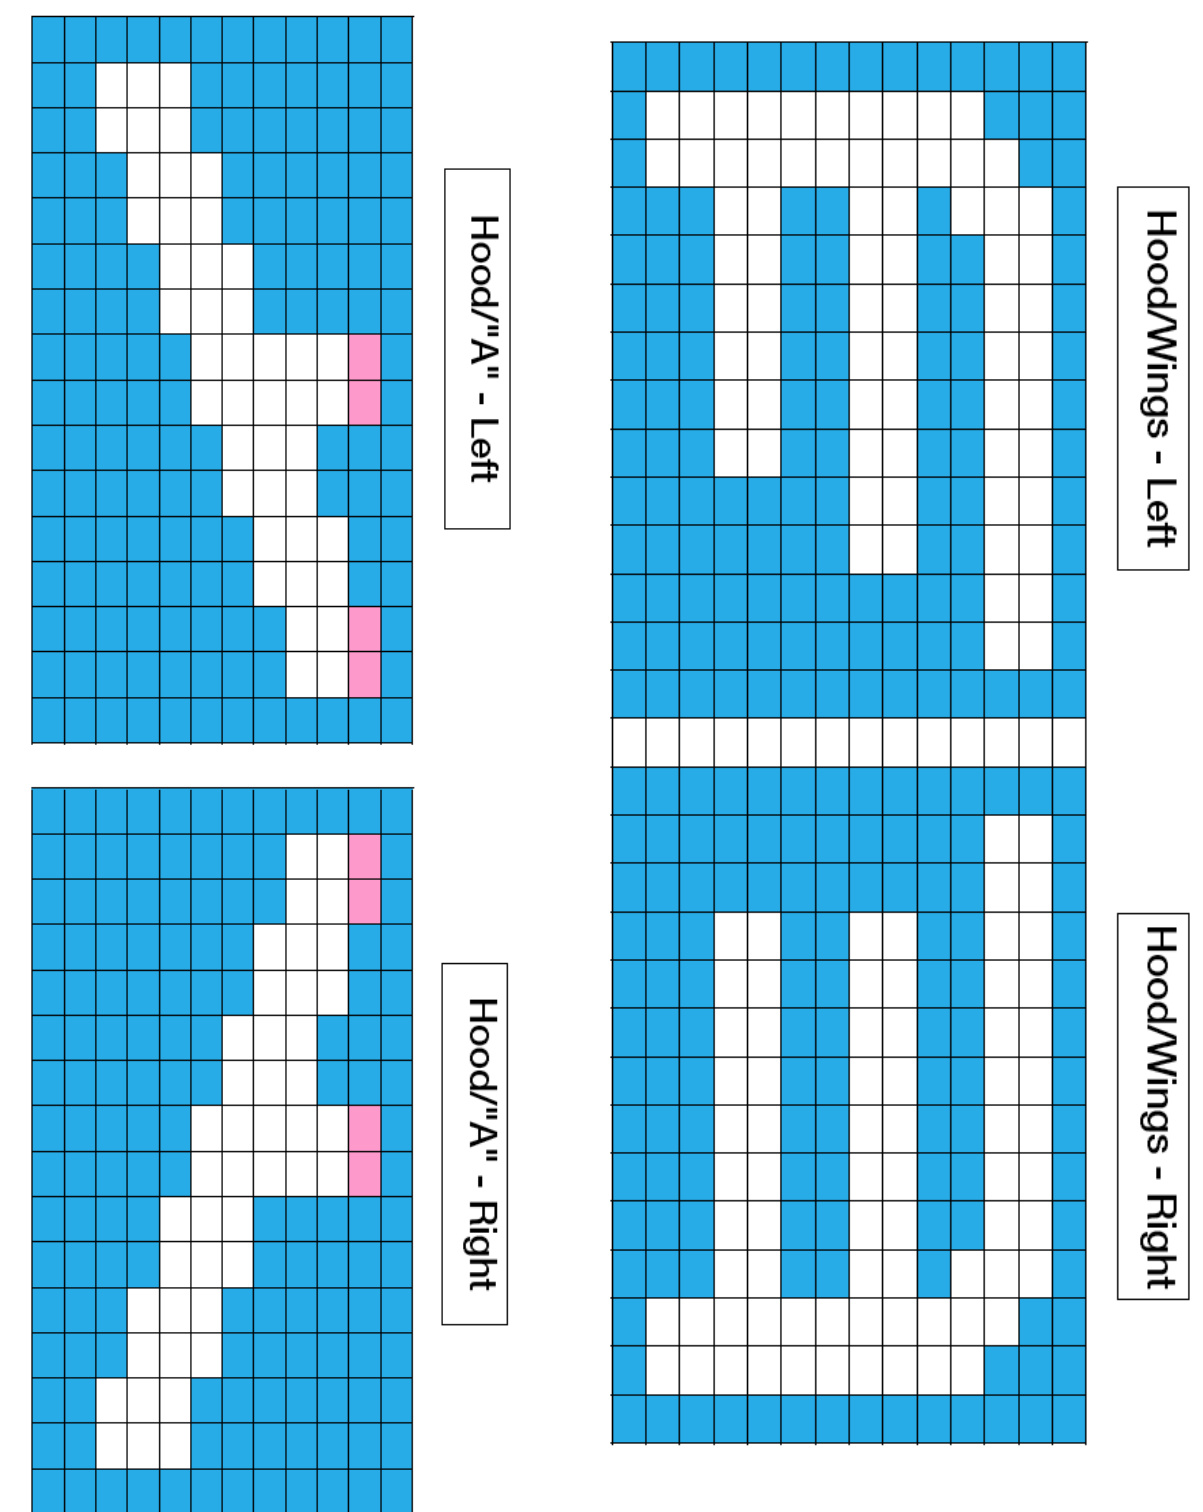
HOOD
After height is acheived on Back sts, knit plain around the entire collar for a further 1". Then work a decrease round to reduce stitch count to 79 sts. (This sets up the hood from the “Janda" sweater per the original pattern.) I had 95 sts, so I decreased using SKP by 16 sts evenly around, or 1 dec every 6th st. Hoods in different gauges: If your gauge is way off the approximately 4 sts/in I've been working with, then you can figure out the appropriate number of sts to decrease using percentages instead of specific numbers. The decrease for the start of this hood reduced my stitch count by about 17%. You can fudge the actual number of stitches decreased up or down a little depending on what works best for you. Knit plain to center front. Hood will be worked back and forth on the circular needle and grafted together at the top. On next RS row, inc 21 sts evenly spaced. (100 sts) Work in st st until hood measures 6-5/8", ending with WS row. Next row: K19, then begin intarsia chart Hood/Wings - Right. Work around back of hood to last 22 sts, then begin intarsia chart Hood/Wings - Left. Cont in st st, working the charts on either side of the hood. AT THE SAME TIME, when hood measures 7-1/2", work 1 increase row: K30 (including intarsia), increase 10 sts across next 40 sts, K30 (including intarsia). (110 sts) Cont in pattern, completing intarsia wings, until hood measures 13", ending with wS. Next row: K11, then begin intarsia chart Hood/A"- Right. Work around back of hood to last 13 sts, then begin intarsia chart Hood/"A" - Left. Work next row even, including intarsia. Next row: K35 (including intarsia), dec 10 sts across next 40 sts, K35 (including intarsia). (100 sts) Work 3 rows even, including intarsia. Next row: K30 (including inarsia), dec 10 sts across next 40 sts, K30 (including intarsia). (90 sts) Work 1 row even, including intarsia. Divide the remaining sts evenly on both ends of the circular needle and graft together using color (C). Once the graft is complete, finish the “A" charts in duplicate stitch using color (A). A little satin stitch embroidery/fiddling might be necessary to clean it up, since the grafing pulls everything about half a stitchoutofwhack.
LINKS
Seamless Yoke Sweaters a la Elizabeth Zimmermann This Ravelry page has a comprehensive list of links to the products that have instructions: http://www.ravelry.com/patterns/library/seamless-yoke-sweater "Janda" Hoodie by Amy Swenson I almost based the whole sweater off this hoodie, but then I realized that I was stretching my skills with the intarsia already, and I'd best stick with a foundation sweater that I already understood. Maybe next time! http://www.knitty.com/ISSUEspring03/PATTjanda.html Intarsia tutorials For the basics, this video has some good shots of what the yarn does when twisting stiches: http://www.youtube.com/watch?v=gK07PBQMTE8 I also watched Lucy Neatby's Intarsia Untangled 1 DvD (yay libraries!), which was really helpful For intarsia-in-the-round: I watched this 15 times. These instructions are really clear, and probably work great if you're not stupid about picking up wraps on short rows like I am. http://www.youtube.com/watch?v=ofSotC-vPSw Short rows with wrap-and-turn This guys picks up the wrapped stitch in a different way than most of the tutorials I watched, and it almost makessense: http://www.youtube.com/watch?v=8Z9R1BqCbz4 Grafting/Kitchener stitch This is by far and away the best grafting/kitchener stitch tutorial I've found. The ilustrations are crystal clear and the instructions even give you a nice little mantra to use as a mnemonic. http://knitty.com/ISSUEsummer04/FEATtheresasum04.html
Center front
Thka


