Easy-Peasy Knittn' Mittens
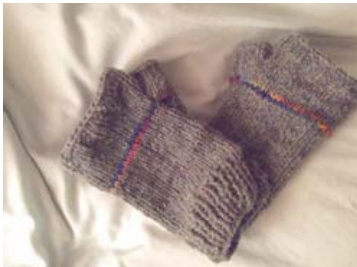
H.L. Fuller These simple fingerless mitts have a split, ribbed cuff, and may, optionally, be modestly embellished with a pinstripe of contrasting yarn. Here is a great fate for scraps of leftover aran-weight or worsted yarn. They'll be a boon to anyone who types in a cold office, or works with her hands and has developed a touch of arthritis or tendonitis in her knuckles. You'll need about 65 yards (50 grams; 1.8 oz) of worsted or aran weight in your main colorway, and (optionally) a couple two three yards of a contrasting colorway to make a pinstripe. The main body of the mitt is worked on size 7 needles (straight and dpn), and the thumb is worked on size 3 dpn. You also need a stitch holder and two stitch markers. You can custom tailor the circumference easily; measure around the hand at the widest point (knuckles) and multiply that value in inches by 4. That's the number of stitches to cast on. The instructions are given for a hand that measures 8 inches in circumference at the knuckles - women's medium. 1. On your size 7 straight needles, cast on 32 stitches. I use a knit-on cast on method for a sturdy, tidy edge. 2.Work a K1, P1 ribbing for 10 rows (about an inch and a half). 3. Knit the 11th row onto your size 7 dpn. 4. Join in round (don't twist!), and work another 14 rounds, all K. 5. Find the column of stitches stretching up from the cuff split. That stitch will form the center of your thumb gusset. As you work the 15th round, place a marker two stitches before that center stitch, and another marker two stitches after it (so there are five stitches total between the markers - the center stitch and two on each side). You should have a total of 25 rows, including the ribbing. Row A: Knit around to the first marker. Sm, k1, m1, then knit until only one stitch is left before the second marker. M1, k1, sm. Knit to end of round. Row B: Knit all stitches in the round. 6.Alternate Row A and Row B for a total of 7 new rows (ending with Row A). 7. OPTIONAL Join your piece of highlight color yarn and knit in pattern for 2 rows (Row B, followed byRowA). 8. Return to the main color, and continue in pattern for 4 more rows (B, A, B, A). (Now you have made 38 rows total including the cuff ribbing). 9. On your next round: knit to the first marker. Then: Sm, K1, put 11 stitches onto the stich holder (these will wrap around the thumb eventually), cast on 4 stitches to cross onto the right needle (simple thumb cast-on is fine for this). K1, sm, and knit to the end of the round. 10. Knit 4 additional rounds. As you pass above the gusset & thumb hole, knit snug to keep gaps minimal. 11. Work four rounds of K2,P2 ribbing and bind off 12. Using your size 3 dpn, pick up: 11 gusset stitches (from the stitch holder), plus 2 stitches on either side, plus your 4 cast-ons. Your thumb should have a total of 17 stitches divided on three dpn. 13. Knit 4 or five rounds on the thumb. 14. Bind off the thumb. 15. Weave in your ends. Show me what you did with this pattern! Send me a photo at whetstone.alpacas@gmail.com Have fun... h


