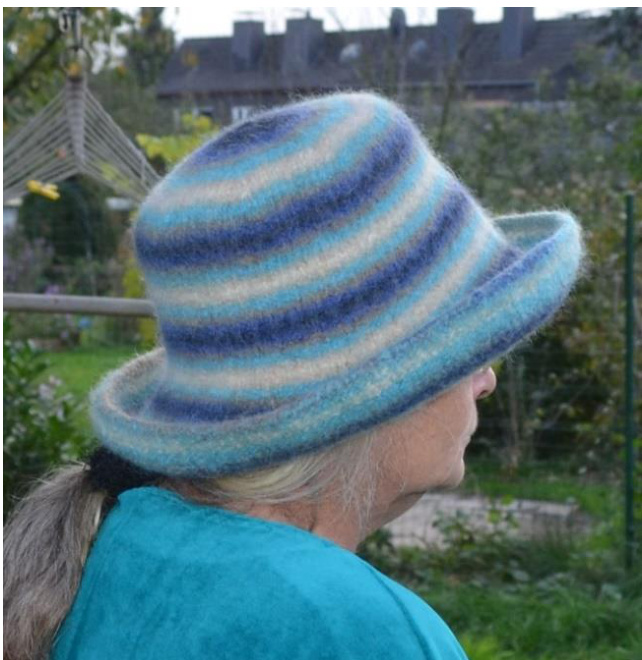
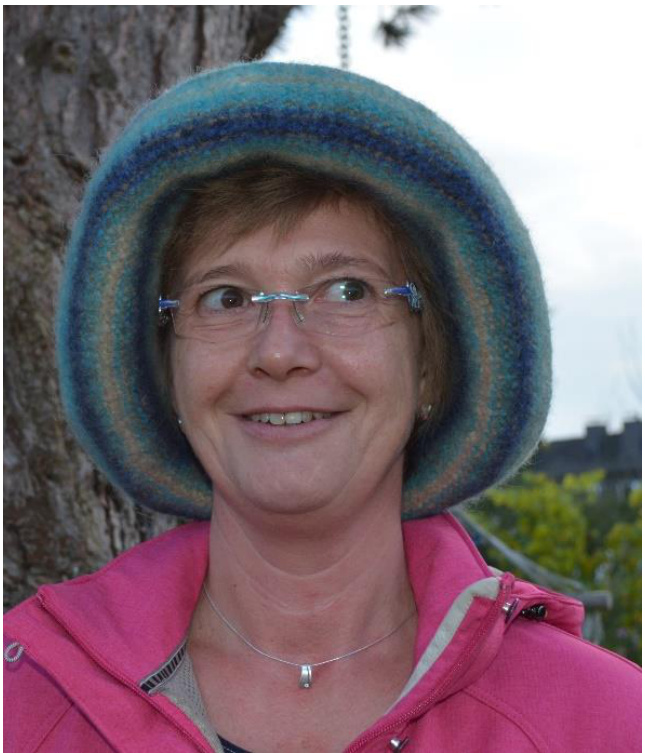
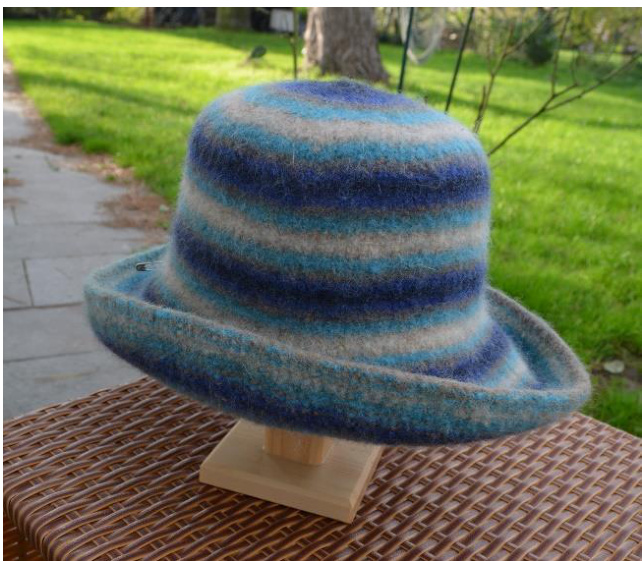
HAT PARADE
Four different hats, knitted on a circular needle by using magic loop
Thank you to Sabine Taubert-Juttner for her pattern of a felted hat that I used as a start!
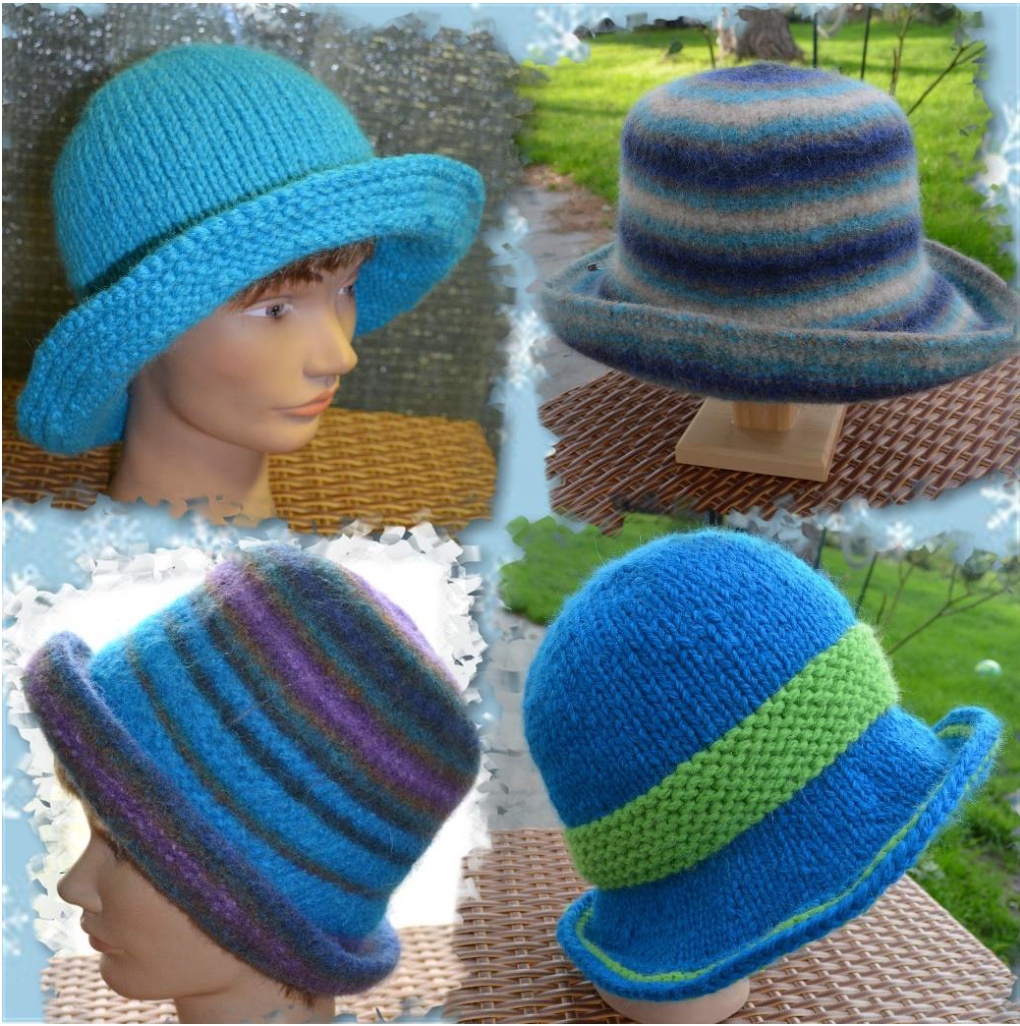
This pattern explains four different hats made of two different yarns. Two of these hats are felted in the washer after knitting, two hats will be worn unfelted. All hats differ in size and arch of the brim. Sizes: 54/56/58/60 cm inner circumference of the hat for all four versions Difficulty: itting techniques that might not be known by everyone, are explained step by step in the appendi @ Magische Maschen Heidrun Liegmann, 2014
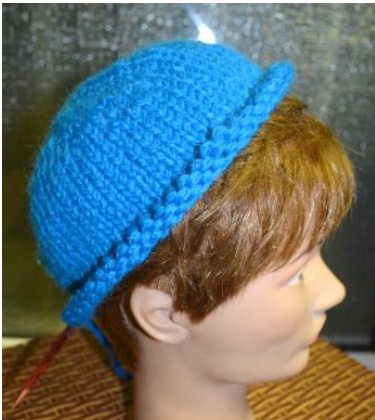
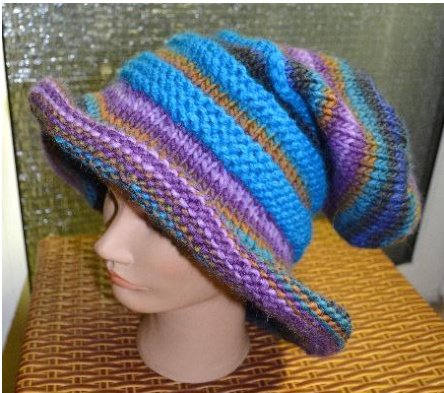
UNFELTED HAT
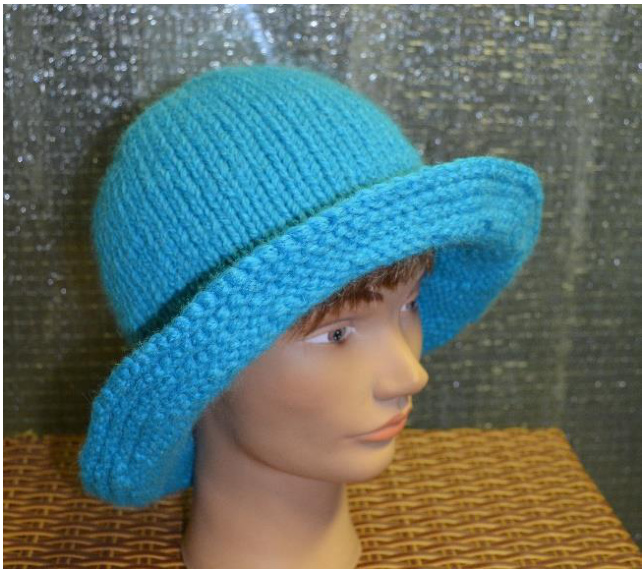
Material: 200 g Ferner Crazy Chain (50% alpaca, 50% wool, 35m/ 50g), color 114 The yarn is internationally available at www.Jawolle.com . The hat is knitted very tightly, so it will keep in shape. 1 circular knitting needle 6.0 mm, at least 80 cm long 1 lockable stitch marker
Gauge:
12 stitches and 20 rows knitted with needles 6.0 mm in stockinette stitch = 10 x 10 cm
Instructions:
Take Crazy Chain and the circular knitting needle and knit the beginning of the hat according to the instructions in the technical part.
Knitting sequence for the crown of the hat:
Instructions between asterisks \* \* are repeated until the end of the round.
| Round | Instructions | Stitchnumber at theendof the round |
| 5 | Knit all stitches. | 24 |
| 6 | Double every 3rd stitch by KFB = * knit 2 stitches, double 1 stitch by KFB * | 32 |
| 7 | Knit all stitches. | 32 |
| 8 | Double every 4th stitch byKFB = * knit 3 stitches, double 1 stitch by KFB * | 40 |
| 9 | Knit all stitches. | 40 |
| 10 | Double every 5th stitch by KFB = * knit 4 stitches, double 1 stitch by KFB * | 48 |
| 11 | Knit all stitches. | 48 |
| 12 | Double every 6th stitch by KFB = * knit 5 stitches, double 1 stitch by KFB * | 56 |
| 13 | Knit all stitches. | 56 |
| 14 | Double every 7th stitch by KFB = * knit 6 stitches, double 1 stitch by KFB * | 64 |
| 15 | Knit all stitches. | 64 |
The next round is knitted differently, depending on the size you knit! According to the gauge (12 stitches = 10 cm) we calculate the total stitches we need for the head circumference. To give the hat a proper fit, we subtract 2 to 3 stitches for every size.
| Head circumference | Numberofstitches accordingtothe gauge | Numberof stitchesforthe hat | Instructionsfor the16thround |
| 54 cm | 65stitches | 63stitches | Knittogether thefirst2stitches,thenknitupto theendoftheround. |
| 56cm | 67stitches | 65stitches | Double the first stitch by KFB, then knit up to theendoftheround. |
| 58cm | 70 stitches | 67 stitches | Doublethe1st,22nd and43rdstitchbyKFB, knitallotherstitchestotheendoftheround. |
| 60cm | 72stitches | 69stitches | Double the 1st,13th,25th,38th and 51st stitch byKFB,knitallotherstitchestotheendofthe round. |
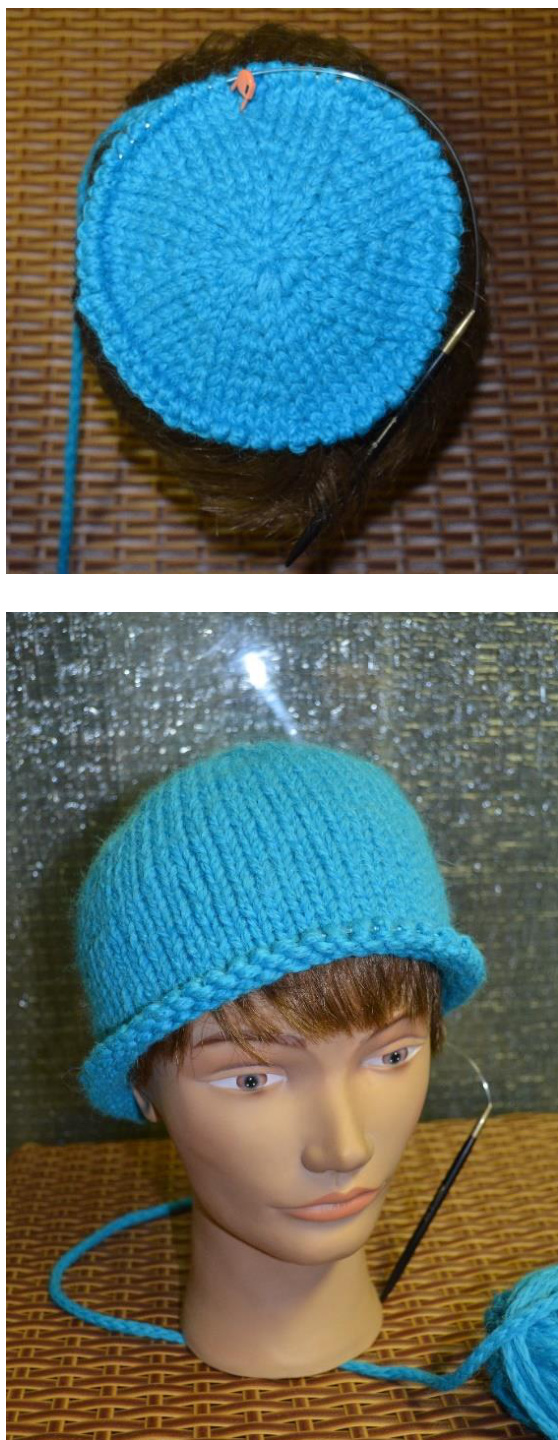
= end of increases for the hat crown Knit 24 round in stockinette stitch, until the hat is high enough.
HAT PARADE
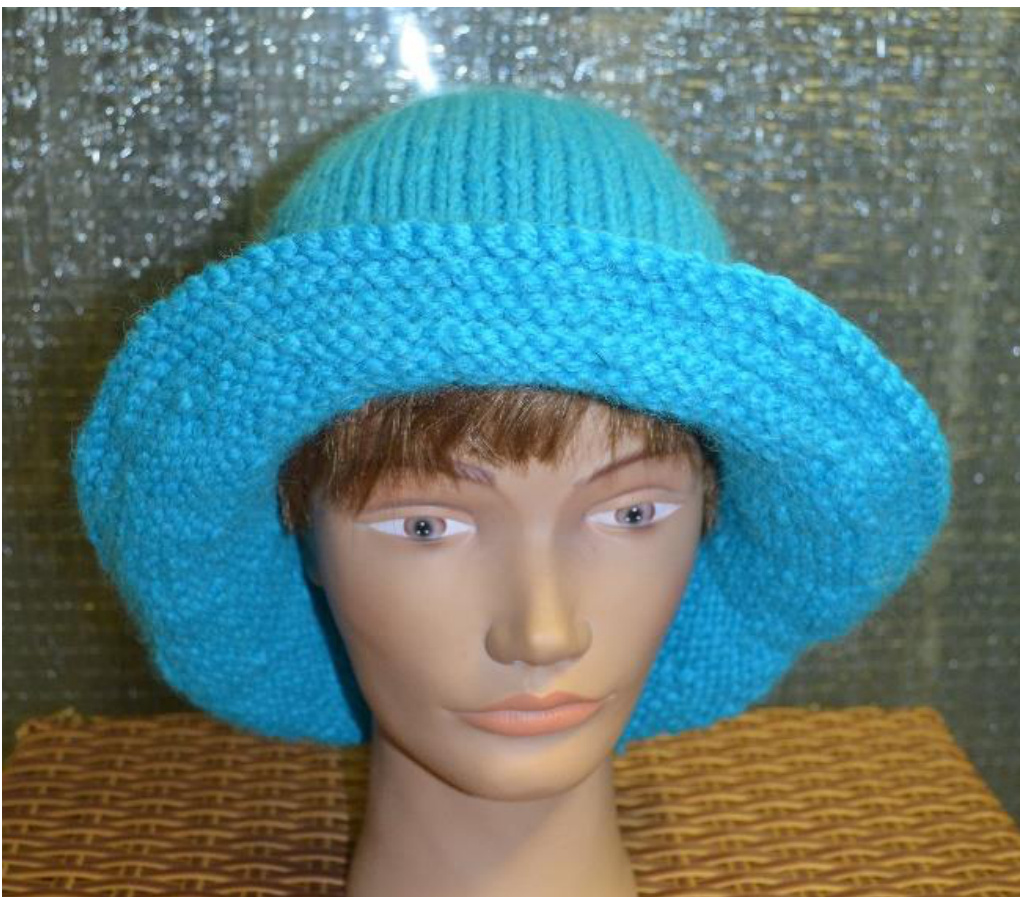
Hat brim:
| Round | Instructions |
| 1 | Increase 1 stitch after every 5th stitch by m1 increase (picking up the yarn of the previous row as a yarn-over and knitting it through the back loop). |
| 2-6 | Knit 5 rounds in stockinette stitch. |
| 7 | Increase 1 stitch after every 5th stitch by m1 increase (picking up the yarn of the previousrowasayarn-overandknittingit throughthebackloop). |
| 8 -11 | Knit4roundsinstockinettestitch. |
| 12 | Increase 1 stitch after every 5th stitch by m1 increase (picking up the yarn of the previousrowasayarn-overandknittingit throughthebackloop). |
| 13 | Purl 1 round. |
| 14 15 | Knit 1 round in stockinette stitch. |
| 16 | Purl 1 round. |
| 17 | Knit1roundinstockinettestitch. |
| 18 | Purl 1 round. |
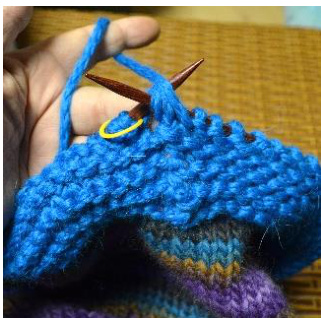
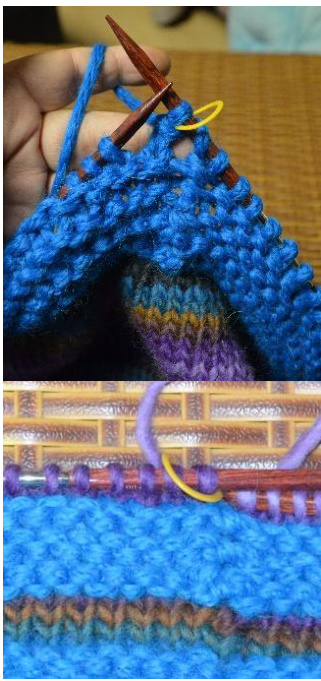
| Cast off all stitches knitwise. |
Sew in remaining yarn ends. Moisten the hat and pull it into shape, best block it on a hat stand and let it dry there.
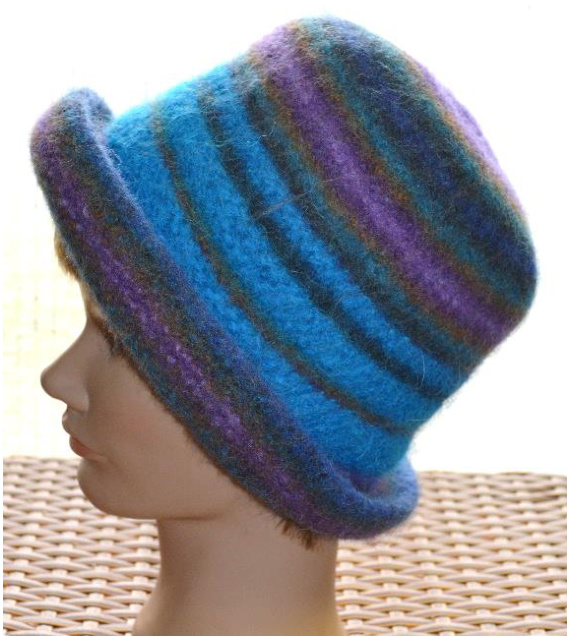
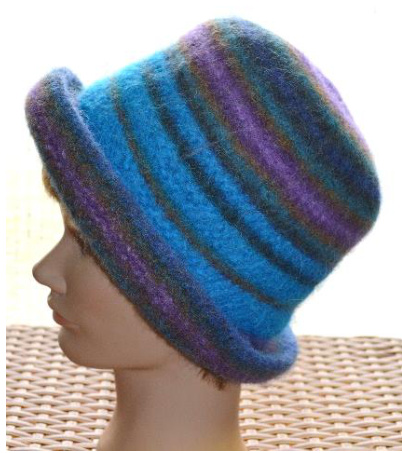
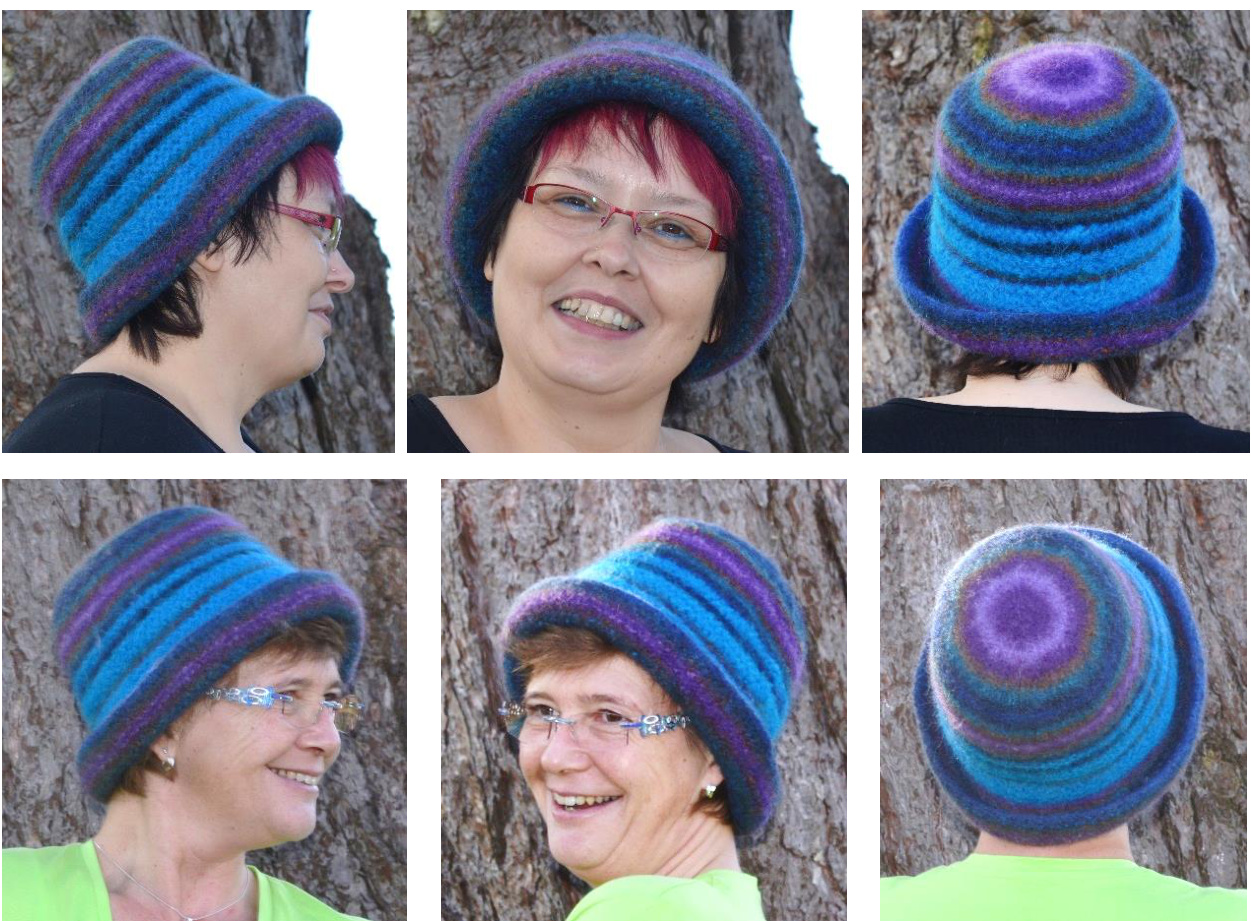
FELTED HAT
Material: 200 g Ferner Filzmich (100% w0ol, 200m/ 200g), color 2018 The yarn is internationally available at www.Jawolle.com . The knitted hat is felted in the washing machine. 1 circular knitting needle 6.0 mm, at least 80 cm long 1 lockable stitch marker Gauge before felting: 12 stitches and 20 rows knitted with needles 6.0 mm in stockinette stitch=10 x 10 cm
Gauge after felting:
12 stitches and 20 rows knitted with needles 6.0 mm in stockinette stitch = 8.5 x 6.5 cm
Instructions:
Take Filzmich and the circular knitting needle and knit the beginning of the hat according to the instructions in the technical part.
Knitting sequence for the crown of the hat:
Instructions between asterisks \* \* are repeated until the end of the round.
| Round | Instructions | Stitchnumberattheendofthe round |
| 5 | Knit all stitches. | 24 |
| 6 | Double every 3rd stitch byKFB = * knit 2 stitches, double 1 stitch by KFB * | 32 |
| 7 | Knit all stitches. | 32 |
| 8 | Double every 4th stitch by KFB = * knit 3 stitches, double 1 stitch by KFB * | 40 |
| 9 | Knit all stitches. | 40 |
| 10 | Double every 5th stitch by KFB = * knit 4 stitches, double 1 stitch by KFB * | 48 |
| 11 | Knit all stitches. Double every 6th stitch by KFB = | 48 |
| 12 | * knit 5 stitches, double 1 stitch by KFB * | 56 |
| 13 14 | Knit all stitches. Double every 7th stitch by KFB = | 56 64 |
| * knit 6 stitches, double 1 stitch by KFB * | ||
| 15 16 | Knit all stitches. Double every 8th stitch by KFB = | 64 72 |
| * knit 7 stitches, double 1 stitch by KFB * | ||
| 17 | Knit all stitches. | 72 |
HAT PARADE
The next round is knitted differently, depending on the size you knit! According to the felted gauge (1 cm felted fabric = 1.4 stitches) we calculate the total stitches we need for the respective head circumference. To give the hat a proper fit, we subtract 2 to 3 stitches for every size.
| Head circumference | Numberofstitches accordingtothe gauge | Number of stitchesforthe hat | Instructionforthe18thRound |
| 54 cm | 76stitches | 73stitches | DoublethefirststitchbyKFB,thenknitupto theendoftheround. |
| 56cm | 78 stitches | 75stitches | Doublethe1st,25thand50thstitchbyKFB, knitallotherstitchestotheendoftheround. |
| 58 cm | 81stitches | 78 stitches | Double the1st,13th,25th,37th,49th and 61st stitch by KFB, knit all other stitches to the end of the round. |
| 60 cm | 84 stitches | 80 stitches | Doubleevery9thstitchbyKFB= * knit 8 stitches, double 1 stitch by KFB * |
= end of increases for the hat crown Knit another 26 rounds until the hat is high enough - it will get felted, so it must be a lot larger to get the proper height after felting!
Hat brim:
| Round | Instructions |
| 1 | Increase 1 stitch after every 5th stitch by m1 increase (picking up theyarn of the previousrowasayarn-overandknittingitthroughthebackloop). |
| 2-6 | Knit5roundsinstockinettestitch. |
| 7 | Makeam1increaseafterevery6thstitchbym1increase(pickinguptheyarnofthe previousrowasayarn-overandknittingitthroughthebackloop). |
| 8 -15 | Knit8roundsinstockinettestitch. |
| 16 | Makeam1increaseafterevery7thstitchbym1increase(pickinguptheyarnofthe previousrowasayarn-overandknittingitthroughthebackloop). |
| 17 -26 | Knit10roundsinstockinettestitch. |
| 27 | Castoffallstitchesknitwiseloosely.Sewinallyarnends. |
The hat is very large now!

Put the hat into the washer, add 8 tennis balls and some normal detergent, and wash it for 1 hour at 40°C. Pull the wet hat into shape and smoothen it, best block it on a hat stand and let it drythere. If the hat is still too large, you can wash it again with 30 or 40°℃, or you can give it into the dryer for a few minutes. If you felt in the dryer, please control the size regularly!
The felted fabric is rain and wind tight, and it still is soft and cuddly.
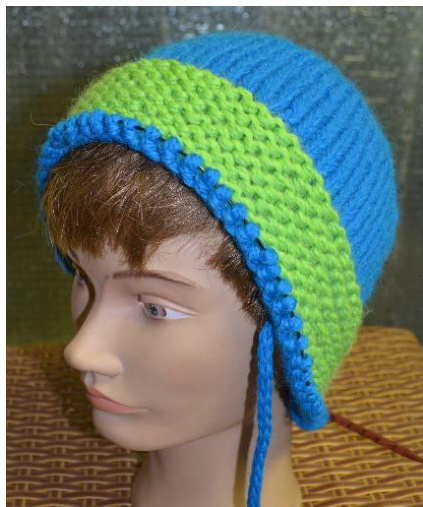
UNFELTED HAT WITH HAT BAND

Material:
3 x 50 g Ferner Crazy Chain (50% alpaca, 50% wool, 35m/ 50g), color 116 - MC 1 x 50 g Ferner Crazy Chain color 135, for hat circumference of 60 cm you'll need 2 x 50 g - CC The yarn is internationally available at www.Jawolle.com . The hat is knitted very tightly, so it will keep in shape. 1 circular knitting needle 6.0 mm, at least 80 cm long 1 lockable stitch marker
Gauge:
12 stitches and 20 rows knitted with needles 6.0 mm in stockinette stitch = 10 x 10 cm
Instructions:
Take Crazy Chain in MC and the circular knitting needle and knit the beginning of the hat according to the instructions in the technical part.
HAT PARADE
Knitting sequence for the crown of the hat:
Instructions between asterisks \* \* are repeated until the end of the round.
| Round | Instructions | Stitchnumberattheendofthe round |
| 5 | Knit all stitches. | 24 |
| 6 | Double every 3rd stitch by KFB = * knit 2 stitches, double 1 stitch by KFB * | 32 |
| 7 | Knit all stitches. | 32 |
| 8 | Double every 4th stitch by KFB = * knit 3 stitches, double 1 stitch by KFB * | 40 |
| 9 | Knit all stitches. | 40 |
| 10 | Double every 5th stitch by KFB = * knit 4 stitches, double 1 stitch by KFB * | 48 |
| 11 | Knit all stitches. | 48 |
| 12 | Double every 6th stitch by KFB = * knit 5 stitches, double 1 stitch by KFB * | 56 |
| 13 | Knit all stitches. | 56 |
| 14 | Double every 7th stitch by KFB = * knit 6 stitches, double 1 stitch by KFB * | 64 |
| 15 | Knit all stitches. | 64 |
The next round is knitted differently, depending on the size you knit! According to the gauge (12 stitches = 10 cm) we calculate the total stitches we need for the head circumference. To give the hat a proper fit, we subtract 2 to 3 stitches for every size.
| Head circumference | Numberofstitches accordingtothe gauge | Numberof stitchesforthe hat | Instructionforthe16thRound |
| 54cm | 65stitches | 63stitches | Knittogetherthefirst2stitches,thenknitupto theendoftheround. |
| 56 cm | 67stitches | 65stitches | DoublethefirststitchbyKFB,thenknitupto theendoftheround. |
| 58 cm | 70 stitches | 67stitches | Doublethe1st,22nd and 43rd stitchbyKFB, knitallotherstitchestotheendoftheround. |
| 60cm | 72 stitches | 69 stitches | Double the1st,13th,25th,38th and 51ststitch byKFB,knit all other stitchesto the end of the round. |
= end of increases for the hat crown
Knit 13 rounds in stockinette stitch, until the hat is high enough to begin the hat band.
HAT PARADE
With the 14th knit round, knit together some stitches according to the table. This round is the last round in MC before changing to CC, therefore make a yarn-over before knitting the round and knit together the last stitch of the round and the yarn-over by SSK (see technical appendix).
| Head circumference | Number of stitchesforthe hat | Number of hatstitches after decreasing | Instructionsforthe14thround |
| 54cm | 63 stitches | 60 | Knit t0gether the 1st/2nd, 21st/22nd, 41st/42nd stitch,knitallotherstitchestotheendoftheround. |
| 56cm | 65 stitches | 62 | Knitt0getherthe1st/2nd,22nd/23rd,42nd/43rd stitch,knitallotherstitchestotheendoftheround. |
| 58cm | 67 stitches | 64 | Knit t0gether the 1st/2nd, 22nd/23rd, 44th/45th stitch,knitallotherstitchestotheendoftheround. |
| 60cm | 69 stitches | 66 | Knittogetherthe 1st/2nd,23rd/24th,45th/46th stitch,knitallotherstitchestotheendoftheround. |
Hat band:
Cut MC. The hat band is knitted with CC in garter stitch in rounds.
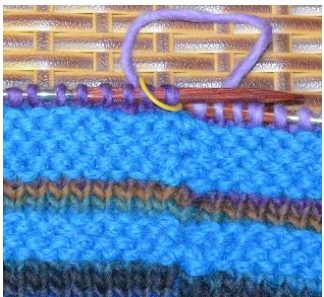
In order to get garter ridges, we have to knit and purl alternating rounds - knit one round, purl one round makes a garter ridge. If you don't want to get a "step" at the beginning of each round, please work the changes of color and pattern rounds according to the instructions in the technical appendix. Knit a total of 12 rounds with CC, alternating 1 knit round and 1 purl round, so that you can see 6 garter ridges. Cut CC and knit 2 more rounds with MC - please knit the color change according to the explanation in the technical appendix.
Hat brim:
Knit the color and pattern changes according to the explanations in the technical appendix to prevent visible "steps" between the garter ridges.
| Round | Instructions |
| 1 | Increase1stitchafterevery5thstitchbym1increase(pickinguptheyarnofthe previousrowasayarn-overandknittingitthroughthebackloop). |
| 2-6 | Knit5roundsinstockinettestitch. |
| 7 | Increase1stitchafterevery5thstitchbym1increase(pickinguptheyarnofthe previousrowasayarn-overandknittingitthroughthebackloop). |
| 8-11 | Knit4roundsinstockinettestitch. |
| 12 | Increase1stitchafterevery5thstitchbym1increase(pickinguptheyarnofthe previousrowasayarn-over andknittingitthroughtheback loop). |
| 13 | Purl1round.Beforepurlingtheround,makeayarn-over.Purltogethertheyarn-over withthelaststitchoftheround.LeavetheMConthewrongsideofthefabric. |
| 14 | TakeCCandknit1round.Beforeknittingtheround,makeayarn-over.Knittogether the yarn-over with the last stitch of the round. |
| 15 | With CC purl 1 round. Before purling the round, make a yarn-over. Purl together the yarn-over with thelast stitchof the round.Cut CC. |
| 16 | Pick up MC and knit 1 round.Before knitting the round,make a yarn-over.Knit together theyarn-overwith thelast stitch of theround byusingSSK. |
| 17 | WithMCpurl 1round.Beforepurlingthe round,make ayarn-over.Purl togetherthe yarn-over with the last stitch of the round.Cast off all stitches purlwise.. |
Sew in all yarn ends.
Moisten the hat and pull it into shape, best block it on a hat stand and let it dry there.
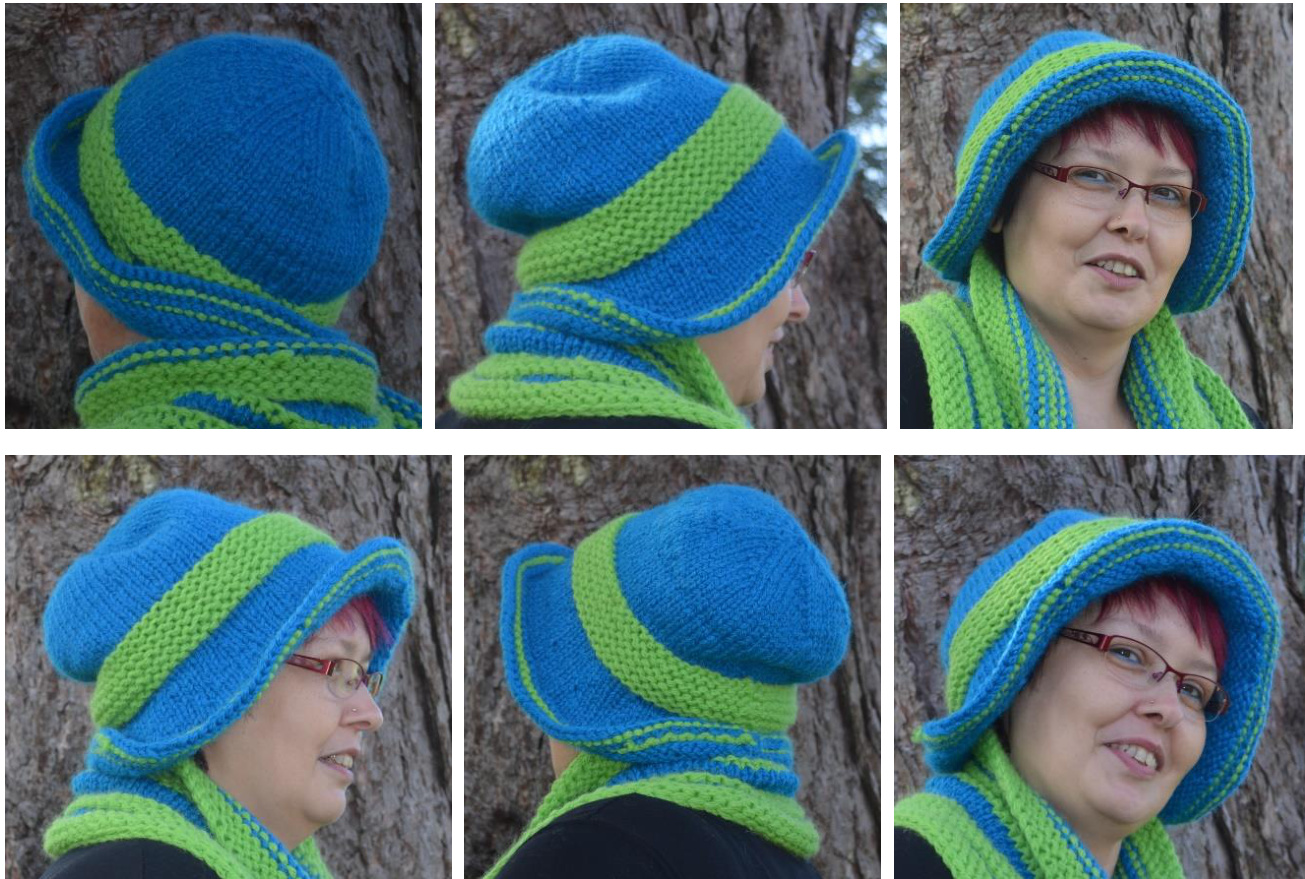
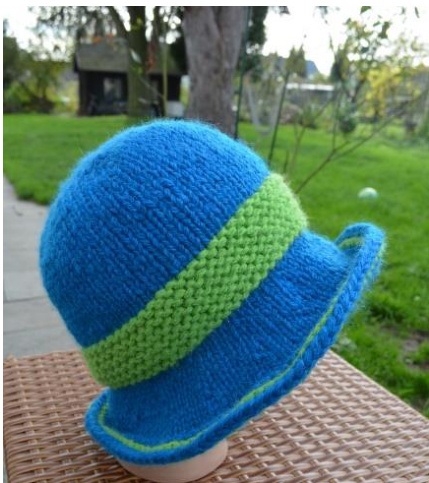
FELTED HAT WITH HAT BAND
Material: 1 x 200 g Ferner Filzmich - MC (100% wool, 200m/ 200g), color 2014 (approx. 150 g will be used) 1 x 50 g Ferner Crazy Chain - CC (50% alpaca, 50% wool, 35m/ 50g), color 116 The yarn is internationally available at www.Jawolle.com . The knitted hat is felted in the washing machine. 1 circular knitting needle 6.0 mm, at least 80 cm long 1 lockable stitch marker
Gauge before felting:
12 stitches and 20 rows knitted with needles 6.0 mm instockinettestitch=10x10cm
Gauge after felting:
12 stitches and 20 rows knitted with needles 6.0 mm in stockinette stitch = 8.5 x 6.5 cm
Instructions:
Take Filzmich and the circular knitting needle and knit the beginning of the hat according to the instructions in the technical part.
Knitting sequence for the crown of the hat:
Instructions between asterisks \* \* are repeated until the end of the round.
| Round | Instructions | Stitchnumberattheendof the round |
| 5 | Knit all stitches. | 24 |
| 6 | Double every 3rd stitch by KFB = * knit 2 stitches, double 1 stitch by KFB * | 32 |
| 7 | Knit all stitches. | 32 |
| 8 | Double every 4th stitch by KFB = * knit 3 stitches, double 1 stitch by KFB * | 40 |
| 9 | Knit all stitches. | 40 |
| 10 | Double every 5th stitch by KFB = * knit 4 stitches, double 1 stitch by KFB * | 48 |
| 11 | Knit all stitches. | 48 |
| 12 | Double every 6th stitch by KFB = * knit 5 stitches, double 1 stitch by KFB * | 56 |
| 13 14 | Knit all stitches. Double every 7th stitch by KFB = | 56 64 |
| * knit 6 stitches, double 1 stitch by KFB * | ||
| 15 16 | Knit all stitches. Double every 8th stitch by KFB = | 64 72 |
| * knit 7 stitches, double 1 stitch by KFB * | ||
| 17 | Knit all stitches. | 72 |
The next round is knitted differently, depending on the size you knit! According to the felted gauge (1 cm felted fabric = 1.4 stitches) we calculate the total stitches we need for the head circumference. To give the hat a proper fit, we subtract 2 to 3 stitches for very size.
| Head circumference | Numberofstitches accordingtothe gauge | Number of stitchesforthe hat | Instructionforthe18thRound |
| 54cm | 76stitches | 73stitches | DoublethefirststitchbyKFB,thenknitupto theendoftheround. |
| 56cm | 78 stitches | 75stitches | Doublethe1st,25thand50thstitchbyKFB, knitallotherstitchestotheendoftheround. |
| 58 cm | 81 stitches | 78stitches | Double the1st,13th,25th,37th,49thand 61st stitchbyKFB,knit allotherstitchesto theend of the round. |
| 60cm | 84 stitches | 80 stitches | Doubleevery9thstitchbyKFB= * knit 8 stitches, double 1 stitch by KFB * |
Knit 21 round in stockinette stitch, until the hat is high enough to begin the hat band. With the 22nd round, knit together some stitches according to the table.
| Head circumference | Number of stitchesforthe hat | Number of hat stitches after decreasing | Instructionsfor the22ndround |
| 54cm | 73 stitches | 69 | Knittogetherthe1st/2nd,19th/20th,37th/38thand 55th/56th stitch, knit all other stitches to the end of the round. |
| 56 cm | 75 stitches | 71 | Knittogetherthe1st/2nd,19th/20th,38th/39thand 57th/58thstitch,knit allother stitchesto theend of the round. |
| 58cm | 78 stitches | 74 | Knittogetherthe1st/2nd,20th/21st,39th/40thand 59th/60thstitch,knit allother stitchesto theend of the round. |
| 60 cm | 80 stitches | 76 | Knittogetherthe 1st/2nd,21st/22nd,40th/41stand 60th/61ststitch,knit allother stitchesto the end of the round. |
Hat band:
Cut MC. The hat band is knitted with CC in garter stitch in rounds. Garter ridges in CC alternate with stripes in stockinette stitch in MC.
In order to get garter ridges, we have to knit and purl alternating rounds-knit one round,purl one round makes a garter ridge. If you don't want to get a "step" at the beginning of each round, please work the changes of color and pattern rounds according to the instructions in the technical appendix.
HAT PARADE
Don't cut yarn. The yarn you don't need is kept on the wrong side of the fabric, both MC and CC.
Knitting sequence of the hat band:
| Round | Yarn | Instructions |
| 1 | contrasting yarn CC | Knit 1 round in stockinette stitch. |
| 2 | contrasting yarn CC | Purl 1 round (start with a yarn-over before beginning the round, purl together the last stitch with the yarn-over) |
| 3 | main yarn MC | Knit 1 round (start with a yarn-over before beginning the |
| 4 | main yarn MC | round, knit together the last stitch with the yarn-over) Knit 1 round |
| 5 | main yarn MC | Knit 1 round |
| 6 | main yarn MC | Knit 1 round (start with a yarn-over before beginning the round, knit together the last stitch with the yarn-over by |
| 7 | contrasting yarn CC | using SSK) Knit 1 round |
| 8 | contrasting yarn CC | Purl 1 round (start with a yarn-over before beginning the |
| 7 | contrasting yarn CC | round, purl together the last stitch with the yarn-over) Knit 1 round |
| 8 | contrasting yarn CC | Purl 1 round (start with a yarn-over before beginning the round, purl together the last stitch with the yarn-over) |
| 9 | main yarn MC | Knit 1 round (start with a yarn-over before beginning the |
| 10 | main yarn MC | round,knit together the last stitch with the yarn-over) Knit 1 round |
| 11 | main yarn MC | Knit 1 round |
| 12 | main yarn MC | Knit 1 round (start with a yarn-over before beginning the round, knit together the last stitch with the yarn-over by |
| 13 | contrasting yarn CC | using SSK) Knit 1 round |
| 14 | contrasting yarn CC | Purl 1 round (start with a yarn-over before beginning the round, purl together the last stitch with the yarn-over) |
| 15 | contrasting yarn CC | Knit 1 round |
| 16 | contrasting yarn CC | Purl 1 round (start with a yarn-over before beginning the round, purl together the last stitch with the yarn-over) |
| 17 | contrasting yarn CC | Knit 1 round |
| 18 | contrasting yarn CC | Purl 1 round (start with a yarn-over before beginning the round, purl together the last stitch with the yarn-over) Cut |
| 19 | main yarn MC | CC. Knit 1 round (start with a yarn-over before beginning the |
| 20 | main yarn MC | round,knit together the last stitch with the yarn-over) Knit 1 round |
Hat brim:
| Round | Instructions |
| 1 | Increase1stitchafterevery5thstitchbym1increase(pickinguptheyarnofthe previousrowasayarn-overandknittingitthroughthebackloop). |
| 2-6 | Knit5roundsinstockinettestitch. |
| 7 | Makeam1increaseafterevery6thstitchbym1increase(pickinguptheyarnofthe previousrowasayarn-overandknittingitthroughthebackloop). |
| 8 -13 | Knit6roundsinstockinettestitch. |
| 14 | Makeam1increaseafterevery7thstitchbym1increase(pickinguptheyarnofthe previous row as a yarn-over and knitting it through the back loop). |
| 15-21 | Knit7roundsinstockinettestitch. |
| 22 | Castoffallstitchesknitwiseloosely. |
The hat is very large now!
Put the hat into the washer, add 8 tennis balls and some normal detergent, and wash it for 1 hour at 40°C. Pull the wet hat into shape and smoothen it, best block it on a hat stand and let it dry there. If the hat is still too large, you can wash it again with 30 or 40°℃, or you can give it into the dryer for a few minutes. If you felt in the dryer, please control the size regularly!
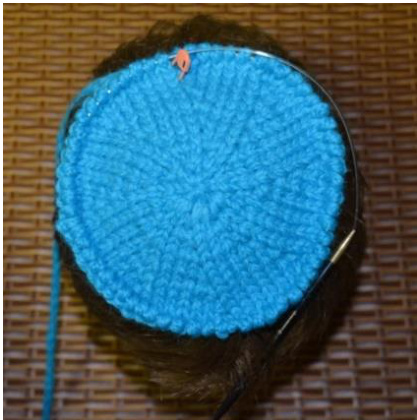
KNITTING TECHNIQUE
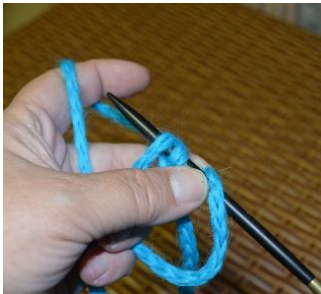
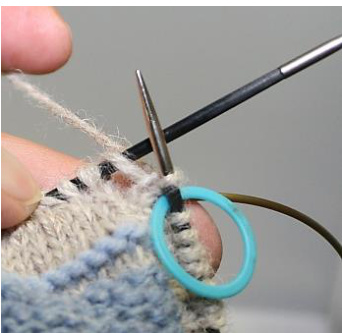
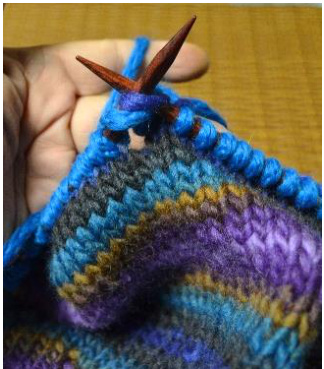
1. Starting the hat and KFB increase
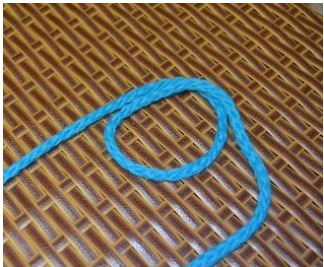
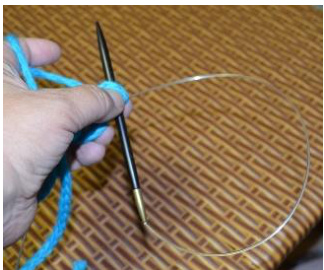
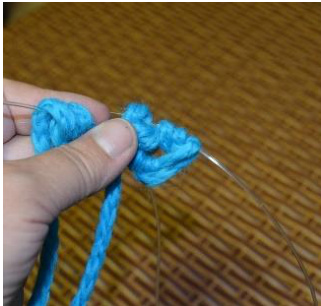
① Make a loop shape into the yarn end, the end is on the right side, the yarn ball is on the left side.
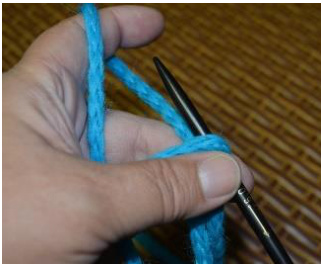
② With the knitting needle,go BELOW the yarn of the yarn loop and catch yarn. Keep holding the yarn loop and the yarn end.
③ Pull through. On the knitting needle, you can see 1 stitch loop. Keep holding the yarn loop and the yarn end.
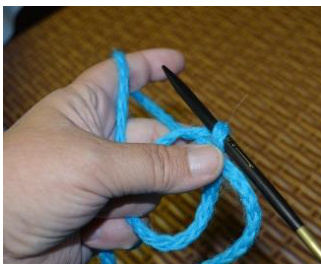
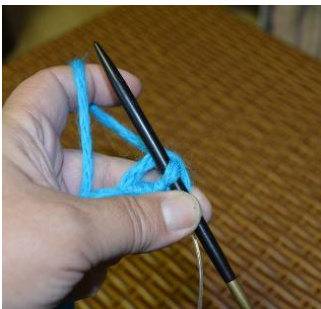
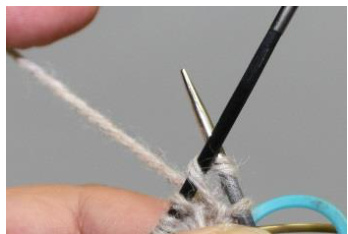
④ Make a yarn-over from front to back on the working needle. On the knitting needle, you can see 2 stitch loops now. Keep holding the yarn loop and the yarn end.
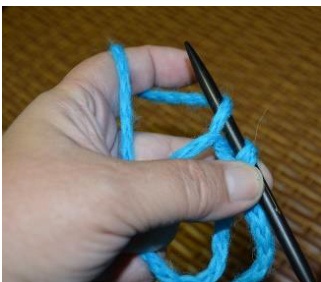
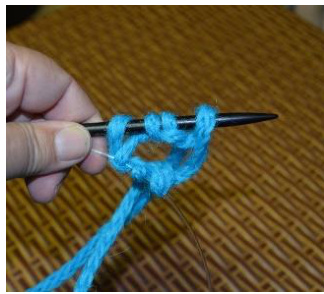
With the knitting needle, go BELOW the yarn of the yarn loop and catch yarn. Keep holding the yarn loop and the yarn end.
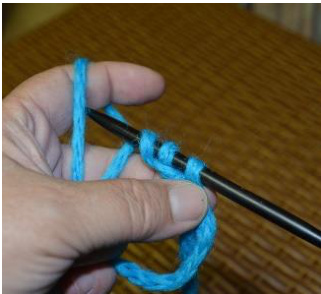
Pull through. On the knitting needle, you can see 3 stitch loops now. Keep holding the yarn loop and the yarn end.
Make a yarn-over from front to back on the working needle. On the knitting needle, you can see 4stitch loops now. Keep holding the yarn loop and the yarn end.
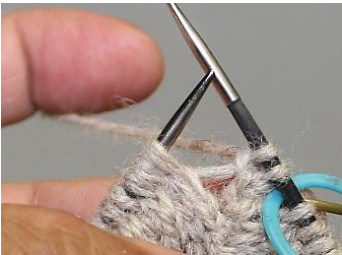
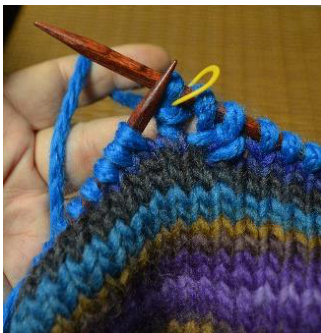
Pull the needle tip forward so that the 4 stitch loops glide onto the needle rope. Keep holding the yarn loop and the yarn end.
HAT PARADE
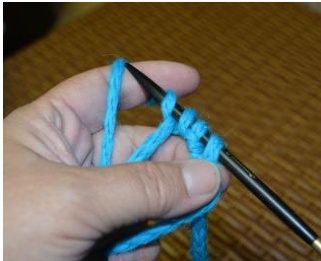
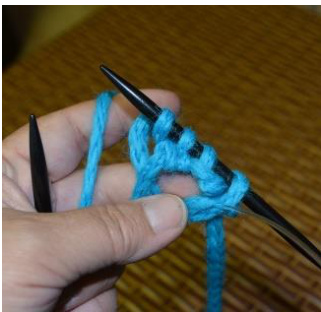
Pull the needle rope to the shape of a loop. (= magic loop) With the knitting needle,go BELOW the yarn of the yarn loop and catch yarn. Keep holding the yarn loop and the yarn end.
Pull through. On the knitting needle, you can see 1 new stitch loop. Keep holding the yarn loop and the yarn end.
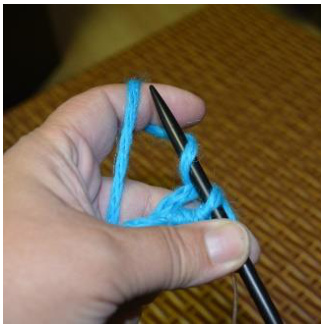
Make a yarn-over. On the knitting needle, you can see 2 new stitch loops. Keep holding the yarn loop and the yarn end.
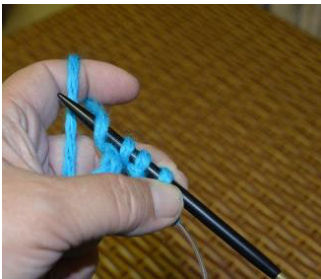
2 Make 1 more stitch by catching yarn from under the yarn loop and make 1 more yarn-over. On the knitting needle, you cansee 4 new stitch loops. Keep holding the yarn loop and the yarn end.
③ Pull the needle tip forward so that the 4 stitch loops glide onto the needle rope. Don't pull the needle rope too far, there still has to be a loop between the first 4 stitches and the second 4 stitches.
1st round:
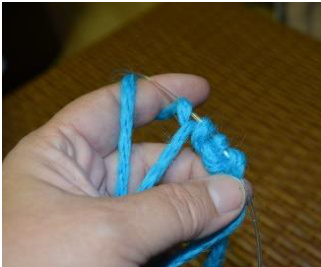
① shift the first 4 stitches onto the left needle tip. The rope builds a large loop. The second 4 stitches are on this loop.
② Knit the 4 stitches. There is a rope loop right to these 4 stitches and a rope loop left to these 4 stitches.
HAT PARADE
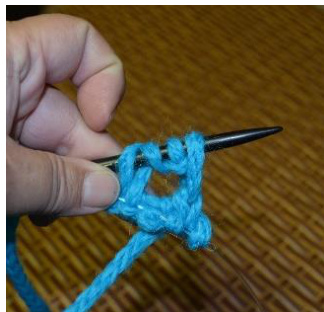
③ Pull the needle tip again, so that the 4 knitted stitches slide onto the rope. Pull the needle rope into a loop, turn the knitting clockwise and shift the second group of 4 stitches onto theleft needle tip. Knit these 4 stitches.
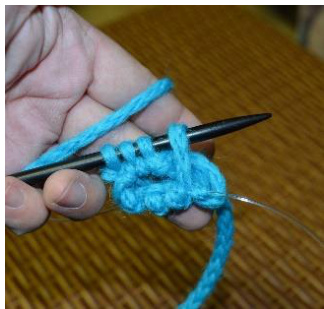
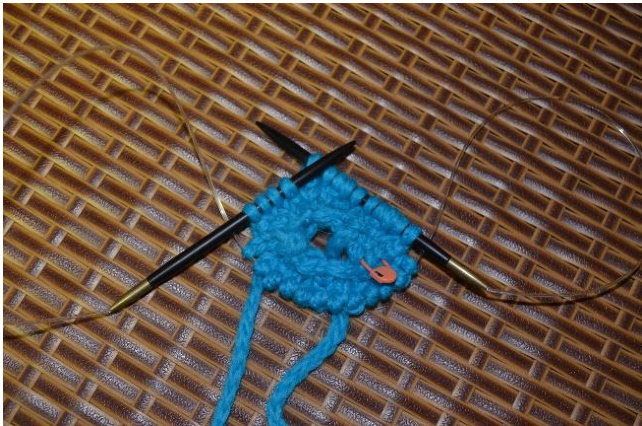
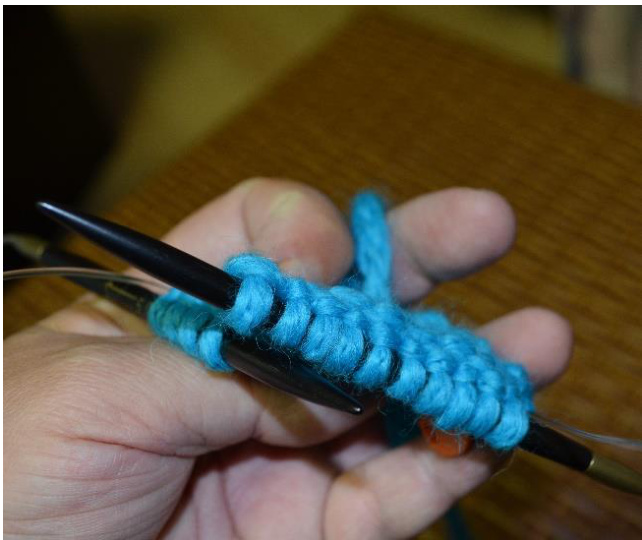
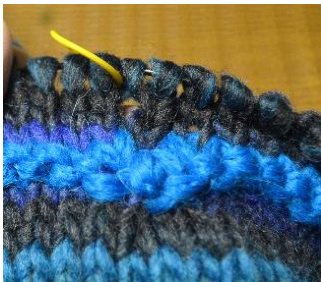
We have knitted one round over all 2 times 4 stitches = 8 stitches that we had cast on into the yarn loop. "Magic loop" means that we pull a circular needle to loops. By doing this, we can knit in the round on a circular, even with very few stitches.
2nd round:
① For the second knitted round, shift the first 4 stitches onto the left needle tip. In this round we are going to double each stitch by knitting it first through the front loop and again through the back loop = KFB (knit front back increase).

② Knit the first stitch, but leave the old stitch on the left needle tip.
③ Put the right tip back into the stitch, this time into the back loop. Knit the stitch , then slip the old stitch from the left needle tip.
You havedoubled the stitch. By using KFB, you made 2 new stitches out of 1 old stitch.
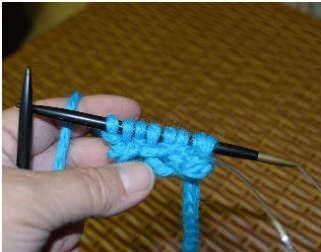
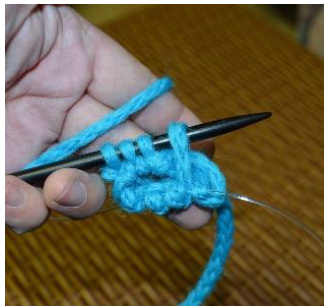
Double each of the 4 stitches by KFB = 8 stitches.
Pull out the right needle tip so that the 8 stitches slide onto the rope. Pull the rope into a loop. Shift the 4 stitches of the second side onto the left needle tip. Double each stitch by KFB.
At the end of the round, both sides show 8 stitches each- a toal of 16 stitches is on the circular.
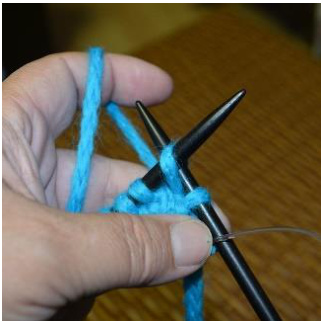
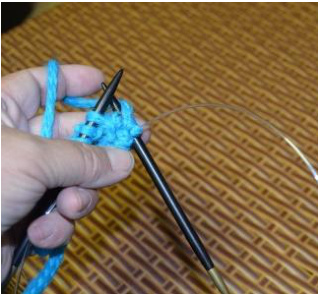
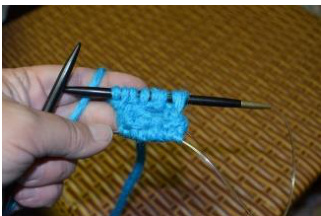
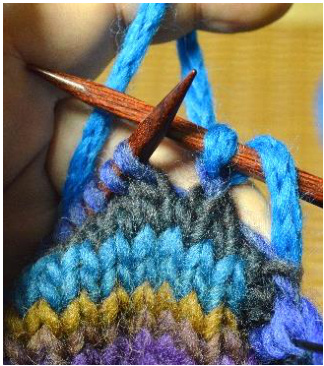
3rd round:
Knit 1 round over all 16 stitches = Shift the 8 stitches of the second side onto the rope, pull the rope into a loop, turn the knitting clockwise. Shift the 8 stitches of the first half onto the left needle tip, then knit these 8 stitches. Shift the 8 stitches that you have just knitted onto the rope, pull the rope into a loop, turn the knitting clockwise. Shift the 8 stitches of the second half onto the left needle tip, then knit these 8 stitches. You have knitted a round over all 16 stitches with magic loop on a circular needle.
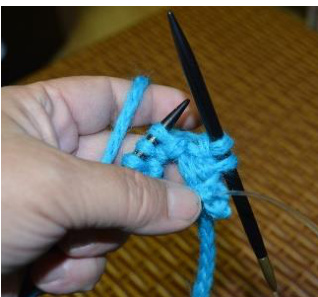
4th round:
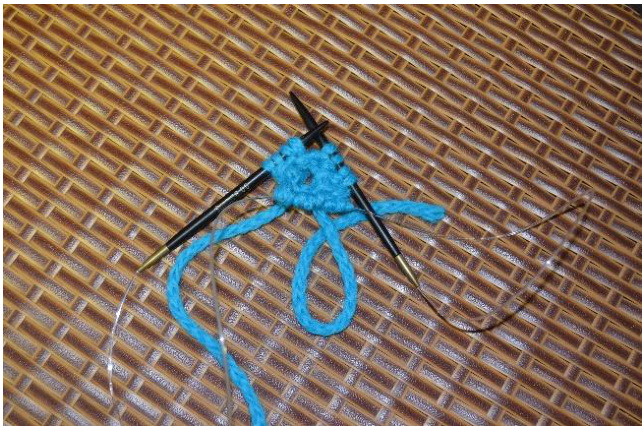
In the 4th round, we will double every 2nd stitch by KFB = knit 1 stitches, double 1 stitch by KFB . Place a marker at the beginning of the round. Knit both "halfs" of the round by using magic loop.
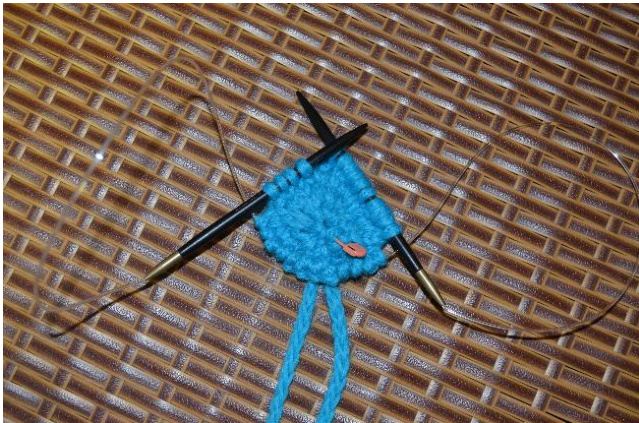
You can close the hole at the beginning during this round. Take the start end on the back of the fabric ... ... and pull it tight: the hole in the middle is closed up gapless, all 8 start stitches lie on the yarn loop. Knit on with magic loop according to the instructions for the knitting sequence in the respective pattern. When you have got more stitches, one rope loop at the beginning of the round will suffice.
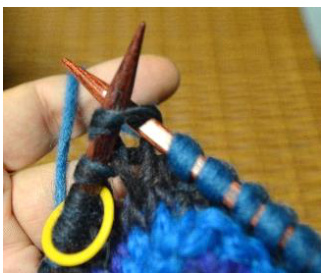
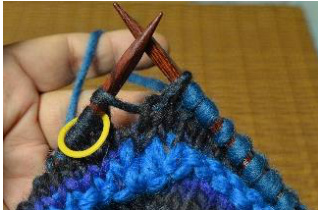
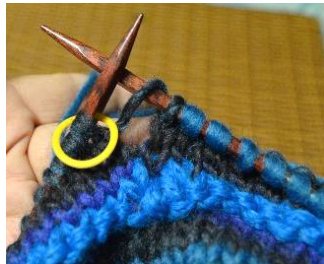
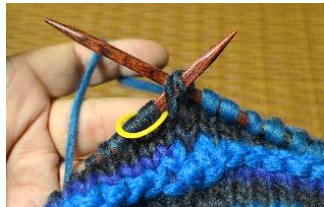
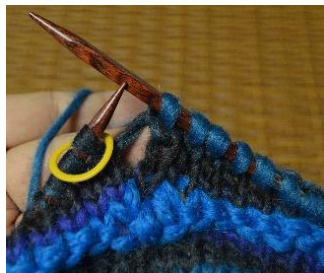
2. Knitting technique for the hat - making a m1 increase
① Knit up to and including the last stitch before the increasing position.
② With the right needle tip, pick up the yarn of the previous row that joins this stitch to the next one. Put it on the left needle as a yarn-over from front to back.
③ Knit this yarn-over through the back loop.
④ This way the yarn-over is half twisted, there will be no visible hole.
3。 Changing colors and patterns in rounds
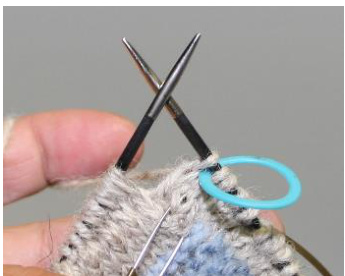
Changing color:
The first and the last round of the respective color are closed by making a yarn-over before beginning the round. This yarn-over is knitted together with the last stitch of the round. ① First round in a new color: Make a yarn-over before beginning the round, before the marker. ② The last stitch of the round is knitted together with the yarnover. In knit rounds, stitch and yarn-over are knitted together. In purl rounds, stitch and yarnover are purled together.
③ The beginning of the color change becomes (nearly) invisible.
④ Last round in this color: Make a yarn-over before beginning the round, before the marker.
The last stitch of the round is knitted together with the yarnover by SSK. = Put the knitting tip into the last stitch as if to knit, slip the stitch to the right needle without knitting it. = Slip
Put the knitting tip into the yarn-over as if to knit, slip the yarnover to the right needle without knitting it. = Slip
Put the left needle tip through both slipped stitches from left to right, from front to back.
HAT PARADE
Knit both slipped stitches together through the back loop. = Knit
By doing this, you close the last row of the respective color. The color change doesn't create a "step".
Changing pattern:
How to make the change of pattern (nearly) invisible, depends on the patterns you knit. You knit garter stitch in round by alternating 1 knit round and 1 purl round. ① Knit the knit round without any yarn-over and knit-together (only if it is the FIRST round in a new color, knit as is described in changing color!). ② Before beginning the purl round, make a yarn-over, then purl the round up to the last stitch.
③ Purl together the last stitch and the yarnover.
④ The change of pattern is (nearly) invisible, there is no "step" at the beginning of the round. This design and the pattern tutorial are under German and International copyright law. I therefore forbid copying, editing, translation, publishing and any way of using it in electronic or printed form without my prior, explicit written permission. It is an instruction for private use only. Any commercial use commercial use as using it to offer courses, workshops, yarn kits or finished objects for sale is forbidden without my PRlOR written permission. If you have questions or remarks, please contact me by e-mail: Heidrun@magischemaschen.de @ Magische Maschen Heidrun Liegmann, 2014


