Cherry Blossom Special v1.0
Patterns for 18" AG Dolls Mittens (p.3) Scarf (p. 6) Hat (p. 9) Sweater (p. 14)
Cherry Blossom Special v 1.0 December 2014 by RobinLynn
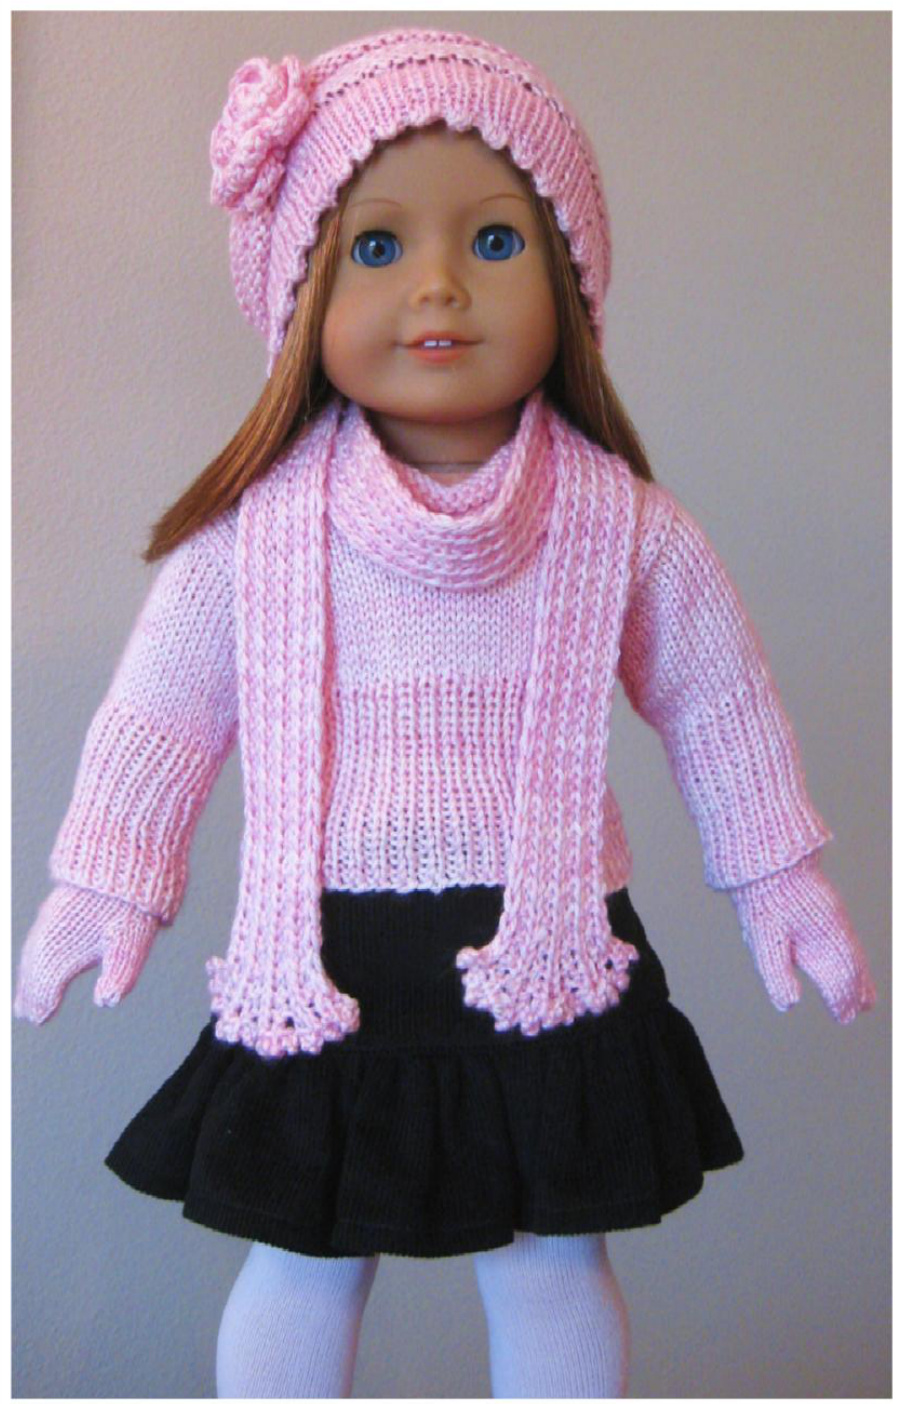
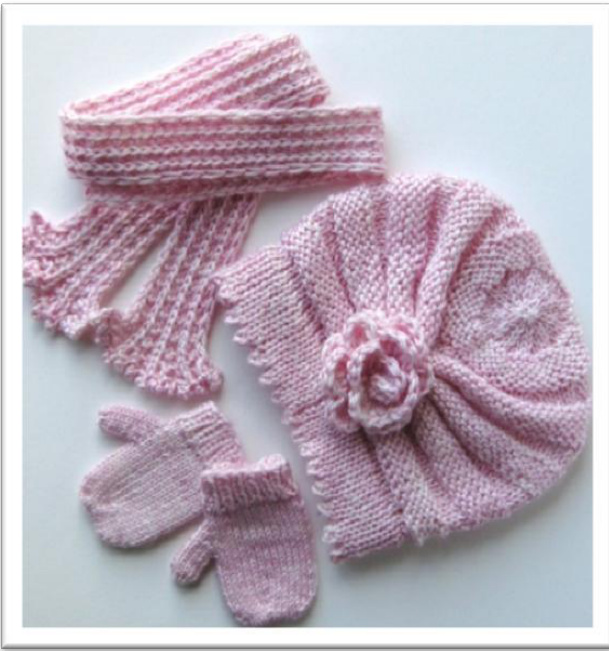
Cherry Blossom Special Mittens \~ Scarf \~ Hat \~ Sweater patterns for 18" AG Dolls
All of the sample items were knit from the same skein of JulieSpins Silky (50/50 superwash merino silk blend; 435 yds/100g) in the Cherry Blossom colorway . A total of 62g were used. Wet blocking improves the look of each of the final garments and so a light fingering weight yarn of natural fiber is recommended. I designed these patterns to fit American Girl Dolls. I am not affiliated in any way with American Girl but enjoy designing things for our granddaughters' dolls. I wrote up these patterns from notes I'd been accumulating over the past few years (1) to alleviate the clutter of papers in my knitting basket, and (2) so that others could enjoy them. They are freely given and you have full permission share the patterns and to sell items knit up using them. But please do not profit from selling the actual patterns themselves. Needles and notions are not listed separately but are included in the body of text. So please take time to read through patterns before beginning. Gauge is not provided. Intermediate knitting skills are assumed. I have provided some photo tutorials, but key word searches on the internet will bring up additional tutorials that may be helpful for new skills.
stitch key
BO bind off CO cast on dpn's double pointed needles k knit kfb one stitch increase made by knitting the next stitch in the front loop and then the back loop before slipping these two new stitches off the left needle k2tog knit two stitches together (one stitch decreased) m1L pick up bar between stitches with left needle front to back; knit into the back increasing by one stitch m1R pick up bar between stitches with left needle back to front; knit into the front increasing by one stitch p purl pfb one stitch increase made by purling the next stitch in the front loop and then the back loop before slipping these two new stitches off the left needle pm place marker sm slip marker sts stitches yo yarn over Cherry Blossom Special v 1.0 December 2014 by RobinLynn
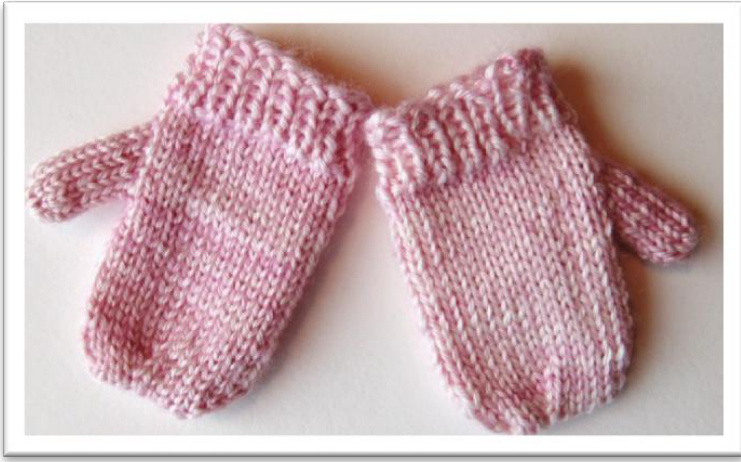
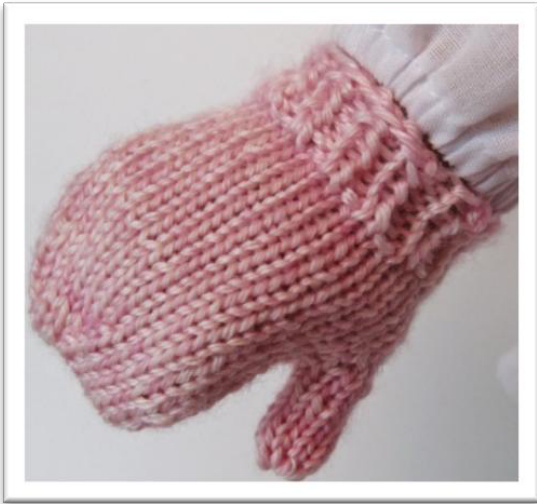
Mittens
Needles: set of 5 - US#0 dpn's CO 28 and arrange stitches on (three) dpn's: 8/10/10 pm to indicate beginning of round; join and knit in the round being careful not to twist sts
rounds
1-6 (k1, p1) ribbing around 7-10knit 11 k4, pm, m1L, k1, m1R, pm, knit remaining stitches in round 12 knit 13 k4, sm, m1L, k3, m1R, sm, knit remaining stitches in round 14 knit 15 k4, sm, m1L, k5, m1R, sm, knit remaining stitches 16 k4; removing the markers as you go, transfer the 7 sts between markers to scrap yarn; increasing one stitch by a reverse loop in the gap; knit remaining sts in round.
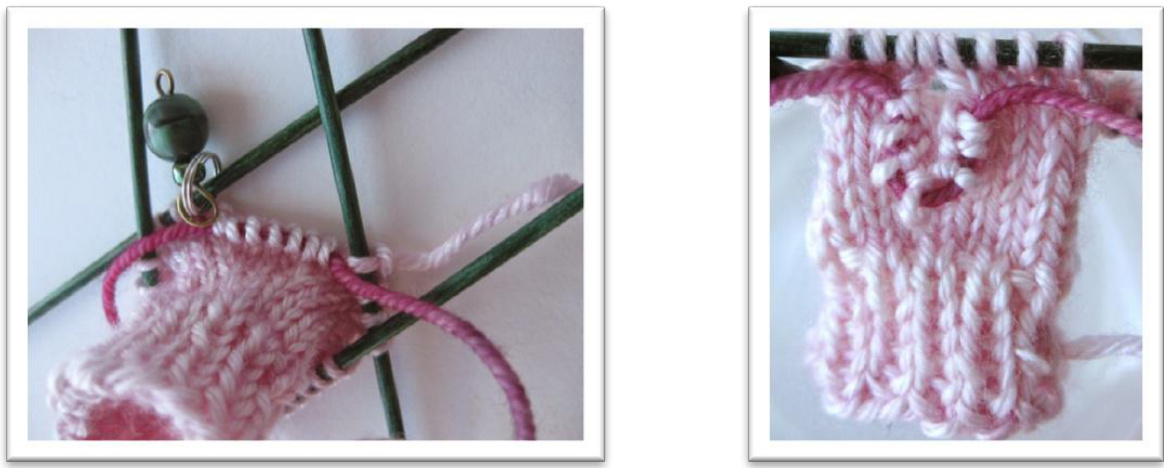
You are now back to the original stitch count on the needles with the thumb gusset stitches held on a scrap piece of yarn (to be picked up and knit later.) Cherry Blossom Special v 1.0 December 2014 by RobinLynn rounds (continued) 17-26 knit Set-up for decrease section: k 5 (this is your new starting point) Re-arrange stitches on (four) dpn's: 7/7/7/7
rounds (continued) 27 [k5, k2tog] 4 times 28 k 29 [k4, k2tog] 4 times 30 [k3, k2tog] 4 times Arrange on (two) dpn's: 8/8 Kitchener graft
Cherry Blossom Special v 1.0 December 2014 by RobinLynn
thumb
Pick up all live stitches from scrap yarn plus 2 sts inside thumb area = 9 stitches. Arrange on (three) dpn's: 3/3/3 Introduce new yarn, join and knit in the round for a total of 9 rounds (81 sts.)
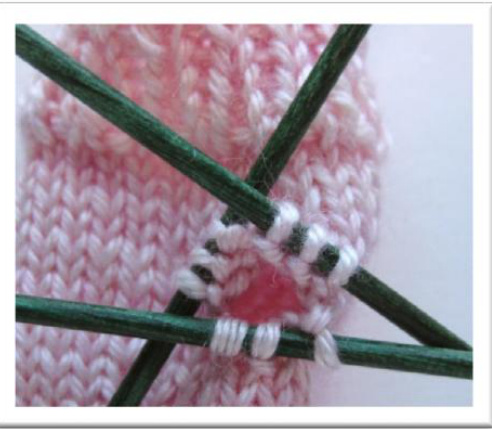
Leaving a 4"tail, break yarn, thread through all 9 loops and pass through center to inside; turn inside out and secure inside. Weave in all ends, closing any gaps created along the way. Wet block and air dry.
Cherry Blossom Special v 1.0 December 2014 by RobinLynn
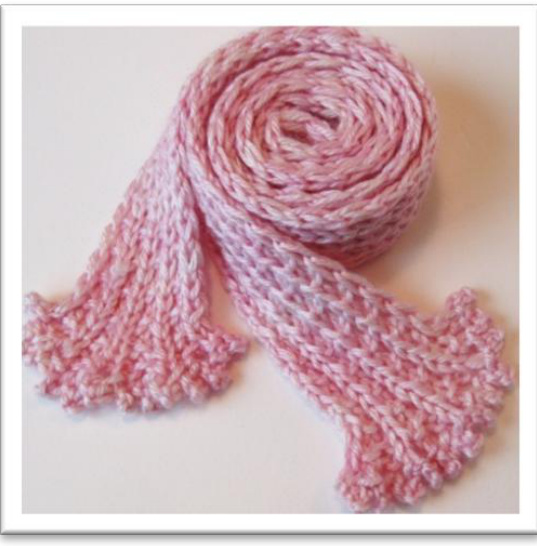
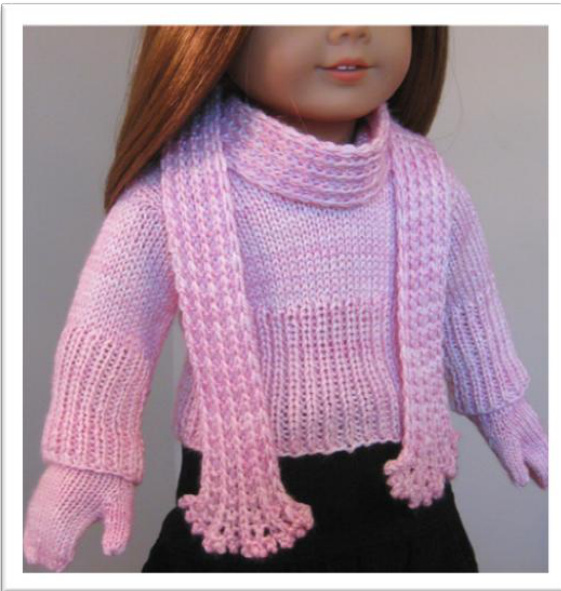
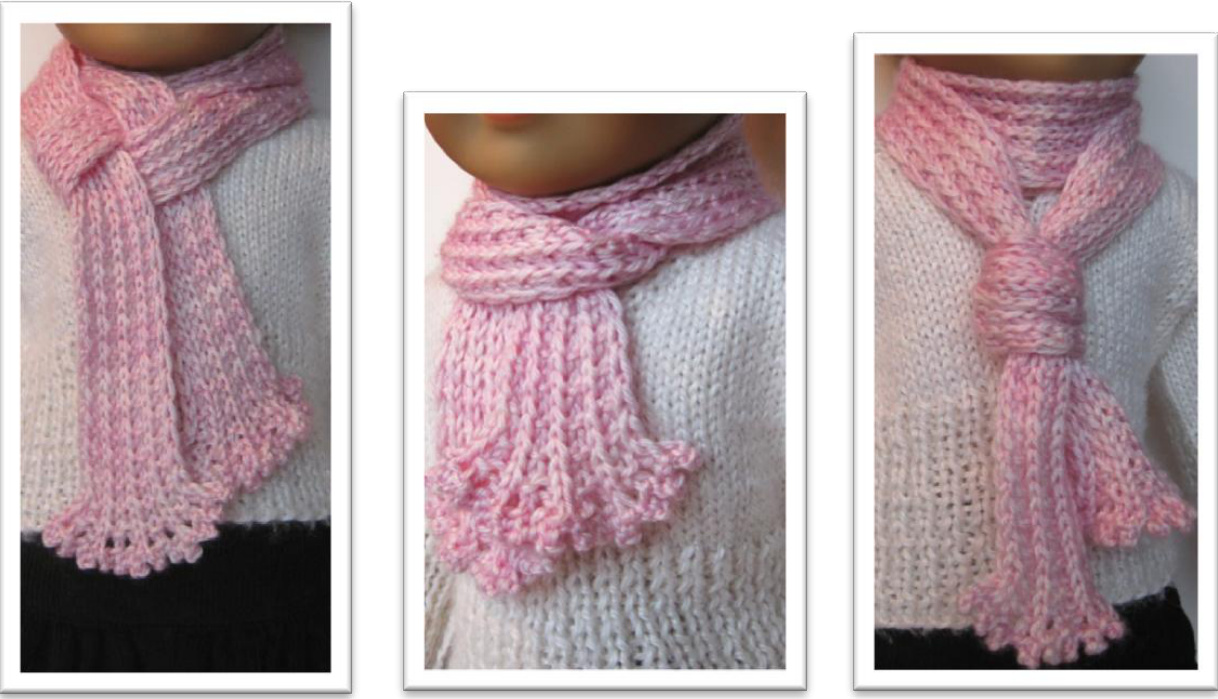
Scarf
US#2 needles (circular, straights or dpn's.) Begin by reading through all notes and tips: )ack and forth in rows. After set-up row, begin every row in this manner: ? holding the yarn in front, slip the first stitch as if to purl pass the yarn between the needles front to back so that it is in the position to knit and continue in pattern This will form a finished/slightly twisted "chained" edge on both sides of the scarf. If you choose to add a picot trim to the ends, you will use a provisional cast on. For plain ends, loosely cast on and bind off in your preferred manner.
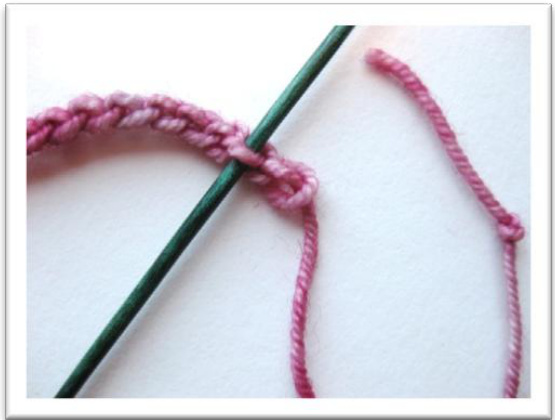
Provisional Cast On
With a length of scrap yarn in a contrasting color, crochet a chain several sts longer than the number of sts you will be casting on. The cast-on for this scarf is 14 sts; I usually crochet a chain of 18 sts. Pull the yarn through the last chain loop loosely because you will be opening it up later to unzip the sts. Tie a small knot on this end to easily locate it. Turn your chain over and you will see "bumps" on the wrong side.
Cherry Blossom Special v 1.0 December 2014 by RobinLynn

With your working yarn, pick up and knit one stitch in each of the bumps until you have the cast on number of sts on the needle. Note: You will need to reserve some of your working yarn for the picot edge BO, so leave a tail of about 52" before making that first stitch. Another tip: To secure the working yarn, pick up and knit the first stitch. Wrap both the source and reserve yarns to make the second stitch. Then continue making the remaining sts with the source yarn. When it is time to release these stitches, find the knot-end of the scrap yarn; pull this end back through to open the chain. Slowly and carefully open the scrap yarn chain to reveal "live stitches" and transfer these one at a time onto a knitting needle.
Cherry Blossom Special v 1.0 December 2014 by RobinLynn picot bind off edge Scroll down here for the picot bind off technique. For more clarity, tutorials for this method are easily found on youtube with key words "picot bind off." I like to use a much smaller needle for petite picots on top of each stitch. The sample was bound off with a Us#0 dpn, cable casting on 2 stitches and binding off 3 (instead of binding off 4 as shown in the tutorial.) This gives a lovely flair edge.
Directions for Scarf
Provisional CO 14 stitches set-up row: k3, (k2, p1) 4 times; k1 for every row thereafter: slip first stitch purlwise; (k2, p1) 4 times; k Continue working back and forth until scarf is the desired length Picot bind off both ends (casting on 2 and binding off 3 with US#0) I like making long scarves so we can play with making fancy wraps and tie configurations. So I usually knit about 20" in length which wet blocks to about 26" or so. Wet block and arrange on towel to air dry by (1) pulling the scarf to lengthen and (2) flair out the picots on each end.
Cherry Blossom Special v 1.0 December 2014 by RobinLynn
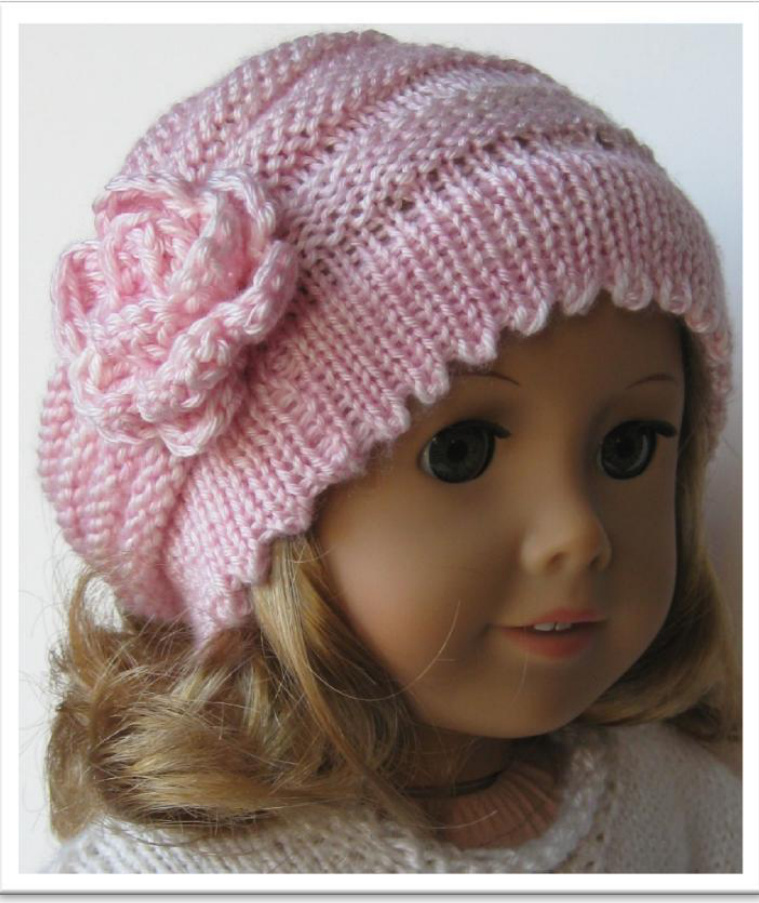
Hat
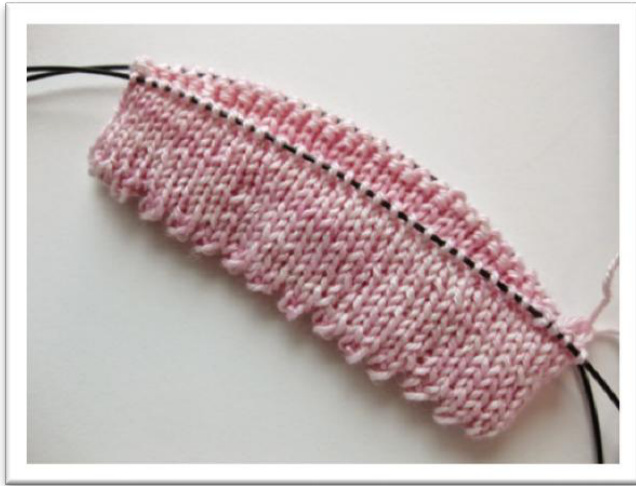
The doll hat is knit in the round with (two) US#2 circular needles. You can explore youtube videos for this technique. It features a self-facing picot edged hem for firmness and smoothness around the doll's face. NOTE: Casting on with a larger needle (US#3) and picking up edge sts with a smaller needle (US#1) will help with the hemming round.
Directions
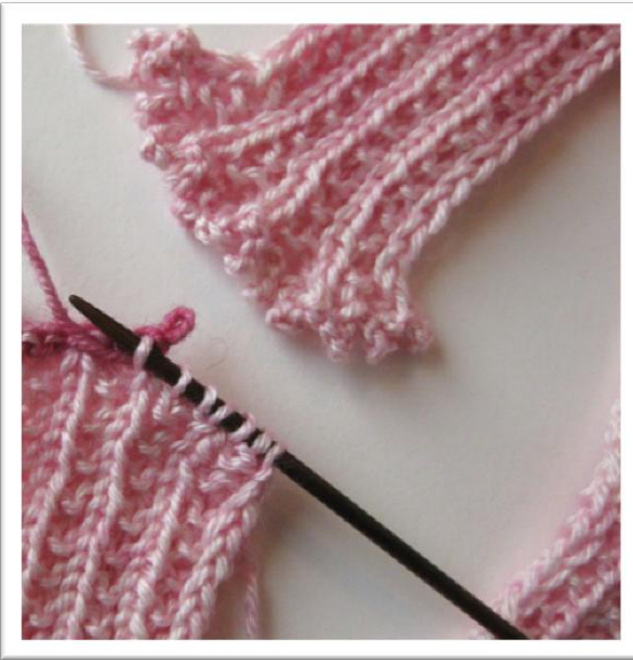
longtail cast-on method (reserving a 12" tail will be helpful for cinching up the side of the hat and attaching the embellishment later.) Switch to (two) Us#2 circular needles; pm to indicate start of round; join and knit in the round being careful not to twist sts; arrange sts 30/30 on needles. knit (9 rounds) (k2tog, yo) repeat to the end of the round. knit (10 rounds) Cherry Blossom Special v 1.0 December 2014 by RobinLynn Hem Round Use your preferred method, explore youtube, or follow the method I use: With (two) smaller circular needles, pick up the loops formed on the cast-on edge and arrange 30/30 (beginning at the cast-on tail.) Because you cast-on with a larger needle, these loops should be apparent. In this picture, the live sts (top row) are arranged 30/30 on (two) US#2 circulars AND the picked-up sts (bottom row) are arranged a matching 30/30 on (two) Us#1 circulars.
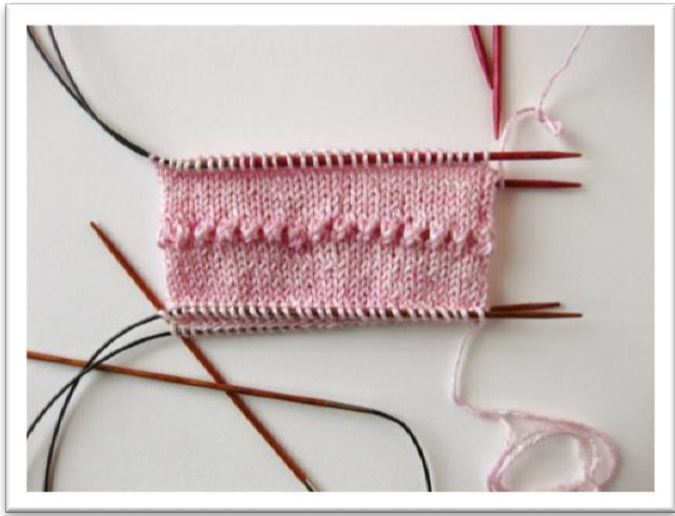
The sts in the picture above have been brought out onto the needles for clarification of placement. Pull the needle ends so that all sts are on the nylon cords of the circulars before folding knitted fabric. The (k2tog, yo) round will be your folding edge. Next Picture: You will be folding the work by bringing the smaller circulars with the pickedup sts carefully up and inside - keeping the live sts on the outside. Check to be sure the picked up sts are on the inside needle and the live sts are on the outside needle. They should match stitch-for-stitch.
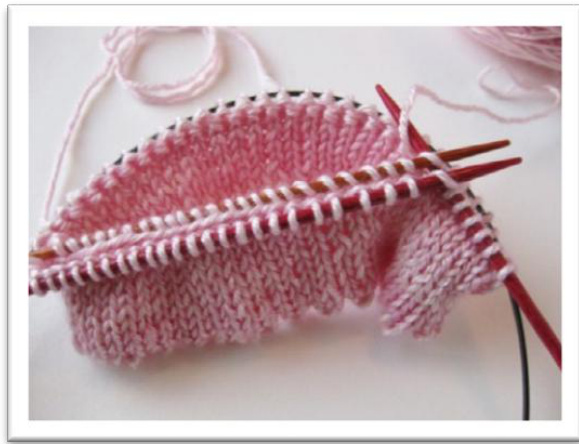
Cherry Blossom Special v 1.0 December 2014 by RobinLynn With the US#2 circular needle, knit 1 front stitch together with 1 corresponding back stitch, thus creating your hem by combining the two into one stitch. Continue across both sets of needles.
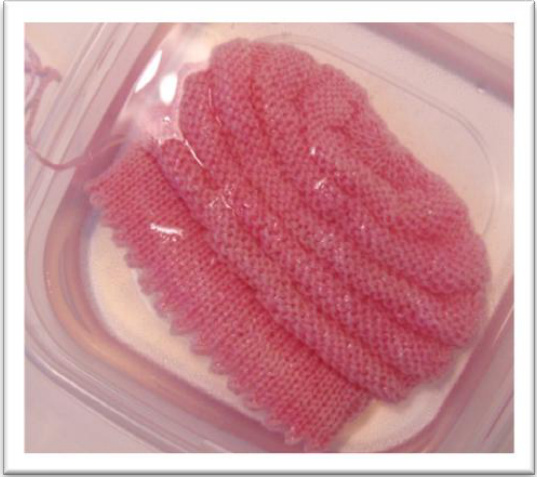
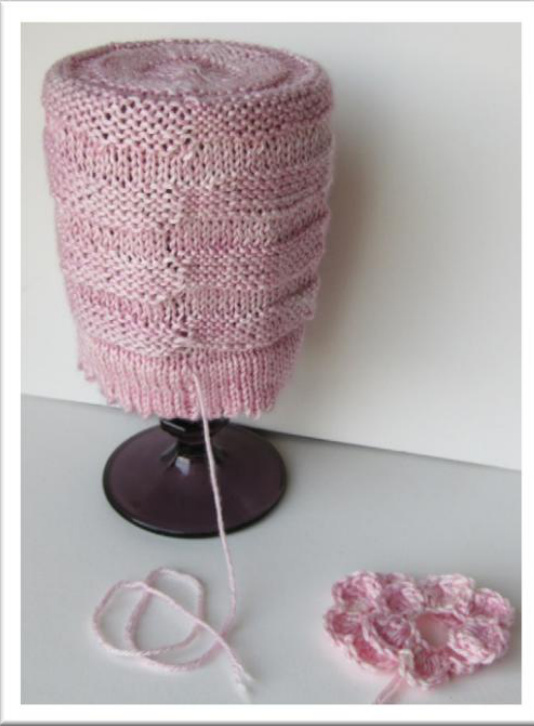
knit (1 round) increase round: (k5, kfb) repeat around = 70 sts purl (5 rounds) knit (3 rounds) increase round: (k9, kfb) repeat around = 77 sts purl (5 rounds) knit (4 rounds) purl (5 rounds) knit (3 rounds) Re-arrange sts for decrease section: 35/42 decrease round: (k5, k2tog) repeat around = 66 sts purl (5 rounds) decrease round: (k4, k2tog) repeat around = 55 sts knit (2 rounds) decrease round: (k3, k2tog) repeat around = 44 sts purl (5 rounds) decrease round: (k2, k2tog) repeat around = 33 sts knit (1 round) decrease round: (k1, k2tog) repeat around = 22 sts knit (1 round) decrease round: (k2tog) repeat around = 11 sts knit (1 round) Thread needle through remaining 11 sts and pull snug, pass needle through center to the inside of the hat, secure inside. Cherry Blossom Special v 1.0 December 2014 by RobinLynn This hat must be wet blocked to fully open up the ribs. Soak in a small container of cool water with a bitty drop of liquid dish detergent for about 40 minutes. Press excess moisture out by rolling in a dry clean towel. Air dry on a non-metal container with an opening of about 3" to 3-1/2" and a height of 6" or more. There will be a distinct ridge in the fabric at the starting point of each round. Don't be concerned. This is the place where you will be cinching up the side and adding the embellishment.
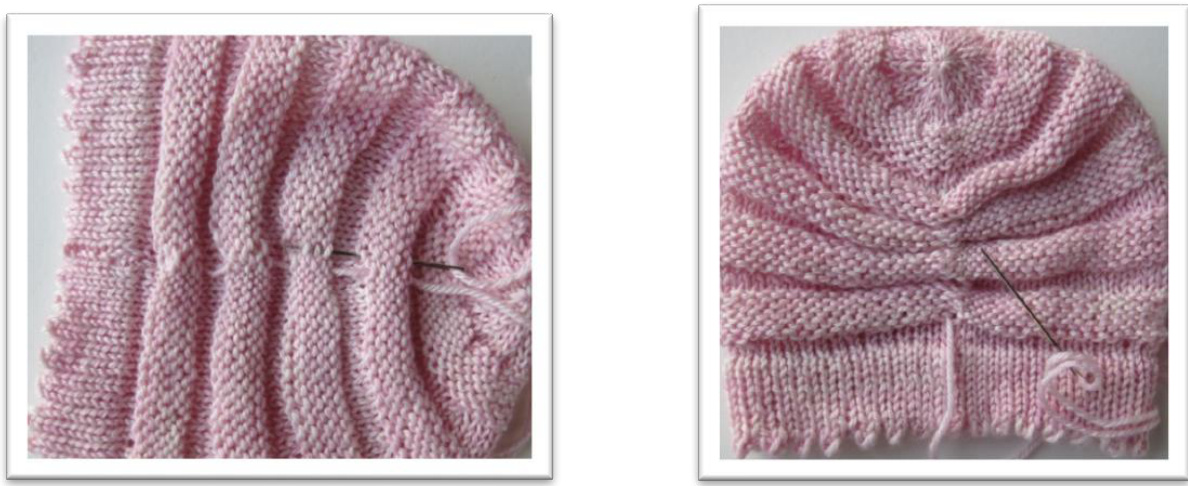
Air dry thoroughly. Using a tapestry needle and the tail from your cast-on (or add yarn if this is not available,) thread the needle upwards through the top purl bumps in the four purled section. only enough to eliminate the gaps made by the three stockinette sections. cead downwards through the adjacent purled bumps in the same manner Pass the threaded needle through to the inside and secure but do not cut the yarn. You will use it to secure your embellishment. Cherry Blossom Special v 1.0 December 2014 by RobinLynn
Embellish however you would like. Ideas: a series of medium buttons, one large button, silk blossoms from a hobby store, ribbon flowers, crochet rosette. Crochet Flower Embellishment ·chain 27 set-up: 4 triple crochet into the 3rd loop (1 single crochet into the next loop; 5 triple crochet into next loop) - repeat to end of chain = 13 petals. Soak the spiral in cool water with a drop of detergent for 40 minutes. Open and shape as shown in the picture on p. 12 and air dry. Using the threads on the rosette, secure on back by slip stitching the “rounds" together. Using any remaining yarn on the rosette and the leftover yarn from cinching, attach embellishment in the middle of the cinched side of the hat.
Cherry Blossom Special v 1.0 December 2014 by RobinLynn
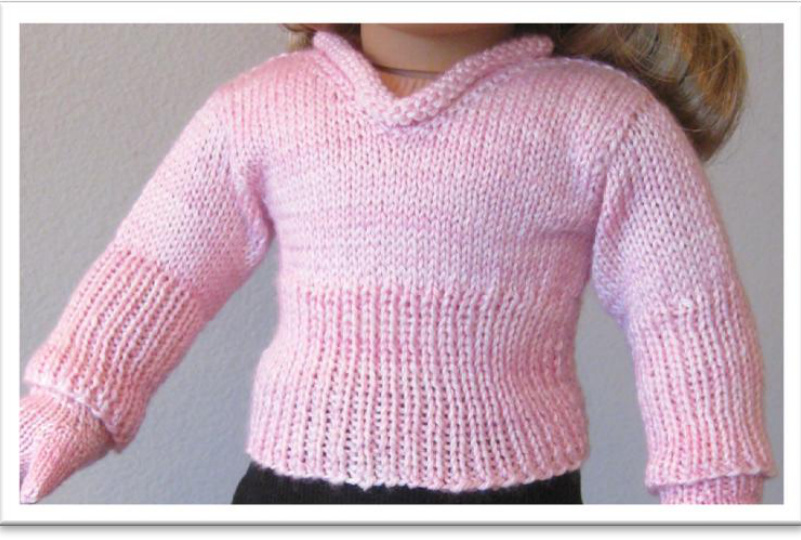
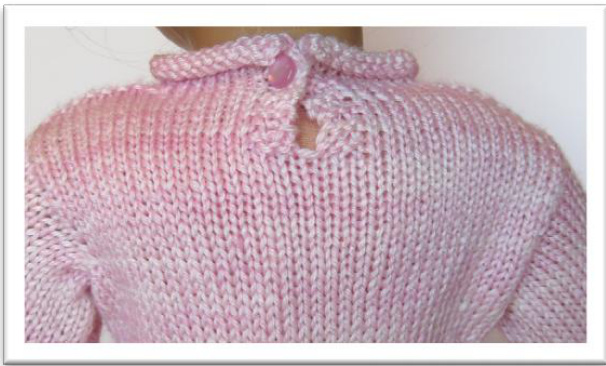
Sweater
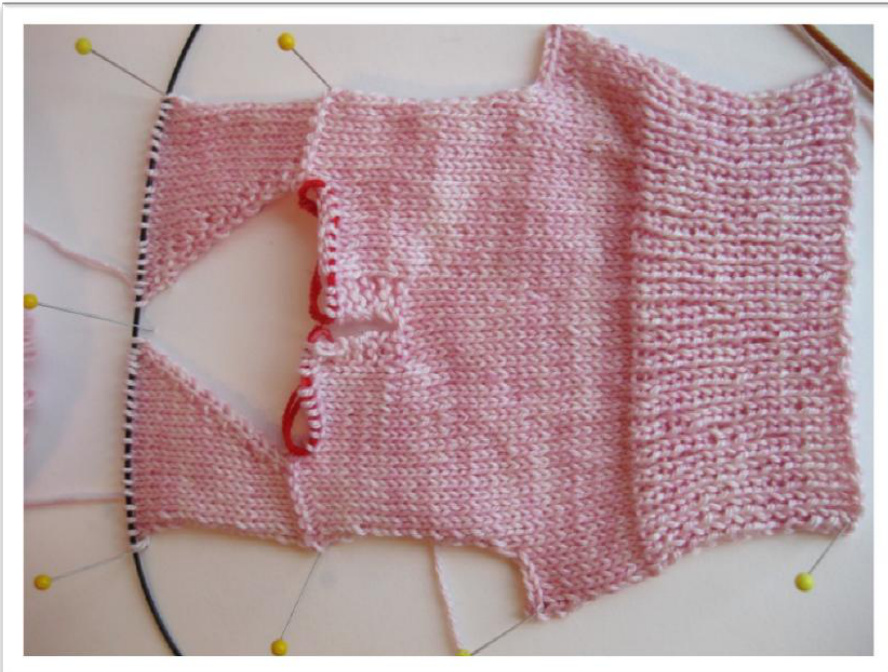
This pullover sweater is knit in one piece beginning at the bottom of the back with 1x1 ribbing (up the back and down the front construction.) Row 44 is a set-up row in preparation for the division of stitches for the neck opening at row 45. At row 45 a new yarn in introduced and both sides of the neck opening are knit separately but on the same needle until combined to one unit on row 76. Preparing your yarn: There are two options for preparing to knit this construction: (1) wind your yarn off into two separate balls, (2) wind a yarn cake and work from both the center pull and outside ends. The benefit of option (1) is that there is less possibility of the two sources becoming tangled. The benefit of option (2) is that you need not cut your yarn to divide into two separate balls. // indicates rows where there is divided knitting loosely CO 48 rows 1-20: k1, p1 ribbing rows 21-30: stockinette (RS knit; WS purl) row 31: B0 5, knit to the of row (= 43 stitches) row 32: B0 5, purl to end of row (= 38 stitches) rows 33-43: slipping first stitch in each row, continue in stockinette row 44: slip 1, p15, k6, p16 (set-up for back division) row 45: slip 1, knit 18 // with second yarn source, k19 row 46: slip 1, p15, k3 // k3, p16 rows 47-52: repeat rows 45-46 row 53: (buttonhole row) slip 1, k18 // k1, k2tog, yo, k16
| Cherry Blossom Special v 1.0 December 2014 by RobinLynn | |
| row 54: | slip 1, p15, k3 // k3, p16 |
| row 55: | (shoulder) slip 1, p8, k10 stitches and then place them on waste yarn // k10 and then place those 10 stitches on waste yarn, p9 (faux shoulder seam) |
| row 56: | slip 1, p8 // p9 |
| row 57: | (begin shaping increases for front of pullover) slip 1, k6, kfb, k1 // k1, kfb, k7 |
| row 58: | slip 1, p9 // p10 |
| row 59: | slip 1, k7, kfb, k1 // k1, kfb, k8 |
| row 60: | slip 1, p10 // p11 |
| row 61: | slip 1, k8, kfb, k1 // k1, kfb, k9 |
| row 62: | slip 1, p11 // p12 |
| row 63: | slip 1, k9, kfb, k1 / / k1, kfb, k10 |
| row 64: | slip 1, p12 // p13 |
| row 65: | slip 1, k10, kfb, k1 // k1, kfb, k11 |
| row 66: | slip 1, p13 // p14 |
| row 67: | slip 1, k11, kfb, k1 // k1, kfb, k12 |
| row 68: | slip 1, p14 // p15 |
| row 69: | slip 1, k12, kfb, k1 // k1, kfb, k13 |
| row 70: | slip 1, p15 // p16 |
| row 71: | slip 1, k13, kfb, k1 // k1, kfb, k14 |
| row 72: | slip 1, p16 // p17 |
| row 73: | slip 1, k14, kfb, k1 // k1, kfb, k15 |
| row 74: | slip 1, p17 // p18 |
| row 75: | slip 1, k15, kfb, k1 // k1, kfb, k16 |
Cherry Blossom Special v 1.0 December 2014 by RobinLynn
row 76: combine stitches as you work across the row: slip 1, p17, p2tog (one from each side of //), p18, break yarn from center source leaving a few inches to weave in later. (37sts) row 77-80: slipping the first stitch in each row, continue in stockinette (RS knit; WS purl) row82: C0 5 sts using cable cast-on purlwise method (47 sts) and purl this row. rows 93-112: k1, p1 ribbing Bind off loosely in pattern.
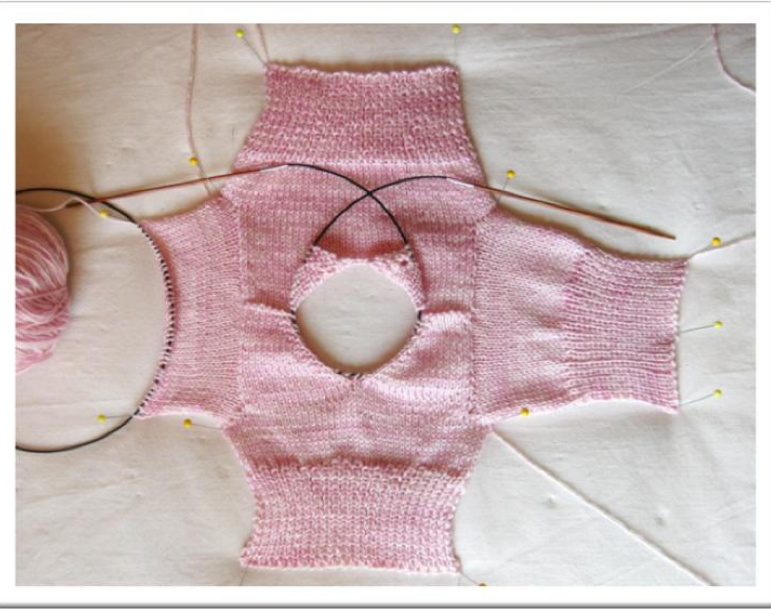
Sleeves
Pick up 36 loops along entire sleeve opening. Work back and forth in rows. On the first row, increase two sts by a kfb on either side of the shoulder faux seam = 38 sts. 20 rows stockinette. 20 rows k1,p1 ribbing. Bind-off loosely pattern. Repeat for other side. Cherry Blossom Special v 1.0 December 2014 by RobinLynn
Neck
Beginning at the buttonhole side of the back, pick up 10 live sts held on waste yarn, pick-up 17 sts along each side of front opening and remaining 10 sts held on waste yarn = 54 sts total. Introduce yarn and knit 6 rows stockinette for a finished rolled edge. BO loosely.
Finishing
Make up sleeves and sides with mattress stitch. Weave in all ends. Wet Block. Sew button onback.