Goldilocks finger puppet knilting patterns by Amanda Bery
You will need
· Less than 20g of double knit yarn in cream, yellow, pink and purple ·Embroidery thread in black and red for eyes and mouth · Small amount of toy filling. · 3.75mm knitting needles ·2 x 3.75mm double pointed needles (DPNs) · Tapestry needle
Abbreviations
K Knit P Purl KFB (Increase) - Knit twice into the stitch by knitting into the front and the back SSK (Decrease) - Slip the next stitch on the left needle knitwise, then slip the next stitch on the left needle purlwise. Take the left needle and knit through the front of the two slipped stitches on the right needle. K2TOG (Decrease) - Knit two stitches together [...] Repeat the sequence in square brackets by the number indicated.
Pattern notes
Finished size To fit a small child's finger approximately 15mm diameter, (or an adult's little finger). Approximately 7cm tall. To make larger, follow this pattern and use a slightly larger needle size.
Finishing
Use mattress stitch to sew the seams. Tie any knots on the inside (as these will not be seen when completed), and bury any loose ends from sewing inside the finished pieces.
knilting paltems by Amanda Beny
Safety
If you are making these toys to give to a child, please ensure you have no loose parts (loose threads, beads, etc) which can be potential choking hazards.
Construction
This pattern is knitted flat, but can easily be converted to knitting in the round. To work stockinette stitch in the round, knit all the rounds.
Copyright @ 2011
Amanda Berry All patterns offered by fluff and fuzz (designed by Amanda Berry) are protected by international copyright laws. Any unauthorised copying will constitute an infringement of copyright. All rights reserved. This pattern, designed by Amanda Berry, was first published in Let's Get Crafting Knitting & Crochet magazine, issue 33, July 2011.
Knitting Patterns
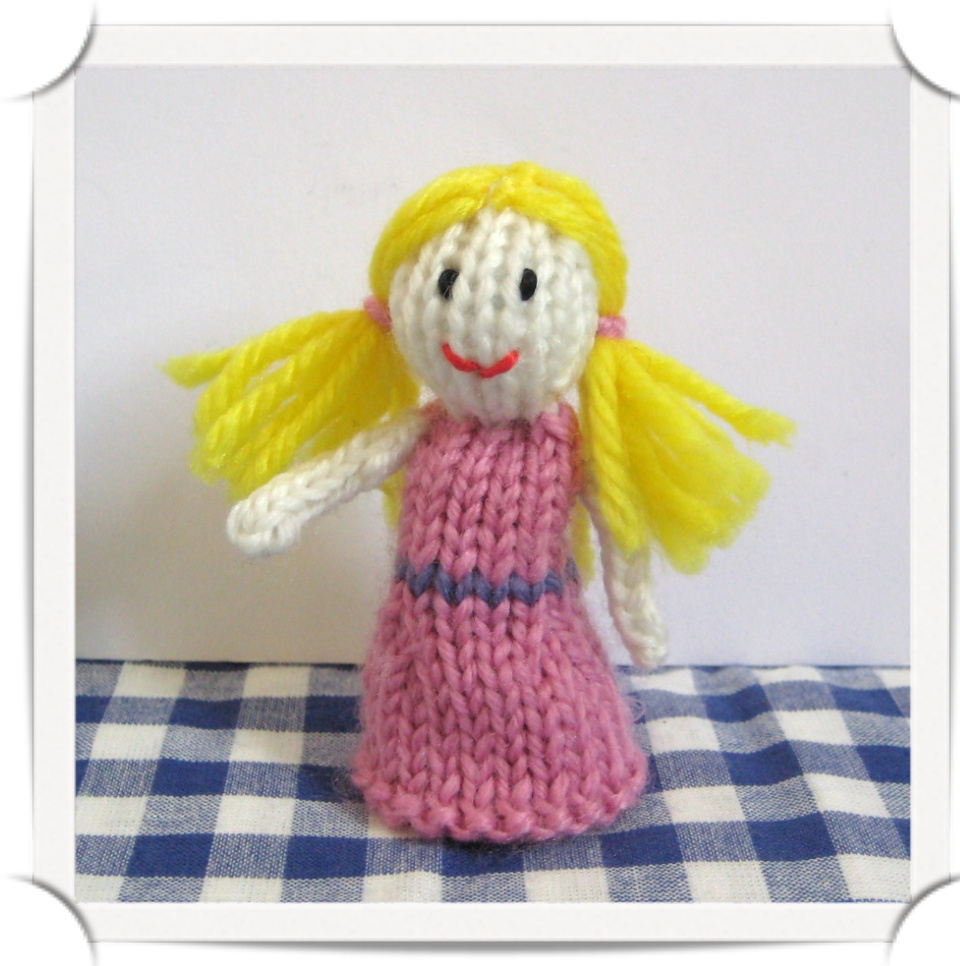
Goldilocks Make 1. Start at the base of the puppet. Cast on 23 in pink. dress Row 1: K (23) Row 2: K (23) Row 3: P (23) Row 4: K (23) Row 5: P (23) Row 6: K (23) Row 7: P (23) Row 8: K1, K2TOG, [K4, K2TOG] x 3, K2 (19) Row 9: P (19) Row 10: K1, K2TOG, [K3, K2TOG] x 3, K1 (15) Row 11: Change to purple wool at the beginning of this row, P Row 12: Change to pink wool at the beginning of this row, K Row 13: P(15) Row 14: K(15) Row 15: P(15) Row 16: K(15) head Row 17: Change to cream wool at the beginning of this row, P Row 18: K1, [K2TOG, K3] × 2, K2TOG, K2 (12) Row 19: P (12) Row 20: K3, KFB, K4, KFB, K3 (14) Row 21: P(14) Row 22: K (14) Row 23: P (14) Row 24: K (14) Row 25: P (14) Row 26: K3, SSK, K4, K2TOG, K3 (12) Row 27: P (12) Row 28: [K2TOG] ×6 (6) Break the yarn leaving a tail. Thread the yarn through the remaining stitches and pull tight to gather. Secure the thread. Sew the side edges together from the cast on to cast off edge. Add some stuffing into the top of the puppet (the cream head). Then sew a running stitch around the neck and pull to gather together. Secure the thread. To make her hair, cut several 10cm lengths of yellow wool, and sew on the top of her head. Tie the strands in abunch at each side of the head in pink wool. To finish,embroider her eyes and mouth using embroidery thread.
Arms
To make i-cord arms, use two DPNs (double pointed needles) and cast on 3 stitches in cream. Knit i-cord on 3 stitches for a length of 2.5cm. Break the yarn leaving a tail. Thread the yarn through the 3 stitches on the needle and pull tight to gather. Secure the thread. If you do not have DPNs,an alternative to making i-cord arms is to use your straight knitting needles. Cast on 10 stitches in cream wool, and then cast off all 10 stitches. Sew the arms to the sides of the puppet body.


