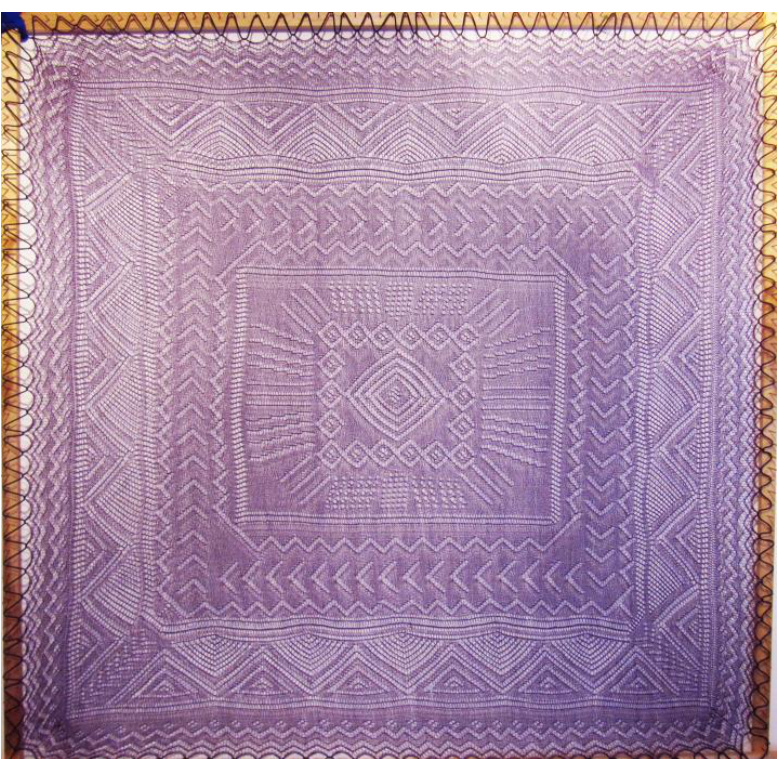
Santa Fe Summer Skies Shawl
Pattern # 003 by Mara Bishop Statnekov Summer Skies is the third in a series of gossamer lace shawls based on the Orenburg square shawl construction with design elementsfromtheAmericanSouthwest. This series starts with the Santa Fe Lightning Shawl with 26- peaks per side. The second is Santa Fe Mountain Trails with 36- peaks per side. This shawl has 32 peaks per side. My teacher, Galina Khmeleva, continues to be my principal source of inspiration as well as my sourcefor patterns and information, both from her outstanding books & published articles, and from her wonderful workshops & classes. I like to put a lot of little details in my patterns, hoping this will make the knitting process easier for you. I'm assuming that anyone starting this project is an experienced knitter. It helps if you areverypersistent,and a little courageous.Even if you are an experienced lace knitter who is new to gossamer lace, my patterns will walk you through the process step-by-step. My motto is: "Never give up, never surrender" (from Galaxy Quest!).
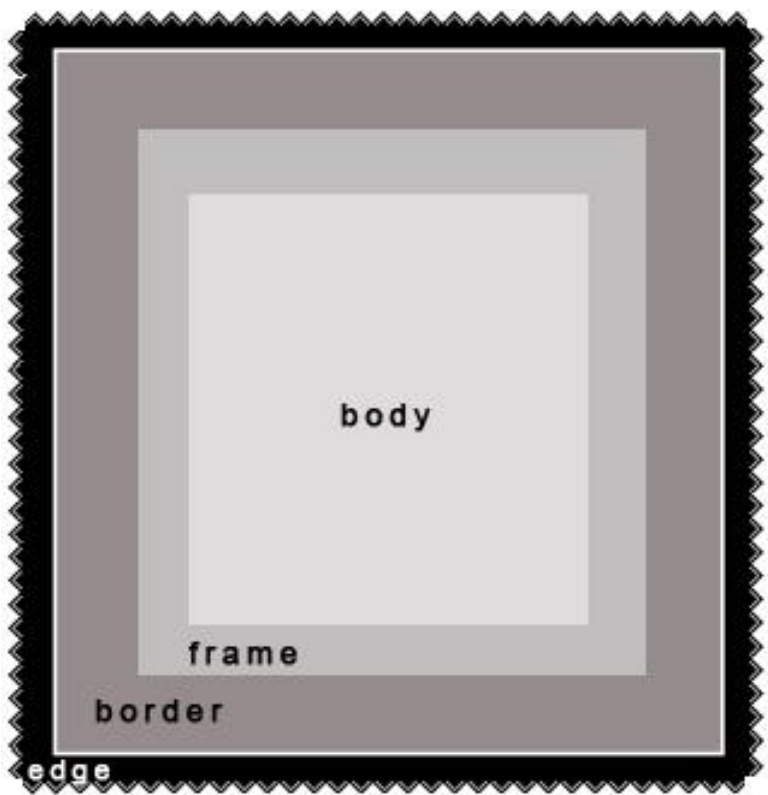
Just so you'll know, these are my terms for the partsof theshawl. The border + frame + body are combined in the interior charts. There are separate charts for the edges & corners.
Overview:
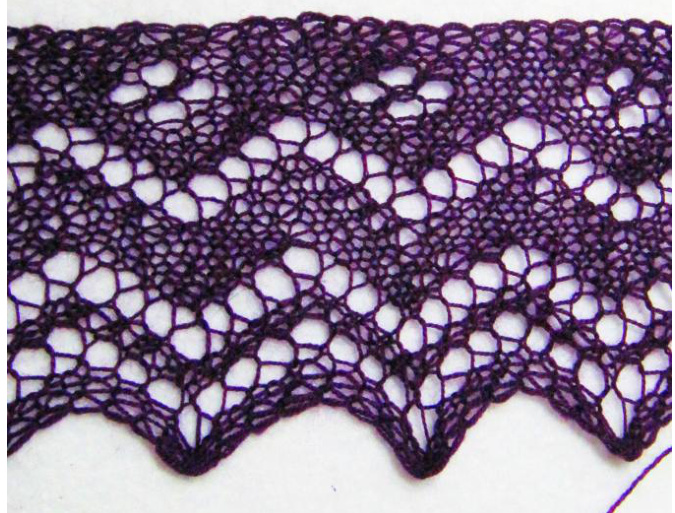
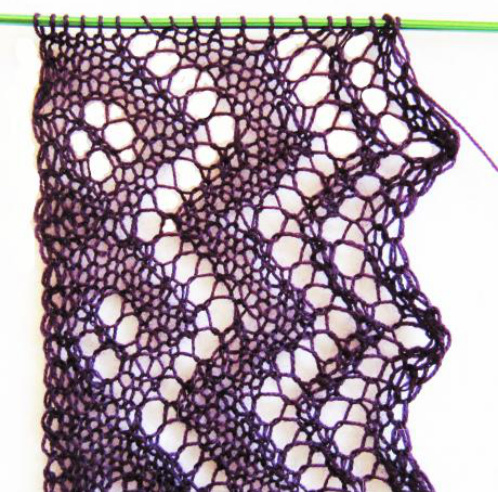
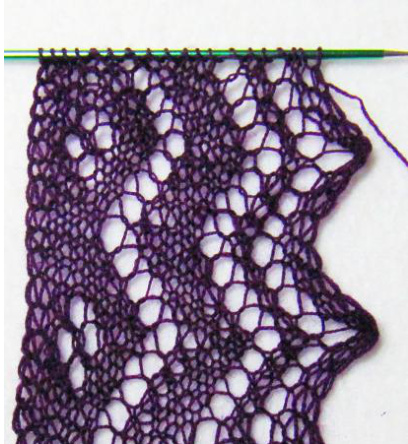
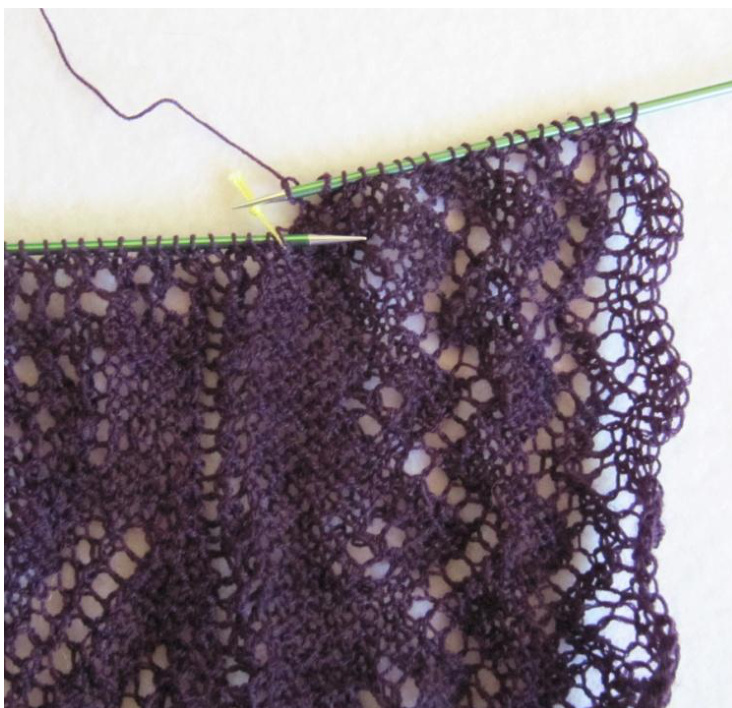
There are detailed instructions, photos and charts on the next pages, but first just a little bit of information. Orenburg-style shawls are worked in garter stitch so both sides look approximately the same. There are no purl stitches. It may be helpful to mark the “front" to keep your bearings. Remember that the tail of your cast-on is always in that lower left-hand corner. This shawl starts with knitting a ribbon of the edging which will be thebottom edge and will look like this:
Yarn Quantity: approximately 2300 yds of any fine lace weight, cobweb, or gossamer lace yarn.

The finished size depends on a few variables starting with your choice of yarn.The other variables are your choice of needle size and your personal style of knitting, e.g. loose , tight, or just right (like Goldilocks). It's always a good idea to swatch a couple of peaks of the border to find your ideal gauge concerning tension,yarn weight and needle size. For gossamer weight shawls, I prefer to use a yarn no thicker than18/2. There are many beautiful yarns available from Galina at Skaska.com. One is the 18/2 weight Jaggerspun Zephyr which is 50% fine grade Merino wool and 50% Chinese Tussah silk in skeins or cones in a wide variety of gorgeous colors. Skaska.com also has beautiful 30/2 to 32/2 weight yarns in exotic fibers such as yak/silk, camel/silk, or cashmere/silk. Treenway.com also carries beautiful lace weightyarns. I've used Galina's Mongolian Cashmere in the photos for this pattern. It is a lovely, soft 3-ply that comes in 100 gm skeins of approx.10o0ydseach. Another beautiful yarn is from DyeforWool (an Etsy site). It is their smooth 70%Fine Merino/20%Silk/ 10%Cashmere that is hand-dyed by Nicole&Cordula in Germany.Their colors are slightly variegated and exquisite. Skeins vary from 75 - 145 gms s0 check the yardage.
More on yarn:
When choosing a yarn, I look for diameter, amount of twist, lack of halo or fuzziness, and color. I can't tell you how many times I've been blinded by a beautifully colored yarn only to realize later that the other elements were less than optimal, but I'm a fool for glorious color. Also, one of the wonderful things about knitting shawls is that they don't have "to fit", like a sweater, vest or socks. Yay!
Construction Overview:
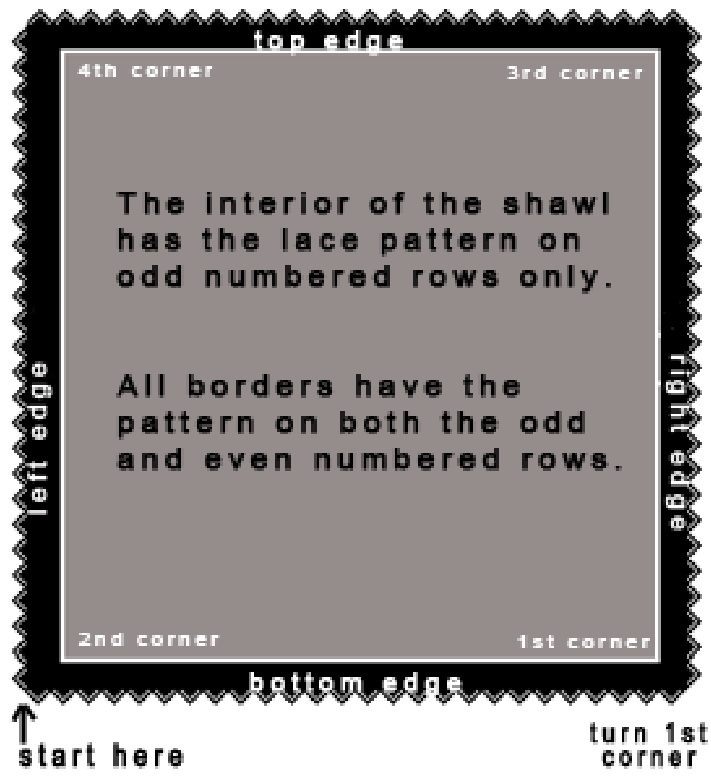
The peaks/points/teeth are on all four sides, but there is not a point in the exact corner. There are 32 peaks per side. Start by casting on and knitting the bottom edge which is a thin strip until you have finished 32 peaks. Then turn your 1st corner. Pick up the slipped stitches on the interior edge, knit across, and turn yoursecond corner. Now you're ready to knit across the entire shawl with the right edge, interior, and left edge on each row. When you've gotten to the top of the interior charts, you'll turn the 3rd corner. Then you'll knit the top edge attaching it to the "live" stitches of the top by k2tog. Don't panic - there are detailed instructions. You will find a chart for the cast-on and bottom border on page 4. There are 4 separate charts for turning the four corners with short rows.
personal note:
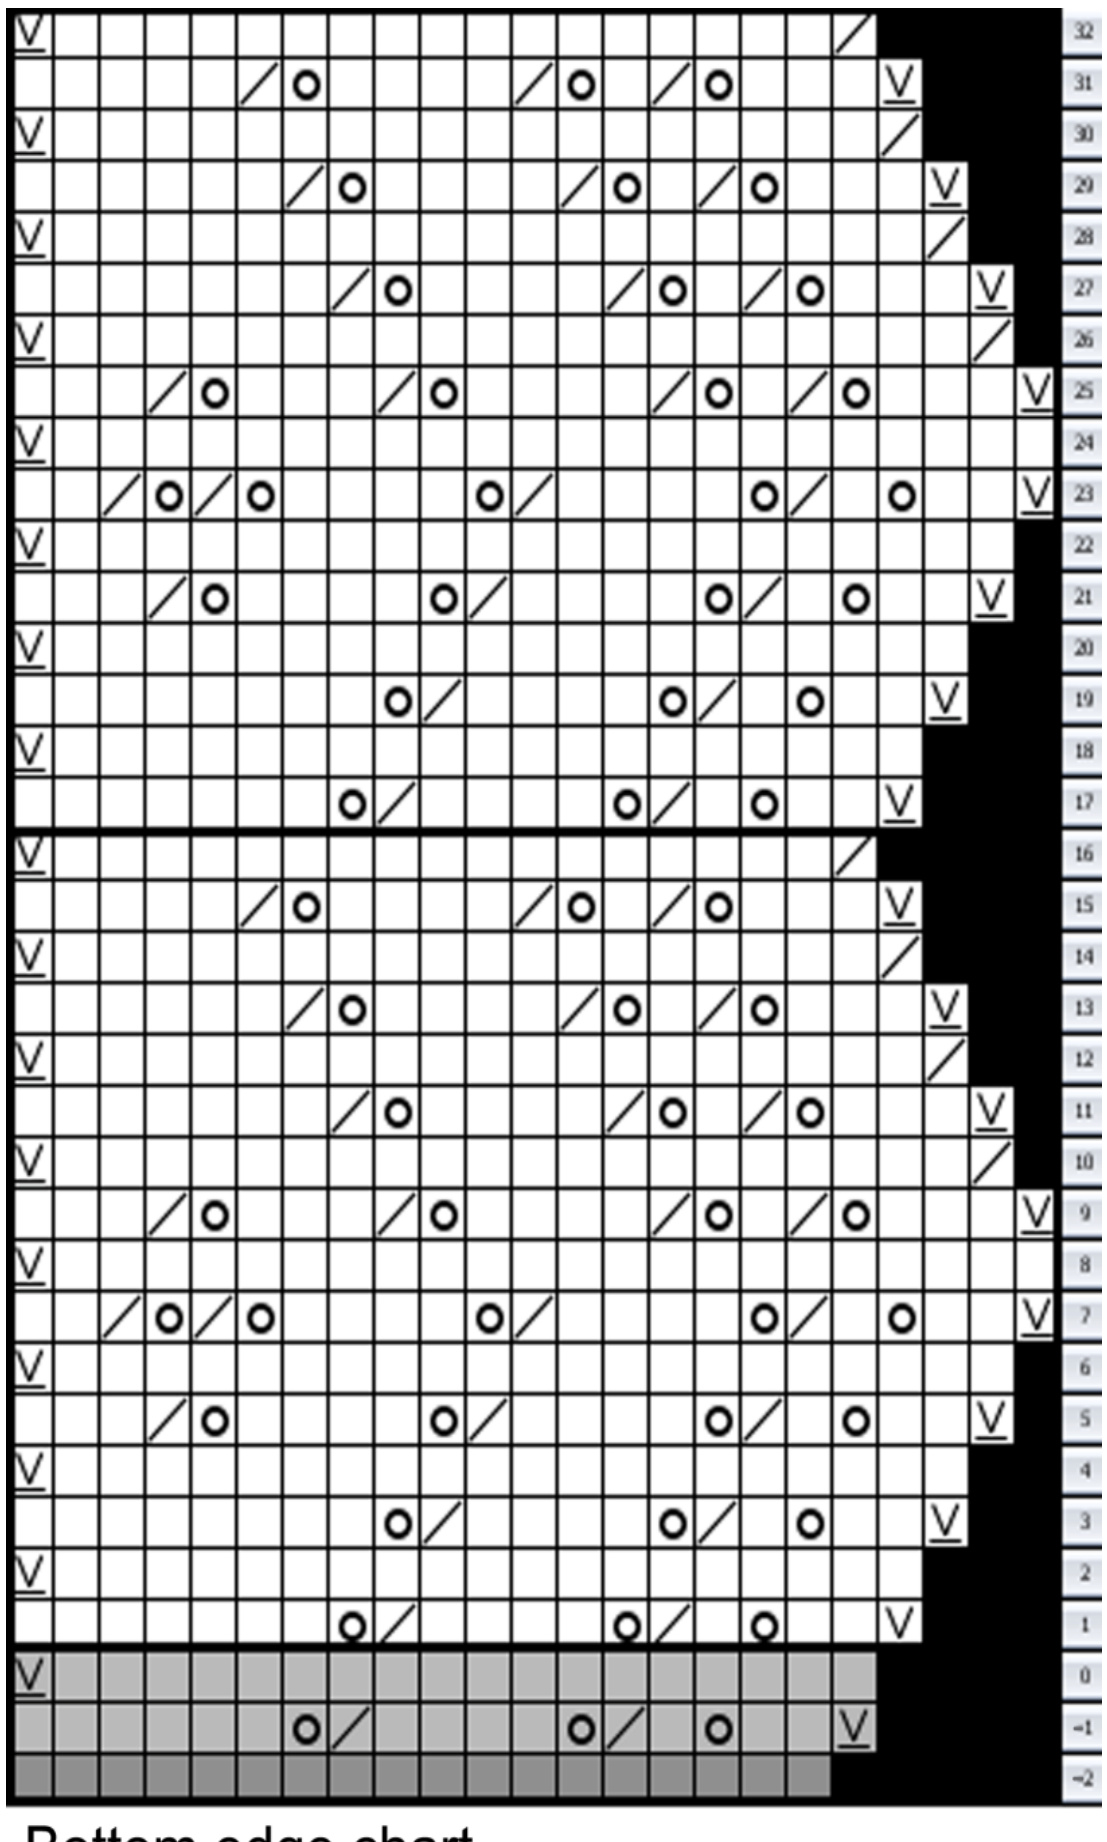
I love using Signature Needle Arts needles. For this project, I use 10" straight needles with the stiletto point in a Size 1 US (2.25 mm). EveryrowisstartedwithaSlipstitch:Slip1purlwise (s1wyif), with the yarn held in front and then shifted to the back so that it is in place to make the next stitch a knit stitch. knit stitch setuprows cast-onrow yarnover(yo) knit 2 tog knit 3 tog slip 1purlwise,withyarn in front knit,and put back on left needle donotknit laststitch The Bottom Edge chart (next page) shows Row "-2" as your caston row. Work both Row "-1" and Row O (zero) as set-up rows. Each peak consists of 16 rows. Work this first edge piece to Row 512. Then you will be ready to turn the first corner. As you knit each pattern row,keep alert to the previous pattern row and how the yarn-overs relate to each other as each row develops. By doing this, you'll start to see when you've dropped a yarn-overin a previous row, and correct it beforeyou continue.
To start:
Cast on loosely, 18 stitches, using the long-tail cast-on method (or using your preferred method). I usually cast onto 2 needles held together, or a larger-sized needle for the cast-on rowonly. You will be knitting a ribbon of edge that has 32 peaks before turning the 1st corner where you will start working on the main body of the shawl. Hint: On the charts, all odd-numbered rows are read from right to left. All even-numbered rows are read from left to right. The body charts show only odd-numbered rows. The edging charts show both odd- & even-numbered rows. Hint: as you finish each row, grab the bottom of your knitting and give it a tug or two. This will help straighten out and align thestitches.
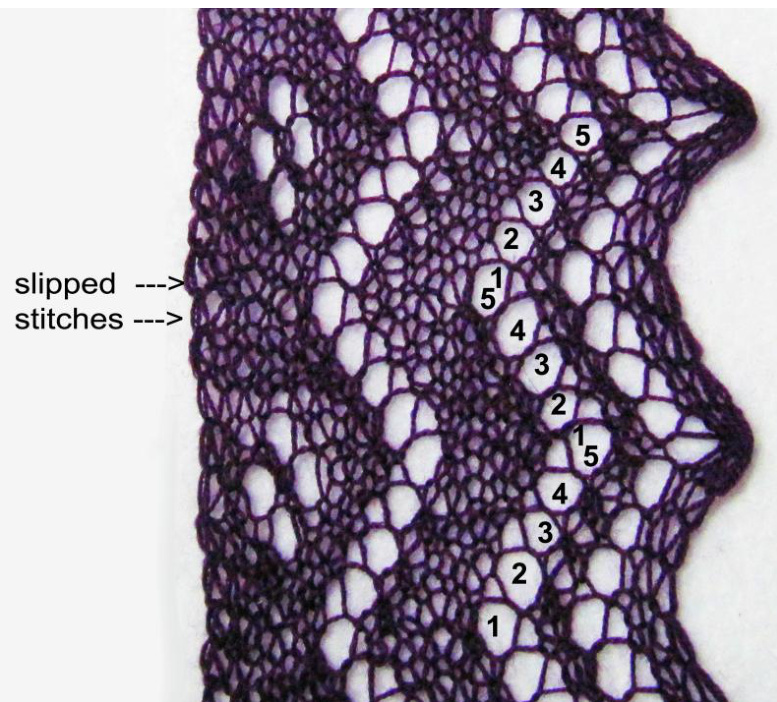
This edge has a typical 5-hole Orenburg peaks. The holes at the widest point and narrowest point are counted twice, as#1and #5. Since there is one slipped stitch for every 2 rows of edging, you will be picking up 256 stitches from the 512 rows of edging.
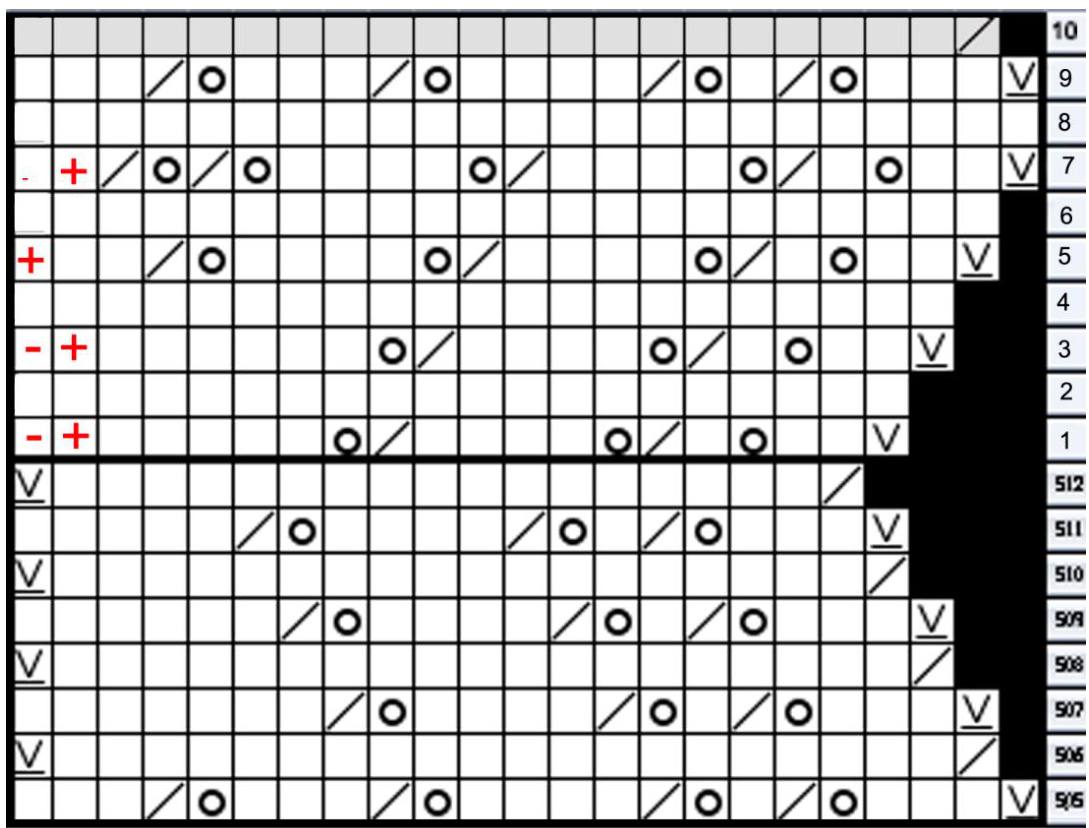
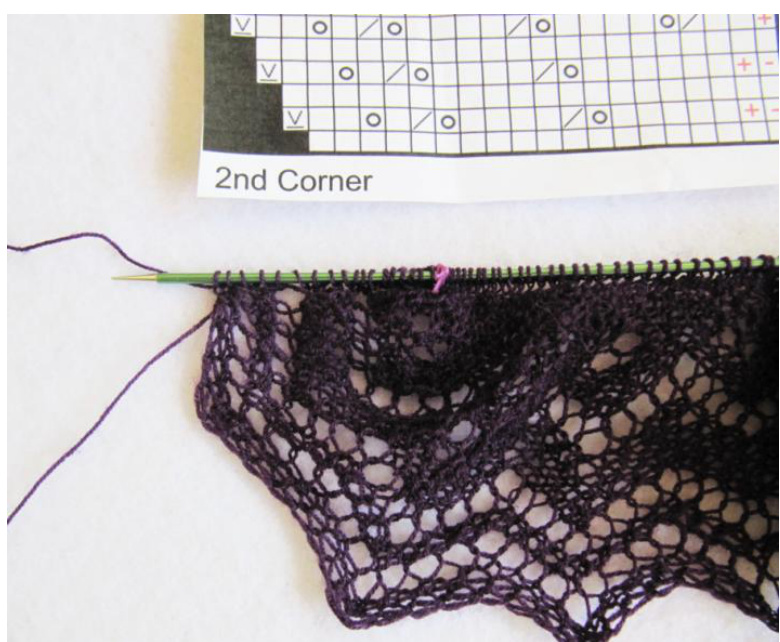
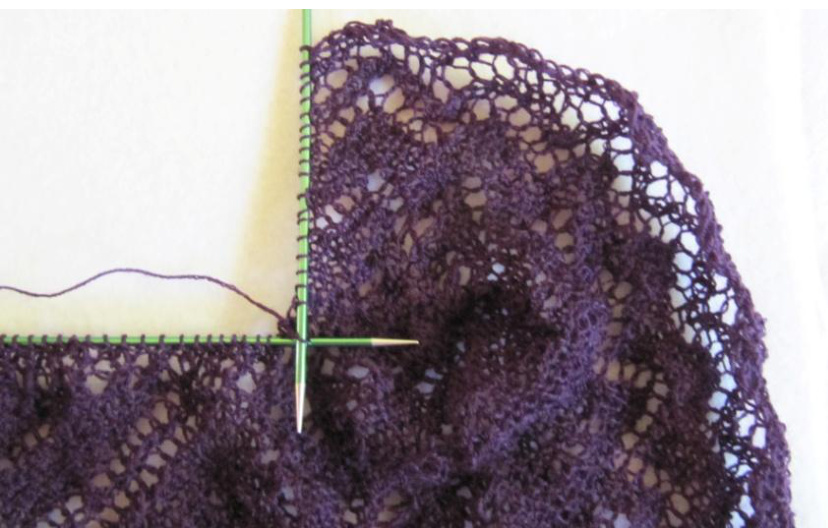
Upon completing the first (bottom) edge after Row 512, you'll knit these 9 rows of the 1st corner with short rows (marked in red). After knitting Row 9, you will use your emply needle and start at the far end of the edging by picking up 256 slipped stitches on the side. You should only pick up the front loop of these slipped stitches. See the photo below - right. Place a marker in between the edge stitches and the 256 picked up stitches. Knit across the 256 picked up stitches, knitting through the back loop. This gives a nice X pattern between the bottom edging and the body of the shawl.
1st Corner
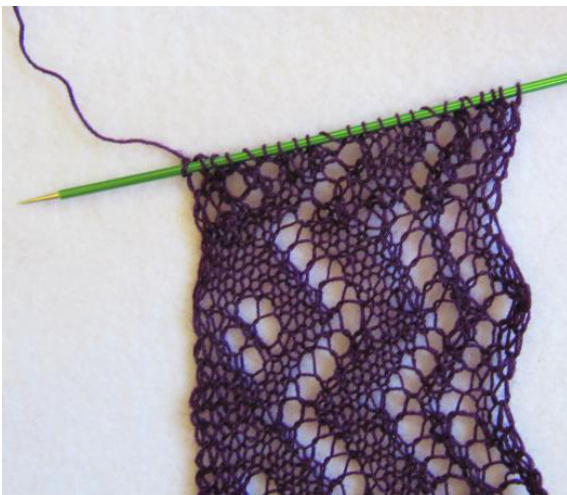
This shows the beginning of Row 9 after you have finished the short rows making the first corner.
Place a marker in between the 20 edge stitches of Row 9 and the 256 picked up stitches on the side of the edging. This shows Row 1 of the first corner.
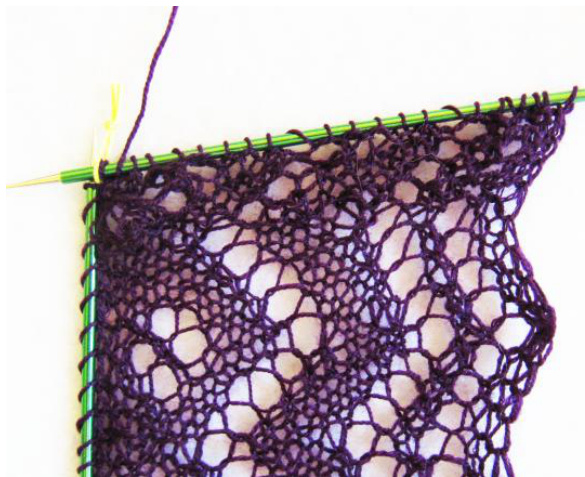
This photo shows where you have finished knitting across the 256 stitches on the picked up edge. Place a marker before picking up the 19 edge stitches at the 2nd corner. These 19 stitches are picked up along your original cast-on edge. Try to pick up through the centers of the yarn-overs, with the correct amount of stitches around them to make the patterns merge. Knit across these 19 stitches as Row 9a (below).
This is what it looks like after knitting Row 9i.
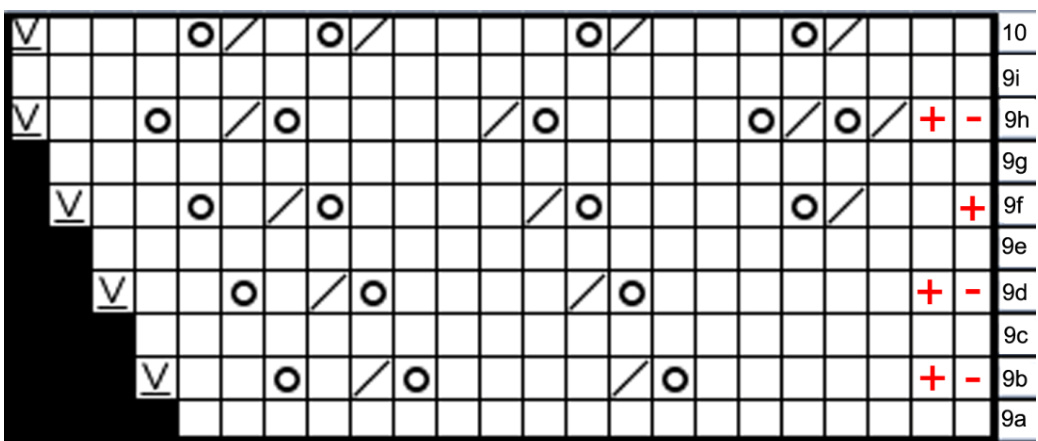
2nd Corner
Work these Rows 9a - 9i in short rows, turning the 2nd corner. When you start Row 10, you will knit the edge pattern, and then knit all the way across the entire body and other edge. Remember that this is a garter stitch garment. Reminder: when you get to the end of Row 10 (past the 2nd marker) and into the right edging, remember to knit the last 2 stitches together (as indicated on Row 10 of the 1st Corner chart). This little detail is easy to miss. As you start Row 11, you should have 22 right edge stitches + 256 body stitches + 23 left edge stitches.
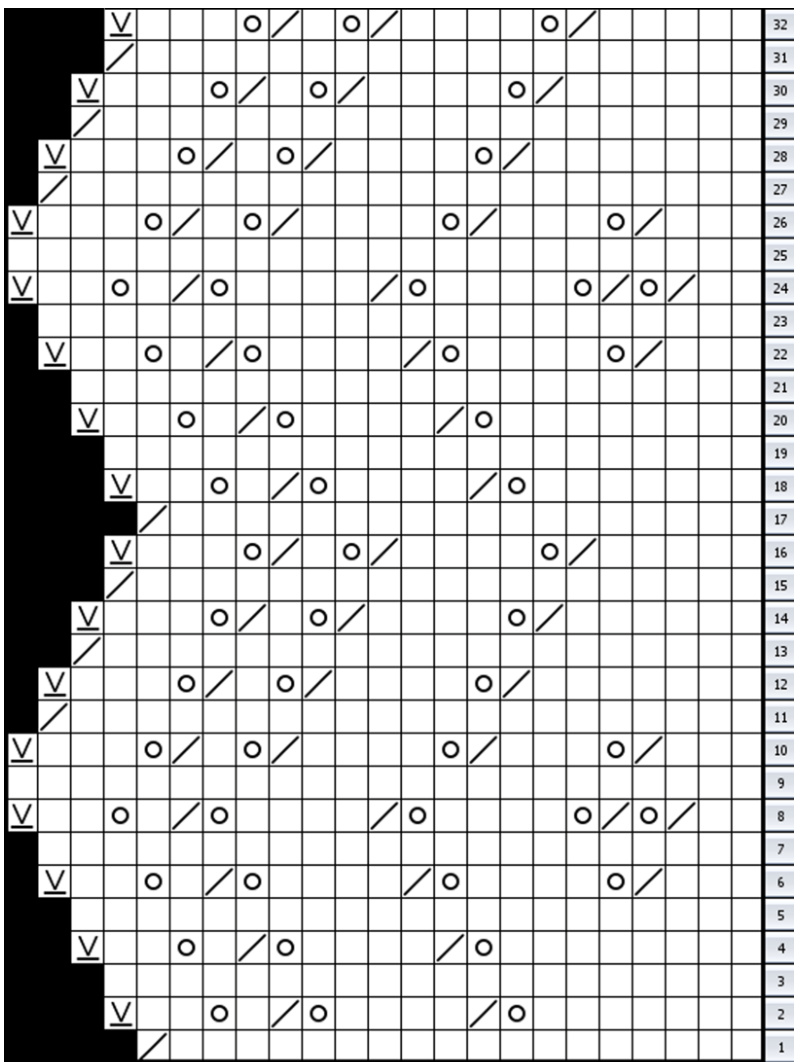
Left Edging Chart
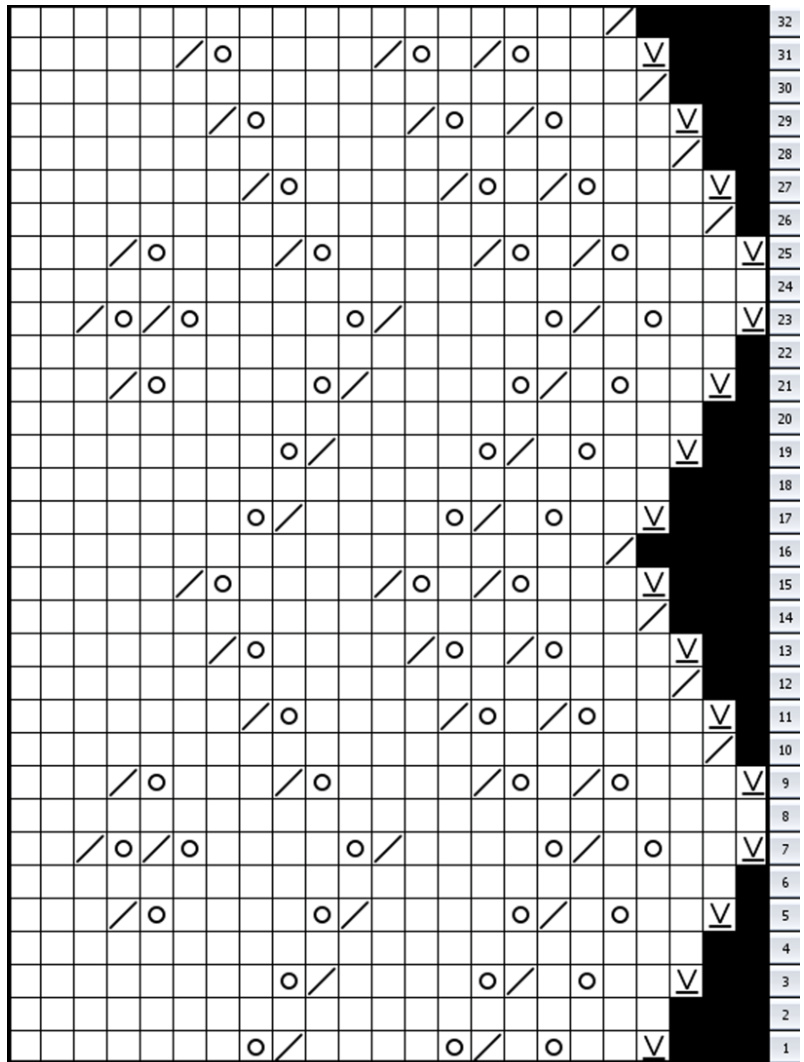
Right Edging Chart Hint: You'll need to keep track of your edging pattern charts separately from the body charts. I use a highlighter pen to cross out a row as I've finished it in the body. At the same time, I use highlighter tape (which is re-useable) to keep track of where I am on the edging charts.
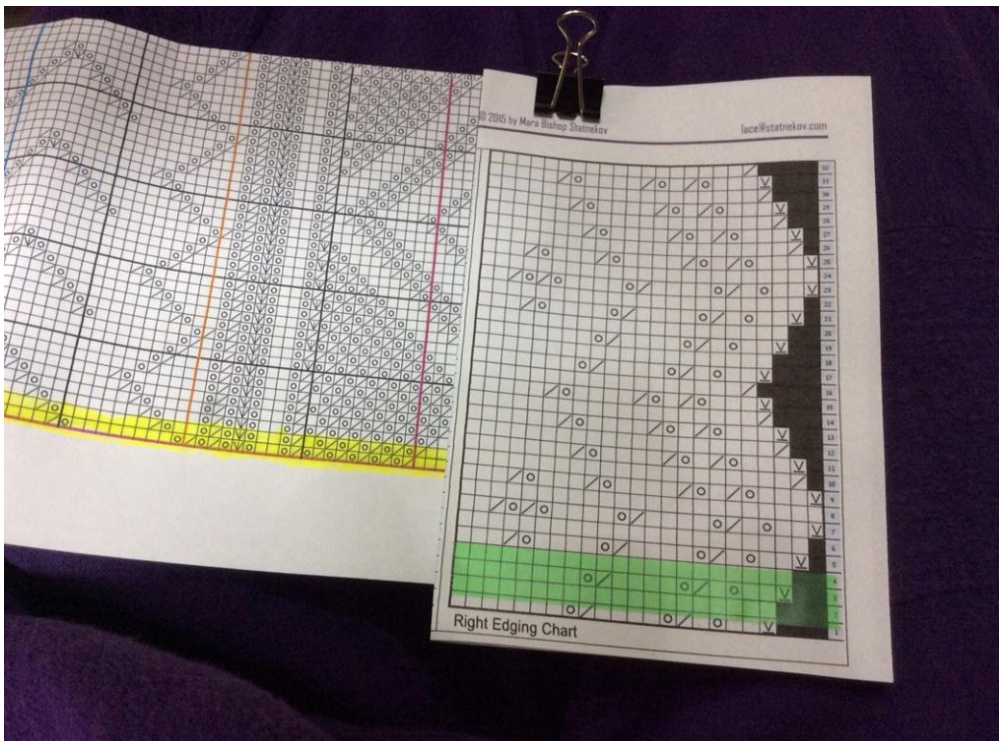
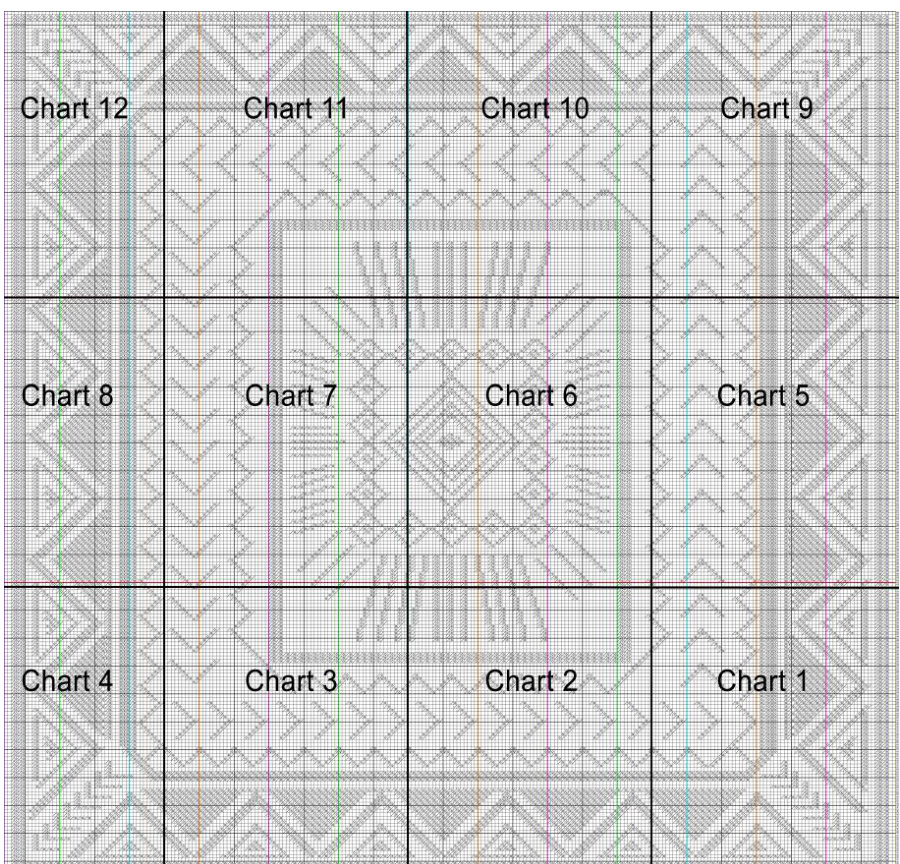
Reminder: the black horizontal lines on the body charts are placed every 16 rows to correspond with the 16 rows of the edge pattern. Miscellaneous Hint: I've found it useful to attach a new ball of yarn at the extreme edge where you can weave the endsinto theoutsideedge. Otherwise, the graft will show when you block your finished garment. Santa-Fe-Summer-Skies-Shawl-charts.pdf The edging charts are included in the text, and also in the charts pdf. There are 12 pages of body charts. Here is a diagram of how they fit together. I tape the charts into 3 section of 4 pages each: 4-3-2-1,8-7-6-5, and 12-11-10-9. When you downloaded this pattern, you should haveseen: There are horizontal lines on the body charts every 16 rows to correspond with the16row edgingpattern The vertical lines are in 10 stitch increments. They are alternately black and colored. I use these colored lines to indicate where to place colored markers across the row. Santa-Fe-Summer-Skies-Shawl-text.pdf
CHARTS:
Edges & Body:
You should be at Row 11 on all three charts at this point. The numbering will only correspond to Row 32 where you will start repeating the edging charts, and the row numbers will no longer correspond.
On even-numbered rows (WS):
From the first stitch to the edge marker, you willfollow the Left Edging chart. Remember to Slip 1 purlwise at the beginning of every row. From the second edge marker to the end of the row, you use the Right Edging chart. In between the markers is the body of the shawl which is worked in garter stitch (plain knitting). You may find it easier to keep track of where you are on a row by placing colored markers at regular intervals across the row. I use colored #10 pearl cotton tied in loops to make my own markers. If this works for you, you can place them corresponding to the colored lines on the pattern. With yarn as fine as 32/2, metal or plastic markers can leave a space in your knitting that shows up in the finished piece in a bad way. (Can you tell that I learned this the hard way?) That's why I suggest using #10 (or finer) pearl cotton. It comes in colors - I'm a proponent of color coding! I suggest that you remove all of the markers except the two edging markers as you are working Row 503. Upon finishing Row 504, you will have finished the body of the shawl. Now you are ready to turn the 3rd corner.
Turning the 3rd Corner:
You will have ended the body of your shawl by completing the wrong side row with:
Left EdgeRow8+Body Row504+Right EdgeRow8
You are halfway through a peak, and will finish it with the short rows in the following chart.
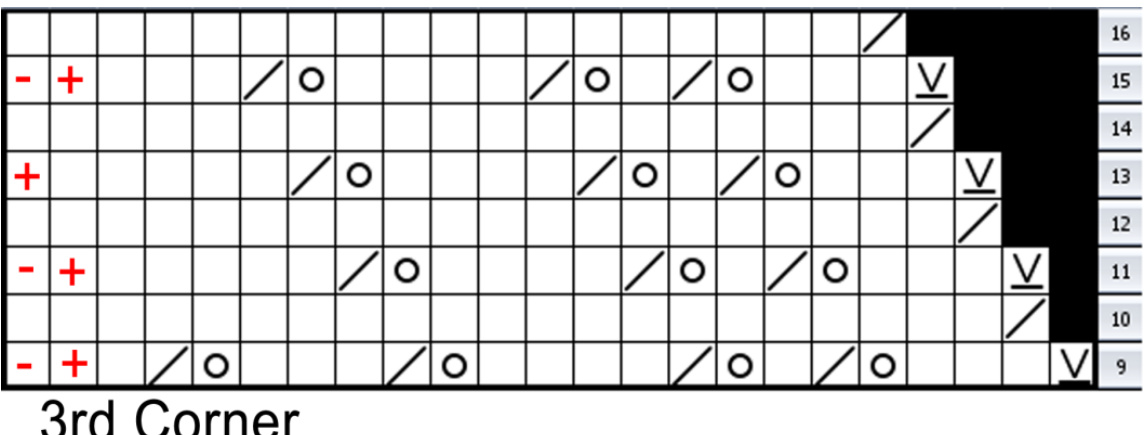
Complete Rows 9-16 of the right edge with the 3rd Corner chart. This is the last peak on the right side of your shawl. Then use the Right Edging Chart to work the 32 peaks of the top edge of your shawl.
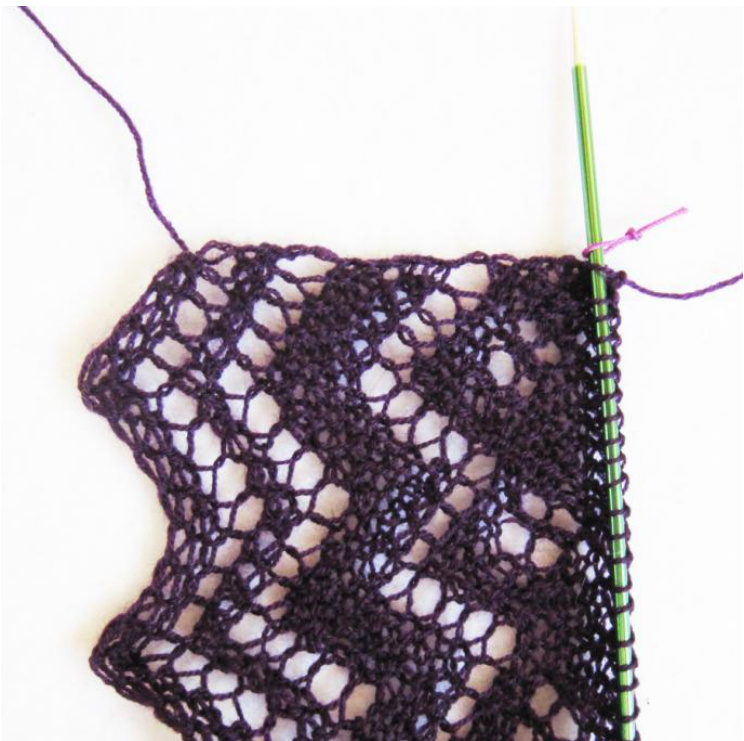
This photos shows the completion of the 3rd Corner chart. Remove the right edge marker.
As you are knitting each row of the edge pattern, knit the last or interior stitch together with one "live" stitch of the body. Slip this last stitch back on to the left-hand needle before you turn your work. This attaches the top edging onto the body. Knit back to the outside edge on the even-numbered rows. Continue knitting 1 edge stitch with 1 body stitch at the interior of every odd-numbered row until you have almost reached the end of the 32 peak. On this last peak, do not knit the last row which is Row 16 of the edge pattern. Complete Row 15. You should have 20 stitches on your right needle. To the left of the "left-side" marker, there should be 23 "left-hand edge" stitches on your left needle. You may have to move your marker over one stitch to the right.
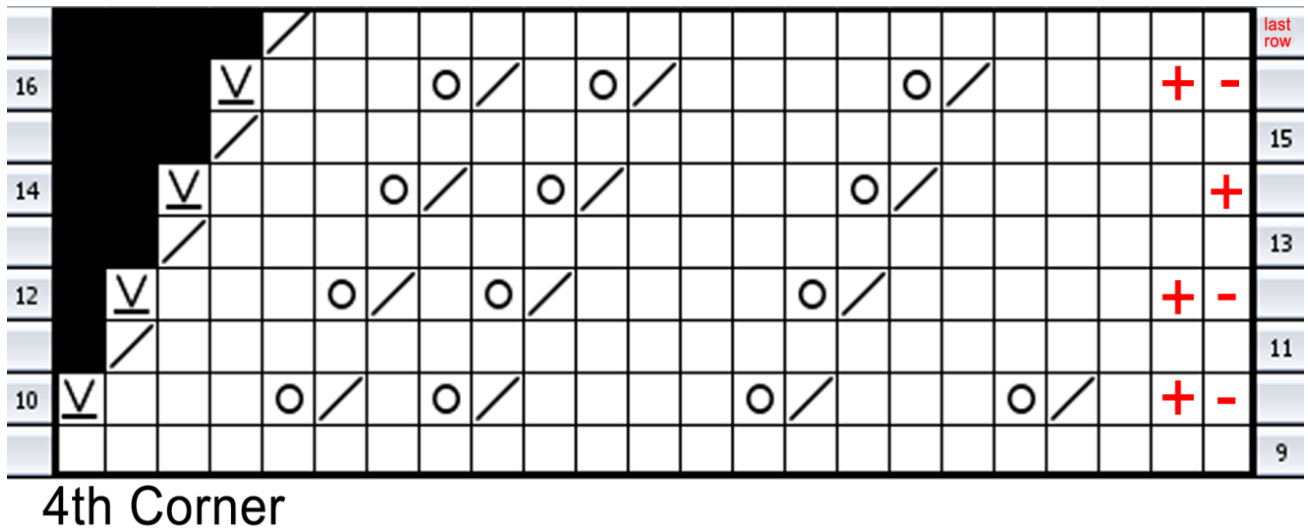
Turning the 4th Corner:
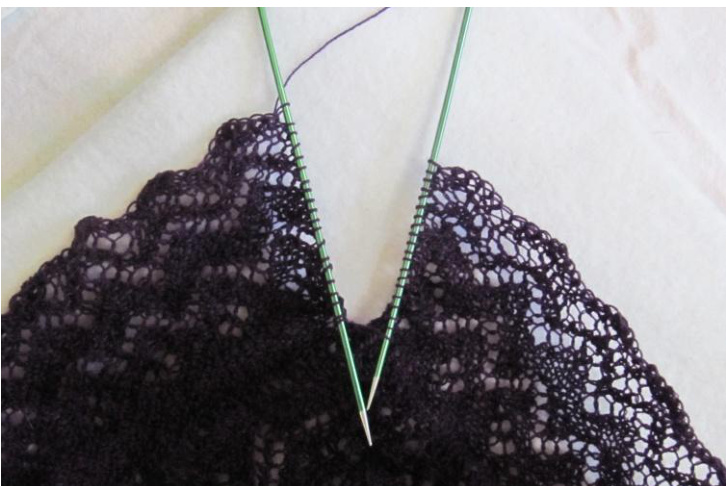
Continue knitting across the remaining stitches which is Row 9 in the chart above. All of your stitches are nowononeneedle. Use the chart above to turn the last corner. You will be working on only the left-hand edge stitches. Work this chart through Row 17 or "Last Row". You should have 19 stitches remaining to the left of the marker. You will have all of your stitches on one needle with the marker in the center. You must slip the left edge stitches up to the marker onto your empty needle so that the points of your two needles are in the center. Remove the marker, and adjust so you have the same number of stitchesoneachneedle. This is when can take a deep sigh of relief, roll your shoulders a little, and give yourself a pat on the back because you're almost finished.
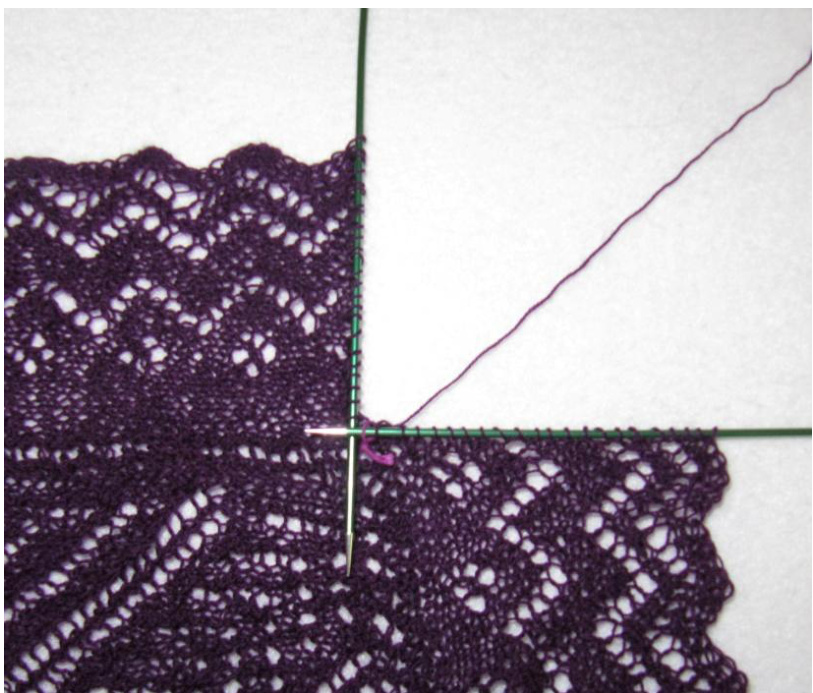
Graft the last corner:
Slip 1 stitch from the left-hand needle to the right-hand needle. Bring the second stitch on the right needle through the slipped stitch, putting it on the left-hand needle as you drop the slipped stitch off of your right needle. (Clear as mud.) It's difficult to write, but if you do each step, I believe you'llfind the actions fairly simple. Now, bring the second stitch on the left needle through the first stitch, putting it on the right needle and dropping the first stitch off of the left needle. Do this back and forth until 1 stitch remains. Break the yarn leaving 5-6 inches of yarn, and thread the tail end of the yarn through the last stitch. Then, weave that end into the edge. Voila! You're done knitting.
Blocking or Finishing:
There are lots of ways to block a square or rectangular shawl. The traditional way is to use a blocking frame. I've made one from four 72" long, 1" x 2"s of maple with holes drilled every 1" into which I placed galvanized nails at convenient intervals and in the corners to make adjusting the size easier. Thread a nylon cord through all of the peaks starting in one corner and going all the way around. Wash the shawl gently in a bowl of warm water to make sure that it is thoroughly wet & clean. Remove and gently squeeze out all of the water. I usually put a bath towel on the floor, put the shawl on half of it and fold the other half over the top. Then, I walk back and forth on it so that the towel absorbs the extra moisture. Stretch the nylon cord over the nails of your blocking frame, starting in the corners, and then over the nails at intervals. Before I built the blocking frame, I used my queen-sized mattress with just the mattress pad on it to block shawls. Using blocking rods (though 3/32" stainless steel welding rods work fine and are cheaper), lace them through the peaks of the borders. I stretch out the rods and anchor them with large T-pins at the appropriate finished size. You should stretch the shawl as much or as little as you like. I personally stretch mine quite taut. Good Luck!

May you enjoy this pattern, and wear your shawl in good health and che Mara Bishop Statnekov Feel free to email me at: lace@statnekov.com


