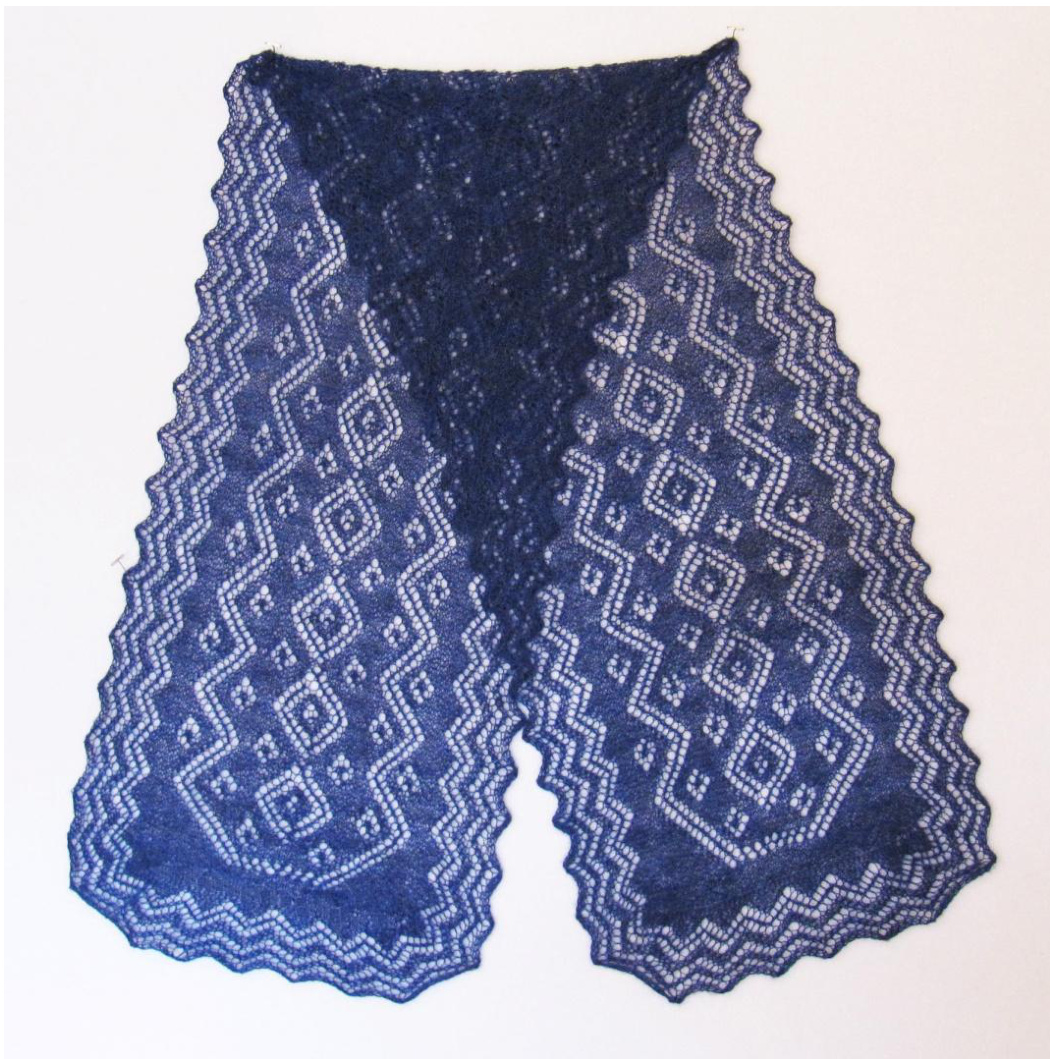
Santa Fe Starry Skies Scarf
(6 peaks wide) Pattern # 004 by Mara BishopStatnekov Santa Fe Starry Skies Scarf is thefourth pattern in a series based on the Orenburg square shawl construction using design elements from the American Southwest. This scarf has Orenburgstyle edging on the ends and on the sides, and is 6 peaks wide. It's a perfect small project for getting the feel of gossamerlace.
Yarn Quantity:
For a gossamer weight version, I used a 30/2 weight,100% Peruvian Alpaca, hand-dyed from Spruce Dragon in Colorado Springs, Colorado, USA. Using #1 US (2.25mm) Signature Needlearts stiletto-point 10" straight needles, 1 used about 750 yards (which of this weight yarn was about 65 grams). The finished piece turned out to be 15"x 62" by doing 15 repeats of the central section. Of course, you can use any lace weight yarn, or even sock yarn. It's always a good idea to swatch a couple of peaks of the border to find your ideal gauge concerning yarn weight , needle size, and your personal knitting tension. I always buy more yarn than I think I'll need so that I don't have a knitting disaster by running out before finishing. With this scarf pattern, you can add or subtract any number of repeats to use up some lovelyyarn in your stash.
The finished size depends on your choice of yarn, your choice of needle size and your personal style of knitting, e.g. loose , tight, or just right (like Goldilocks). In the Orenburg-style, this scarf is worked in garter stitch so that both sides look approximately the same. There are no purl stitches. It may be helpful to mark the “front" tokeepyourbearings.

To start:
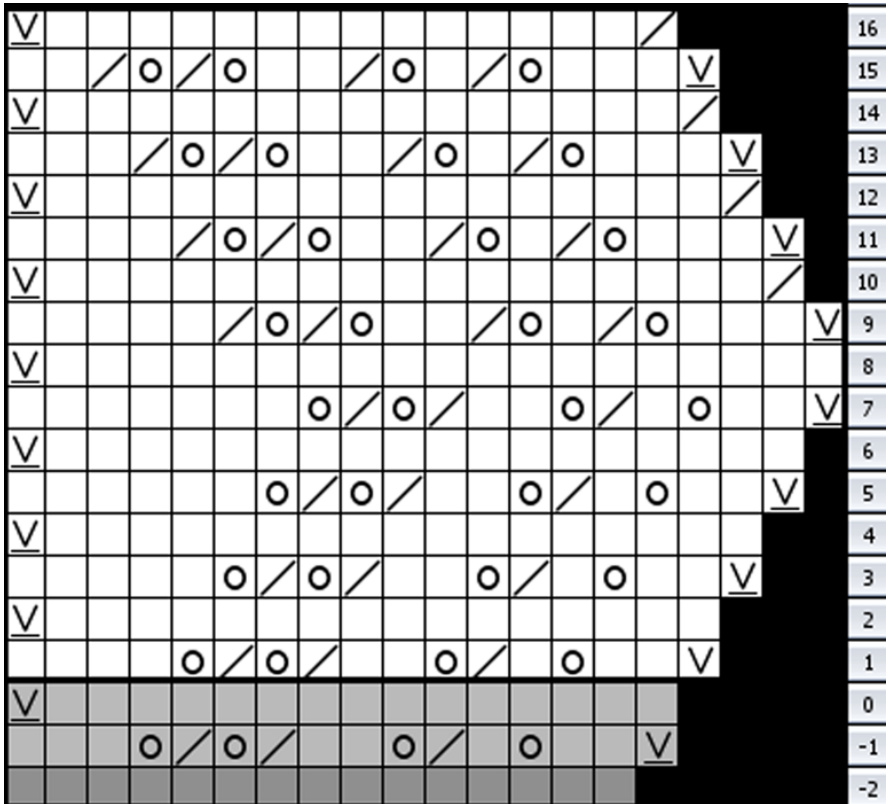
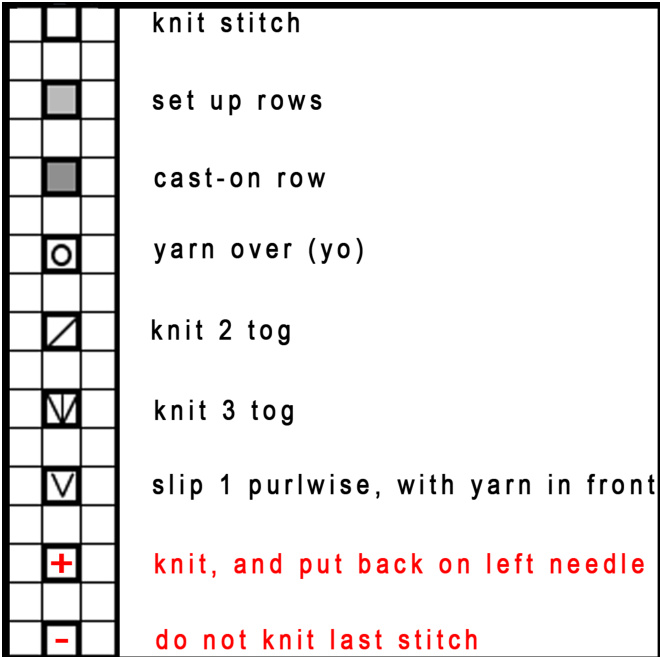
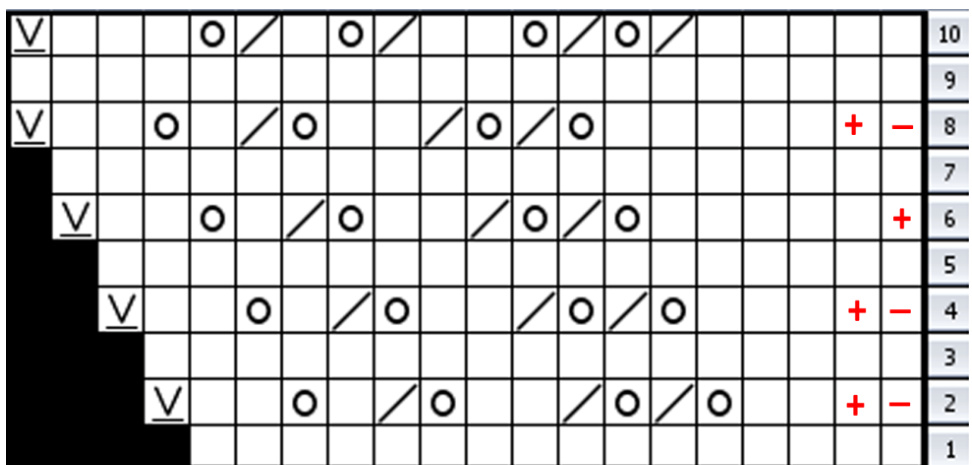
Cast on loosely, 15 stitches, using the long-tail cast-on method (or using your preferred method). I usually cast onto 2 needles held together, slipping the stitches off of one of them to begin knitting. Every row is started with a Slip stitch: Slip 1 purlwise (s1wyif), with the yarn held in front and then shifted to the back so that it is in place to makethe nextstitch aknit stitch. You will be knitting a ribbon of edge that has 6 peaks before turning the 1stcorner. Hint: On the charts, all odd-numbered rows are read from right to left. Alleven-numberedrowsarereadfromlefttoright. The body chart show only odd-numbered (pattern) rows. The return rows of the body areknitted. The edging charts show both odd- & even-numbered rows.
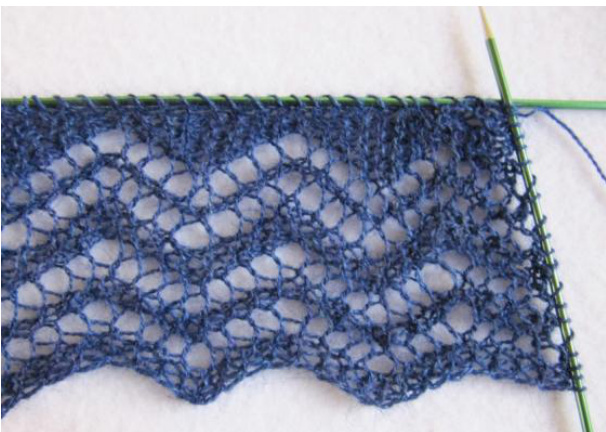
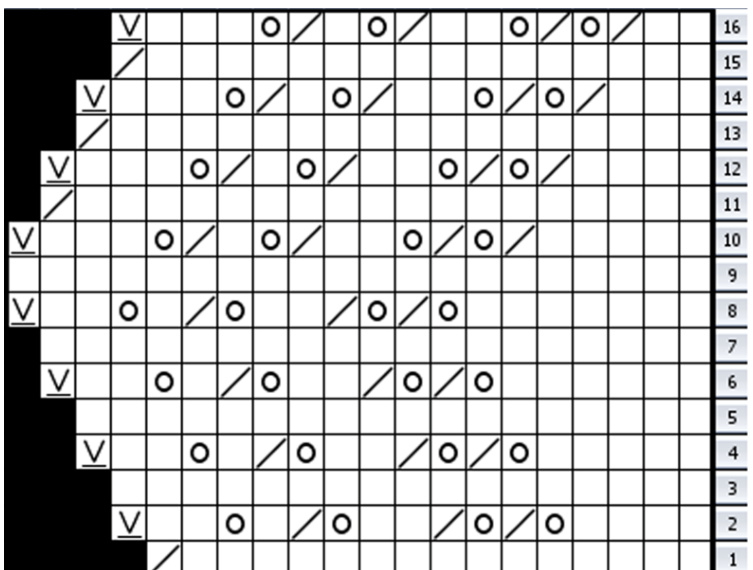
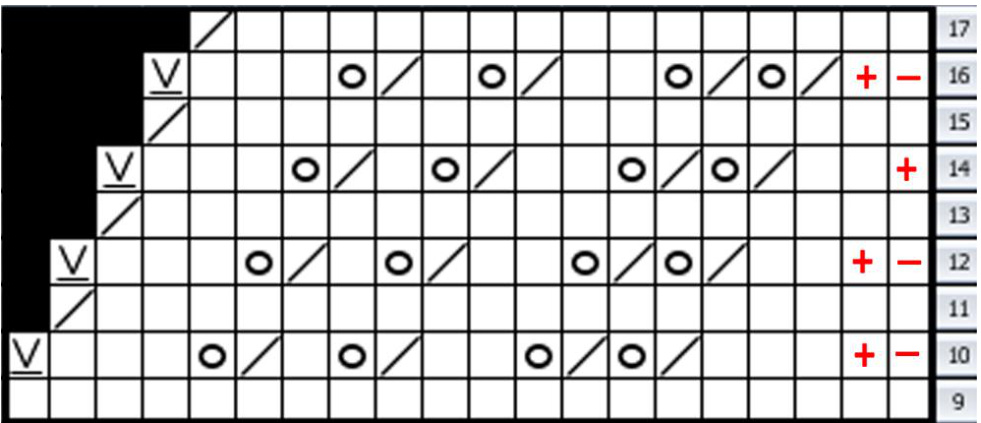
Santa Fe Starry Skies Scarf - bottom edging
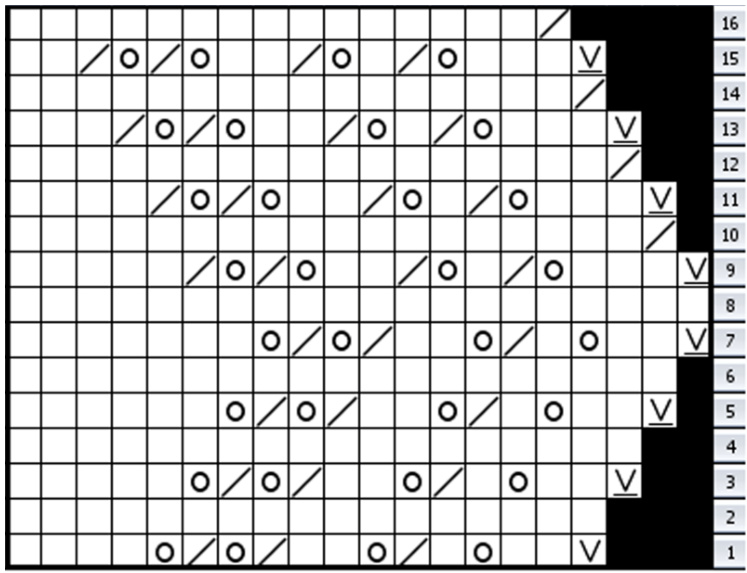
Rows 1 - 16 of the bottom edging chart are repeated 6 times total to make the 6 peaks at the end of the scarf. (See the photo on page 4.) When you've finished all 6 peaks, you are ready to turn the 1st corner. Work the 1st Corner chart to your right, knitting Rows 1 - 9 with short rows as indicated. Do not work Row 10 at this point. (Clue: when you get back to the end of Row 10, there is a k2tog.)
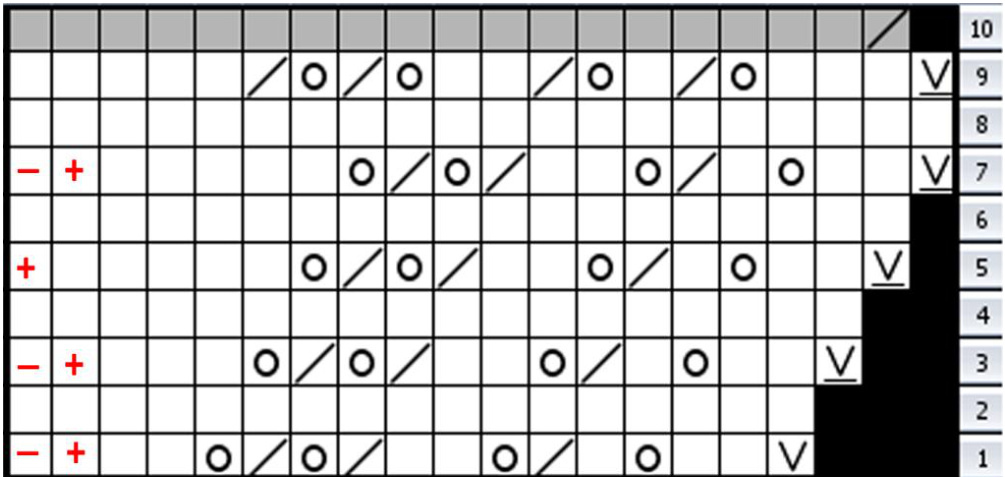
1st Corner
After knitting Row 9 of the right edge pattern, you will use your empty needle to pick up the interior edge "slipped" stitches. Start at the far end of the edging, picking up 48 stitches on the side. You should only pick up the front loop of these slipped stitches.(See the photo at left.) Place a marker after the edge stitches and before knitting across the 48 picked up stitches, knitting through the back loop. This gives a good join between the bottom edging and the body of the scarf.

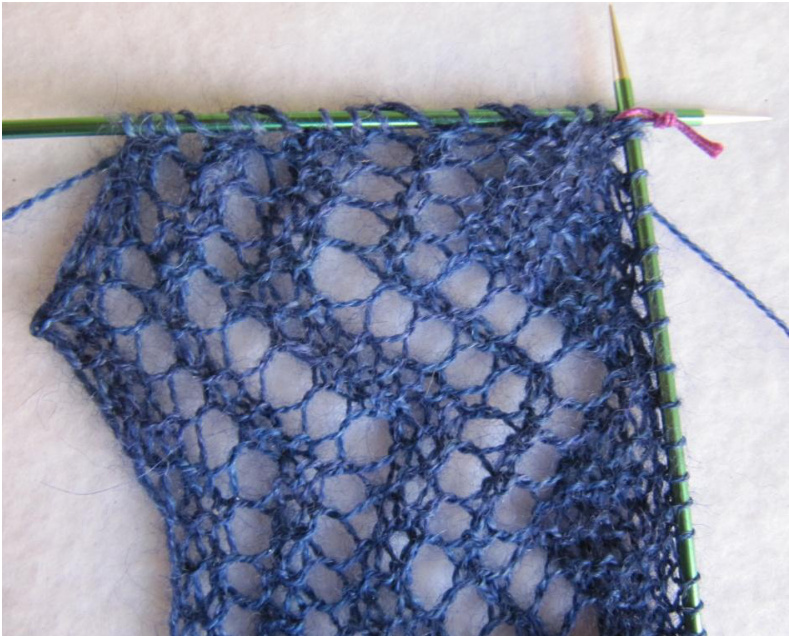
Place a marker after the 48 picked up stitches. Pick up 16 stitches where the original cast-on was, trying to pick up through the centers of the yarn-overs, with the correct amount of stitches around them to make the patterns merge. (See the 2 photos above.) Knit these 16 stitches; this is Row 1 of this chart to the right. You are ready to turn the 2nd corner. Turn the second corner using this chart (to the right). Knit only the edge stitches until Row 10. At row 10, you will work the edge pattern and then knit across the 48 body stitches, adding 2 stitches so that you will have 50 stitches in the body. Continue knitting row 10 to the end of the row, remembering to K2tog at the end of the row. This little detail is easy to miss.
2nd Corner
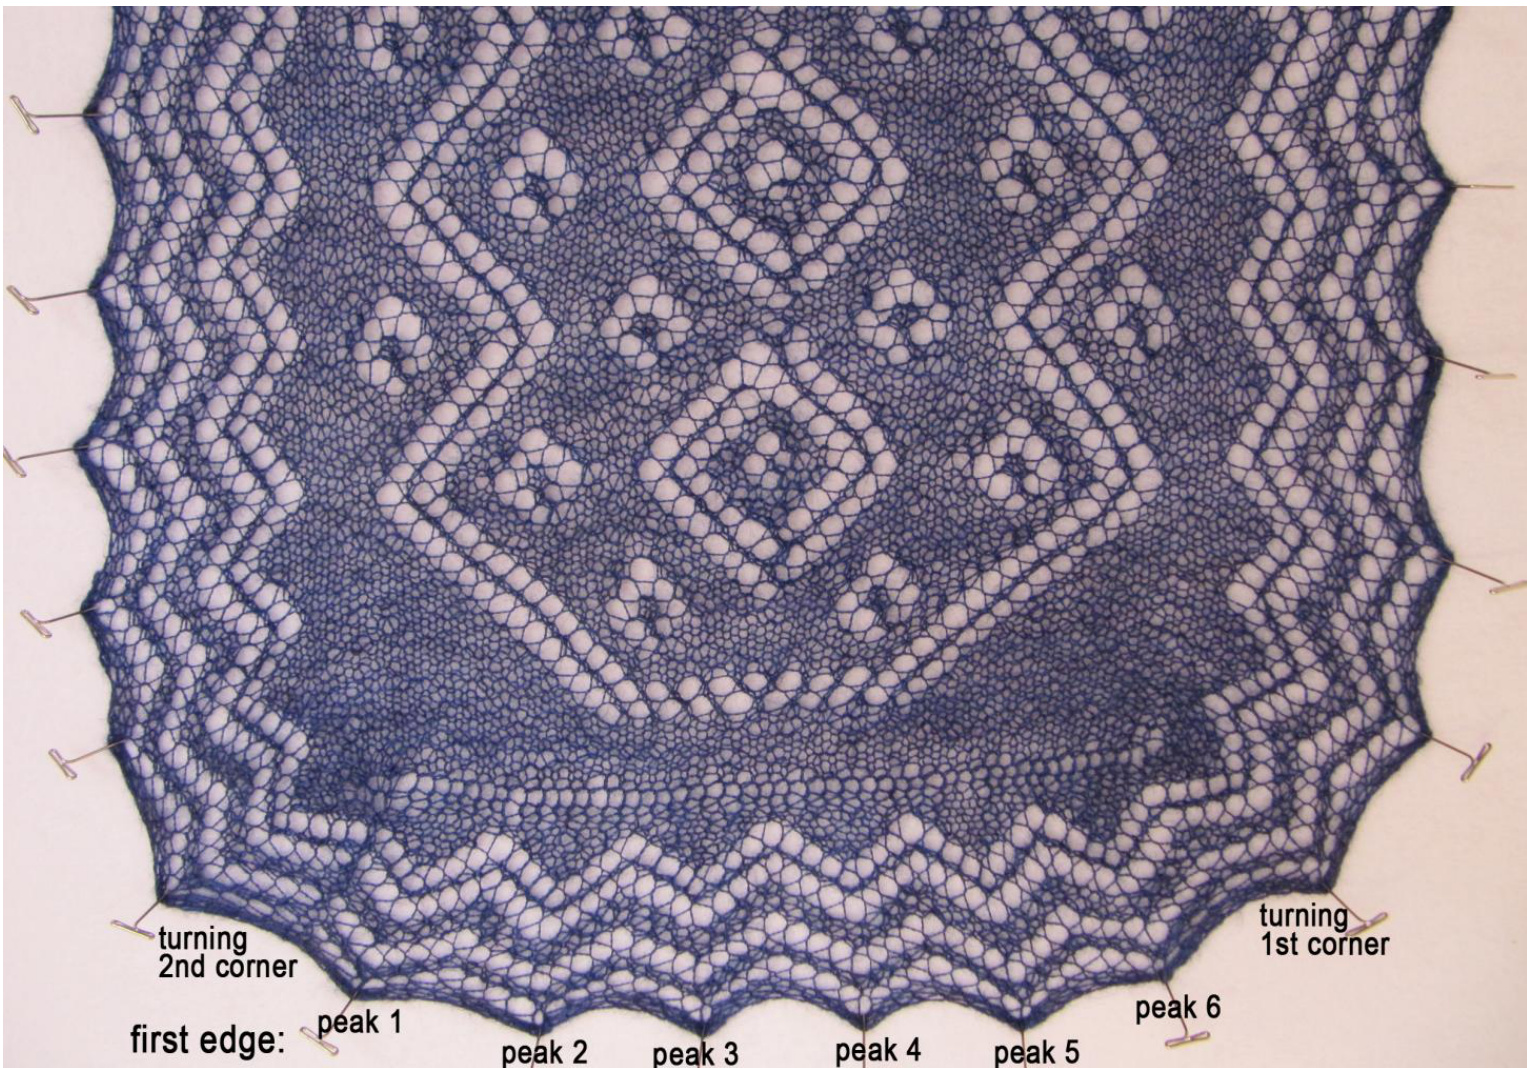
This photo (above) shows an overall view. At the bottom is the first edge with 6 peaks. The line where you've picked up the 48+2 stitches is fairly visable, as is the seam of the picked up stitches along the original cast-on edge next to the 2nd corner. Below, you'llfind the right and left edge charts. The numbers from the body chart and the two edge charts only match up from Row 11 to Row 16. As you'll see on the next page, the body chart starts at Row 11.
Left edge chart
The horizontal black lines give you an indication of where the 16 row edge charts fit with the body chart. The vertical colored lines can be used to put in colored markers every 10 stitches. This will help you keep track of where you are, and will help you know where you may have dropped a stitch or missed a yarn-over.
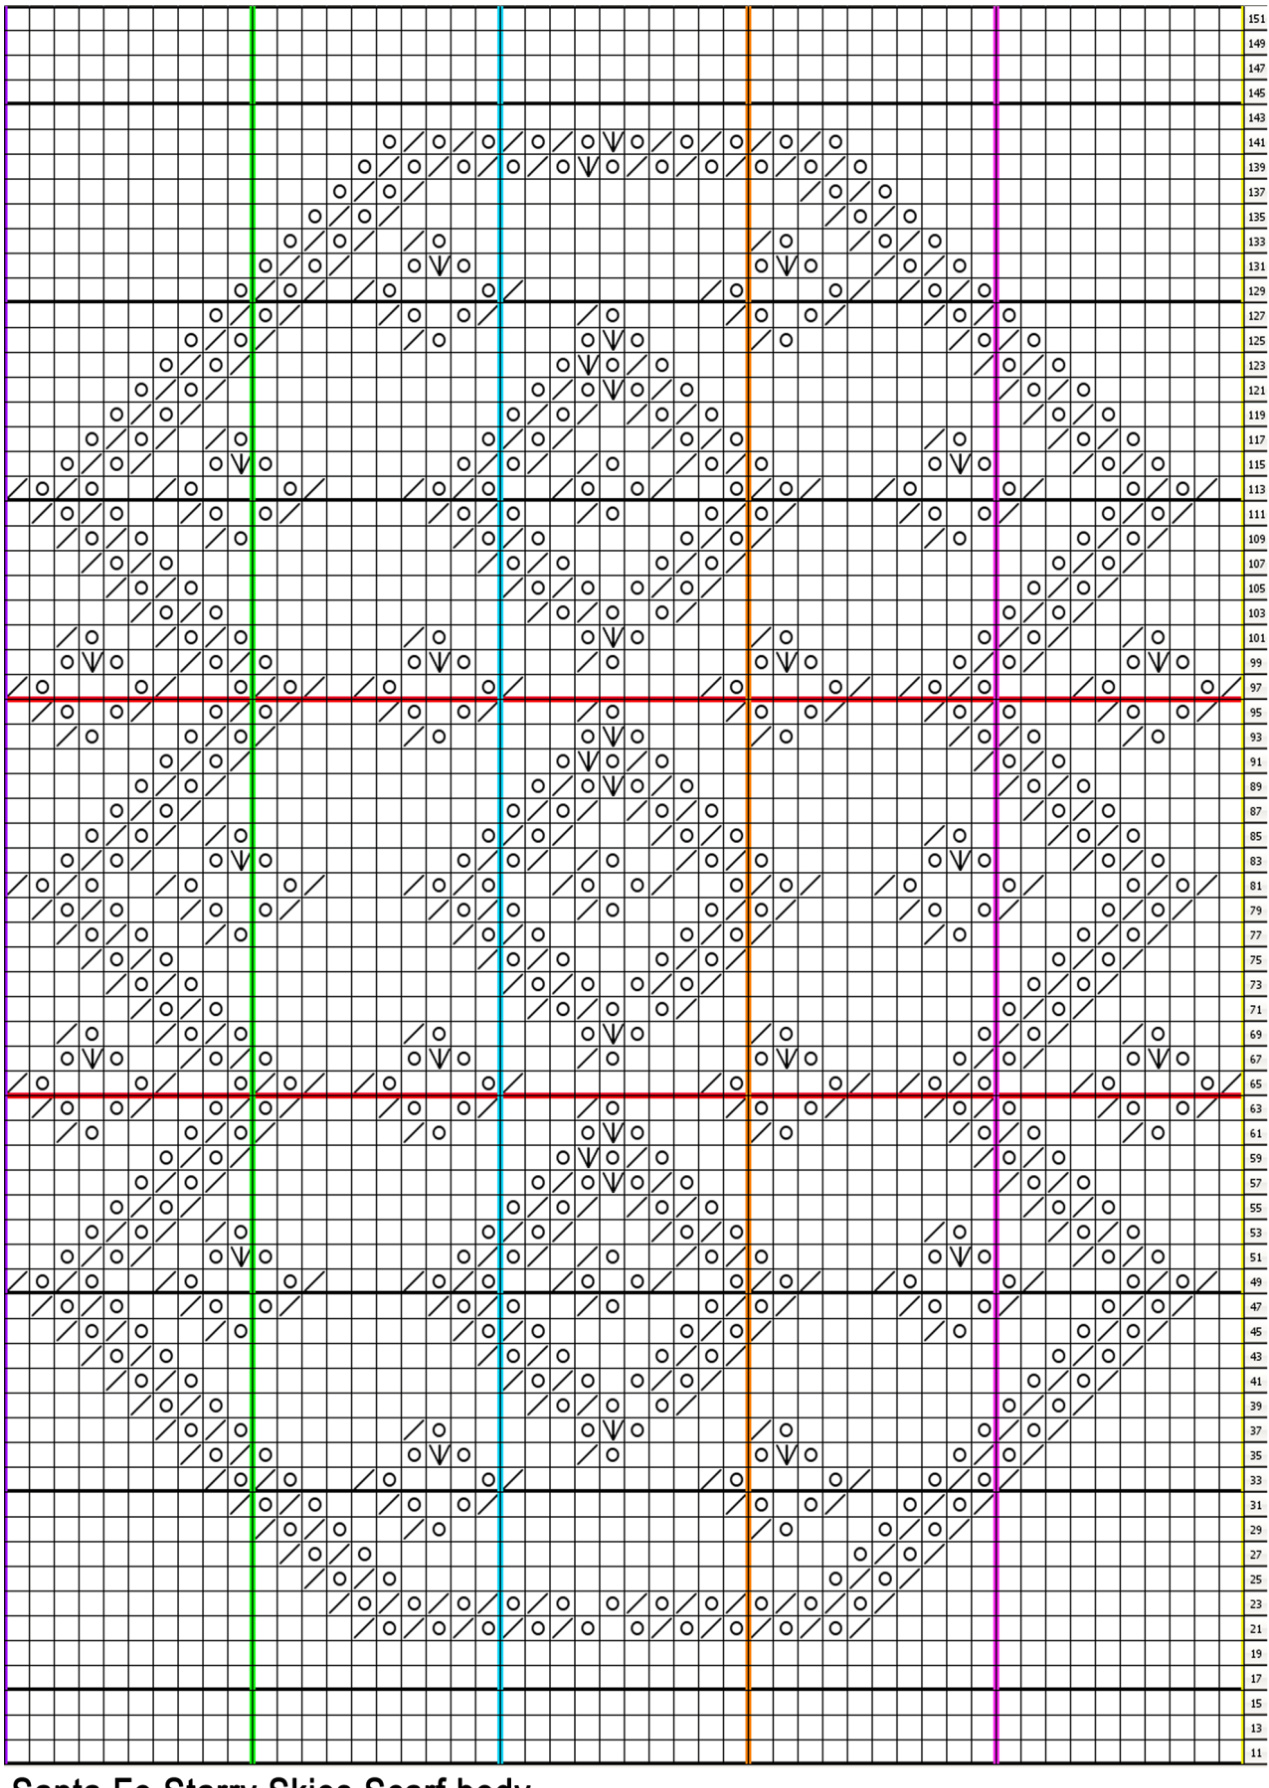
Santa Fe Starry Skies Scarf body Starting on Row 11, you'll knit from the right edge chart, then the body chart, and then the left edge chart. At Row 17, the body chart row numbers and the edging chart row numbers no longer correspond. When you get to Row 65, you'llstart the repeat section which in between the two red horizontal lines: Rows 65 - 96. You can repeat this section between the red lines as many times as you want. It corresponds with 2 side peaks. In my sample, I repeated the middlesection15 times. Work the final body Rows 97 - 152. While knitting across Row 152, decrease by 2 stitches back to the original 48. Now youll be ready to turn the 3rd corner. Hint: You'll need to keep track of your edging pattern charts separately from the body charts. I use highlighter tape (which is re-useable) to keep track of where I am on all three charts. Hint about Markers: I use colored #10 pearl cotton tied in loops to make my own markers. If this works for you, you can place them corresponding to the colored lines on the pattern. Hint: I've found it useful to attach a new ball of yarn at the beginning or end of a row. This way you can weave the ends along the outside edge. With a fine yarn, if you graft in the middle of a piece, it will show especially when you block it. With yarn as fine as 32/2, metal or plastic markers can leave a space in your knitting that shows up in the finished piece in a bad way. (Can you tell that I learned this the hard way?) That's why I suggest using #10 (or finer) pearl cotton. It comes in colors - I'm a proponentofcolorcoding!

Turning the 3rd Corner:
After finishing Row 152 of the body chart,you can notice that you are halfway through the peak on the edging, and will finish it with the short rows. Remove the right edge marker. Complete Rows 9-16 of the right edge with the 3rd Corner chart. This is the last peak on the right side of your scarf. After you finish this chart, you will re-use the Right Edging Chart on page 4 to work the 6 peaks of the top edge of your shawl.
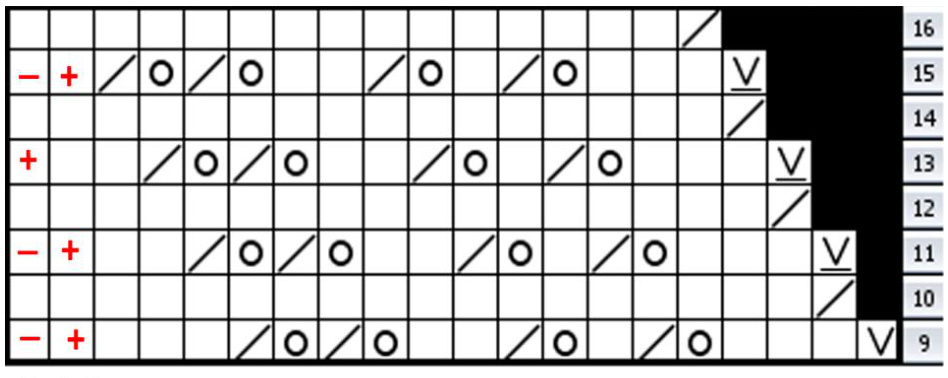
3rd Corner As you are knitting each row of the top edge, knit the last or interior stitch together with one "live" stitch of the body. Slip this last stitch back onto the left-hand needle before you turn your work. This attaches the top edging onto the body. Knit back to the outside edge on theeven-numberedrows. Continue until you've reach Row 15 of the 6th peak. Knit the edge pattern of Row 15, slip the left edge marker, and knit across the left edge stitches. All of your remaining stitches are on one needle with a marker in the middle. This is Row 9 of the 4th corner chart.
Turning the 4th Corner:
Use this chart to turn the last corner. You will be working on only the left-hand edge stitches. Work this chart through Row 17 or "Last Row". Now, slip the left edge stitches up to the marker onto your empty needle so that the points of your two needles are in the center. Remove the marker, and adjust so you have the same number of stitches on eachneedle. This is when can take a deep sigh of relief, roll your shoulders a little, and give yourself a pat on the back because you're almost finished.
Graft the last corner:
Slip 1 stitch from the left-hand needle to the right-hand needle. Bring the second stitch on the right needle through the slipped stitch, putting it on the left-hand needle as you drop the slipped stitch off of your right needle. (Clear as mud.) It's difficult to write, but if you do each step, I believe you'll find the actions fairly simple. Now, bring the second stitch onthe left needle through the first stitch, putting it on the right needle and dropping the first stitch off of the left needle. Do this back and forth until 1 stitch remains. Break the yarn leaving 5-6 inches of yarn, and thread the tail end of the yarn through the last stitch. Then, weave that end into the edge. Voila! You're done knitting.
Blocking or Finishing:
With a small project like a scarf, I don't bother to use a blocking frame. I wash the scarf gently in a bowl of warm water to make sure that it is thoroughly wet & clean. Remove and gently squeeze out all of the water. On a mattress with just the mattress pad on it, Ilace the 3/32" stainless steel blocking rods through the peaks of the borders. I stretch out the rods and anchor them with large T-pins at the appropriate finished size. You should stretch the shawl as much or as little as you like. I personally stretch mine quite taut. Good Luck! May you enjoy this pattern, and wear your scarf in good health and cheer.

Mara Bishop Statnekov Feel free to email me at: lace@statnekov.com My teacher, Galina Khmeleva, continues to be my inspiration as well as my source for patterns and information, both from her outstanding books & published articles, and from her wonderful workshops & classes.


