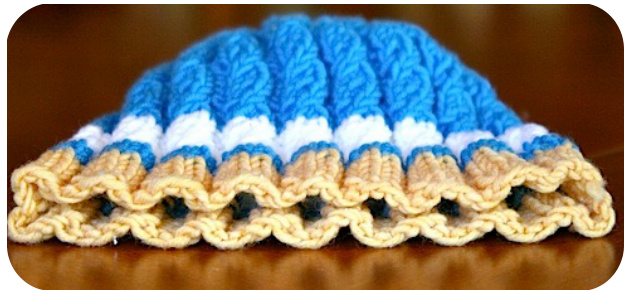
Losemite ome Hat
Keeping it simple with a smooth dome top that's perfect for the minimalist in your life.
Note from the Designer
The Yosemite Hat is the third in a trio of hat patterns designed to introduce and demonstrate the uses for the Showy & Subtle Decreases. The first two, Vortex and Rip Cord, highlighted the Showy Decrease, This time we're using its opposite partner the Subtle Decrease. The hat starts with the Wavy Tail cast on which improves the flow of the rib and has more give. It continues with a series of Subtle Decreases and finishes up with a Double Decker hat closure that slides the remaining purl stitches under the knit stitches for a smoother top.
| Gauge | Yarn/Yardage |
| Knit the hat to the gauge on the yarnlabel orjust a bittighter.Five gauges are provided from 4 to 6 stsper1”instockinette. The gauge in ribwill be less and thehatpattern accountsforthat. | General: 90-130 yds yarn in Main Color and about 20 yds of CC. Sample 1: Karabella Aurora 8 (blue); 100% Merino, 109 yards per ball, knit to5.0st.Samplecaston90stitches forachildsizeandused85ydstotal. Sample 2: Karabella Margrite (tan) 80% Merino,20% Cashmere, 154 yds per ball, 5.5 st. Sample Adult Small, cast on110standused120yardstotal. |
| Size | Notions |
| The finished hat stretchestofit heads up to two inches larger. Averageheadsizes: Infant: 14.5" Baby: 16.0" Toddler/Child: 17.5" AdultMedium: 19" Adult Large: 21" | Needles: -Two 16"or 24"circular needles +Size US 4 - 8 as needed for gauge. StitchMarkers:1per10sts TapestryNeedle |
| Gauge / St st | 80 | 90 | 100 | 110 |
| 6.0/1” | 14.5" | 16.0" | 18.0" | |
| 5.5/1" | 14.0" | 16.0" | 18.0" | 19.5" |
| 5.0/1" | 15.5" | 17.5" | 19.5" | 21.0" |
| 4.5/ 1" | 17.0" | 19.5" | 22.0" | |
| 4.0 / 1" | 19.5" | 22.0" |
The gauge of your swatch in stockinette.The finished circumferences listed take into account the rib pattern. Colors refer to sizes above. More pictures and examples are available on Photobucket.com .
Abbreviations
| k,p | knit or purl |
| sl1 | slip 1 as if to purl, yarn inback |
| k2tog | knit2together |
| p2tog | purl2together |
Chart Legend
| knit knitstitch |
| purl purlstitch |
| k2tog Knittwostitches togetherasonestitch |
| p2tog Purl2stitchestogether |
| slip Slip stitch as if to purl holdingyarninback |
| NoStitch Placeholder-Nostitch made. |
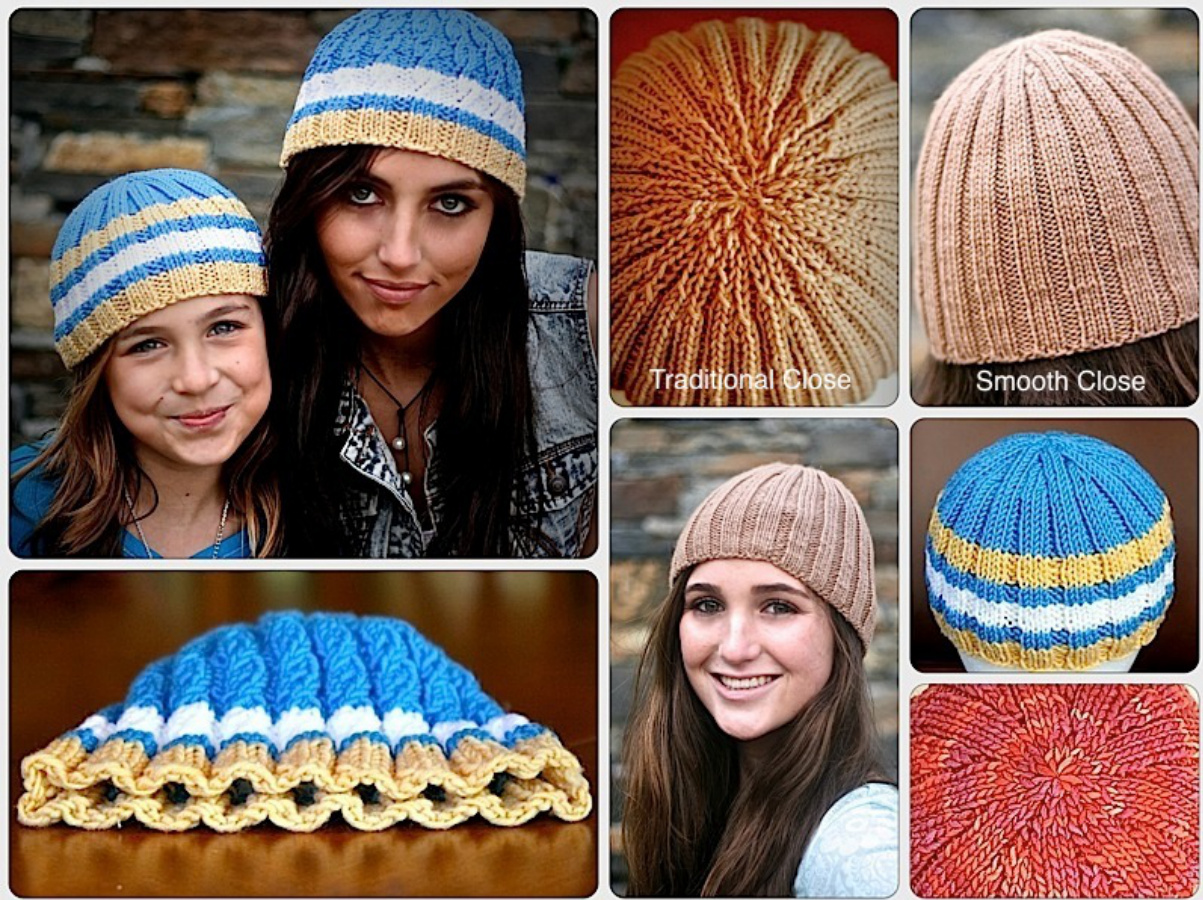
Two stripe options (or none at all)
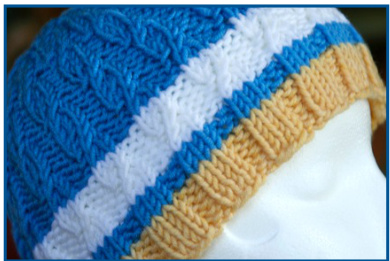
Stripes are 5 rounds wide with 3 rounds of main color between. Work the first round after changing color in knit only (no ribbing) and slip the 1st stitch of the 2nd round after a color change for a smoother color change.
Knitting Muances
Knitting Instructions
Cast On
· Color of the cast on will depend on your choice of stripes. See photos for options. · Cast on using the Wavy Tail Cast On in multiples of 10 stitches using the gauge and size chart for guidance. Instructions for the Wavy Tail CO are included on a separate page. Start with 2 purl cast ons, then follow with 3 knit cast on stitches. The slip knot counts as the first purl stitch. · Join to knit in the round being careful not to twist, placing marker for BOR. You can knit on a single 16" circular needle until the decrease rounds or divide the stitches ontotwoneedlesnow.Makesureeachsidehasmultipleof10stitches.For example, if you cast on 90 stitches divide into 40 & 50 stitches.
Main Hat
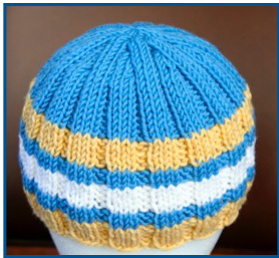
· Work in rib \* p2, k3 \* checking that rib follows established pattern of the cast on. · Directions for optional stripes: 1. Work 5 rib rounds in Contrasting Color 1. 2. Switch to Main Color and knit 1 round followed by 2 rib rounds. 3. Switch to Contrasting Color 2 and knit 1 round followed by 4 rib rounds. 4. Switch to Main Color and knit 1 round followed by 2 rib rounds. 5. Continue in Main Color to desired height or add a 3rd stripe. ·Continue working rib until hat is 4.0" (4.25", 4.5", 4.5", 5.0") based on size, not on number of stitches. On last round place markers every 10 sts to define decrease sets which areworkedeveryother rib.
Slip Stitch:
The slip stitch worked with the k2tog and p2tog decrease minimizes the impact of the decrease in the knit fabric. To make sure the adjacent stitch is not too loose work the stitch following the slip snuggly. If you'd like to learn more about our Showy and Subtle Decreases wehave included an introduction at in the pattern.

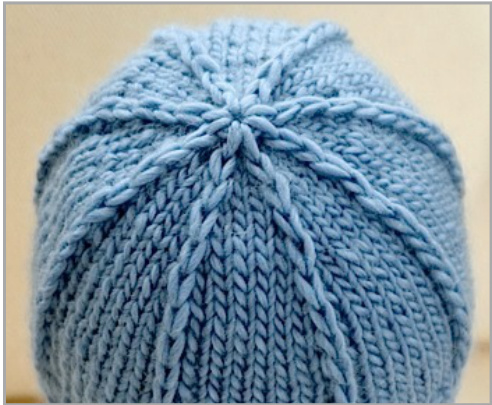
Crown Shaping
· If you're still working on one needle, it's time to divide the stitches onto 2 needles. . The decreases are worked in sets of 10 over 14 rounds eliminating sections of the rib while maintaining one main section until the very end. We even reestablish the p2, k3 pattern in Rnd 10. Remove markers on last round.
| Rnd 1: p2, k3, p1, sl1, k3 | Rnd 8:p1,k2tog,p1,k3 |
| Rnd 2: p2,k3,p2tog,k3 | Rnd 9: p1,p2tog,k3 |
| Rnd 3: p1, sl1, k3, p1, k3 | Rnd 10: p2,k3 |
| Rnd 4: p2tog, k3, p1, k3 | Rnd 11: p1, sl1, k3 |
| Rnd 5: p1, k1, sl1, k1, p1, k3 | Rnd 12: p2tog,k3 |
| Rnd 6:p1,k1,k2tog, p1,k3 | Rnd 13: p1,k1,sl1, k1 |
| Rnd 7: p1, sl1, k1,p1, k3 | Rnd 14:p1,k1,k2tog |
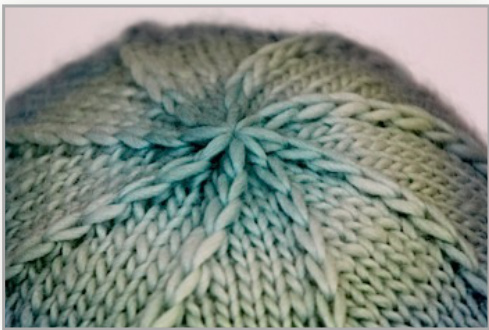
Double Decker Hat Top Finish
The remaining 24 (27, 30, 33) sts will be closed in two steps creating a 2-tier closure in which the purl stitches can disappear under the knit sts. In this case it results in a nice smooth and uncrowded top. In other cases it can highlight the decorative stitches of the hat design. We've included a tutorial page at the end of the pattern for you. · Cut a yarn tail about 12" long and put on tapestry needle. · First run the tapestry needle through all the purl stitches but not the knit stitches. Here's how it works for the 3 stitches remaining in each set: · Slide purl stitch onto yarn tail, then slide next 2 knit stitches to other end of the same circular needle. Continue until all purl stitches are on the tail · Pull tight to close the lower tier. · Run tail through the remaining knit stitches and pull tight to close. · Pull the tapestry needle one more time through the small circle of knit stitches then down through the center to the other side to weave in. · With one hand holding the center of the hat, pull down gently on all the ribs. This wil help set the decreases for a smoother look.
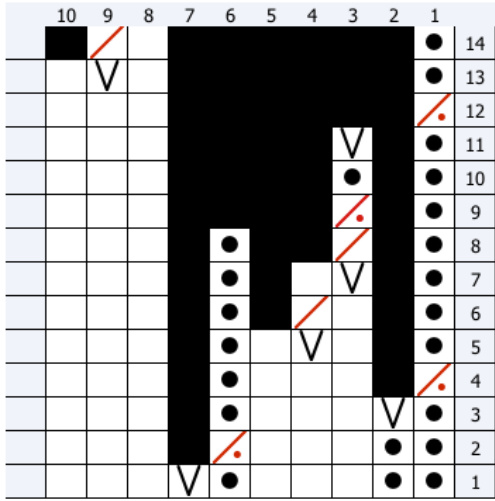
The red simply highlights the decreases. Chart downloads for this pattern are on our web site at KnittingNuances.com/ help. This link does not show in the menu bar so type “/help" after the URL on the home page.
| knit | |
| purl | |
| k2tog | |
| p2tog | |
| V | slip |
| NoStitch |
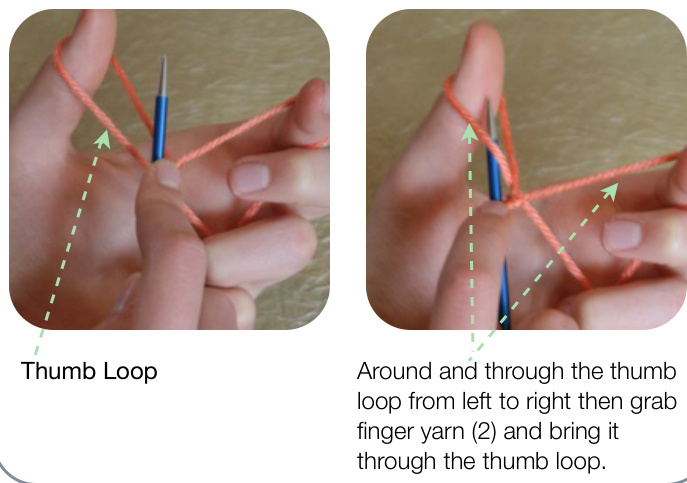
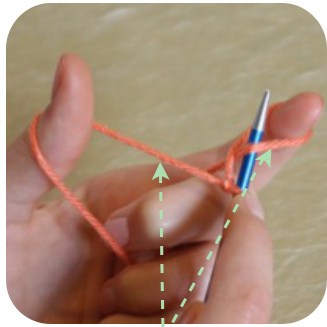
The Wavy Tail Cast On
The Technique
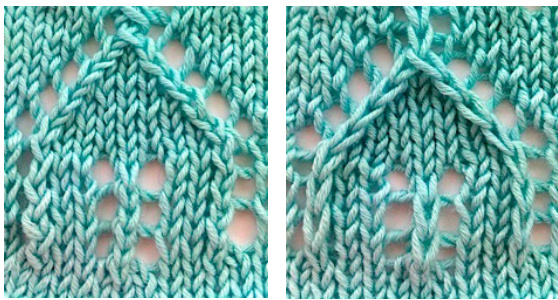
The Wavy-Tail Cast On alternates a traditional long-tail cast on with a reversed long-tail cast on that mimics the purl stitch. There are several benefits. First, it looks more interesting than the standard chain edge but it's more functional also. The cast on has more give and in enhances the flow of the rib stitch. Here's how it works ... Set up just as you would for a long tail cast on with plenty of yarn for the tail. This cast on uses approximately the same length. The tail is on the left over the thumb as usual. > Knit stitch (standard): the needle travels behind and through the thumb loop from left to right, over to grab finger yarn, and bring it back through the thumb loop. > Purl stitch: the needle travels to the outside of the finger loop, through the loop from right to left, then over to the thumb yarn. Grab the thumb yarn from beneath and bring it through the finger loop. Snuggle the yarn up to the needle, but don't pull too tightly. You do not want to “cast on loosely" for this technique or you'll lose the structure. You can combine knit and purl castons to match your rib pattern (1x1, 1x2, 3x3 etc.).
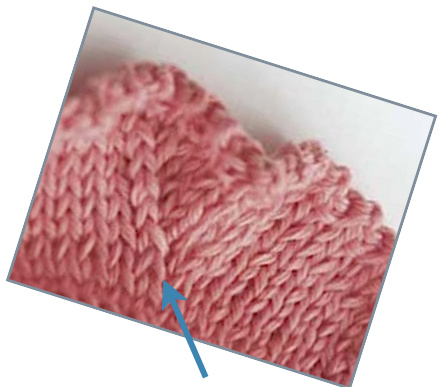
Before ...
After ...
Shown above is a 1 by 1 rib with the traditional long tail cast on and the Wavy Tail cast on. The effect is even more dramatic in the 3 by 2 rib up top.
Traditional Knit Cast On
The Purl Cast On

Finger Loop
Introduction to Showy & Subtle Decreases
Overview
Two of the most common decreases, knit-2-together and slip-slip-knit, are getting a makeover. The result is two distinctive decreases: one that has less impact, and the other that pops off the fabric creating a new design element. The key to these decreases is to set them up on the row before by slipping one of the two stitches to be knit together on the next row. Which one you slip depends on what you'd like the stitch to do - hide or highlight. Both have right and left leaning versions, and can work alone as a true decrease or with a variety of increases, like theyarn over,tocreatenewstitchpatterns.
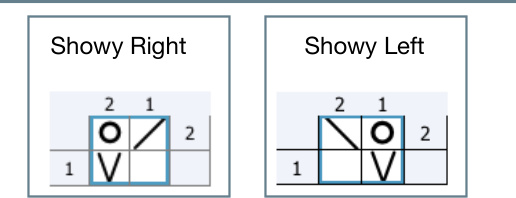
The Subtle Decrease
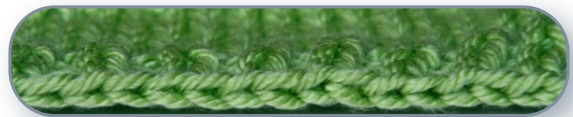
The Subtle Decrease uses the slip stitch in the row below to eliminate a purl bump. Now the slip stitch can slide easily behind its partner. This minimizes the ridge between the decrease and the fabric. Take a look at the Subtle Right chart. Picture how your needle will enter the two stitches ... first through the knit stitch, then the slipped stitch to its right. The Subtle charts show a true decrease, such as you might use in waist or arm hole shaping or the ruffle shown above. You could run a series of Subtle Decreases with the eyelet, but this will be more common.
The Showy Decrease
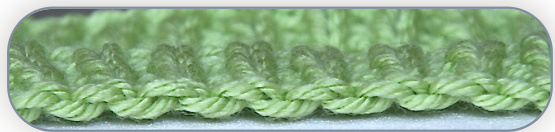
Butwhat ifyouwanted thedecreasetoshow?Thistimewe'llreversetheorder and you'll see what happens when the slipped stitch sits on top. Compare the chart for the Showy Right Decrease to the Subtle Right Decrease above it: > The slip stitch is now on the left. It will be the first one your needle enters as you work the k2tog decrease. As a result, the elongated stitch is sitting on top of its partner rising above the knit fabric. In both Showy Decrease charts, the yarn over is on the outside of the decrease. This is the set up for a string of diagonal decreases as shown in the pattern to the right.
The Left Leaning Decrease (ssk)
The traditional, right-slanting k2tog is pretty straight forward and well behaved. It doesn't require any fiddling with stitches and lies pretty well in the fabric. But its left leaning cohort has always been a bit wonky . The stitches of the left slanting decrease need to be reoriented in order to lie flat (ssk) and, try as we might, the two just never looked exactly the same ... until now. The right and left slanting Showy Decreases are perfectly matched and the Subtle versions look more alike and are less noticeable than before. Joining decreases and more .. With the Showy Decrease you can join right and left decrease line in ways that have just not been possible before. And just wait till you see what the Showy Decrease can do for hat tops! More pictures and examples are available on our Photobucket.com page.
Subtle Decrease
The needle enters the regular stitch first.
Showy Decrease
Both yo's sit outside & slip stitches are positioned so the needle enters them first.
Before & After
Not only to the right and left leaning decreases match, they rise up off the fabric, adding more texture..
WantMoreInformation?
You can find it on our web site. Our blog also has sample swatches to try like the Perfect Eyelet experiment.
| 口 knit |
| k2tog |
| ssk |
| slip |
| 回 yo |
KnittingNuances.com/Learn
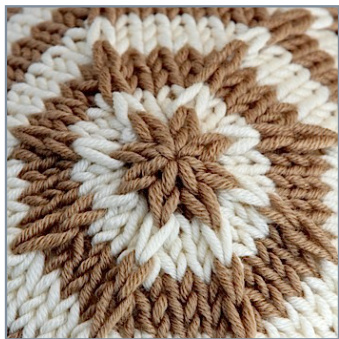
Double Decker Hat Top
Add texture and interest where there's been none before with this easy two-tier hat closure. Here's a fun new technique that's quick, easy and can work on almost any hat pattern. We combine it with our Showy Decrease for real punch.
Separating the Stitches
The hat crown is shaped by decreases every other round until there are just 2 stitches per decrease set remaining For example, if you are working 8 decreases therewillbe16 stitchesremaining.Thesestitches alternate intwo categories: those that are part of a Showy Decrease and those that are not. After your last decrease round: > cut the working yarn into a nice long tail about 12" long and thread it through a tapestry needle. The stitches are still on 2 circular needles. Slip the stitches one by one onto: 1. the tapestry needle with yarn tail if it is a 'normal' stitch and, 2. the other end of the same circular needle (without working it) if it is a raised Showy Decrease stitch.
The Lower Layer
> With the tail running through all the normal stitches, pull tight to close. There are 8 stitches remaining on your 2 circular needles.
The Upper Layer
. Run the tapestry needle and yarn tail through the remaining stitches. Slide off knitting needles and pull tight to close. . Run the tapestry needle and yarn through the small circle of raised stitches again a few times to augment the height (optional). . Push the tapestry needle down through the center of the hat top and weave in remaining ends. More information and project photos are available on our web site at KnittingNuances.com/Learn.
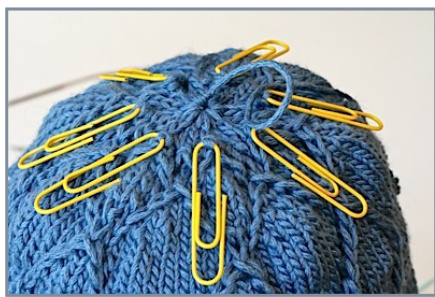
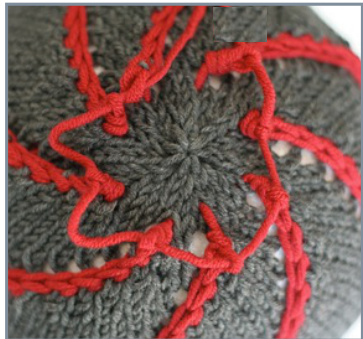
For demonstration purposes, the raised stitches were placed on holders (OK, paperclips) to separate them. The tail has been run through the lower stitches ready to be pulled tight. For this 2-color Galaxy Hat, the lower tier is closed with the gray yarn while the upper stitches will be closed with the contrasting red yarn.
Adapting Existing Patterns
These hats use 8 deceases every other round, which is typical for hat shaping. At the top there are 8 sets of 2 (16 stitches) remaining. For our patterns one of these stitches is a raised Showy Decrease. If you're using another pattern, decrease until you have 2 stitches for each decrease set. Split the stitches in half as above, closing every other stitch on the lower layer and slipping the others to close on top. We recommend no fewer than 6 sets of stitches (12 total) for this technique.
Star Top Option
Cut a 15" tail. After you've pulled the lower layer tight, knit 1 more round with the upper layer stitches for this star effect.


