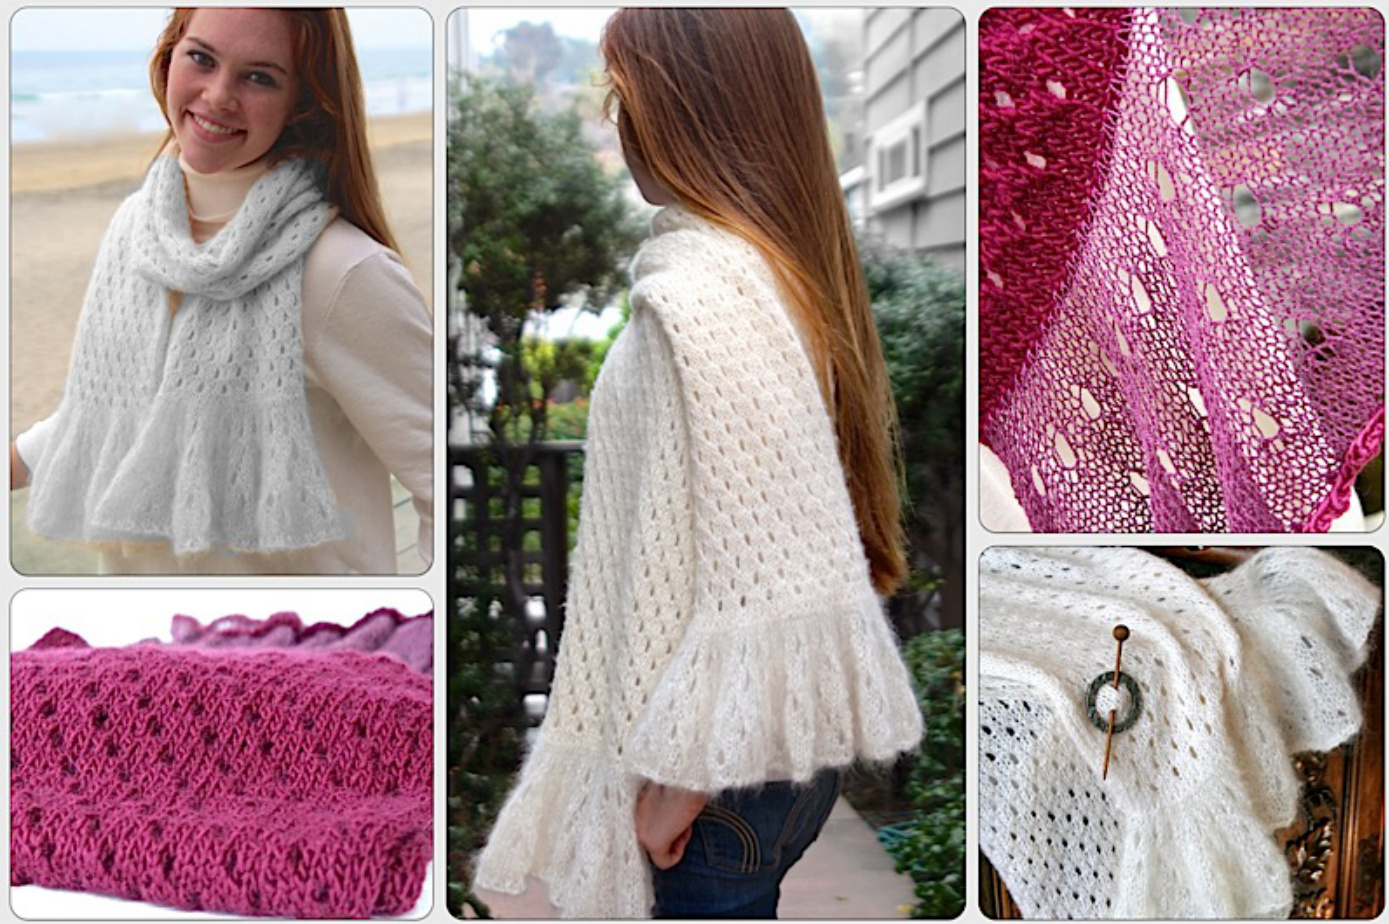
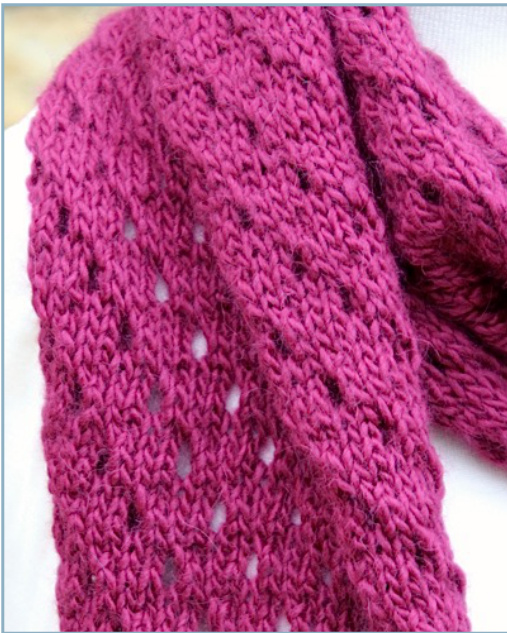
Late Harvest Shawl
Subtle texture and beautifully formed eyelets are the foundation for this simple but dramatic shawl.
Part of our trio of free introduction to Showy & Subtle Decrease patterns. Available as a booklet on Ravelry.
What's Inside .
Online Extras
Detailed pattern w/Tables & Charts New Knitting Nuances skills including the Subtle Decrease, Perfect Eyelet and Double Eyelet Increase Pattern links to online tips, detailed Photobucket pictures & blog posts Download chart files to load onto your phone or tablet More project tips and technique help.
Late Harvest Shawl
From the Designer
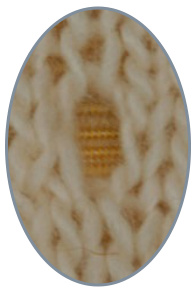
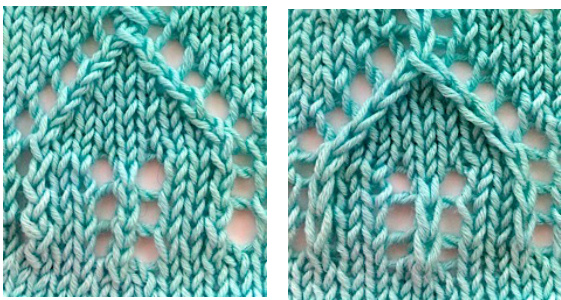
The Harvest pattern highlights the most basic element of our Knitting Nuance skills - the perfect eyelet. And while it might seem almost too simplistic to base an entire shawl on such a simple idea, there's more here than meets theeye.
If you haven't yet had a chance to read about our Showy & Subtle Decrease this project is a great jumping off point. Here are some resourcesforyou: 1. There's a summary page at the end of this pattern. 2. You can check our before and after photos of this stitch pattern on our Photobucket site at s1013.photobucket.com. Link below. 3. Our blog has instructions for an Eyelet Experiment you can try. 4. There is a trio of hat designs that highlight different ways to use Showy or Subtle Decreases: the Vortex, Rip Cord & Yosemite.
Scarf or Shawl? Gauge?
The size and gauge is pretty much all up to you. Decide what you're knitting, pick your yarn, knit it slightly looser than the ball gauge (not too loose or you'll lose the structure), knit a swatch to test the pattern out and then go for it. The table below provides cast on numbers for your selected number of repeats. The pattern is based on stockinette which can roll a bit, so you will want 8 repeats at a minimum. We've incorporated an anti-roll edge to offset this. Store it flat vs. hanging it. More pictures and examples are available on our Photobucket.com site. everdriven by fields of freshly planted crops you'll recognize the inspiration for this simple but elegant shawl. Rows and rows of plants separated by a mound of soil. The symmetry of man and beauty of nature.
The Interactive Knitting Pattern
·You're Connected with links throughout the PDF file taking you to additional online information; more project details, more tips & photos. · It's portable; download PDF file onto your computer, laptop or phone & take us along. Chart files are also downloadable. · Don't forget to check out our blog at blog.knittingnuances.com for our Perfect Eyelet Experiment.

| CastOnExamplesforScarforShawl (multipleof4plus10stitches) | ||||||||||
| Repeats | 8 | 10 | 12 | 14 | 16 | 18 | 20 | 25 | 30 | 35 |
| CastOnStitches | 42 | 50 | 58 | 66 | 74 | 82 | 90 | 110 | 130 | 150 |
To determine cast on, multiply Desired Width by Gauge and divide by 4. Round down to the closest number of repeats to find cast on. → Example 1: 10" wide scarf x 5 sts per 1" = 50 sts divided by 4 = 12.5 repeats. Use 12 repeats and cast on 58 stitches.
Late Harvest Shawl
Reference Sheet
| Gauge | Size |
| Gauge is flexible for this project. Samples: Yarns have a label gauge of 5.5 and 5.0 st per 1" w/ US 8. However, they were knit on a Us 9 (5.5 mm) at a slightly looser gauge. | Adaptabletoyourgauge. Shawls are 15" wide by 60" long, plus a 5-6" ruffle on each end. |
| Yarn | Notions |
| Main Yarn: Smooth and soft yarn. Wool blends with alpaca orcashmere would workwell. Ruffle Yarn: 200 yds, thin mohair, mohair/silk, or lace merino, i.e. Kid Seta or Kids Silk Haze Sample 1:KarabellaBoise(50%cashmere / merino blend) 50g/163 yds, 400 yds Used Sample 2: 2 skeins Cascade Highlands Duo (70% baby alpaca / 30% merino), 100g/179 yds, Classic Elite SilkyAlpaca for ruffle Other yarn ideas include: Debbie Bliss Andes or Malabrigo Silky Merino. | Knitting needles to knit to gauge or slightly larger. You may want to use a circular needle for the shawl. Tapestry needle Stitch markers: 2 (optional) |
| knit RS:knit stitch WS: purl stitch | kin stbelow |
| RS:Knit into stitch below, inserting needle fromfront through the st in the row below WS:Purlstitchinthe rowbelow, inserting needle from behind throughthestin the rowbelow | |
| k2tog RS:Knit two stitches togetheras one stitch WS:Purl2stitchestogether | |
| purl RS: purl stitch WS: knit stitch | |
| slip RS: Slip stitch as if to purl, holding yarn in back WS: Slip stitch as if to purl, holding yarn in front | |
| yo | RS:Yarn Over WS:Yarn Over |
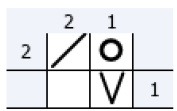
Chart Legend
Table Abbreviations
| k,p | knit or purl |
| k1rb | knit 1in the row (eyelet) below. |
| k2tog | knit2together |
| sl | slip as if to purl |
| yo | yarnover |
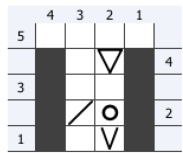
Knit 1 in the row (eyelet) below
When you get to this point insert your needle into that great big yarn over hole and knit one. This creates a larger eyelet with great structure and further integrates the rows.
Right & Wrong Sides vs Front & Back
The Right Side is the public (usually pretier) side of the fabric. The Wrong Side is the inside non-visible side of the project. → The Front is the side facing you as you knit that row. The Back is the side you can not see as you're knitting. When you're purling in Stockinette, that's the front side. The "V" symbol means the horizontal yarn bar from the slip stitch does not show on the Right Side. The instructions 'slip wyif' on the purl side mean the bar shows as you work it, but not when viewed from the Right Side.
Late Harvest Shawl
Knitting Instructions
Use the table on page 2 to help determine the number of stitches to cast on. A nice stretchy cast on is important for proper drape. Work Long Tail Cast On, placing markers 5 stitches from each end. > Knit 4 rows of stockinette establishing the edge stitches. The integrated i-cord edges pull short at first so you'll add an extra i-cord row at the very beginning. Here'show: - Row 1 (WSR): p3, k1, purl to last 4 sts, k1, sl3 wyif - Row 2 (RSR): k3, [slide back to left needle and k3 again], p1, knit to last 4 sts, p1, sl3 - Row 3 (WSR): p3, [slide back to left needle and p3 again], k1, purl to last 4 sts, k1, sl3 wyif - Row 4 (RSR): k3, p1, knit to last 4 sts, p1, sl3 > Knit Harvest pattern to the desired length ending with either row 4 or 8. -Leave a few extra yards of main yarn for binding off the ruffle (optional). > Knit 3 rows of stockinette (maintaining i-cord edges) > Bind off loosely. > Follow instructions for the ruffle on the next page.
| Row | Side | Edge Sts. | Repeat | Edge Sts. |
| Row 1 | WSR | p3, k1, p1 | ¥ p3, sl1 wyif | p1, k1, sl3 wyif |
| Row 2 | RSR | k3, p1, k1 | yo, k2tog, k2 | k1, p1, sl3 |
| Row3 | WSR | p3, k1, p1 | purl tolast5sts | p1, k1, sl3 wyif |
| Row 4 | RSR | k3, p1, k1 | k1rb, k3 *k1, p1, sl3 | k1, p1, sl3 |
| Row5 | WSR | p3, k1,p1 | p1, sl1 wyif, p2* | p1, k1, sl3 wyif |
| Row 6 | RSR | k3, p1, k1 | k2, yo, k2tog *k1, p1, sl3 | k1, p1, sl3 |
| Row 7 | WSR | p3, k1, p1 | purl to last 5 sts | p1, k1, sl3 wyif |
| Row 8 | RSR | k3, p1, k1 | k2, k1rb, k1 | k1, p1, sl3 |
Harvest Pattern
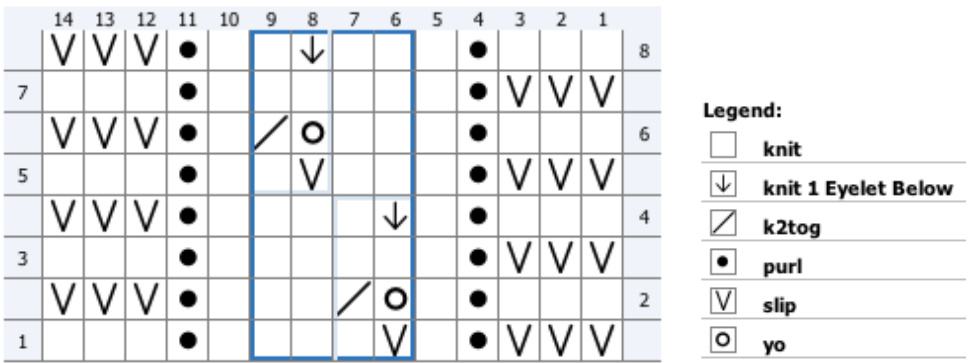
Chart downloads for this pattern are on our web site at KnittingNuances.com/help. This link does not show in the menu bar so just type "/help" from the home page.
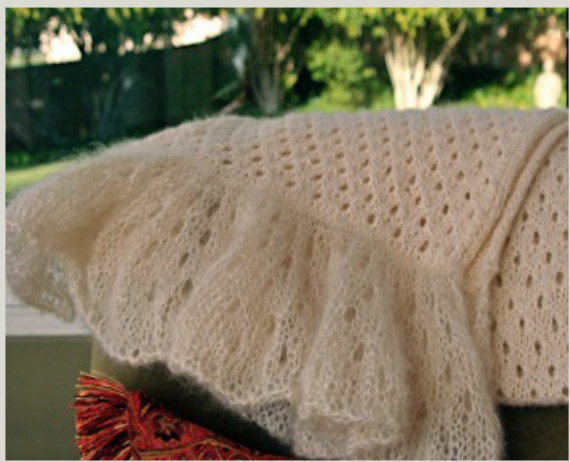
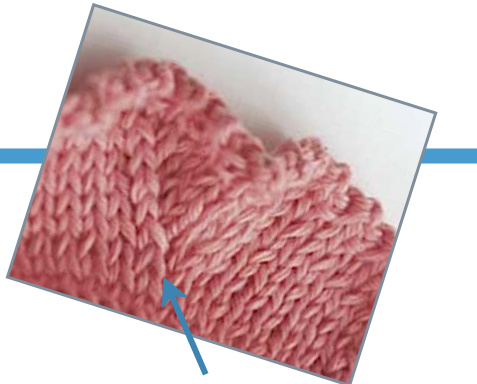
Integrated i-cord edgesblend seamlessly with the smooth look of the Harvest pattern. No messy garter edgeshere.
Helpful Tips:
Change yarn 5 stitches in from edge instead of at the end of the row (inside the integrated i-cord). Slip stitches in this pattern are all worked so that the yarn is on the wrong side. You'll purl them at the start of wrong side rows and knit them at the start of right side rows. The yarn is already on the correct side for sliping. i-cords are not as stretchy as regular knitting. It helps to add an extra row of icord every 4 or 5 inches like you did for the first few rows above. Both rows 1 and 5 are worked with p3, sl1 \*. The middle of those purl stitches should line up above the previous eyelet. Once you get that down you may not even need to carry the pattern! If you would like to see a chart with multiple repeats so you can see how the eyelets flow together, you can download it. See note below.
Late Harvest Shawl
Ruffle Instructions
The Double Eyelet Increase creates a light airy ruffle. It's the same Subtle Eyelet from the main pattern with a twist. Now it's a base for the increases. A separate tutorial page for the Double Eyelet Increase has been included in your pattern. You can bind off with the main yarn for added contrast. Use the same size needle as the shawl. Big Tip! I'm a fan of charts and detailed instructions, however, in this case, after the initial set up, it's easier to just go with the flow. → Knit the 1st eyelets. Offset the following sets. The result is four times as many stitches as you cast on, with well spaced, big fat eyeletsthroughout. Here are the logical instructions (we still include the standard ones below). Four sets of eyelets rows are worked as follows. 1. Work the repeat of the set up rows to the right, followed by the Double Eyelet Increase 2. Knit stockinette for 4 rows 3. Work the 2nd set of increases in between the 1st so they are offset. 4. Knit stockinette for 4 rows then the 3rd set of increases lined up with the 1st set. 5. Knit stockinette for 4 rows then the 4th set of increases lined up with the 2nd set. 6. Knit 4 rows of stockinette and bind off loosely with main yarn. This chart looks more complicated than it is. Just follow the common sense instructions above, sincesmallvariationswill not matter.
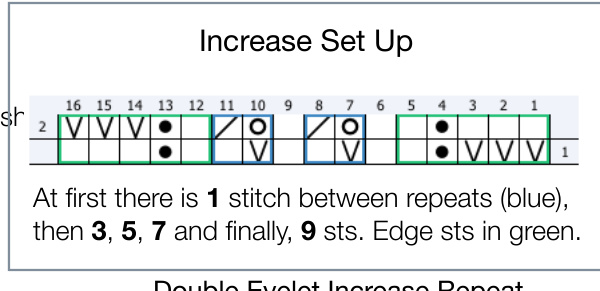
Here are the first two sets. Did I mention going with the flow is easier?
| Row | Side | Edge Sts. | Repeat | Edge Sts. |
| Row3 | WSR | p3, k1,p1 | *[p1,sl1wyif], p1* | p1, k1, sl3 wyif |
| Row 4 | RSR | k3, p1, k1 | k1, [yo, k2tog]* | k1, p1, sl3 |
| Row 5 | WSR | p3, k1, p1 | purl tolast5sts | p1, k1, sl3 wyif |
| Row 6 | RSR | k3, p1, k1 | *k1, [dei, k1]* | k1, p1, sl3 |
| Row 7-8 | Both | edge sts. | knit4rowsofstockinette | edge sts. |
| Row9 | WSR | p3, k1, p1 | p3,*[p1, sl1wyif], p3* p2 | p1, k1, sl3 wyif |
| Row 10 | RSR | k3, p1, k1 | k2, *k3, [yo, k2tog]* k3 | k1, p1, sl3 |
| Row 11 | WSR | p3, k1, p1 | purltolast5sts | p1, k1, sl3 wyif |
| Row 10 | RSR | k3, p1, k1 | k2,*k3, [dei, k1]* k3 | k1, p1, sl3 |
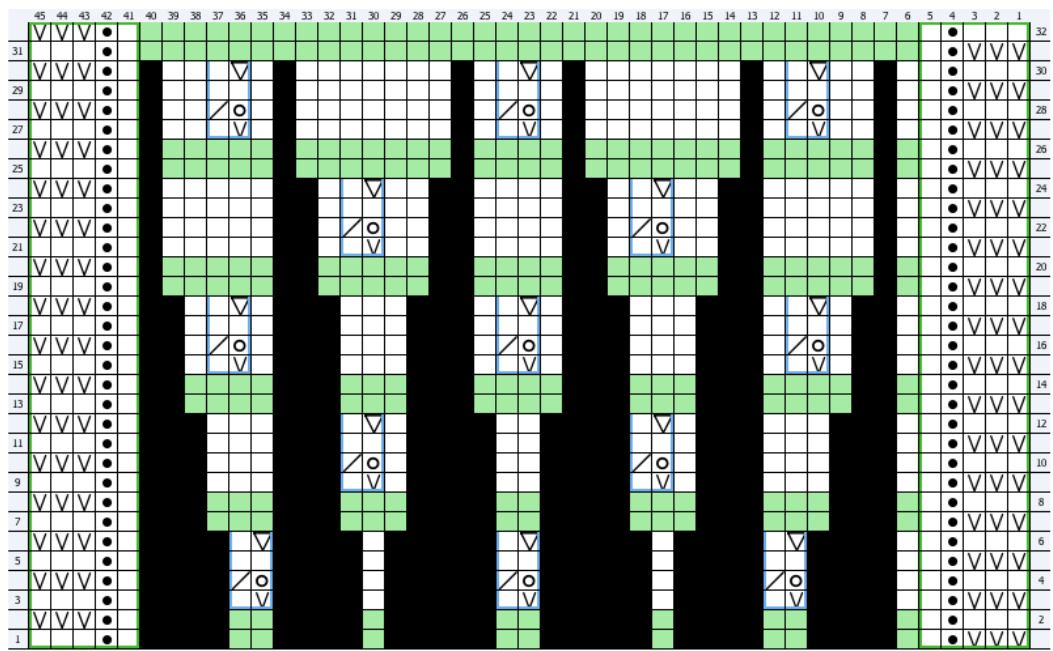
Double EyeletIncrease RS: knit 3 into next st: 1st into the eyelet on the row below, then a knit stitch and one more into the eyelet. Results in a 2bl increase. - Repeats outlined in blue - Edgesstitches outlined in green -Green blocks = knit 4 rows St st
| knit | |
| k2tog | |
| DoubleEyeletIncrease | |
| purl | |
| slip | |
| yo | |
| NoStitch |
Chart downloads for this pattern are on our web site at KnittingNuances.com/help. This link does not show in the menu bar so type "/help" after the home page URL.
Introduction to Showy & Subtle Decreases
Overview
Two of the most common decreases, knit-2-together and slip-slip-knit, are getting a makeover. The result is two distinctive decreases: one that has less impact, and the other that pops off the fabric creating a new design element. The key to these decreases is to set them up on the row before by slipping one of the two stitches to be knit together on the next row. Which one you slip depends on what you'd like the stitch to do - hide or highlight. Both have right and left leaning versions, and can work alone as a true decrease or with a variety of increases, like the yarn over, to create new stitch patterns.
The Subtle Decrease
The Subtle Decrease uses the slip stitch in the row below to eliminate a purl bump. Now the slip stitch can slide easily behind its partner. This minimizes the ridge between the decrease and the fabric. Take a look at the Subtle Right chart. Picture how your needle will enter the two stitches ... first through the knit stitch, then the slipped stitch to its right. The Subtle charts show a true decrease, such as you might use in waist or arm hole shaping or the ruffle shown above. You could run a series of Subtle Decreases with the eyelet, but this will be more common.
The Showy Decrease
But what if you wanted the decrease to show? This time we'll reverse the order and you'll see what happens when the slipped stitch sits on top. Compare the chart for the Showy Right Decrease to the Subtle Right Decrease above it: The slip stitch is now on the left. It will be the first one your needle enters as you work the k2tog decrease. As a result, the elongated stitch is sitting on top of its partner rising above the knit fabric. In both Showy Decrease charts, the yarn over is on the outside of the decrease. This is the set up for a string of diagonal decreases as shown in the pattern to the right.
The Left Leaning Decrease (ssk)
The traditional, right-slanting k2tog is pretty straight forward and well behaved. It doesn't require any fiddling with stitches and lies pretty well in the fabric. But its left leaning cohort has always been a bit wonky . The stitches of the left slanting decrease need to be reoriented in order to lie flat (ssk) and, try as we might, the two just never looked exactly the same ... until now. The right and left slanting Showy Decreases are perfectly matched and the Subtle versionslookmorealikeandarelessnoticeablethanbefore. Joining decreases and more ... With the Showy Decrease you can join right and left decrease line in ways that have just not been possible before. And just wait till you see what the Showy Decrease can do for hat tops! More pictures and examples are available on our Photobucket.com page. Note: Many have searched for matching or less noticeable decreases so you will find other alternativesfromotherknitters if yousearchfor themonline.
Subtle Decrease
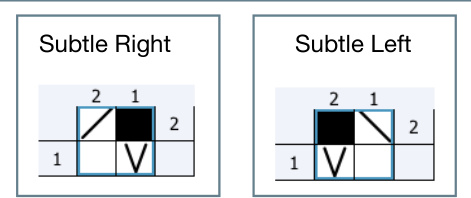
The needle enters the regular stitch first.
Showy Decrease

Both yo's sit outside & slip stitches are positioned so the needle enters them first.
Before & After
Not only to the right and left leaning decreases match, they rise up off the fabric, adding more texture..
WantMoreInformation?
You can find it on our web site. Our blog has an entire category dedicated to the Showy Decrease with detailed posts that include sample swatches.
| 口 knit |
| k2tog |
| △ ssk |
| slip |
| yo |
Blog.KnittingNuances.com


