THE BRAUE BUNDLE
A granny square baby blanket, and a cozy cap. BY: DYE LOT 23 This pattern is the property of DYE L0123 and Brave Bundles. It may be printed for personal use only. Distribution of this pattern, including but not limited to, images, diagrams, and text for any reason is not permitted. This pattern may not be distributed in print or electronic form. Finished products created from this pattern may be sold by the maker of the finished item but please link back to the DYEL023 Ravelry or Etsy shop and the Brave Bundles Facebook page. Copyright @ 2014
The Brave Bundle
A Note from DYE L0T23 Hi, I'm Anny, the owner and designer of DYE LOT23. I started my business this year and am taking advantage of the opportunities that come across my path. That's how I ended up partnering with Brave Bundles. Another designer shared their page and I sent Kerri and Rebecca an email. That's all it took, because in the handmade community there is an overwhelming desire to see everyone succeed. It hasn't always been easy since I opened my shops, but I love working in this industry, because it's a community where we lift each other up and take joy in the success of others. I've been blessed by this partnership, so please consider supporting other families in need with this pattern, and send a bundle to Brave Bundles.
About Brave Bundles
The mission of Brave Bundles is to provide baby blankets for military families who have babies while stationed overseas, and to military families in the United States who are welcoming a new addition while a spouse or significant other is deployed. What started with a request from a friend to make blankets for their military unit has blossomed into an effort to provide this touch of comfort and home to as many military families as possible. If you have questions regarding the blankets, or know of a military unit that would like to receive blankets from us, please email bravebundles@gmail.com. You can also find us on Facebook: www.facebook.com/bravebundles. Thank you to all the men and women that serve, and have served in the armed forces. We appreciate your sacrifice.
What I Used
6 Skeins Lion Brand Heartland Yarn — Medium, Worsted Weight (4) — 2 Skeins of Each Color JHook Iypes or stitcnes Adjustable Ring Puff Stitch: PUFF Beginning Double Crochet Cluster: Beg DC Cluster Reverse Single Crochet: RSC Chain: CH Single Crochet: SC Double Crochet: DC Single Crochet 2 Together: SC2TOG Double Crochet Cluster: DC Cluster Slip Stitch: SS Double/Treble Decrease: DBL/TR DEC Treble Crochet: TR Half Double Crochet: HDC V Stitch
Skill Level: Intermediate
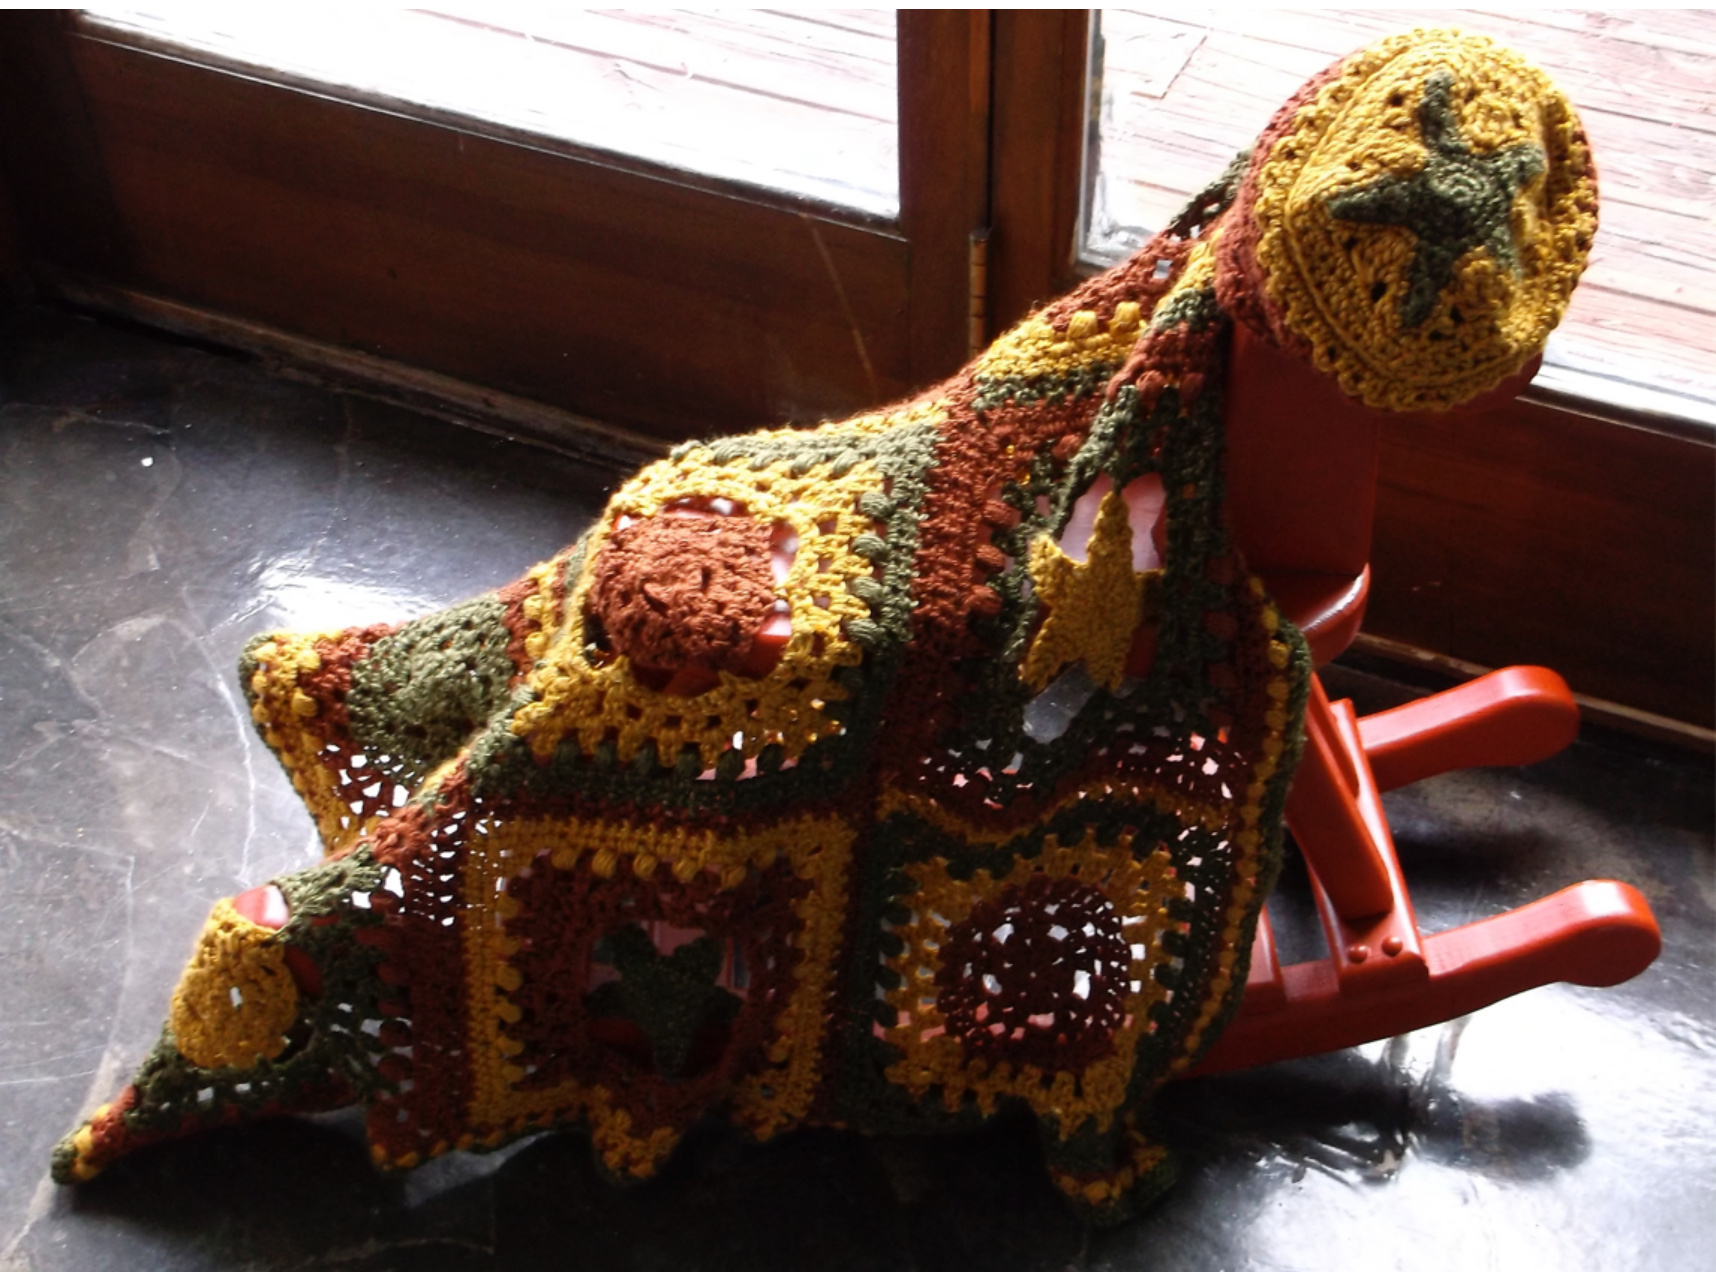
Finished Dimensions: Blanket 32 inches x 32 inches Color Scheme Color A: Yosemite Color B: Yellowstone Color C: Joshua Tree
SpecialStitches
Adjustable Ring: Holding your yarn in your right hand drape the tail of the yarn over your index finger on your left hand. Make two loops on your middle finger, wrapping from back-to-front. Insert your hook into the two loops on your finger and pull a loop of the yarn through both loops. Chain 1, complete the required stitches in the circle according to the pattern. Once you have completed enough stitches pull the tail (not the working yarn) to close. Join with a slip stitch in the first stitch. Beginning Double Crochet Cluster (beg dc cluster): Ch 2, yarn over (yo), insert hook into same stitch as ch 2. Pull up a loop, yo, pull through 2 loops. Yo, pull through both lops. Double Crochet Cluster (Dc Cluster): (Yo, insert hook in designated stitch and pullup a loop. Yo, pull through two loop.) Twice. YO, pull through remaining loops. Double/Treble Decrease (Dbl/Tr dec): Yo, insert hook in next stitch and pull up a loop. Yo and pullthrough two loops. Skip one stitch, \*yo twice. Insert hook in next stitch and pull up a loop. (Yo, pull through two loops), twice. Repeat from once. Skip on stitch, yo over. Insert hook in next stitch and pull up a loop. Yo, and pullthrough two loops. Yo, and pull through remaining loops. Puff Stitch (PUFF):(Yo, insert hook in designated stitch and pullup a loop) 5 times. Yo, pullthrough alloops. Chain 1. Reverse Single Crochet (rsc): Working from left to right, insert your hook into the first stitch, yo and pull up a loop. While pulling up your loop twist your wrist and hook so that both loops are on the hook and the yarn you drew through the stitch is closest to the hooked part of the hook. DO NOT PULL THE NEW LOOP THROUGH THE FIRST LOOP! Yarn over and draw through bothloops. Single Crochet 2 Together (sc2tog): Insert hook into stitch and pullup a loop. Insert hook in next stitch and pullup a loop. Yo, and pull through all loops. This decreases by one stitch. V Stitch: Double crochet, ch 1, double crochet in the same stitch.
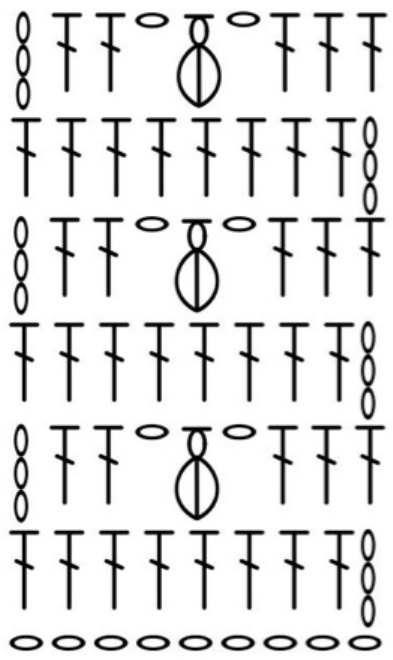
Polka Dot Square
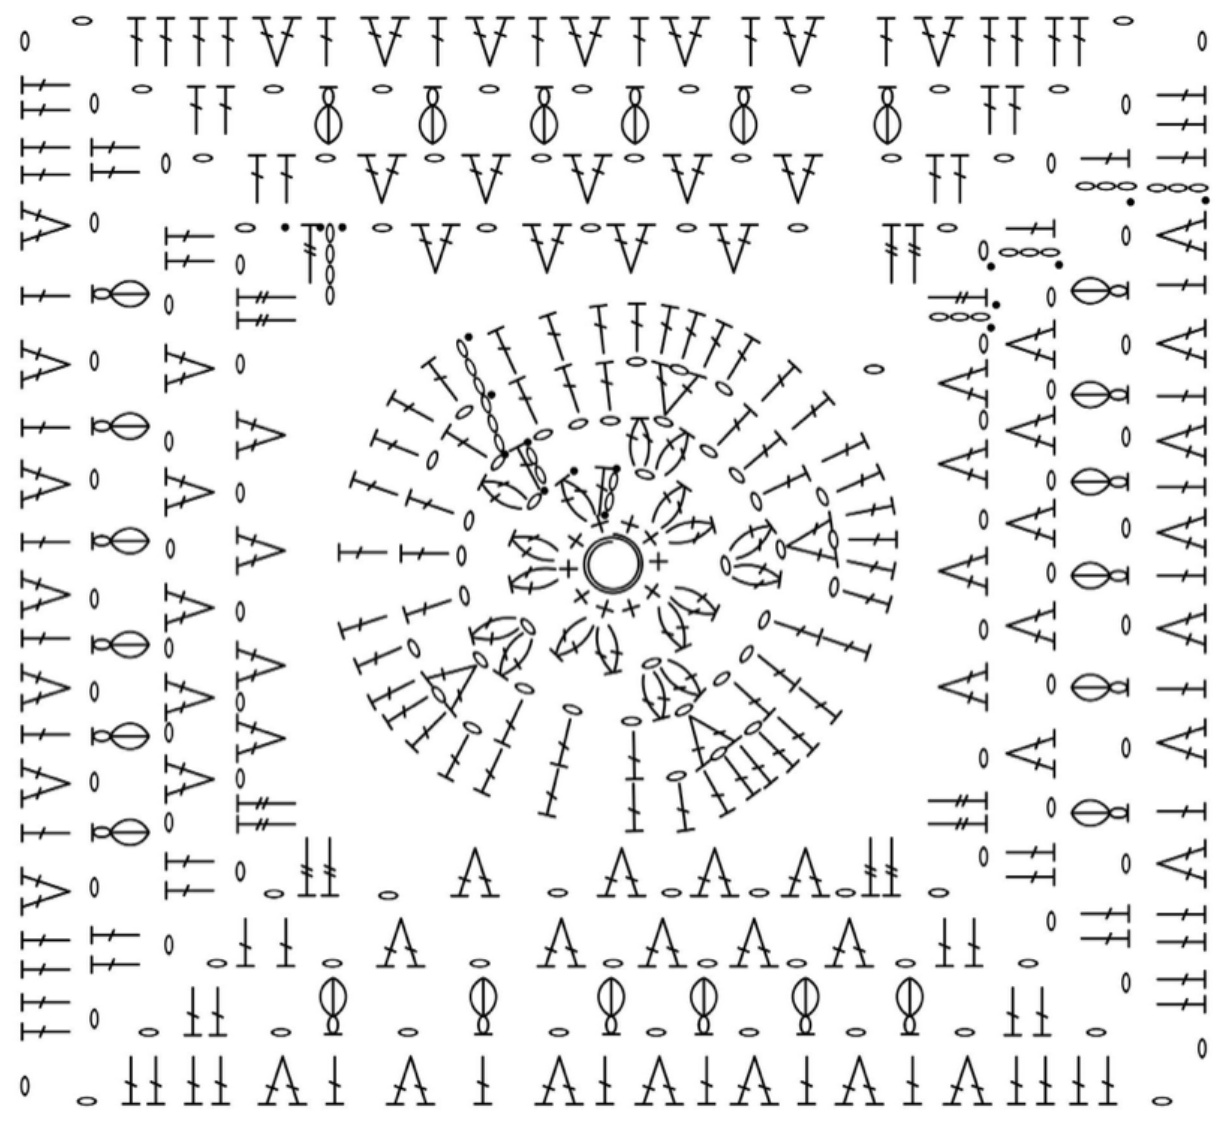
Stitch Legend 2 DC in 1 Stitch Adjustable Ring Beginning Cluster Chain Chain 3 Chain 4 Double Crochet DC Cluster Puff Stitch Single Crochet Slip Stitch Treble Crochet V Stitch
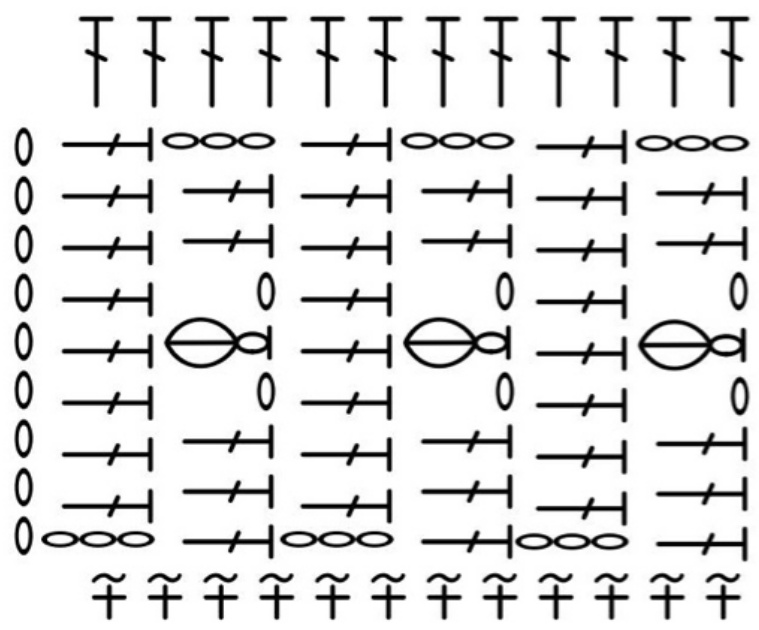
Triangle Square
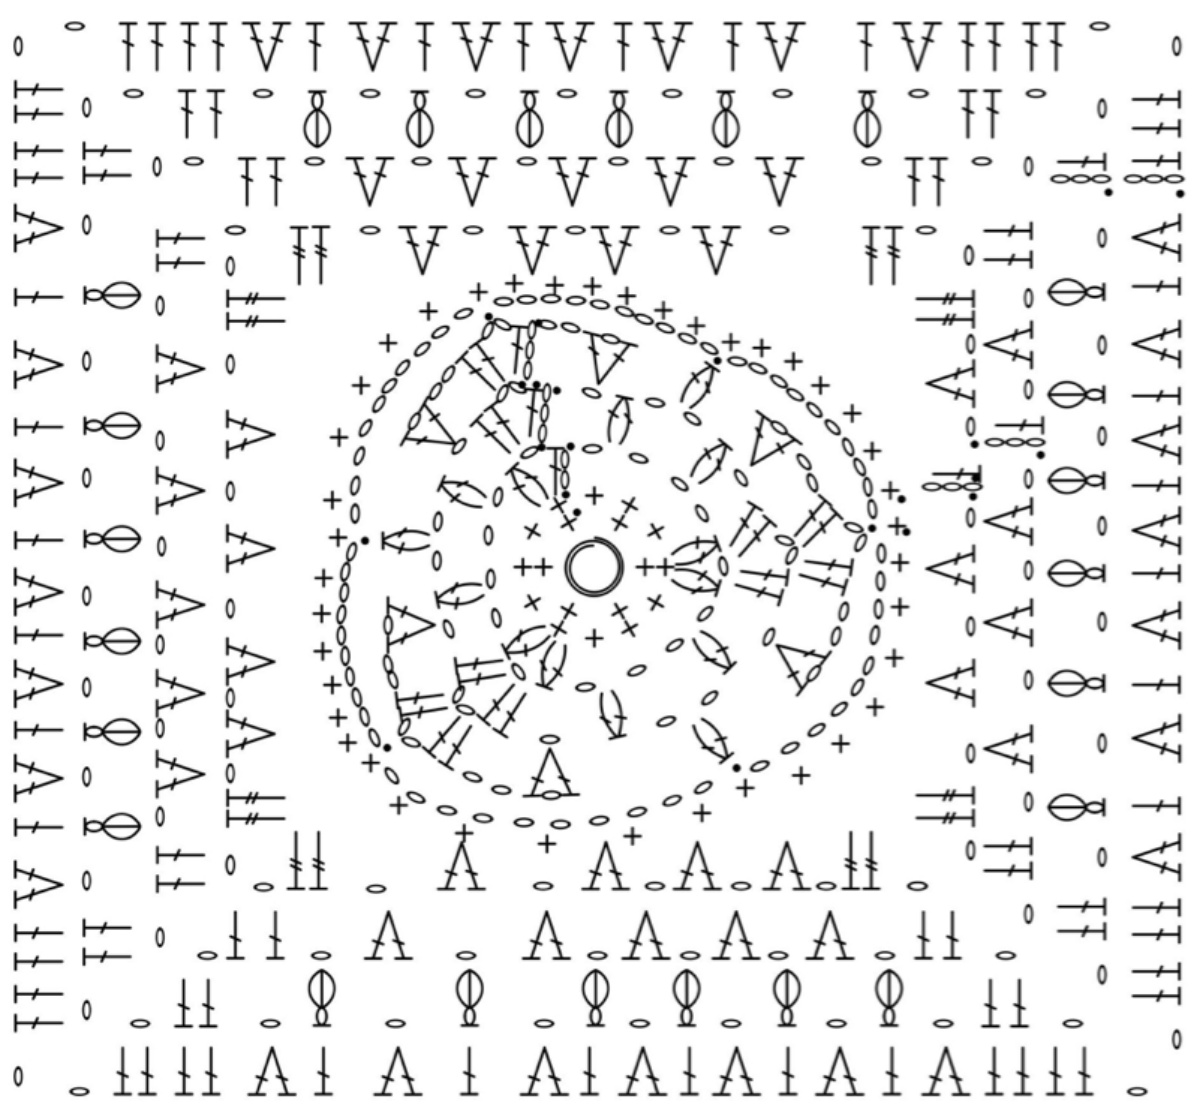
Stitch Legend 2 DC in 1 Stitch Adjustable Ring Beginning Cluster Chain Chain 3 Double Crochet DC Cluster Puff Stitch + Single Crochet Slip Stitch Treble Crochet V Stitch
Star Square
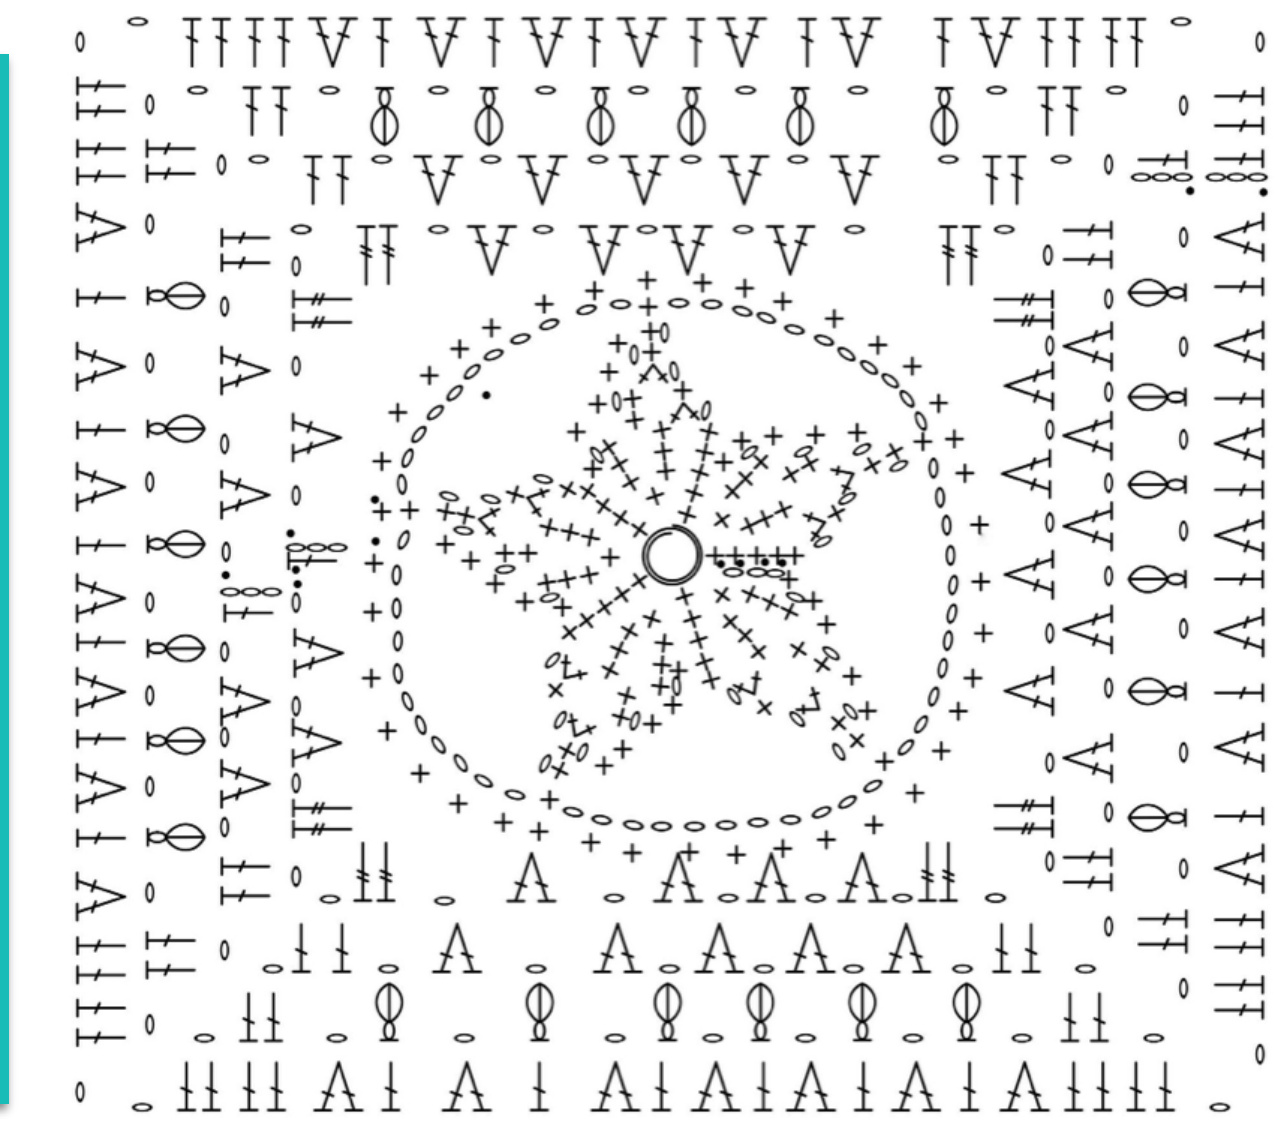
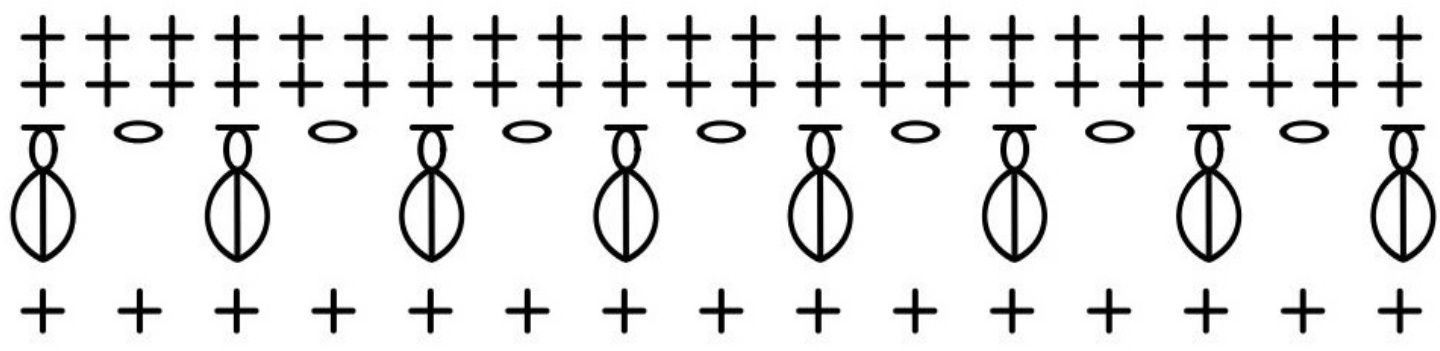
The remaining diagrams use the stitches previously shown in the stitch legends on pages 3 -5. The one exception is the hat band which uses a Reverse Single Crochet. The symbol looks like this: 十 Blanket Edging
Vertical Join
Horizontal Join with Joining in Center
++++++
Cap Band
Cap Band After Joining with Edging and Base of Cap
The Brave Bundle Blanket Instructions
Polka Dot Square: Make 3
:h square will follow the same instructions, but with a different color scheme.
| Polka Dot Square 1 | Polka Dot Square 2 | Polka Dot Square 3 |
| Adjustable Ring - Round 4: Color A | Adjustable Ring - Round 4: Color B | Adjustable Ring - Round 4: Color C |
| Rounds5-6:ColorB | Rounds5-6:ColorC | Rounds5-6:ColorA |
| Rounds7-8:ColorC | Rounds7-8:ColorA | Rounds7-8:ColorB |
With appropriate color make an Adjustable Ring with 10 sc in the ring. Round 1: Beg dc cluster, work a dc cluster in the same stitch. Ch 1, Skip the next stitch. \*2 dc clusters in the next stitch, ch 1, skip the next stitch. Repeat from \* around. Join with a ss in the top of the beg dc cluster. - 10 clusters, 5 ch 1 spaces Round 2: SS to the next ch 1 space. Work a beg dc cluster in the same space. Ch 1, in the same space work dc cluster, ch 3. \*In the next ch 1 space work (dc cluster, ch 1, dc cluster), ch 3. Repeat from \* around. Join with a ss in the top of the beg dc cluster. —- 10 clusters, 5 ch 1 spaces, 5 ch 3 spaces Round 3: SS to the next ch 1 space. Ch 4 (counts as dc, ch 1), dc in the same space. Ch 1, work 3 dc in the ch 3 space. \* Ch 1, V stitch in the next ch 1 space. Ch 1, work 3 dc in the next ch 2 space. Repeat from \* around. Ch 1, join with a ss in the third chain of beginning ch 4. — 25 dc, 15 ch 1 spaces Round 4: Ch 3 (counts as a dc here and throughout), dc in each st and ch 1 space around. Join with a ss in the top of the beginning ch 3. Fasten off. — 40 dc Round 5: Join the next color with a ss in any stitch. Ch 4 (counts as a tr here and throughout), in the same stitch work (tr, ch 2, 2 tr). \*(Ch 1, skip the next stitch, 2 dc in the next stitch), four times. Ch 1, skip the next stitch, work (2 tr, ch 2, 2 tr) in the next stitch. Repeat from \* twice. (Ch 1, skip the next stitch, 2 dc in the next stitch), four times. Ch 1, join with a ss in the top of the beginning ch 4. — 16 tr, 4 ch 2 spaces, 32 dc, 20 ch 1 spaces Round 6: SS to the corner ch 2 space. Ch 3, in the same space work (dc, ch 2, 2 dc). \*(Ch 1, work 2 dc in the next ch 1 space), five times. Ch 1, in the ch 2 space work (2 dc, ch 2, 2 dc). Repeat from \* twice. (Ch 1, in the next ch 1 space, work 2 dc), five times. Ch 1, join with a ss in the top of the beginning ch 3. Fasten off. — 4 ch 2 spaces, 56 dc, 24 ch 1 spaces Round 7: Join the next color with a ss in any corner ch 2 space. Ch 3, in the same space work (dc, ch 2, 2 dc). \*(Ch 1, Puffin next ch 1 space), six times. THE CH 1 THAT IS PART OF THE PUFF IS NOT THE CH 1 IN THE REPEAT! Ch 1, work (2 dc, ch 2, 2 dc) in the corner ch 2 space. Repeat from \* twice. (Ch 1, Puff in the next ch 1 space), six times. Ch 1, join with a ss in the top of the beginning ch 3. — 4 ch 2 spaces, 16, dc, 24 Puffs, 28 ch 1 spaces Round 8: Ch 3, dc in the next st. Work (2 dc, ch 2, 2 dc) in the corner ch 2 space. On each side work 1 dc in each stitch and 2 dc in each ch space. In each corner ch 2 space work (2 dc, ch 2, 2 dc). Join with a ss in the top of the beginning ch 3. Fasten off. — 112 dc, 4 ch 2 spaces
The Brave Bundle Blanket Instructions - Continued
Triangle Square: Make 3
ich square will follow the same instructions, but with a different color scheme Triangle Square 1 Triangle Square 2 Triangle Square 3 Adjustable Ring - Round 4: Color A Adjustable Ring - Round 4: Color B Adjustable Ring - Round 4: Color C Rounds 5 - 8: Color B Rounds 5 - 8: Color C Rounds 5 - 8: Color A Rounds 9 - 10: Color C Rounds 9 - 10: Color A Rounds 9 - 10: Color B With appropriate color make an Adjustable Ring with 6 sc in the ring. Round 1: Ch 1, work 2 sc in each stitch around. Join with a ss in the 1st sc. — 12 sc Round 2: Beg dc cluster, ch 1, dc cluster in the same stitch. Ch 4, skip 3 stitches. \*In next stitch work (dc cluste ch 1, dc cluster). Ch 4. Repeat from \* around. Join with a ss in the top of the beg dc cluster. —- 6 clusters, 3 1spaces3 ch4spaces Round 3: SS to the next ch 1 space. Ch 3 (counts as a dc here and throughout), in the same space work (dc, ch 2, 2 dc). \*Ch 1, in the ch 4 space work (dc cluster, ch 2, dc cluster). Ch 1, in the ch 1 space work ( 2 dc, ch 2, 2 dc). Repeat from \* once. Ch 1, in the ch 4 space work (dc cluster, ch 2, dc cluster). Ch 1, join with a ss in the top of the beginning ch 3. -- 12 dc, 6 dc clusters, 6 ch 2 spaces, 3 ch 1 spaces Round 4: SS to the ch 2 space, ch 3. In the same space work (dc, ch 2, 2 dc). \*Ch 2, V stitch in the next ch 1 space. Work a dc cluster in the next ch 2 space. V stitch in the next ch 1 space, ch 2. Work (2 dc, ch 2, 2 dc) in the next ch 2 space. Repeat from \* once. Ch 2, V stitch in the next ch 1 space. Work a dc cluster in the next ch 2 space. V stitch in the next ch 1 space, ch 2. Join with a ss in the top of the beginning ch 3. — 24 dc, 3 clusters, 9 ch 2 spaces, 6 ch 1 spaces Round 5: Join the next color with a ss in any corner ch 2 space. \*Ch 10, ss in the next cluster, ch 10, ss in the next corner ch 2 space. Repeat from \* once. Ch 10, dc ss in the next cluster, ch 10. Join with a sc in the beginning ss. The joining sc is counted as a stitch in round 6 and used in round 7. — 5 ss, 1 sc, 6 ch 10 spaces Round 6: \*Work 5 sc in the first ch 10 space (work the stitches loosely and slide them down the ch 10 space s0 that they stretch as much as possible). SC in the next ss, work 6 sc in the next ch 10 space. SC in the next ss. Repeat from \* once. Work 6 sc in the next ch 10 space, sc in the next ss, work 6 sc in the ch 10 space. Join with a ss in the sc made in round 5. — 40 sc Round 7: SS to the next stitch, ch 3, work a dc in the same space. Ch 1, skip the next stitch, work 2 dc in the next st. \*Ch 1, skip the next stitch. In the next stitch work (2 tr, ch 2, 2 tr). (Ch 1, skip next stitch. Work 2 dc in the next stitch), four times. Repeat from \* twice. Ch 1, skip the next stitch. In the next stitch work (2 tr, ch 2, 2 tr). (Ch 1, skip next stitch. Work 2 dc in the next stitch), twice. —16 tr, 32 dc, 4 ch 2 spaces, 20 ch 1 spaces Round 8: SS to next ch 1 space, Ch 3, work a dc in the same space. Ch 1, work 2 dc in the next ch 1 space. \*Ch 1, in the next ch 2 space work (2 dc, ch 2, 2 dc). (Ch 1, work 2 dc in the next ch 1 space), five times. Repeat from \* twice. Ch 1, work (2 dc, ch 2, 2 dc) in the next ch 1 space. (Ch 1, work 2 dc in the next ch 1 space), three times. Fasten off. — 4 ch 2 spaces, 56 dc, 24 ch 1 spaces
The Brave Bundle Blanket Instructions — Continued
Triangle Square — Continued
Round 9: Join the next color with a ss in any corner ch 2 space. Ch 3, in the same space work (dc, ch 2, 2 dc). \*(Ch 1, Puff in next ch 1 space), six times. THE CH 1 THAT IS PART OF THE PUFF IS NOT THE CH 1 IN THE REPEAT! Ch 1, work (2 dc, ch 2, 2 dc) in the corner ch 2 space. Repeat from \* twice. (Ch 1, Puff in the next ch 1 space), six times. Ch 1, join with a ss in the top of the beginning ch 3. — 4 ch 2 spaces, 16, dc, 24 Puffs, 28 ch 1 spaces Round 10: Ch 3, dc in the next st. Work (2 dc, ch 2, 2 dc) in the corner ch 2 space. On each side work 1 dc in each stitch and 2 dc in each ch space. In each corner ch 2 space work (2 dc, ch 2, 2 dc). Join with a ss in the top of the beginning ch 3. Fasten off. — 112 dc, 4 ch 2 spaces
Star Square: Make 3
ich square will follow the same instructions, but with a different color scheme Star Square 1 Star Square 2 Star Square 3 Adjustable Ring - Round 3: Color A Adjustable Ring - Round 3: Color B Adjustable Ring - Round 3: Color C Rounds 4 - 7: Color B Rounds 4 - 7: Color C Rounds 4 - 7: Color A Rounds 8 - 9: Color C Rounds 8 - 9: Color A Rounds 8 - 9: Color B With appropriate color make an Adjustable Ring with 5 sc in the ring. Round 1: Ch 1, work 2 sc in each stitch around. Join with a ss in beginning sc. —— 10 sc Round 2: Ch 1, work 2 sc in first stitch, sc in next st. \*2 sc in next stitch, sc in next stitch. Repeat from \* around. - 15 dc
Round 3: You make the points of the star in this round. Each point is made using turned rows and then crocheting down one side to get back to the circle made with rounds 1 and 2. Once at the circle you use round 2 stitches to begin the next point, then you work in turned rows again.
Ch 1, \*sc in the next 3 stitches. — Make point. Row 1: Ch 1, turn. SC in each stitch. —— 3 sc Row 2: Ch 1, turn. SC2tog, sc in the next stitch. —— 2 sc Row 3: Ch 1, turn. SC in each stitch. —- 2 sc Row 4: Ch 1, turn. SC2tog. — 1 sc Row 5: Ch 1, turn, sc. — 1 sc Row 6: Ch 1, turn, sc. Using the sides of the end stitches from rows 1-5 sc down the side of the point. SC in the 3rd stitch you single crocheted in from round 2. Repeat from \* around (4 times) and join with a ss in the first sc. Fasten off.
The Brave Bundle Blanket Instructions — Continued
Star Square: Continued
Round 4: Join the next color with a sc in the top sc of any point. Ch 11, \*sc in the top of the next point. Ch 11. Repeat from \* around. Join with a ss in the first sc. — 5 sc, 5 ch 11 spaces. Round 5: Sc in the same stitch as the join. Work 7 sc in each ch 11 space (work the stitches loosely and slide them down the ch 11 space so that they stretch as much as possible) and 1 sc in each sc around. Join with a ss in the first stitch. — 40 sc Round 6: SS to the next stitch, ch 3 (counts as a dc here and throughout), dc in the same stitch. (Ch 1, skip next stitch, work 2 dc in the next stitch), three times. Ch 1, skip the next stitch, work (2 tr, ch 2, 2 tr) in the next stitch. \*(Ch 1, skip the next stitch, work 2 dc in the next stitch), four times. Ch 1, skip the next stitch, work (2 tr, ch 2, 2 tr) in the next stitch. Repeat from \* around. Ch 1, join with a ss to the top of the beginning ch 3. — 16 tr, 4 ch 2 spaces, 32 dc, 20 ch 1 spaces Round 7: SS to the next ch 1 space. Ch 3, dc in the same space. (Ch 1, work 2 dc in the next ch 1 space), three times. \*Ch 1, in the corner ch 2 space work (2 dc, ch 2, 2 dc). (Ch 1, work 2 dc in the next ch 1 space), five times. Repeat from \* twice. Ch 1, work (2 dc, ch 2, 2 dc) in the corner ch 2 space. Ch 1, work 2 dc in the last ch 1 space. Ch 1, join with a ss in the top of the beginning ch 3. Fasten off. — 4 ch 2 spaces, 56 dc, 24 ch 1 spaces Round 8: Join the next color with a ss in any corner ch 2 space. Ch 3, in the same space work (dc, ch 2, 2 dc). \*(Ch 1, Puff in next ch 1 space), six times. THE CH 1 THAT IS PART OF THE PUFF IS NOT THE CH 1 IN THE REPEAT! Ch 1, work (2 dc, ch 2, 2 dc) in the corner ch 2 space. Repeat from \* twice. (Ch 1, Puff in the next ch 1 space), six times. Ch 1, join with a ss in the top of the beginning ch 3. — 4ch 2 spaces, 16, dc, 24 Puffs, 28 ch 1 spaces Round 9: Ch 3, dc in the next st. Work (2 dc, ch 2, 2 dc) in the corner ch 2 space. On each side work 1 dc in each stitch and 2 dc in each ch space. In each corner ch 2 space work (2 dc, ch 2, 2 dc). Join with a ss in the top of the beginning ch 3. Fasten off. — 112 dc, 4 ch 2 spaces
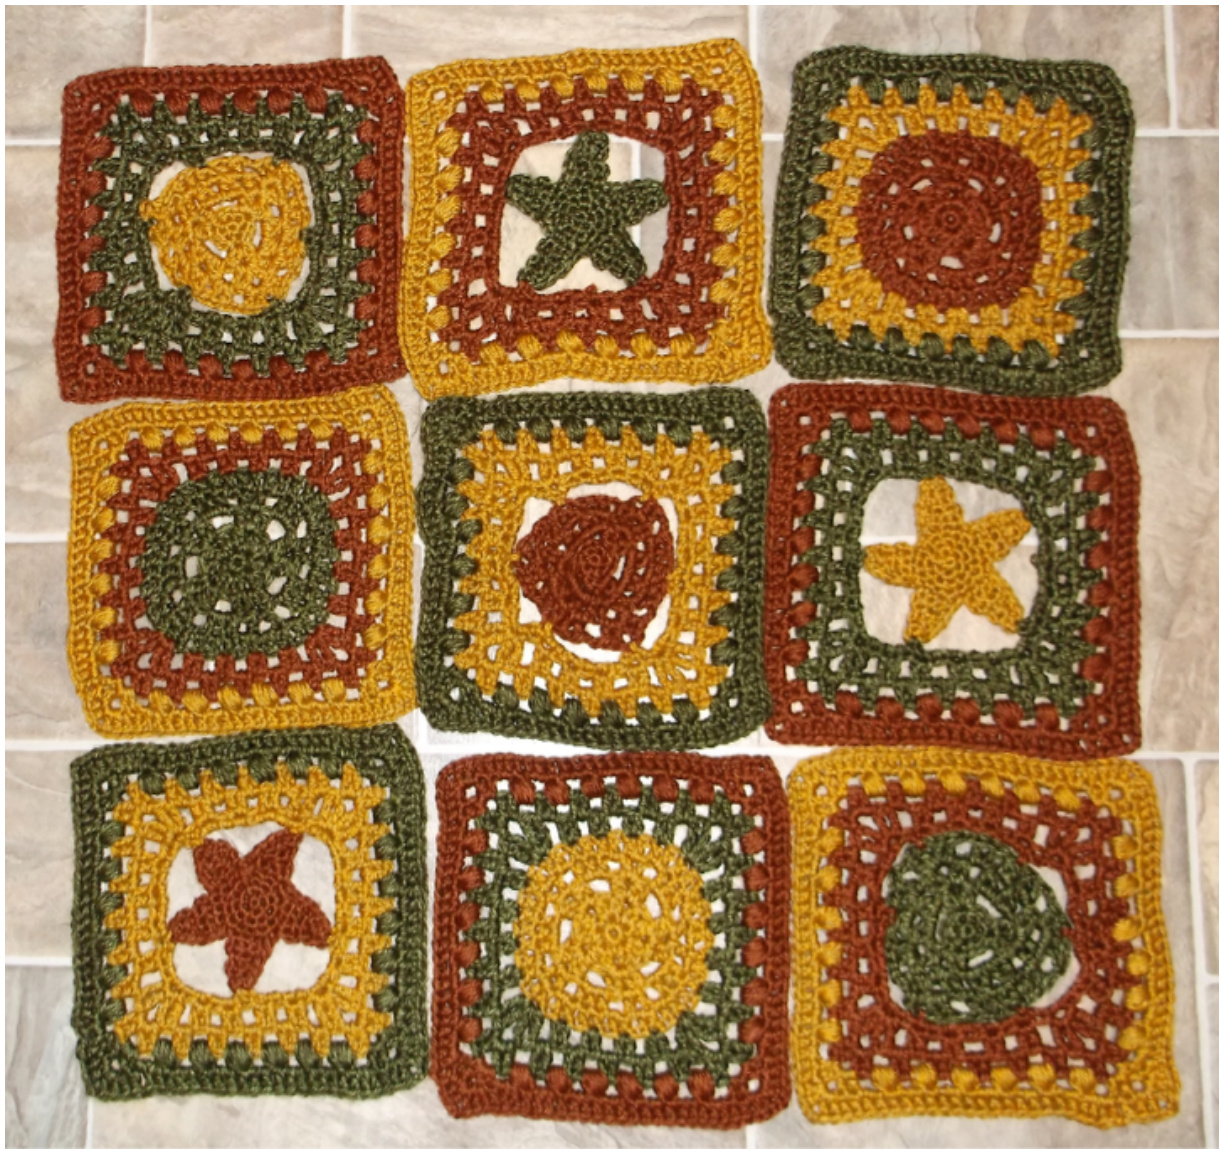
Layout
Layout your squares so that there are three squares across, and three squares down, and the individual squares make one large square. Each row, and each column should have a star, triangle, and polka dot square. I laid mine out so that each row, and each column had one square of each color scheme.
Layout: Continued
| Triangle Square 2 | Star Square 3 | Polka Dot Square 1 |
| Polka Dot Square 3 | Triangle Square 1 | Star Square 2 |
| Star Square | Polka Dot Square 2 | Triangle Square 3 |
The Brave Bundle Blanket Instructions - Continued
Joining
You willjoin the squares using what I call a Ladder Join. For a free photo tutorial for this join please visit my Ravelry site, www.ravelry.com/DyeLot23. When you join squares, in a column, use the yarn that is not the same color as either edge. For example, if you have a square where the last round was worked in color A, and a square where the last round is worked in color B, join them with color C. When you join column with another column use one color. Join the squares in individual columns first, then join the three columns together.
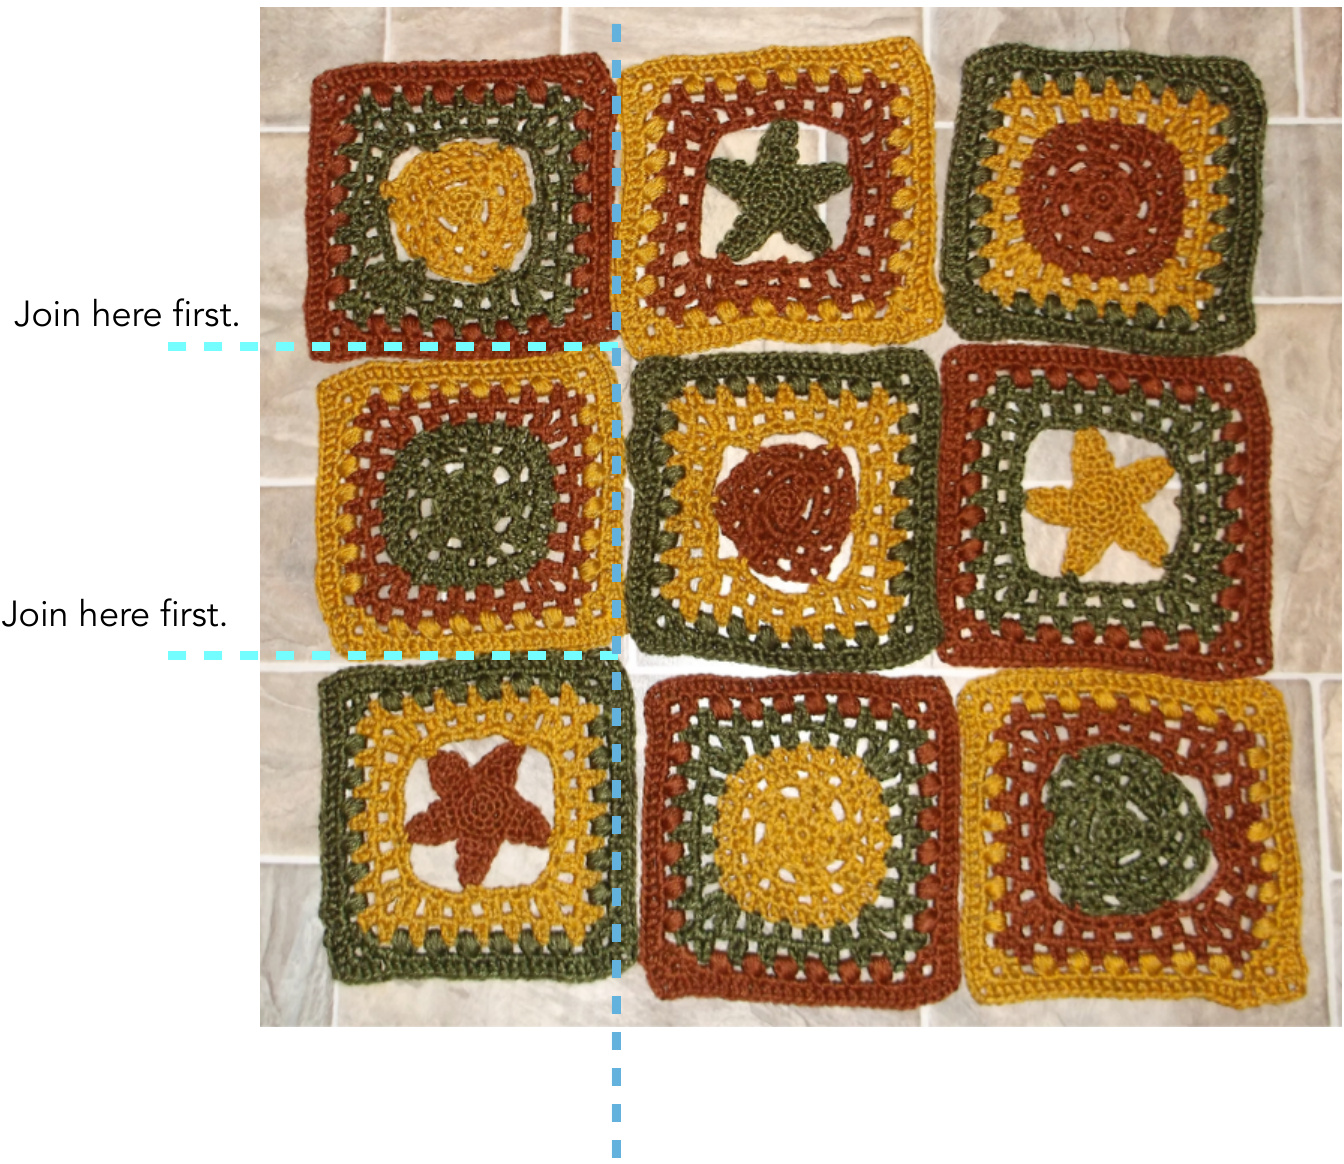
Join here second.
The Brave Bundle Blanket Instructions — Continued
Joining: Continued
The ladder join is worked holding two squares with the wrong sides together. Do not work through both thicknesses, ever.
Ladder loin Eor ? Sauares . LadderJoinTor2Squares Ladder Join For 2 Squares
Join appropriate color yarn with a sc in a corner ch 2 space of the square closest to you. Ch1, sc in the corner ch 2 space of the square farthest from you. \*SC in the next stitch on the same square, ch 1, sc in the next stitch on the other square. Repeat from \* across, ending in a corner ch 2 space. Fasten off, and weave in ends. Ladder Join For Joining Squares already Joined to Another Square Join appropriate color yarn with a sc in a corner ch 2 space of the square closest to you. Ch1, sc in the corner ch 2 space of the square farthest from you. \*SC in the next stitch on the same square, ch 1, sc in the next stitch on the other square. Repeat from \* until you reach the join between 2 squares. Work a regular join in the ch 2 space prior to the join. (SC in the join, ch 1, sc in the join on the opposite square) two times. Work the regular repeat in the ch 2 space. Repeat from \* until done.
Edging
Round 1: Join color A with a sc in any corner square's, corner ch 2 space. In the same space work (ch 1, sc). \*(SC in each stitch, including the corner ch2 space used in the join, work 3 sc across the join. SC in each stitch, including the corners used in the join. Work 2 sc across the join. SC in each stitch to the corner ch 2 space. In the corner ch 2 space work (sc, ch 1, sc). Repeat from \* twice. (SC in each stitch, including the corner ch2 space used in the join, work 3 sc across the join. SC in each stitch, including the corners used in the join. Work 2 sc across the join. SC in each remaining stitch across. Join with a ss in the top of the joining sc. Fasten off and weave in the ends. — 380 sc, 4 ch 1 spaces Round 2: Join color B with a ss in any corner ch 1 space. Ch 3 (counts as a dc), in the same space work (dc, ch 2, 2 dc). \*(Ch 1, skip the next stitch, puff in the next stitch) 47 times. Ch 1, in the corner ch 1 space work (2 dc, ch 2, 2 dc). Repeat from \* twice. (Ch 1, skip the next stitch, puff in the next stitch) 47 times. Ch 1 and join with a ss in the top of the beginning ch 3. Fasten off and weave in the ends. — 16 dc, 188 puffs, 4 ch 2 spaces, 192 ch 1 spaces Round 3: Join color C with a sc in any corner ch 2 space. Work 2 more sc in the same space. On each side work 1 sc in each stitch and 2 sc in each chain space. In each corner ch 2 space work 3 sc. Join with a ss in the beginning sc. — 600 sc Round 4: Ch 1, sc in same stitch. SC in each stitch around. Join with a ss in the beginning sc. Fasten off and weave in ends. — 600 sc
The Brave Bundle Cozy Cap Instructions
The cap is made in two pieces and then joined using the ladder join so that it mimics the design of the blanket.
Cap Band
With color A, ch 11. Row 1: DC in the fourth ch from the hook and in each chain across. — 9 dc Row 2: Ch 3 (counts as a dc, here and throughout), dc in each of the next 2 stitches, ch 1, skip the next stitch. Puffin the next stitch, ch 1, skip the next stitch. DC in each of the next 3 stitches. - 6 dc, 1 puff, 2 ch 1 spaces. Row 3: Ch 3, dc in each stitch and ch space across. —- 9 dc Rows 4 - 29: Repeat rows 2 and 3, alternating. Row 29, will be a repeat of row 3, and the rows should maintain the stitch counts listed above.
Seaming
Fold the band in half, the side you are now looking at will become the wrong side of the fabric. Working through the horizontal bar of the foundation row and the stitches of row 29 sc in each "stitch." — 9 sc Do not fasten off, turn the band so you can work across one edge in a round. You will be working in the sides of the end stitches of rows 1-29. Do not fasten off. Round 1: Ch 3, work 2 dc in the end of the same row. Work 2 dc in the end of the remaining rows. Join with a ss in the top ch of the beginning ch 3. — 59 dc Round 2: Ch 3, dc in each stitch around. Join with a ss in the top ch of the beginning ch 3. Fasten off and weave in ends. Set this piece aside, you will need it after you make the star motif. — 59 dc
Star Motif
With color C make an Adjustable Ring with 5 sc in the ring. Ch 1, work 2 sc in each stitch around. Join with a ss in beginning sc. — 10 s Round 2: Ch 1, work 2 sc in first stitch, sc in next st. \*2 sc in next stitch, sc in next stitch. Repeat from \* around. -15 dc Round 3: You make the points of the star in this round. Each point is made using turned rows and then crocheting down one side to get back to the circle made with rounds 1 and 2. Once at the circle you use round 2 stitches to begin the next point, then you work in turned rows again.
The Brave Bundle Cozy Cap Instructions — Continued
Star Motif: Continued
Round 3 — Continued: Ch 1, \*sc in the next 3 stitches. — Make point. Row 1: Ch 1, turn. SC in each stitch. — 3 sc Row 2: Ch 1, turn. SC2tog, sc in the next stitch. — 2 sc Row 3: Ch 1, turn. SC in each stitch. — 2 sc Row 4: Ch 1, turn. SC2tog. — 1 sc Row 5: Ch 1, turn, sC. - 1 sc Row 6: Ch 1, turn, sc. Using the sides of the end stitches from rows 1-5 sc down the side of the point. SC in the 3rd stitch you single crocheted in from round 2. )und (4 times) and join with a ss in the first sc. Fasten off, and weave in ends Round 4: Join color B with a sc in th top sc of any point. Working as evenly possible, and using the available sc stitches from round 3, work 72 sc around the star. Join with a ss in the beginning sc. —— 72 sc Round 5: Ch 1, sc in the same stitch. \*Ch 1, skip the next stitch, dc in the next stitch. Skip the next stitch, dbl/tr decrease, ch 1, skip the next stitch. DC in the next stitch, ch 1, skip the next stitch. Sc in the next stitch. Work 2 sc in the next stitch. Repeat from \* twice. (Ch 1, skip the next stitch, dc), twice. Ch 1, skip the next stitch, dbl/tr dec, ch 1, skip the next stitch. DC, ch 1, sc the next stitch. Work 2 sc in the next stitch. Ch 1, skip the next stitch, dc in the next stitch. Skip the next stitch, dbl/tr decrease, ch 1, skip the next stitch. DC in the next stitch, ch 1, skip the next stitch. Sc in the next stitch. SC in the same stitch as the beginning sc. Join wi a ss in the first sc. — 31 stitches Round 6: Ch 2 (counts as hdc, here and throughout), hdc in the same stitch. Hdc in the next 3 stitches/ch spaces. \*Work 2 hdc in the decrease. Hdc in the next 9 stitches/ch spaces. Repeat from \* once. Hdc in the next 11 stitches/ch spaces. Work 2 hdc in the decrease. Hdc in the next 9 stitches/ch spaces. Work 2 hdc in the decrease. Hdc in the next 5 stitches/ch spaces. Join with a ss in the top of the beginning ch 2. -58 hdc Round 7: Ch 1, work a sc in the same stitch. SC in each of the next 2 stitches, \*hdc in each of the next 2 stitches, dc in the next 3 stitches. Hdc in the next 2 stitches, Work a sc in the next 4 stitches. Repeat from \* once. \*\*Hdc in each of the next 2 stitches, dc in the next 3 stitches. Hdc in the next 2 stitches, Work a sC in the next 5 stitches. Repeat from \*\* once. Hdc in each of the next 2 stitches, dc in the next 3 stitches. Hdc in the next 2 stitches, Work 2sc in the next stitch. Join with a ss in the beginning sc. — 59 stitches Round 8: Ch 1, working in the back loops only, sc in each stitch around. Join with a ss in the first sc, and fasten off. Weave in all ends. — 59 sc
Joining
With color B use the ladder join to connect the cap band to the star motif, end with a sc in the same stitch you joined your yarn when you began joining. Fasten off and weave in ends.
Edging
Join color C to the bottom of the band with a ss, ch 1. Rsc around, join with a ss in beginning ss. Fasten off and weave in ends.


