
arallelity
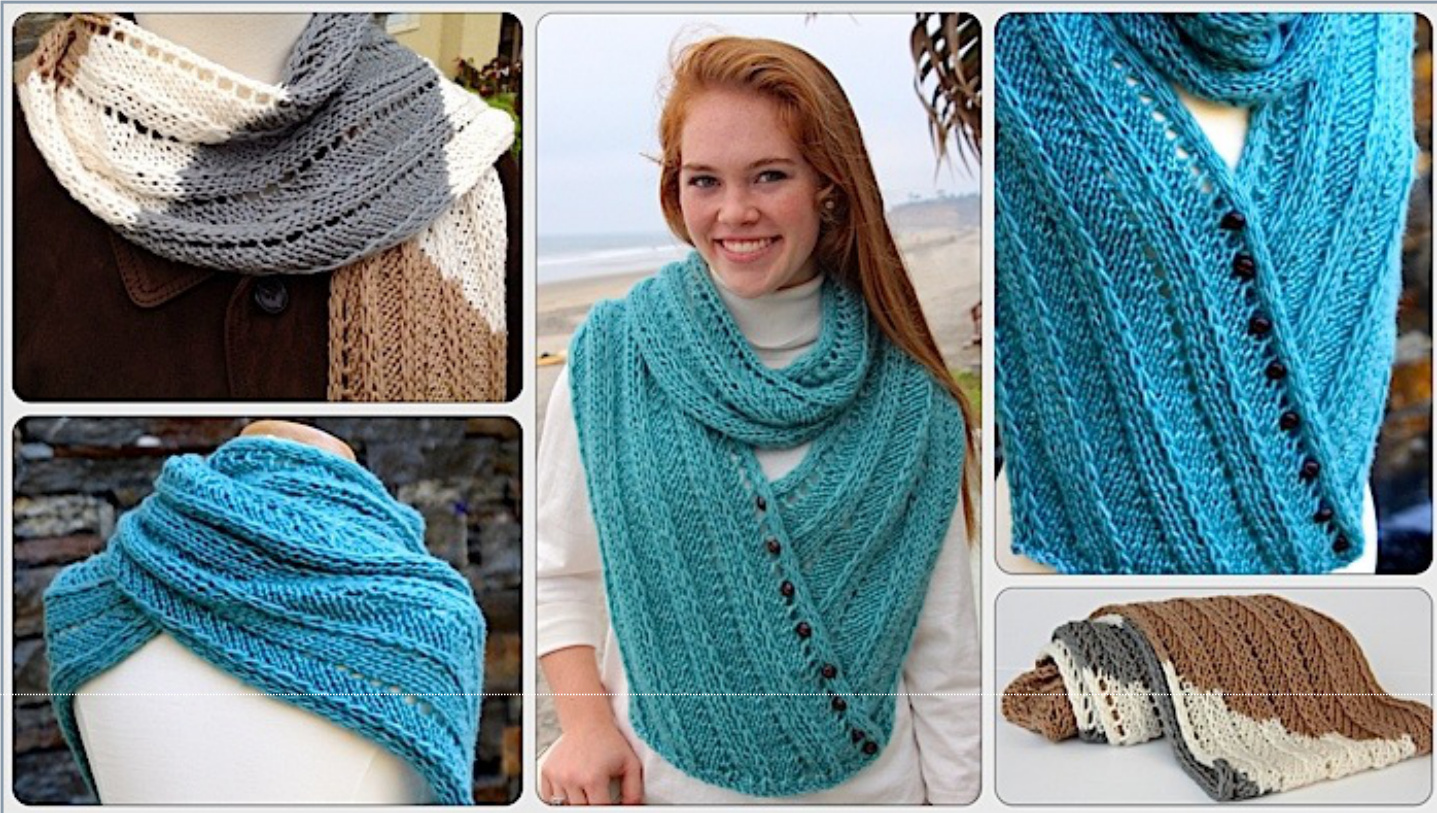
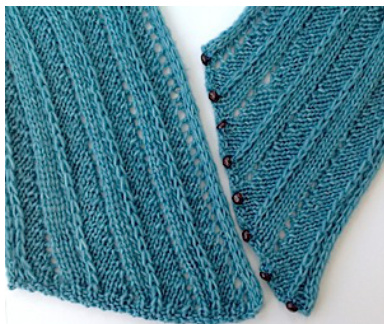
Bias shaping allows the Showy Decreases to travel side-by-side in parallel down the entire length. The striped version is great for guys or add buttons and you've got a vest.
What's Inside
Detailed pattern w/Tables & Charts Knitting techniques including the Showy Decrease, non-rolling i-Cord Edge & a left leaning option for trappers.
Online Extras .
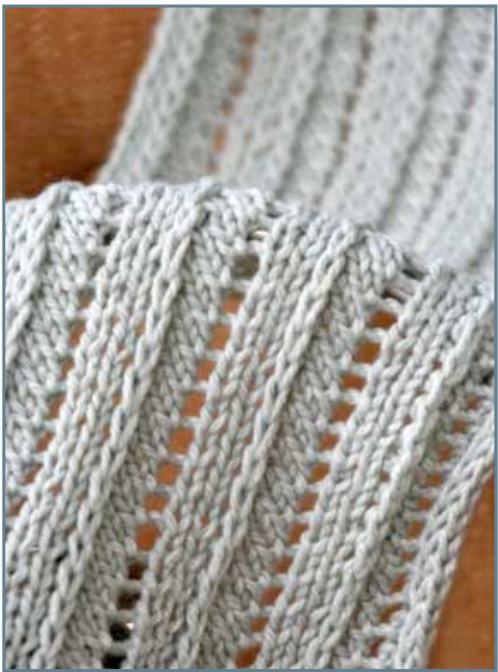
Pattern links to online tips, detailed Photobucket pictures & blog posts PDF pattern pages and chart files to load onto your phone or tablet. More project tips and technique help. Beautiful Showy Decreases rise up off the knit fabric, running parallel to the bias shaping of the scarf.
From the Designer
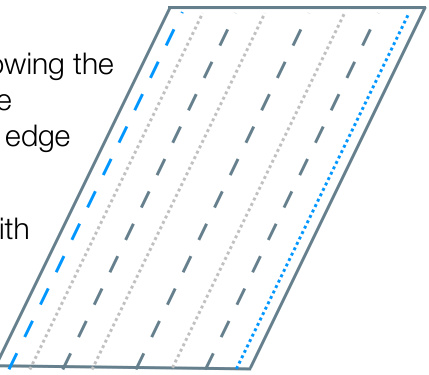
The beauty of this design is in its simplicity which takes advantage of two right leaning techniques - the Showy Decrease (in gray) and Bias Shaping ( shown in blue). They both move one stitch to the right allowing the striking Showy Decreases to rise up off the smooth stockinette and run parallel to the edge of the scarf for the entire length. We've kept the edges clean and simple with set in, integrated i-cord edges that offset any tendency of this stockinette based scarf to roll.
A Pattern for Trappers
Knitting right-leaning, k2tog decreases are the fastest and easiest to work ... unless you're a trapper. Not sure what that is? Trappers are continental knitters who work their purls in the opposite (but easier) direction by trapping the yarn against the needle. It results in a twisted stitch that needs to be knit through the back loop on the following row to correct.
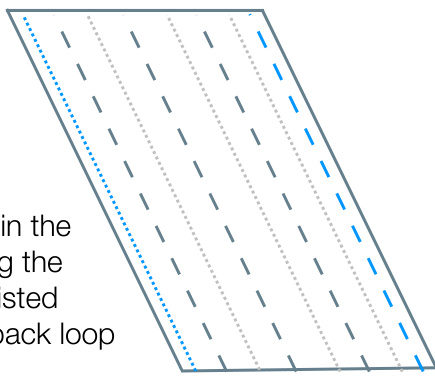
It is a very fast and efficient way to knit. Since the stitch orientation is different, a left leaning decrease is easier to knit and, since I am a trapper, I thought it's about time we had a pattern written for us! The striped scarf and wrap vest are knit this way so don't get confused by the direction of the wrap. More pictures and examples are available on our Photobucket.com site.
| WidthforVariousGauges (multiple of 8 plus 13 stitches) | ||||||
| Repeats | Stitches | 5.5 St | 5.0St | 4.5 St | 4.0 St | 3.5 st |
| 3 | 37 | 7” | 7.5" | 8.5" | 9" | 10.5" |
| 4 | 45 | 8” | 9" | 10" | 11”" | 13" |
| 5 | 53 | 9.5" | 10.5" | 12" | 13" | 15" |
| 6 | 61 | 11" | 12" | 13.5" | 15" | 17.5" |
| 7 | 69 | 13" | 14" | 15.5" | 17" | 19.5" |
| 8 | 77 | 14" | 16" | 17" | 19" | 22" |
This would also make a great throw with the pointed edge wrapping nicely around you toes!
The Interactive Knitting Pattern
·You're Connected with links throughout the PDF file taking you to additional online information; more project details, more tips & photos. · It's portable; download PDF file onto your computer, laptop or phone & take us along. Chart files are also downloadable. · Don't forget to check out our blog at blog.knittingnuances.com for more about the Showy Decrease.
More About Showy & Subtle Decreases
This pattern is a great introduction to how Showy Decreases work. You can read more about them in the tutorial. We also have a trio of hats designed to introduce different ways to use the Showy & Subtle Decreases. The Vortex, Rib Cord & Yosemite hats each introduce a new technique.
Reference Sheet
| Size | Gauge |
| Wrap Vest is 11" by 76" long (80" from point topoint). Scarf is 7" wide by 72" long (after blocking) Therearenoruleswiththisproject.Knitit as long and wide as you'd like, however, knit a minimumof3repeatssothepatternshows. See page 4 for more on sizes for wrap vest. | Gauge is flexible for this project. You will knit slightly looser than the yarnlabel gauge. WrapVest knit at 3.5 sts per 1" Scarfknit at5.0sts per 1" |
| Yarn | Notions |
| Sample1: Wrap Vest, Austermann Natura, woolblendwithbamboo,cotton,alpaca,and mohair, 50g = 110 yds, 3.5 sts per 1", 3 balls. Sample2:StripedScarf,KarabellaMargrite, 80% merino, 20% cashmere. 50g = 154 yds, 3 balls used, one of each color, 5 sts per 1". Total of 375 yards. This yarn blocks 20% longer. | Needletoknittoslightlylooser than ball gauge. StitchMarkers2(optional) TapestryNeedle OptionalButtons(8or 9) |
Chart Legend
Helpful Tips:
Change yarn 5 stitches in from edge instead of at the end of the row (inside the integrated i-cord edge). Slip stitches in this pattern are all worked so that the yarn is on the wrong side. You'll purl them at the start of wrong side rows and knit them at the start of right siderows. > i-cords are not as stretchy as regular knitting. It helps to add an extra row of icord every 4 or 5 inches as you did in the first few row directions on the next page. I found they were more necessary on the decreasing side.
Right & Wrong Sides vs Front & Back
| knit RS: knit stitch WS: purl stitch | |
| k2tog stitch | RS:Knit two stitches together as one WS: Purl 2 stitches together |
| k2tog tbl RS: Knit two stitches together in back loops as one WS: Purl two stitches together in back loops, inserting needle from the left, behind and into the backs of the 2nd & 1st stitches in that order | |
| purl RS: purl stitch WS:knit stitch | |
| slip RS: Slip stitch as if to purl, holding yarn in back WS: Slip stitch as if to purl, holding yarn in front | |
| Slip 1 Knitwise RS: Slip one as if to knit :SM | |
| yo RS:Yarn Over WS: Yarn Over | |
| NoStitch RS: Placeholder- No stitch made. WS: none defined |
→ The Right Side is the public (usually prettier) side of the fabric. The Wrong Side is the inside non-visible side of the project.
| TableAbbreviations | |
| k,p | knit or purl |
| k2tog | knit2together |
| k2tog tbl | k2tog throughbackloop |
| sl1 | slip as if to purl, w/ yarn in back |
| sl1 kwise | slip as if to knit, w/ yarn in back |
| sl1wyif | slip as if to purl, w/ yarn in front |
| yo | yarnover |
→ The Front is the side facing you as you knit. The Back is the side you can not see as you're knitting. When you are purling in Stockinette, that is the Front Side. The “V" symbol means the horizontal yarn bar from the slip stitch does not show on the Right Side. The instructions 'slip wyif 'on the purl side (Wrong Side) mean you see the yarn bar as you slip it but it will not show on the Right Side.
Need help reading charts?
Not sure how long to knit your scarf?
There is a free downloadable tutorial available in the knittingnuances.com/learn section onour website. We have some guidelines in the Scarf section of our web site knittingnuances.com/shop/ scarves/scarf-length.
Knitting Instructions
Use the table on page 2 to help determine the number of stitches to cast on. You can follow the Wavy Tail Cast On instructions included here or use your favorite. If your yarn has little structure, consider using 2 strands of yarn for the cast on & bind off rows only. > Work WavyTail Cast On placing markers 6 & 7 sts from each end, respectively (see chart below). A Wavy Tail Cast On tutorial is included in your pattern. > Work 3 set up rows establishing the edge stitches. The integrated i-cord edges pull short at first so we add an extra i-cord row at the beginning. The rib pattern should continue from your Wavy Tail cast on edge. - Row 1 (RSR): k3, p1 \*k1, p1\* sl3 purl to last 4 sts, k1, sl3 wyif not see as you're knitting. When you're purling in Stockinette, that's the front side. knit to last 6 sts, k2tog, p1, sl3 > Knit Parallelity pattern repeating Rows 4 & 5 below to the desired length ending with a right side row. The Front is the side facing you as you knit that row. The Back is the side you can → The Right Side is the public (usually prettier) side of the fabric. The Wrong Side is - p2tog, p1, k1 \*p1, k1\* sl3wyif Bind off loosely in established k1, p1 pattern for the non-i-cord stitches similar to Row 1, starting with a k2tog to wrap the edge.
| Row | Side | Edge Sts. | Repeat | Edge Sts. |
| Row 4 | WSR | p3, k1, p1,sl1 | p6, sl1 wyif, p1 大 | p3, k1, sl3 wyif |
| Row 5 | RSR | k3, p1, yo, k3 | k2tog, k2,yo, k4* | k2tog, p1, sl3 |
| 2423222120191817 16151413 | ||||||||||||||||||||||||||
| VIVIV | o | 3121110 | 8 | 6 | 5 | 4 | 3 | 2 | 1 | |||||||||||||||||
| 6 | 7 | |||||||||||||||||||||||||
| o | o | 5 | ||||||||||||||||||||||||
| 4 | ||||||||||||||||||||||||||
| o | 3 | |||||||||||||||||||||||||
| 2 | ||||||||||||||||||||||||||
| 1 |
And for Trappers: All purl stitches, except i-cord edges, are trapped and stitches are slipped knitwise so they are also reoriented. Read the instructions for the first 3 set up rows above then follow them in reverse per Rows 1 - 3 of the chart below.
| yo | slip Sts. | Repeat | knit Sts. | |
| Row 14 | k2tog | p3, k1, p3 | p1, sl1 kwise wyif gd | sl1 kwise wyif, p1, k1, sl3 wyif |
| purl 5 | RSR | k3, p1, k2tog tbl | k4, yo, k3, k2tog tbl, k2 | k1, p1, sl3 |
| 24232221 | 20191817 | 16 | 15 14 | 13 | 1211 | 10 | 6 | 8 | 7 | 6543 | 2 | 1 | ||||||||||||||
| o | 7 | |||||||||||||||||||||||||
| 6 | V | |||||||||||||||||||||||||
| o | 5 | |||||||||||||||||||||||||
| 4 | VVIV | V | ||||||||||||||||||||||||
| IvIv | 3 | |||||||||||||||||||||||||
| 2 | VIVIV | |||||||||||||||||||||||||
| Tviy | 1 | |||||||||||||||||||||||||
Knitting Nuances
Wrapping it into a Vest
The wrap vest utilizes the existing button holes from the bias shaping. Buttons are added every 3rd eyelet along the cast on edge. Line up the cast on edge to the eyelet side of the end to determine placement and quantity of buttons. Make sure buttons are big enough to stay in the eyelet hole. Hint: the ones below are not!
How long should it be?
The sample is 80" long and was long on our size 6 model. It also depends on how low you want it to hang. Joining decreases and more .. With the Showy Decrease you can join right and left decrease line in ways that have just not been possible before. And just wait till you see what the Showy Decrease can do for hat tops! Bias shaping decreases are shown in blue to help you differentiate them from the repeat pattern. Chart downloads for this pattern are on our web site at KnittingNuances.com/ help. This link does not show in the menu bar so type "/help" from the home page if you don't have the PDF pattern open.
| Legend: |
| knit |
| k2tog k2tog tbl |
| purl |
| slip |
| Slip1 Knitwise |
| yo |
| NoStitch |
Introduction to Showy & Subtle Decreases
Overview
Two of the most common decreases, knit-2-together and slip-slip-knit, are getting a makeover. The result is two distinctive decreases: one that has less impact, and the other that pops off the fabric creating a new design element. The key to these decreases is to set them up on the row before by slipping one of the two stitches to be knit together on the next row. Which one you slip depends on what you'd like the stitch to do - hide or highlight. Both have right and left leaning versions, and can work alone as a true decrease or with a variety of increases, like theyarn over,tocreatenewstitchpatterns.
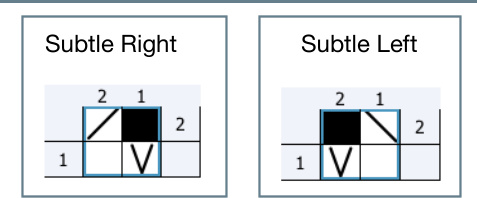
The Subtle Decrease
The Subtle Decrease uses the slip stitch in the row below to eliminate a purl bump. Now the slip stitch can slide easily behind its partner. This minimizes the ridge between the decrease and the fabric. Take a look at the Subtle Right chart. Picture how your needle will enter the two stitches ... first through the knit stitch, then the slipped stitch to its right. The Subtle charts show a true decrease, such as you might use in waist or arm hole shaping or the ruffle shown above. You could run a series of Subtle Decreases with the eyelet, but this will be more common.
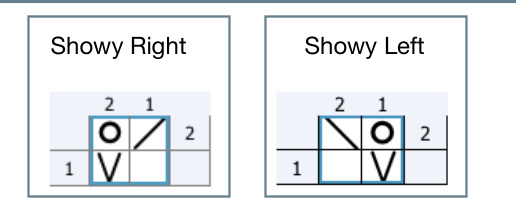
The Showy Decrease
Butwhat ifyouwanted thedecreasetoshow?Thistimewe'll reversetheorder and you'll see what happens when the slipped stitch sits on top. Compare the chart for the Showy Right Decrease to the Subtle Right Decrease above it: > The slip stitch is now on the left. It will be the first one your needle enters as you work the k2tog decrease. As a result, the elongated stitch is sitting on top of its partner rising above the knit fabric. · In both Showy Decrease charts, the yarn over is on the outside of the decrease. This is the set up for a string of diagonal decreases as shown in the pattern to the right.
The Left Leaning Decrease (ssk)
The traditional, right-slanting k2tog is pretty straight forward and well behaved. It doesn't require any fiddling with stitches and lies pretty well in the fabric. But its left leaning cohort has always been a bit wonky . The stitches of the left slanting decrease need to be reoriented in order to lie flat (ssk) and, try as we might, the two just never looked exactly the same ... until now. The right and left slanting Showy Decreases are perfectly matched and the Subtle versions look more alike and are less noticeable than before. Joining decreases and more .. With the Showy Decrease you can join right and left decrease line in ways that have just not been possible before. And just wait till you see what the Showy Decrease can do for hat tops! More pictures and examples are available on our Photobucket.com page.
Subtle Decrease
The needle enters the regular stitch first.
Showy Decrease
Both yo's sit outside & slip stitches are positioned so the needle enters them first.
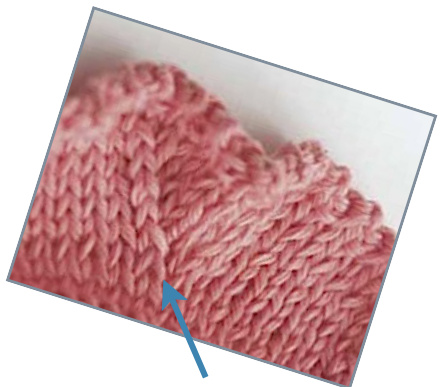
Before & After
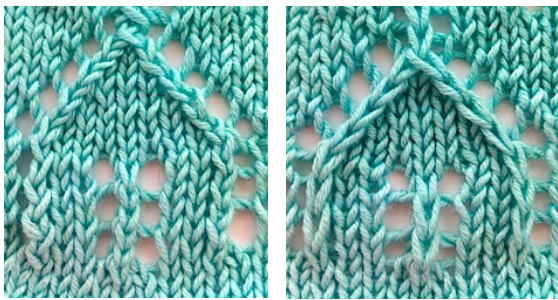
Not only to the right and left leaning decreases match, they rise up off the fabric, adding more texture..
WantMoreInformation?
You can find it on our web site. Our blog also has sample swatches to try like the Perfect Eyelet experiment.
| 口 knit |
| k2tog |
| ssk |
| slip |
| 回 yo |
KnittingNuances.com/Learn


