Stramberry Victorian
a pattern by Molly Jane Wick

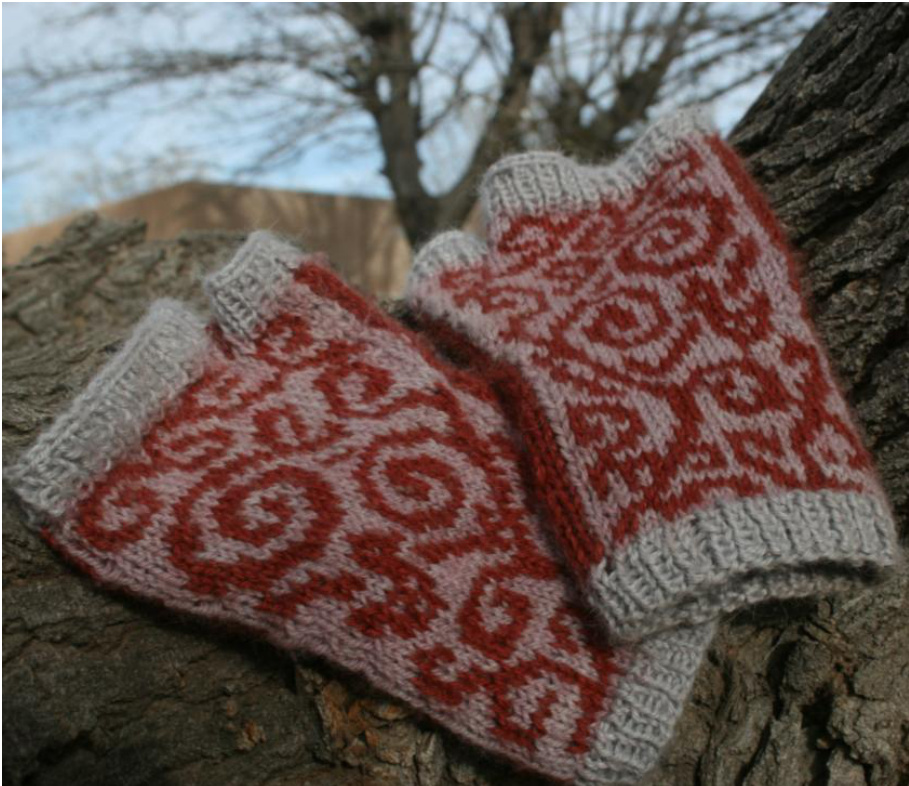
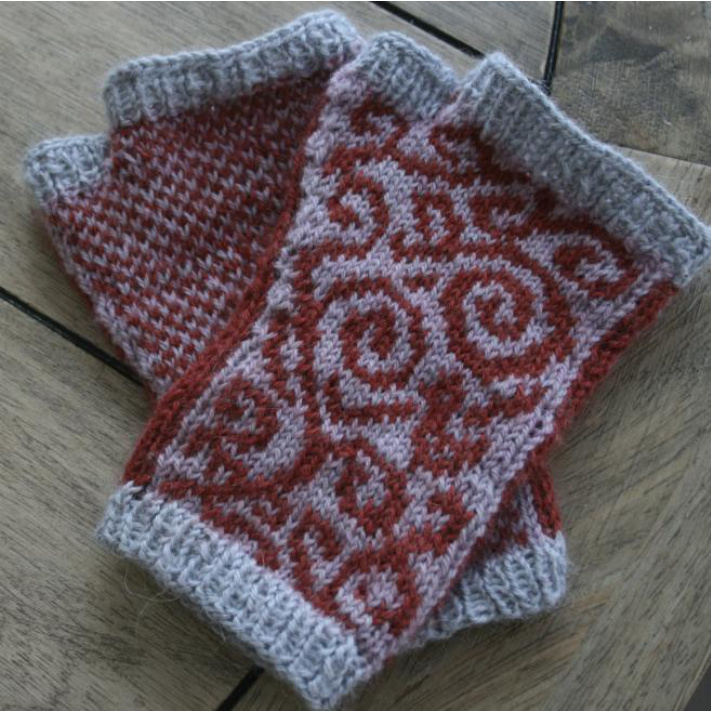
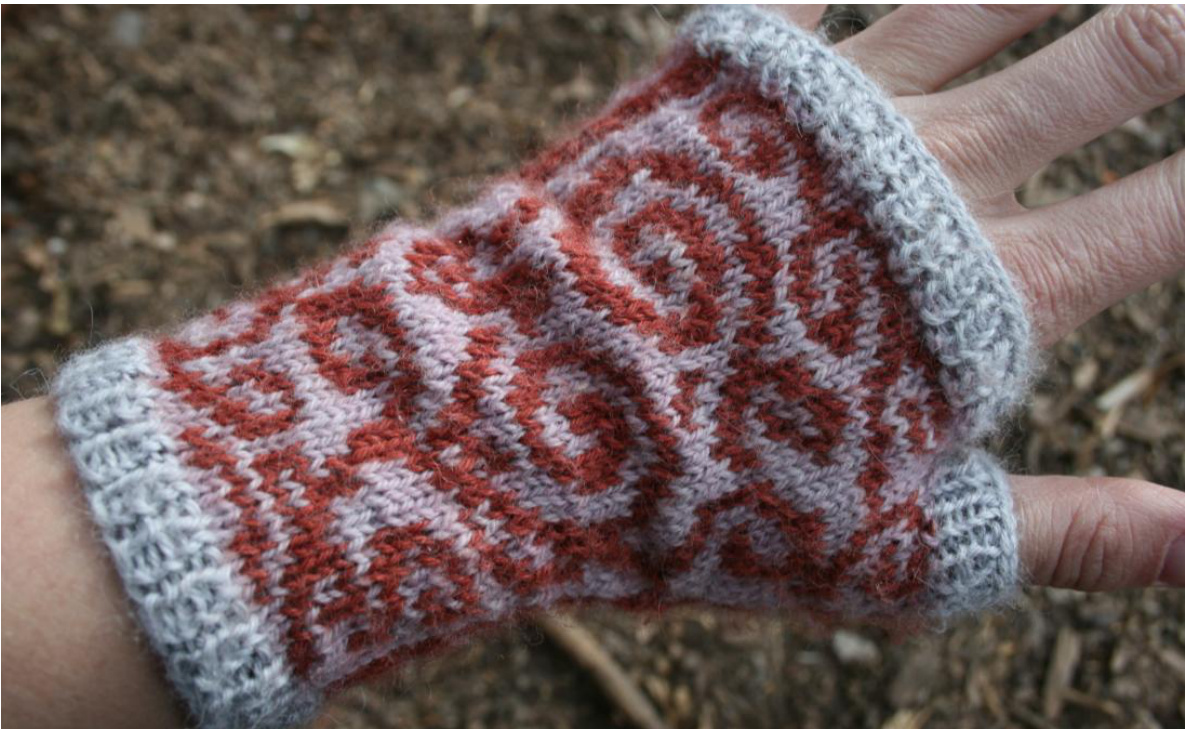
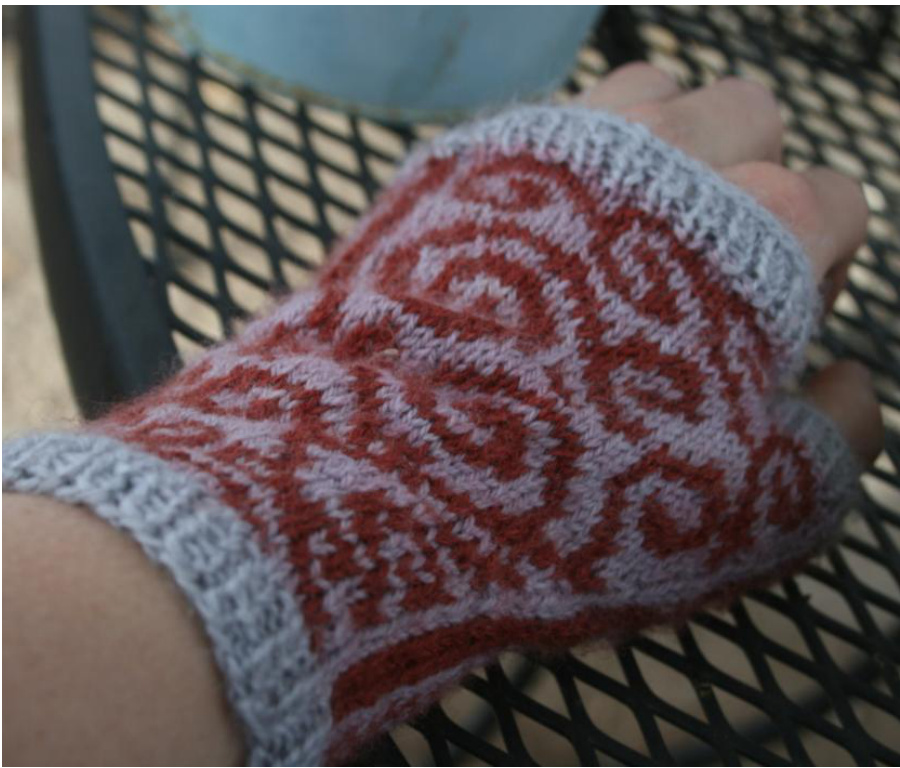
These elegant mitts are perfect for winter, spring and fall! The curls and swirls in this pattern were inspired by the graceful peaks and embellishments of Painted Ladies, tall, proud multi-colored Victorian-style houses that can be found all across America. The soft hues of Swan's Island's naturally-dyed, organic merino fingering weight are matched with soft Bristol Yarn Gallery Alpaca-Silk to give your hands a soft and beautiful treat. Or, you can easily substitute your favorite fingering weight yarn for this pattern. These mitts have the style and timeless elegance of Painted Ladies, as well as the warm coziness of your favorite hand-knit. You'll be wearing them for your morning tea and your afternoon stroll every day! This pattern includes instructions for two women's sizes, depending on your preferred type of wrist-warmer. It also includes an easy-to-follow chart.
Yarn:
- 2 contrasting skeins Bristol Yarn Gallery Buckingham: 80% Alpaca, 20% Silk (218 yards / 50 gram skein) OShown here: colors 0499/red & color 3865/grey - Less than 1 skein Swan's Island Certified Organic Merino Fingering: 100% Merino (580 yards / 100 gram skein) OShown here: Vintage Violet. You'll have lots of this yarn left over!
Notions:
- Set of 4 US size 1 DPNs - Depending on size desired, you may also need a set of four US size 3 DPN (or needles to achieve gauge). See sizing information below. - Darning Needle or crochet hook to weave in ends - Scrap Yarn or stitch holder
Sizing:
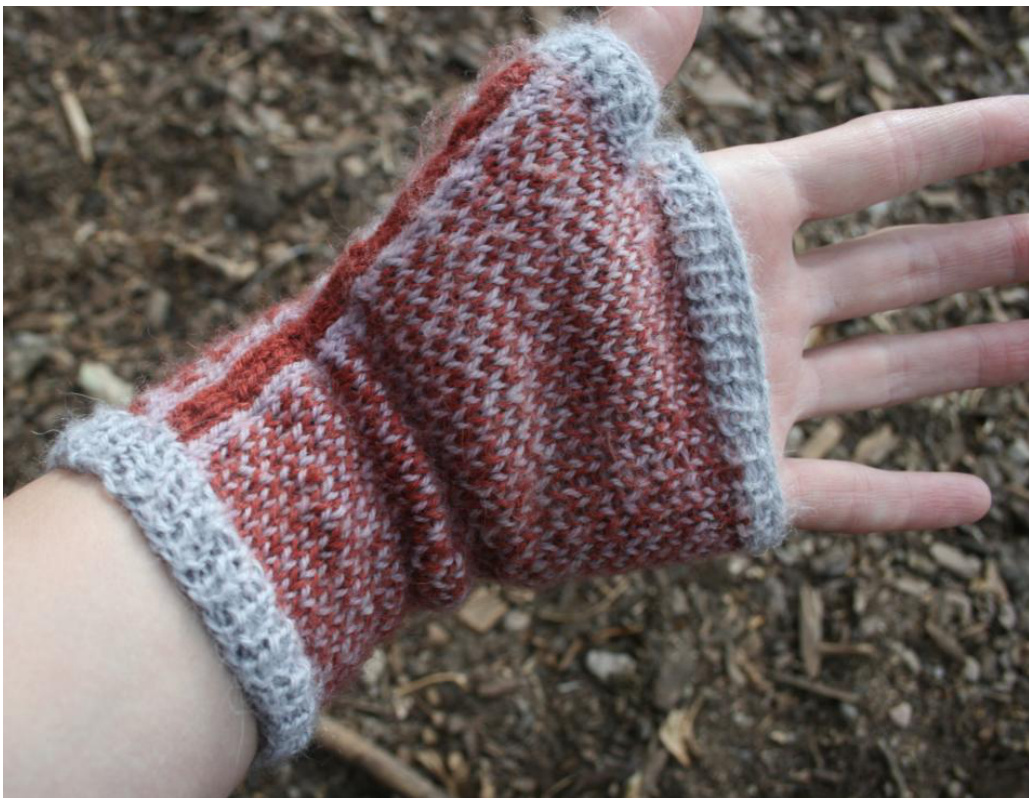
Sizes for Women's small and medium are given in this pattern. The directions for knitting the mitts for each size are the same. The multiple sizes are achieved by using different needle sizes and changing your gauge. Therefore for each size, a different needle size and a different gauge is given. Gauge is measured on the stockinette checkerboard stitch used on the palm of the mitt (see chart). When knitting your swatch, it is suggested that you use two colors to make a swatch in the checkerboard stitch, as your gauge in single-color stockinette may be slightly different.
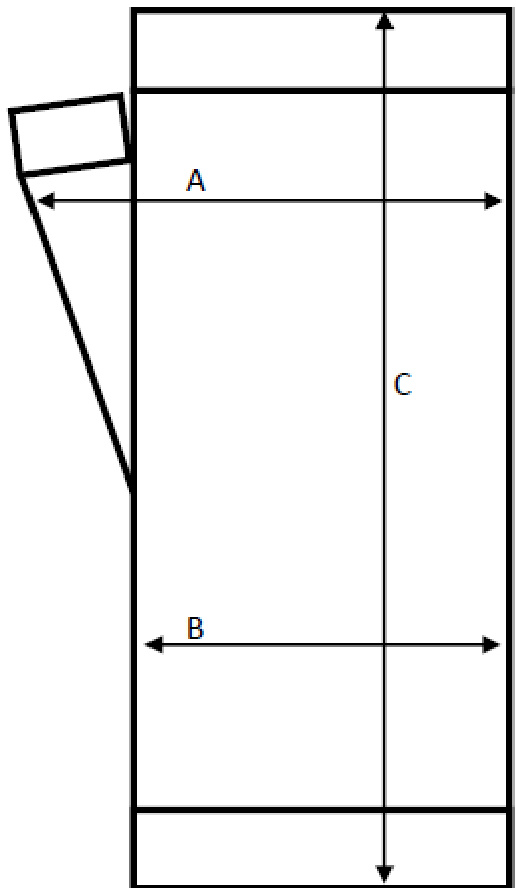
Measurement A: across widest part of mitt, including the back of hand and thumb gusset. :asurement B: across wrist / narrowest part of Measurement C: From CO to BO, or from edge of bottom ribbing to edge of top ribbing.
Sizes Options:
All mitt measurements are made across the back of the mitt, NOT around the entire circumference of the mitt.These mitts are designed to fit with slight negative ease. If you prefer mitts that are a little looser, determine your size, and then use a needle one size up from the suggested needle for your size. The sample shown in the images is a size small.
Small
Fits a hand circumference (measured at widest point) of 8 - 9 inches. Gauge: 29 sts and 32 rows per 4 inches. Needles: Use size 2 needles throughout mitt, or needles to achieve gauge above. Final Size: A: \~4.25 inches B: \~3.25 inches C: \~6 inches
Medium
Fits a hand circumference (measured at widest point) of 9 - 11 inches. Gauge: 26 sts and 29 rows per 4 inches. Needles: Use size 1 needles for ribbing on top, bottom, and on thumb. Use size 3 needles on body of mitt, or needles to achieve gaugeabove. Final Size: A: \~4.5 inches B: \~3.85 inches C: \~7 inches
Strawberry Victorian Mitt Directions:
Right Hand
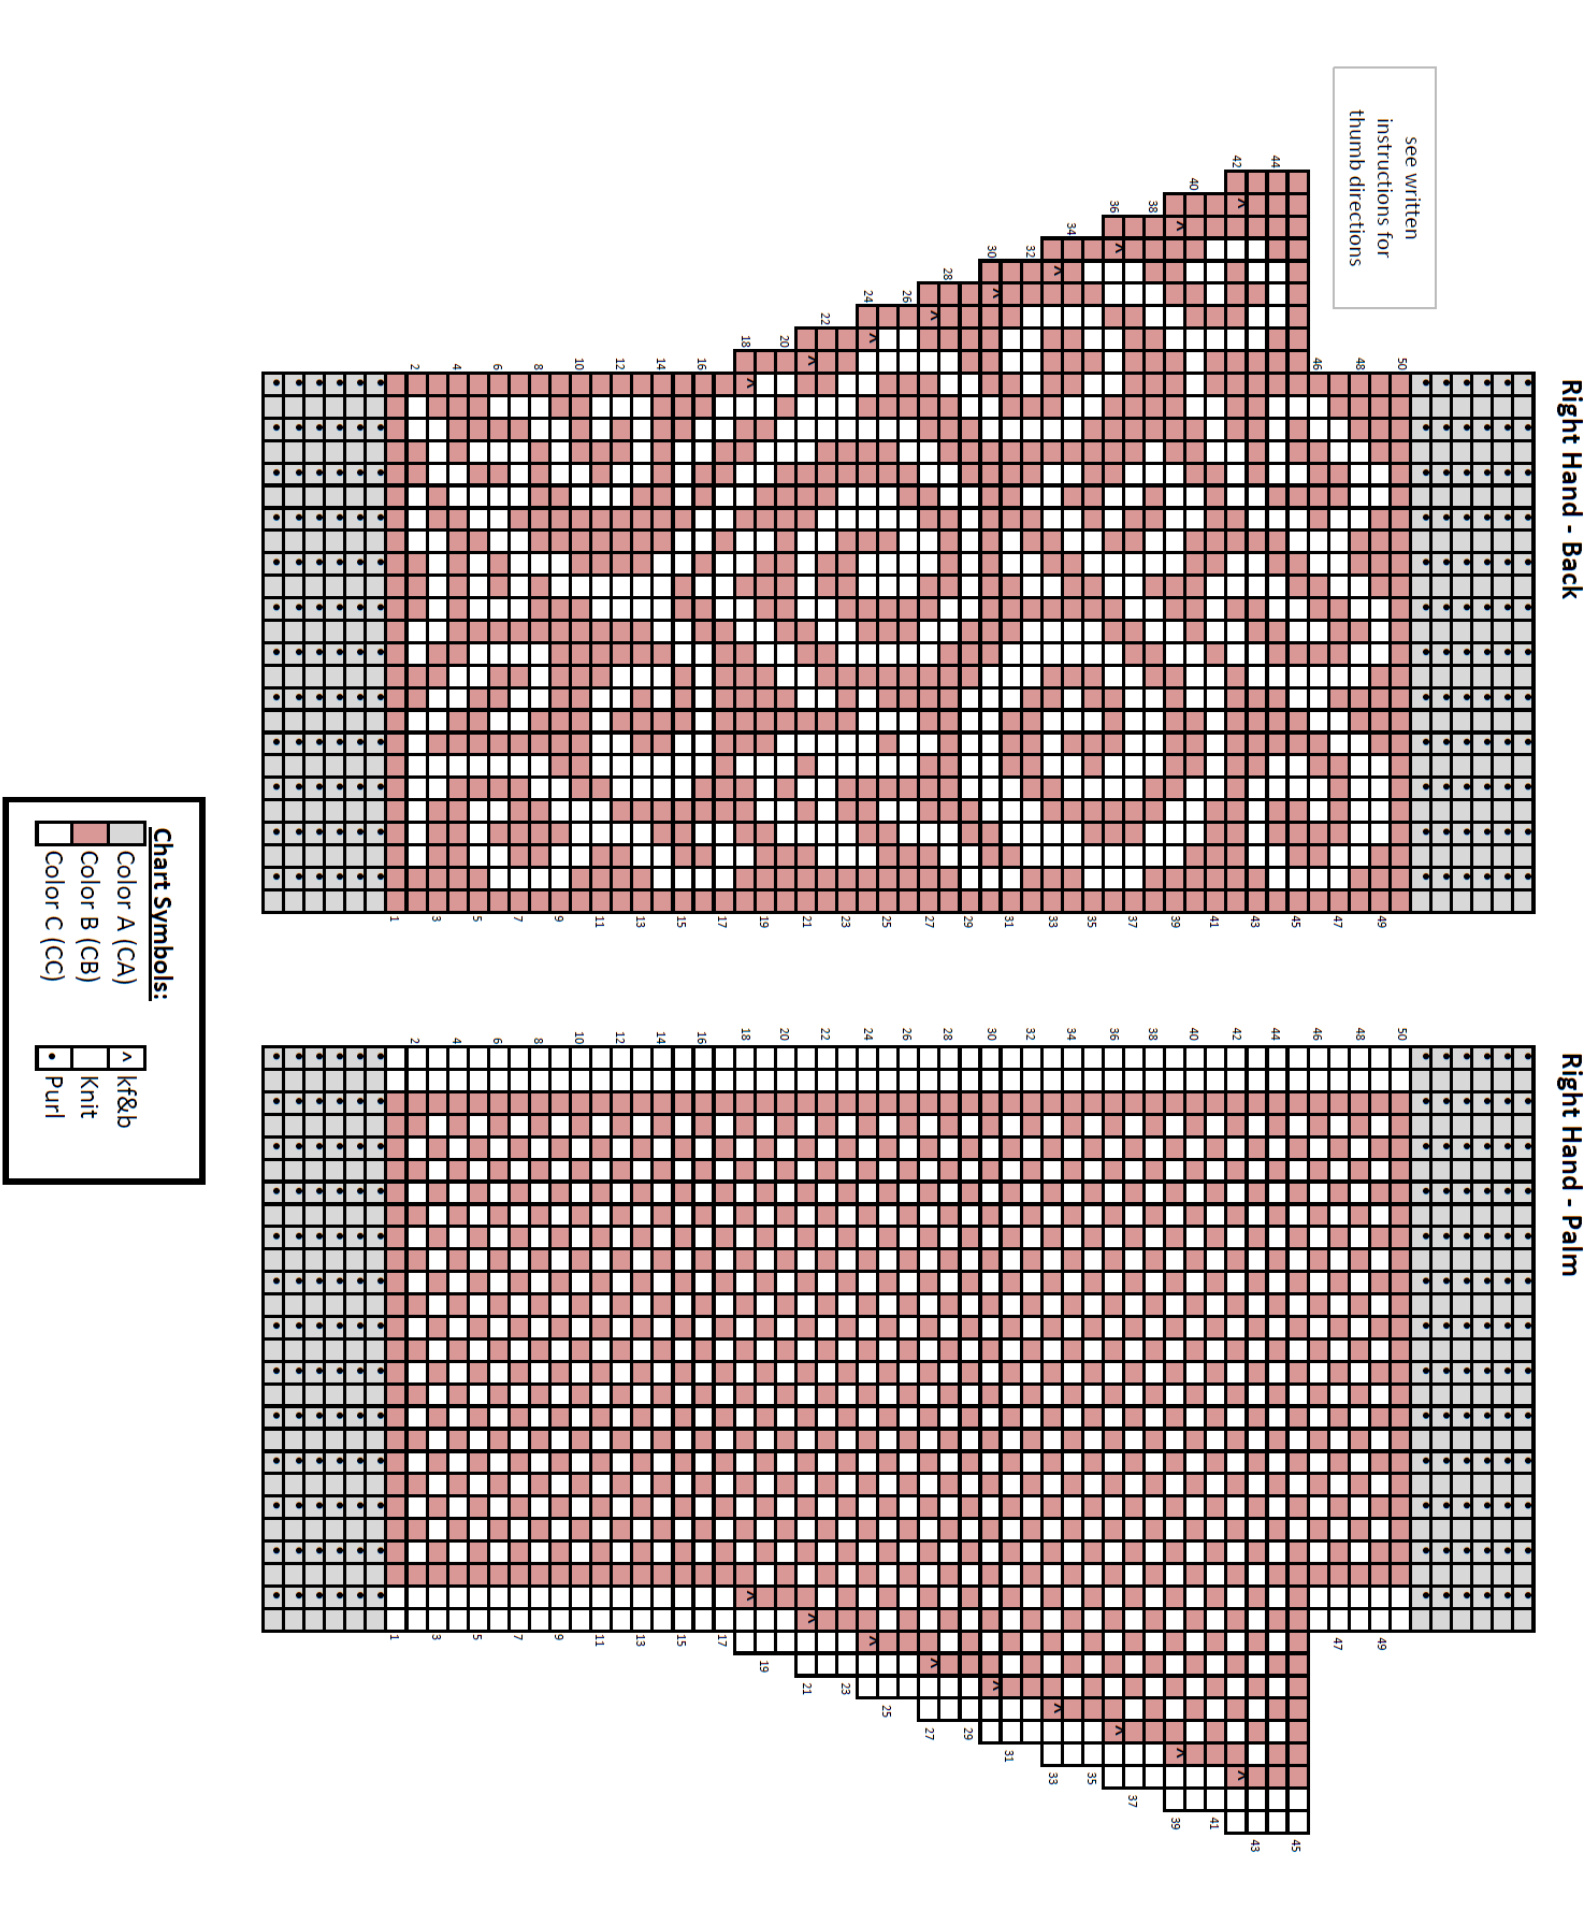
Bottom Ribbing: Cast on 50 stitches using Color A with size 1 double pointed needle. Set up the following ribbing: \*(k1, p1), repeat from \* to end of row. For next 5 rows, continue in K1, p1 ribbing. Ribbing should measure \~ 3/4 of an inch from CO. Body of Mitt: If necessary for your size, switch to size 2 dpns (see sizing instructions above). Row 1: Using Color B (CB), Start knitting row 1 of Right Hand - Back. Slip next two stitches, ie the first two stitches of the Right hand - Palm Chart. Continue knitting across Right Hand- Palm Chart until last two stitches, and slip last two stitches. (Slipped stitches are done so that you don't have to carry Color C yarn across entire back and palm of mitt.) Row 2 - 50: Continue knitting Right Hand Back Chart & Right Hand Palm Chart, using Colors B & C, until end of chart. On Rows 18, 21,24,27,30, 33,36,39, and 42: These are increase rows to shape for the thumb gussets. On the last stitch of the Right Hand - Back Chart (First stitch of the Left Hand - Back Chart), you will make one stitch, by knitting into the front and back of the last stitch in the chart. On Row 46, Knit first 24 stitches according to chart, and then place next 18 stitches on scrap yarn. These stitches will be picked up later to knit the thumb ribbing. Cast on 2 sts with CC and join remaining stitches on needle to continue knitting in the round.
On Row 50, slip side stripe rows as you did for Row 1: Knit across Right Hand - Back Chart, then slip the first two stitches of the Right Hand -Palm Chart. Continue knitting across Palm Chart until last two stitches of chart, and slip the last two stitches. Top Ribbing: Cut CB and CC with a few inch tail. If necessary, switch to size 1 dpns again. Establish ribbing again in CA: \*(k1, p1), repeat from \* to end of row. Continue in ribing for 3/4 of an inch. Bind loosely. Thumb Ribbing: Place 20 held stitches off of scrap yarn onto size 1 double pointed needles. Pick up additional two stitches from inside of thumb (bottom of side stripe of C2). These will be the first and the last stitches of the round: PM between them. Knit first two stitches together, p1. Establish ribbing as follows: \*(k1, p1), repeat from \* to last 2 stitches. Purl last two stitches together. Continue knitting in ribbing for 5 more rows. Bind off using loosely.
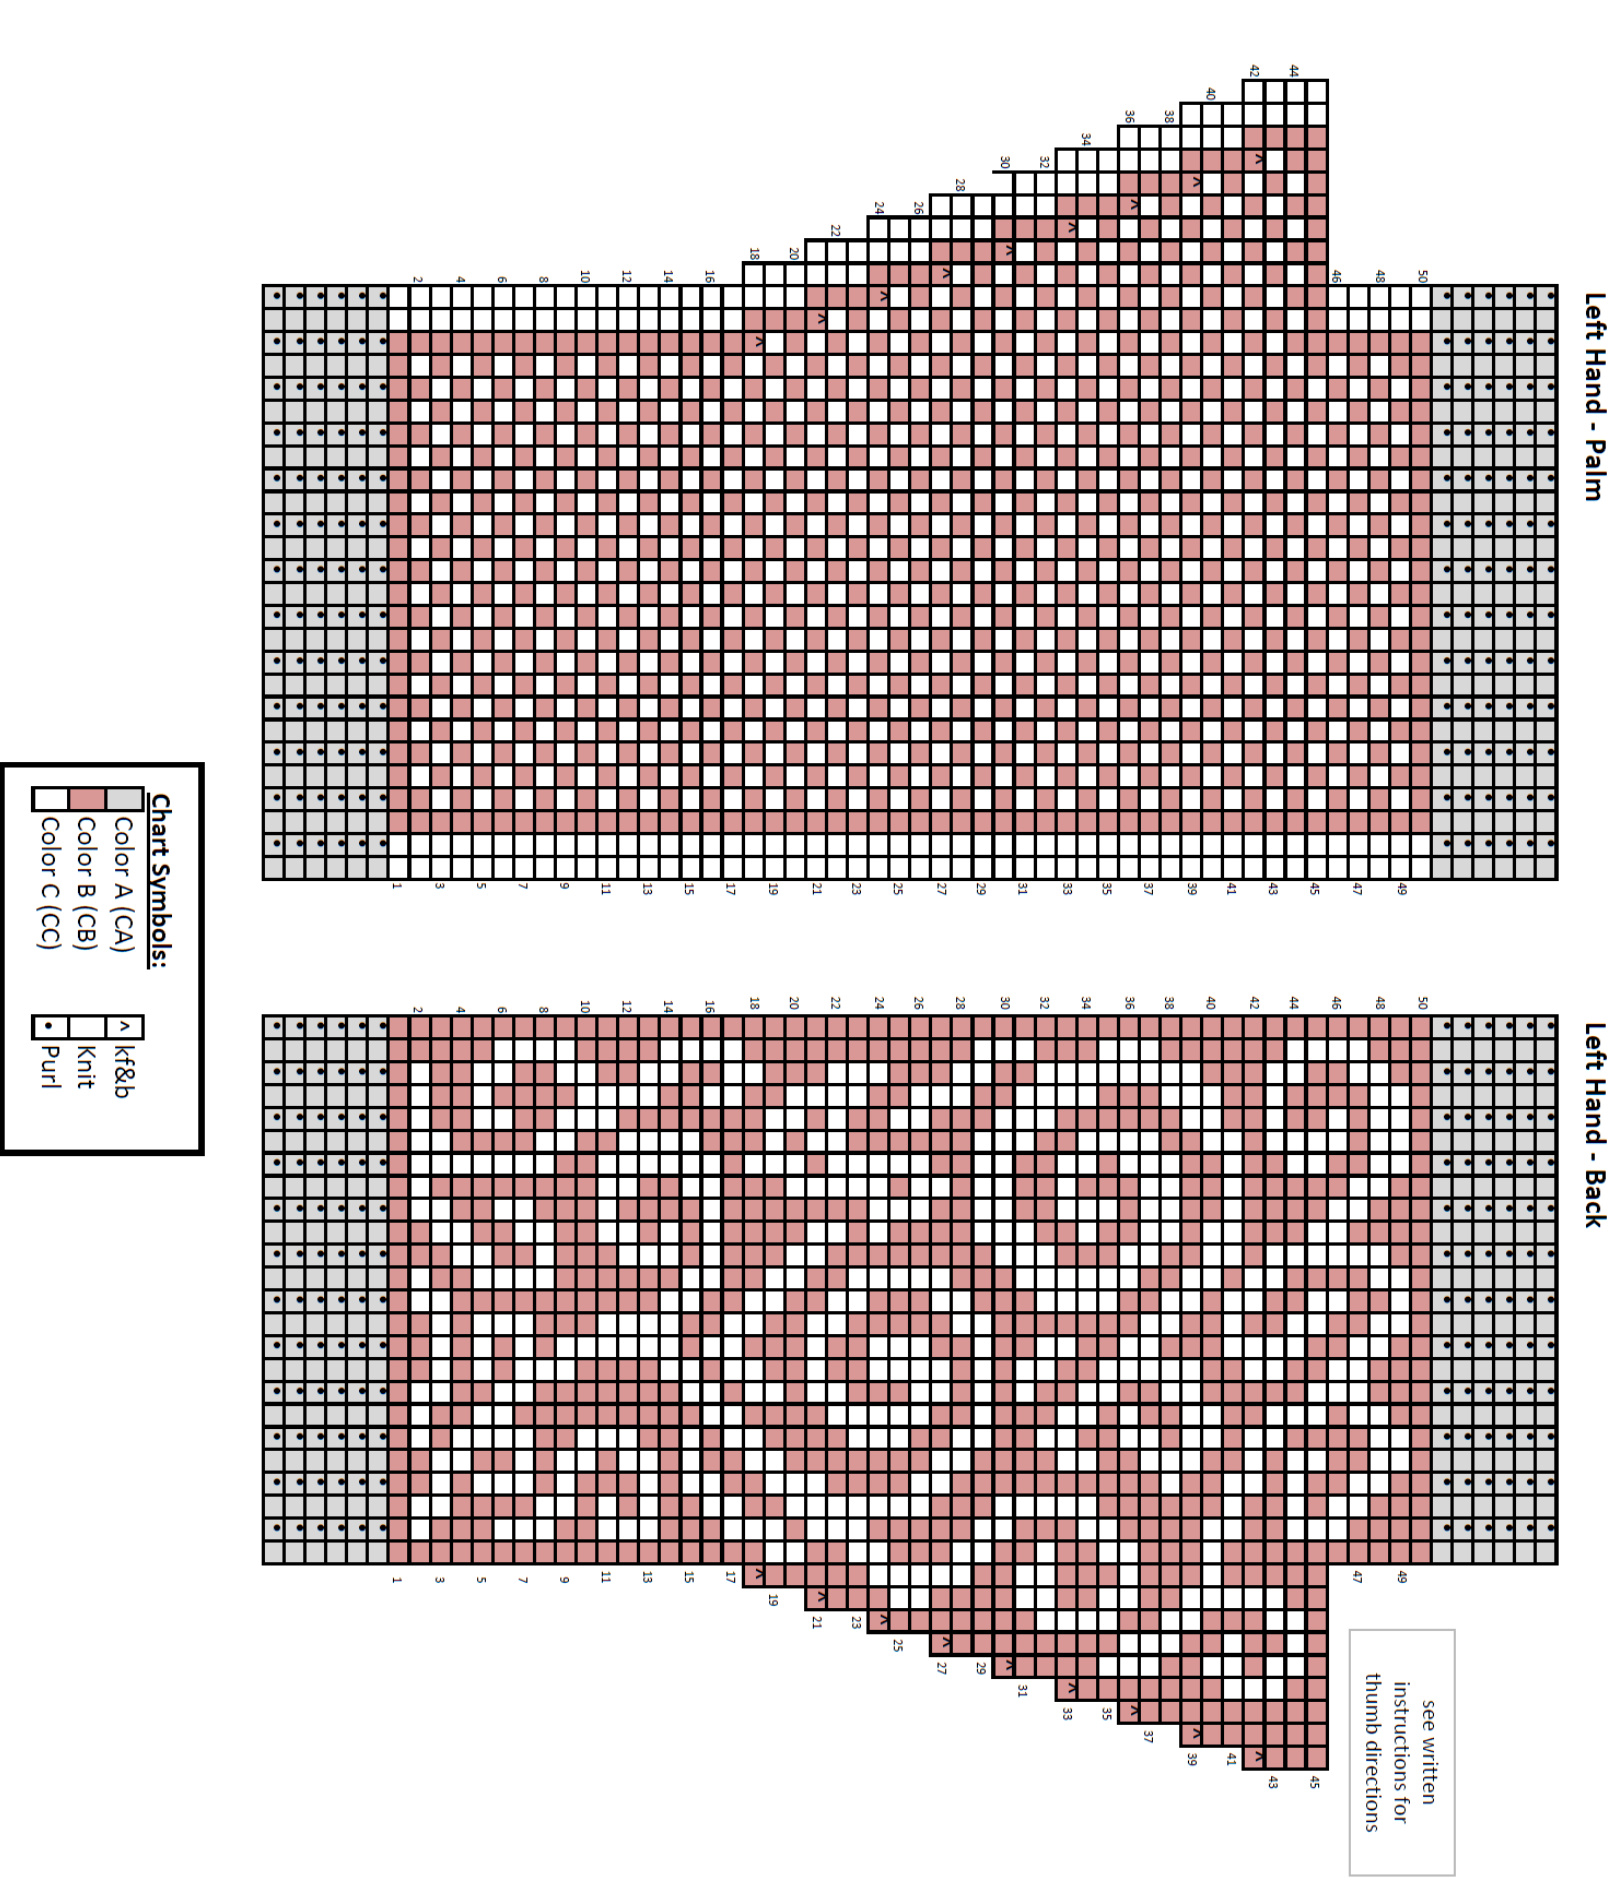
Left Hand: Directions for the Left Hand are very similar to the directions for the right hand, but you must use the Left Hand Chart. Top Ribbing: CO 50 sts with CA and establish ribbing as follows: \*(k1, p1), repeat from \* to end of row. Repeat ribbing for 5 more rows. size, switch to larger needles. Begin knitting across the Left Hand - Back Cha and then the Right Hand - Back Chart, slipping the side stripe stitches on the first row. On row 18, start increasing for the thumb gussets, every third row (rows 18, 21, 24, 27, 30, 33, 36, 39, and 42). For this hand, kf&b into the first stitch and third from last stitch on each increase row. When you get to Row 46, Clip your CB and CC working yarns a few inches from your stitches. Next, set aside the first 9 stitches of the row. String scrap yarn through the live stitches and ignore them. Start knitting again at the inside of the back of the hand, following the Left Hand Chart - Back, and Left Hand Chart - Palm. Continue until the last 11 stitches of the row, and set these sts aside on scrap yarn as well. Then
cast on another two sts in CC to continue the side stripe. These are the last two stitches of the row. Join to continue knitting charts in the round. Continue knitting Left Hand Chart - Back, and Left Hand Chart - Palm until you reach row 50. On row 50, slip the side stripe stitches as described above for the Right Hand. Top Ribbing: If necessary, switch back to size 1 needles to do the ribbing. Establish ribbing as follows: \*(k1,p1), repeat from \* to end of row. Continue in ribbing for 5 more rows, then bind off loosely. Thumb Ribbing: (exactly as described for Right Hand) Place 20 held stitches off of scrap yarn onto size 1 double pointed needles. Pick up additional two stitches from inside of thumb (bottom of side stripe of C2). These will be the first and the last stitches of the round: PM between them. Knit first two stitches together, p1. Establish ribbing as follows: \*(k1, p1), repeat from \* to last 2 stitches. Purl last two stitches together. Continue knitting in ribbing for 5 more rows. Bind off using loosely. Weave in your ends and try out your new Strawberry Victorian Mitts! Notes: For assistance with your Strawberry Victorian Mitts, or if you think you may have found an error, please contact the designer at mollwick@gmail.com, or on Ravelry, user molwick. More information about the pattern and the designer can be found at http://wildblueflax.tumblr.com/. This pattern is subject to copyright. You may not sell this pattern, or any items produced using this pattern.