Owls Baby Blanket
By Simone Rees Difficulty: Experienced Beginner/Intermediate PLEASE NOTE: This blanket is offered as a free download. However it is asked that you make a donation of what you think the pattern is worth (suggested - \$4.00 USD or more) to one of the charities listed at the bottom of the page. If none of the charities listed work for you, please consider giving what you think the pattern is worth to your favorite charity. Thank you!
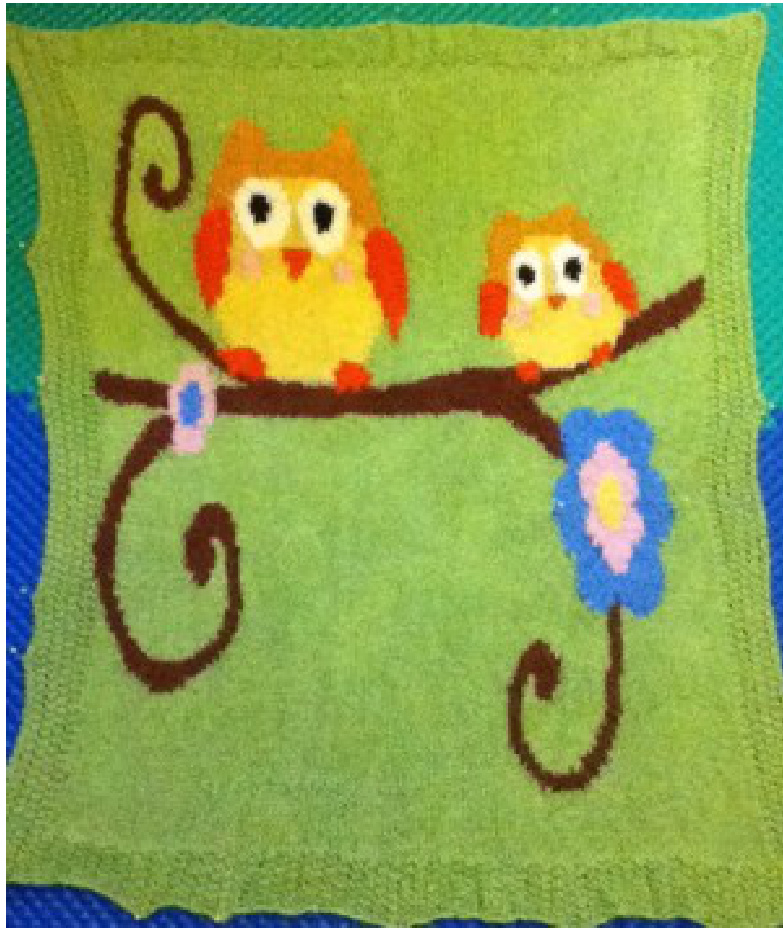
This blanket was inspired by the owl decals in my new niece's bedroom and my mother's LoVEofOwls. The graphic were inspired by from Dena Design's bedroom collection (www.denadesigns.com) and has been used and modified with permission from the designer. The blanket is offered in one size - 25 by 30ins (63.5cm by 76cm) For those new to color work, I have included links to both stranded color work and intarsia tutorials at the end of this pattern. It is STRONGLY encouraged that intarsia be used for the majority of the blanket. Stranding across small sections (center of both flowers) does work. However stranding across multiple colors tends to cause puckering. Links to tutorials for both intarsia and stranded knitting have been included at the end of this pattern. We are using this blanket as a fundraiser for our favorite charities. This pattern is offered for free with a suggested donation of \$4.00 USD (or more) to any one of the following charities: Heifer International - http://www.heifer.org/ - Heifer International's mission is to work with communities to end hunger and poverty and care for the earth. Empowers people by giving animals. Junior Diabetes Research Fund - http://jdrf.org/#donate - JDRF is the leader of the type 1 diabetes (TiD) community—unifying global efforts to cure, treat, and prevent TiD. Through a transformative vision, breakthrough innovations, and effective operations, JDRF is working to remove the impact of T1D from people's lives until we achieve a world without T1D. Autism Speaks - http://www.autismspeaks.org/ways-give - Autism Speaks is the world's leading autism science and advocacy organization, dedicated to funding research into the causes, prevention, treatments and a cure for autism. Project Linus - Providing blankets to children and adults in need. About Project Linus - http://www.projectlinus.org/about/ Donate to Project Linus - https://secure.acceptiva.com/?cst=5acf60 Designed to be gender neutral, you can swap out the colors of the Owls and the background, depending on your own preferences. The pattern comes in three files: 1. OwlsBlanket.pdf - General pattern outline - This one.. 2. OwlsChartl.pdf - Full color chart on one page. - intended to be taken to a copying place and printed on the biggest piece of paper they have. Another option is to load the pdf on a tablet device. 3. OwlsChart2.pdf - Blown up color chart over 6 pages with a white background for those who do not have access to a copying place and have a home printer. Print on 6 sheets and then tape together. The background has been changed to white for ease of home printing. SIZES One Size
FINISHED MEASUREMENTS
Approx 29.5 inches (75cms) wide by 33 inches (84cms) long
MATERIALS
Any super wash or machine washable worsted weight yarn that gives you the right gauge will do. The blanket in the photo was made with Cascade 220 super wash. Because the pattern only requires a small amount of white, black and pink, feel free to use acrylic or something machine washable of the same weight from your stash.
Yarn Suggestions
The following are specific color suggestions for the yarns used in the sample Lime Green 851 (Green): 540yds (3 balls) Tangerine Heather 907 (Orange): 48yds (1 ball) Golden 877 (Dark Yellow): 30yds (1 ball) Lemon 820 (Yellow): 44yds (1 ball) Strawberry Cream (Pink): 44yds (1 ball) Blue 846: 44yds (1 ball) Pumpkin Spice 1920 (Brown): 66yds (1 ball) White 871; uses 33yds (1 ball) Black 815; uses 22yds (1 ball) Alternate Yarn Suggestions: Knit Picks Swish Worsted .Knit Picks Brava Worsted .Berroco Comfort ?Plymouth Encore Cascade Pacific
Needles
1 set US #7/4.5mm straight needles or size to obtain gauge OR 34 inch US #7/4.5mm circular needle or size to obtain gauge (optional). I use circulars when knitting baby blankets/afghans. This keeps the weight of the blanket centered and in the lap while working on it.
Notions required
E size crochet hook (sewing in ends and in the event you drop a stitch) 2 stitch markers Tapestry needle (sewing in ends) Backing material to fit blanket (either fleece, flannel or terry toweling) - optional Cotton thread (same color as backing) - optional Sewing needle (to attach backing) - optional
GAUGE
22 sts/28 rows = 4" in stockinette stitch of the super wash unblocked. 20 sts/26 rows = 4" in stockinette stitch of the super wash blocked.
PATTERN NOTES
Seed stitch is used for the border. Alternatively, moss stitch can be used.
Seed Stitch
you have cast on an even number of stitches (as recommended in the pattern): Row 1 (RS): K1 P1 Row 2 (WS): P1 K1 If you have cast on an odd number of stitches: Row 1 (RS): K1 P1 Row 2 (WS): K1 P1 In general: knit the purl stitches and purl the knit stitches. Moss Stitch (alternative to seed stitch - optional) If you have cast on an even number of stitches (as recommended in the pattern): Row 1 (RS): K2 P2 Row 2 (WS): P2 K2 If you have cast on an odd number of stitches: Row 1 (RS): K2 P2 Row 2 (WS): K2 P2 Abbreviations K - knit P- purl
PATTERN
Cast On
LOOSELY cast on 150 stitches. If you find that your cast on is quite tight, hold a thin double point needle (dpn) (say a US 2 or 3) underneath your cast on needle whilst casting on. Remove the dpn once you have finished casting on. This will ensure your stitches are uniformly loose and will make it easier to begin working the border.
Bottom Border
Work in seed or moss stitch for 13 rows.
Blanket Body
Row 14 (RS): work in seed/moss stitch for 10 stitches. Place stitch marker. Work in K until 10 stitches from the end. Place stitch marker. Work in seed/moss stitch until the end of the row. The stitch markers make it easier to identify where to start/stop with seed stitch and when to start/stop in stockinette stitch. This is the first row of the main body of the blanket, i.e. the first row of the blanket body chart (OwlBlanketChart.pdf). Row 15 (WS): work in seed stitch for 10 stitches. Work in P until next stitch marker, or 10 stitches from the end of the row. For every row, work in seed/moss stitch for the first ten and last ten stitches and stockinette for the body. This border area is NOT included in the following chart.
Blanket Body Chart
Please see separate chart (OwlBlanketChart.pdf) for the main chart. The chart DOES NOT include the seed/moss stitch rows or border. The first stitch on the chart is the first stitch of the body of the blanket, not the border.
Top Border
After completing the last row of the body of the blanket, continue for 13 rows in seed/mossstitch. Once you have complete the 13 rows of seed/moss stitch, loosely binding off using your preferred method of binding off.
FINISHING
Sew in all ends and block blanket to dimensions. If you do not want to sew a backing to the blanket, you're finished! Congratulations.
Backing the blanket
This step is optional, yet HIGHLY recommended if the intended recipient is under the age of 10, or if the blanket is to be in constant use. This will increase the life of the blanket and reduces the risk of them “pulling” your owls and tree branches out of shape or holes developing. Colder climates - back with any fleece that is machine washable. ·Warmer climates - washable flannel or terry toweling. When buying your backing, buy a piece 1.5 bigger than you think you'll need. This will allow for any shrinkage during the washing of your backing before you cut and sew it to the blanket. ?ash and block your blanket and wash the backing BEFORE sewing it together Wash the backing the way you would the blanket - i.e. if you are going to put the blanket in the washing machine instead of hand washing, then do the same thing to the backing. Always follow the care/washing instructions of the yarn that you have used. After washing and blocking the blanket and washing the backing, cut the backing to the same size as the blanket. Place the backing and the blanket RIGHT sides together Using the needle and thread (thread color same as the backing), start on the bottom right hand side of the blanket and whip stitch around three and three quarter sides of the blanket. Start by going straight up the first long side. Turn the blanket the right way (through the open edge that you have on the fourth side. Sew remaining open section of your fourth side closed using whip stitch. So as look uniform with the other edges, fold in the backing edge slightly and sew into the 2"d stitch from the blanket edge and folding the blanket edge under. Once you get to the end of the edge, tie a knot in your thread and cut the remaining thread. Handy Links For great online tutorials for Intarsia: http://www.purlbee.com/intarsia-knitting-tutorial/ http://www.youtube.com/watch?v=gK07PBQMTE8 Stranded knitting: http://knitty.com/ISSUEwinter06/FEATwin06TT.html http://www.knittinghelp.com/video/play/fair-isle-color-knitting Loose Cast Off (Grandma's Loose Bind Off) - makes it easier to attach the backing afterwards. http://www.youtube.com/watch?v=tYMFEYvCBRE Whip Stitch tutorial: http://www.youtube.com/watch?v=zLJjS0dXYy8 Enjoy! For problems/issues questions or queries, please email me: techieangel@yahoo.com.


