
Advices
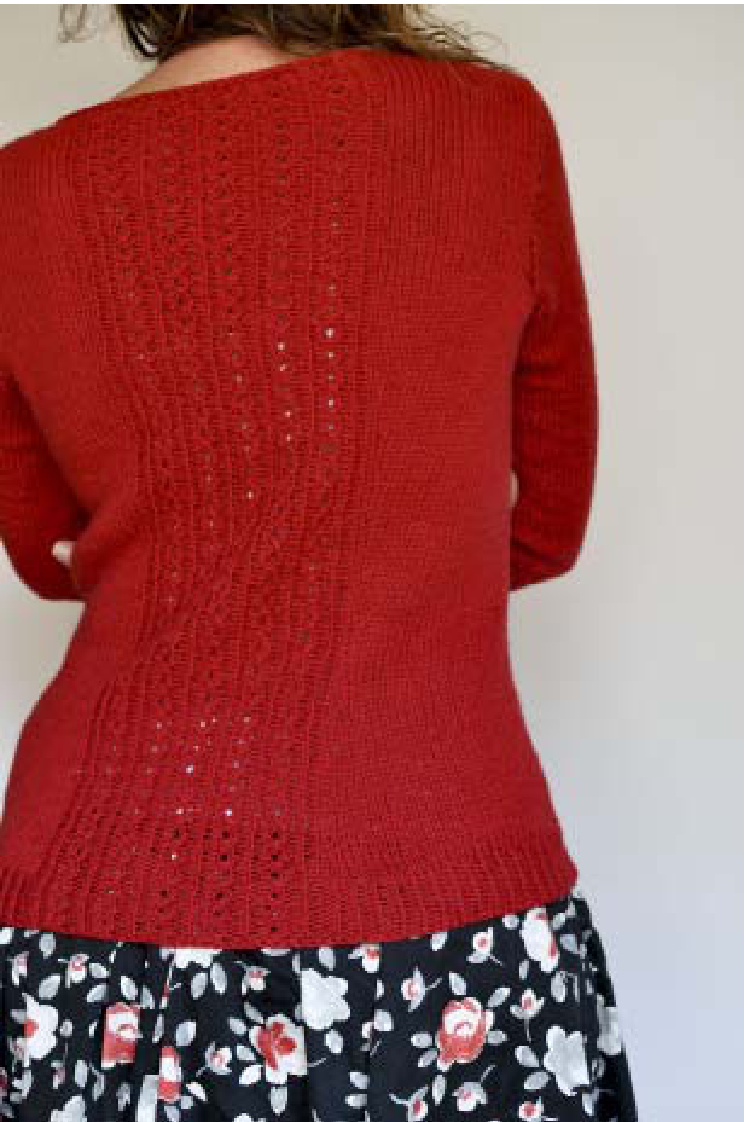
Montrouge is a feminine cardigan with the perfect length for dresses and skirts. It is knitted from the top down, in one piece, with set-in sleeves in the round. The waist and hips are shaped in a unique way on this cardigan: the shaping takes place on the front, the sides and the back, with a specific ratio to follow closely the back curve and avoid being too adjusted on the tummy. Take the time to read the chart, the glossary and the technical explanations before you begin : almost all the techniques are illustrated at the end of the pattern with detailed step-by-step pictures. The chart is a simplified version (compared to knitting standards) so it is easier to interpret : if follow the legend, you will soon realize that you already know the chart by heart. The pattern is based on standard clothing industry measurements, but very few women have identical measurements. For example you can decrease less stitches on the waist if needed. Take your bust measurements and compare them to the standard ones. You should choose the size you will knit according to your bust circumference. Everything else can be adapted.
The way you slip the first st of every chart row as an impact on the edges : to keep them neat, please read carefully the diagram legend.
Informations
Materials
.Yarn: 860(915, 990,1070, 1125, 1190, 1250) meters / 935(1000, 1080, 1170, 1230, 1300,1365) yards of 《sport / 5ply>> yarn or 6(6, 6, 7, 7, 8, 8) skeins of Quince and Co. Chickadee The model is shown in Winesap colorway.
. Needles:
Circular needles in size needed to obtain gauge (suggested: 4.5mm / US 7).
. Other:
Markers, tapestry needle, waste yarn, cable needle.
Gauge
20 sts & 30 rows = 10 cm / 4" in Stockinette Stitch, washed and blocked.

Protect the earth : To preserve our planet, I recommend that you only print the instructions, from page 4 to page 9. Thank you :)
Blueprint
Sizes : 32(34, 36, 38, 40, 42, 44, 46) Sample shown in size 36 with 2cm / 3/4 " positive ease on model at the bust area.
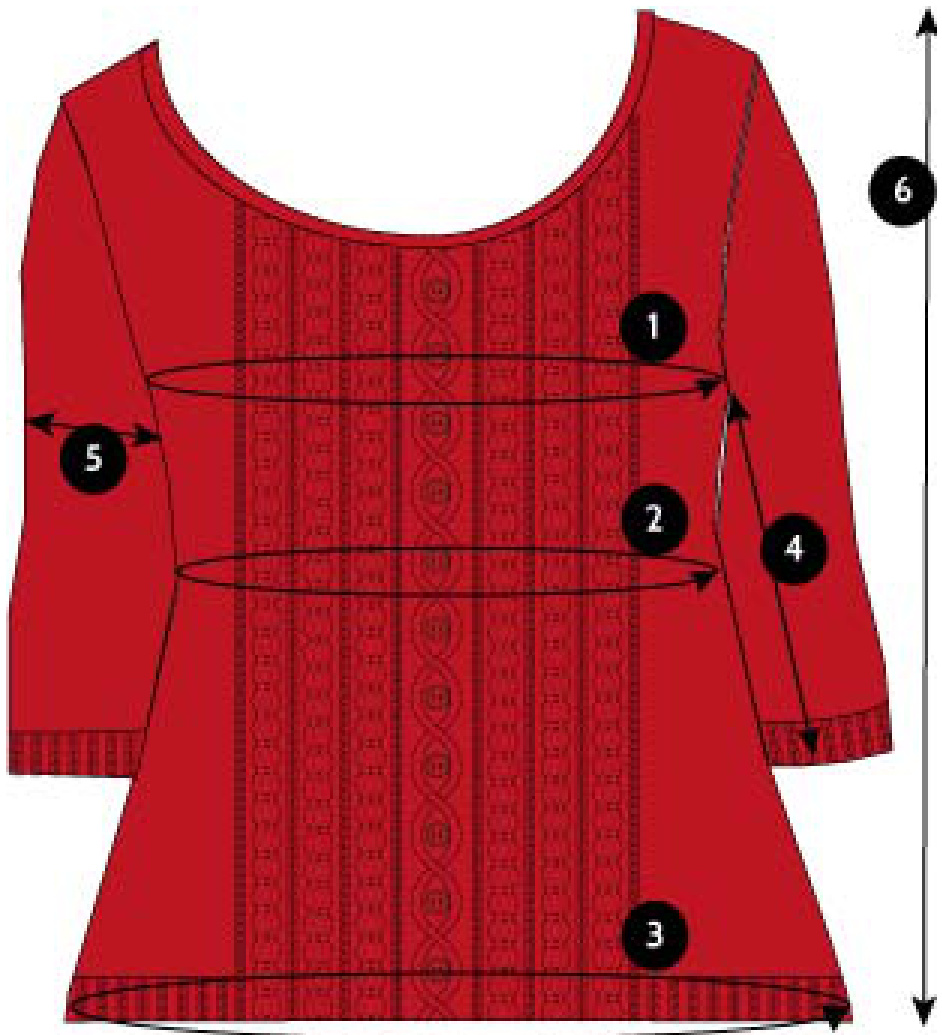
Finished dimensions
| Size | 32 | 34 | 36 | 38 | 40 | 42 | 44 | 46 |
| 1 Bust circ. | 325/8" 83 cm | 345/8" 88 cm | 365/8" 93cm | 38 1/4" 97cm | 40 1/2" 103 cm | 421/2" 108 cm | 44 1/2" 113 cm | 461/2" 118 cm |
| 2 Waist circ. | 28" 71 cm | 297/8" 76 cm | 317/8" 81 cm | 331/2" 85 cm | 357/8" 91cm | 373/4" 96 cm | 393/8" 100 cm | 413/4" 106 cm |
| 3 Hips circ. | 317/8" 81cm | 337/8" 86 cm | 357/8" 91 cm | 373/8' 95 cm' | 393/4" 101cm | 413/4" 106 cm | 433/4" 111 cm | 455/8" 116 cm |
| 4 Arm length | 113/8" 29 cm | 113/8" 29 cm | 113/8" 29 cm | 12 5/8" 32 cm | 13 3/8" 34 cm | 13 3/8" 34cm | 14 1/8" 36 cm | 14 1/8" 36 cm |
| 5 Biceps circ. | 11" 28 cm | 11 3/4" 30 cm | 12 5/8" 32 cm | 13 3/8" 34 cm | 13 3/4" 35 cm | 14 1/8" 36 cm | 14 1/8" 36 cm | 14 5/8" 37 cm |
| 6 Total length | 20 7/8" 53 cm | 21" 53.5 cm | 211/4" 54 cm | 211/2" 54.5 cm | 215/8" 55 cm | 217/8" 55.5 cm | 22" 56 cm | 22 1/4" 56.5 cm |
Standard (european) measures
To choose your size, measure your bust at the widest point.
| Size | 32 | 34 | 36 | 38 | 40 | 42 | 44 | 46 |
| Real bust circ. | 321/4" 82 cm | 341/4" 87 cm | 361/4" 92 cm | 381/4 97 cm | 401/8" 102cm | 421/8" 107cm | 441/8" 112 cm | 46" 117 cm |
The pattern, pictures and instructions can not be used for commercial use without the author written approval. For any questions contact me at elise.dupont@gmail.com http://elisedupont.fr/
Back
Cast 0n 58(64, 68, 70, 74, 80, 86, 88)sts Setup row: K 15(18, 20, 21, 23, 26, 29, 30)sts, place marker (pm), \*P1, 1K TBL, P1, K2\* (repeat instructions between \* \* 5 times), P1, K1 TBL, P1, pm, K 15(18, 20, 21, 23, 26, 29, 30)sts. You now have 15(18, 20, 21, 23, 26, 29, 30)sts on each side and 28sts at the center.
Shape shoulders:
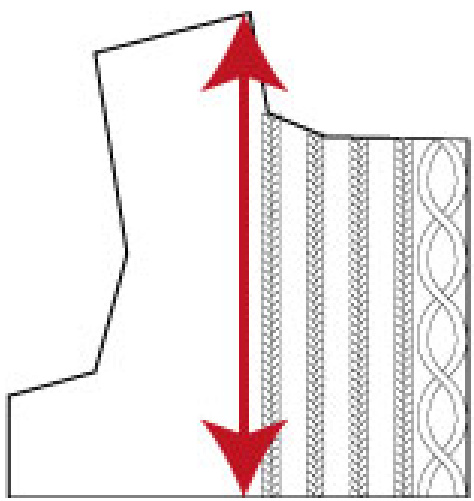
Row 1 : P to m, sm, knit Row 1 of Back Pattern Chart, sm, P 7 (7, 7, 8, 8, 9, 9, 10)sts, W&T. Row 2 : K to m, sm, knit Row 2 of Back Pattern Chart, sm, K7 (7,7, 8, 8, 9, 9, 10)sts, W&T. Row 3 : P to m, sm, knit Row 3 of Back Pattern Chart, sm, P 7 (7, 7, 8, 8, 9, 9, 10)sts, work wrapped st. P 4(4, 5, 5, 6, 7, 7, 7)sts, W&T. Row 4 : K to m, sm, knit Row 4 of Back Pattern Chart, sm, K 7 (7, 7, 8, 8, 9, 9, 10)sts, work wrapped st. K 4(4, 5, 5, 6, 7,7, 7)sts, W&T. Next row, work wrapped sts as you come to them. Continue back and forth, repeating Back Pattern Chart (Rows 1 to 4) until piece measures 15.5(15.5 , 16, 16, 16.5, 17, 16.5, 16.5) cm / 6 1/8(6 1/8 , 6 1/4, 6 1/4, 6 1/2, 6 3/4, 6 1/2, 6 1/2) inches from CO along the armhole edge. Do not measure from center back. End with a WS row.
Armholes:
Increase at each side: K1, M1L, K to m, sm, continue to work the pattern, sm, K to one st, M1R, K1. Work 2 increases each RS row 3(3, 4, 5, 6 ,6 ,6 ,7) times.End with aWS row. Next row (RS), CO 3 sts, K to m, sm, continue to work the pattern, sm, K to end, CO 3sts. You now have 21(24, 27, 29, 32, 35, 38, 40)sts on each side of the markers. Write here the last worked Row of Back Pattern: This number is important because you will need to end with this same number for the fronts. Example : I ended with R3 from Back Pattern, and I will need to end my fronts with the same number later. Place sts on waste yarn to work later. Cut yarn leaving 20cm / 8" tail.
Right Side Front
With RS facing and beg at right armhole edge, pick up and K 1 st in each of the following number of CO sts : 12(14, 15, 16, 18, 20, 22, 24) sts.
Next row (WS) : P all Next row (RS) : K all.
Shape shoulders:
Row 1(WS) : P 3(3,2,3, 3, 3, 2,2)sts, W&T. Row 2 : K all, turn. Row 3 : P 3(3,2,3,3, 3, 2, 2 )sts, work wrapped st, P 4(4, 5, 5,6, 7,7,7)sts, W&T. Row 4 : K all, turn. Row 5 : P to previously wrapped st, work wrapped st, P till the end of the row. Knit back and forth 19 more rows, working wrapped st as you come to it. At the 2Oth row, CO 6 sts at the end of the row.
Right Front Pattern :
Row 1 :P1 TBL, K1, P2, K1, P1 TBL, K1, pm. P to the end of row. Row 2 : K to m, sm, P1, K1 TBL, P1, K1, YO, K1, P1, K1 TBL then CO 6 sts. RoW3 :P1TBL,K1,P3,K1,P1TBL,K1,P3,K1,P1 TBL, K1, sm, P to the end of row. Row 4 : K to m, sm, P1, K1 TBL, P1, [K3, pass the 3rd st on right-hand needle over the first 2 sts], P1, K1 TBL, P1, [K3, pass the 3rd st on right-hand needle over the first 2 sts], P1, K1 TBL then CO 17sts. From now, you are going to follow the Right Front Cable Band Chart and the Right Front Pattern Chart, repeating the row 1 to 12 till the end: Row 5 : Row 1 Right Front Cable Band Chart, Row 1 Right Front Pattern Chart, sm, P to end. Row 6 : K to m, sm, Row 2 Right Front Pattern Chart, Row 2 Right Front Cable Band Chart Continue back and forth, repeating Right Front Cable Band Chart (rows 1 to 12) and Right Front Pattern chart (Rows 1 to 4) until piece measures 15.5(15.5, 16, 16,16.5, 17,16.5, 16.5) cm / 6 1/8(6 1/8 , 6 1/4, 6 1/4, 6 1/2, 6 3/4, 6 1/2, 6 1/2) inches from CO along the armhole edge. Do not measure from center back. End with a WS row. Next row, increase at the beginning of each RS row: K1, M1L, continue to work till the end. Work 1increase each RS row 3(3, 4, 5, 6 ,6 ,6 ,7) times total, ending with a WS row. Next row, CO 3 sts, K to m, sm, continue charts. You now have 17(19, 21, 23,26,28, 30, 33) st sts (we do not count the chart sts as the sts number can vary, depending of the row where you stopped). This last row must end with the same Right Front Pattern Chart row number than the one you wrote down for the Back Pattern Chart.
Write here the Right Cable band chart number:
Place sts on waste yarn to work later. DO NOT CUT THE YARN. Use a new ball of yarn for the left side.
Left Side Front With RS facing and beg at left armhole edge, pick up and K 1 st in each of the following number of CO sts : 12(14, 15, 16, 18, 20, 22, 24) sts. Next row (RS) : K all Next row (WS) : P all
Shoulders short rows:
Row 1(RS) : K 3(3,2,3,3, 3, 2,2)sts, W&T Row 2 : P all, turn. Row 3 : K 3(3, 2, 3, 3, 3, 2, 2 )sts, work wrapped st, K 4(4, 5, 5, 6,7,7, 7)sts, W8T. Row 4 : P all, turn. Row 5 : K to previously wrapped st, work wrapped st, K till the end of the row. K back and forth 19 more rows working wrapped st as you come to it. At the 19th row, CO 6 sts at the end of the row.
Left Front Pattern:
Row 1: K1 TBL, P1, K2, P1, K1 TBL, P1, pm. K to the end of row. Row 2 : P to m, sm, K1, P1 TBL, K1, P2, K1, P1 TBL then CO 5 sts. Row 3 : K1 TBL, P1, K1, YO, K1, P1, K1TBL, P1, K1, YO, K1, P1, K1 TBL, P1, sm, K to end. Row 4 : P to m, Sm, K1, P1 TBL, K1, P3, K1, P1 TBL, K1, P3, K1, P1 TBL, then CO 18sts. Row 5: SL1,P3, K2, P1, K2, P3, K1TBL, P1, [K3, pass the 3rd st on right-hand needle over the first 2 sts], P1, K1 TBL, P1, [K3, pass the 3rd st on right-hand needle over the first 2 sts], P1, K1 TBL, P1, [K3, pass the 3rd st on right-hand needle over the first 2 sts], P1, K1 TBL, P1, sm, K to end. From now, you are going to follow the Left Front Pattern Chart and the Left Front Cable Band Chart, repeating the row 1 to 12 till the end: Row 5: P to m, sm, Row 1 Left Front Pattern Chart, Row 1 Left Front Cable Band Chart Row 6: Row 2 Left Front Cable Band Chart, Row 2 Left Front Pattern Chart, sm, K to end. Continue back and forth, repeating Right Front Cable Band Chart (rows 1 to 12) and Right Front Pattern chart (Rows 1 to 4) until piece measures 15.5(15.5 ,16, 16, 16.5, 17, 16.5, 16.5) cm / 6 1/8(6 1/8 , 6 1/4, 6 1/4, 6 1/2, 6 3/4, 6 1/2, 6 1/2) inchesfrom CO along the armhole edge. Do not measure from center back. End with a WS row. Next row, increase at the end of each RS row: Work charts, sm, K to one st, M1R, K1. Work 1increase each RS row 3(3, 4, 5, 6 ,6 ,6 ,7) times total, ending with a WS row. Next row, CO 3 sts, K to m, sm, continue charts. You now have 17(19,21,23,26,28,30,33) st sts (we do not count the chart sts as the sts number can vary, depending of the row where you stopped). This last row must end with the same Right Front Pattern Chart row number than the one you wrote down for the Back Pattern Chart. This last row must also have the same Cable chart number as the Right Cable band chart number. Place sts on waste yarn to work later. Cut yarn. Now your new yarn is the one from the Right Side Front, indicating the beginning of the row.
Body
Beginning with WS of Right Side Front, you are going to join all pieces together: Continue Right charts, sm, P to end of Right Front, CO 5 sts, pm, CO 5 sts, P Back piece to m, sm, continue Back Pattern chart, sm, P to end of the Back piece, CO 5 sts, pm, CO 5 sts, P Left Side piece to m, sm, continue Left charts. You now have 96(106, 116, 124, 136, 146, 156, 166) st sts (we do not count the chart sts as the sts number can vary, depending of the row where you stopped).
Continue to knit back and forth until piece measures 23(23.5, 24,24.5, 25, 25.5, 26,26.5)cm / 9(9 1/4, 9 1/2, 9 5/8, 9 7/8, 10, 10 1/4, 10 3/8) inches from the top of the cardigan, taking the measurement at the base of the neck.
Waist:
The decreases are always done on a RS row.
Decreases n1 :
Continue chart, sm, K2, K2 tog, K to m, sm, K to 4 sts before m, SSK, K2, sm, continue Back chart, sm, K2, K2 tog, K to m, sm, K to 4 sts before m, SSK, K2, sm, continue chart. K 7 rows, and do Decreases n°2:
Decreases n°2 :
Continue chart, sm, K to m, sm, K1, K2 tog, K to 4 sts before m, SSK, K2, sm, continue Back chart, sm, K2, K2 tog, K to 3 sts before m, SSK, K1, sm, K to m, sm, continue chart. Continue in pattern for 7 more rows, and do Decreases n°1 Continue in pattern for 7 more rows, and do Decreases n°2 Continue in pattern for 7 more rows, and do Decreases n°1 Continue in pattern for 7 more rows, and do Decreases n°2 You now have 72(82, 92, 100, 112, 122, 132, 142) st sts (we do not count the chart sts as the sts number can vary, depending of the row where you stopped). Work back and forth 7 more rows without any decrease. Next row, we are going to work hips increases. Continue chart, sm, K2, M1L, K to m, sm, K to 2 sts before m, M1R, K2, sm, continue Back chart, sm, K2, M1L, K to m, sm, K to 2 sts before m, M1R, K2, sm, continue chart. Continue in pattern for 7 more rows, and do Increases 2.
Increases n°2 :
Continue chart, sm, K to m, sm, K1, M1L, K to 2 sts before m, M1R, K2, sm, continue Back chart, sm, K2, M1L, K to 1 sts before m, M1R, K1, sm, K to m, sm, continue chart. Continue in pattern for 5 more rows, and do Increases n°1. Continue in pattern for 7 more rows, and do Increases n°2. Continue in pattern for 7 more rows, and do Increases n°1. Continue to work back and forth without any more increases until you end with a Row 12 from the Cable charts. You now have 92(102,112,120, 132,142, 152, 162) st sts (we do not count the chart sts as the sts number can vary, depending of the row where you stopped).
Edging:
Repeat a new series of the charts (for 12 more rows) and between the charts, work in twisted 1x1 rib: \*K1TBL,P1TBL\* Ending with a row 12 of the Cable charts and a row 4 for front and back pattern, Bind off loosely all sts, knitting the K and purling the P.
Sleeves
With pick up and K armhole sts, beg at center of underarm: Pick upandK5sts underarm, pick up and K (approximately every other stitch) to shoulders 《seam>>: 23(25, 27, 29,30, 31, 31, 32) sts, pick up and K (approximately every other stitch) to underarm: 23(25, 27, 29, 30, 31, 31, 32) sts, pick up and K 5 sts, PM.
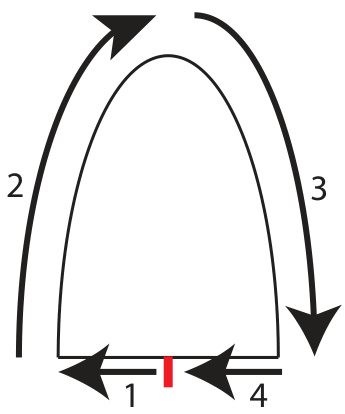
You now have 56(60,64, 68, 70, 72, 72, 74)m. From now on, K in round. Shape cap: K36(38,40,42,43,44,44,45)sts, W8T P16, W&T. K 16, work wrapped st, K1, W&T. P 18, work wrapped st, P1, W&T. K 20, work wrapped st, K1, W&T. Continue to wrap the 2nd st after the previous gap and turn work at each side 3(3, 4, 6, 7, 8, 8, 8) times more. Then, work to previously wrapped st, work it, wrap and turn next st and turn. Repeat this step (wrapping the next st after the previous gap) for a total of 5 times for each side (RS and WS), ending with a WS. Then work 2 sts past turning gap, wrap the next st and turn. Do the same for the WS row. Then work to 1 st before marker, wrap the next st and turn. Do the same for the WS row. Turn. K to last wrapped st, work it, sm, work wrapped st, K to end of the round. Work even in rounds until the sleeve measures 1 5/8 inches from underarms. Begin decreases:
K1, K2 tog, K to 3 sts, SSK, K1.
Repeat the decreases every 10th row O(0, 0, 0, 0, O, O, 3) more times. Repeat the decreases every 8th row 5(5, 5, 6, 9, 9, 9, 5) times Repeat the decreases every 6th row 5(5, 5, 4, 0, O, O, O) times. Work 12 rows in 1x1 twisted rib : \*K1 TBL, P1 TBL\* Bind off loosely all sts.
Neck
Pick up and K neck sts, beg at one of the fronts. Pick up with the following ratio: Fronts : where you made the front increases pick up and K3 out of the next 4 stitches. At the middle front (where you have the cable chart) pick up and K all sts. Back : each sts Do not join, you are going to make an i-cord now. CO3sts. K 2, K2tog. Slip all sts to left needle. Go on until you have 3 sts left. K together the 3 remaining sts. Break your yarn and pull it through the remaining loop. Weave in ends, wash and block the pullover.
Glossary
K: Knit P: Purl M: Marker PM: Place marker SM: Slip marker RS: Right side WS: Wrong side CO: Cast on YO: Yarn Over K1 TBL: Knit 1 st through the back loop P1 TBL: Purl 1 st through the back loop K2tog: Knit 2 sts together SSK: slip slip knit W&T: Wrap and turn, see techniques below. Work wrapped st: see techniques below. CO st: see techniques below. M1L: Make one left. See techniques below. M1R: Make one right. See techniques below. CN: cable needle
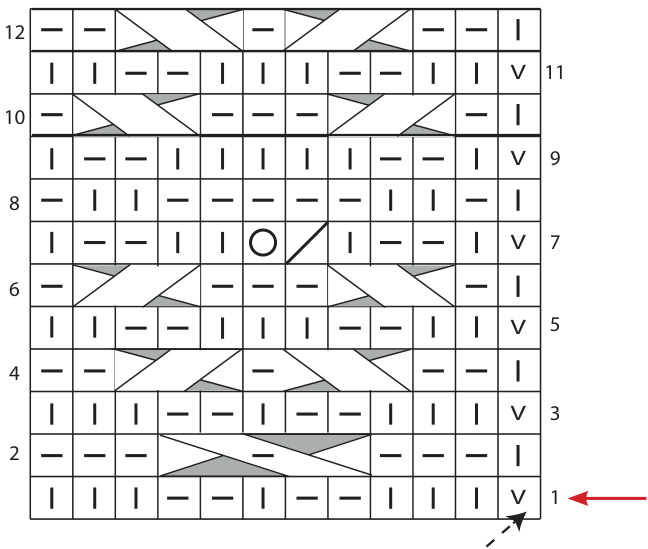
Back pattern
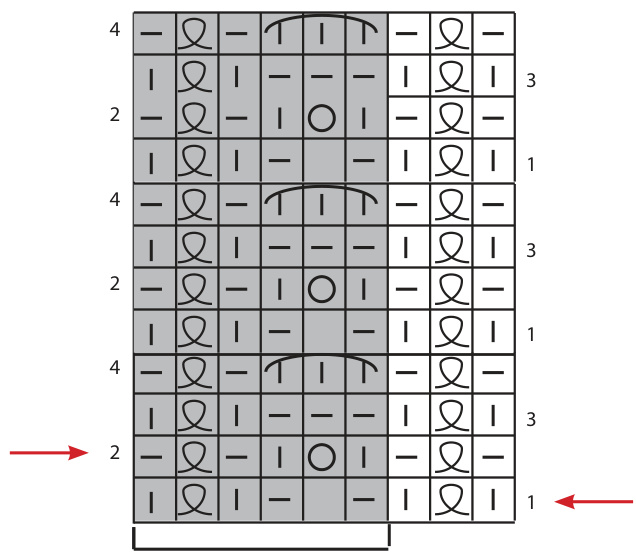
Repeat 5 times
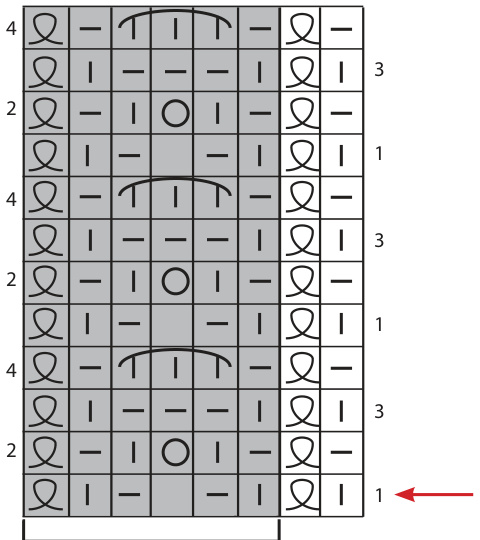
Right Front Cable Band
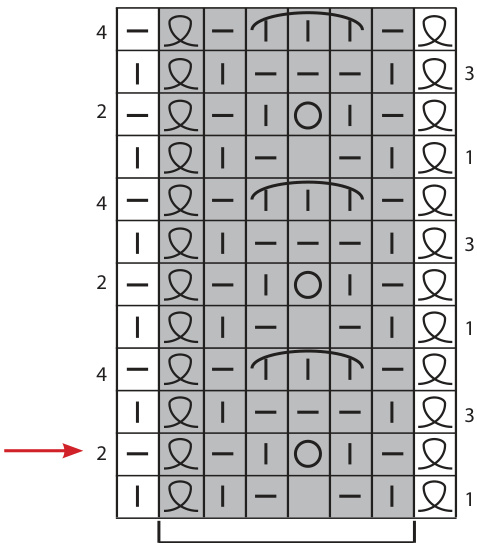
Repeat 3 times
Left Front pattern For the first row, K this st. Then for allother times, slip it a explained in the legend.
Repeat 3 times The pattern, pictures and instructions can not be used for commercial use without the author written approval. For any questions contact me at elise.dupont@gmail.com http://elisedupont.fr/ K3, pass the 3rd st on right-hand needle over the first 2 sts 3 LPC : Slip 2 st to cn and hold front, P1, then K2 from cn. 5RPC:Sli3stsoncnand hold back,K2, slthe Pst backtoleft-hand nee Right Front pattern Right Front Cable Band
| Repeat 3 times Repeat5 times Repeat 3 times times, slip it as explained in the legend. For the first row, K this st. Then for all other | ||||||||||
| 一 | ||||||||||
| W | 6 | < 二 |
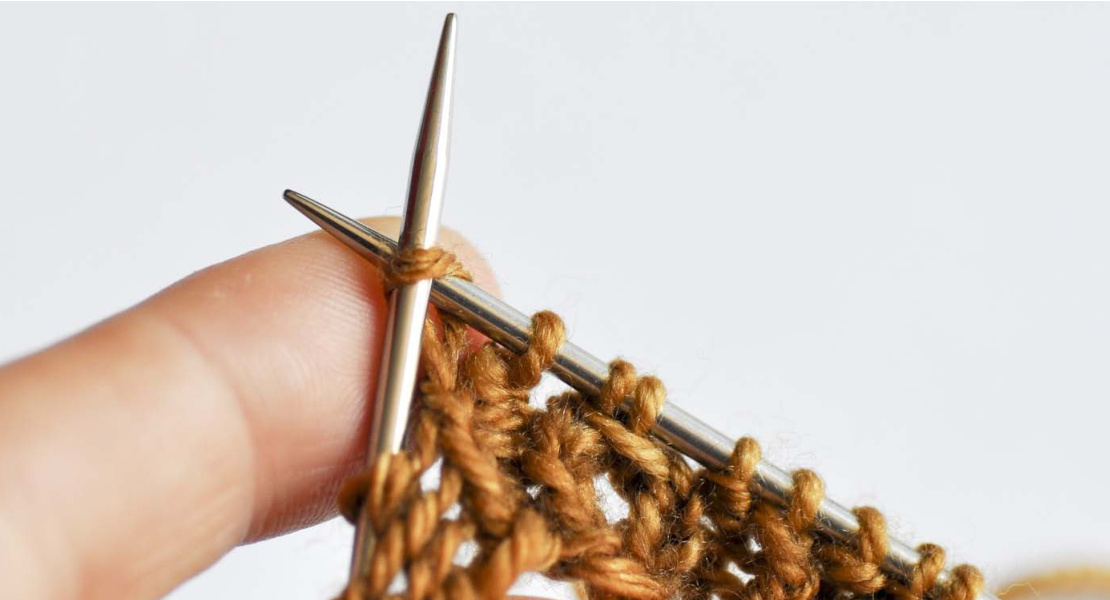
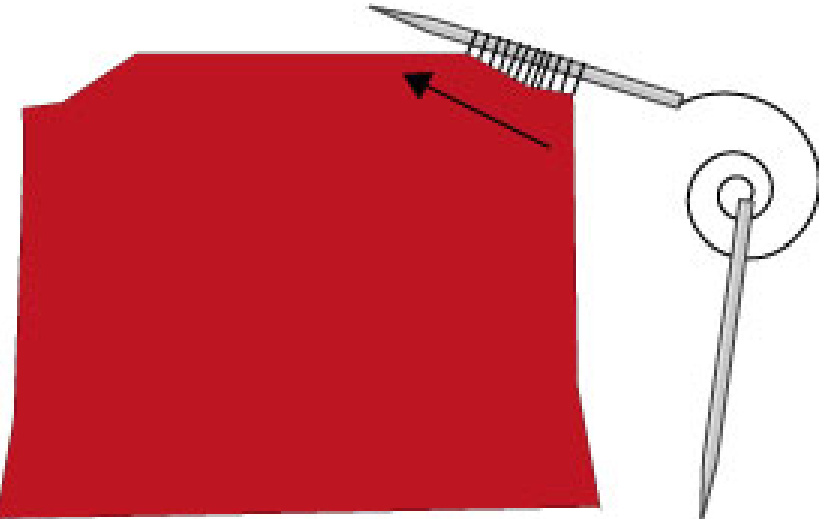
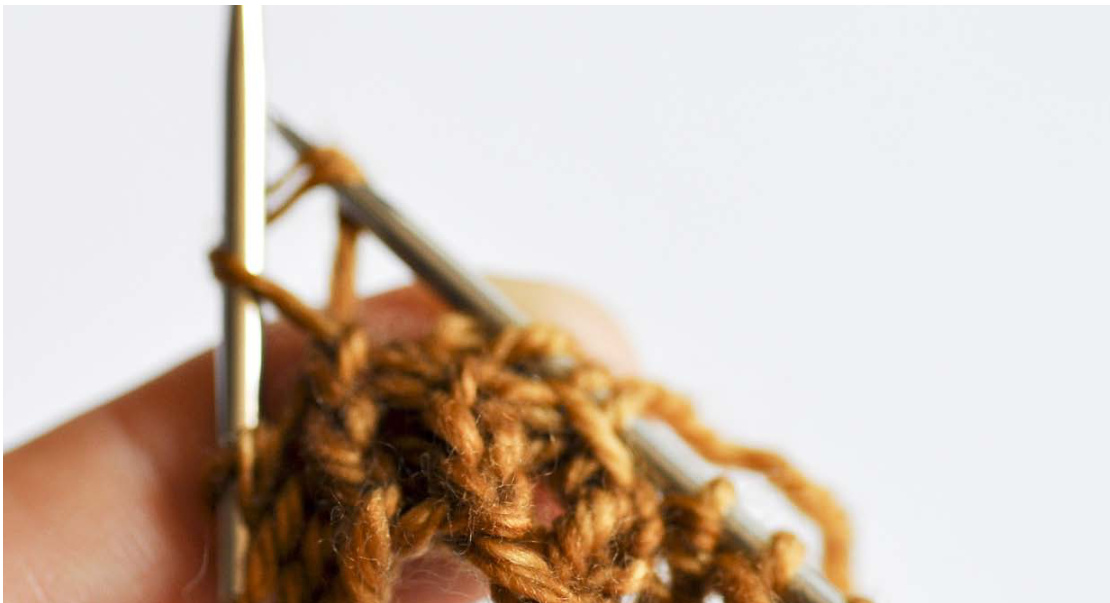
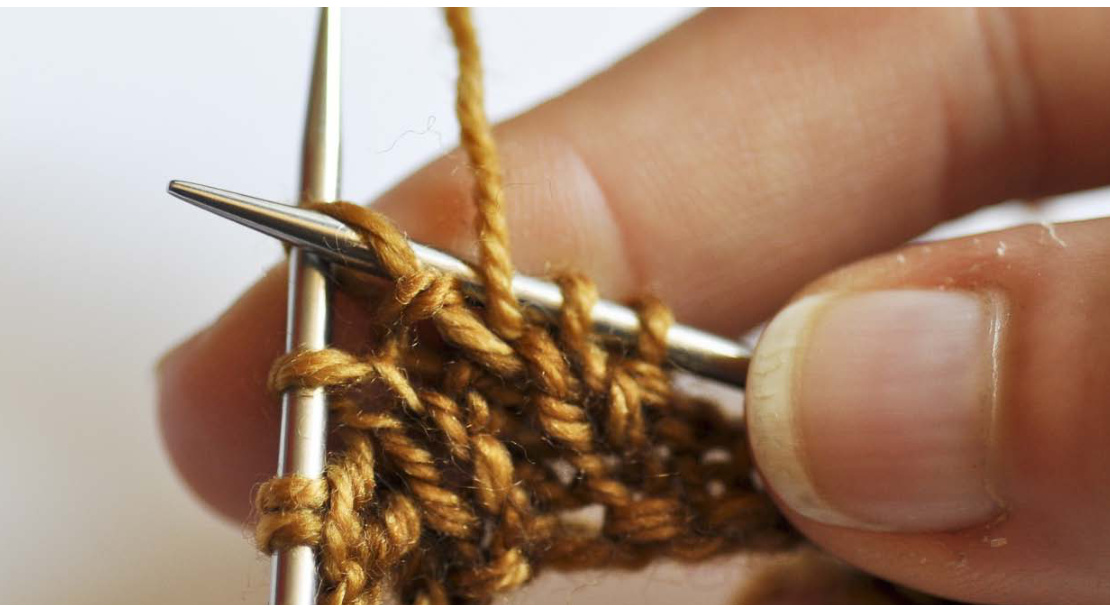
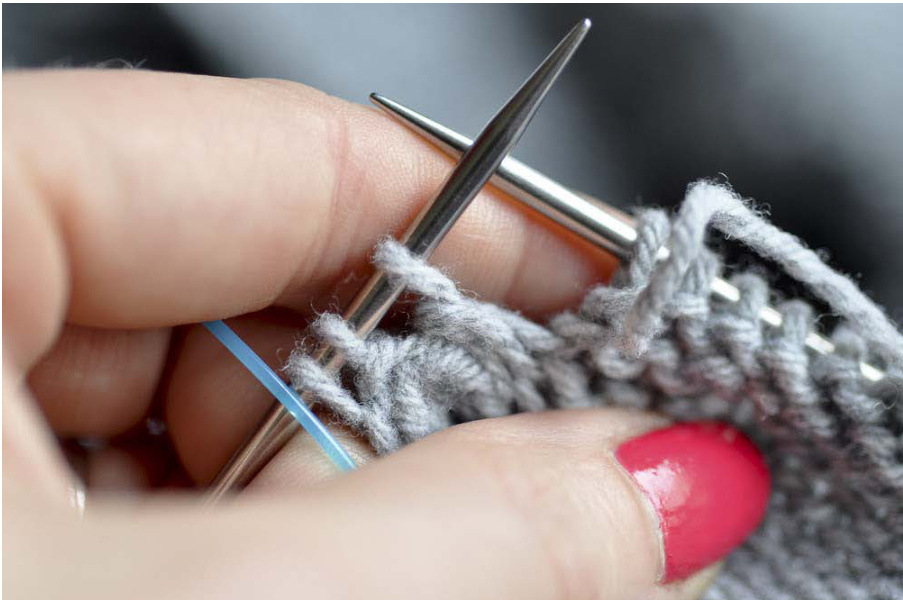
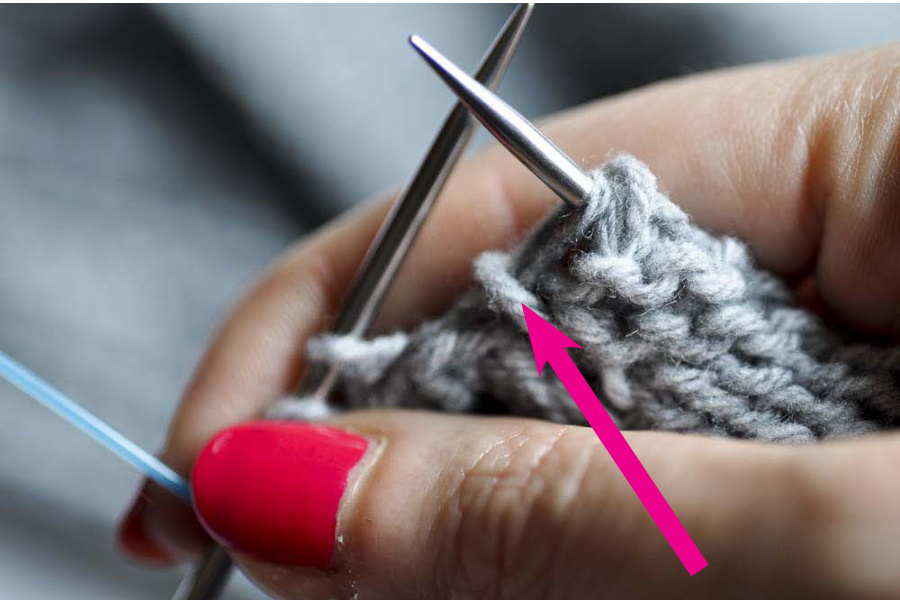
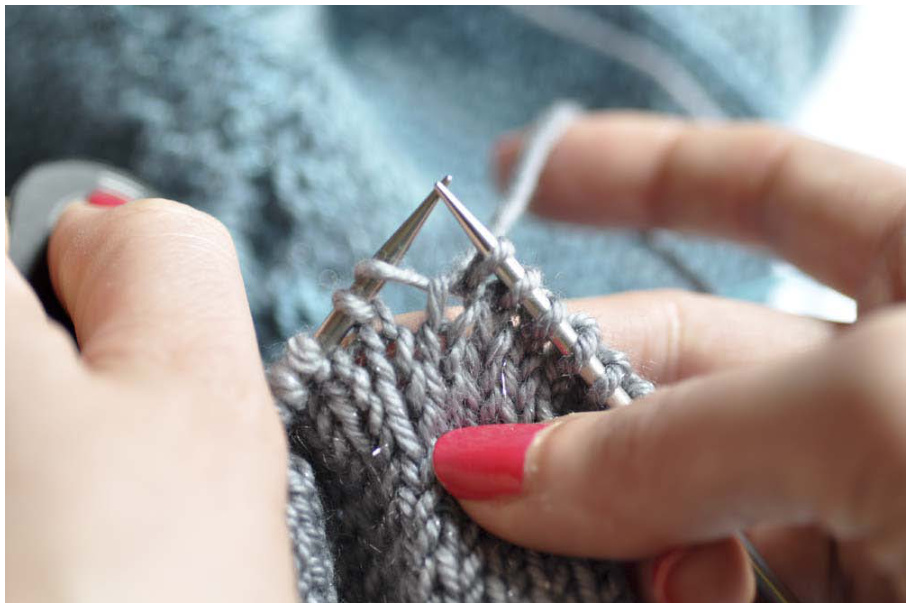
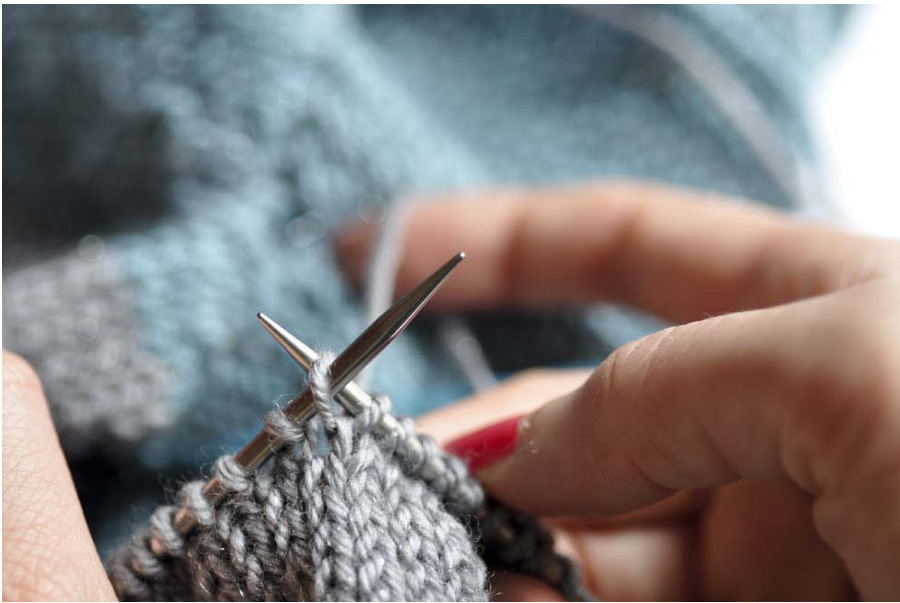
Here is how looks a normal K : the needle goes through the front loop: For a K1 TBL, the needle goes inside the loop through the back loop:
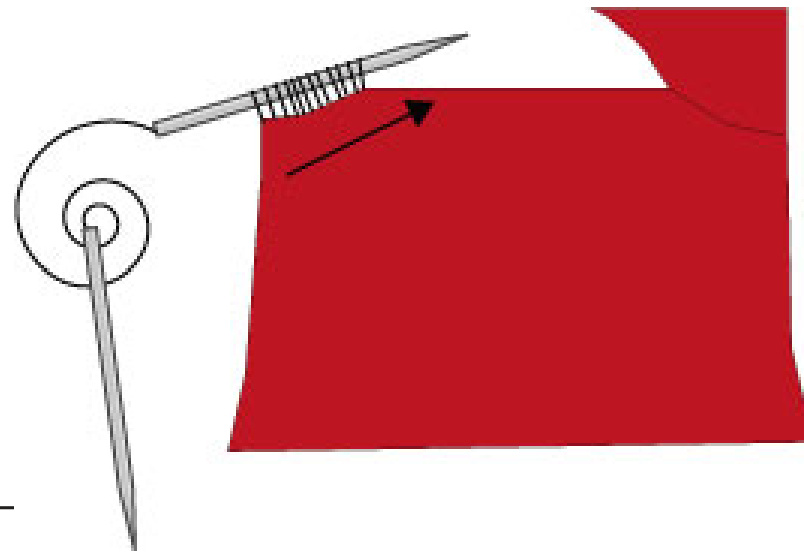
Look from an other angle:
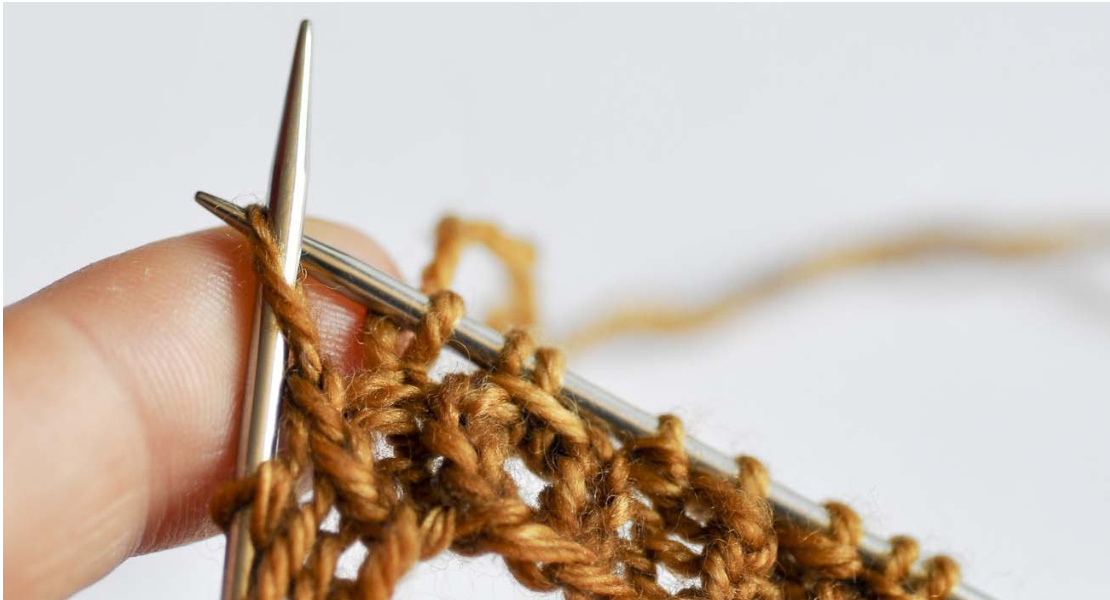
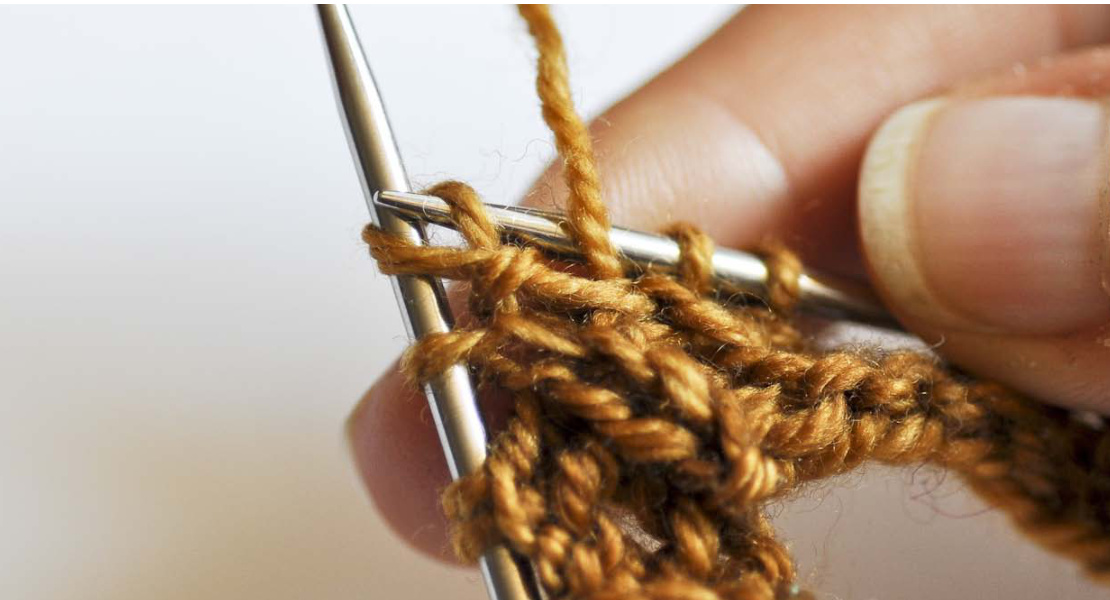
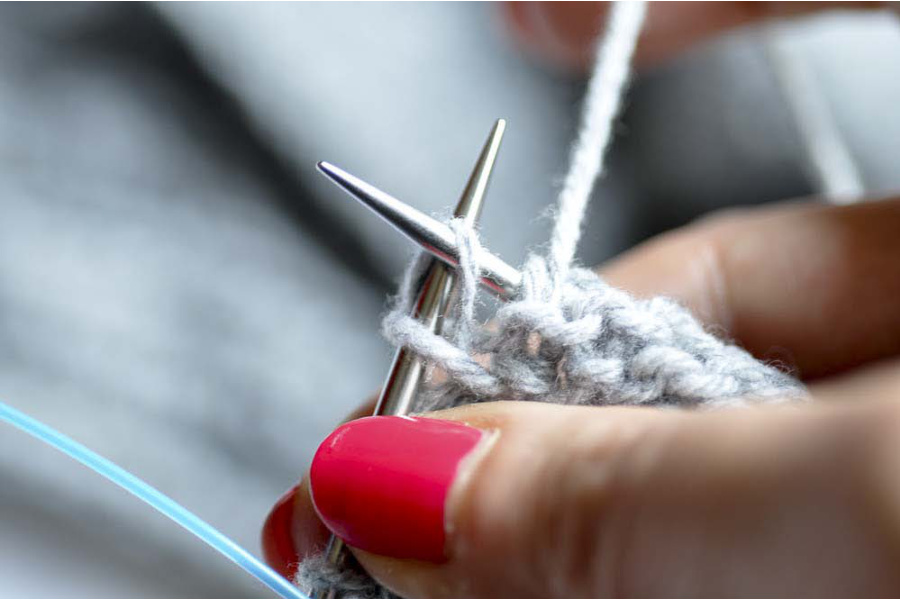
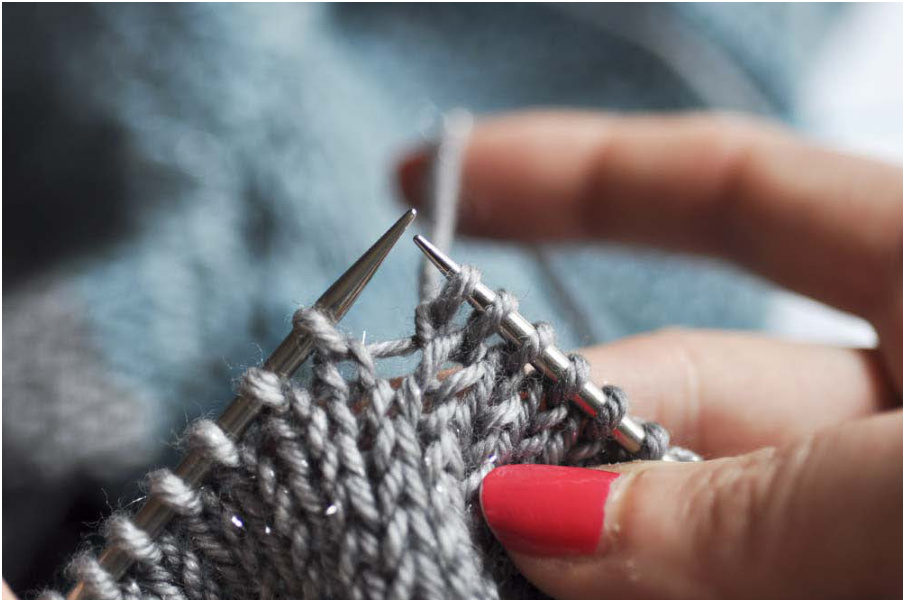
Here is how looks a normal P : the needle goes through the front loop:
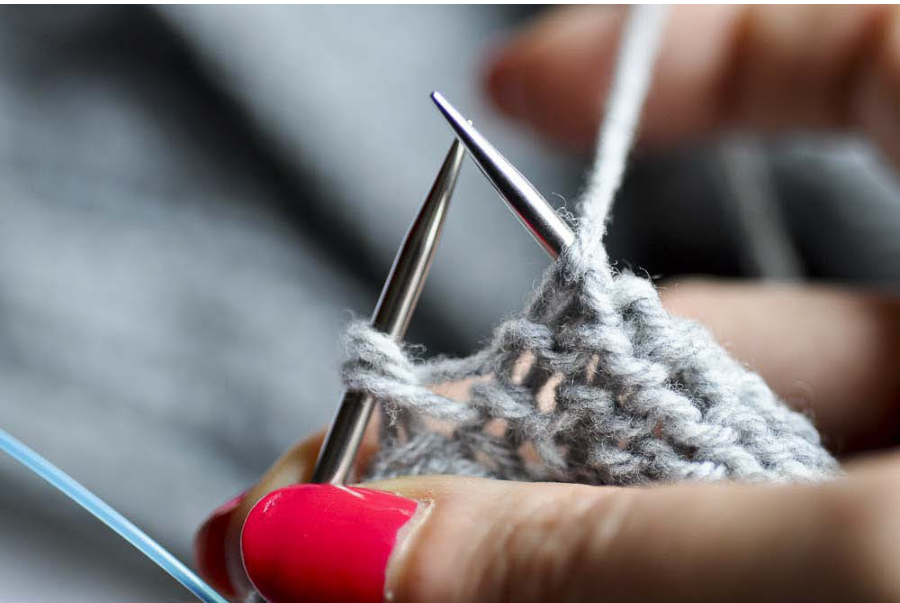
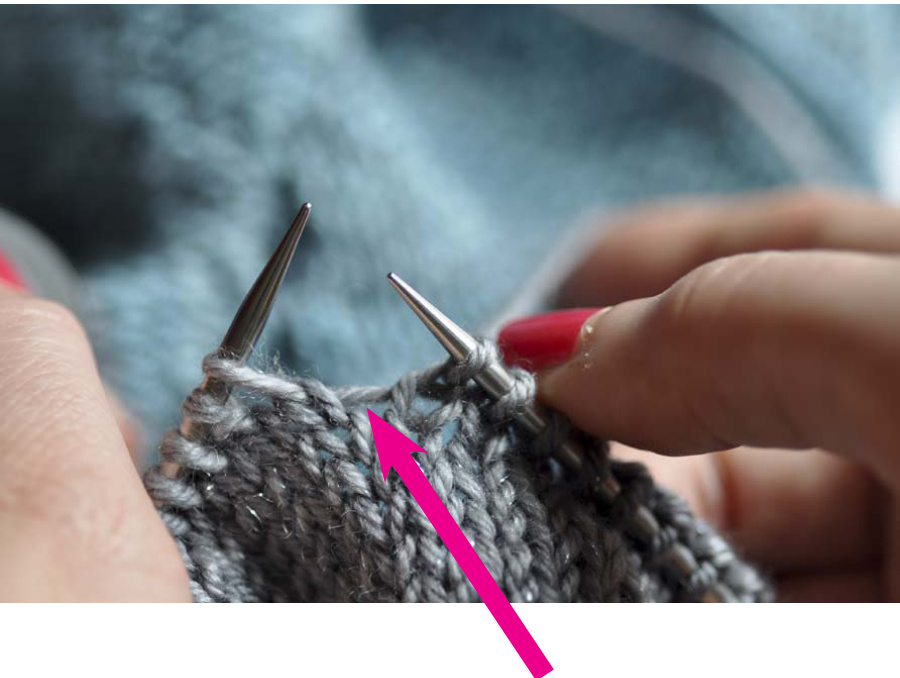
For a P1 TBL, the needle goes inside the loop through the back loop:
K3, pass the 3rd st on right-hand needle over the first 2 sts : TT
After K3, put your left-hand needle through the 3rd sts on the right-hand needle
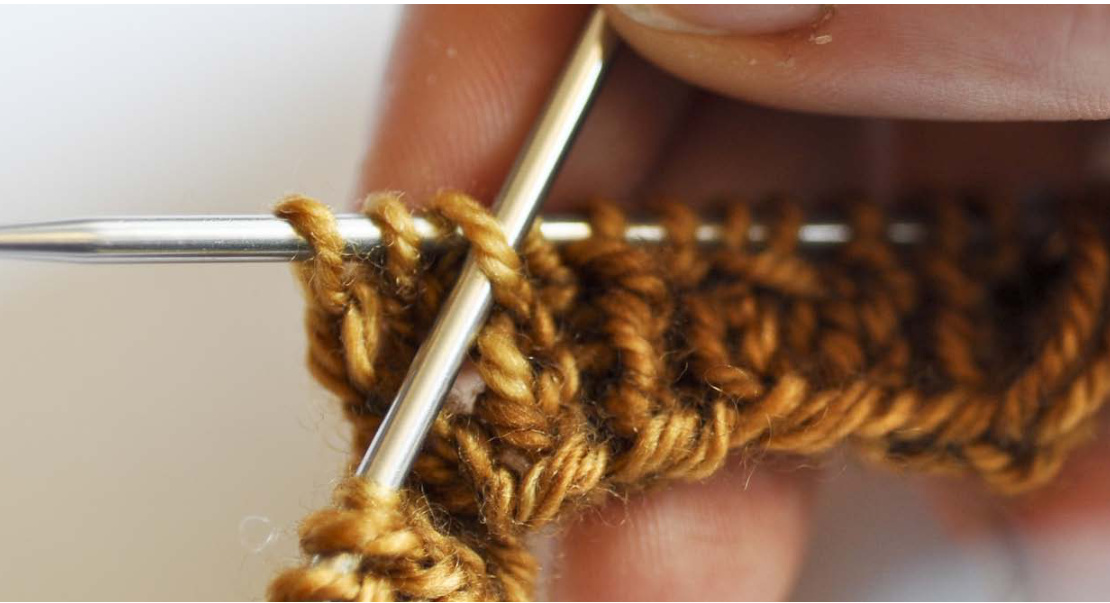
Pass it over the first 2 sts:
Here is the final result:
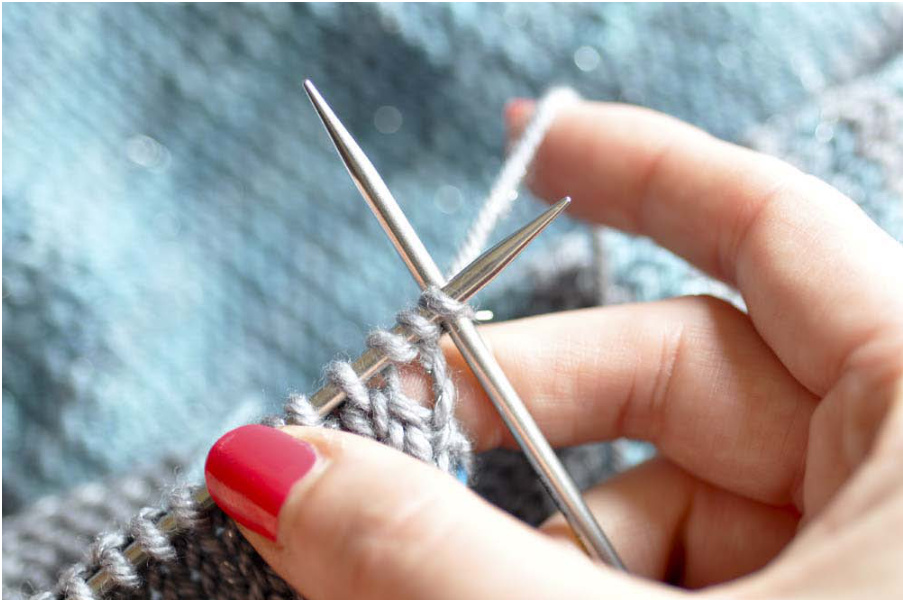
W&T (RS)
Slip the st to right needle as if to purl:
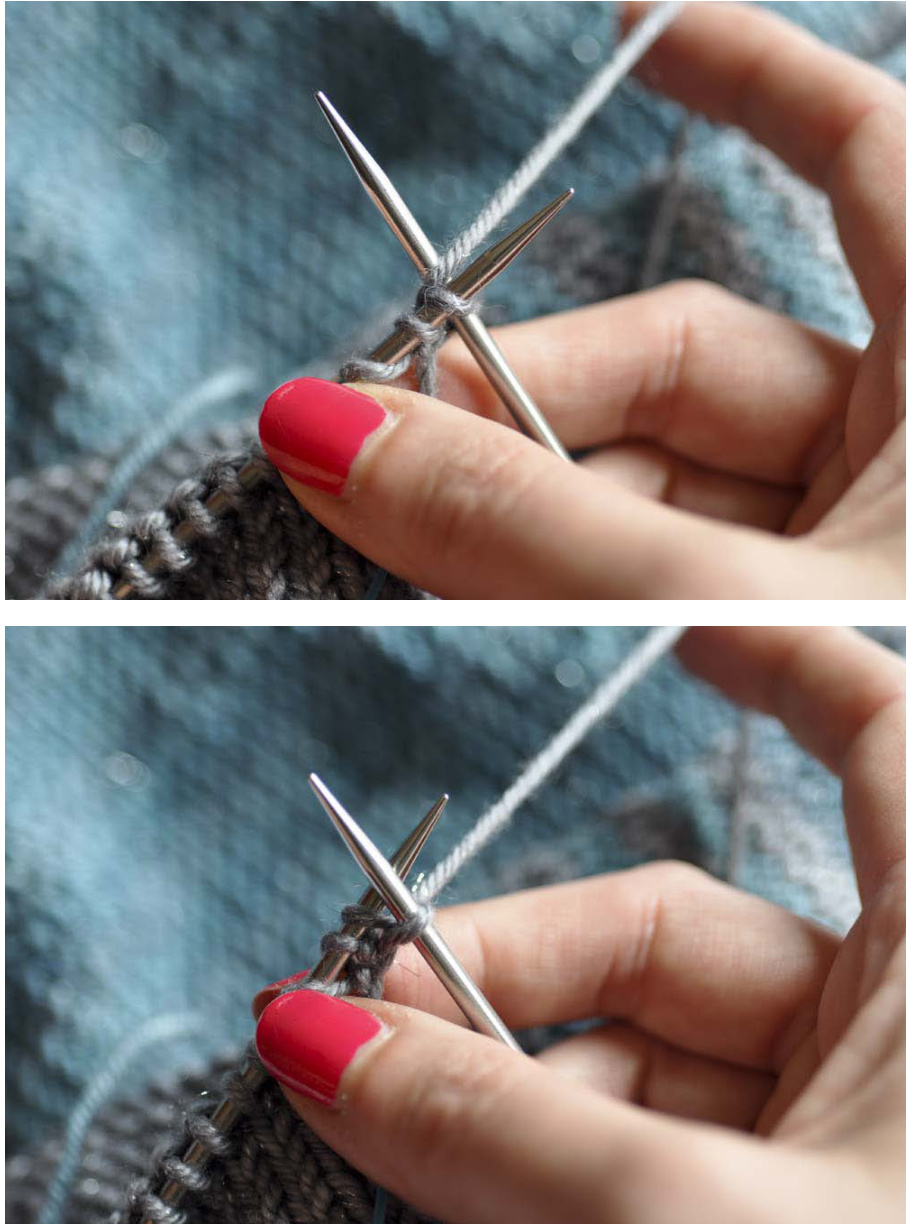
Bring the yarn to the front:
Slip the stitch back onto the left hand needle;
Turn the work, you can now go on with the WS:
W&T(WS)Slip the st to right needle as if to purl and bring the yarn to the back:
Slip the stitch back onto the left hand needle:
Turn the work, you can now go on with the RS:
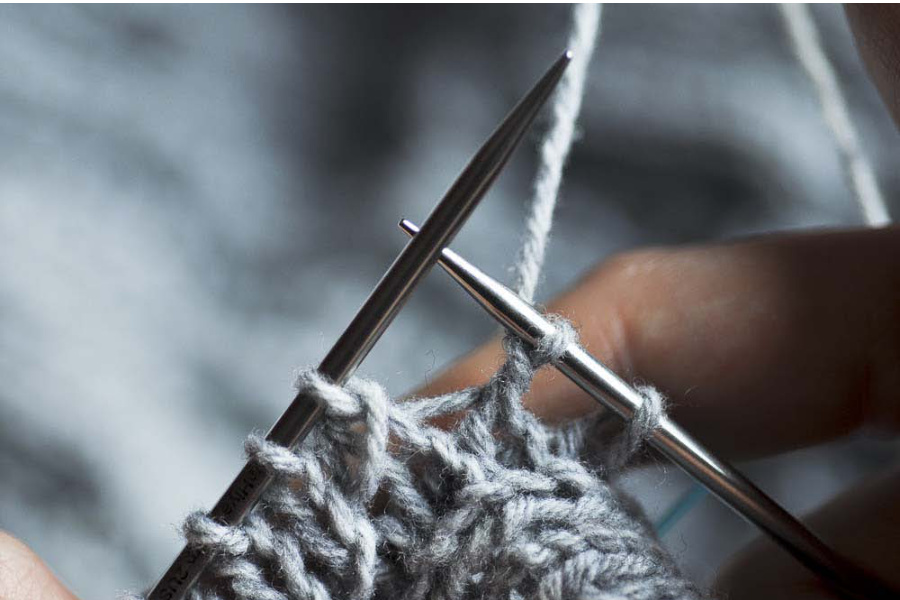
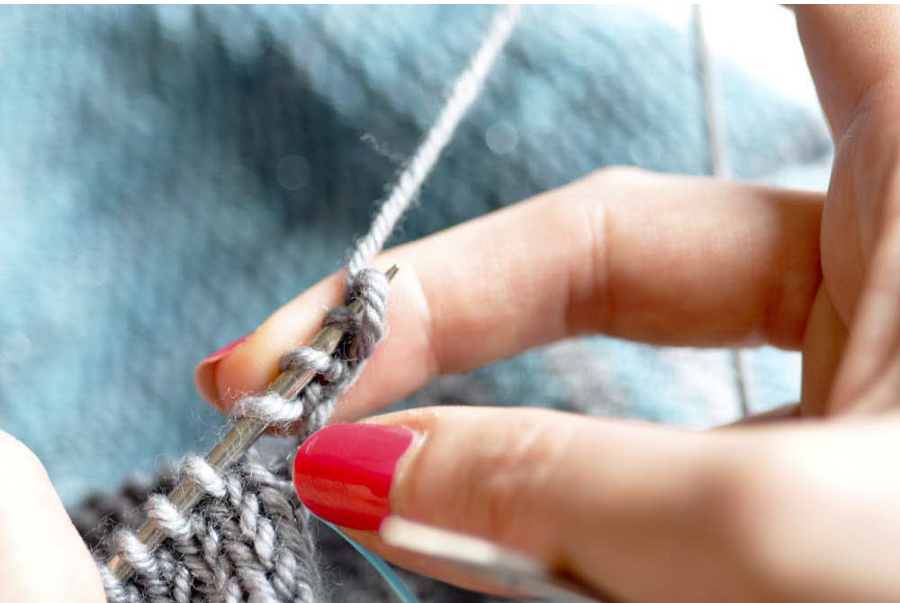
Work the wrapped st (RS row)
The wrapped st is on the left hand needle:
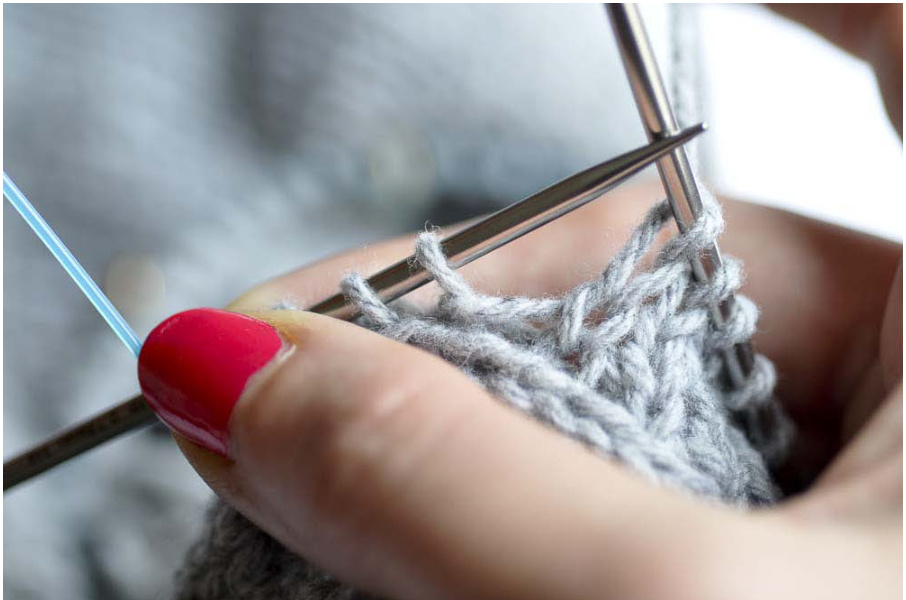
Slip the st as if to purl, to the right hand needle. Notice the little bump below:
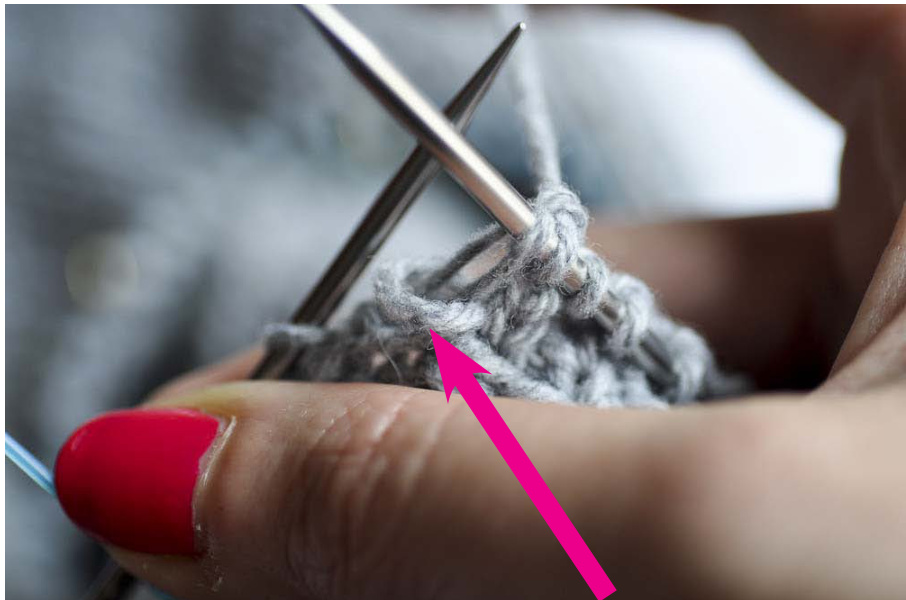
Work the bump with the st together, K them:
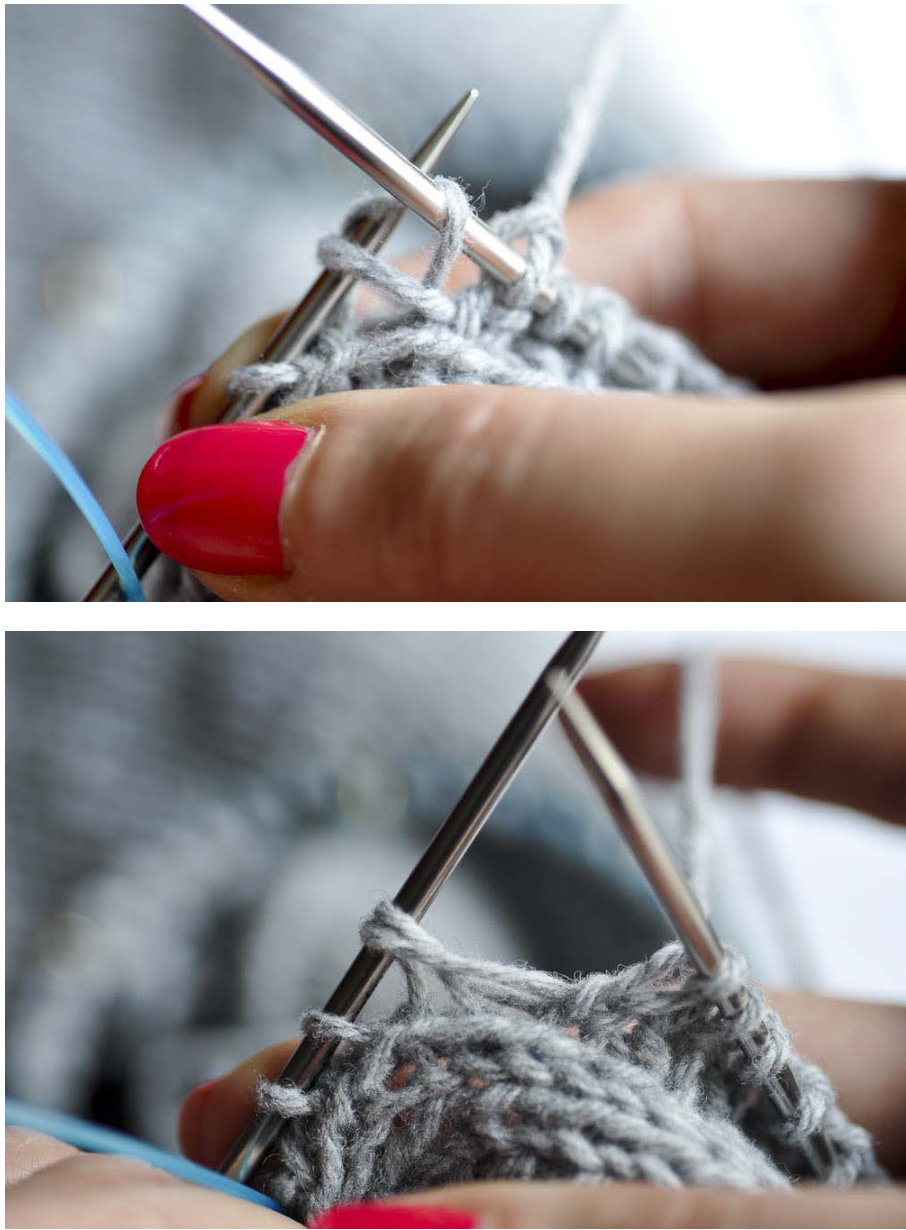
Work the wrapped st (WS row)
The wrapped st is on the left hand needle:
The pattern, pictures and instructions can not be used for commercial use without the author written approval. For any questions contact me at elise.dupont@gmail.com http://elisedupont.fr/ Slip the st as if to purl, to the right hand needle. Notice the little bump below:
Work the bump with the st together, P them:
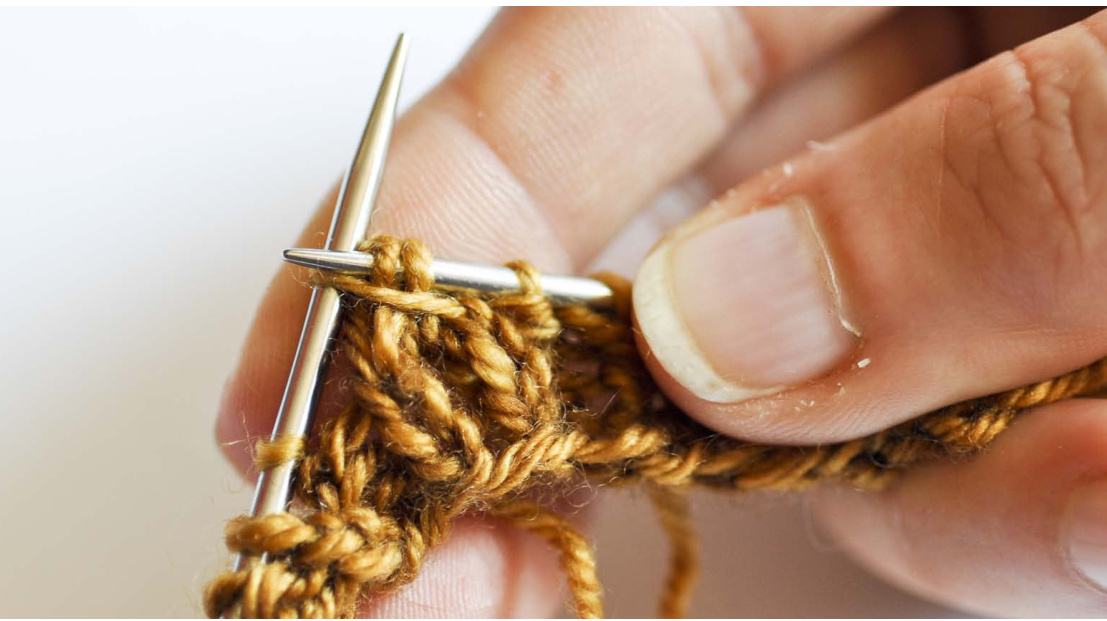
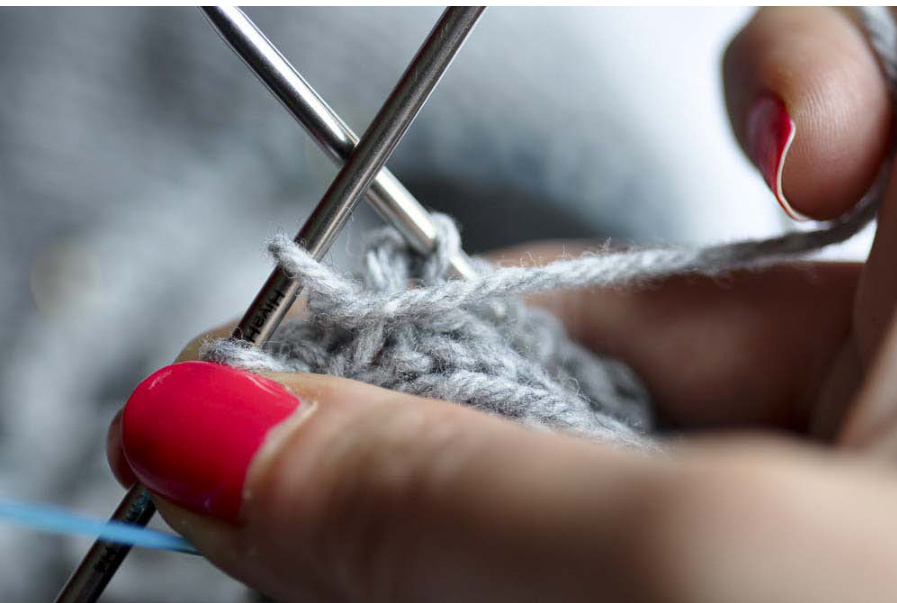
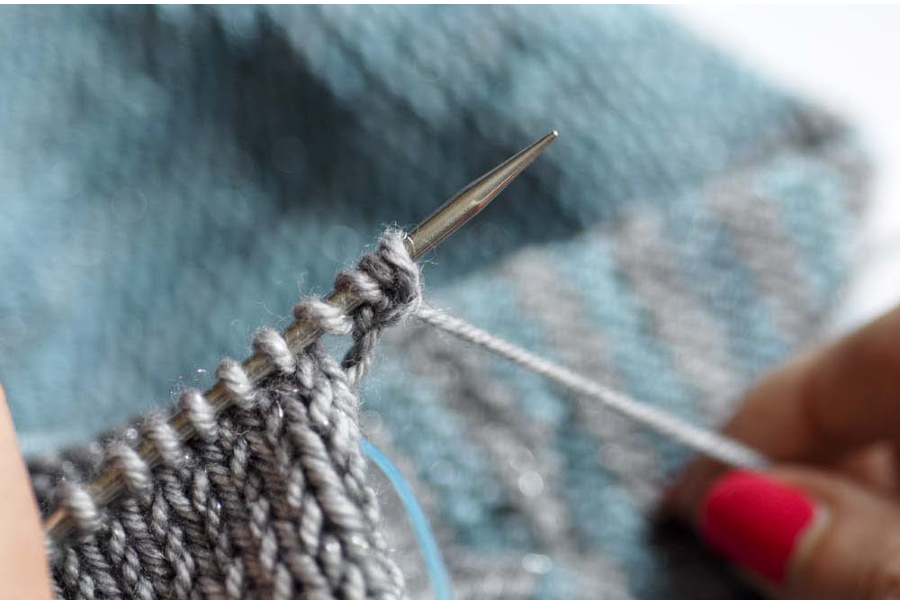
Cast on sts
Aside from the classic CO for the beginning of the project, I recommend that you perform the other CO (underarm, neck .) like this: Insert the right hand needle into the last st as if to K:
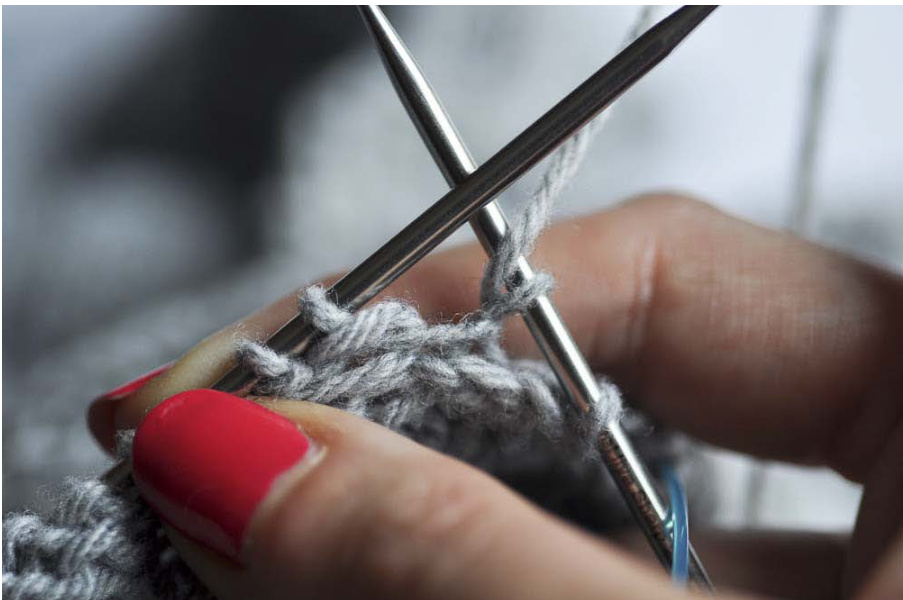
wrap and pullthrough just like regular knit stitch:
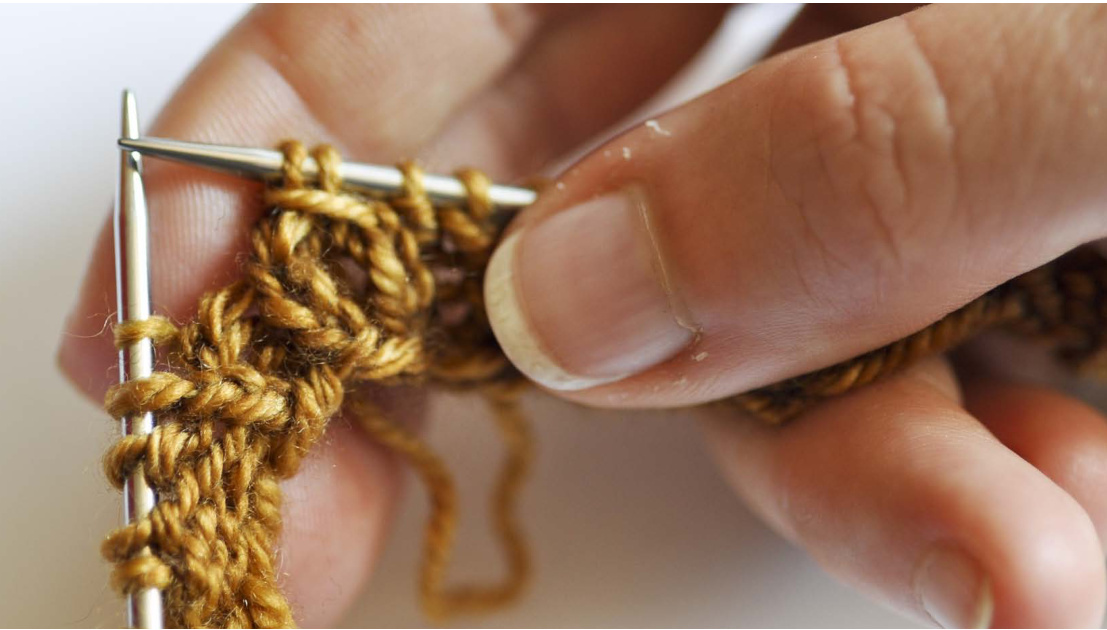
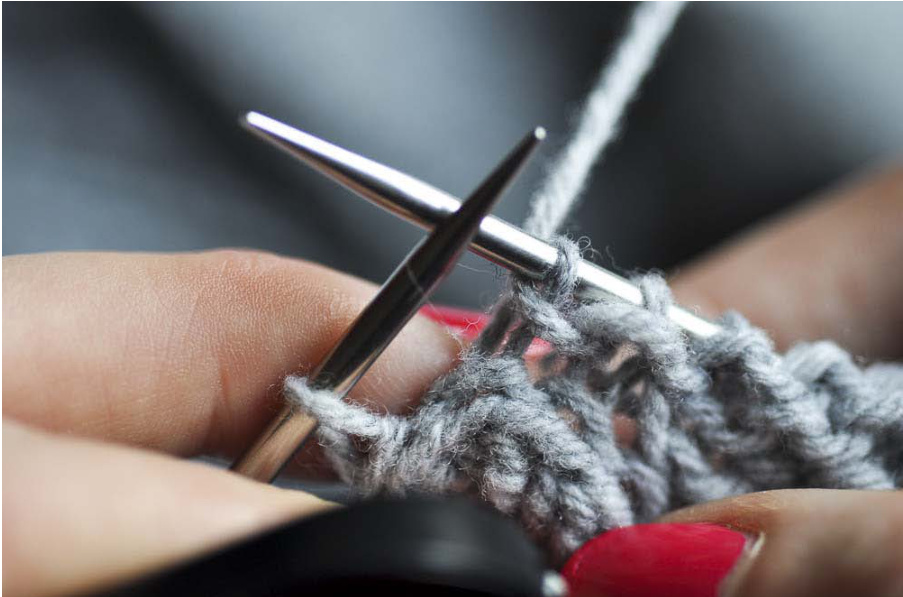
Place the newly created stitch back onto the left hand needle:
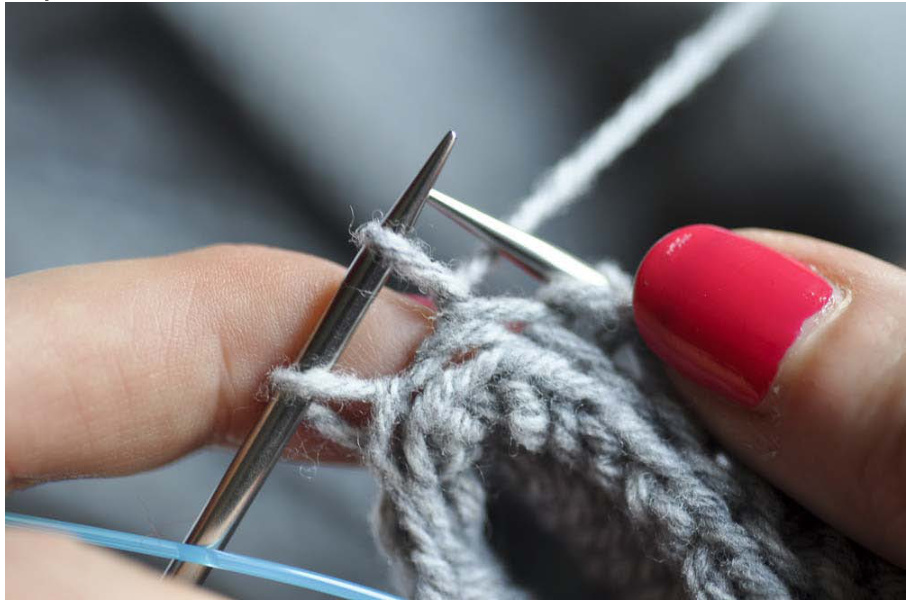
You created a new st. Work the same steps, inserting the right hand needle into the last st as many times as required.
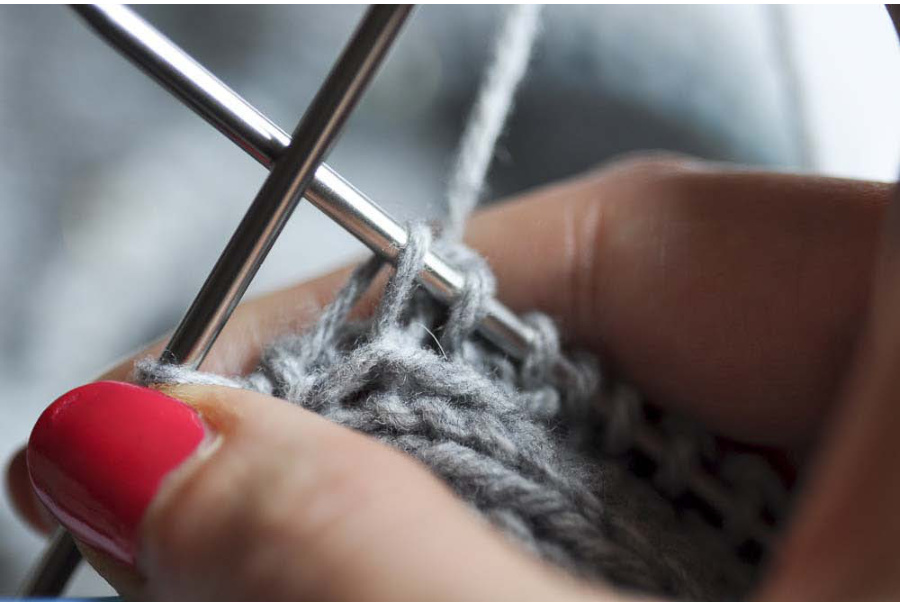
M1L
Notice the place under the strand of yarn which runs between the stitch just worked and the next stitch

The pattern, pictures and instructions can not be used for commercial use without the author written approval. For any questions contact me at elise.dupont@gmail.com http://elisedupont.fr/ Insert the left hand needle from front to back into the strand:
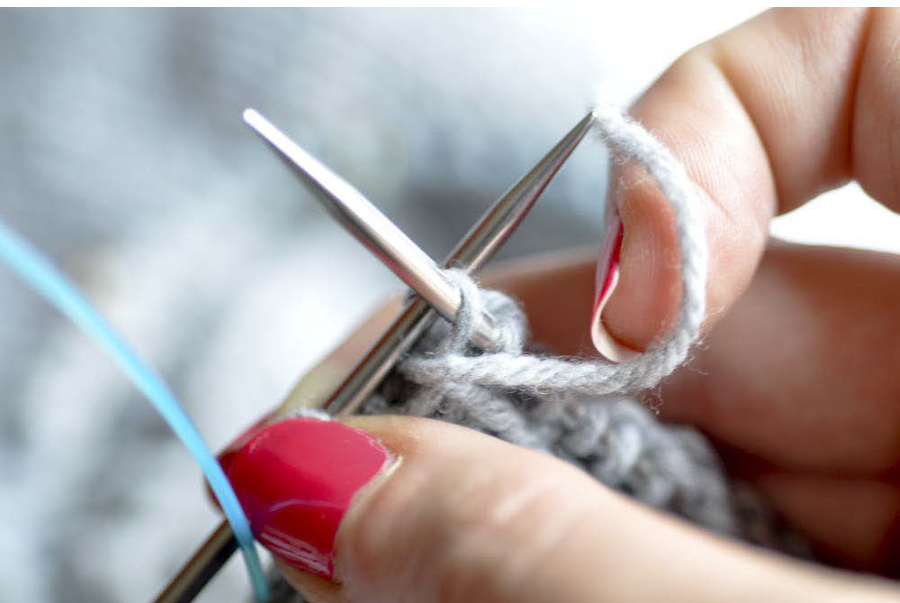
You made one left increase:
M1R
Notice the place under the strand of yarn which runs between the stitch just worked and the next stitch on the left-hand needle:
Insert the left hand needle from back to front into the strand:
Knit this stitch through the front loop:

You made one right increase:


