Stockinette Haruni
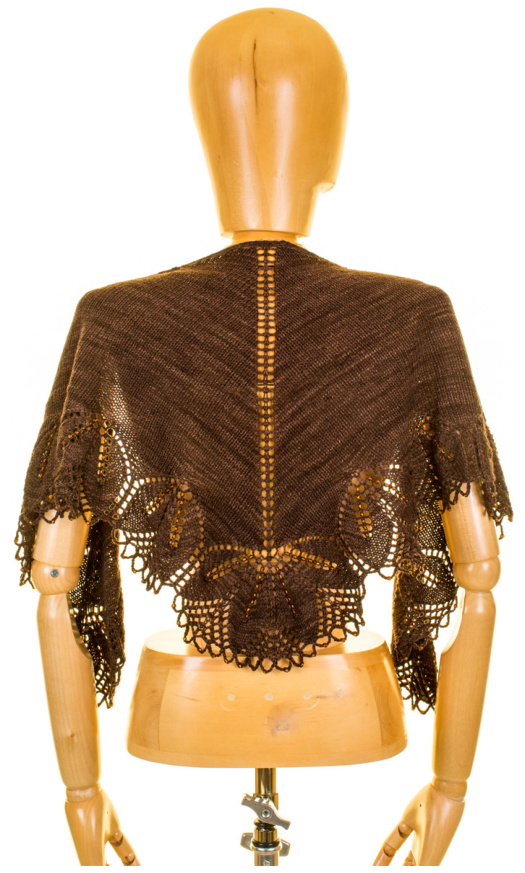
by Emily Ross December 31,2014 Pattern 013 Revision 1 This shawl is a simplified version of Haruni, featuring a stockinette body. The body increases at a rate of six stitches every other row, which creates a slightly shallow, crescent shaped triangle. You can easily create a very wearable shawlette with a single skein of most sock yarns. Directions are given for increasing the overall size as well. Optional beads, which are placed as you knit, give the lacy edge a bit of sparkle.
Materials
Measurements
Yarn: Malabrigo Yarn, Sock Yarn, 440 yards (100g), 1 skein Needles: U.S. Size 4 (3.5mm), circular needle, or size needed to obtain gauge Other Materials: stitch markers, tapestry needle, blocking pins and / or wires, 350 size 6/0 seed beads Gauge: 24 stitches and 32 rows = 4" (10cm) in stockinette, after blocking Finished Size: 15" (38cm), deep, 46" (117cm), wide, after blocking
Instructions
Set Up
This shawl begins with a garter stitch tab cast on. Using the provisional cast on method of your choice, cast on 3 stitches. Slip 1 as if to purl, knit 2. This initial slipped stitch should be worked quite loosely, to facilitate blocking. The slipped stitch creates an attractively smooth finish on these edge stitches. You may simply knit the first stitch of every row if you prefer. Repeat this row 5 more times. After the 6th row, rotate your knitting 90 degrees clock-wise, and pick up and knit 3 stitches along the side of your strip of knitting, one in each garter ridge. Undo your provisional cast on, place the 3 stitches on your left hand needle, knit 3. 9 stitches total. Turn. Slip 1, k2, p3, k3, turn. You are now ready to begin the stockinette body.
Stockinette Body
KFB = knit into the front and back of a stitch, adding 1 stitch. Row 1, sl1, k2, yo, k to center stitch, yo, k1, yo, k to final 3 stitches, yo, k3 Row 2, sl1, k2, KFB, p to final 4 stitches, KFB, k3 Repeat these 2 rows until you have a total of 249 stitches. If you would like to adjust the size of your shawl you may do so in 40 stitch increments, ie, continue until 289 stitches. Since 40 is not divisible by 6 (your rate of increase) you will need to adjust the final purl row. Working 6 additional repeats will bring you up to 285 stitches, then work 2 rows with only 4 increases (omitting the wrong side increases), to bring you up to 289. Make sure your stitch count total is a multiple of 40 + 9, and that the stitch counts on either side of your center stitch are consistent before continuing to Chart A.
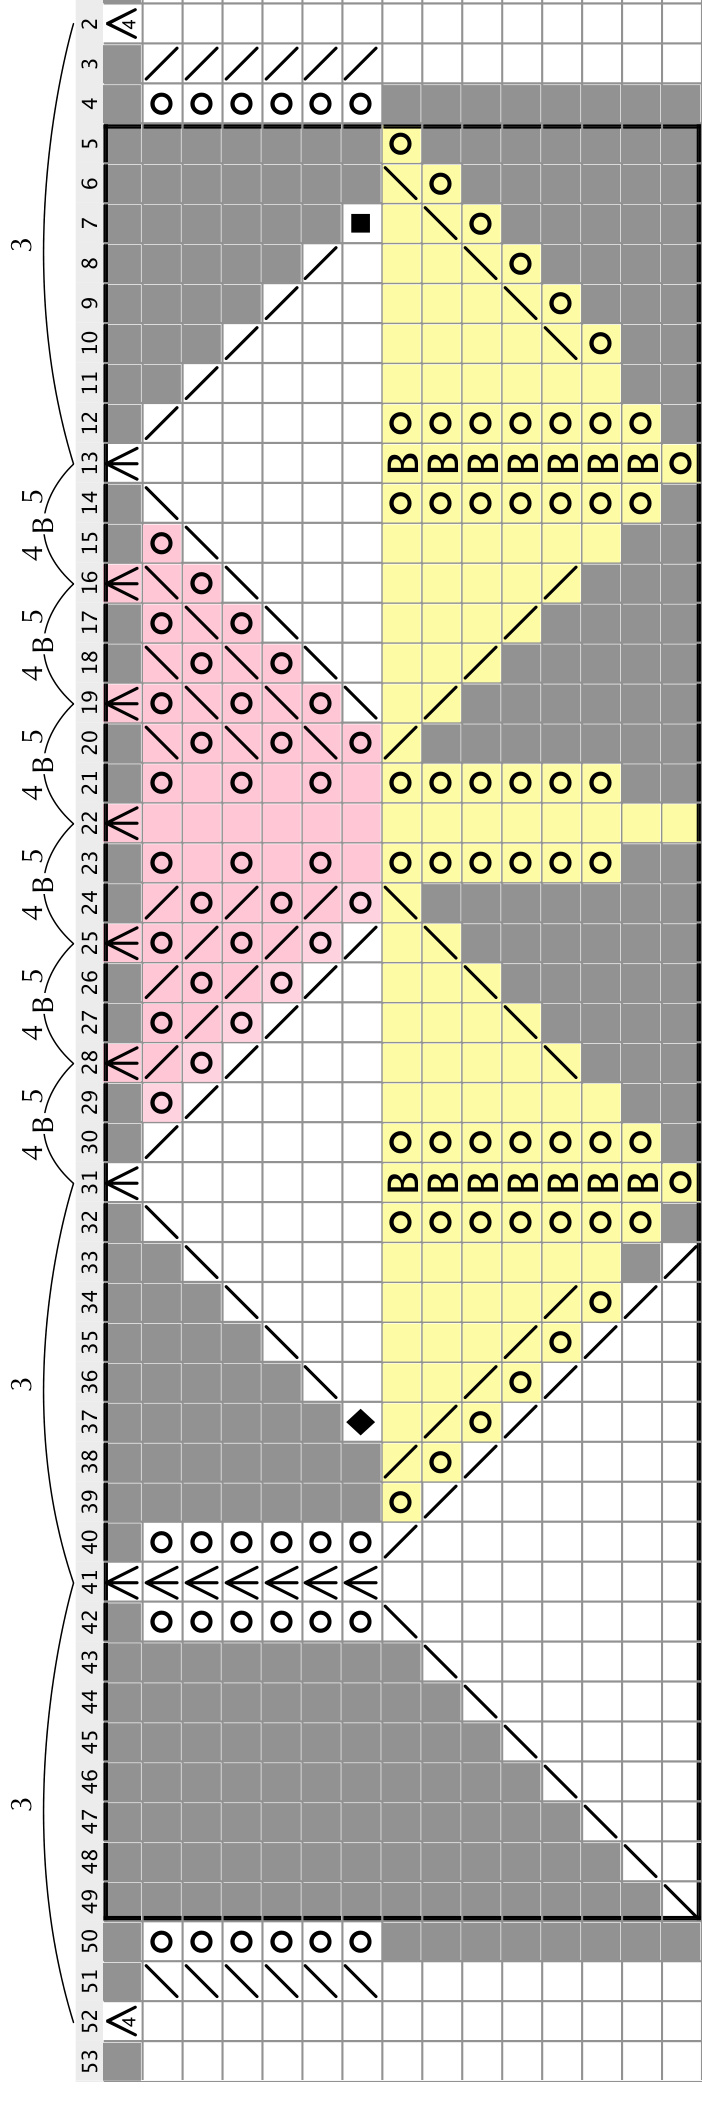
Chart A — Overview
In Chart A you will be increasing very rapidly for the first 16 rows, then decreasing the number of stitches per row for the final 13 rows. All wrong side rows are worked as following: sl1, k2, p to the final 3 stitches, k3. The center stitch is still uncharted. For rows 1-15 it remains as a single knit stitch, in rows 17-29 the center stitch grows into a center section, shown in pink on the chart. For the first 16 rows of this chart each half of the shawl must begin AND end with a pair of leaves, separated by your center stitch. These segments are highlighted in yellow on the chart. To knit the first 16 rows of Chart A, begin reading right to left, repeating the boxed stitches, ending your final repeat of the first half midway through the chart, with the last yellow stitch. Knit your center stitch (not shown on the chart), and repeat for the second half of the shawl starting AND ending with a yellow segment, and finishing with the 3 edge stitches. Starting in Row 17, the center stitch grows into a center section, which is shown in pink. To work these final rows begin with the edge stitches (noting that they have changed), then repeat the boxed stitches until your final repeat before the center stitch. This final repeat is worked as written until the final 3 stitches (the yo, sl2k1psso, yo), which are omitted. This should bring you up to 1 before the center stitch. Place a stitch marker, and work the section of the chart shown in pink, place another stitch marker, and begin repeating the chart as written, ending your final repeat by skipping the yo, sl2k1psso, yo, and working the final edge stitches. As you knit Rows 19-29 these 2 stitch markers will help you keep track as the center section widens. If you are knitting from the charts you may want to consult the written instructions to insure you understand the repeat structure. Row 29 represents your bind off row, please refer to the following bind off instructions.
Bind Off
This bind off is worked by creating chains to connect groups of stitches. This makes a very stretchy bind off, which blocks into beautiful little loops. Row 29 on the chart shows you which stitches are grouped together (the decreases), and how many stitches to chain between each decrease. Work the first decrease on Row 29, a knit 4 together. Insert your left hand needle into the FRONT of the stitch on your right hand needle, knit this stitch. You've just chained 1 stitch. Repeat this 2 more times, for a total of 3 times. Work the next decrease on the chart, a sl2k1psso. You now have 2 stitches on your right hand needle. Cast off one stitch, by passing the rightmost stitch over and off the needle. Chain 5, place bead and chain 4. If you'd like to omit the beads simply chain 9. Once you have a 9 stitch chain (with or without bead), work the next decrease on the chart. Cast off 1 stitch, and begin the next chain. Continue to work the bind off row in this manner.
31-Dec-14
Sew in any ends, soak, and block. To emphasize the curving lines of the leafy edge pin out the longer (beaded) chains individually, and do not pin the shorter chains.
Legend

No Stitch
Placeholder - No stitch made.

slip Slip stitch as if to purl, holding yarn in back k Knit yo Yarn Over sSsk Slip one stitch as if to knit, Slip another stitch as if to knit. Insert left-hand needle into front of these 2 stitches and knit them together

k2tog Knit two stitches together as one stitch sl2k1pss0 Slip first and second stitches together as if to knit. Knit 1 stitch. Pass two slipped stitches over the knit stitch. Place Bead Place bead, knit. If omitting beads simply knit On first time per half, ssk, all other repeats, sl2, kl, psso On first time per half, ssk. On all repeats, sl2, kl, psso. sl2, k1, psso. On final repeat of each half k2tog sl2, kl, psso. On final repeat of each half, k2tog k4tog Knit four stitches together as one
Directions
Chart A — Directions
The bold k# indicates your center stitch(es) TS = Total Stiches per row PB = place bead. If you are omitting beads simply knit this stitch Row 1, sl1, k2, [yo, k1, yo, ssk, k15, k2togl, repeat stitches within brackets until 1 before center stitch, yo, k1, yo, k1, repeat stitches within brackets until final 4 stitches, yo, k1, yo, k3, (253 TS) Row 2 and all even numbered rows, sl1, k2, p to final 3 stitches, k3 Row 3, sl1, k2, [yo, PB, yo, k1, yo, PB, yo, ssk, k13, k2togl, repeat stitches within brackets until 3 before center stitch, yo, PB, yo, k1, yo, PB, yo, k1, repeat stitches within brackets until final 6 stitches, yo, PB, yo, k1, yo, PB, yo, k3, (285 TS) Row 5, sl1, k2, [yo, k1, yo, PB, yo, k1, yo, k1, yo, k1, yo, PB, yo, kl, yo, ssk, k11, k2togl, repeat stitches within brackets until 7 before center stitch, yo, k1, yo, PB, yo, kl, yo, kl, yo, k1, yo, PB, yo, kl, yo, k1, repeat stitches within brackets until final 10 stitches, yo, kl, yo, PB, yo, k1, yo, k1, yo, k1, yo, PB, yo, k1, yo, k3, (373 TS) Row 7, sll, k2, [yo, k2tog, k1, yo, PB, yo, k1, ssk, yo, k1, yo, k2tog, k1, yo, PB, yo, k1, ssk, yo, ssk, k9, k2togl, repeat stitches within brackets until 15 before center stitch, yo, k2tog, k1, yo, PB, yo, k1, ssk, yo, k1, yo, k2tog, k1, yo, PB, yo, k1, ssk, yo, k1, repeat stitches within brackets until final 18 stitches, yo, k2tog, k1, yo, PB, yo, k1, ssk, yo, k1, yo, k2tog, k1, yo, PB, yo, k1, ssk, yo, k3, (405 TS) Row 9, sl1, k2, [yo, k2tog, k2, yo, PB, yo, k2, ssk, yo, k1, yo, k2tog, k2, yo, PB, yo, k2, ssk, yo, ssk, k7, k2togl, repeat stitches within brackets until 19 before center stitch, yo, k2tog, k2, yo, PB, yo, k2, ssk, yo, k1, yo, k2tog, k2, yo, k1, yo, k2, ssk, yo, k1, repeat stitches within brackets until final 22, yo, k2tog, k2, yo, PB, yo, k2, ssk, yo, k1, yo, k2tog, k2, yo, PB, yo, k2, ssk, yo, k3, (437 TS) Row 11, sll, k2, [yo, k2tog, k3, yo, PB, yo, k3, ssk, yo, k1, yo, k2tog, k3, yo, PB, yo, k3, ssk, yo, ssk, k5, k2togl, repeat stitches within brackets until 23 before center stitch, yo, k2tog, k3, yo, PB, yo, k3, ssk, yo, k1, yo, k2tog, k3, yo, PB, yo, k3, ssk, yo, k1, repeat stitches within brackets until final 26 stitches, yo, k2tog, k3, yo, PB, yo, k3, ssk, yo, k1, yo, k2tog, k3, yo, PB, yo, k3, ssk, yo, k3, (469 TS) Row 13, sl1, k2, [yo, k2tog, k4, yo, PB, yo, k4, ssk, yo, kl, yo, k2tog, k4, yo, PB, yo, k4, ssk, y0, ssk, k3, k2togl, repeat stitches within brackets until 27 before center stitch, yo, k2tog, k4, yo, PB, yo, k4, ssk, yo, k1, yo, k2tog, k4, yo, PB, yo, k4, ssk, yo, k1, repeat stitches within brackets until final 31 stitches, yo, k2tog, k4, yo, PB, yo, k4, ssk, yo, k1, yo, k2tog, k4, yo, PB, yo, k4, ssk, yo, k3, (501 TS) Row 15, sl1, k2, [yo, k2tog, k5, yo, PB, yo, k5, ssk, yo, k1, yo, k2tog, k5, yo, PB, yo, k5, ssk, yo, ssk, k1, k2togl, repeat stitches within brackets until 31 before center stitch, yo, k2tog, k5, yo, PB, yo, k5, ssk, yo, k1, yo, k2tog, k5, yo, PB, yo, k5, ssk, yo, ki, repeat stitches within brackets until final 34 stitches, yo, k2tog, k5, yo, PB, yo, k5, ssk, yo, k1, yo, k2tog, k5, yo, PB, yo, k5, ssk, yo, k3, (533 TS) Beginning on Row 17, you no longer have a center stitch, but a center section which is shown in pink on the chart. You will place 2 stitch markers in Row 17 to help you track the growth of this section, which will always begin and end with a yarn over. This entire center section is shown in bold here. Row 17, sl1, k1, ssk, yo, ssk, k11, k2tog, yo, k3, yo, ssk, k11, sl2k1psso, yo, sl2k1psso, yo, [sl2k1psso, k11, k2tog, yo, k3, yo, ssk, k11, sl2k1psso, yo, sl2k1psso, yol, repeat stitches within brackets until 34 before center stitch, ssk, k11, k2tog, yo, k3, yo, ssk, k11, k2tog, place stitch marker, yo, k3, yo, place 2nd stitch marker, ssk, k11, k2tog, yo, k3, yo, ssk, k11, sl2k1psso, yo, sl2k1psso, yo, repeat stitches within brackets until final 38 stitches, sl2k1psso, k11, k2tog, yo, k3, yo, ssk, k11, k2tog, yo, k2tog, k2, (483 TS) Row 19, sl1, k1, ssk, yo, [Sssk, k9, (k2tog, yo) x2, k1, (yo, ssk) x2, k9, k2tog, yo, sl2k1psso, yol, repeat stitches within brackets until 31 before stitch marker, ssk, k9, (k2tog, yo) x2, k1, (yo, ssk) x2, k9, k2tog, slide marker, yo, k2tog, yo, k1, yo, ssk, yo, slide marker, repeat stitches within brackets until final 35 stitches, ssk, k9, (k2tog, yo) x2, k1, (yo, ssk) x2, k9, k2tog, yo, k2tog, k2, (456 TS) Row 21, sl1, k1, ssk, yo, [ssk, k7, (k2tog, yo) x2, k3, (yo, ssk) x2, k7, k2tog, yo, sl2k1psso, yol, repeat stitches within brackets until 29 before stitch marker, ssk, k7, (k2tog, yo) x2, k3, (yo, ssk) x2, k7, k2tog, slide marker, yo, k2tog, yo, k3, yo, ssk, yo, slide marker, repeat stitches within brackets until final 33 stitches, ssk, k7, (k2tog, yo) x2, k3, (yo, ssk) x2, k7, k2tog, yo, k2tog, k2, (431 TS) Row 23, sl1, k1, ssk, yo, [ssk, k5, (k2tog, yo) x3, k1, (yo, ssk) x3, k5, k2tog, yo, sl2k1psso, yol, repeat stitches within brackets until 27 before stitch marker, ssk, k5, (k2tog, yo) x3, k1, (yo, ssk) x3, k5, k2tog, slide marker, (yo, k2tog) x2, yo, k1, (yo, ssk) x2, yo, slide marker, repeat stitches within brackets until final 31 stitches, ssk, k5, (k2tog, yo) x3, k1, (yo, ssk) x3, k5, k2tog, yo, k2tog, k2, (405 TS) Row 25, sl1, k1, ssk, yo, [ssk, k3, (k2tog, yo,) x 3, k3, (yo, ssk) x3, k3, k2tog, yo, sl2k1psso, yol, repeat stitches within brackets until 25 before stitch marker, ssk, k3, (k2tog, yo) x3, k1, (yo, ssk) x3, k3, k2tog, slide marker, (yo, k2tog) x2, yo, k3, (yo, ssk) x2, yo, slide marker, repeat stitches within brackets until final 29 stitches, ssk, k3, (k2tog, yo) x3, k3, (yo, ssk) x3, k3, k2tog, yo, k2tog, k2, (379 TS Row 27, sl1, k1, ssk, yo, [ssk, k1, (k2tog, yo) x4, k1, (yo, ssk) x4, k1, k2tog, yo, sl2k1psso, yol, repeat stitches within brackets until 23 before stitch marker, ssk, k1, (k2tog, yo) x4, k1, (yo, sk) x4, k1, k2tog, slide marker, (yo, k2tog) x3, yo, k1, (yo, ssk) x3, yo, slide marker, repeat stitches within brackets until final 27 stitches, ssk, k1, (k2tog, yo) x4, k1, (yo, ssk) x4, k1, k2tog, yo, k2tog, k2, (353 TS) Work Row 28 very loosely, to facilitate the bind off row. Chain = insert LH needle into FRONT of stitch on RH needle, k1 Cast off = pass 1st stitch on RH needle over 2nd, and off the needle PB = place bead Row 29, k4tog, chain 3, sl2k1pss0, Cast off 1, \*(chain 5, PB, chain 4, sl2k1psso, cast off 1) x 6, chain 3, sl2k1psso, cast off 1, chain 3, sl2k1psso, cast off 1,\* repeat from \* to \* until stitch marker, (chain 5, PB, chain 4, sl2k1psso, cast off 1) x6, repeat from \* to \* until final 22 stitches, (chain 5, PB, chain 4, sl2k1psso, cast off 1) x6, chain 3, k4tog, Cast off 1. Break yarn, and pull through final stitch.
Acknowledgments
I would like to thank my husband Brian (Prince Charming) for his wonderful design, layout, photography, and editing. This would not have been possible without his help. I've tried to make this pattern as accurate as possible, but if you find any errors or have questions there is pattern support at Ravelry.com/groups/knitterain. If you need additional information you can contact me through knitterain.com. Happy Knitting!

Copyright
Stockinette Haruni
Emily Ross All rights reserved. This pattern is for personal use only.

You may print the work in full or in part for your own use. You may place this work on any of your personal devices for your own personal and reading reference. No part of this work may be reproduced or distributed without the prior written permission of the copyright owner. You may sell items you have made using this pattern, however you must cite the pattern and designer's name.