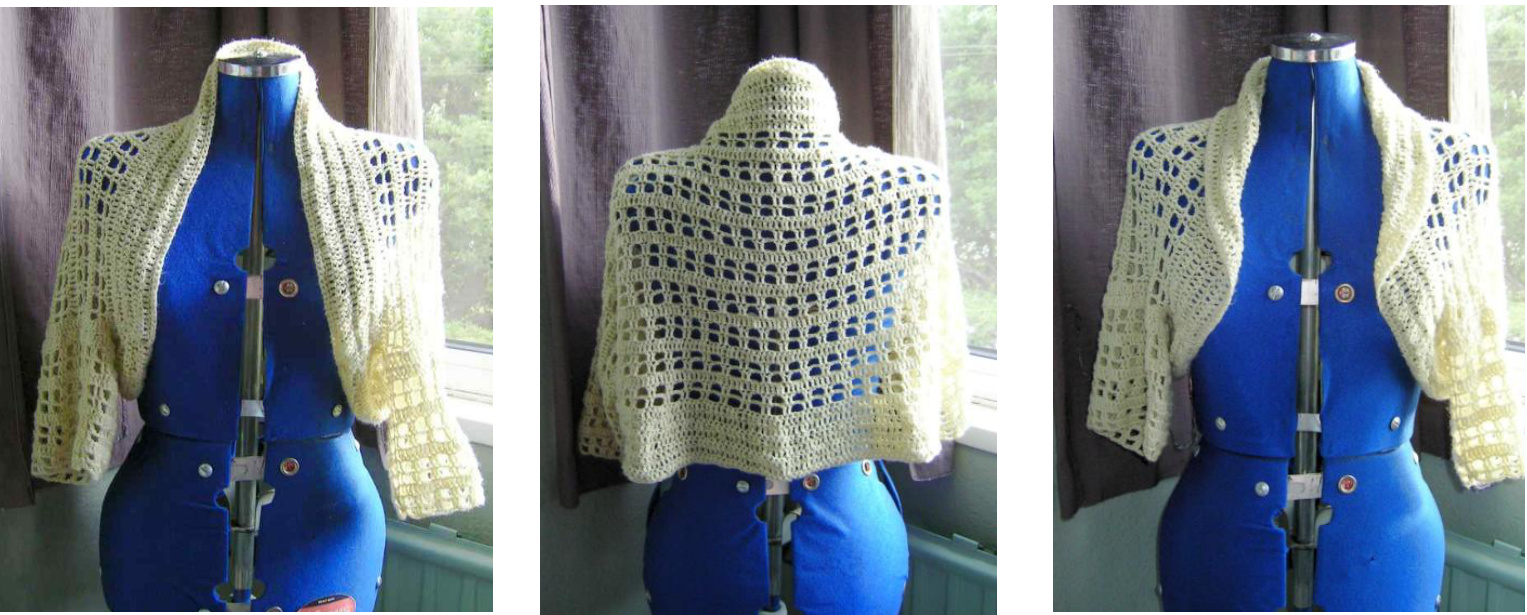
Custard Shrug.
A lightweight, cheap, easy-to-make shrug.
Materials:
Approx 150g / 750yds of 4ply Acrylic blend. 3.5mm hook.
Abbreviations:
DC = Double Crochet (US),(Treble Crochet UK). SC = Single Crochet (US),(Double Crochet UK). Ch = Chain. Trn = Turn. ss = Slip stitch.
IBPDc = A Double Crochet (UK Treble) stitch into the back post by inserting your hook down into the back post from the top of the stitch (as you would normally put your hook in, but into the back post only) . ↑FPDc = A Double Crochet (UK Treble) stitch into the front post only by inserting your hook up into the stitch from below.
Measuring yourself up:
1.Width; Measure across your back from shoulder to shoulder (I was 38cm). Add between 20 to 40cm on top of this measurement..20cm will give you a drapey shoulder before the sleeve starts, 40cm will give you a longer drape of shoulder before the sleeve starts. (I added 20cm, to get 58cm). 2.Length; Measure the circumference of your upper arm (I was 34cm). Add another 15cm to make a sleeve hole with good movement room (so for me, a total of 49cm).
Foundation:
3.Leave a tail of about 40cm, as this will be handy later. Make a chain that equals the width measurement you finished with earlier (when laid out without being pulled).It is important that the total number of chain stitches are even-numbered and divisible by four, as we will be using a stitch pattern that repeats in 2xDC & 2xCh. Don't worry if the length is a little shorter or longer than your measurement, as it's not crucial with this design, due to the stretchy nature of the stitch pattern. Trn. 4.SC into the 2nd ch from the hook (so, not the one that the loop on your hook comes out of, but the one next to that). SC into each ch to the end. Trn.
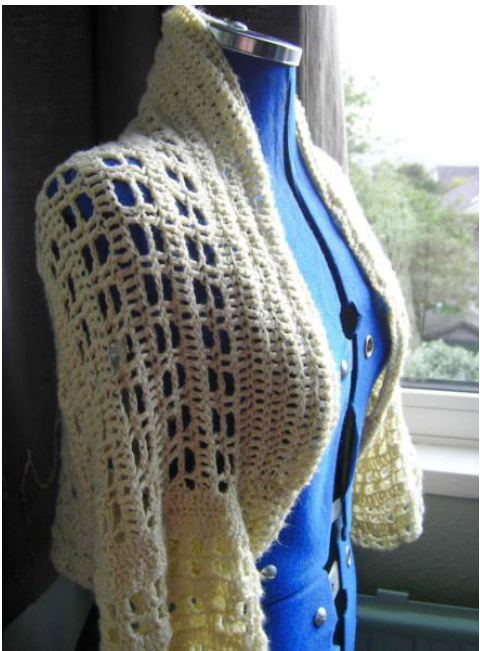
Rippled Edge band:
5.Row 1.Ch3 (counts as first DC). DC into next SC.\*↑FPDC into the next 2 SC. ↓BPDC into the next 2 SC.\* Repeat between the \* to the end of the row. Trn. 6.Row 2.Ch3. DC into next DC. Now, if the next 2 DC of the previous row were ↑FPDC stitches, then make your next 2 stitches IBPDC...and vice versa. Continue the row to the end, alternating 2 ↑FPDC with 2 ↓BPDC. Trn . 7.Row 3 (and more). Continue creating rows in this way until you have between 3 to 8 rows (I chose to have 7), the preference is yours as to how wide you like it. For each row start with ch3 then follow with 1DC, followed by your repeats of 2 ↑FPDC & ↓BPDC. Trn. 3.Measure and note the width of your Ripple Edge Band.
Torso:
9.Row 1. Ch3. DC1 into the next stitch. \*Ch2, skip 2DC of the previous row, DC2, Ch2, skip 2Dc\*.Repeat the pattern of 2 DC & 2 Ch between the * to the end of the row and make the last stitch a DC. You now have one row of mesh. Trn. 10.Row 2. Ch3. Make another row of mesh, copying the pattern of the row below exactly as it appears. You now have 2 rows of mesh. Trn. 11.Row 3. Ch3. DC into each DC and Ch, to the end of the row. You now have l row of Dc. 12.Repeat Torso Rows 1 to 3, ending with the 2nd row of mesh (Row 2.) until your rectangle is the length of your Length Measurement that you took in step 2. but MINUS the width of your Ripple Edge Band measurement, which you did in step 8. Don't worry if the length is one or two centimetres out, it's not crucial with this pattern. Don't fasten off. 13.Repeat the Ripple Edge Band rows 1, 2 & 3 to the same width as the first band you did. Trn. 14.Chl. SC into the same stitch as the hook then SC into each DC to the end of the row. This is the end of the Torso. Don't fasten off.
Joining up:
15.Lay your rectangle down so that there's a Ripple Edge Band across the top and across the bottom. Now bring each corner into the centre a little, until the 2 ends of the Ripple Edge Bands are meeting each other. SS the ends of the bands together. You will need to join at least 7cms worth, so if you only have few rows in your Ripple Edge Band, then you'll find that you will be Slip Stitching into the mesh section too. This creates the body and armholes ready for the sleeves.
Sleeves:
16.Sleeve l, Row 1. Chl then SC into the Same stitch. SC evenly all the way around the armhole, pausing every few stitches to check that they are not too crowded and not too spaced apart. Make sure that you have an even number of stitches divisible by 4. 17.Row 2. Ch3. DC into the next stitch and each stitch around. SS into the top chain of the Ch3 that started the row. Do not turn. Ch3. If you want a wider band here as part of the design then make another row of DC, otherwise continue to step 18. 18.Row 3.DCl into the next stitch. \*Ch2, skip 2DC of the previous row, DC2, Ch2, skip 2Dc\*. Repeat the pattern of 2 DC & 2 Ch between the \* to the end of the row and make the last 2 stitches are the Ch2. SS into the top chain of the Ch3 that started the row. You now have one row of mesh. Do not turn. 19.Row 4. ch3. Repeat Sleeve Row 3. You now have 2 rows of mesh following your row/s of DC. 20.Rows 5+. Repeat Sleeve Rows 2 to 4 until the sleeve is the length you like it (keep trying on the shrug). 21.End the sleeve either with the 2nd repeat row of mesh, or by finishing that with a row of SC or by ending the sleeve at the row of DC.. it's up to you! Fasten off. Weave in the yarn end. 22.sleeve 2. Using the long tail of yarn from your Foundation, join the Ripple Edge Band exactly the same as you did for the first sleeve, in Step 15. "Joining Up". 23.Join in a new yarn. Repeat Step 16. making sure you have the same number of stitches as you made for your first sleeve. Try and trap the yarn end of the new yarn into the row of Sc. 24. Repeat Steps 17 to 2l, as for the first sleeve. FINISHED!