Estonian Lace #1
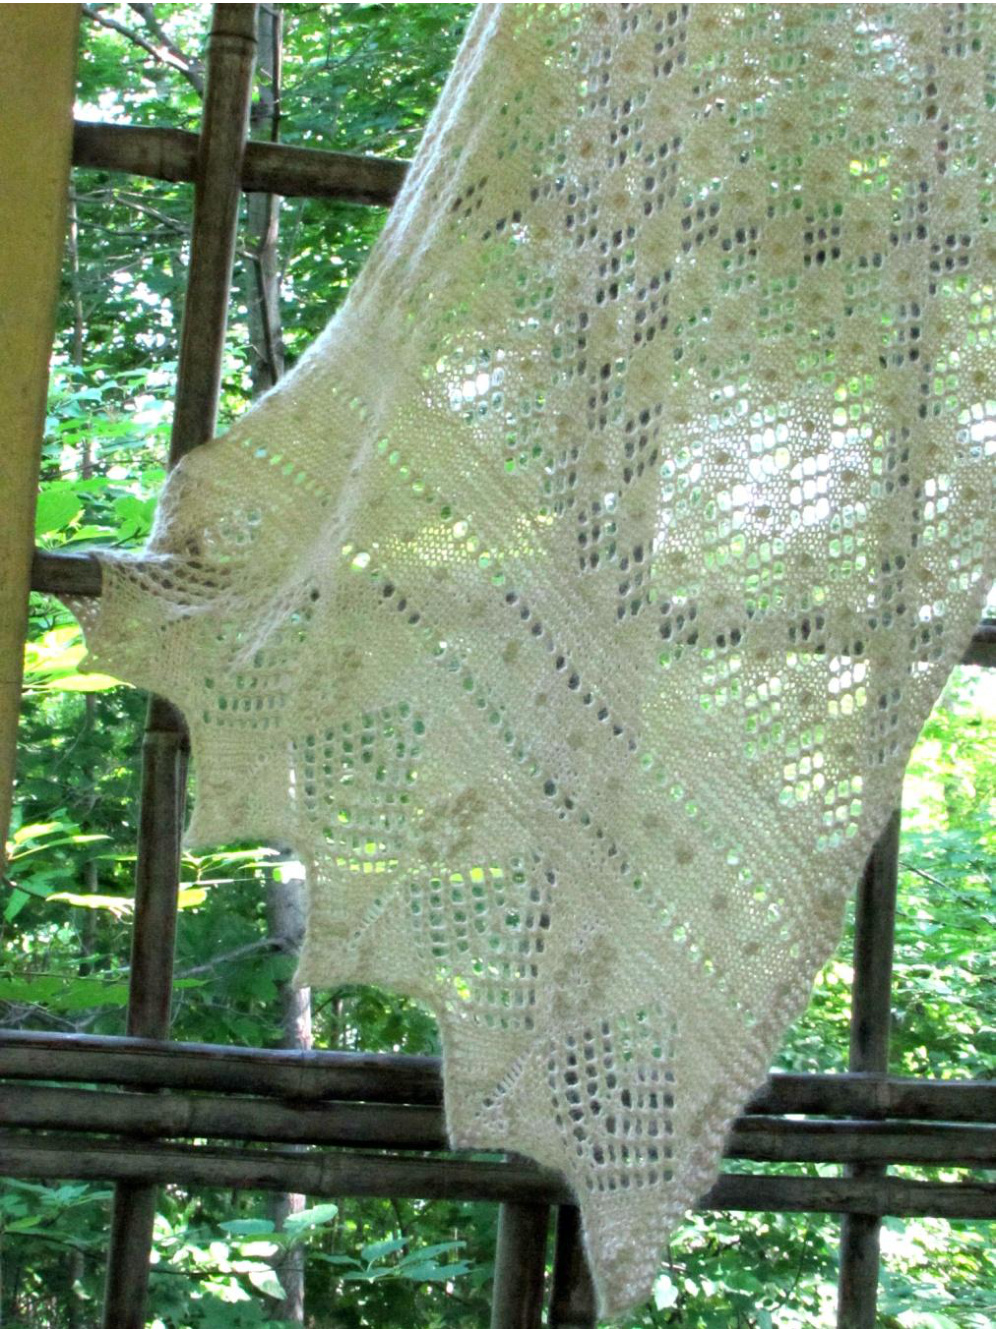
Designed by Michele Alberg
Find me on Ravelry as primenumbergirl or by email at alberg.michele9@gmail.com
June 2012
Technical Information
Size:
20 inches wide x 68 inches long
Materials:
825 yds (755m) Classic Elite MountainTop Vail (3.5 hanks), fingering weight 70% alpaca, 30% bambo0
Needles:
One 32" circular needles US 4 (3.50mm)
Tools:
Blunt tapestry needle for grafting and weaving in ends, 2 stitch markers if desired to mark location of garter stitch edging.
Gauge
17st/inch after wet blocking for Chart A (Border) 19st/inch after wet blocking for Chart B (center panel)
Construction Notes:
This shawl is cast on and the first end border is worked to Row 54. At this time, the knitter has a choice to work the second border to Row 54 and place it on a holder while the center section is worked on Border 1. The second border is then be grafted to the center section. The benefit of this is that the shawl can be knit as long as there is yarn to do so. Just be sure to keep enough yarn set aside to complete the grafting. However, if you have plenty of yarn, the second end border can be completed after the center section is worked to the desired length.
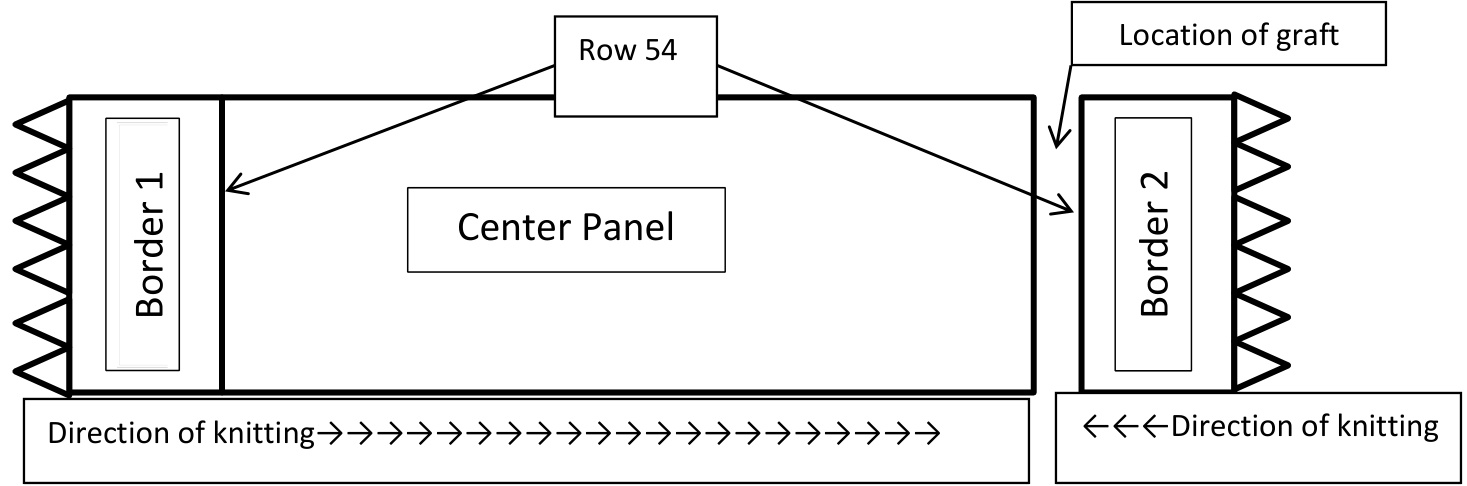
Shawl Schematic:
Size Adjustment Notes:
Adjusting the width of this shawl is done by adding additional 17 stitch repeats in the Border section of Chart A (in my shawl 17 stitches will increase the width by about 4 inches). This will cause the need to add 3 additional 6 stitch repeats in the center panel Chart B (18 stitches consumed). Because you are adding 17 inches in the border but will consume 18 in the center panel, you will need to increase 1 stitch (for each 17 stitch repeat) before reaching the center panel. The best place to do this would be after the eyelet row is worked (Row 47) in Rows 49-53. Adjusting the length of this shawl is done by working additional repeats of Rows 13-24 of Chart B until the desired length is reached. As discussed in the Construction notes, if you work both Border ends at the start of the project (and reserve one of them on waste yarn or stitch holder) you can knit as many repeats of Chart B as you desire without worrying about running out of yarn when knitting the second border.
Terminology: Stitches:
Charts A and B and written instructions

Written Instructions Only:
RS=right side (odd numbered rows) WS=wrong side (even numbered row PM=Place marker SM=Slip marker S1wyif=slip1 stitch knit-wise with yarn to the front, move yarn to back, under needle, after stitch is slipped
Special Instructions:
Knitted cast on instructions can be found at: Knitted Cast On Instructions or watched on YouTube here: YouTube Knitted Cast on
Nupps:
Nupps are used throughout Estonian knitting to add visual and textural interest to lace. Although they are not difficult to do, they can be a challenge because of the need to bring the 7 stitch increase back to a single stitch. Traditionally this is done by purling the 7 stitches back to 1 stitch on the following purl row on the wrong side. It is easier to do this if you knit the Nupp stitches very loosely. It also helps if you are using a very sharp pointed needle (there are several needle manufacturer's that are making lace tip needles) to knit the shawl. However, sometimes I will purl the 7 stitches together (on the following purl row) using a US1 dpn to purl the stitch and then place the resulting single stitch back onto the working needle with the rest of the stitches and continue on with the purl row. Another method that is used is to use a crochet hook to make the Nupp. In this method, the Nupp is made and reduced back to a single stitch before continuing on the right side of the work using a crochet hook instead of a knitting needle for that stitch. If you choose to use this method the reverse side of the shawl is all purls (excluding edge stitches). The link to watch this method on Youtube is here: Nupps using crochet hook
Notes on construction:
This shawl is knit from Border 1 up through the center panel where the live stitches are set aside and a second border is completed. Or, you can choose to knit the second border (on another set of needles) before starting the center panel. If you do this, then the second border will be set aside and you will graft then second border to the center panel as soon as that section is completed. Kitchener stitch is used to graft the second border's live stitches to the center panel.
Notes on Garter Stitch Edges:
The first 4 stitches and the last 4 stitches in each row are part of a garter stitch edging that is traditionally done in Estonian lace shawls. Once the edge stitches are set up in the instructions, they will not appear in the charting that is used to complete this shawl. Remember that the edges stitches are always worked on either side of the charts. However, whenever the stitch instructions are written out, the edge stitches are included in the instructions.
Border 1:
Cast on 93 stitches using a knitted cast on with yarn doubled. Once cast on is complete, one of the yarns can be cut and you will continue to knit the rest of the scarf with a single thread of yarn. Knit Row 1 of the Border as follows: S1wyif, k3, Place Marker (PM), knit Row 1 of Chart A (or follow the written directions under Chart A), PM, Knit 4 From now on, the 1st stitch in each row will be slipped with the yarn in front and the next 3 stitches will be knit. The last 4 stitches of each row will also be knit. This creates the simple garter stitch edge that appears on Estonian shawls that do not have more elaborate edge borders added. Any. time you are working a chart, these edge stitches will not be included in the chart but they will be worked as the garter edge. Continue knitting the Border by following Rows 2-33 of Chart A (or written instructions below the chart) and then return here to continue on with Row34. Row 34 (WS): S1wyif, k3, Slip Marker (SM), (k21, knit into front and back on next stitch) 3 times, k19, SM, k4 (96 stitches on needle) Row 35 (RS): S1wyif, k3, SM, (k2tog, y0) 43 times, k2tog, SM, k4 (95 stitches) Row 36 (WS): S1wyif, k3, SM, purl to marker, SM, k4 Row 37 (RS): S1wyif, k3, SM, knit to marker, SM, k4 Row 38 (WS): S1wyif, k3, SM, purl to marker, SM, k4 Row 39 (RS): S1wyif, k3, SM, knit to marker, SM, k4 Row 40 (WS): S1wyif, k3, SM, purl to marker, SM, k4 Row 41 (RS): S1wyif, k3, SM, k1, (Nupp, k4) 17 times, Nupp, SM, k4 Row 42 (WS): S1wyif, k3, SM, p7tog, (p4, p7tog) 17 times, p1, SM, k4 Row 43 (RS): S1wyif, k3, SM, knit to marker, SM, k4 Row 44 (WS): S1wyif, k3, SM, purl to marker, SM, k4 Row 45 (RS): S1wyif, k3, SM, knit to marker, SM, k4 Row 46 (WS): S1wyif, k3, SM, purl to marker, SM, k4 Row 47 (RS): S1wyif, k3, SM, (k2tog, yo) 43 times, k1, SM, k4 (95 stitches) Rows 48-53: S1wyif, k3, SM, Knit across to marker, SM, k4 Row 54: S1wyif, k3, Slip Marker (SM), k43, K2tog, k42, SM, k4 (94 stitches on needle)
Center Panel of Shawl:
Rows 55-xx. Begin working Chart B for Center Sections or follow written direction below the chart. Work Rows 1-12 only once and then repeat rows 13-24 until desired length (less the second border) is reached. In the shawl I did this was 23 repeats. Once you have finished the center panel you place the live stitches on waste yarn or another circular needle US size 4 or smaller as you will be doing a Kitchener stitch on these stitches once the second border is completed). If you have already completed Border 2, move on the Grafting Border 2 to Center Panel.
Border 2:
Work the same as Border 1 through Row 54 of the border. As discussed in Construction Notes, you can work this Border immediately after working Border 1 and simply set it aside on waste yarn or a stitch holder. In this case, do not put the center panel stitches on waste yarn but, instead, progress to Grafting Border 2 to Center Panel section once center panel is completed.
Grafting Border 2 to Center Panel:
With right sides facing you, Kitchener stitch the 94 live stitches together. in loose ends and leave tails uncut until after blocking has been completed
Blocking:
Blocking wires simplify the blocking procedure but T pins can be used as well. Begin by soaking the shawl for 12 hr. in tepid water. Squeeze as much water as possible from the shawl. If using Block wires: Begin by running block wires through the pointed tips on each end of the shawl (Border 1 and Border 2). Lay the shawl on a flat surface that can have pins pushed into it. Pull the shawl into the approximate final length. Pin the shawl to the surface on one end to the desired width. Pull the shawl to the desired length and pin the other end in place. If desired, pin out the garter edges into points every 2-3 inches. This is commonly done with Estonian shawls but it is completely up to you if you wish to do so. Allow the shawl to dry completely before unpinning. Check to see if yarn needs to be further weaved in, trim the yarn tails. If you do not have blocking wires, T-pins or other rust-resistant pins can be used to secure the shawl in place. More care will be needed to ensure that blocking is done evenly.
Acknowledgements:
There is an incredible group of dedicated and talented knitters on Ravelry in the Group: Free Pattern Testers. I want to take time to personally thank each of the knitters that worked the bugs and poorly worded phases out of this design and helped to bring you this pattern. Thanks very much to: Angeliakay, celia, kerryespins, luoelivert, Mizlacey, purplesocklady, and VintageRedHead. Any remaining errors or lack of clarity rests completely on my shoulders. Should you have any questions please do not hesitate to contact me.
Chart A
Border Pattern Estonian Shawl #1

Written Instructions Chart A
Row 1 (RS): S1wyif, K3, PM, k85, PM, k4 Row 2 (WS): S1wyif, K3, SM, p85, SM, k4 Row 3 (RS): S1wyif, K3, k2tog, k1, nupp7, k4, yo, (k1, yo, k4, nupp7, k1, ssk, k2tog, k1, nupp7, k4, yo) 4 times, k1, yo, k4, nupp7, k1, ssk, SM, k4 Row 5 (RS): S1wyif, K3, SM, k2tog, nupp7, k4, yo, k1 (k2, yo, k4, nupp7, ssk, k2tog, nupp7, k4, yo, k1)4times, k2, yo, k4, nupp7, ssk Row 7 (Rs): S1wyif, K3, SM, k2tog, k4, yo, k2tog, yo (k1, yo, ssk, yo, k4, ssk, k2tog, k4, yo, k2tog, yo) 4 times, k1, yo, ssk, yo, k4, ssk, SM, k4 Row 8 (WS): S1wyif, K3, SM, p85, SM, k4 Row 9 (Rs): S1wyif, K3, SM, k2tog, k3, yo, k2tog, yo, k1 (k2, yo, ssk, yo, k3, ssk, k2tog, k3, yo, k2tog, yo, k1) 4 times, k2, yo, ssk, yo, k3, ssk, SM, k4 Row 10 (WS): S1wyif, K3, SM, p85, SM, k4, SM, k4 Row 11 (Rs): S1wyif, K3, SM, k2tog, k2, yo, k2tog, yo, k2tog, yo, (k1, yo, ssk, yo, ssk, yo, k2, ssk, k2tog, k2, yo, k2tog, yo, k2tog, yo) 4 times, k1, yo, ssk, yo, ssk, yo, k2, ssk, SM, k4 Row 12 (WS): S1wyif, K3, SM, p85, SM, k4, SM, k4 Row 13 (Rs): S1wyif, K3, SM, k2tog, k1, yo, k2tog, yo, k2tog, yo, k1 (k2, yo, ssk, yo, ssk, yo, k1, ssk, k2tog, k1, yo, k2tog, yo, k2tog, yo, k1) 4 times, k2, yo, ssk, yo, ssk, yo, k1, ssk, SM, k4 Row 14 (WS): S1wyif, K3, SM, p85, SM, k4, SM, k4 Row 15 (Rs): S1wyif, K3, SM, k2tog, yo, k2tog, yo, k2tog, yo, k2tog, yo (k1, yo, ssk, yo, ssk, yo, ssk, yo, ssk, k2tog, yo, k2tog, yo, k2tog, yo, k2tog, yo) 4 times, k1, yo, ssk, yo, ssk, yo, ssk, yo, ssk, SM, k4 Row 16 (WS): S1wyif, K3, SM, p85, SM, k4, SM, k4 Row 17 (Rs): S1wyif, K3, SM, k1, k2tog, yo, k2tog, yo, k2tog, yo, k1 (k2, yo, ssk, yo, ssk, yo, ssk, k2, k2tog, yo, k2tog, yo, k2tog, yo, k1) 4 times, k2, yo, ssk, yo, ssk, yo, ssk, k1, SM, k4 Row 18 (WS): S1wyif, K3, SM, p85, SM, k4 Row 19 (Rs): S1wyif, K3, SM, nupp7, k1, k2tog, yo, k2tog, yo, k2tog, yo (k1, yo, ssk, yo, ssk, yo, ssk, k1, nupp7, nupp7, k1, k2tog, yo, k2tog, yo, k2tog, yo) 4 times, k1, yo, ssk, yo, ssk, yo, ssk, k1, nupp7 SM,k4 Row 20 (WS): S1wyif, K3, SM, p7tog, p8 (p7, p7tog, p7tog, p8)4 times, p7, p7tog, SM, k4 Row 21 (Rs): S1wyif, K3, SM, k1, nupp7, k1, k2tog, yo, k2tog, yo, k1 (k2, yo, ssk, yo, ssk, k1, nupp7, k2, nupp7, k1, k2tog, yo, k2tog, yo, k1) 4 times, k2, yo, ssk, yo, ssk, k1, nupp7, k1 sM, k4 Row 22 (WS): S1wyif, K3, SM, p1, p7tog, p7 (p6,p7tog, p2, p7tog, p7)4 times, p6, p7tog,p1,SM, k4 Row 23 (Rs): S1wyif, K3, SM, k1, nupp7, k2, k2tog, yo, k2tog, yo (k1, yo, ssk, yo, ssk, k2, nupp7, k2, nupp7, k2, k2tog, yo, k2tog, yo) 4 times, k1, yo, ssk, yo, ssk, k2, nupp7, k1 SM, k4 . SM, p1, p7tog, p7 (p6, p7tog, p2, p7tog, p7) 4 times, p6, p7tog, k1 SM, k4 Row 25 (Rs): S1wyif, K3, SM, nupp7, k4, k2tog, yo, k1,(k2, yo, ssk, k4, nupp7, nupp7, k4, k2tog, yo, k1)4 times, k2, yo, ssk, k4, nupp7,SM, k4 Row 26 (WS): S1wyif, K3, SM, p7tog, p8 (p7, p7tog, p7tog, k8) 4 times, p7, p7tog, SM, k4 Row 27 (RS): S1wyif, K3, SM, nupp7, k5, k2tog, yo (k1, yo, ssk, k5, nupp7, nupp7, k5, k2tog, yo) 4 times, k1, yo, ssk, k5, nupp7, SM, k4 Row 28 (WS): S1wyif, K3, SM, p7tog, p8 (p7, p7tog, p7tog, k8) 4 times, p7, p7tog, SM, k4 Rows 29-33 (RS, WS): S1wyif, K3, SM, k85, SM, k4
Chart B
Center Pattern Estonian Shawl#1
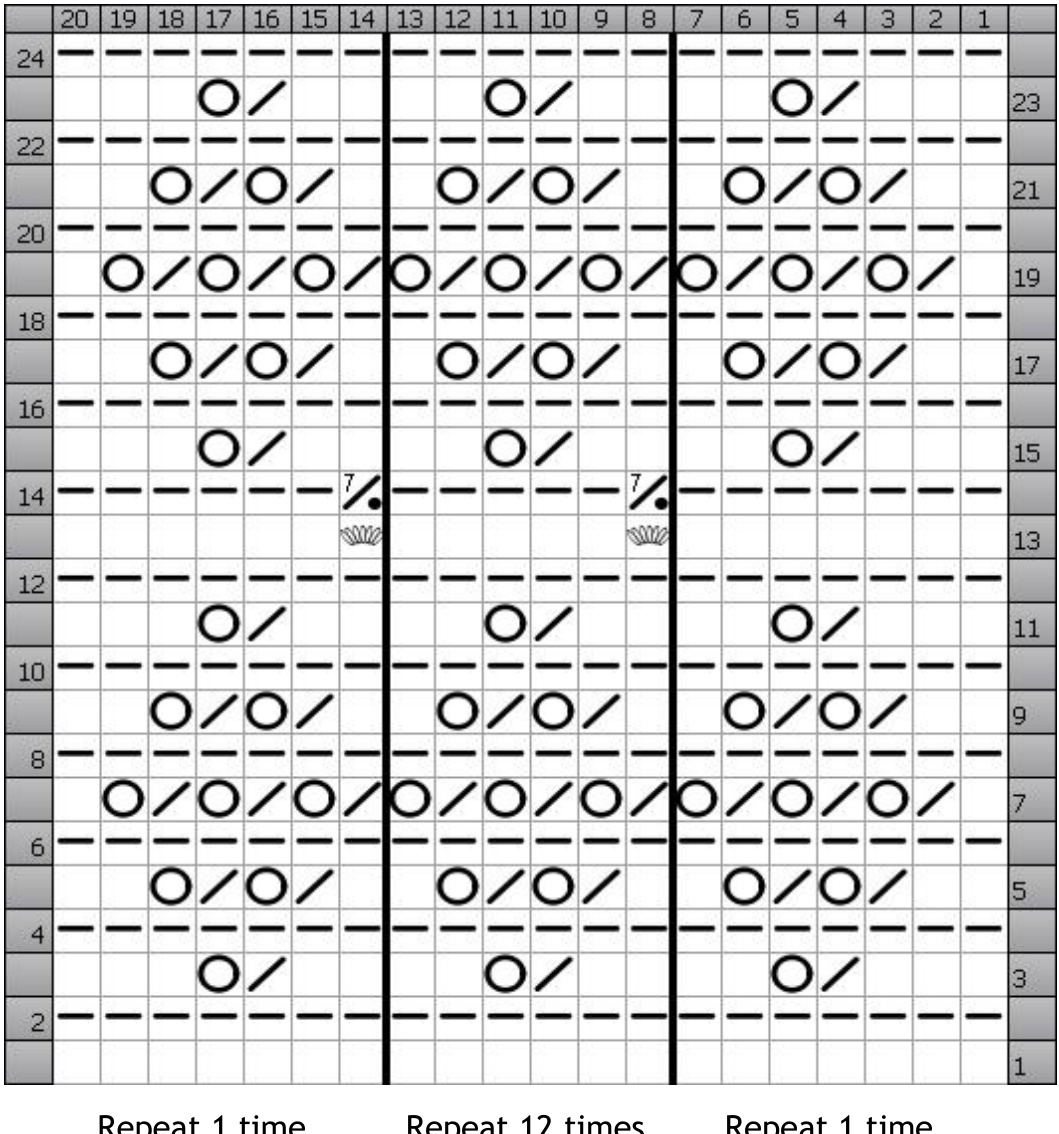
Repeat 1 time Repeat 12 times Repeat 1 time Written instructions Chart B Row 1 (RS): S1wyif, k3, SM, k86, SM, k4 Row 2 (WS): S1wyif, k3, SM, p86, SM, k4 Row 3 (RS): S1wyif, k3, SM, k3, k2tog, yo, k2 (k2, k2tog, yo, k2) 12 times, k2, k2tog, yo, k3, SM, k4 Row 4 (WS): S1wyif, k3, SM, p86, SM, k4 Row 5 (RS): S1wyif, k3, SM, k2, k2tog, yo, k2tog, yo, k1, (k1, k2tog, yo, k2tog, yo, k1) 12 times, k1, k2tog, yo, k2tog, yo, k2, SM, k4 Row 6 (WS): S1wyif, k3, SM, p86, SM, k4 Row 7 (Rs): S1wyif, k3, SM, k1, k2tog, yo, k2tog, yo, k2tog, yo (k2tog, yo, k2tog, yo, k2tog, yo) 12 times k2tog, yo, k2tog, yo, k2tog, yo, k1, SM, k4 Row 8 (WS): S1wyif, k3, SM, p86, SM, k4 Row 9 (RS): S1wyif, k3, SM, k2, k2tog, yo, k2tog, yo, k1, (k1, k2tog, yo, k2tog, yo, k1) 12 times, k1, k2tog, yo, k2tog, yo, k2, SM, k4 Row 10 (WS): S1wyif, k3, SM, p86, SM, k4 Row 11 (RS): S1wyif, k3, SM, k3, k2tog, yo, k2 (k2, k2tog, yo, k2) 12 times, k2, k2tog, yo, k3, SM, k4 Row 12 (WS): S1wyif, k3, SM, p86, SM, k4 Row 13 (RS): S1wyif, k3, SM, k7, (nupp7, k5) 12 times, nupp7, k6, SM, k4 Row 14 (WS): S1wyif, k3, SM, p6, p7tog,(p5, p7tog) 12 times, p7, SM , k4 Row 15 (RS): S1wyif, k3, SM, k3, k2tog, yo, k2 (k2, k2tog, yo, k2) 12 times, k2, k2tog, yo, k3, SM, k4 Row 16 (WS): S1wyif, k3, SM, p86, SM, k4 Row 17 (Rs): S1wyif, k3, SM, k2, k2tog, yo, k2tog, yo, k1, (k1, k2tog, yo, k2tog, yo, k1) 12 times, k1, k2tog, yo, k2tog, yo, k2, SM, k4 Row 18 (WS): S1wyif, k3, SM, p86, SM, k4 Row 19 (Rs): k1, k2tog, yo, k2tog, yo, k2tog, yo, k2tog, yo, k2tog, yo, k2tog, yo, k2tog, yo, k2tog, yo, k2tog, yo, k1, SM, k4 Row 20 (WS): S1wyif, k3, SM, p86, SM, k4 Row 21 (Rs): k2): S1wyif, k3, SM, k2, k2tog, yo, k2tog, yo, k1, (k1, k2tog, yo, k2tog, yo, k1) 12 times, k1, k2tog, yo, k2tog, yo, k2, SM, k4 Row 22 (WS): S1wyif, k3, SM, p86, SM, k4 Row 23 (RS S1wyif, k3, SM, k3, k2tog, yo, k2 (k2, k2tog, yo, k2) 12 times, k2, k2tog, yo, k3, SM, k4 Row 24 (WS): S1wyif, k3, SM, p86, SM, k4 For chart B, work Rows 1-24 once and then repeats of Rows 13-24 until desired center panel length is reached.


