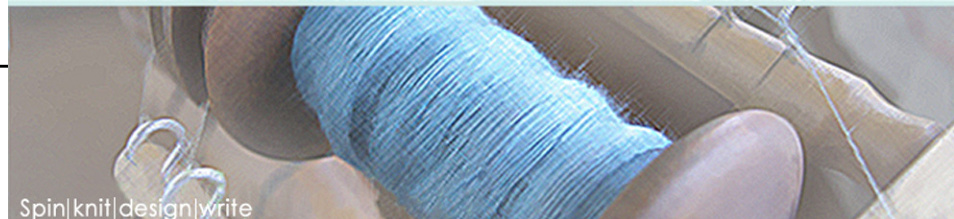
Amy
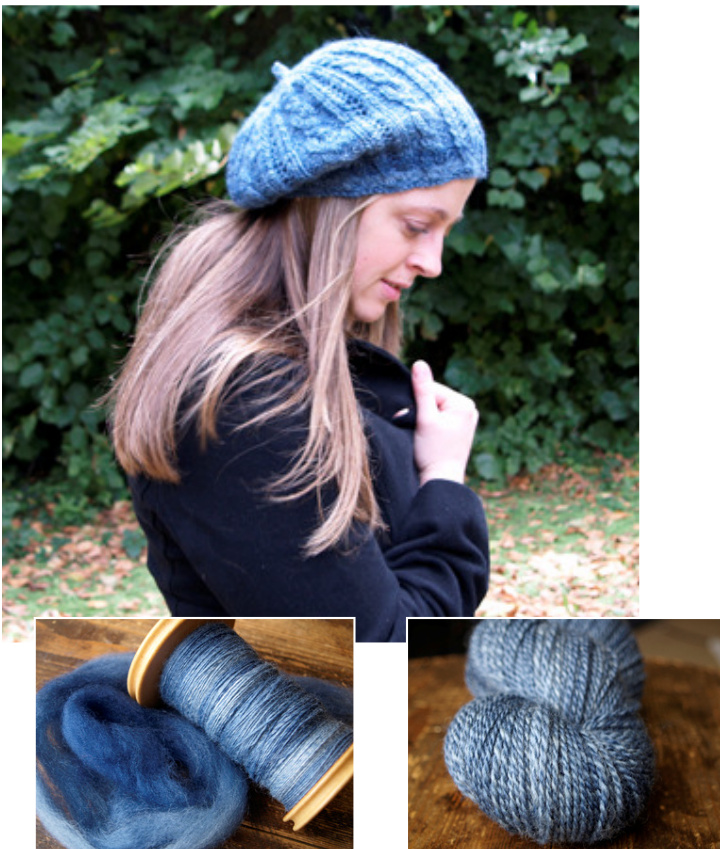
Spin A smooth, even yarn Ply and finish it to create bounce and character Knit A wear-anywhere cabled beret
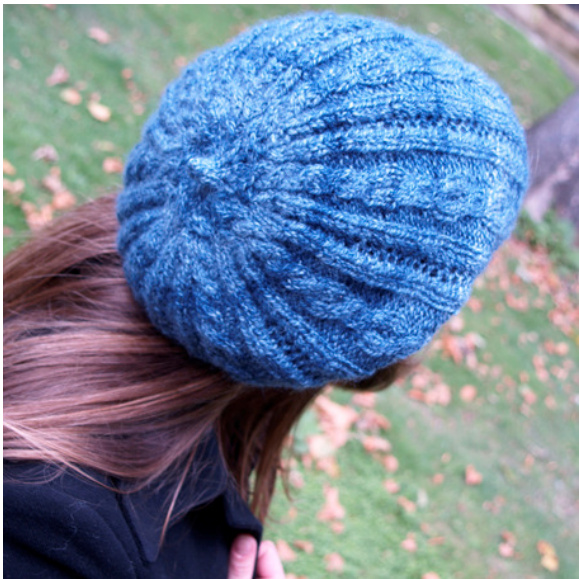
One of the goals of a spinner is to be able to spin a smooth, consistent yarn which can be used in regular knitting patterns. This tutorial covers many of the problems and questions facing a new spinner, including avoiding or correcting lumps, tricks for smooth plying and finishing techniques for a soft, springy yarn. The accompanying beret pattern uses only a small amount of worsted weight yarn, and is just interesting enough to keep the knitter busy without distracting the eye from the character and beauty of the handspun yarn.
Fibre Preparation
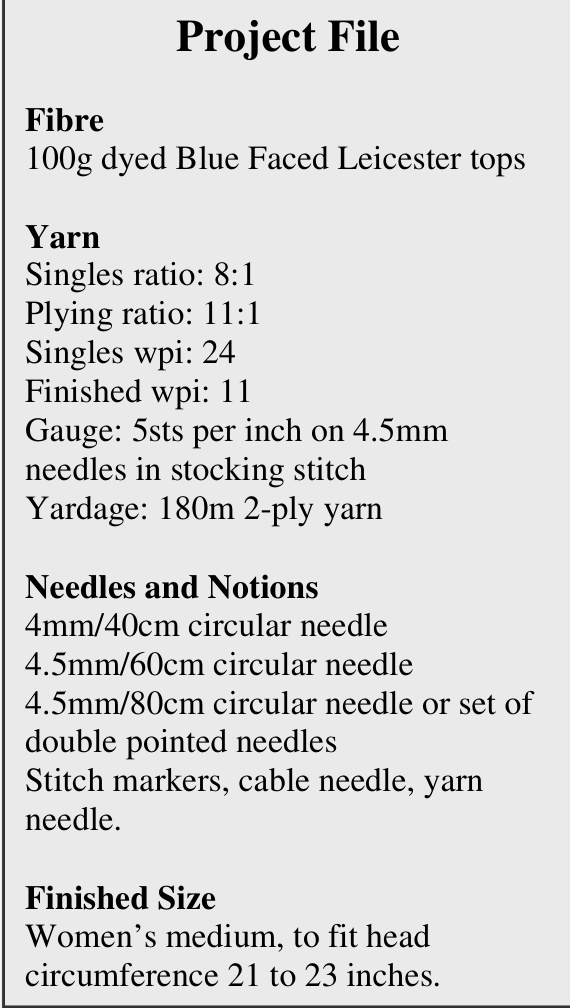
Blue Faced Leicester is a great spinning fibre. It is nice and \*grabby', meaning it is easy to draft, it usually has a good staple length and it can be very soft. Falkland, Corriedale or Polwarth tops are all equally good for this tutorial, a semisolid dyed top is perfect for the subtle patterning on the beret, and creates the concentric circle effect seen here. I dyed my tops with Landscape Dyes in the colour Mountain Blue.
Pre-drafting
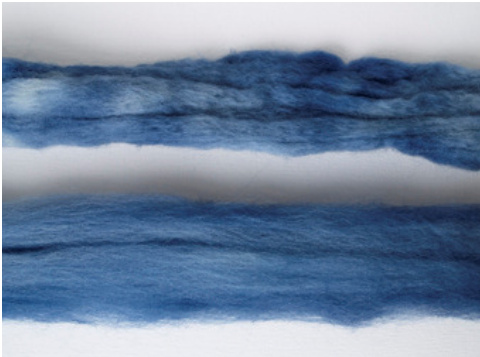
The fibre is already prepared in tops form, with the fibres lying parallel ready for worsted-style spinning. Therefore, there is very little that needs to be done before spinning. It is a very good idea though to take a little time to pre-draft your fibre, particularly if it has been hand-painted. Fibre can become quite compressed during the dyeing process or during shipping, and pre-drafting loosens the fibres a little and makes them easier to draft when it comes to spinning. 1. Split the tops once or twice lengthwise, depending on the original size. About 2 inches across is a good thickness. 2. Wrap both hands around the fibre, a little more than fibre-length apart (probably about 5-6 inches) and pull gently. The fibres will fluff and straighten a little. 3. Move both hands along the tops and repeat, until the whole length has been fluffed. Figure 1 shows the difference between the original (top), and the pre-drafted tops (bottom).
There is no need to draft the fibre so much that it is thin and falling apart. It is much more difficult to manage in this state and is likely to become compressed again if you store it between pre-drafting and spinning.
Spinning
Drafting
In worsted-style spinning the twist is generally not allowed to enter the drafting zone - the triangle of fibres between your forward hand and your fibre hand (figure 2). If you allow the twist to run into this area it will be more difficult to control the thickness of the yarn.
1. Pinch the tip of the triangle with the fingers of your forward hand and draw the fibres out of the triangle. 2. Slide your fingers back along the yarn, allowing the twist to follow them, and turn the fibres just drafted into yarn. 3. Repeat, making sure that the fibre hand is relaxed and the drafting triangle is staying nice and open. The thickness of the yarn is dependant on two things: The point on the triangle where you pinch the fibres to draw them forwards, and The distance you draft before sliding your fingers back. The further down the triangle you pinch the fibres the thicker the yarn will be, try and aim for the same point each time you draft. Similarly, draft forward the same distance each time. For BFL fibre, this is likely to be around 2-3 inches, shorter fibres call for a shorter draft. Achieving a consistent yarn may seem like a lot of work at first, but as you become accustomed to the feel of the fibres and the drafting zone you will find that you are starting to do it automatically.
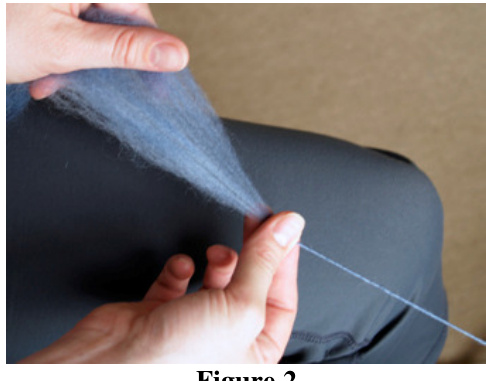
Keeping a control card with some of your singles wrapped around it (figure 3) is a handy way to measure your singles and ensure that you are maintaining an even thickness. Check your spinning against it regularly.
Fixing Lumps and Bumps
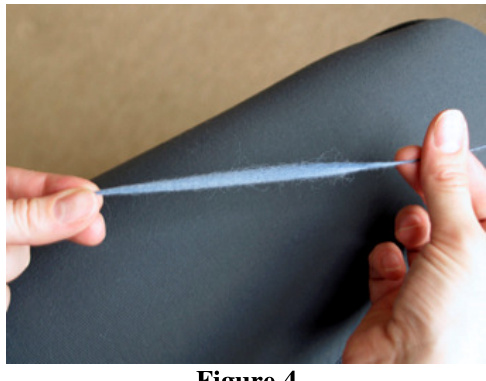
Every so often you will find you have a lump in the yarn, possibly caused by a denser portion of fibre, or a lapse of concentration while drafting. Almost any lump can be fixed, but first the twist needs to be removed - once the fibre is twisted no more drafting can be done. 1. Pinch off the twist at either end of the lump with both hands, leaving about an inch between each hand and the lump. 2. Roll both sets of fingers to untwist the yarn between them. This is fairly tricky, and the twist will want to spring back in - don't let it! 3. Once the lump is twist free you will be able to pull your hands gently apart to draft out the lump (figure 4). You may need to change the position of your fingers a couple of times to make it completely even.
4. Treadle to add more twist. You have made this section longer and thinner, and it will now have less twist than it needs to be consistent with the rest of the yarn.
Joining New Fibre
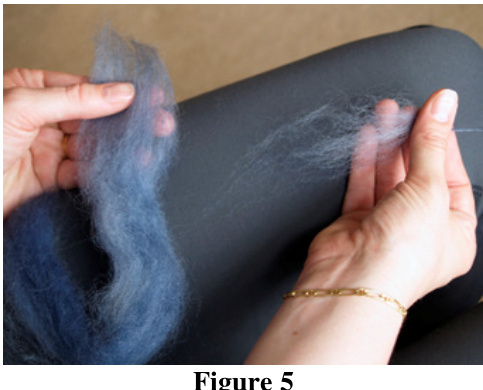
When you come to the end of your piece of fibre, stop before you have completely run out, leaving a couple of inches of fibre twist-free at the end of your yarn (figure 5).
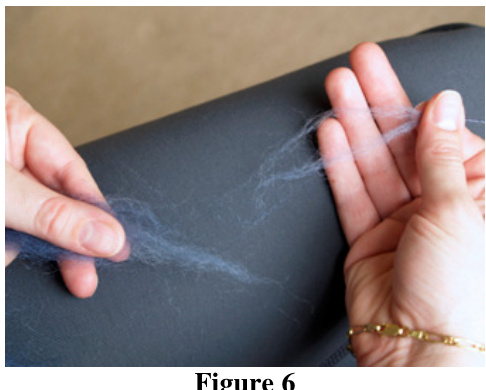
Overlap this fibre with the fluffed-up end of the new fibre piece, and draft them together. With practice, you will be able to make the join completely seamless. If your yarn breaks, or you draft it t00 thinly and want to discard the thin part, you will need to join with a slightly different technique: Pinch off the twist a couple of inches back from the end and fluff up the fibres. This is tricky with only two hands, use any extra fingers you have, or ask a friend to help. Divide the fibre into two “legs’ (figure 6) and overlap these with just a few drawn out fibres in the fibre supply. Let the twist run into the join as you draft carefully to the thickness required.
It is possible to join by simply allowing the new fibre to wrap around the end of the yarn, but this creates a weak point and the twisted end is likely to pull out from inside the wrapped fibres.
Checking Twist
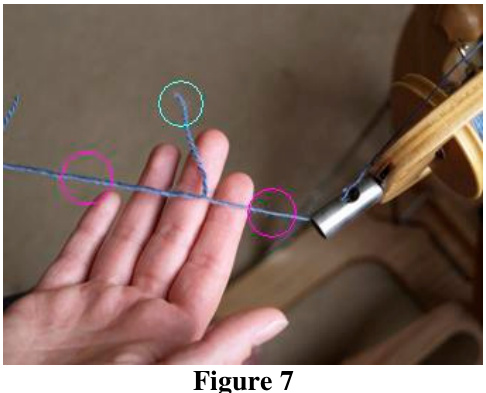
It is a good idea to stop every so often and check the twist in your yarn to ensure it is consistent. Keep a small amount of plied yarn on your control card to check it against (figure 3). Figure 7 shows a singles that has been allowed to relax and twist up. The green circle marks the spot that the twist has sprung to, making a little length of 2-ply yarn. This section is over-twisted however, as it has \*stolen’ the twist from the relaxed sections of the singles marked by the pink circles (figure 7). all times. If one single is allowed to slacken it will wrap around the other and the yarn will be uneven.
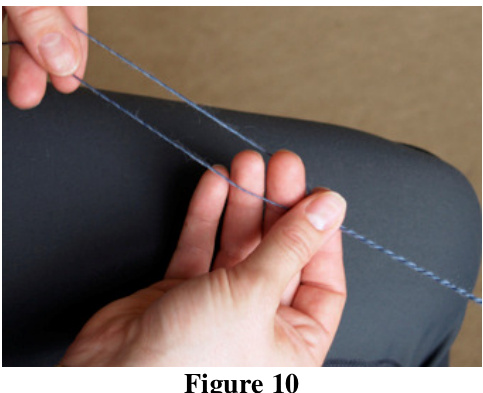
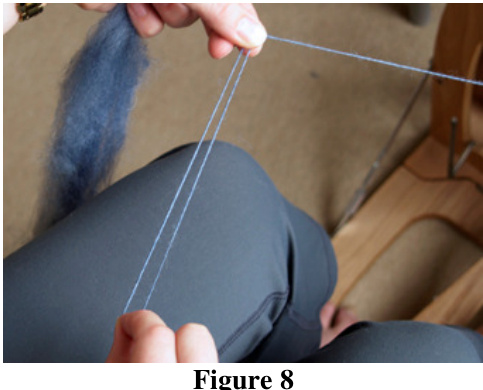
To get a more accurate reading of twist, make a loop with your forward hand and pinch off two points of the yarn with the fibre hand (figure 8). Have the singles coming from a lazy kate placed behind you, on the side of your fibre hand. Hold each strand separately in your fibre hand and pinch off the twist with your forward hand, tensioning the strands evenly between the two hands (figure 10).
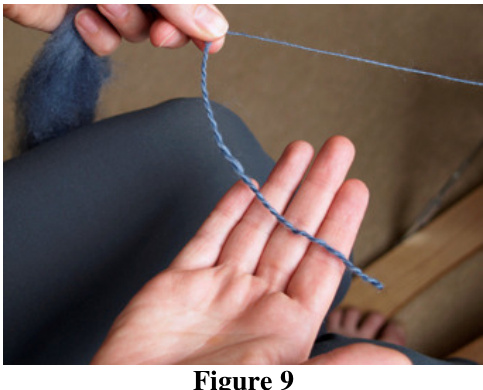
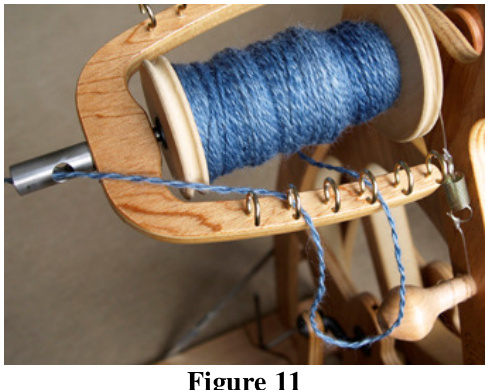
Let this section relax while keeping the twist pinched off (figure 9). The whole length of yarn has even twist and is an accurate example of the twist you are putting into the yarn at that point. Keep a couple of fingers of your forward hand between the strands so that the twist runs evenly down the plies. This is particularly important when making a 3- or 4-ply yarn. When checking the twist in your plying. remember that you are adding twist at all times, right up until the yarn winds onto the bobbin. Test the twist right at the end by pulling some yarn back off the bobbin to see whether it hangs evenly (figure 11).
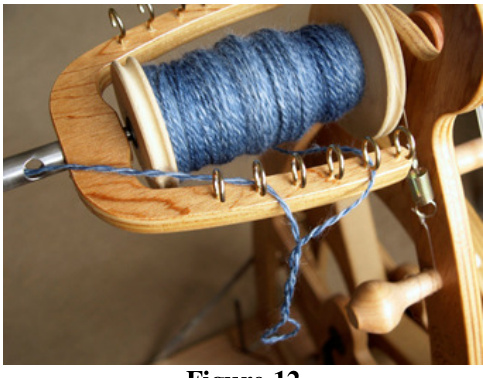
Plying The secret to an evenly plied yarn is to have consistent tension on the singles at Because we want a nice bouncy, springy yarn for this project, add a little extra twist while plying. When relaxed, the yarn should kink up just a little with an stwist (figure 12).
Remember, if you have left your bobbins sitting for a while before plying then the twist will be relaxed. Check the twist against your sample card instead of relaxing the yarn, otherwise it is likely to turn out under-plied .
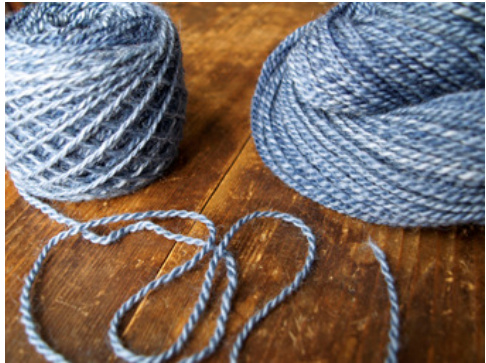
Finishing
Finishing your yarn is a little like blocking a piece of knitwear. The following steps apply to any yarn you would like to be nice and bouncy, particularly wool fibres. 1. Wind off the plied yarn onto a niddy noddy and tie it in four places to secure. You will notice it twists up a little due to the extra plying twist. 2. Run a basin of very hot water and add a little fibre rinse. Press the skein underneath the water and leave to soak for 15 minutes. 3. Remove the skein and squeeze out most of the water with your hands. Fold in half and holding firmly by one end, whack the other end against a cupboard door or counter top. Be reasonably vigorous, but be careful not to snag the yarn on any doorknobs! Repeat for the other end of the skein. 4. Next, place both hands inside the skein and snap them outwards to strands. (This will likely get you rather wet!). 5. Press as much of the remaining water out as possible by rolling in a towel and hang the skein to dry. It should no longer be twisting up. This rough treatment shocks the fibres in the skein, plumping up the plies and encouraging the yarn to bloom and bounce. You are also pre-shrinking the yarn slightly, making it less likely to shrink later after being knitted. Uneven plying twist will travel around the skein as you snap it, giving a more uniform yarn.
Many spinners advocate weighting a skein to straighten it while it is drying. This is not really advisable for knitting yarn however, as it stretches the skein which will then quite likely shrink again later after being knitted. Also, it doesn't remove the twist problem - just hides it until the yarn is wetted again. If your skein is still twisting up a lot, even after finishing (a little bit of twist won’t matter at all), then it is better to wind it into a ball and run the yarn back through the spinning wheel to add or remove a little twist and balance the plying.
Pattern
Requirements
Yarn: $180\mathrm{m}$ light worsted yarn Needles and notions: $4\mathrm{mm}/40\mathrm{cm}$ circular needle, $4.5\mathrm{mm}/60\mathrm{cm}$ circular needle $4.5\mathrm{mm/80cm}$ circular needle or set of double pointed needles, stitch markers, cable needle, yarn needle.
Finished Size
Women's medium, to fit head circumference 21 to 23 inches.
Gauge
5sts per inch on $4.5\mathrm{mm}$ needles in stocking stitch
Pattern Notes
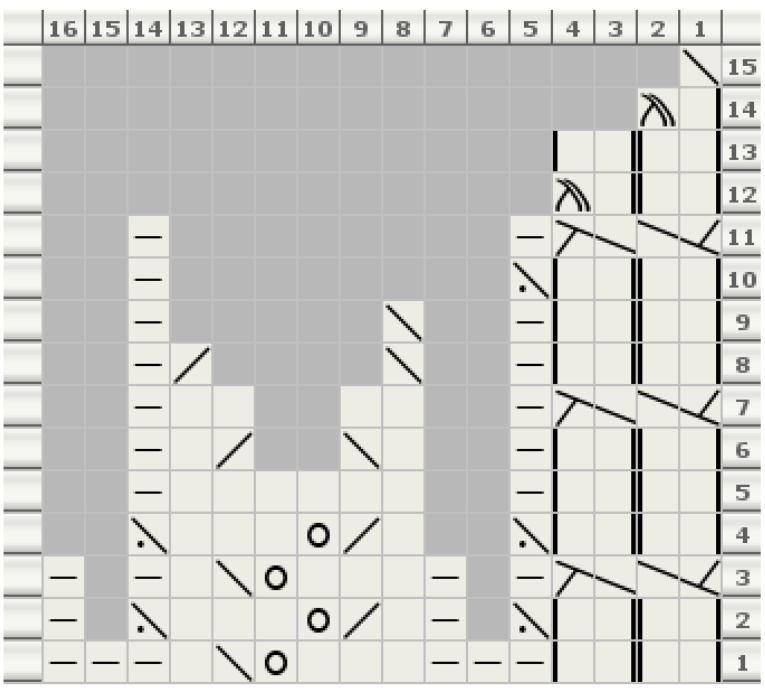
This slouchy, cozy beret is knitted from the band upwards in the round. When decreasing the crown, change to the magic loop method or double-pointed needles when necessary. Your yarn may not knit to exactly the gauge given for the pattern - this is the nature of handspun. A small difference shouldn't matter, but for a significantly thicker or thinner yarn simply reduce or increase by altering the number of pattern repeats. Be sure to cast on a multiple of twelve stitches, this becomes a multiple of sixteen after the increase round. Written instructions and charts are both given for the entire pattern after the band is worked. You may find it helpful to place a marker between each repeat.
Abbreviations
K - knit p- purl k2tog - knit two together yo - yarn over p2tog tbl - purl 2 together through back loops ssk - slip next two sts as if to knit, return to left needle and knit tog through back loops sssk - slip next three sts as if to knit, return to left needle and knit tog through back loops cn - cable needle C4F - cable four front: slip 2 sts to cn, hold in front, k2, k2 from cn RC - right cross: slip 1 st to cn, hold in back, k2, p1 from cn. LC - left cross: slip 2 sts to cn, hold in front, pl, k2 from cn
Instructions
Using smaller needle, cast on 96sts, join in the round being careful not to twist, place a marker to indicate the beginning of the round. Work cabled rib as follows: Rounds 1 and 2: \*p1, k4, p1, rpt from \* to end. Round 3: \*p1, C4F, pl, rpt from \* to end. Round 4: work as for round 1 Repeat these 4 rounds once more. Change to $4.5\mathrm{mm}/60\mathrm{cm}$ needle. Increase round: $\ast_{\mathrm{pl,\,kl}}$ , inc in next st, m1, k2, pl, rpt from \* to end (two stitches increased in the centre of each cable, 128 sts). The main pattern is worked over a multiple of 16sts. These instructions are found in Chart A. Round 1: \*[pl, k2, pl] twice, pl, k3, yo, ssk, k1, pl, rpt from \* to end. Round 2: \*[pl, k2, pl] twice, pl, kl, k2tog, yo, k3, pl, rpt from \* to end. Round 3: $^{*}\mathrm{p}1$ ,LC, RC, p2, k3, yo, ssk, kl, p1, rpt from \* to end. Round 4: \*p2, k4, p3, k1, k2tog, yo, k3, p1, rpt from \* to end. Round 5: $^{*}\mathrm{p}2$ ,C4F, p3, k3, yo, ssk, k1, pl, rpt from \* to end. Round 6: work as for round 4 Round 7: \*p2, k4, p3, k3, yo, ssk, k1, pl, rpt from \* to end. Round 8: work as for round 4 Round 9: work as for round 5 Round 10: work as for round 4 Round 11: \*p1, RC, LC, p2, k3, yo, ssk, k1, pl, rpt from \* to end. Round 12: work as for round 2 These 12 rounds for the pattern. Repeat until work measures approx 7 inches from cast on edge, finishing with round 6 or 10. To decrease the crown a variety of techniques are used to maintain the set of the pattern. These instructions are found in Chart B. Before you start: Remove marker, p2. replace marker. This is the new beginning of the round. Round 1: $\ast\mathbf{k}4$ p3, k3, yo, ssk, kl, p3, rpt from \* to end. Round 2: $\ast\mathbf{k}4$ p2tog tbl, p1, k1, k2tog, yo, k3, p2tog tbl, pl, rpt from \* to end. Round 3: $\mathrm{^{*}C4F}$ p2, k3, yo,ssk, kl, p2, rpt from \* to end. Round 4: $\ast\mathbf{k}4$ p2tog tbl, kl, k2tog, yo, k3, p2tog tbl, rpt from \* to end. Round 5: $\ast\mathbf{k}4$ p1, k6, pl, rpt from \* to end. Round 6: $\ast\mathbf{k}4$ pl, kl, sk, k2tog, k1, pl, rpt from \* to end. Round 7: $\mathrm{^{*}C4F}$ , pl, k4, pl, rpt from \* to end. Round 8: $\ast\mathbf{k}4$ pl, ssk, k2tog, p1, rpt from \* to end. Round 9: $\ast\mathbf{k}4$ pl, ssk, pl, rpt from \* to end. Round 10: $\ast\mathbf{k}4$ p2tog tbl, pl, rpt from \* to end. Round 11: \*C4F, p2, rpt from \* to end. Round 12: $^{*}\mathrm{k}3$ , ssk, rpt from \* to end. Round $13\colon\mathbf{k}$ Round 14: $\ast\mathbf{k}1$ , sssk, rpt from \* to end. Round 15: ssk around, 8 sts remain.
Finishing
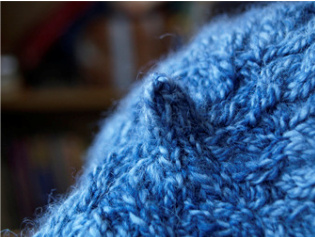
Option 1 (pictured): work these 8 stitches for 6 rounds to create a stem, ssk around once, break yarn and draw tail through remaining 4 sts, fasten off. Option 2: Break yarn and draw firmly through remaining 8 sts, fasten off. Darn in all ends and block if desired over a small dinner plate. This tutorial and accompanying pattern are copyright $\circled{\mathbb{C}}~2008$ to Diane Mulholland and sold for your own personal non-commercial use only. No distribution or reproduction, electronic or otherwise, is permitted without express written permission of the copyright owner. If you have any questions or queries related to this Spin! publication please do not hesitate to contact me, I'm happy to help!
Chart A- Pattern
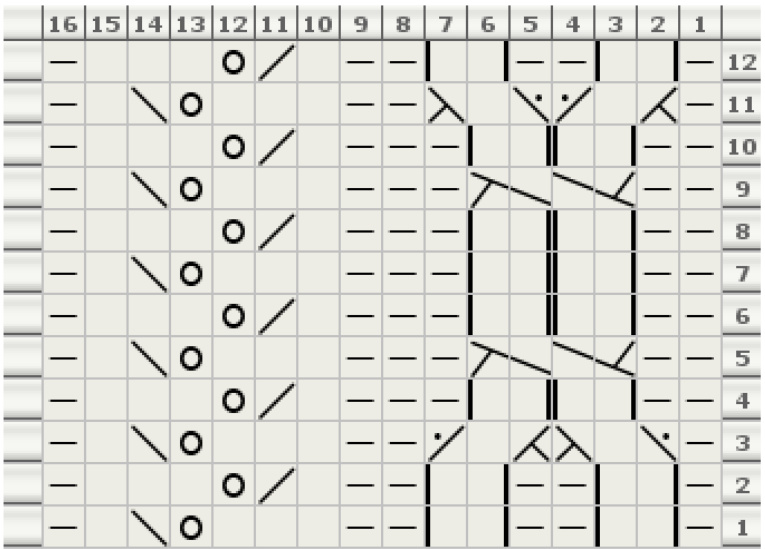

Chart B - Crown