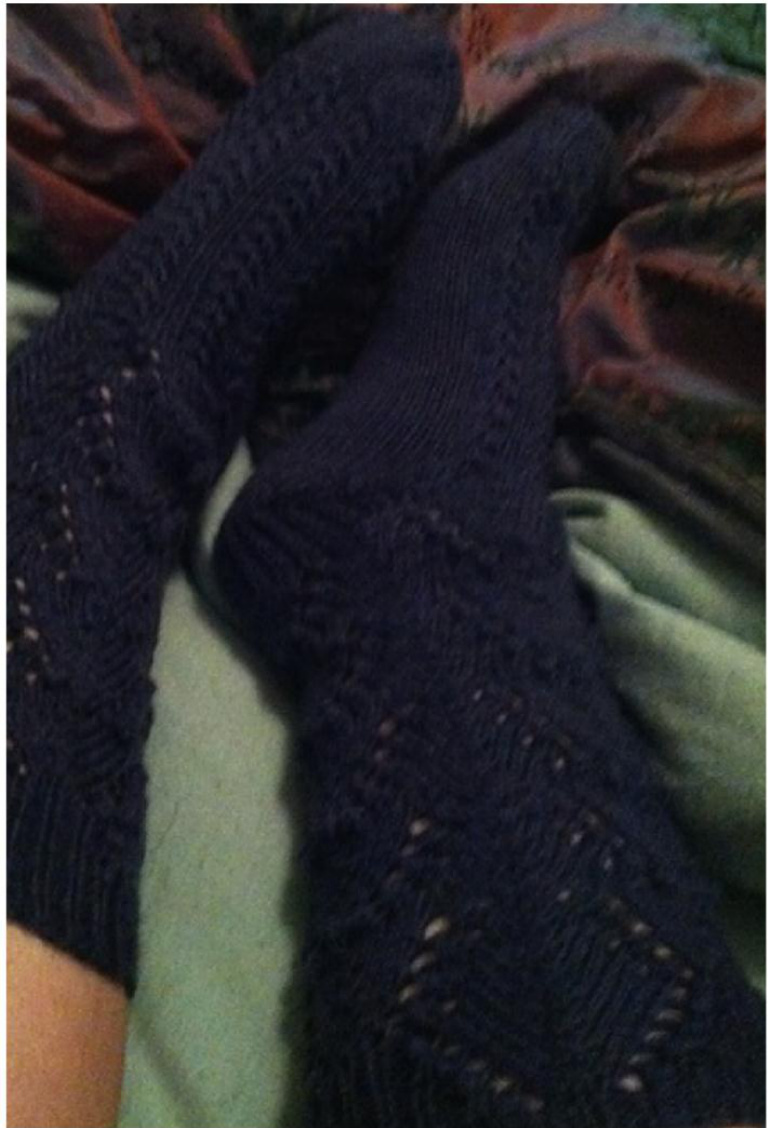
May Contain Nupps
a sock design by FuzzyPumpkin Based on an Estonian lily lace pattern, the long cabled slip stitches on the foot mimic the small leaves found along a flower's stem, and the lace pattern on the legs the lilyflowersthemselves.Theheel on these socksisjust a little different from your typical shortrow heel. It uses more than 50% of the stitches, yet the top is in a slipstitch pattern to draw the heel in and provide a thicker spot for the top of a shoe or that odd snug spot at the top of the heel that always seems to pinch in most boots to rub against. This pattern produces a thicker sock than the normal one you would wear in a standard shoe. They are especially suited to being worn as boot socks during the winter or as inappropriately elaborate bed socks.
Gauge:
Using US 2 or approximate: 6.5 st x 9.5 rounds/inch Note: Horizontal gauge is much more important than vertical. However, please make sure to adjust where the heel is started if your variance is over 1 round/inch.
Sizes:
Medium: Recommended for foot diameter 8-8.5 in, 56-60 stitches Large: Recommended for foot diameter 8.5-9.5 in, 64-66 stitches Where stitch counts or variable instructions are listed, sizes referenced are (medium, large). If desired, these socks can instead be worked in fingering weight yarn at 9st/in. In that case, follow the size large instructions for a medium foot, and size medium instructions for a smaller foot. Instead of starting the heel at 1.25" from target length, start at 1" or even .75".
Yarn:
Instructions
Toe
Cast on (14, 16) sts per needle via figure-8 or Turkish cast-on or any similar closed cast-on you may prefer. (28, 32) sts. Arrange sts as preferred, marking center of round (cOR). R 1: k all sts. R 2 : k1, LLl, k to 2 sts before COR, RLl, k2, LLl, k to 2 sts before EOR, RLI, k1. Repeat rounds 1 and 2 until there are (56, 64) total sts. Move last stitch of round before BOR marker. Move stitch after COR marker to before COR marker. (30, 34) stitches between BOR and COR, (26, 30) stitches between COR and EOR
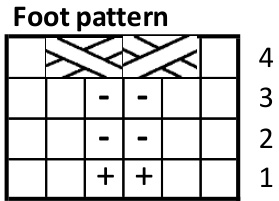
Foot
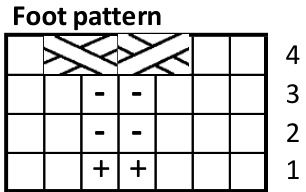
Work foot stitch pattern x5 between BOR and COR. K all sts betweenCOR and EOR. Repeat R1 until foot measures (1.25") short of your total foot length, ending on a row #4 of the foot chart. For example, my foot is 8.75" long and I knit size medium. Measuring from the cast-on toe sts to the bottom of the needles, I would stop at 7.5". Note: this introduces about .25" of negative ease on the foot length in addition to the 10% negative ease in width. lf you do not like negative ease there, knit .25" longer.
Heel
Move first 3 sts to before EOR marker. Move 3 sts before COR marker to after COR marker. (24, 28) sts between BOR and COR. (32, 36) sts between COR and EOR. The sts between the COR and EOR will betheheel. As presented, you should have 3 sts unworked at the end of the round. K1, w&t, leaving one st unworked. At this point and until otherwise noted, work will be done in rows instead of rounds and confined to the stitches in between the COR andEoRmarkers.
Bottom of heel
R 1 (WS): p all sts to 2 sts before COR. w&t. R 2 (RS): k all sts to 1 st before last w&t. w&t. R 3 (Ws): p all sts to 1 st before last w&t. w&t. Continue in this manner, repeating rows 2 & 3 until, on a WS row, you work (14, 18) sts before the w&t.
Top of heel
This heel is designed to best fit an average to pointy heel bone. If your heel is wide, do not work in slip stitch rib as directed. Instead, k all stitches except the first and last on odd rows below. R 1 (RS): sl1, k (13,17), work wrap together with st, turn. R 2 (Ws): sl1, p to next wrap, work wrap together with st, turn. R 3 (RS): sl1, \*k1, sl1\* to 1 st from next wrap, k1, work wrap together with st, turn. R 4 (ws): sl1, p to next wrap, work wrap together with st, turn. R 5 (RS): sl1, k2, \*sl1, k1\* to 2 st from next wrap, k2, work wrap together with st, turn. Repeat rows 2 -5 until all wraps have been worked except one, ending on a RS row.
Getting Back to Business
Next row: sl1, p to end, working wrap together with st when encountered.Turn. Returntoworkinginrounds. Next round: sl1, k to end. Pick up (1,2) sts in gap between heel and foot. K to COR and remove marker, if used. Pick up (1,2) sts in gap between foot and heel. K to EOR. Remove BOR marker and k 3. Replace BOR marker here. (60, 66) sts Sock will now appear off-kilter on the needles. This is necessary to centerthelegpattern.
Leg
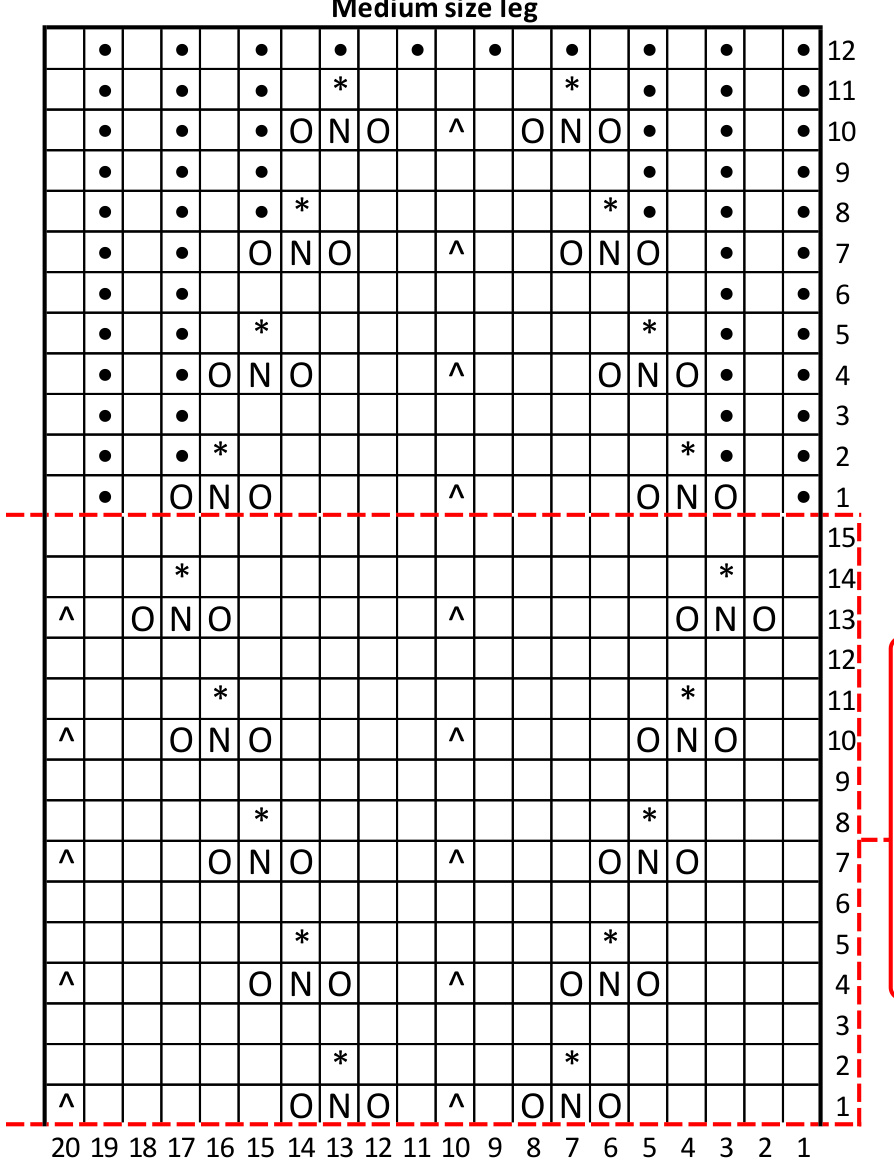
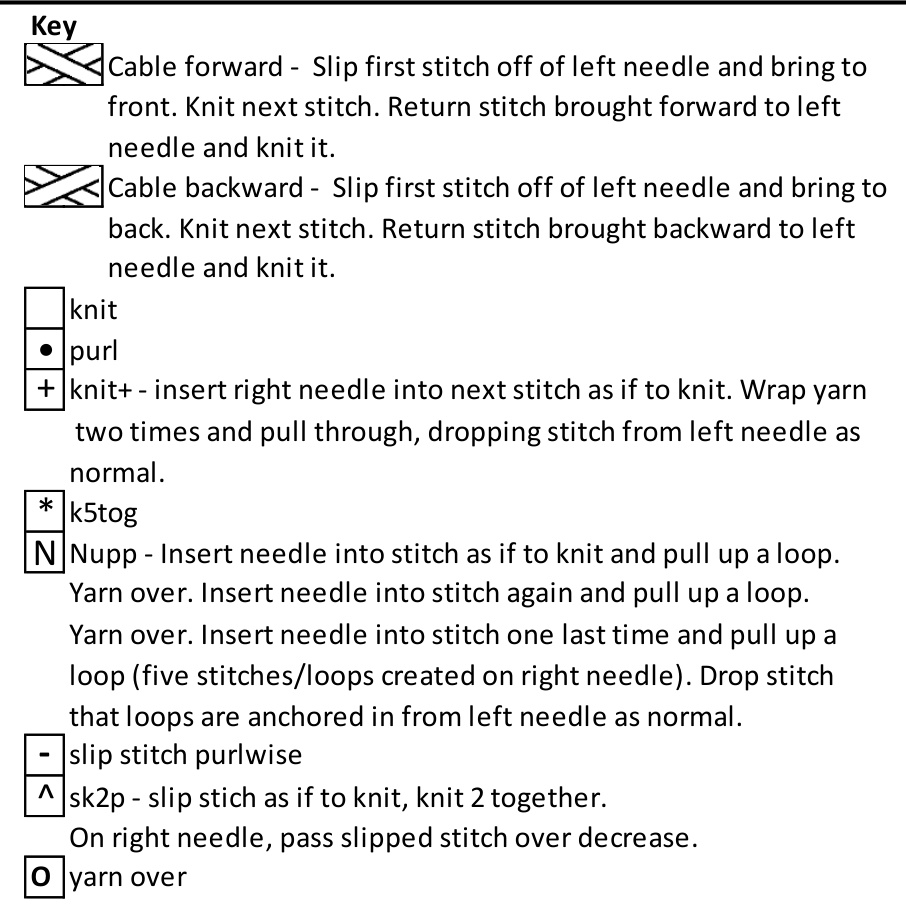
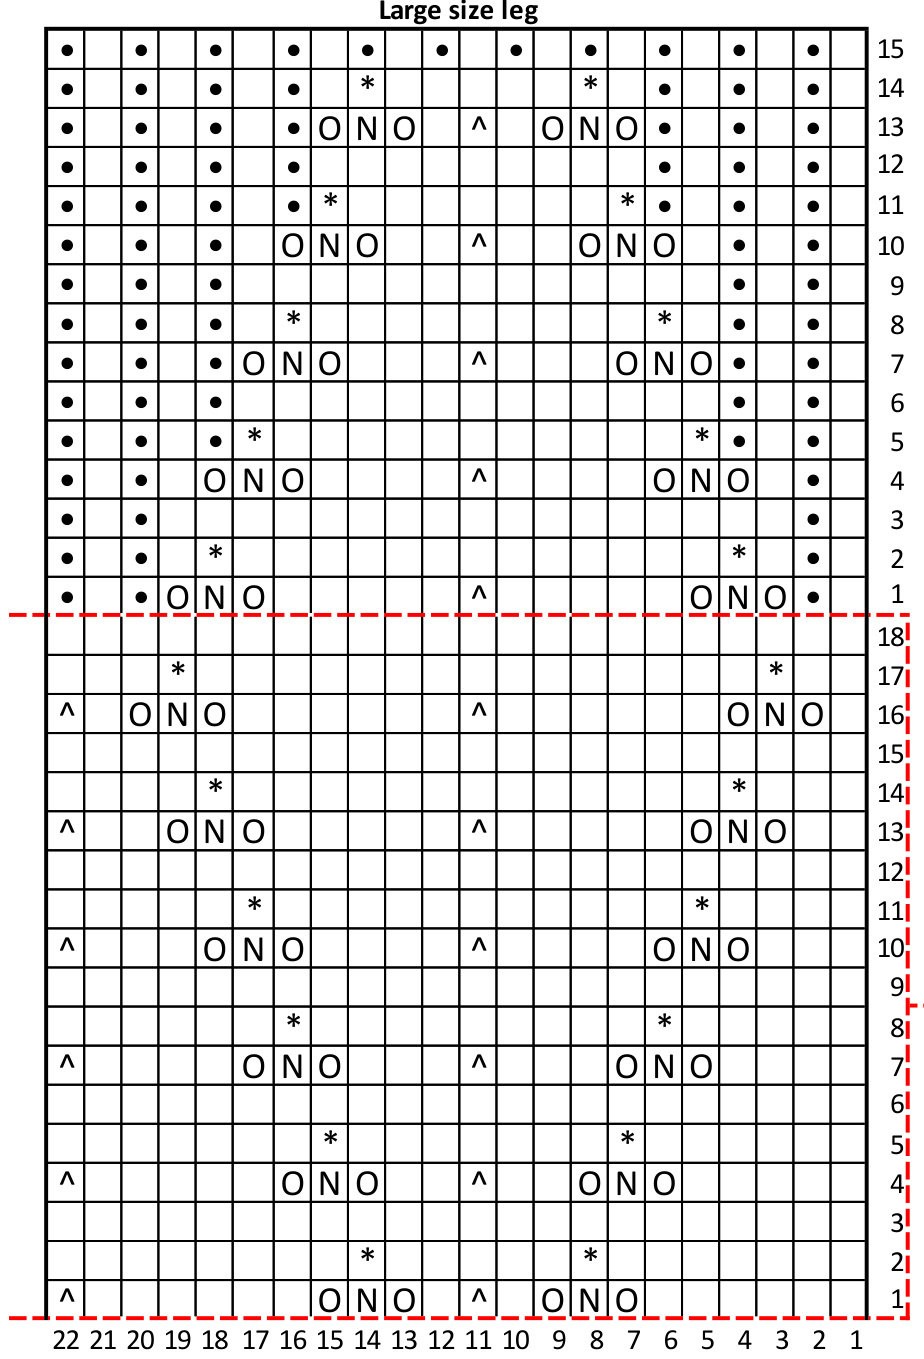
Follow leg chart for chosen size, starting with row 3. The chart will be repeated three times horizontally per round. Do as many repeats of the leg chart rows (1-12, 1-18) as wanted for desired length. Example picture used 5 full repeats. Follow these repeats with the last (12, 15) rows of the chart. A note regarding nupps and k5tog: Be sure to keep your nupps loose while working all five loops into the one stitch. This will make it much easier to knit them all together in the next round. lf you still find it difficult, you can use a small crochet hook to pull the yarn through or even do the k5tog in stages, pulling throughtwoloopsand thentwomoreand then thelast. A note regarding the BOR and chart placement: Due to the centered decreases, every three rows the BOR marker will need to move one stitch forward. It should be easy to follow as long as you focus on keeping those centered decreases on top of each Other.
Cuff
If desired, continue 1x1 ribbing in pattern for a longer cuff
Charts \~ medium
Charts - large
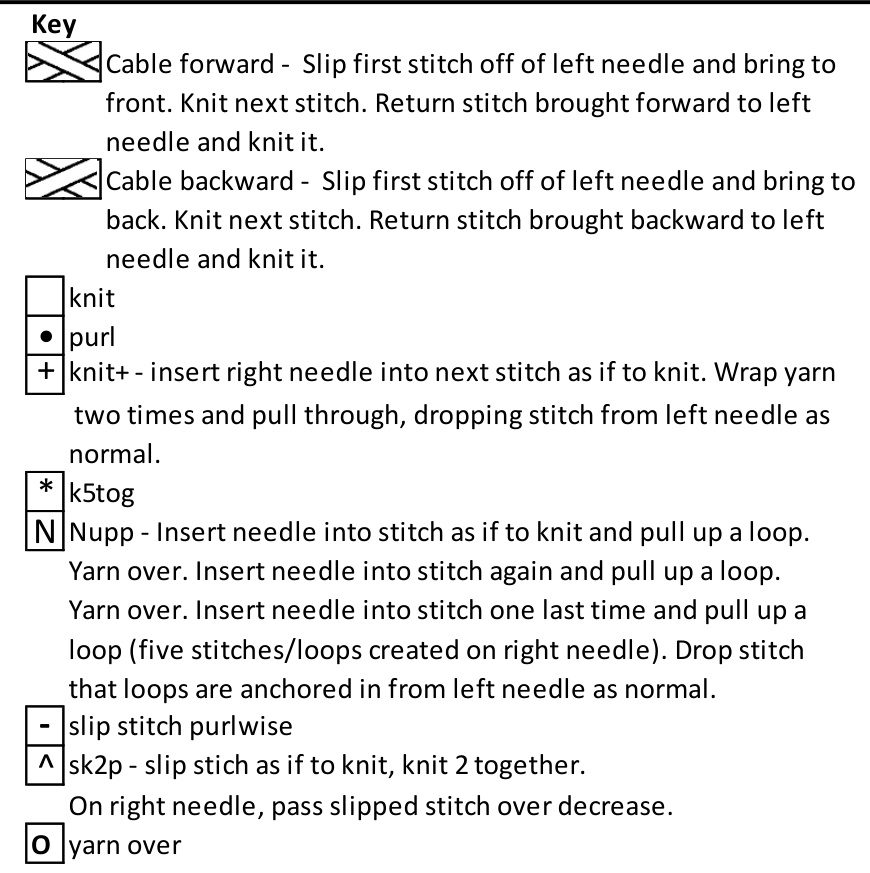
Glossary
LLI: left-leaning increase RLI: right-leaning increase Ktbl: knit through back loop K2tog: knit two together (right-leaning decrease) SSK: slip-slip-knit (left-leaning decrease) P2tog: purl two together BOR/COR/EOR: beginning of round/ center of round/ end of round RS/wS: right side/wrong side W&T: wrap & turn (I prefer German Short Rows to the usual wrap & turn) Sl: slip stitch knitwise St: stitch
Resources
While I'm more than willing to help with suspected erors in this pattern, support for how to do techniques is up to you and will not be provided. Most how-to-knit books contain instructions for every technique or stitch listed in this pattern. There's also that place called YouTube (not Utube...that's an adversite) that has videos. I recommend Very Pink Knits as a source, despite her use of the blech color. That said, here are a couple resources I like in particular and would like to share. German Short-rows (pdf): http://www.ravelry.com/patterns/library/german-short-row-tutorial alternative to wrap & turn, I find as a tight knitter that I keep making my wraps too tight and it creates bad spots. SYTK (blog): http://techknitting.blogspot.com/2007/09/new-method-for-left-leaning-decreases.html alternative to the SSK, doesn't zig-zag about.


