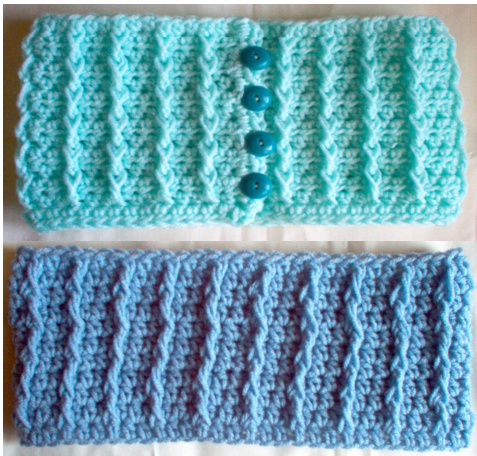
Vertical Bars Neckwarmer
Materials
\* Worsted weight yarn, appx. 4 oz. \* Size J hook (I used a bigger hook for more “stretch") ·Yarn Needle
Finished Size: 22 inches by 6 inches. I prefer my cowl to be a closer fit to fit inside my coat collar without bunching. To change size: This stitch pattern is worked in a multiple of 3 sts. To increase length, be sure to add stitches in multiples of 3 for an accurate increase. For width, repeat Rows 4 and 5 as needed to get the width you want, ending with Row 4.
Abbreviations
| slst-slst | hdc - hdc | st - st | sts-sts |
NOTE: When worked in the round, this pattern stitch looks a little crooked at first, but when you are finished it will be straight. Once I finished mine and straightened it out it was fine (or block if you like).
Special Stitch
1dc/rf - Work a dc around the post of stitch 2 rows below (working in the pattern, this would be every third stitch), inserting hook around post from right to left to draw up loops (make them a little tall so they will be even with your current row). Do not work stitch behind the 1dc/rf. BEGIN Ch 60; join with a slst, being careful not to twist. Round 1 Ch 1 (do not count), hdc in same st, hdc each st to end. Join with a slst to top of 1st hdc. (60 sts) Round 2 Ch 1 (do not count), hdc in same st, hdc each st to end, join with slst to top of 1st hdc. (60 sts) Round 3 Ch 1 (do not count), hdc in same st, \*work 1dc/rf in next st, hdc in each of next 2 st, rep from \* to last 2 st, work 1dc/rf, hdc next st, join with slst to top of 1st hdc. (60 sts), Round 4 Ch 1 (do not count), hdc in same st, hdc each st to end, join with slst to top of 1st hdc. (60 sts) Round 5 Ch 1 (do not count), hdc in same st, \*work 1dc/rf in next st (this will be around the stem of the 1dc/rf two rows below), hdc in each of next 2 st, rep from \* to last 2 st, work 1dc/rf, hdc next st, join with slst to top of 1st hdc. (60 sts) Round 6 Repeat Round 4 Round 7 Repeat Round 5 Round 8 Repeat Round 4 Round 9 Repeat Round 5 Round 10 Repeat Round 4 Round 11 Repeat Round 5 Round 12 Repeat Round 4 Round 13 Repeat Round 5 Round 14 Repeat Round 4. Fasten off and weave ends. To Make Cowl Flat: Ch 61, do not join. Turn. Row 1 (Right Side) (I worked in the humps on the back of the chain for a neater edge) Hdc in 1st st from hook and in each hook to end, turn. (60 sts) Row 2 Ch 1 (do not count), hdc in same st, hdc each st to end, turn. (60 sts) Row3 Ch 1 (do not count), hdc in same st, work hdc in next st \*work 1dc/rf in next st (l counted over to the 3rd stitch on the bottom row), hdc in each of next 2 st, rep from : to end, turn. (60 sts) Row 4 Ch 1 (do not count), hdc in same st, hdc each st to end, turn. (60 sts) Row 5 Ch 1 (do not count), hdc in same st, work hdc in next st \*work 1dc/rf in next st (around stem of 1dc/rf), hdc in each of next 2 st, rep from \* to end, turn. (60 sts) Row 6 Repeat Row 4 Row 7 Repeat Row 5 Row 8Repeat Row 4 Row 9Repeat Row 5 Row 10Repeat Row 4 Row 11 Repeat Row 5 Row 12Repeat Row 4 Row 13Repeat Row 5 Row 14 Repeat Row 4. Do not fasten off.
Button Band
For my button band, I made 4 buttonholes since I used smaller buttons. You can make as many as you like. You will need to adjust the chain accordingly to fit your buttons, either skipping more stitches or just making the chain longer for a button “loop". Here is how I made mine: In the last stitch made, make 2 more hdc (to turn the corner), hdc in next st (on the end), \*ch 2, skip 2 st, hdc in next 3 st, repeat to end, make 2 hdc in corner st and slst to next st. Fasten off and weave end. For the opposite end, join yarn in the corner, make 2 hdc in corner, space hdc evenly down side, 2 hdc in bottom corner, slst to next st, fasten off and weave ends. Sew buttons on. August 2010: Special thanks to Wanda Neely for testing this pattern for me. You can see her work here: http://s292.photobucket.com/albums/mm27/butterflycrochetgirl/CROCHET


