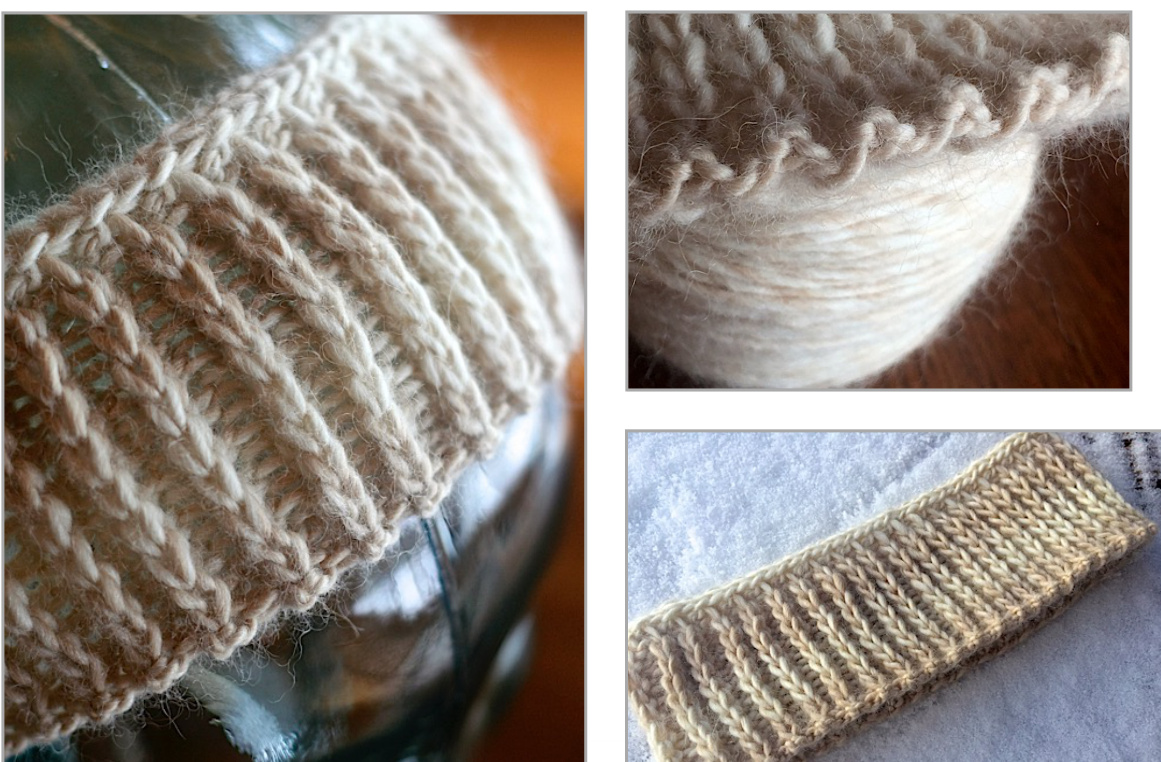
Snowed In Headband
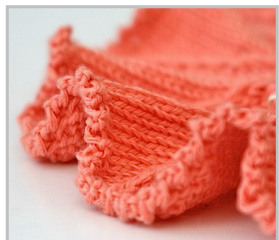
Try a few new techniques with this deeply textured rib headband that also makes a great hat brim.
Pattern for Our Blog Readers:
This pattern is a techniques tutorial for our blog readers. If you're new to Knitting Nuances, we are so glad you're here, but you may notice some things you haven't seen before. Don't worry. Just pop on over to the blog for details about this pattern and a list of other posts that will tell you more about each technique. Join us, we're having lots of fun. Blog Post: Snowed In Headband Makes a Great Last Minute Gift
| Gauge |
| Label gauge of 4.5 sts = 1" (10 cm) in stockinette. Pattern Gauge: Knit gauge of 4.5 sts = 4" (10cm) in Showy Rib |
| pattern. See note on next page. Yarn |
| s s no si p i s s i a this pattern, an alpaca blend for example. Similar yarns are Manos and Cascade Highlands Duo or Crystal Palace Mochi Plus. Cascade Eco Duo: 70% undyed baby alpaca, 30% undyed merino, 100g = 197 yds, 18 sts per 4" in st st, Color Vanilla #1705 |
| Size (unstretched) Childs: 16"x 2.5" |
| Women'sMedium:18"x3" Cowl: 20"x5“or 6" |
| Knitting Notions Brim Needle: One 16-inch circular as needed to get gauge of 20 sts per 4 inches in stockinette. US 7 (4.5 mm) |
Pattern Notes
Resilient Cast On
To create this more elastic edge, cast on 1/2 more stitches than working stitches. (#/2x3) The number of stitches is reduced on the next row by passing one stitch over another every other stitch. The cast on is important to provide the stretch needed for a hat brim.Tutorial included at end of pattern.
Showy Decreases and Raised Rib
The Showy Decrease connects lines of k2tog decreases using slip stitches on the next round. It not only creates a continual line, but raises the decrease up off the knit fabric creating a decorative element. When worked in a rib it really enhances the depth. See blog for more info.
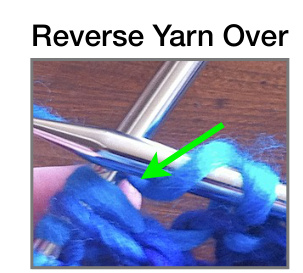
ryo (reverse yarn over)
A reverse yarn over increase is paired with a k2tog to create vertical Showy Decreases without an eyelet. When you yarn over in this direction, you can knit or purl it normally on the next round or row to close the eyelet (instead of working it through the back loop). It also prevents the rib from stretching out so don't ignore this step (see blog post September 2015). To yarn over in reverse, wrap the yarn counterclockwise over the top of the right needle. Since it is following a purl in this pattern, the yarn starts in the front, goes back under the right needle then over the top so it sits like this / on the needle.
| Abbreviations | |
| k | knit |
| k2tog | knit2together |
| d | purl |
| p2tog | purl2together |
| p1sso | pass1slipstover |
| sl | slip 1 wyib |
| ryo | yarnoverinreverse |
Try the swatch below, but remember it will be easier in the round. You will be knitting to close the yo loop instead of purling.
Before You Start
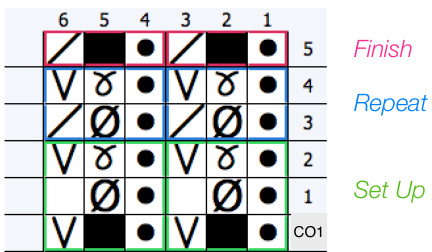
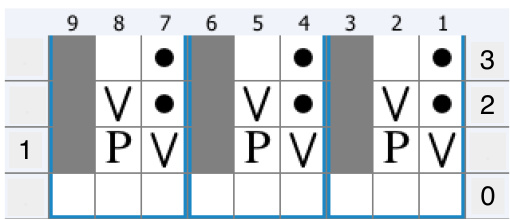
Try this swatch to verify gauge with your yarn. This rib is knit firmly so try dropping down a needle size. (multiple of 2 plus 3) + Cast on 19 sts (8 repeats plus 3) , Purl one row Set Up (in green) · Row 1 (RS): k1 \*p1, yor, k1\* p1, k1 + Row 2 (WS): k2 \*sl1 wyif, p to close, k1\* k1 (now 27 sts) Repeat (in blue) + Row 3 (RS): k1 \*p1, yor, k2tog\* p1, k1 + Row 4 (WS): k2 \*sl1 wyif, p to close, k1\* k1 Repeat rows 3 & 4 until you get the hang of it. Finish (in red) · Row 5 (RS): k1 \*p1, k2tog\* p1, k1 (now 19 sts) See note on next page about measuring and adjusting gauge.
Single Showy Rib
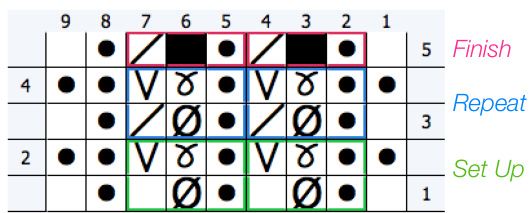
Colorsonthechartareusedtodifferentiatetheset uprounds(green),repeat rounds(blue)and final round (red) of the pattern. Two repeats are shown.
Knitting Instructions
Working Stitches: Child (Adult Medium, Cowl): 72 (80, 90) Number of Rib Sets: 36 (40, 45)
Resilient Cast On (photo tutorial on page 4)
Cast on108 (120, 135) sts with long tail cast on. Do not cast on too loosely. - Calculating the # of sts for the cast on = working / 2 x 3. i.e. 72/2x3 = 108 · Slide the sts to the other end of the circular needle to start slip pattern. Work a pass over decrease every other stitch as follows: sl2, p1sso \* s3, p1sso \* sl1 72 (80, 90) sts remain
Do not join.
·Next Row (RS): \*p1, sl1\* Shown as CO1 on chart Purl the single stitches and slip the piggybacked sts with yarn in back. ’ Join, check to make sure not twisted, place marker for beginning of round.
Set Up Showy Rib
Set Up Rnd 1: \*p1, yor, k1\* now 108 (120, 135) sts Set Up Rnd 2: \*p1, k1 to close, sl1 \*
Showy Rib
Rnd 3: \* p1, ryo, k2tog\* Rnd 4: \*p1, k1 to close, sl1\* Note: k1 will close the ryo from the prior round Repeat last 2 rnds for 2.25 (2.75, 4.75 ) inches from cast on edge, ending on Rnd 4 · Rnd 5: \*p1. k2tog\* eliminating extra Raised Rib sts. 72 (80, 90) sts remain
4 Stitch i-Cord Bind Off
More about thei-cordbind off inpatternin thisblogpost. Add 3 stswith cable cast on Work the i-cord bind off as follows: 1. k3, k2tog, slip 4 stitches back to left needle 2. k3, p2tog, slip 4 stitches back to left needle (w/ yarn in back) Bind off the 4 stitches. Read below if you'd like to add the elastic because you'll do so before you sew together i-cord ends. Here's a standard i-cord bind off photo tutorial if you'd like a reminder.
Add Optional elastic
The 4-stitch i-cord creates a true tube that allows you to add a piece of thin elastic to customize the fit if you'd like. Here's an example of a 1/4" cord from Joanne's Fabric. If you are adding elastic, do so before you sew together i-cord ends. · Add a safety pin to one end of elastic, slide though beginning edge of i-cord just under the Outsideso it won't show. - Pull through i-cord tube and out the other side (again just under the right side). · Determine correct length, leave a bit of tail on each end, sew together with thread and shift the ends so they are just inside one of end of the i-cord.
Modifying Gauge & Size
The Showy Decrease, adds a temporary extra stitch to each rib. When calculating gauge do not count that stitch. I just count the ridges, 5 sets of ribs = 10 sts. Gauge Rule of Thumb Your pattern gauge will be the same as the stockinette gauge on the yarn ball as long as you drop down a needle size. This rib should be knit firmly. Cast on guidelines have been provided by you can cast on in any multiple of 2 working sts = 3 initial cast on sts. It's a stretchy rib, when in doubt use less stitches and/or a smaller needle.
CO1 is part of Resilient Cast On
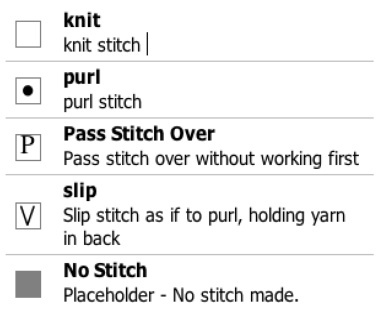
| knit knit stitch | |
| knittoclose knitasusualtoclosereverseyo frompriorround | |
| k2tog Knittwostitchestogetheras onestitch | |
| nd | purl stitch |
| slip Slipstitch as if topurl,holding yarninback | |
| yarnoverreversed wrapyarninoppositedirection soyarnstartsoverrightneedle first | |
| NoStitch | Placeholder-Nostitchmade |
Basic Resilient Cast On
for knitting in the round
Overview
Here's a simple cast on idea that took a bit of testing to get 'right' so it doesn't flare. Here are the three basic steps: 1. Cast on 1/2 more stitches than called for in the pattern. 2. Pass one stitch over another every other stitch to reduce the number. 3. Eliminate some of the bulk by slipping every other stitch on the next row. This basic version of the Resilient Cast On adds flexibility and nice nubby detail. 1. Cast on 1/2 more stitches than called for in the pattern using a long tail cast on: take the # sts / 2 x 3. For Example: 100/2x3 = 150. You don't need to “"cast on loosely". The give comes from the extra stitches, but please not too tightly either. t's easier to cast on a few extra stitches and pull off the unneeded ones after you count, than it is to add more. 2. Slide the stitches to the other end of the circular needle to start slip pattern. This 'row' does not require any knitting so drop your working yarn. The number of cast on stitches are reduced to the working number by passing one stitch over the other every other stitch. Like this: \* sl3, psso \* . Themiddlestitchof the3ispassedover theendstitchlikeabindoffso2stitches remain. Continue to end. Pull down on the stitches across the length of the needle to 'set'thecastonrow. Count to make sure you have the right number of working stitches. · There are now 2 types of stitches: solo stitches and piggybacked stitches. · The 'knit' side of the long tail cast on faces you as you cast on and still does as you work the ‘pass stitch over' row. Since we want the nubby edge to show, this is the ‘wrong' side and you'll start knitting with a Right Side Row. 3. Do not join. Turn and work a Right Side Row, alternating purls and slip stitches. You wil purl into the single stitches and slip the piggybacked ones with yarn in back. \*sl1,p1 \* > Since you're slipping with yarn in back, the yarn will alternate each stitch --back for the slip and front for the purl just like a rib. 4. Join making sure the nubby edge is on the outside of the hat or other project. Follow your pattern for the following rows. If you are modifying an existing pattern, consider adding one or more rows of 1x1 rib in established pattern, to enhance the edge and prevent roling. Not just a pretty face! More cast on stitches add more flexibility, making it a great option for wavy edges.
Coming Soon: A video tutorial for the Resilient Cast On will be added to the Bonus Materials page for Blog Eollowers in January 2016.
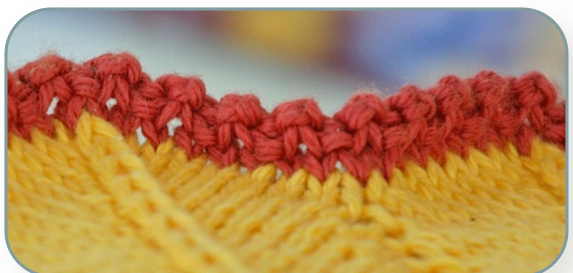
This cast on creates a beautiful nubby edge when workedwith a nicesolidyard like thisCascade Ultra Pima Cotton. If you'd like the nubby texture but are using a soft core yarn consider using 2 strandsfor theinitial cast onrow only.
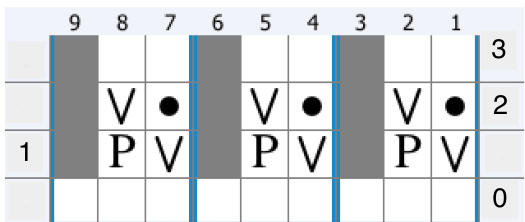
Sample Transition to Stockinette Stillbecarefulaboutroll. 0 = Long Tail Cast on Row Sample Transition to 1x1 Rib
Note:Certainpatterns may change the orderof theslipstitchinordertobetter setupthefollowingstitchpattern.