Vesper
\~a knitting pattern by Heidi Kirrmaier - May 13, 2009\~
Sizes:
S M L XL Finished circumference (cm): 96 113 124 140 Finished circumference (in): 38 45 49 55 To fit bust up to (cm): 89 106 117 132 To fit bust up to (inches): 35 42 46 52 Materials: Main Color (MC) - 750 (830, 910, 1000) m light dk yarn (shown in Elsebeth Hempathy, color 007) Contrasting Color (CC) - about $10\;\mathsf{m}$ of light dk yarn (shown in Euroflax Sport Weight, color 036) 2 circular needles of a size to get gauge - around $3.5\;\mathrm{mm}$ (one of which is at least 80 cm long) 1 button (2 cm diameter) Gauge: 22 st and 30 rows per 10 cm $\mathrel{\left[=4\right.}$ inches)
Yoke:
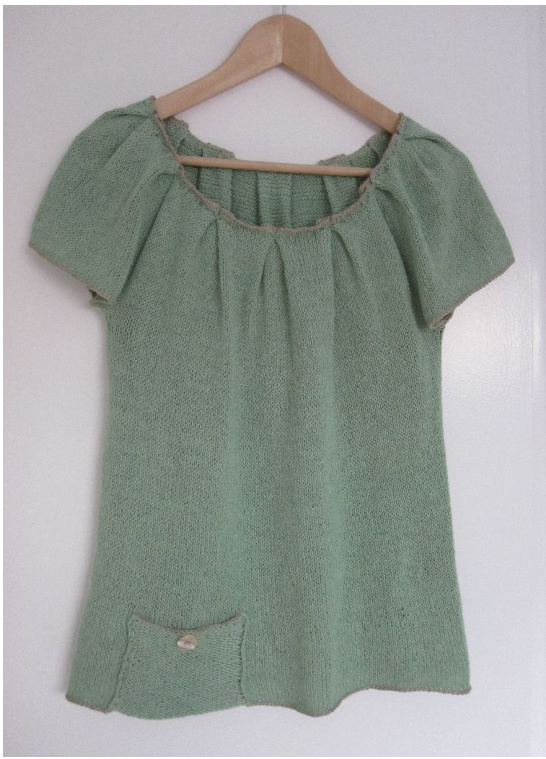
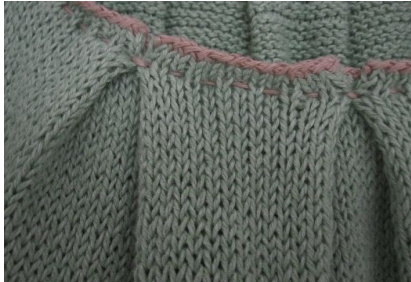
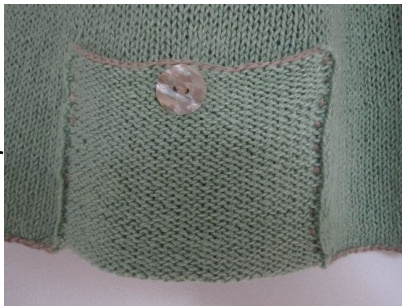
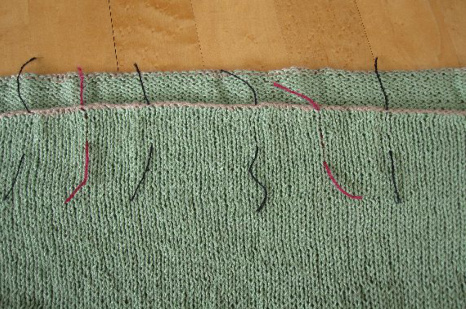
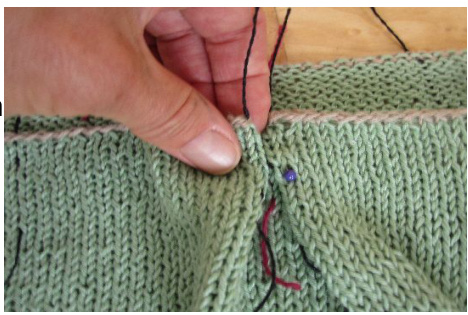
Worked top down. With CC, and long circular needle, cast on 360 (396, 432, 468) st. Place one marker at beginning, and one at midpoint at 180 (198, 216, 234) st. Join in the round (being careful not to twist), change to MC and knit 2 rounds. Make short rows: Next Row: k to 5 (6, 7, 8) st past midpoint marker, wrap next st and turn. Next Row: p to 5 (6, 7, 8) st past beginning marker, wrap next st and turn. Next Row: k to 10 (12.14, 16) st past midpoint marker (knitting wrapped stitch with its wrapping when you get to it), wrap next st and turn. Next Row: p to 10 (12, 14, 16) st past beginning marker (purling wrapped stitch with its wrapping when you get to it), wrap next st and turn. Continue this way, adding 5 (6, 7, 8) st per row, until you have completed 16 short rows. Wrap and turn, and then continue working in st st in the round from rs. Work to a total of 22 (23, 25, 26) cm measured from center of back neck, ending round at the beginning marker. Separate sleeve stitches: K to 37(37, 40, 40) st before midpoint marker, place next 74 (74, 80, 80) st on scrap yarn, removing marker and placing it on the needle after you've moved the sleeve stitches, continue knitting the round to 37(37, 40, 40) st before beginning marker, place next 74 (74, 80, 80) st on scrap yarn, removing marker and placing it on the needle after you've moved these sleeve stitches. [If you want the sleeves wider or narrower - just do it! It willalter the width of the body by the same number of stitches but otherwise doesn't affect anything.] Continue in st st, straight until piece measures 38-40 cm [or desired length] from under arms, ending at the marker at the right side. Next row (start pocket): K 40, turn, now use your second needle, p 28, turn and continue in st st forming pocket until it measures 9 cm. Next pocket row (make buttonhole): k14, yo, k2tog, k to end. Work another 1 cm in st st until pocket measures 10 - 11i cm ending with rs row (rs is stil relative to main piece; i.e. the knit side, not the purl side). Next pocket row: switch to CC, and bind off knitwise, leaving a tail on each end, to be used later to sew pocket in place. With CC, starting at the bottom of the main piece just left(if you were wearing it) of the pocket, bind off knitwise all around to the other side of the pocket. Sleeves: Move sleeve stitches from scrap yarn to 2 circular needles. With MC, work 3 rows in st st. Switch to CC, and bind off knitwise. Finishing: Press edges. This will make it easier to make the pleats and stitch pocket into place. Using 2 colors of fine scrap yarn or thread, with the right side of the garment facing, mark placement of pleats at the top edge as follows: Using color A (shown in black), mark 8.5 (9.5, 11, 12) st from the beginning of first round (top center of left shoulder), towards the front. Mark 13 (14, 14, 15) st from there, then mark after 17 (19, 22, 24) st. Repeat these 2 until you have marked all around the top edge, ending back at the top left shoulder. Using color B (shown in pink), mark the center of each of the larger sections. The smaller sections (without a color B marker ir them) will form the visible pleats. On the right edge of a smaller section, fold along the color A marker (pinch the fabric towards you from the right side) and align the color A marker with the color B marker to its right. Pin into place through the 3 layers. Similarly, on the left edge of the same section, fold along the color A marker and align it with the color B marker to its left and pin into place. Do this for all 12 pleats. With CC, starting at the center of one shoulder, stitch the pinned pleats into place using a simple running stitch evenly spaced along the $3^{\mathrm{rd}}$ MC knit row, making one stitch that grabs one st on either side of where the top pleats meet (visible form the top).

Try it on to see if you want the neckline wider or narrower - there is enough ease in the knit fabric to shift by a few cm and keep the pleats looking the same (as pinned in the last diagram). For the 2 smaller sizes, the width when pulled end to end should be about 35-39 cm; for the 2 larger sizes about 40-43 cm. Ease to the desired width, secure at one end, and stitch around again, securing the pleats with a backstitch on topof the previous visible stitch, and spacing allstitches evenly either between or on top of first running stitch). [Flip up pocket, and with CC, stitch it in place with a running stitch in both directions. Sew button on main piece under buttonhole.