The Great Granny Swap was hosted by Amber Cox of the blog Hoot-n-Annie (http://avocado-owlet.biogspot.com) in the. spring of 2010. Twenty one participants (myself included) submitted batches of 21 granny squares and Amber graciously volunteered to sort and return all the goodies. I decided to do 2 squares each from 10 different designs (plus one surprise). This booklet includes the patterns I used and learning experiences from along the way. Happy Crocheting, The ltsy Bitsy Spider http://itsybitsyspidercrochet.blogspot.com/ Motif #1: Square Target. 3 Motif #2: Frilly Square... Motif #3: Spiked Square. Motif #4: Square with Swags.. 8 Motif #5: Square Wheel. 10 Motif #6: Four Wheeler. 11 Motif #7: Split in Two. .13 Motif #8: Diamond .. 15 Motif #9: Classic Granny. 16 Motif #10: Four Patch Granny ..18 Bonus:. 19 Mix'n Match 21 Append ix. 21
Notes on... The Patterns
The patterns included in this booklet are based on patterns I found in my own crochet library and on the Internet. Each of the patterns has been edited and modified so that the finished squares come out roughly the same size (six rounds). Because none of the patterns is completely my own, I have made every effort to give credit to the original authors. Complete references are listed at the end of this booklet in the Apendix.
The Yarns
Most of the yarns used to crochet the squares included in this booklet were inherited from my friend's grandmother. “Bubbi," as the family called her, was an avid crocheter. At the time she passed away, she had no fewer than eight in-process afghans and her yarn stash was enormous. As my friend's parents cleared Bubbi's house and readied it for sale, they bagged the yarn stash and work-in-process into six giant black trash bags. They showed up at my house a few days later with their "gift" from Bubbi. At the time, I was completely overwhelmed. Over the years, I have managed to complete several of Bubbi's afghans and return the works to her family. I have also used yarn from her stash to make the receiving blanket that welcomed her first great grandhild into the world. But in a lot of cases, there either wasn't enough yarn to finish or I just couldn't figure out the complex patterns from the work-in process. So, a lot of Bubbi's yarn was cleaned, balled, and put away for that "special project." When I joined the Great Granny Swap, I knew it would be a great opportunity to share Bubbi's stash with a group of other crocheters who would appeciate the fibers and the history behind them as much as I do. So there you have it. A final word on the yarns... when I received the yarns, many had lost their tags, been balled, had become otherwise unidentifiable. In some cases, Only Bubbi knows the real origin.
The Stitches and Abbreviations
Stitches and abbreviations used in this booklet: CH Chain Stitch SL Slip Stitch SC Single Crochet DC Double Crochet FPTC Front Post Treble Crochet SP/SPS Space/Spaces ST/STS Stitch/Stitches
The Hook
Allof the squares in this booklet were made with a size G (US) crochet hook.
Copyright
This booklet is copyright 2010 by Karla Fitch/The Itsy Bitsy Spider (http:/itsybitsyspidercrochet. blogspot.com/). Free distribution is allowed; however, I request that you please keep the file intact with copyright information when doing so. Graphic design is copyright 2010 by Steph Dillon (http://sdillondesign.wordpress.com). Please do not reproduce graphic elements outside this booklet without consent from the artist.
Square Target
Based on the original pattern from Theresa Richardson of Crochet Mania. Note: This design was modified from the original to fit in my 6-round limit for project squares. I also re-wrote the round 2 instructions to help clarify for beginners.

Foundation Ring: Using yarn A, CH 4 and join with SL to form ring. Round 1: CH 5 (counts as 1 DC, CH 2), [3 DC into ring, CH 2] 3 times, 2 DC into ring, join with SL into 3rd of CH 5. (Four groups of 3 DC, four CH 2 spaces forming corners.) Round 2: SL into CH 2 SP, CH 7 (counts a 1 DC, CH 4), 2 DC into same CH 2 SP. \*Work 1 DC into each DC across side, then 2 DC, CH 4, and 2 DC into next CH 2 SP. Repeat from \* two more times. Work 1 DC into each DC across remaining side and DC into last CH 2 SP. Join with SL to 3rd of begining CH 7. (Four groups of 7 DC, four CH 4 spaces forming corners.) Break yarn. Round 3: Join yarn B to CH 4 SP. Repeat round 2. (Four groups of 11 DC, four CH 4 spaces forming corners.) Break yarn. Round 4: Join yarn C to CH 4 SP. Repeat round 2. (Four groups of 15 DC, four CH 4 spaces forming corners.) Break yarn. Round 5: Join yarn B to CH 4 SP. Repeat round 2. (Four groups of 19 DC, four CH 4 spaces forming corners.) Break yarn. Round 6: Join yarn A to CH 4 SP. Repeat round 2. (Four groups of 23 DC, four CH 4 spaces forming corners.) Fasten off yarn.
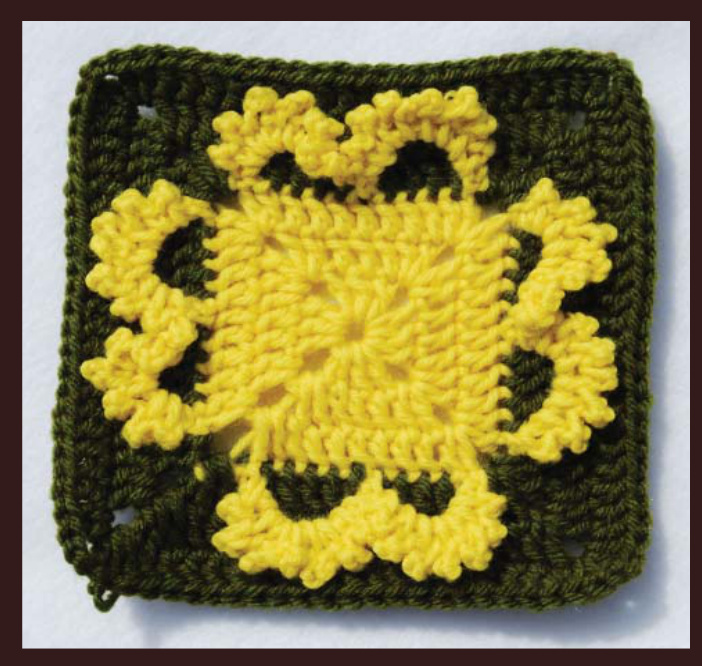
Frilly Square
I found this pattern on the Crochet Mania blog and made few simplifications. The following is my own version of the Frilly Granny Square.
Foundation Ring: Using yarn A, CH 4 and join with SL to form ring. Round 1: CH 2 (counts as first DC) and work 2 DC through loop. $^{\star}\sf C H\,2$ and work 3 DC in loop. Repeat from \* two more times. CH 2 and join with SL to 2nd of beg CH 2. (Four groups of 3 DC, four CH 2 spaces forming corners.) Round 2: CH 2 (counts as first DC). Work 1 DC in same CH SP and 1 DC in each of the next 3 STS. Then, 2 DC in the next CH 2 SP. $^{\star}\sf C H\,2$ and work 2 DC in same SP, then 1 DC in each of the next 3 STS. Work 2 DC in CH 2 SP. Repeat from \* two more times. CH 2 and join with SL to 2nd of beg CH 2. (Four groups of 7 DC, four CH 2 spaces forming corners.) Round 3: CH 2 (counts as first DC). Work 1 DC in same CH SP and 1 DC in each of the next 7 STS. Then, 2 DC in the next CH 2 SP. TURN and Work Frill motif. FRILL MOTIE: CH 7, count 6 DC over and attach with SC to the front loop of the ST. CH 7 and attach with SC to the front loop of the last DC made for round 3. TURN. $^{\star}{\sf S C}$ through the CH 7 loop. CH 3, SC, CH 4, SC, [CH 5, SC] 3 times. CH 4 SC, CH 3, SC. Repeat from \* for remaining CH 7 loop. SL in the top of lasr DC made for round 3. (Frill motif made.) \*\* CH 2 and work 2 DC in next CH 2 SP. Work 1 DC in each of the next 7 STS, then, 2 DC in the next CH 2 SP. TURN and work Frill motif. Repeat from \*\* two more times. CH 2 and join with SL to 2nd of beg CH 2. (Four groups of 11 DC, four CH 2 spaces forming corners.) Break yarn.

Note: To complete the remaining rounds, use only the DC stitches from round 3. To make things less confusing, you can fold the frlled edge in toward the center of the square and just ignore it. Round 4: Join yarn B to CH 4 SP. CH 2 (counts as first DC). Work 1 DC in same CH SP and 1 DC in each of the next 11 STS. Then, 2 DC in the next CH 2 SP. $^{\star}\sf C H\,2$ , and work 2 DC in same SP, then 1 DC in each of the next 11 STS. Work 2 DC in CH 2 SP. Repeat from \* two more times. CH 2 and join with SL to 2nd of beg CH 2. (Four groups of 15 DC, four CH 2 spaces formingcorners.) Round 5: CH 2 (counts as first DC). Work 1 DC in same CH SP and 1 DC in each of the next 15 STS. Then, 2 DC in the next CH 2 SP. \*CH 2, and work 2 DC in same SP, then 1 DC in each of the next 15 STS. Work 2 DC in CH 2 SP. Repeat from \* two more times. CH 2 and join with SL to 2nd of beg CH 2. (Four groups of 19 DC, four CH 2 spaces forming corners.) Round 6: CH 2 (counts as first DC). Work 1 DC in same CH SP and 1 DC in each of the next 19 STS. Then, 2 DC in the next CH 2 SP. $^{\star}\sf C H\,2$ ,and work 2 DC in same SP, then 1 DC in each of the next 19 STS. Work 2 DC in CH 2 SP. Repeat from \* two more times. CH 2 and join with SL to 2nd of beg CH 2. (Four groups of 23 DC, four CH 2 spaces forming corners.) Fasten off yarn.
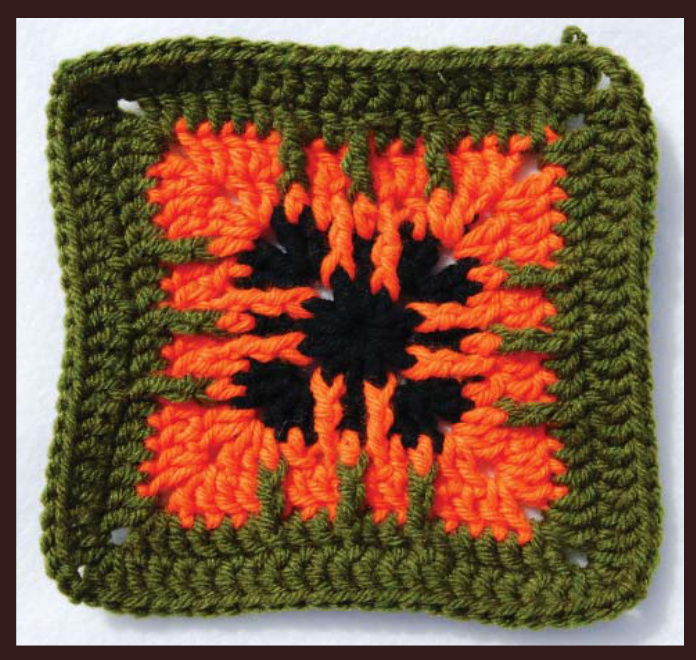
Spiked Square
This is another great pattern on the Crochet Mania blog, but it needed a few modifications to get the square to lie flat and to fit my 6 round criteria.
Stitches: To get the textured effect, this pattern calls for a front post treble crochet (FPTC). Typically, this stich is worked into the stitches in the previous round, but the spiked square adds extra drama by stretching the FPTC to the round before that. Make sure to stay loose with your tension when making these stitches or your work will not lay flat. Foundation Ring: Using yarn A, CH 4 and join with SL to form ring. Round 1: CH 2 (counts as first DC) and work 2 DC through loop. $^{\star}\sf C H\,2$ and work 3 DC in loop. Repeat from \* two more times. CH 2 and join with SL to 2nd of beg CH 2. (Four groups of 3 DC, four CH 2 spaces forming corners.) Round 2: CH 2 (counts as first DC). Work 1 DC in same CH SP and 1 DC in each of the next 3 STS. Then, 2 DC in the next CH 2 SP. $^{\star}\sf C H\,2$ and work 2 DC in same SP, then 1 DC in each of the next 3 STS. Work 2 DC in CH 2 SP. Repeat from \* two more times. CH 2 and join with SL to 2nd of beg CH 2. (Four groups of 7 DC, four CH 2 spaces forming corners.) Break yarn. Round 3: With yarn B, CH 2 (counts as first DC). Work 1 DC in same CH SP and 1 DC in each of the next 2 STS. FPTC into the first DC of the first 3 DC group from round 1 (FPTC counts as DC in round 3 here and throughout). Return to round 2 and DC in next ST. FPTC in the last DC of the same group from round 1. Return to round 2 and work 1 DC in each of the next 2 STS. Work 2 DC and CH 2 in CH 2 SP. \* Work 2 DC in same CH 2 SP and1 DC in each of the next 2 STS. FPTC into the first DC of the next 3 DC group from round 1. Return to round 2 and DC in next ST. FPTC in the last DC of the same group from round 1. Return to round 2 and work 1 DC in each of the next 2 STS. 2 DC, CH 2 in CH 2 SP. Repeat from \* two more times. Join
Motif #3: Spiked Square (continued)
with SL to 2nd of beg CH 2. (Four groups of 11 DC, four CH 2 spaces forming corners.) Break yarn. Round 4: With yarn C, CH 2 (counts as first DC). Work 1 DC in same CH SP and 1 DC in each of the next 11 STS. Then, 2 DC in the next CH 2 SP. $^{\star}\sf C H\,2$ , and work 2 DC in same SP, then 1 DC in each of the next 11 STS. Work 2 DC in CH 2 SP. Repeat from \* two more times. CH 2 and join with SL to 2nd of beg CH 2. (Four groups of 15 DC, four CH 2 spaces forming corners.)Break yarn. Round 5: With yarn D, CH 2 (counts as first DC). Work 1 DC in same CH SP and 1 DC in each of the next 4 STS. FPTC into the third DC of the first group from round 3 (FPTC counts as DC in round 5 here and throughout). Return to round 4 and DC in next 2 STS. FPTC in the sixth DC of the same group from round 3. Return to round 4 and DC in next 2 STS. FPTC in the ninth DC of the same group from round 3. Return to round 4 and DC in next 4 STS. Work 2 DC and CH 2 in CH 2 SP. \* Work 2 DC in same CH 2 SP and 1 DC in each of the next 4 STS. FPTC into the third DC of the next group from round 3. Return to round 4 and DC in next 2 STS. FPTC in the sixth DC of the same group from round 3. Return to round 4 and DC in next 2 STS. FPTC in the ninth DC of the same group from round 3. Return to round 4 and DC in next 4 STS. Work 2 DC and CH 2 in CH 2 SP. Repeat from \* two more times. Join with SL to 2nd of beg CH 2. (Four groups of 19 DC, four CH 2 spaces forming corners.) Break yarn. Round 6: With yarn B, CH 2 (counts as first DC). Work 1 DC in same CH SP and 1 DC in each of the next 19 STS. Then, 2 DC in the next CH 2 SP. $^{\star}\sf C H\,2$ , and work 2 DC in same SP, then 1 DC in each of the next 19 STS. Work 2 DC in CH 2 SP. Repeat from \* two more times. CH 2 and join with SL to 2nd of beg CH 2. (Four groups of 23 DC, four CH 2 spaces forming corners.) Fasten off yarn.
Motif #4:
Swag Square
The patterns for motifs #3 and #4 are actually the same, with a variation on the way round 5 is worked to give the swag effect. Again, credit for the original pattern goes to the Crochet Mania blog.
Stitches: To get the textured effect, this pattern calls for a front post treble crochet (FPTC). Typically, this stich is worked into the stitches in the previous round, but the spiked square adds extra drama by stretching the FPTC to the round before that. In round 5, you will work two FPTC in the same stitch to get the swag effect. The first FPTC swings out to the far right and the second swings out to the left. Foundation Ring: Using yarn A, CH 4 and join with SL to form ring. Round 1: CH 2 (counts as first DC) and work 2 DC through loop. $^{\star}\sf C H\,2$ and work 3 DC in loop. Repeat from \* two more times. CH 2 and join with SL to 2nd of beg CH 2. (Four groups of 3 DC, four CH 2 spaces forming corners.) Round 2: CH 2 (counts as first DC). Work 1 DC in same CH SP and 1 DC in each of the next 3 STS. Then, 2 DC in the next CH 2 SP. $^{\star}\sf C H\,2$ and work 2 DC in same SP, then 1 DC in each of the next 3 STS. Work 2 DC in CH 2 SP. Repeat from \* two more times. CH 2 and join with SL to 2nd of beg CH 2. (Four groups of 7 DC, four CH 2 spaces forming corners.) Break yarn. Round 3: With yarn B, CH 2 (counts as first DC). Work 1 DC in same CH SP and 1 DC in each of the next 2 STS. FPTC into the first DC of the first 3 DC group from round 1 (FPTC counts as DC in round 3 here and throughout). Return to round 2 and DC in next ST. FPTC in the last DC of the same group from round 1. Return to round 2 and work 1 DC in each of the next 2 STS. Work 2 DC and CH 2 in CH 2 SP.
\* Work 2 DC in same CH 2 SP and1 DC in each of the next 2 STS. FPTC into the first DC of the next 3 DC group from round 1. Return to round 2 and DC in next ST. FPTC in the last DC of the same group from round 1. Return to round 2 and work 1 DC in each of the next 2 STS. 2 DC, CH 2 in CH 2 SP. Repeat from \* two more times. Join with SL to 2nd of beg CH 2. (Four groups of 11 DC, four CH 2 spaces forming corners.) Break yarn. Round 4: With yarn A, CH 2 (counts as first DC). Work 1 DC in same CH SP and 1 DC in each of the next 11 STS. Then, 2 DC in the next CH 2 SP. $^{\star}\sf C H\,2$ , and work 2 DC in same SP, then 1 DC in each of the next 11 STS. Work 2 DC in CH 2 SP. Repeat from \* two more times. CH 2 and join with SL to 2nd of beg CH 2. (Four groups of 15 DC, four CH 2 spaces forming corners.) Break yarn. Round 5: With yarn B, CH 2 (counts as first DC). Work 1 DC in same CH SP and 1 DC in each of the next 7 STS. FPTC into the first and eleventh DCs of the first group from round 3 (2 FPTC count as 1 DC in round 5 here and throughout). Return to round 4 and DC in next 7 STS. Work 2 DC and CH 2 in CH 2 SP. \* Work 2 DC in same CH 2 SP and 1 DC in each of the next 7 STS. FPTC into the first and eleventh DCs of the next group from round 3. Return to round 4 and DC in next 7 STS. Work 2 DC and CH 2 in CH 2 SP. Repeat from \* two more times. Join with SL to 2nd of beg CH 2. (Four groups of 19 DC, four CH 2 spaces forming corners.) Break yarn. Round 6: With yarn A, CH 2 (counts as first DC). Work 1 DC in same CH SP and 1 DC in each of the next 19 STS. Then, 2 DC in the next CH 2 SP. $^{\star}\sf C H\,2$ , and work 2 DC in same SP, then 1 DC in each of the next 19 STS. Work 2 DC in CH 2 SP. Repeat from \* two more times. CH 2 and join with SL to 2nd of beg CH 2. (Four groups of 23 DC, four CH 2 spaces forming corners.) Fasten off yarn.
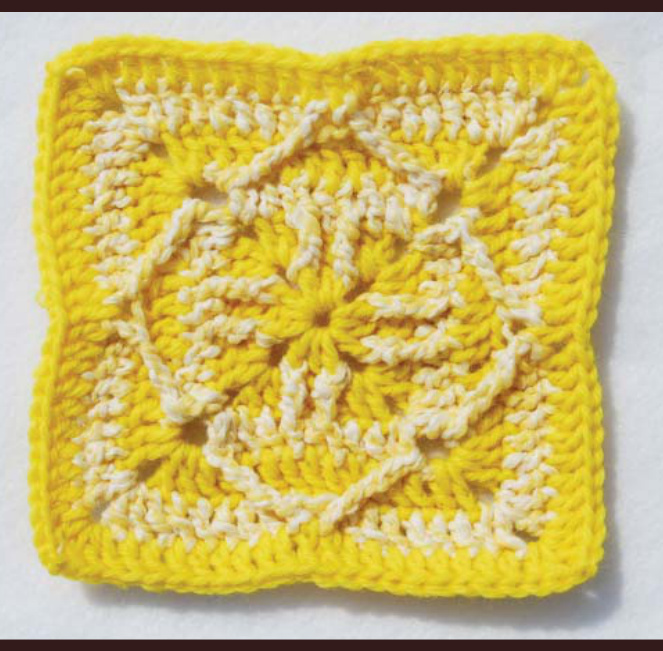
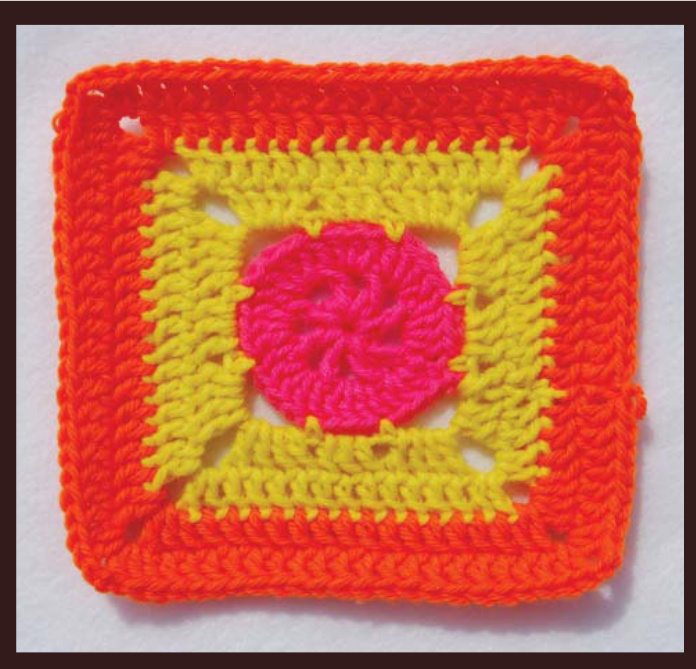
Square Wheel
Ever feel like you're trying to drive on square wheels? This pattern combines the square motif from the first four grannies to show that circles really can fit where a square should be!
Foundation Ring: Using yarn A, CH 4 and join with SL to form ring. Round 1: CH 4 (counts as first DC and CH 2). $^{\star}\mathsf{D C}$ through loop, CH 2. Repeat from \* six more times. Join with SL to 2nd of beg CH 4. (Eight DC "spokes" separated by CH 2 in a circle.) Round 2: CH 2 (counts as first DC) and work 3 DC in CH 2 SP. \* DC in next DC. Work 3 DC in CH 2 SP. Repeat from \* six more times. Join with SL to 2nd of beg CH 2. Round 3: CH 1 and SC in first DC. \* CH 3, skip 3 STS and SC in next. CH 6, skip 3 STS and SC in next. Repeat from \* three more times. Join with SL to first SC. (Four CH 3 sides and four CH 6 spaces forming corners.) Break Yarn. Round 4: With yarn B, join yarn in any corner and CH 2 (counts as first DC). 3 DC in same CH 6 SP. \* Work 3 DC in next CH 3 SP. 4 DC, CH 4, 4 DC in corner. Repeat from \* three more times. Join with SL to 2nd of beg CH 2. (Four groups of 11 DC, four CH 4 spaces forming corners.) Round 5: Join yarn B to CH 4 SP. CH 2 (counts as first DC). Work 1 DC in same CH SP and 1 DC in each of the next 11 STS. Then, 2 DC in the next CH 2 SP. $^{\star}\sf C H\,2$ , and work 2 DC in same SP, then 1 DC in each of the next 11 STS. Work 2 DC in CH 2 SP. Repeat from \* two more times. CH 2 and join with SL to 2nd of beg CH 2. (Four groups of 15 DC, four CH 2 spaces forming corners.) Break yarn. Round 6: With yarn C, CH 2 (counts as first DC). Work 1 DC in same CH SP and 1 DC in each of the next 15 STS. Then, 2 DC in the next CH 2 SP. $^{\star}\sf C H\,2$ , and work 2 DC in same SP, then 1 DC in each of the next 15 STS. Work 2 DC in CH 2 SP. Repeat from \* two more times. CH 2 and join with SL to 2nd of beg CH 2. (Four groups of 19 DC, four CH 2 spaces forming corners.) Round 7: CH 2 (counts as first DC). Work 1 DC in same CH SP and 1 DC in each of the next 19 STS. Then, 2 DC in the next CH 2 SP. $^{\star}\sf C H\,2$ ,and work 2 DC in same SP, then 1 DC in each of the next 19 STS. Work 2 DC in CH 2 SP. Repeat from \* two more times. CH 2 and join with SL to 2nd of beg CH 2. (Four groups of 23 DC, four CH 2 spaces forming corners.) Fasten off yarn.

Motif #6:
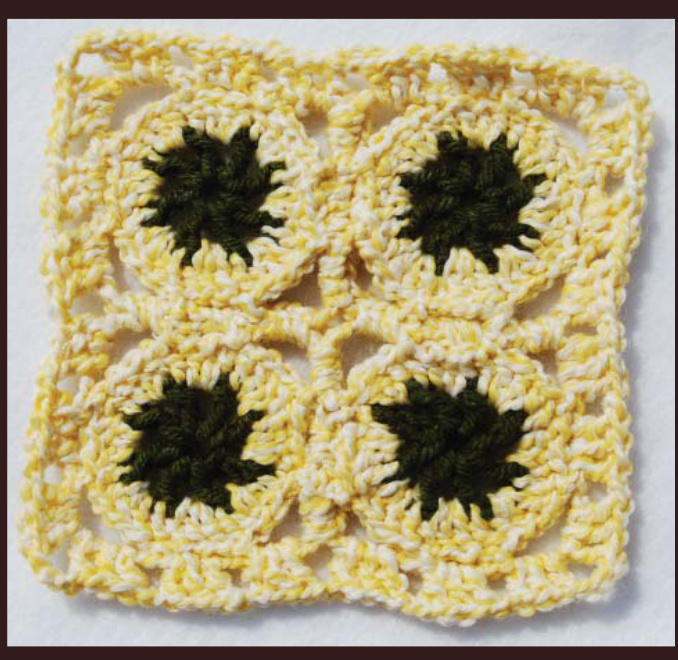
Four Wheeler
The four wheeler uses four copies of the wheel motif from the Square Wheel pattern and combines them to make a "wheely" neat granny.
Wheel Motif - Make 4 Foundation Ring: Using yarn A, CH 4 and join with SL to form ring. Round 1: CH 4 (counts as first DC and CH 2). \*DC through loop, CH 2. Repeat from \* six more times. Join with SL to 2nd of beg CH 4. (Eight DC "spokes" separated by CH 2 in a circle.) Break yarn. Round 2: With Yarn B, CH 2 (counts as first DC) and work 3 DC in CH 2 SP. \* DC in next DC. Work 3 DC in CH 2 SP. Repeat from \* six more times. Join with SL to 2nd of beg CH 2. Round 3: CH 1 and SC in first DC. \* CH 3, skip 3 STS and SC in next. CH 6, skip 3 STS and SC in next. Repeat from \* three more times. Join with SL to first SC. (Four CH 3 sides and four CH 6 spaces forming corners.) Break Yarn. Connect the four wheels to form a square. Note: I prefer to crochet my squares together because it adds strength to the final piece, but you can connect your squares however you are most comfortable. Finishing: Join Yarn B in any corner. CH 2 (counts as first DC) and work 2 DC in same SP. CH 2, work 3 DC and CH 1 to form corner. [3 DC, CH 1] four times along side of square. $^{\star}3$ DC, CH 2, 3 DC, Ch 1 in corner. [3 DC, CH 1] four times along side of square. Repeat from \* two more times. Join with SL to 2nd of beg CH 2. (Sixteen groups of 3 DC, and four groups of 6 DC separated by CH 2 spaces forming corners.) Fasten off yarn.
Motif #7:
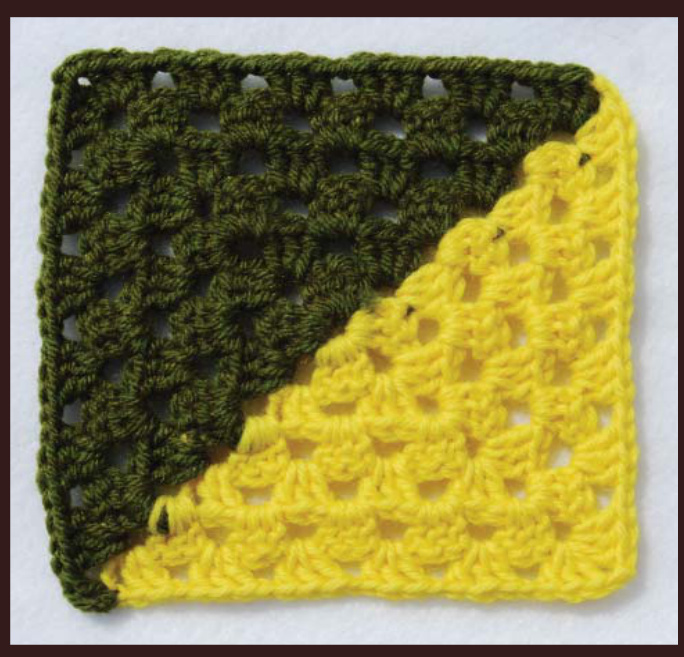
Split in TWo
This square is a great introduction to color work with multiple working yarns. Because you'll be turning the square as you go, there is no need to carry the second strand with you. The instructions for this square are color coded to help you see when you should be working with each yarn.
Foundation Ring: Using yarn A, CH 4 and join with SL to form ring. Round 1: CH 2 (counts as first DC). $^{\ast}2$ DC through loop, CH 2. CH 2, 3 DC in loop, CH 2. Join yarn B and work [3 DC, CH 2] twice. Join with SL to 2nd of beg CH 2. (Four clusters of 3 DC, eight CH 2 spaces.) Round 2: Turn (right side facing away). CH 1 and SL into CH 2 SP. CH 2 (counts as first DC). 2 DC in same space, CH 2. Work [3 DC, CH 2] twice in next SP to form corner. CH 2, drop yarn B and pick up yarn A. Work 3 DC, CH 2 in next SP and 3 DC, CH 2, 3 DC in next to form corner. CH 2, 3 DC, CH 2 in last corner and join with SL to 2nd of beg CH 2. (Eight 3 DC clusters, separated by 2 CH each). Round 3: Turn (right side facing you). CH 1 and SL into CH 2 SP. CH 2 (counts as first DC). 2 DC in same space, CH 2. 3DC in next SP, CH2. 3 DC, CH 2, 3 DC in corner. Work [3 DC, CH 2] in each of the next two SPS. Drop yarn A and pick up yarn B. Work 3 DC, CH 2 in same SP to form corner, then 3 DC, CH 2 in next SP. 3 DC, CH 2, 3 DC in corner. 3 DC, CH 2 in SP and 3 DC, CH 2 in remaining corner. Join with SL to 2nd CH of beg CH 2. (Twleve 3 DC clusters, separated by 2 CH each). Round 4: Turn (right side facing away). CH 1 and SL into CH 2 SP. CH 2 (counts as first DC). 2 DC in same space, CH 2. 3DC in next SP, CH2 Work [3 DC, CH 2] in next two SPS, then [3 DC, CH2] twice in corner. [3 DC, CH 2] in each of the next three spaces. Drop yarn B and pick up yarn A. Work 3 DC, CH 2 in same SP to form corner, then [3 DC, CH 2] in next two SPS. 3 DC, CH 2, 3 DC in corner. [3 DC, CH 2] in next two SPS and 3 DC, CH 2 in remaining corner. Join with SL to 2nd CH of beg CH 2. (Sixteen 3 DC clusters, separated by 2 CH each).

Round 5: Turn (right side facing you). CH 1 and SL into CH 2 SP. CH 2 (counts as first DC). 2 DC in same space, CH 2. 3DC in next SP, CH2. Work [3 DC, CH 2] in next three SPS, then [3 DC, CH2] twice in corner. [3 DC, CH 2] in each of the next four spaces. Drop yarn A and pick up yarn B. Work 3 DC, CH 2 in same SP to form corner, then [3 DC, CH 2] in next three SPS. 3 DC, CH 2, 3 DC in corner. [3 DC, CH 2] in next three SPS and 3 DC, CH 2 in remaining corner. Join with SL to 2nd CH of beg CH 2. (Twenty 3 DC clusters, separated by 2 CH each). Round 6: Turn (right side facing away). CH 1 and SL into CH 2 SP. CH 2 (counts as first DC). 2 DC in same space, CH 2. 3DC in next SP, CH2. Work [3 DC, CH 2] in next four SPS, then [3 DC, CH2] twice in corner. [3 DC, CH 2] in each of the next five spaces. Drop yarn B and pick up yarn A. Work 3 DC, CH 2 in same SP to form corner, then [3 DC, CH 2] in next four SPS. 3 DC, CH 2, 3 DC in corner. [3 DC, CH 2] in next four SPS and 3 DC, CH 2 in remaining corner. Join with SL to 2nd CH of beg CH 2. (Twenty four 3 DC clusters, separated by 2 CH each). Fasten off both yarns.
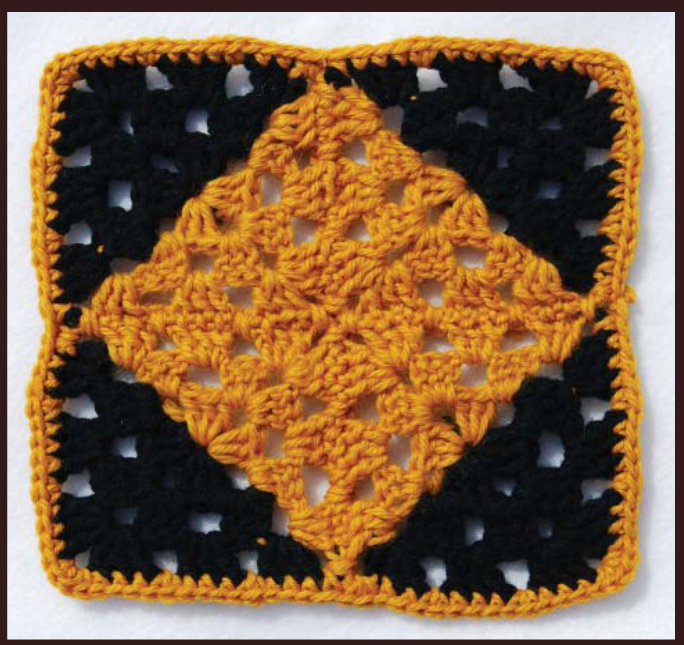
Motif #8:
Diamond
The diamond uses four copies of the first three rounds from the Split in Two pattern. Try playing around with positioning to see what other designs you can come up with. As before, the instructions for these squares are color coded to help you see when you should be working with each yarn.
Small Split in Two Motif - Make 4
Foundation Ring: Using yarn A, CH 4 and join with SL to form ring. Round 1: CH 2 (counts as first DC). $^{\ast}2$ DC through loop, CH 2. CH 2, 3 DC in loop, CH 2. Join yarn B and work [3 DC, CH 2] twice. Join with SL to 2nd of beg CH 2. (Four clusters of 3 DC, eight CH 2 spaces.) Round 2: Turn (right side facing away). CH 1 and SL into CH 2 SP. CH 2 (counts as first DC). 2 DC in same space, CH 2. Work [3 DC, CH 2] twice in next SP to form corner. CH 2, drop yarn B and pick up yarn A. Work 3 DC, CH 2 in next SP and 3 DC, CH 2, 3 DC in next to form corner. CH 2, 3 DC, CH 2 in last corner and join with SL to 2nd of beg CH 2. (Eight 3 DC clusters, separated by 2 CH each). Round 3: Turn (right side facing you). CH 1 and SL into CH 2 SP. CH 2 (counts as first DC). 2 DC in same space, CH 2. 3DC in next SP, CH2. 3 DC, CH 2, 3 DC in corner. Work [3 DC, CH 2] in each of the next two SPS. Drop yarn A and pick up yarn B. Work 3 DC, CH 2 in same SP to form corner, then 3 DC, CH 2 in next SP. 3 DC, CH 2, 3 DC in corner. 3 DC, CH 2 in SP and 3 DC, CH 2 in remaining corner. Join with SL to 2nd CH of beg CH 2. (Twleve 3 DC clusters, separated by 2 CH each). Fasten off both yarns. Connect the four motifs to form a square. Note: I prefer to crochet my squares together because it adds strength to the final piece, but you can connect your squares however you are most comfortable.
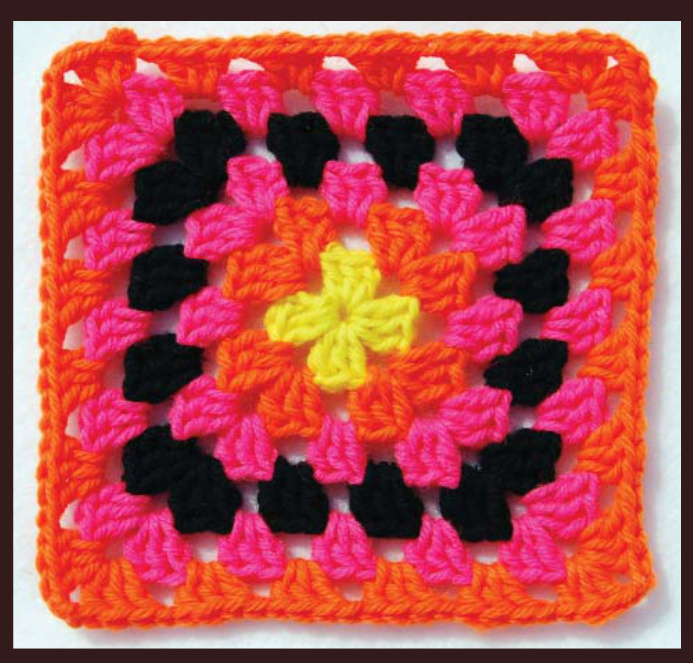
Classic Granny
It wouldn't be a granny swap without the classic granny square. So, as we come along the final stretch of the tour, I had to incude this classic design.
Foundation Ring: CH 4 and join with SL to form ring. Round 1: CH 2, 2 DC in ring. CH 2, $^{\star}3$ DC in ring, CH 2. Repeat from \* two more times. CH 2, slst in top of ch3. Join with SL to 2nd of beg CH 2. (Four clusters of 3 DC, eight CH 2 spaces.) Break yarn. Round 2: Join next color at any corner. CH 2 (counts as first DC). Work 2 DC, CH 2, then 3 DC, CH 1 in same SP to form corner. \* Work 3 DC, CH 2, 3 DC, CH 1 in corner. Repeat from \* three more times. Join with SL to 2nd of beg CH 2. (Four 3 DC, CH2, 3 DC corners, separated by 1 CH each). Breakyarn. Round 3: Join next color at any corner. CH 2 (counts as first DC). Work 2 DC, CH 2, then 3 DC, CH 1 in same SP to form corner. $^{\star}3$ DC, CH 1 in next SP and 3 DC, CH 2, 3 DC, CH 1 in corner. Repeat from \* two more times. Work 3 DC, CH 1 in remaining SP and join with SL to 2nd of beg CH 2. (Four 3 DC, CH2, 3 DC corners, and four 3 DC clusters, separated by 1 CH each). Break yarn. Round 4: Join next color at any corner. CH 2 (counts as first DC). Work 2 DC, CH 2, then 3 DC, CH 1 in same SP to form corner.\* [3 DC, CH 1] in each of the next two SPS, then 3 DC, CH 2, 3 DC, CH 1 in corner. Repeat from \* two more times. [3 DC, CH 1] in each of the next two SPS and join with SL to 2nd of beg CH 2. (Four 3 DC, CH2, 3 DC corners, and eight 3 DC clusters, separated by 1 CH each). Break yarn. Round 5: Join next color at any corner. CH 2 (counts as first DC). Work 2 DC, CH 2, then 3 DC, CH 1 in same SP to form corner.\* [3 DC, CH 1] in each of the next three SPS, then 3 DC, CH 2, 3 DC, CH 1 in corner. Repeat from \* two more times. [3 DC, CH 1] in each of the next three SPS and join with SL to 2nd of beg CH 2. (Four 3 DC, CH2, 3 DC corners, and eight 3 DC clusters, separated by 1 CH each). Break yarn.

Round 6: Join next color at any corner. CH 2 (counts as first DC). Work 2 DC, CH 2, then 3 DC, CH 1 in same SP to form corner.\* [3 DC, CH 1] in each of the next four SPS, then 3 DC, CH 2, 3 DC, CH 1 in corner. Repeat from \* two more times. [3 DC, CH 1] in each of the next four SPS and join with SL to 2nd of beg CH 2. (Four 3 DC, CH2, 3 DC corners, and eight 3 DC clusters, separated by 1 CH each). Fasten off yarn.

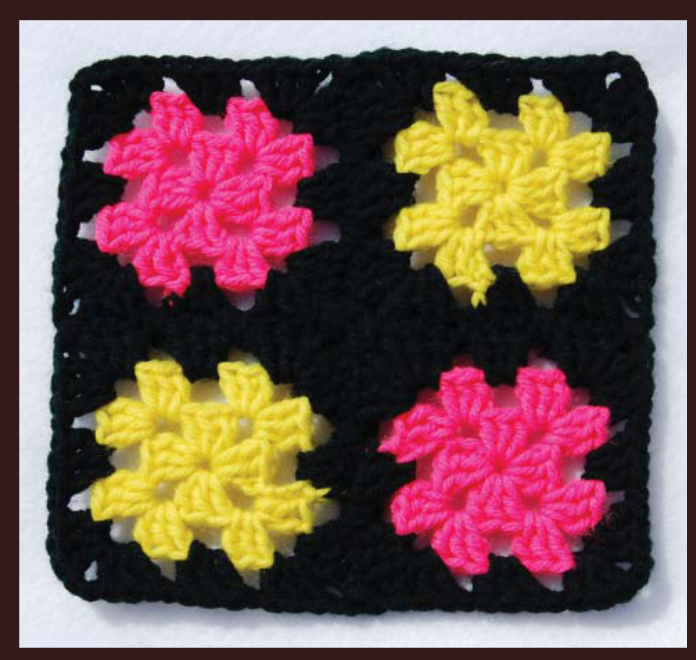
Motif #10:
Four Patch
Part of the fun of granny squares is mixing and matching different colors from your stash The classic Four Patch granny allows you to use up those smaller amounts of yarn that might not otherwise be enough for a larger square.
Small Granny Motif - Make 4 Foundation Ring: CH 4 and join with SL to form ring. Round 1: CH 2, 2 DC in ring. CH 2, $^{\star}3$ DC in ring, CH 2. Repeat from \* two more times. CH 2, slst in top of ch3. Join with SL to 2nd of beg CH 2. (Four clusters of 3 DC, eight CH 2 spaces.) Round 2: CH 3 (counts as DC and CH 1). \* Work 3 DC, CH 2, 3 DC, CH 1 in corner. Repeat from \* two more times. Work 3 DC, CH 2, 2 DC in remaining corner and join with SL to 2nd of beg CH 2. (Four 3 DC, CH2, 3 DC corners, separated by 1 CH each). Break Yarn. Round 3: Join next color at any corner. CH 2 (counts as first DC). Work 2 DC, CH 2, then 3 DC CH 1 in same SP to form corner. $^{\star}3$ DC, CH 1 in next SP and 3 DC, CH 2, 3 DC, CH 1 in corner. Repeat from \* two more times. Work 3 DC, CH 1 in remaining SP and join with SL to 2nd of beg CH 2. (Four 3 DC, CH2, 3 DC corners, and four 3 DC clusters, separated by 1 CH each). Connect the four motifs to form a square. Note: I prefer to crochet my squares together because it adds strength to the final piece, but you can connect your squares however you are most comfortable.
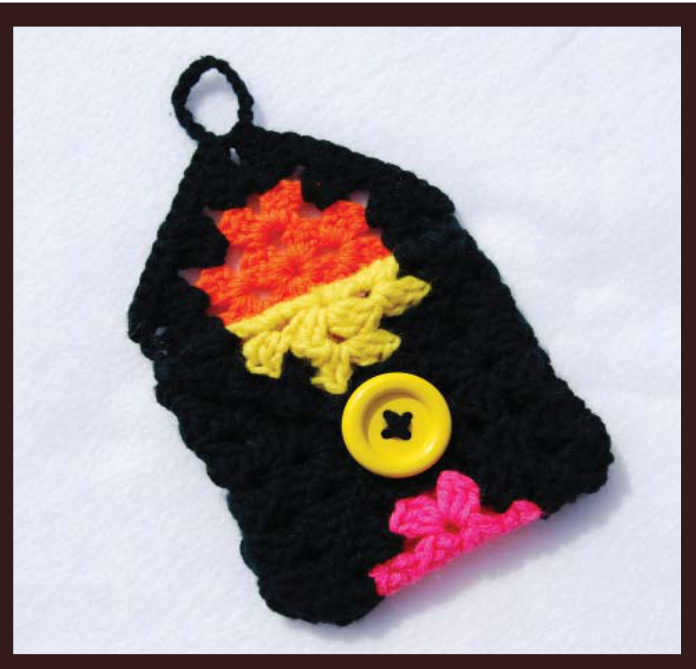
Five Patch Pouch
The number of fun projects and everyday items you can create from granny squares is infinite. This quick and easy pattern uses five three-round grannies to make an envelopestyle pouch.
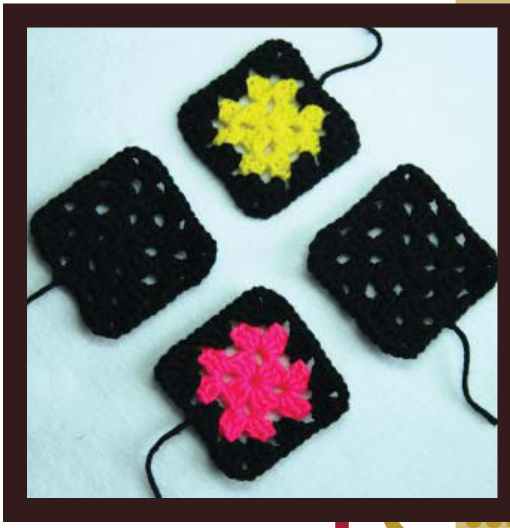
Small Granny Motif - Make 5 Foundation Ring: CH 4 and join with SL to form ring. Round 1: CH 2, 2 DC in ring. CH 2, $^{\star}3$ DC in ring, CH 2. Repeat from \* two more times. CH 2, slst in top of ch3. Join with SL to 2nd of beg CH 2. (Four clusters of 3 DC, eight CH 2 spaces.) Round 2: CH 3 (counts as DC and CH 1). \* Work 3 DC, CH 2, 3 DC, CH 1 in corner. Repeat from \* two more times. Work 3 DC, CH 2, 2 DC in remaining corner and join with SL to 2nd of beg CH 2. (Four 3 DC, CH2, 3 DC corners, separated by 1 CH each). Break Yarn. Round 3: Join next color at any corner. CH 2 (counts as first DC). Work 2 DC, CH 2, then 3 DC CH 1 in same SP to form corner. $^{\star}3$ DC, CH 1 in next SP and 3 DC, CH 2, 3 DC, CH 1 in corner. Repeat from \* two more times. Work 3 DC, CH 1 in remaining SP and join with SL to 2nd of beg CH 2. (Four 3 DC, CH2, 3 DC corners, and four 3 DC clusters, separated by 1 CH each).
Assembly Instructions:
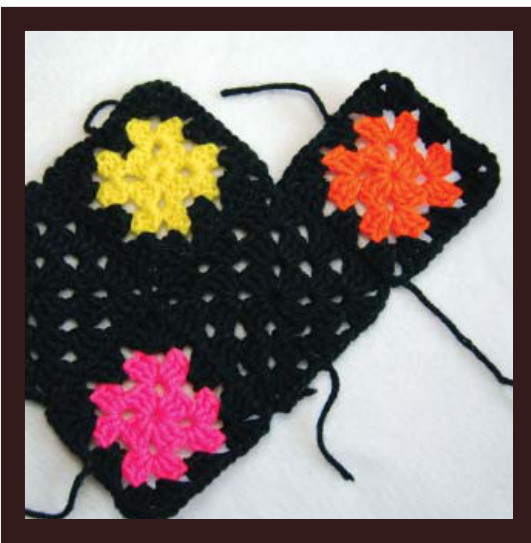
1. Place four patches in a square shape as shown. Make sure that the topmost square is facing right-side down. Using yarn needle, whip stitch the four pieces together.
Bonus: Five Patch Pouch (continued)
2. Add the fifth square to the right side and whip stitch in place.

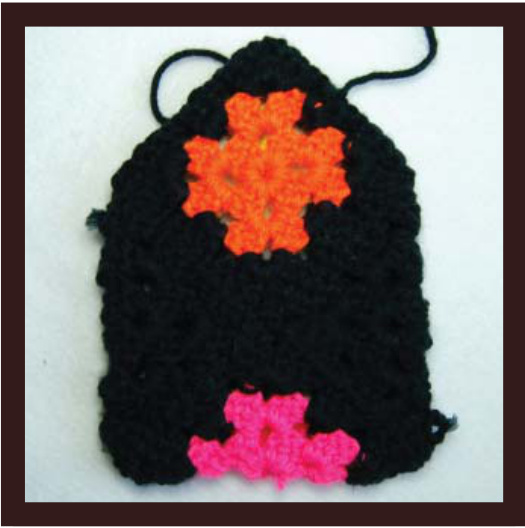
3.Fold square (inside out) so the two outside points meet and whip stitch along edge of fifth patch. 4. Fold the bottom square up and whip stitch in place. Turn pouch right-side out. 5. Fold the topmost square toward the center of the pouch and stitch in place. Optional - you can place a colorful or decorative button at the center of the pouch to make a closure.
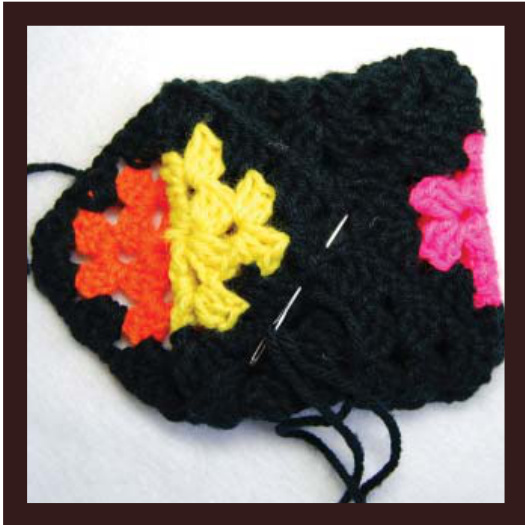
6.SC evenly along the remaining two sides of the fifth square (flap). To make the button loop, CH as needed when you reach the point.
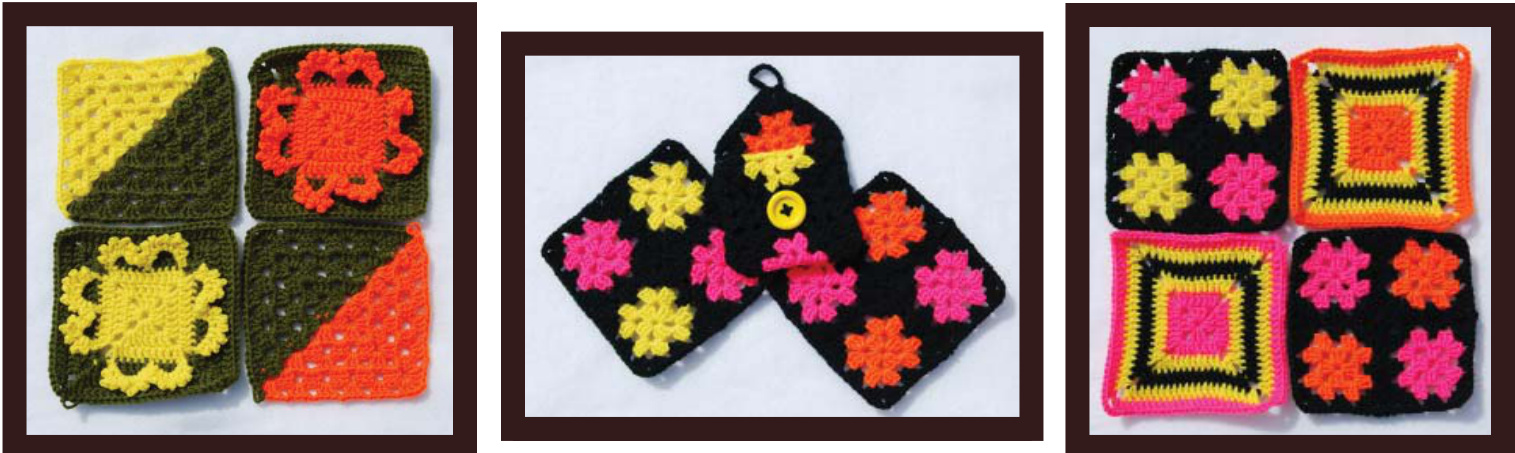
Mix'n Match...
Who could resist a little mix and match with all these great grannies? Not me! So, for your viewing pleasure, here are a few of my favorite combinations:
Append ix...
My Sources
I couldn't have put this booklet together without some great sources that I've “met' in the blogosphere: Theresa Richardson; The Art of Crochet Blog, htp://crochet-mania.blogspot.com/ - Pattern inspiration for motifs 1, 2, 3, and 4 Steph Dillon; The Bottom Line Blog, htp://sdillndesign.wordpress.com/ - Cover art, crochet squaremotif


