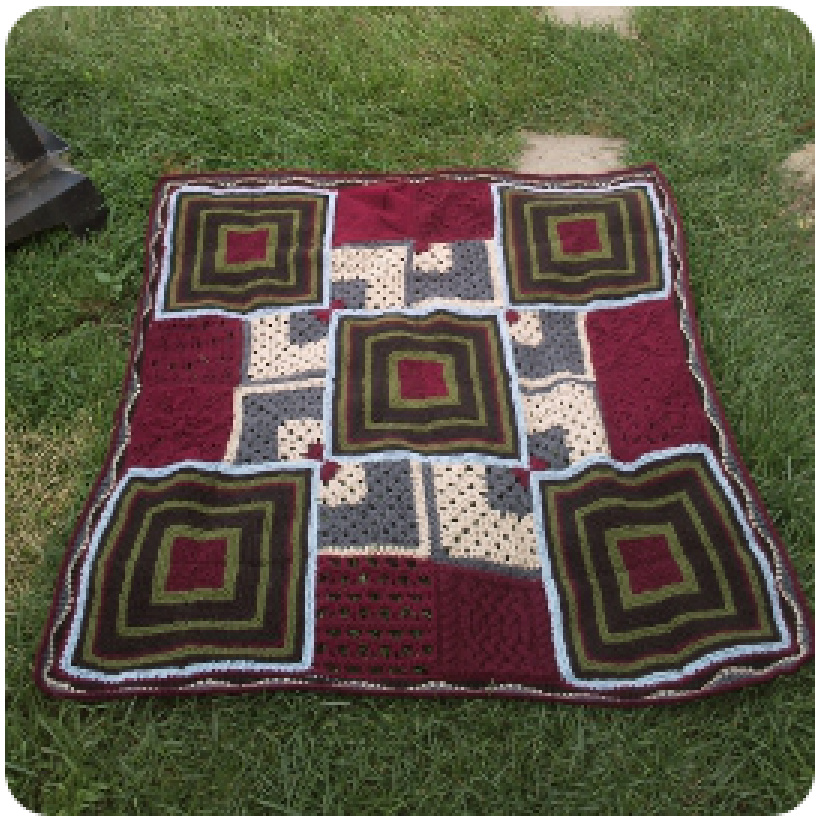
Squares Dancing in Harmony

Introduction
I designed this piece to be a metaphor for life. I designed it for my step-dad to use in his office where he is a marriage and family therapist. He asked for earth tones, and much thought went into the color choices. Deep red like the earth's core for grounding; brown for soil, from which many things grow; green for the foliage which gives us shade and gives us air; gray because life, in my opinion, is one large "gray area” made up of many smaller gray areas-everything is relative; cream for natural neutrality; blue for the sky. Choose colors that speak to you. The concepts go beyond the color choices, though. For me, knitting came second, so the pedigree pattern of knit garter squares which layers itself over the foundation of tradition in the granny squares represents “the new" layering over “the old." While / value tradition, I enjoy making it uniquely mine, so even the granny squares aren't constructed in the traditional way. I've always striven to find my own rhythm within the confines of the greater rhythm, so to speak, in music it might be called syncopation, so turning one of the granny squares around represents me syncopating the beat. Square turning is optional. The sampler squares represent many different aspects coming together in peace and harmony. This could represent anything from personality types to flavors in a stir-fry. I was going for complete balance here, so / chose 4 knit squares and 4 crochet squares. Within the four, two are open stitch patterns while the other two are thick, textured, and comparatively solid. Designing the border was a lesson for me in letting go of preconceived ideas and taking sUggestions from others. When I was challenged by using what yarn I had left in a way that pleased me for the border, my boyfriend suggested something wavy. I'm glad I took the suggestion because I think the waviness of the colors in the border adds a calming ebb and flow otherwise not present in the design. It seals the blanket with a geometric balance, and sometimes life is about finding your own personal balance, whatever that may mean for you at any given time. It might come in an unexpected way. Should you decide to embark on such a journeyghan, / wish you all the best :)
Materials and Measurements
Materials
2160 yards Bulky Weight Yarn in 6 colors Sample uses Lion Brand Jiffy Solid MC1: Wine-4 skeins (540 yards) MC2: Espress0-4 skeins (540 yards) CC1: Avocado-2 skeins (270 yards) CC2: Sky-2 skeins (270 yards) CC3: Dark Grey Heather-2 skeins (270 yards) CC4: Camel-2 skeins (270 yards) Size 10.5/6.5 mm needles (straight or circular) US K/6.5 mm crochet hook Other hook or needle sizes may be needed for sampler squares 1 (or more) stitch marker optional but can be helpful Yarn needle for tails and seaming Scissors
Measurements & Gauge
Blanket measures \~ 54"x 54"/135cm x 135cm Each square measures 8"/20cm Individual square gauges are listed on respective instructions pages.
Notes and Suggestions
The pattern is divided into 4 sections: Garter Miters (page 3) Shiff+Granny squares (page 8) Sampler Squares (page 12) Mountain Range Border (page 14). The first three sections can be completed in any order, but the border must be worked last affer all the squares have been assembled... Each section has a title page with notes, measurements, and materials listed for that particular section. It can be extremely helpful to read these pages before starting any given section. If you would like to print instructions only, written instructions are on pages 4, 9, and 15 while charted instructions appear on pages 5, 10, and 16.
Garter Miters
Materials
MC1: Wine MC2: Espresso CC1: Avocado CC2: Sky Size 10.5/6.5mm knitting needles straight or circular for working in rows
Measurements & Gauge
14 stitches x 30 rows = 4"/10cm in Garter Stitch Pattern through row 30 = 4"/10cm square Final square measures 8"/20cm
Notes and Suggestions
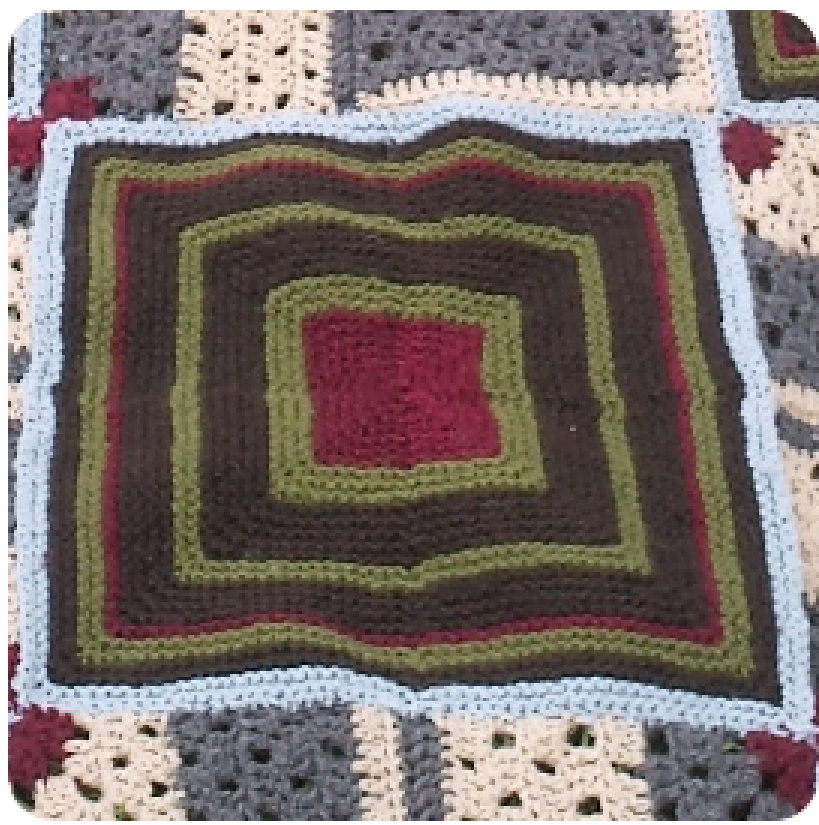
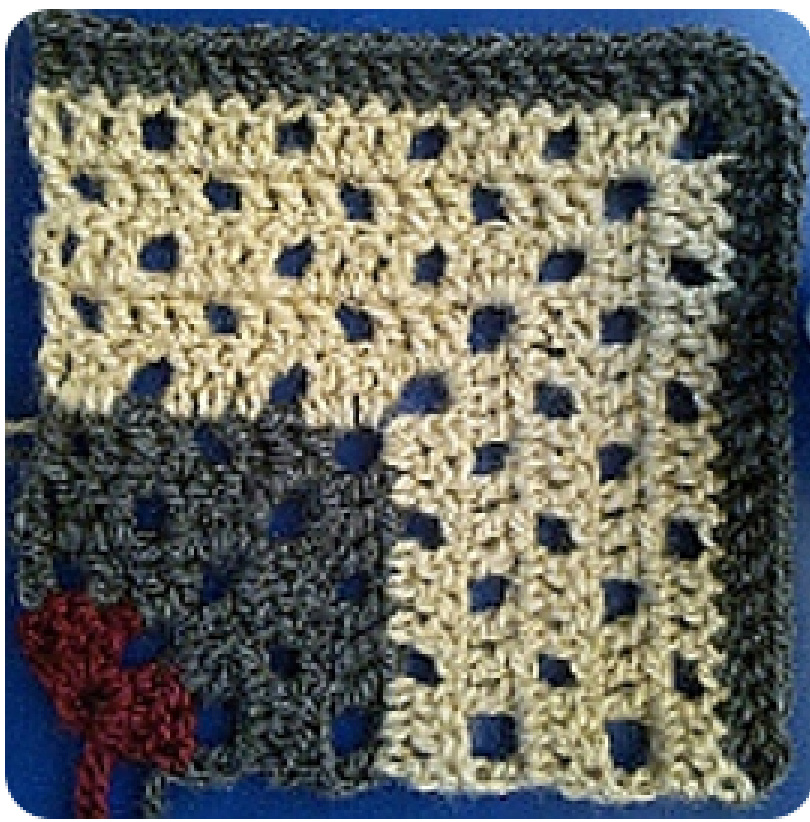
Make 20 squares following pattern, leaving 6" tails with each color change for seaming. Seam them together according to photo at leff. Seaming instructions for the seams as shown begin on page 6. Use your preferred seaming method if you have one. If reading the charted instructions, cast on 3 and skip to page 5. Read odd rows from right to leff and even rows from leff to right. Only rows 1-8, 51, and 52 are depicted. Continue in Garter Stitch after row 8 maintaining the increase pattern on the even rows. When binding off, increase as normal and bind off the increased stitches also as normal. A stitch marker on either side of the center stitch might be helpful, but isn't absolutely necessary. Alternatively, if you are comfortable making a square from the center out, you could cast on 12 stitches (pinhole cast-on recommended) and use your preferred method for working in the round, purling all odd rows and following the increase pattern for the even rows. This would avoid later seaming and allow for perfectly aligned stripes. Should you choose this method, note that you only need to make 5 of these squares, and they will be 16"/40cm finished.
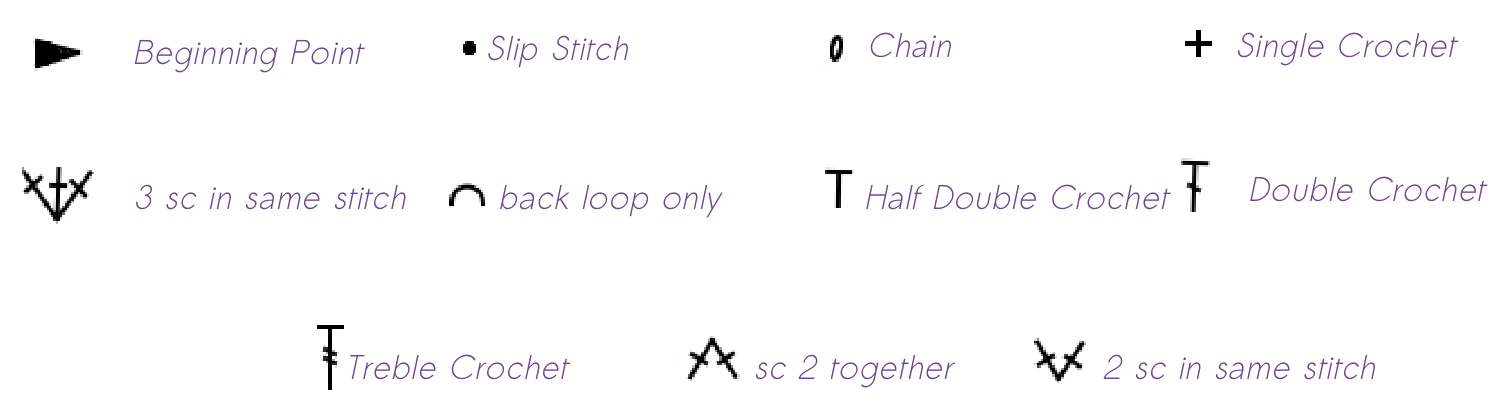
Stitches and Abbreviations
RS ... right side WS ... wrong side K ... knit MiL ... make one leff pm ... place marker MiR ... make one right sm ... slip marker
Instructions
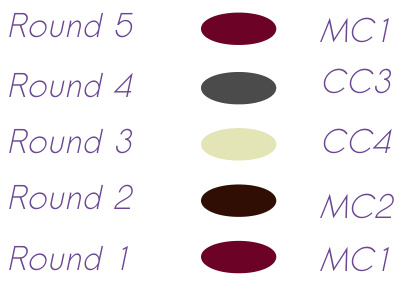
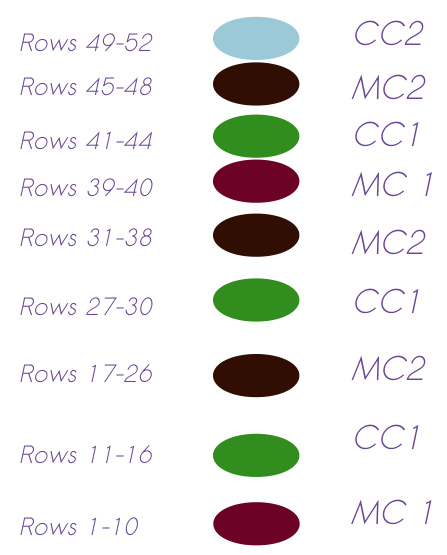
With MC1, cast on 3 Row 1 and all odd rows (RS): knit Row 2 (WS): k1, M1L, pm, k1, M1R, k1 Row 4 and all even rows: knit to marker, M1 L, sm, k1, M1R, knit to end. Row 11: switch to CC1 Row 17: switch to MC2 Row 27: switch to CC1 Row 31: switch to MC2 Row 39: switch to MC1 Row 41: switch to CC1 Row 45: switch to MC2 Row 49: switch to CC2 Row 52: bind off knit wise, increasing as normal and binding off the increased stitches also as norme

Stitch Guide
Color Change Guide
51
Garter Miters
Seaming Tips
> Refer to the photo on page 3 for how to arrange the squares. Hold 2 squares flat with the right sides facing you and the bound off edges to the right. → Begin at the bound off edge and work your way toward the cast on edge. Use the tail of the corresponding color to seam the rows together (example: blue tail for blue rows, red tail for red rows, etc.) First, insert needle from right to leff through edge-most purl bump on bottom square. In the sample phot. below-leff, the needle shows the column of purl bumps.
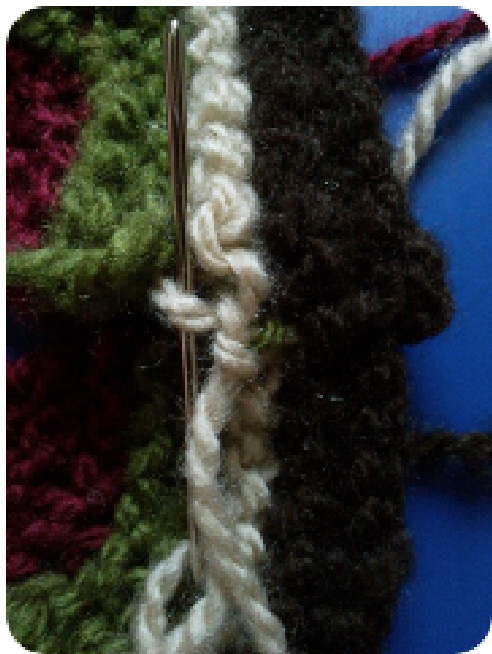
Next, insert the needle from back to front into the edgemost leg only of the knit stitch in the corresponding row on the top square. On the first row of a given color, his will be the same loop from which the tail emerges, pictured above-righ. On subsequent rows, it is a little harder to distinguish at first. If you spread the fabric a bit, you will see two available loops between garter ridges. Use the edge-most leg only of the right hand stitch (the one closer to the bound off edge, whole stitch highlighted below.
Garter Miters
Seaming Tips, continued
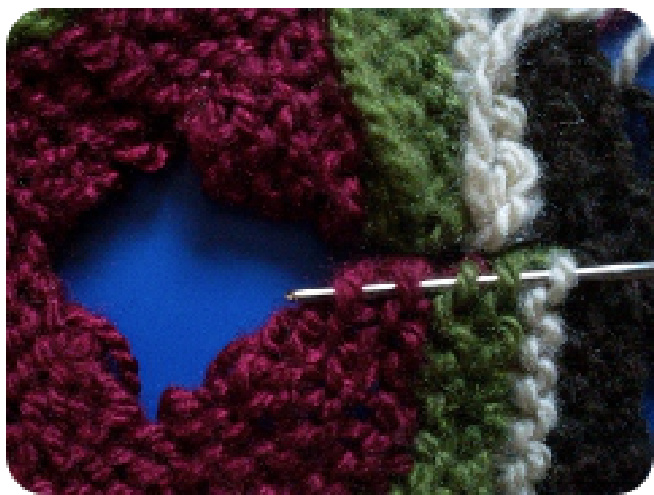
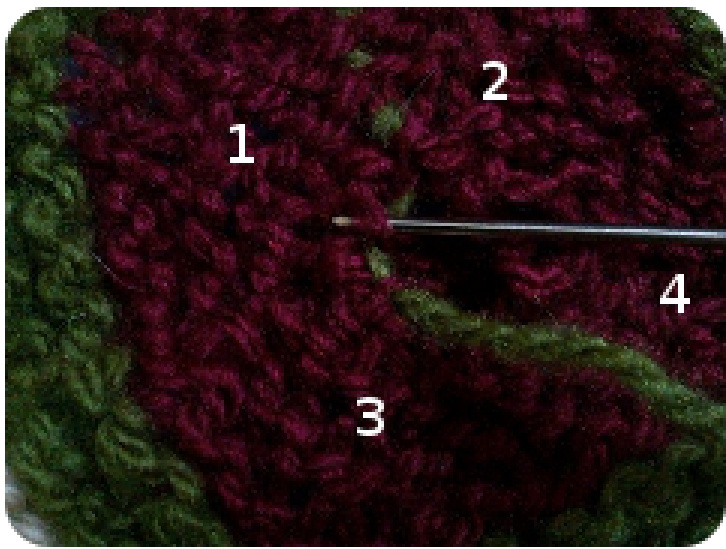
Continue toward the cast-on edge, alternating between edge-most purl bumps and edge-most legs of knit stitches. When you reach the cast on edge, pick up, from back to front, 1st cast on loop from the bottom square then the 3rd cast on loop from the top square, also from back to front, leaving the center cast on loops Unworked. + Repeat this whole seaming process down to the cast on loops until you have 4 squares seamed together. Next you will close the hole that remains. Always insert needle from back to front. In the sample below, green is used for ease of demonstration.
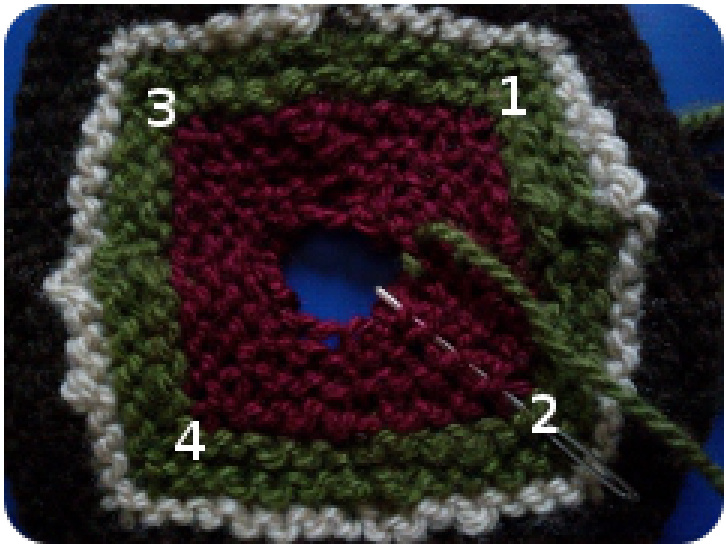
on loop from square 2, then square 1. Still with the same tail, pick up the center cast on loop from square 3, and back to square 1, pictured right. At leff, the needle shows the center column of stitches. Using a MC1 tail from square 1, pick up the center cast
Next, use a tail from square 4 to repeat the process, picking up the center cast on loop from square 2, back to square 4, then square 3, and back to square 4 again. If you pull snug, but not tight, you should end up with a beautifully closed hole! Now, secure all the tails well on the wrong sides.
Shift+Granny Squares
Materials
MC1: Wine CC3: Dark Grey Heather CC4: Camel US K/6.5mm crochet hook
Notes and Suggestions
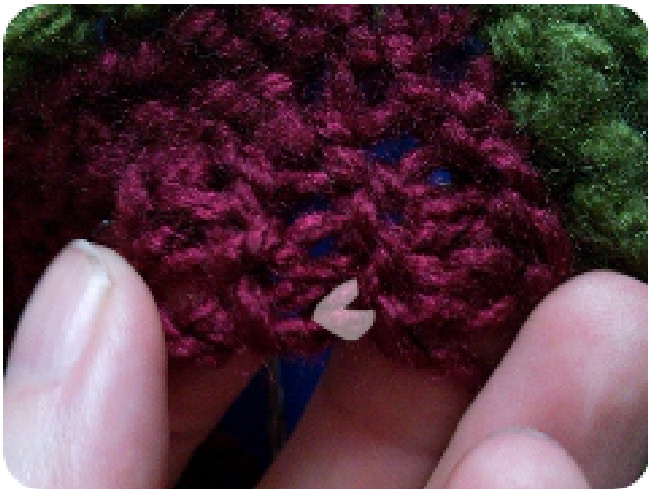
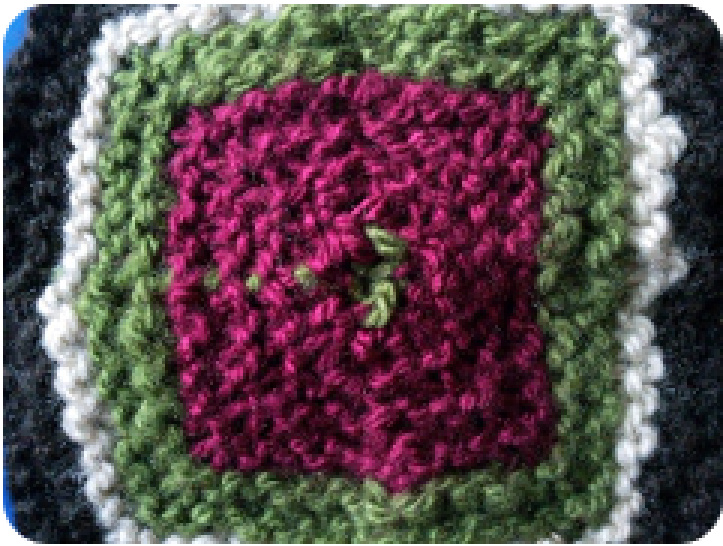
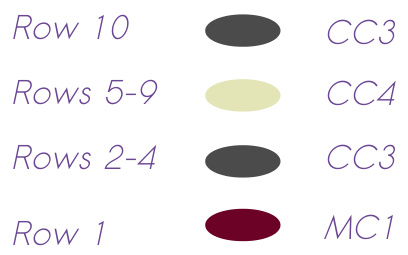
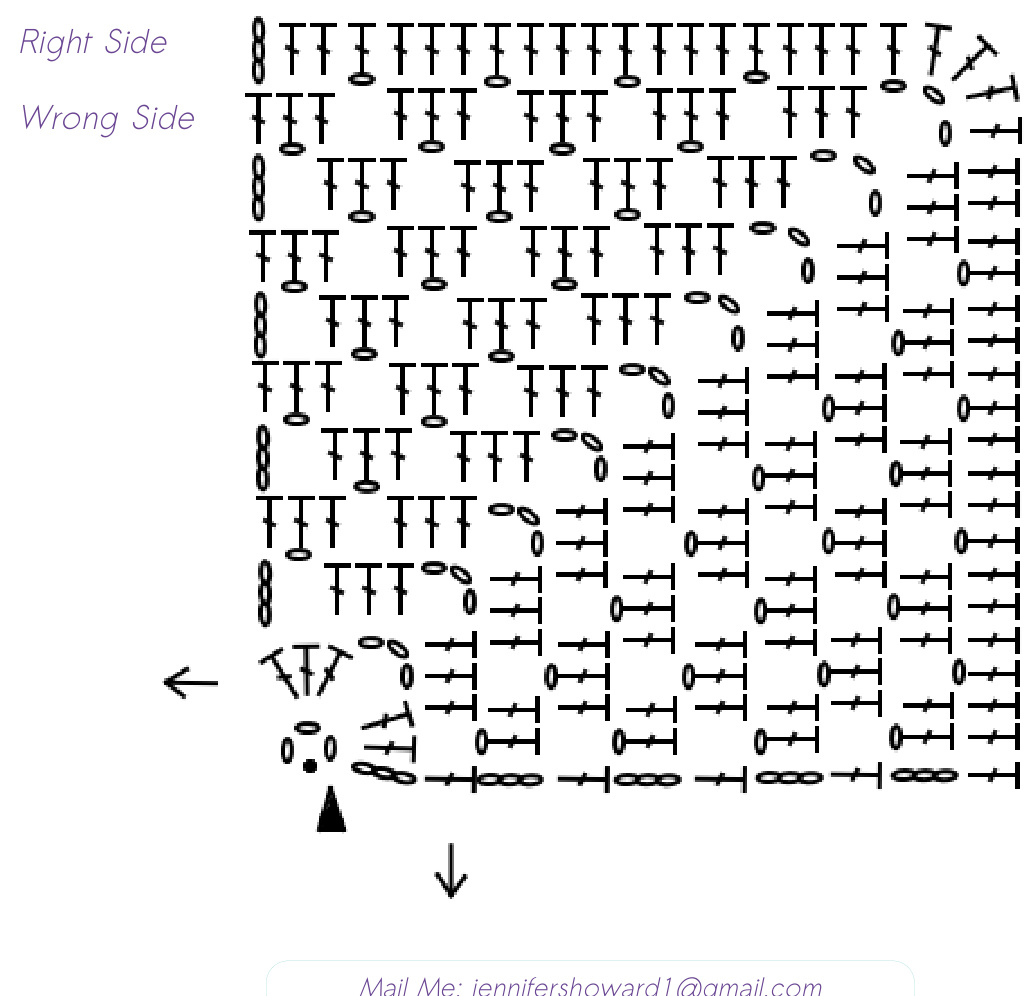
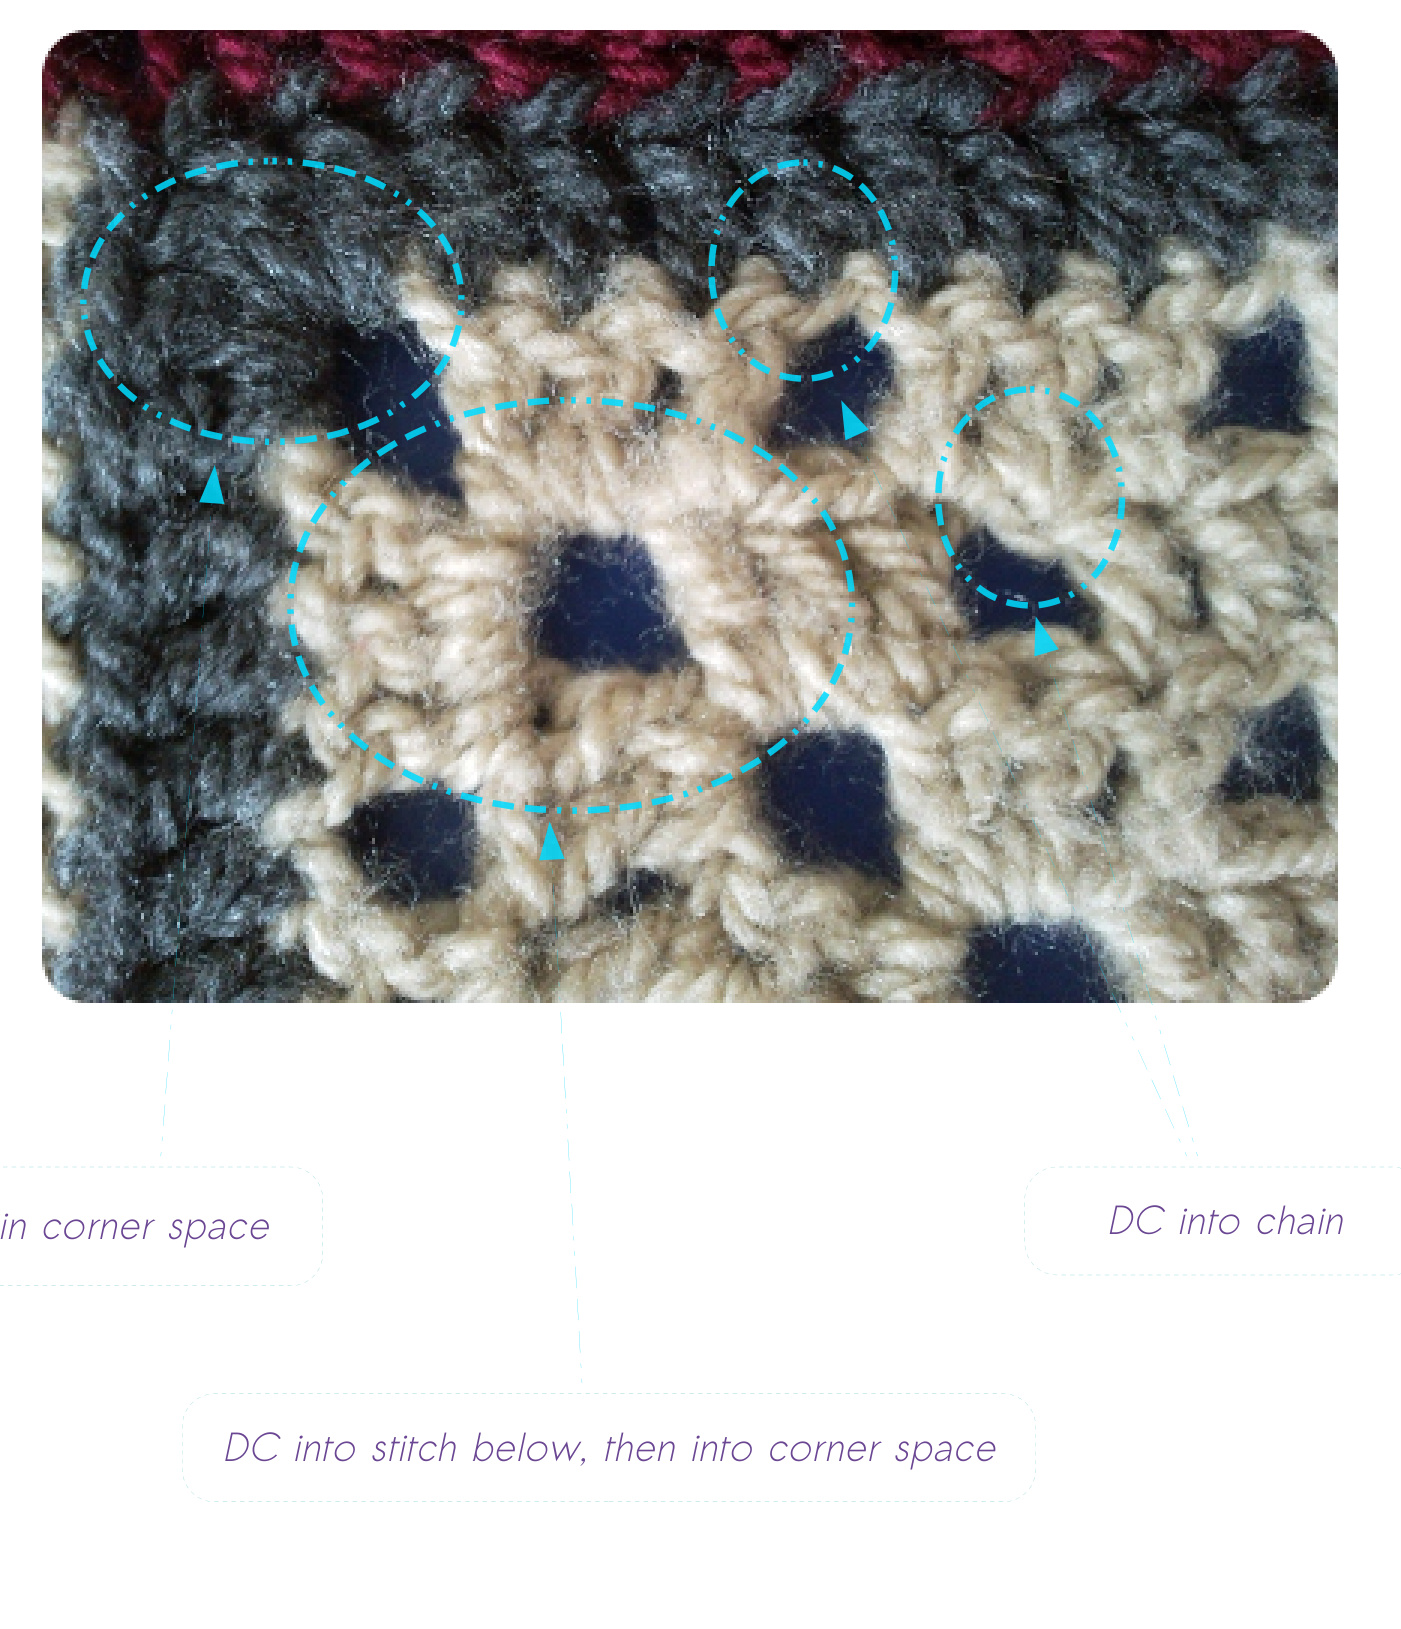
Make 4 squares following Color Pattern A and 4 squares following Color Pattern B. When changing colors, work with the old color up to the last step of the stitch being worked, drop the old color, complete the stitch using the new color, and cut the old color, leaving a 6" tail. The middle stitch of each cluster is made through both top loops of the chain itself, as if to crochet into a normal stitch. It is not made into the chain space (see detail photo on page 11). When working the last stitch of a row into a chain stitch of the previous row, working through both top loops, rather than through the back and bottom loops, minimizes the gap On the final row, when working into a chain, work as before through both top loops of the chain.
Measurements & Gauge
Pattern through Row 5 = 4"/10cm Final square measures 8"/20cm
Shift+Granny Squares
Stitches and Abbreviations
Color Change Guide
ch ...chain dc ... double crochet sp ... space
Instructions
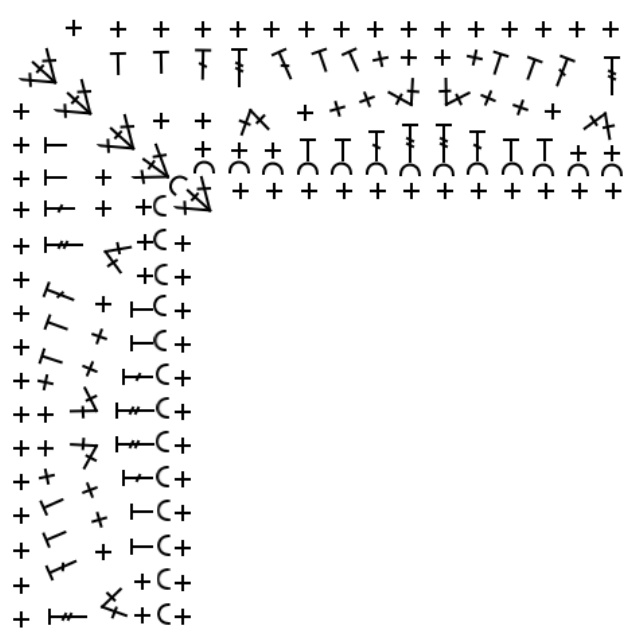
with MC1, chain 3, join with slip stitch to form a ring Row 1 (Wrong Side): ch3 (counts as double crochet here and throughout), (2dc, ch3, 2dc) into ring (corner made), dc into ring, ch4 (counts as (dc, ch1) here and throughout), turn. Row 2 (Right Side): skip next stitch, dc into next stitch, make corner into ch3 sp, dc into next stitch, ch1, skip next stitch, dc into top of 3rd ch of previous row, ch3, turn. Row 3: dc into ch, dc into next stitch, ch1, skip next stitch, dc into next stitch, make corner into ch3 sp, dc into next stitch, ch1, skip next stitch; dc into each of next 2 stitches, dc into top of 3rd ch of previous row, ch4, turn. Row 4: skip next stitch; \*dc into each of next 3 stitches, ch1, skip next stitch, dc into next stitch, make corner into ch3 sp, dc into next stitch, ch1, skip next stitch, dc into each of next 3 stitches, ch1, skip next stitch, dc into top of 3rd ch of previous row,ch3, turn. Row 5: dc into each of next 2 stitches, ch1, skip next stitch, dc into each of next 3 stitches, ch1, skip next stitch, dc into next stitch, make corner into ch3 sp, \*dc into next stitch, ch1, skip next stitch, dc into each of next 2 stitches, repeat from \* to end finishing with dc into top of 3rd ch of previous row, ch4, turn. Row 6: skip next stitch; \*dc into each of next 3 stitches, ch1, skip next stitch, repeat from \* to corner, dc into next stitch, make corner into ch3 sp, dc into next stitch, ch1, skip next stitch, \*\*dc into each of next 3 stitches, ch1, skip next stitch, repeat from \*\* to end, finishing with d into top of 3rd ch of previous row, ch3, turmh. Row 7: dc into each of next 2 stitches, ch1, skip next stitch, \*dc into each of next 3 stitches, ch1, skip next stitch, repeat from \* to corner, dc into next stitch, make corner into ch3 sp, dc into next stitch, ch1, skip next stitch, \*\*dc into each of next 3 stitches, ch1, skip next stitch, repeat from \*\* to end making last dc into top of 3rd ch of previous row, ch4, turn. Rows 8-9: Repeat Rows 6 and 7 once more, ending with a ch3 (not 4l) on Row 9, turn. Row 10: dc into next stitch and each stitch across to corner, 5 dc into corner space, dc into each stitch across to end, finishing with dc into top of ch3 of previous row. (43 dc) Break yarn and use the yarn needle to weave in all tails or save them to seam the square to other squares as you see fift.
Shift+Granny Squares
Stitch Guide
Color Change Guide
Shift+Granny Squares
> When working the clusters, make the center stitch into the chain stitch, also work into chains on the last row as shown (below right). > At the corners, work the first stitch of the cluster into the stitch below, then (2dc, ch3, 2dc) into corner space, then dc into the next stitch (below center). On the final row, work the five corner stitches into the chain space (below leff).
# Sampler Squares
Materials
MC1: Wine Size 10/6.00mm needles or needed to obtain gauge that you like US K/6.5mm crochet hook or size needed to obtain gauge that you like
Measurements & Gauge
Each square will have its own gauge, but they should all be 8"/20cm at the end.
Notes and Suggestions
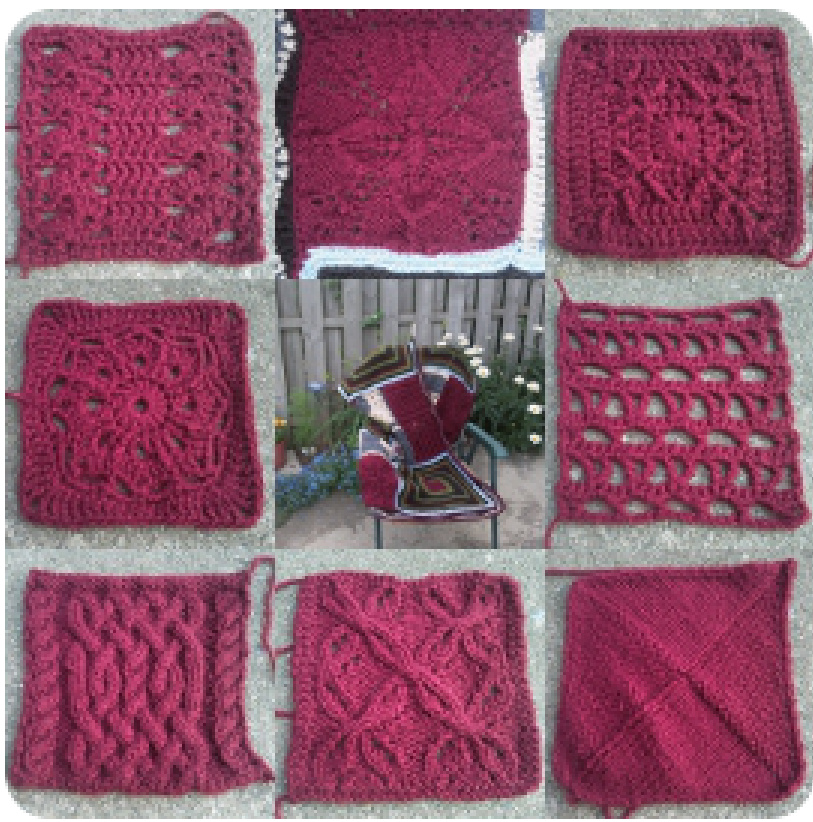
This is where the design can take a highly personal turn. Choose 8 different squares that you like or make one square 8 times or even design your own! As long as the squares come out to 8"/20cm when they are done. Most patterns might need small tweaks, but for the most part, patterns for 6"/15cm squares that call for worsted weight yarn will come out to 8"/20cm with a bulky weight yarn and Size 10/6.00mm needles or K/6.5mm hook. I designed Ever Evolveeeng and Celebration Leaves! specifically for this blanket so they should work without adjusting the pattern. The patterns shown clockwise from top leff are: Blocks & Shells_ (modified) Celebration Leaves! Climbing Corners 6" Square Ever Evolveeeng KAL Weekly Square 2 Quatrefoil Motif (modified to 12 stitches) Status Quo (through 1 pattern repeat) Small Winter Burst
Seaming All the Rest!
Seaming Tips
Puting squares together can be tricky especially if they are knit and crochet squares with different gauges. I think the first step to successful seaming is knowing how many stitches you've got to work with. Take the granny squares for instance. The two sides that are formed by the last row of double crochets each have 21 stitches (plus 1 corner stitch). Along the other two edges where you'll be picking up loops from row ends, there are 10 rows, and since a good rule of thumb is to pick up two loops from the end of a double crochet row, there are 20 “stitches" because 10 rows x 2 stitches per row = 20. To match the other two edges, though, just pick up an extra loop somewhere along the way. So we've got 21 stitches to work with on a given granny square and let's say we're seaming it to a garter stitch mitered square. The mitered square has 26 stitches to work with on any given edge. Since there are 52 rows, when working into the row ends, I only pick up a stitch from every other row: the purl bump at the end is convenient. I liked the matress stitch (or some variations thereof) for this project, but you can pick any type of seaming method you like. So if you start by picking up a stitch from the garter square, then a stitch from the granny square, and so on alternating between the two squares evenly, you'd have 5 extra stitches unworked on the garter square since 26 - 21 = 5. So what I do to solve that is simply to skip a stitch on the garter square 5 times evenly spaced out across that edge of the square. The same goes for any square. One of my sampler squares had 31 stitches to work with and when I joined it to the granny square, I had to skip a stitch 10 times across the edge of the sampler square. Alternatively, you could work the same stitch twice on the smaller square instead of skipping a stitch on the larger square. Personally, I usually prefer the skipping method. First, I seamed all the garter squares together to make 5 garter blocks. Then I decided how / wanted my sampler squares arranged and seamed 2 sampler squares to 2 granny squares into 4 granny/sampler blocks. For the intersections where four squares meet, I worked them as shown in the garer seaming tips (page 7). Affer I had 9 4-square blocks, I seamed the blocks together into 3 rows of 3 blocks. Then / wove in all the tails On a row of blocks, just to break up the work. Then I seamed the rows of blocks together. You can do it however you like, I just offer this as an example in case you need some guidance. One important suggestion is that I used a length of yarn about 18" / 45 cm in the dominant color of the squares / was seaming. This was long enough that l could get a decent amount of seaming done with one length but not So long that it wore out the sewing yarn. Leave a 6" / 15 cm tail at the beginning and end for securing.
Mountain Range Border
Materials
MC1: Wine → MC2: Espresso → CC3: Dark Grey Heather > CC4: Camel US K/6.5mm crochet hook You've made it! Congratulations!!
Notes and Suggestions
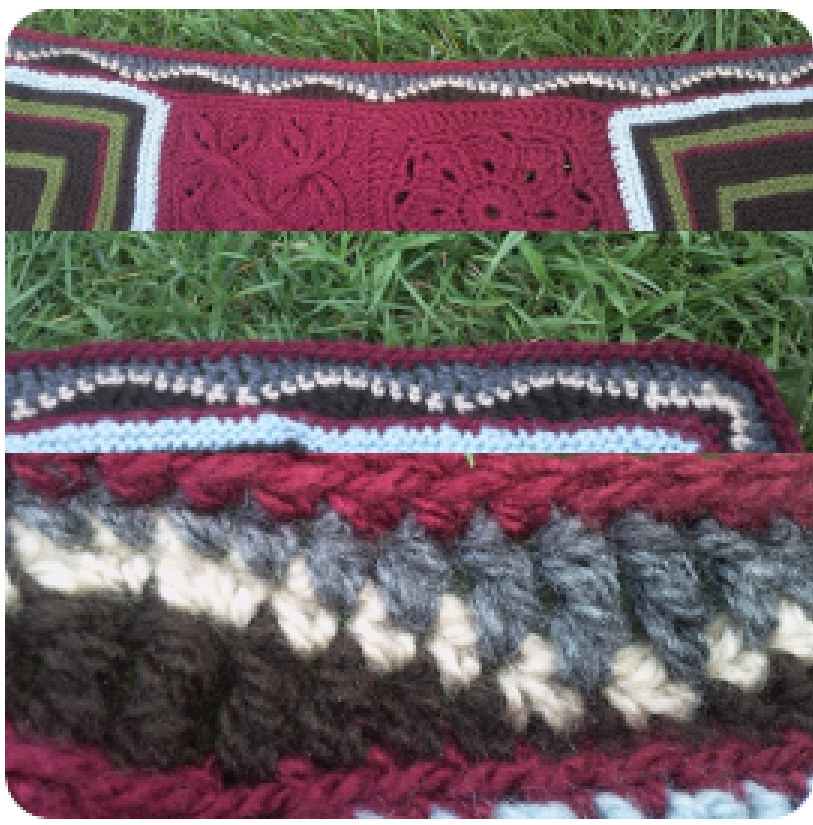
By now your blanket is really looking like a blanket, and now it's time to give it that finishing touch that makes you kiss your fingers into the air and say things like "Magnifique!" and “Que bella!" The border is a 12-stitch pattern that is iterated 1o times across each side. To keep the chart simple with straight edges, it does not exactly match the written instructions in terms of where to join the new yarn on each round. lf you are following the chart only, with the right side facing you, begin by joining the yarn to the first stitch to the lefft of any corner. At the end of each round, join with a slip stitch to the first stitch of the round, cut the yarn, then join the new color and start the next round as indicated on the chart. Note that round two is worked into the back loops only of each stitch.
Stitches and Abbreviations
RS ... right side ch ... chain sC ... single crochet hdc ... half double crochet dc ... double crochet tr ... treble crochet
Instructions
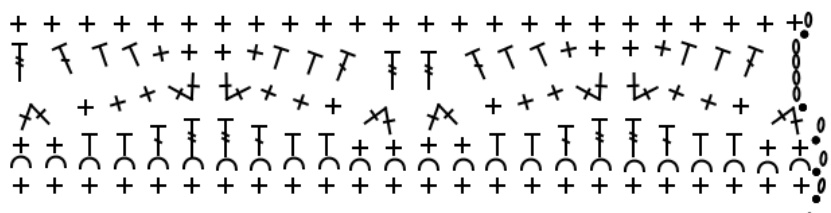
With RS facing and using MC1, join with slip stitch to the first stitch to the leff of any corner. ch1. Round 1: sc in same stitch as joining, sc 119 evenly across this edge, \*3sc in corner, sc 120 evenly across to next corner, repeat from \* twice more, ending with 3 sc in corner, join with slip stitch to first sc of round, cut yarn. Round 2: working in back loops only for this round, join MC2 with slip stitch to 3rd sc of any 3 sc corner, ch 1, sc in same stitch as joining,+\*2 sc, 2 hdc, dc, 2tr, dc, 2 hdc, 2 sc\*, repeat from \* to \* to last stitch of this side, sC, 3 sc in corner, sc, repeat from + three times more, finishing with 3 sc in corner, join with slip stitch to first sc Of round,cutyarn. Round 3: join CC4 with slip stitch to 3rd sc of any 3 sc corner, ch1, sc in same stitch as joining, sc, +\*sc next tWo stitches together, 3sc, (2 sc in next stitch) twice, 3 sc, sc next two stitches together\*, repeat from \* to \* to last 2 stitches of this side, 2 sc, 3 sc in corner, 2 sc, repeat from + three times more, finishing with 3 sc in Corner, join with slip stitch to first sc, cut yarn. Round 4: join CC3 with slip stitch to 3rd sc of any 3 sc corner, ch2 (counts as hdc), hdc, dc, +\*tr, dc, 2 hdc, 4 Sc, 2 hdc, dc, tr\*, repeat from \* to \* to last 3 stitches of this side, dc, 2 hdc, 3 sc in corner, 2 hdc, dc, repeat from + three times more, finishing with dc, 2 hdc, 3 sc in corner, join with slip stitch to first hdc, cut yarn. Round 5: join MC1 with slip stitch to 3rd sc of any 3 sc corner, ch1, sc in same stitch as joining, \*sc in each stitch to corner, 3 sc in corner, repeat from \* around, slip stitch in first sc, cut yarn. Weave in tails.
Mountain Range Border
Stitch Guide
Color Change Guide