Triumph E-book
So, how does this work? Pick a shape, pick a stitch to use, and pick a yarn. When you are finished with the body of the project, pick whether or not you want to add a border. It is not necessary to add one, but I have added complete directions for the edgings. When you finish the three row edging, decide on a finishing for the border. The finishing options are provided at the end of each section. That's all there is to it! Basic shaping principals are used in this e-book. To get a triangular shape, increases are used along the outer edges of the shapes. Using this principal, a triangle can be worked from the center top down or from the bottom tip up. By manipulating the stitches just a bit, a V- shape can be made. For this particular series, I have provided three interchangeable stitches, one basic border, and three different finishes for the border. By mixing and matching these elements, there are more than thirty different shawls/ scarves that can be made. The stitches are worked into the spaces of the body, which will be much easier than working into an actual stitch. The borders are worked the same way. I want to provide a base from which to build upon. One of the basic stitches is the granny square stitch of 3 double crochets worked into a grouping. I have also used a simple V-stitch and an alternating two row repeat made of these two elements. It is my hope that these patterns will be a stepping off point for more advanced patterns while still being fun and easy. I've tried to get rid of as much math as possible, but you will need to know how to find a center stitch for the V-shape. Dartfrog911, 2011 Written Symbols: Ch= chain Dc= double crochet Sc= single crochet V-st= (dc, ch2, dc) in indicated space or stitch Shell= (2dc, ch2, 2dc) in indicated space or stitch 3dc group= 3 double crochets worked into same stitch or space
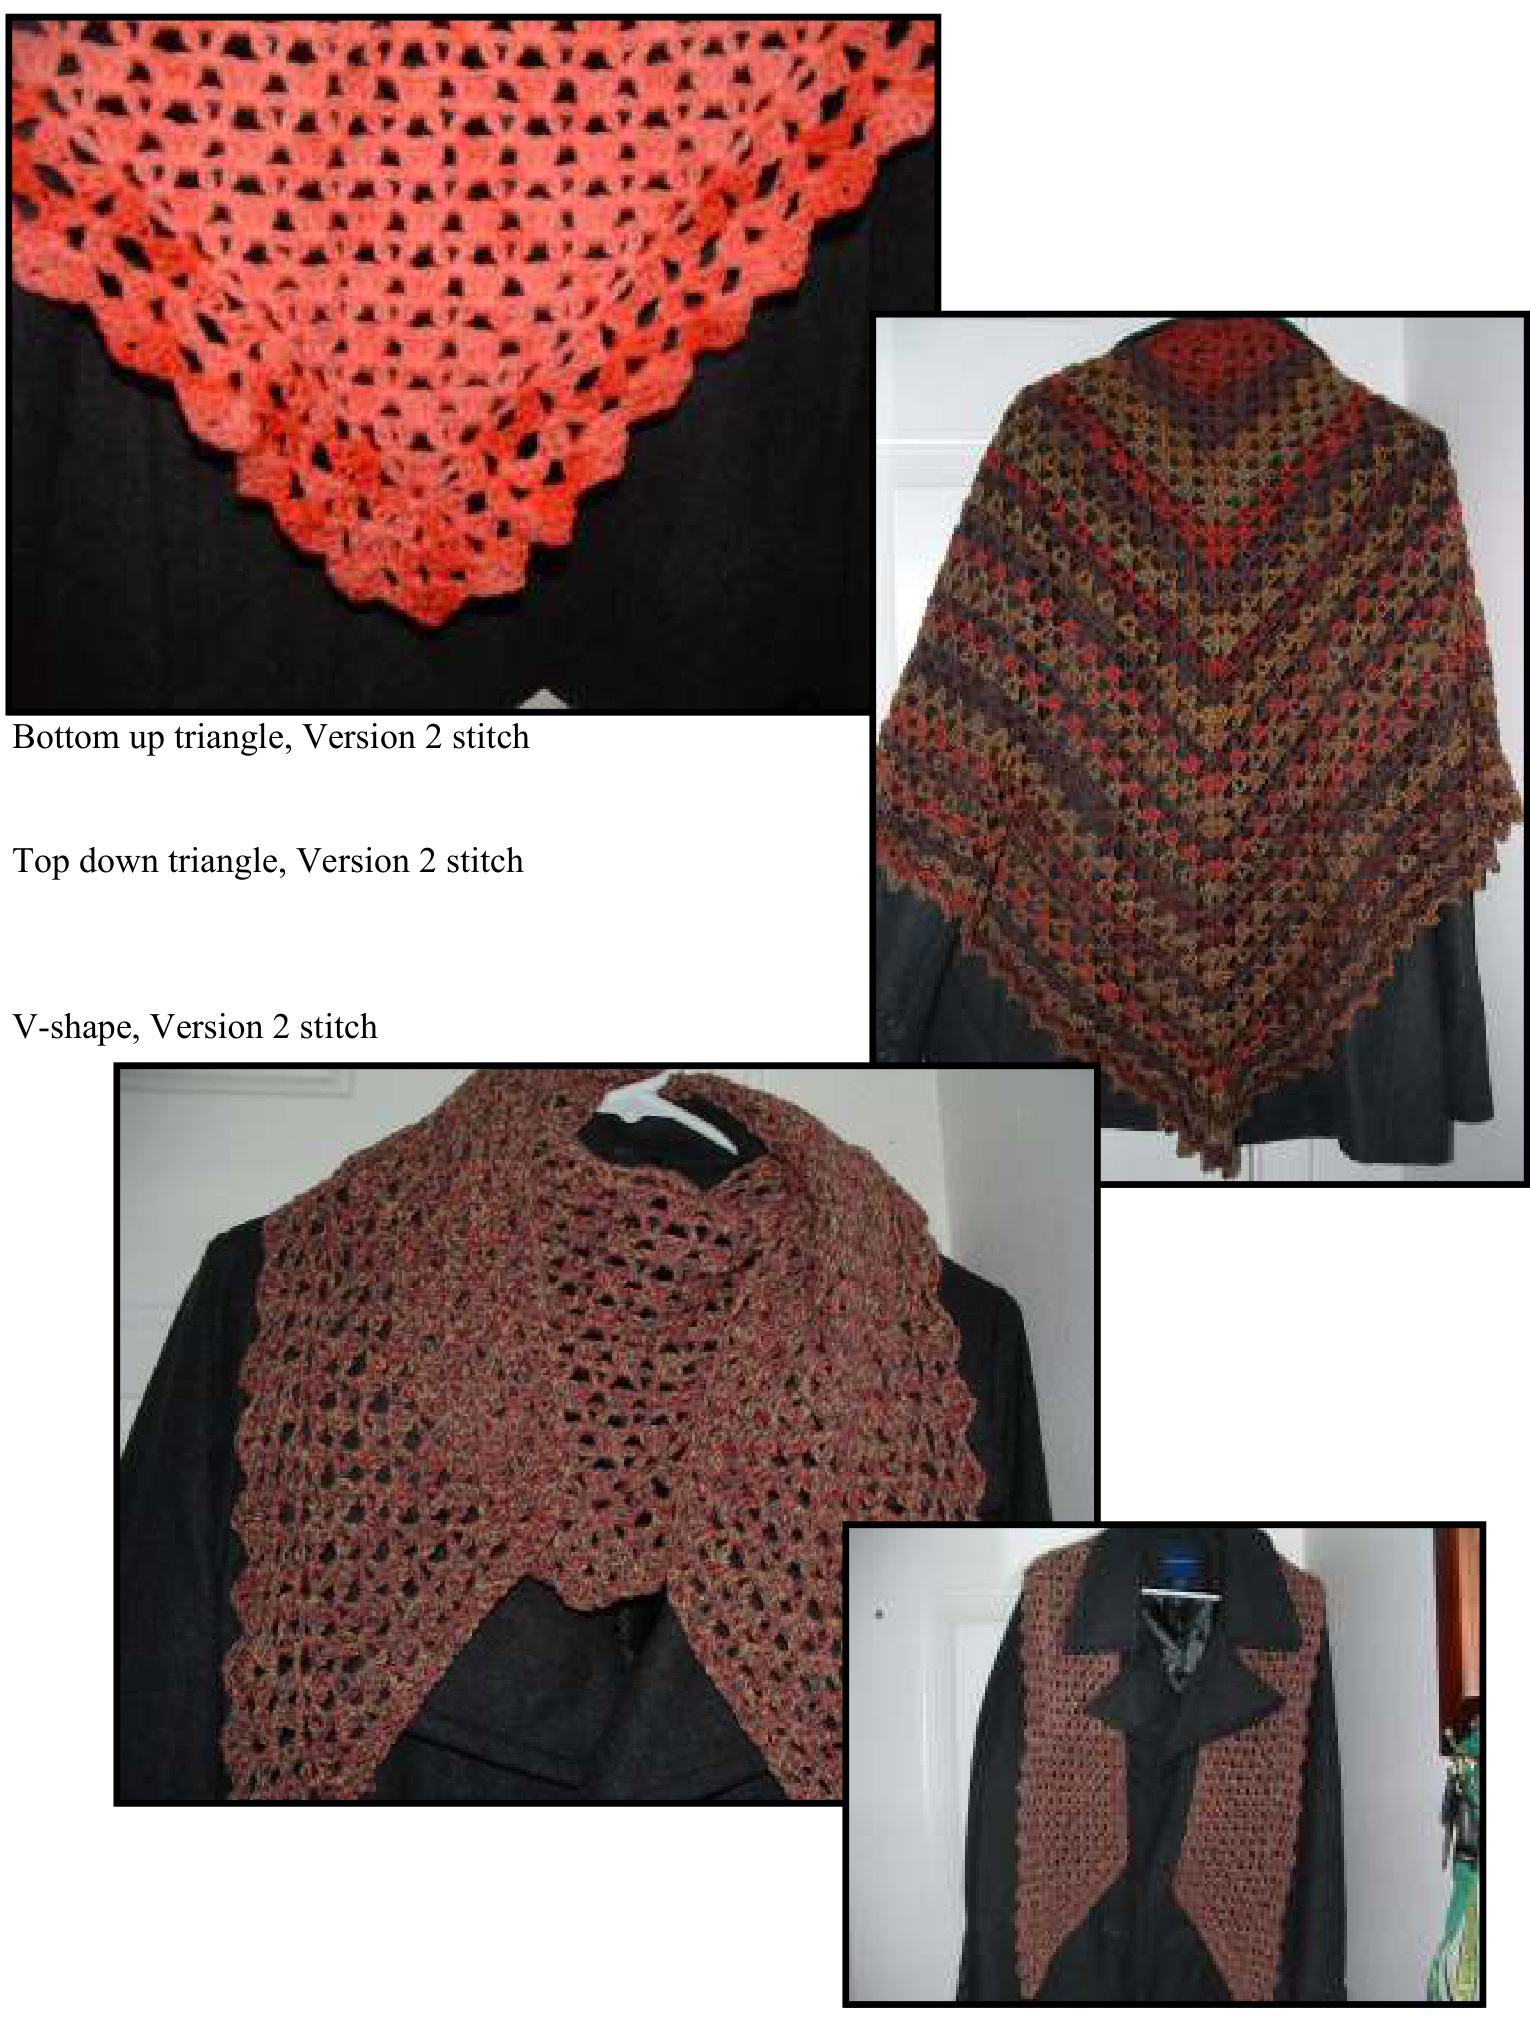
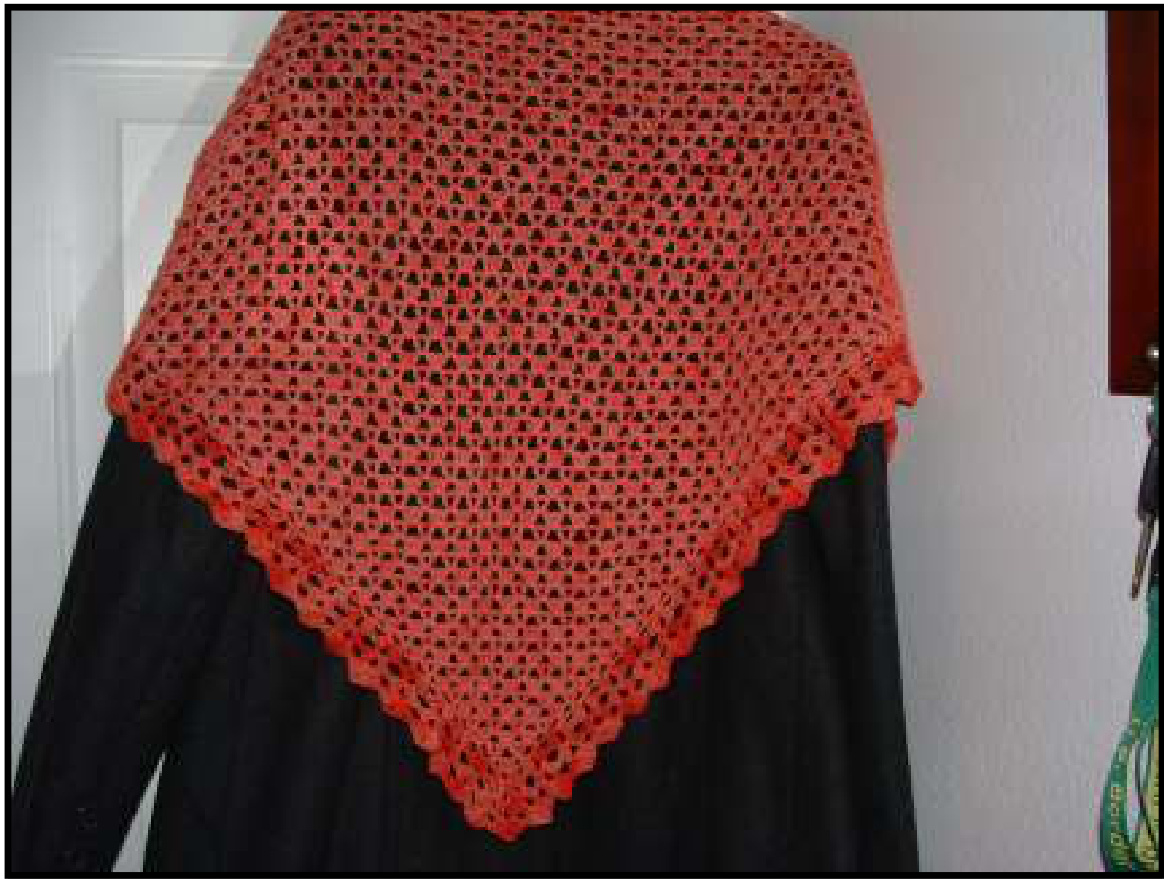
Bottom Up Triangle: Version 1 (the basic granny)
Row 1: Ch5, work 3 dc into fifth chain from hook, ch1, dc in same chain, turn Row 2: Ch4, 3dc into the space before the 3dc of previous row, 3dc into the space after the 3dc of previous row, ch1, dc into same space as last 3dc group, turn Row 3: Ch4, work 3 dc into space before 3dc group of previous row, 3dc into space between the 3dc group of previous row, 3dc in space after last 3dc group of previous row, ch1, dc into same space, turn Row 4: Ch4, 3dc into first space before 3dc of previous row, 3dc group into space between 3dc groups, 3dc into last space after last 3dc group of previous row, ch1, dc into same space, turn Continue repeating Row 4 until desired size. Make sure to end with an ODD number of 3dc groups on the last row. Turn work, ch1 and work one sc into each st across the row. If you do not want to add the edging, cut yarn, weave in ends and block. If you want to add the edging, do not turn work at the end of the row. The edging will be worked along the side, down to the bottom point, and then up to the opposite edge of the single crochet row. First row of edging: Ch 3, (dc, ch2, 2dc into the same stitch as the ch3 starts with), work a row of shells (2dc, ch2, 2dc) into the ch 4 spaces made by every other row (the rows with an even number of 3dc groups) until you get to the center stitch. At the center point, work (2dc, ch2) three times, 2dc into the same stitch. Continue making shells into the ch4 loops of every other row until you come to the other top edge of the shawl and work a shell into the last stitch, turn Second row of edging: Slip stitch over to the ch2 space of the previous shell, ch3, (dc, ch2, 2dc) in same space, Work (2dc ch2, 2 dc) into each ch2 space across the rest of the row,turn Third row of edging: slip stitch over to the ch2 space of previous row, ch3, (2dc, ch2, 3dc) in same space. Work (3dc, ch2, 3dc) into each ch2 space across the rest of the row. Now choose which finishing row you would like to use: See page 4
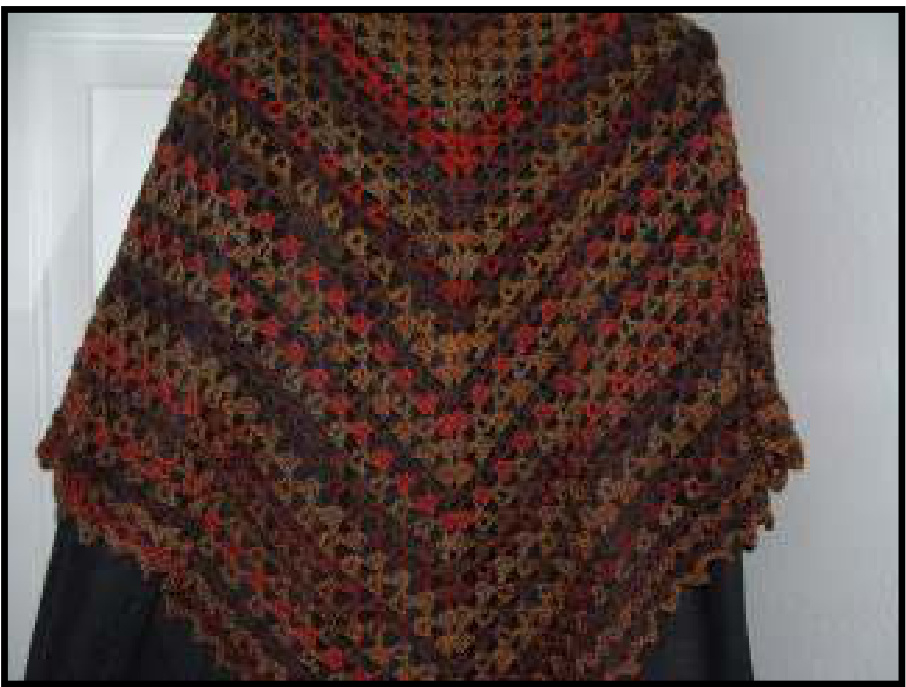
Bottom up triangle: Version 2, Alternating Rows
Row 1: Ch5, work 3 dc into fifth chain from hook, ch1, dc in same chain, turn Row 2: Ch4, V-st into the space before the 3dc group of previous row, V-st into the space after the 3dc of previous row, ch1, dc into same space as V-st, turn Row 3: Ch4, work 3 dc into space before V-st of previous row, 3dc into space between the V-sts of previous row, 3dc in space after last V-st of previous row, ch1, dc into same space, turn Row 4: Ch4, V-st into first space before 3dc of previous row, V-st into space between 3dc groups, V-st into last space after last 3dc group of previous row, ch1, dc into same space,turn Continue repeating rows 3 and 4 to desired length. Stop work on a row 3. At this point, ch1, turn work and work one sc in each stitch across the row. Do not turn work at the end of the row. The edging will be worked along the side down to the bottom point and then up to the opposite edge of the single crochet row. First row of edging: , ch 3, (dc, ch2, 2dc into the same stitch as the ch3 starts with), work a row of shells into the ch4 spaces made by the V-st rows until you get to the center stitch. At the center point, work (2dc, ch2) three times, 2dc into the same stitch. Continue making shells into the ch4 loops of the V-st rows until you come to the other top edge of the shawl and work a shell into the last stitch, turn Second row of edging: slip stitch over to the ch2 space of the previous shell, ch3, (dc, ch2, 2dc) in same space, Work (2dc ch2, 2 dc) into each ch2 space across the rest of the row,turn Third row of edging: slip stitch over to the ch2 space of previous row, ch3, (2dc, ch2, 3dc) in same space. Work (3dc, ch2, 3dc) into each ch2 space across the rest of the row. Now choose which finishing row you would like to use: See page 4
Bottom Up triangle: Version 3: V-st
Row 1: Ch5, work V-st into fifth chain from hook, ch1, dc in same chain, turn Row 2: Ch4, V-st into the space before the V-st of previous row, V-st into the space after the V-st of previous row, ch1, dc into same space as V-st, turn Row 3: Ch4, work V-st into space before V-st of previous row, V-st into space between the V-sts of previous row, V-st in space after last V-st of previous row, ch1, dc into same space,turn Row 4: Ch4, V-st into first space before V-st of previous row, V-st into space between V-sts, V-st into last space after last V-st of previous row, ch1, dc into same space, turn Continue repeating Row 4 until desired size. Make sure to end with an ODD number of V-sts on the last row. Turn work, ch1 and work one sc into each st (2sc into each ch2 sp) across the row. Do not turn work at the end of the row. The edging will be worked along the side down to the bottom point and then up to the opposite edge of the single crochet row. First row of edging: , ch 3, (dc, ch2, 2dc into the same stitch as the ch3 starts with), work a row of shells into the ch 4 spaces made by every other V-st row (the even rows) until you get to the center stitch. At the center point, work (2dc, ch2) three times, 2dc into the same stitch. Continue making shells into the ch4 loops of every other V-st rows until you come to the other top edge of the shawl and work a shell into the last stitch, turn Second row of edging: slip stitch over to the ch2 space of the previous shell, ch3, (dc, ch2, 2dc) in same space, Work (2dc ch2, 2 dc) into each ch2 space across the rest of the row,turn Third row of edging: slip stitch over to the ch2 space of previous row, ch3, (2dc, ch2, 3dc) in same space. Work (3dc, ch2, 3dc) into each ch2 space across the rest of the row. Now choose which finishing row you would like to use:
FINISHING OPTIONS:
Option 1: fasten off without doing anything further. Pull out the ch2 spaces while blocking to get a small leaf-like edging Option 2: turn work and ch1, sc into each stitch across the entire row, fasten off and block. This edging will produce a soft scallop around the edge. Option 3: turn work, ch1, (sc in next 3 sts, sc in ch2 space, ch3, sc in third stitch from hook, (faux picot), sc in ch 2 sp, sc in next 3 sts) work this repeat all the way across the row. It will produce a bump in the middle of each shell and can be used to pin out while blocking the shawl. From a distance, it looks like a real picot, but I find it easier to make.
Weave in ends and enjoy.
Top down triangle: Version 1; (basic granny)
Row 1: Chain 6, (dc, ch2) four times into the 6"h chain from hook, dc in same st, turn (there will be a total of 5 ch2 spaces) Row 2: Ch4, 3dc into each of the first two ch2 sps, (3dc ch2 3dc) in center ch2 sp, 3 dc into next two ch2 sps, ch1, dc in same space as last 3dc group, turn Row 3: Ch4, 3dc into the space before the 3dc of previous row, 3dc into the space between the next two 3dc groups, (3dc, ch2, 3dc) in center ch2 sp. 3dc into the space between the next two 3dc groupss, 3dc into space after the last 3dc group of previous row, ch1, dc into same space Continue working row 3 adding an additional 3dc group per side until the shawl is desired size. If an edging is not desired, cut yarn, weave in ends and block. If edging is wanted, work one row of V-sts (dc ch2, dc instead of the 3dc group) between the 3dc groups across the row, keep the (3dc, ch2, 3dc) for center spine. After completing the V-st row, work the edging.
Edging:
Row 1: ch3, (dc, ch2, 2dc) in the same stitch as beginning ch 3, shell (2dc, ch2, 2dc) into each ch2 space until center, (3dc, ch2, 3dc) in center ch2 sp, Continue working shells into ch2 spaces for the rest of the row, work (2dc ch2 2dc) into the final ch st from previous row,turn Row 2: Slip stitch over to the ch2 sp, ch3, (dc, ch2, dc) in the same ch2 sp, Shell into the ch2 spaces until center ch2 sp, (3dc, ch2, 3dc) in center ch2 sp, continue making shells into the ch2 spaces for the rest of the row, turn Row 3: Slip stitch into the ch2 sp, ch3, (2dc, ch2, 3dc) into ch2 sp, continue working (3dc, ch2, 3dc) into every remaining ch2 space across the row. Now choose which finishing row you would like to use: See page 7
Top down triangle: Version 2 (alternating rows)
Row 1: Chain 6, (dc, ch2) four times into the 6" chain from hook, dc in same st, turn (there will be a total of 5 ch2 spaces) Row 2: Ch4, 3dc into each of the first two ch2 sps, (3dc ch2 3dc) in center ch2 sp, 3dc into next two ch2 sps, ch1, dc in same space as last 3dc group, turn Row 3: Ch4, V-st in into the space before the 3dc group of previous row, V-st into the space between the next two sets of 3dc groups, (3dc, ch2, 3dc) in center ch2 sp. V-st into the space between the next two sets of 3dc groups, V-st into space after the last 3dc group, ch1, dc into same space Row 4: Ch4, 3dc into space before V-st of previous row, 3dc into next 3 spaces between V-sts, (3dc, ch2, 3dc) into center ch2 sp, 3dc into next 3 spaces between V-sts, 3dc into space after last V-st of previous row, ch1, dc into same space Row 5, Ch4, V-st into space before 3dc group of previous row, V-st into spaces between 3dc groups of previous row until getting to center sts, (3dc, ch2, 3dc) into center ch2 sp, V-st into spaces between 3dc groups of previous row until last 3dc group then V-st after that group, ch1, dc into same space. Continue repeating Row 4 and 5 (increasing one V-st or 3dc group on each side) until the shawl is the size you want. If no edging is wanted, stop on row 4 repeat, cut yarn, weave in ends and block. If edging is wanted, end on a row 5 repeat and then continue with the edging.
Edging:
Row 1: ch3, (dc, ch2, 2dc) in the same stitch as beginning ch 3, shell (2dc, ch2, 2dc) into each ch2 space until center, (3dc, ch2, 3dc) in center ch2 sp, Continue working shells into ch2 spaces for the rest of the row, work (2dc ch2 2dc) into the final ch st from previous row, turn Row 2: Slip stitch over to the ch2 sp, ch3, (dc, ch2, dc) in the same ch2 sp, Shell into the ch2 spaces until center ch2 sp, (3dc, ch2, 3dc) in center ch2 sp, continue making shells into the ch2 spaces for the rest of the row, turn Row 3: Slip stitch into the ch2 sp, ch3, (2dc, ch2, 3dc) into ch2 sp, continue working (3dc, ch2, 3dc) into every remaining ch2 space across the row. Now choose a finishing for the edge: See page 7 Top down triangle: Version 3: (V-st) Row 1: Chain 6, (dc, ch2)four times into the 6"h chain from hook, dc in same st, turn (there will be a total of 5 ch2 spaces) Row 2: Ch4, V-st into each of the first two ch2 sps, (3dc ch2 3dc) in center ch2 sp, V-st into next two ch2 sps, ch1, dc in same space as last 3dc group, turn Row 3: Ch4, V-st in into the space before the V-st of previous row, V-st into the space between the next two V-sts, (3dc, ch2, 3dc) in center ch2 sp. V-st into the space between the next two V-sts, V-st into space after the last V-st of previous row, ch1, dc into same space Row 4: Ch4, V-st into space before 1"t V-st of previous row, V-st into next 3 spaces between V-sts, (3dc, ch2, 3dc) into center ch2 sp, V-st into next 3 spaces between V-sts, V-st into space after last V-st of previous row, ch1, dc into same space Continue repeating Row 4 (increasing one V-st on each side) until the shawl is the size you want. Edging is recommended for this variation to add weight to the edge of the shawl. It hangs oddly without one.
Edging:
Row 1: ch3, (dc, ch2, 2dc) in the same stitch as beginning ch 3, shell (2dc, ch2, 2dc) into each ch2 space until center, (3dc, ch2, 3dc) in center ch2 sp, Continue working shells into ch2 spaces for the rest of the row, work (2dc ch2 2dc) into the final ch st from previous row,turn Row 2: Slip stitch over to the ch2 sp, ch3, (dc, ch2, dc) in the same ch2 sp, Shell into the ch2 spaces until center ch2 sp, (3dc, ch2, 3dc) in center ch2 sp, continue making shells into the ch2 spaces for the rest of the row, turn Row 3: Slip stitch into the ch2 sp, ch3, (2dc, ch2, 3dc) into ch2 sp, continue working (3dc, ch2, 3dc) into every remaining ch2 space across the row. Now choose a finishing for the edge!
FINISHING OPTIONS
Option 1: fasten off without doing anything further. Pull out the ch2 spaces while blocking to get a small leaf-like edging Option 2: turn work and ch1, sc into each stitch across the entire row, fasten off and block. This edging will produce a soft scallop around the edge. Option 3: turn work, ch1, (sc in next 3 sts, sc in ch2 space, ch3, sc in third stitch from hook, (faux picot), sc in ch 2 sp, sc in next 3 sts) work this repeat all the way across the row. It will produce a bump in the middle of each shell and can be used to pin out while blocking the shawl. From a distance, it looks like a real picot, but I find it easier to make. Weave in ends and enjoy!
V-shape: Version 1 (basic granny)
This shape will start the same as the bottom up triangle. The magic happened when the neck warmer/scarf/shawl hits the mid-point. Make it with long tails for a wrap around scarf, or make a smaller version and place buttons for a neck warmer. Go all out for a big shawl that leaves the arms free. Row 1: Ch5, work 3 dc into fifth chain from hook, ch1, dc in same chain, turn Row 2: Ch4, 3dc into the space before the 3dc of previous row, 3dc into the space after the 3dc of previous row, ch1, dc into same space as last 3dc group, turn Row 3: Ch4, work 3 dc into space before 3dc group of previous row, 3dc into space between the 3dc group of previous row, 3dc in space after last 3dc group of previous row, ch1, dc into same space, turn Row 4: Ch4, 3dc into first space before 3dc of previous row, 3dc group into space between 3dc groups, 3dc into last space after last 3dc group of previous row, ch1, dc into same space, turn Continue working row 4 until the project is the width you want. End with an odd number of stitch groups. If making a neck warmer or wrap around scarf, work until half of the project is the width you want the wrap around to be. If working a full sized shawl, work until the top edge is the width you want it to be across the shoulders. Mark the center group of stitches. Work the pattern from the edge to the center group, skipping the final space before the center stitch. Work a dc into the first dc of the center group. Row 1: Turn, ch3, work 3dc groups into the spaces between previous rows groups back to the edge, ch1, dc into the same space as before.. Row 2: Turn, work the beginning edge as established and work to the center, but work a dc into the ch3 loop made by the turning of the last row. Continue working rows 1 and 2 until desired length. Fasten off. Attach yarn at the other side of project and work the pattern from the edge to the center group, skipping the final space before the center stitch group. Work a dc into the first dc of the center group. Row 1: Turn work, ch3, work 3dc groups into the spaces between previous rows groups back to the edge, ch1, dc into the same space as before.. Row 2: Turn, work the beginning edge as established and work to the center, but work a dc into the ch3 loop made by the turning of the last row. Continue working rows 1 and 2 until desired length. The project can be left as is, or you can add the edging and finishing options from the bottom up triangle. (See page 4) A button can be placed at the center of the tip and used for a neck warmer or wrap around scarf if making a smaller version.
V-shape: Version 2, Alternating Rows
Row 1: Ch5, work 3 dc into fifth chain from hook, ch1, dc in same chain, turn Row 2: Ch4, V-st into the space before the 3dc group of previous row, V-st into the space after the 3dc of previous row, ch1, dc into same space as V-st, turn Row 3: Ch4, work 3 dc into space before V-st of previous row, 3dc into space between the V-sts of previous row, 3dc in space after last V-st of previous row, ch1, dc into same space, turn Row 4: Ch4, V-st into first space before 3dc of previous row, V-st into space between 3dc groups, V-st into last space after last 3dc group of previous row, ch1, dc into same space,turn Continue working rows 3 and 4 until the project is the width you want. End with a row 4 repeat. If making a neck warmer or wrap around scarf, work until half of the project is the width you want the wrap around to be. If working a full sized shawl, work until the top edge is the width you want it to be across the shoulders. Mark the center group of stitches. Work the pattern from the edge to the center group, skipping the final space before the center stitches. Work a dc into the first dc of the center group. Row 1: Turn, ch3, work V-st into the spaces between previous rows groups back to the edge, ch1, dc into the same space as before.. Row 2: Turn, work the beginning edge as established and work to the center, but work a dc into the ch3 loop made by the turning of the last row. Continue working rows 1 and 2 until desired length. Fasten off. Attach yarn at the other side of project and work the pattern from the edge to the center group, skipping the final space before the center stitch. Work a dc into the first dc of the center group. Row 1: Turn work, ch3, work V-st into the spaces between previous rows groups back to the edge, ch1, dc into the same space as before.. Row 2: Turn, work the beginning edge as established and work to the center, but work a dc into the ch3 loop made by the turning of the last row. Continue working rows 1 and 2 until desired length The project can be left as is, or you can add the edging and finishing options from the bottom up triangle. (See page 4) A button can be placed at the center of the tip and used for a neck warmer or wrap around scarf if making a smaller version.
V-shape: Version 3: V-st
Row 1: Ch5, work V-st into fifth chain from hook, ch1, dc in same chain, turn Row 2: Ch4, V-st into the space before the V-st of previous row, V-st into the space after the V-st of previous row, ch1, dc into same space as V-st, turn Row 3: Ch4, work V-st into space before V-st of previous row, V-st into space between the V-sts of previous row, V-st in space after last V-st of previous row, ch1, dc into same space,turn Row 4: Ch4, V-st into first space before V-st of previous row, V-st into space between V-sts, V-st into last space after last V-st of previous row, ch1, dc into same space, turn Continue repeating Row 4 until desired size. Make sure to end with an ODD number of V-sts on the last row. If making a neck warmer or wrap around scarf, work until half of the project is the width you want the wrap around to be. If working a full sized shawl, work until the top edge is the width you want it to be across the shoulders. Mark the center V-st. Work the pattern from the edge to the center V-st, skipping the final space before the center stitches. Work a dc into the first dc of the center V-st. Row 1: Turn, ch3, work V-st into the spaces between previous rows V-sts back to the edge, ch1, dc into the same space as before.. Row 2: Turn, work the beginning edge as established and work to the center, but work a dc into the ch3 loop made by the turning of the last row. Continue working rows 1 and 2 until desired length. Fasten off. Attach yarn at the other side of project and work the pattern from the edge to the center group, skipping the final space before the center stitch. Work a dc into the first dc of the center group. Row 1: Turn work, ch3, work V-st into the spaces between previous rows V-sts back to the edge, ch1, dc into the same space as before. Row 2: Turn, work the beginning edge as established and work to the center, but work a dc into the ch3 loop made by the turning of the last row. Continue working rows 1 and 2 until desired length. The project can be left as is, or you can add the edging and finishing options from the bottom up triangle. (See page 4) A button can be placed at the center of the tip and used for a neck warmer or wrap around scarf if making a smaller version.