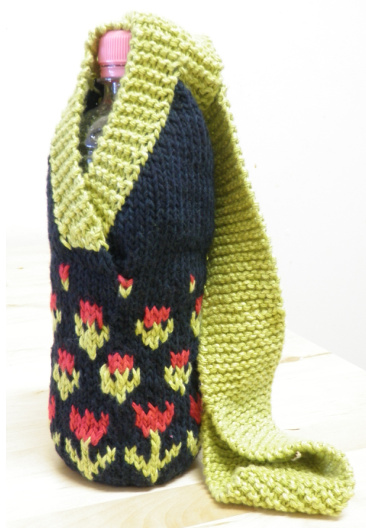
Tulip Time by Sheila Stokes
A stranded knitting water-bottle sling, with a cross-over garter stitch shoulder strap.
YARN & BITS
·1 ball Dalegarn Svale - black · 0.5 ball Dalegarn Svale - red · 1 ball Dalegarn Svale - green MEASUREMENTS To fit a 600ml spring-water bottle NEEDLESANDTOOLS 2 x 4mm circular needles 3.75mm needles Stitch marker Wool sewing needle
TERMS&ABBREVIATIONS
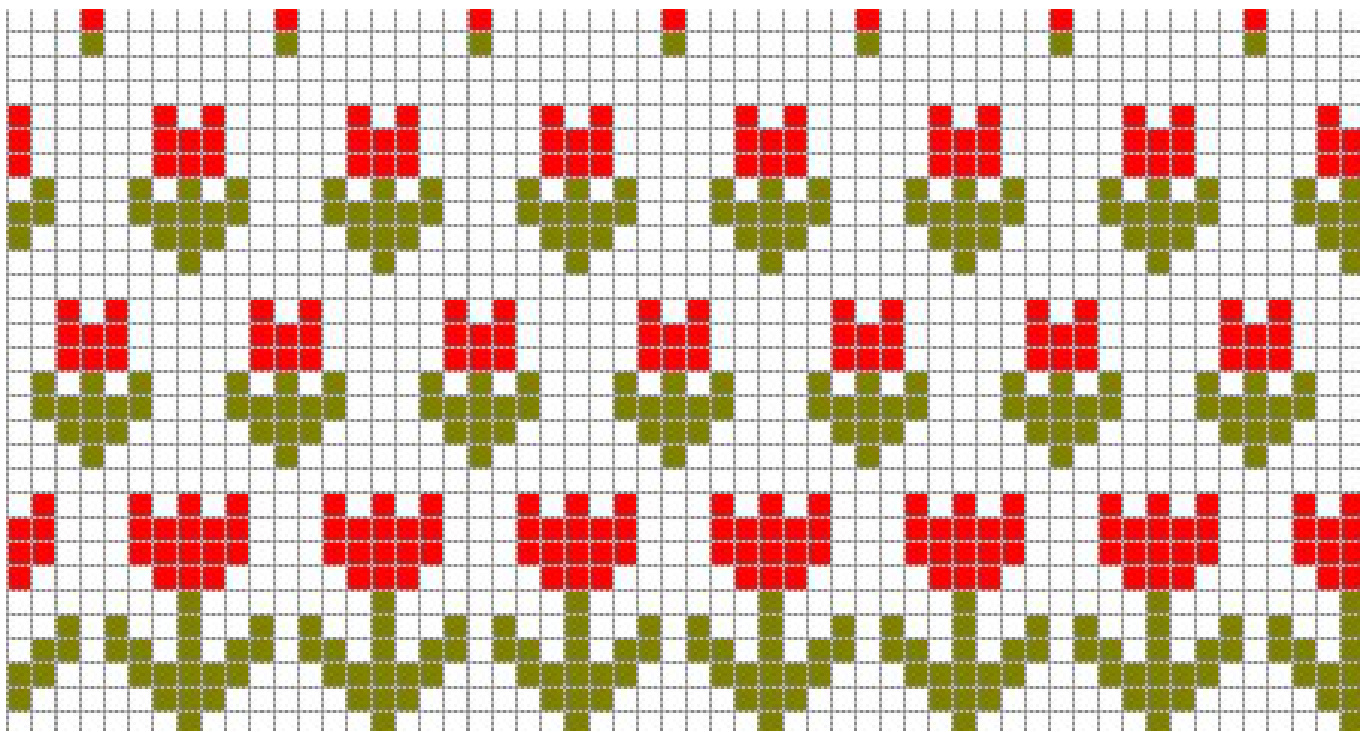
st/sts stitch/stitches st st stocking stitch [whilst you're knitting in the round, this is ALL KNIT] k2tog kinte stchestegether tas the tia sfglerstiedle through othstitches the same k2tog tbl knit 2 sts together through back loop kknit ppurl kfb knit front and back [knit into the front and then the back of the same st before slipping it off the needle, to increase by one st] sl slip stitch from one needle to the other, without knitting it wrap & turn [to prevent holes when working short rows: slip a stitch, bring the yarn w&t forward between the needles, slip the stitch back onto the left needle, and turn ready to knit back in the other direction] GettingStarted Caston7sts. Place marker. Using the Magic Loop method (see instructions on last page), join the two ends of the row to create a circle, taking care to ensure work is not twisted. TheBase Row 1: knit Row 2: knit Row 3: kfb all sts Repeat rows 1-3 three times [56 sts] The Body Row 1: knit Row 2: knit Follow chart for next 30 rows.
Tips:
· When working rows with two colours, catch the unused yarn behind the working yarn every second or third stitch to prevent dangling loops which will snag. · As the two yarns will twist together, everything will begin to tangle, so you might like to wind a few metres of each colour onto a bobbin, to make it easier to untwist the yarns. · Be careful when finishing one pattern row, and starting on the next! To keep the pattern correct you need to start each row a stitch later.
Increase and re-arrange stitches for Strap Kfb 10 sts, k18, kfb 10 sts, k18 [76 sts] Rearrange your sts so that your needles contain the following sts: Circular 1: 1,3,5,7,9,11,13,15,17,19,21-38,40,42,44,46,48,50,52,54,56 [38 sts] Circular 2: 39,41,43,45,47,49,51,53,55,57,59-76,2,4,6,8,10,12,14,16,18,20 [38 sts] In the sections where you have increased, the stitches will be divided so that the odd-numbered stitches go into one strap and the even-numbered stitches go into the other. At this point the straps will overlap, one inside the other. In the overlapping sections your circular needles will lie parallel to each other, one inside and one Outside. The 2 straps are worked separately, so one circular is effectively being used as a stitch holder.
Working the Strap
The borders of the strap are worked in 6sts of garter stitch in green. You will need to wind several metres of green yarn onto a bobbin for the second edge. On Circular 1... ^ Sl1, k to last 6 sts, join Green yarn, k6 Sl1, k1, w&t, k2 Sl1,k3, w&t,k4 Sl1, k6, switch to Black yarn, p to last 6 sts, join second Green yarn, k6 Sl1, k1, w&t, k2 Sl1, k3, w&t, k4 \*Sl1, k4, k2tog tbl, switch to Black, k to last 6 sts, switch to Green, k2tog, k5 Sl1, k5, switch to Black, p to last 6 sts, switch to Green, k6\* [36 sts] Repeat \*\* until 12 sts remain ^ Repeat ^^ on Circular 2 to make second strap. Change to 3.75mm needles \*Sl1, k11\* Repeat \*\* until 30cm of yarn remains. Tip: · Work both straps at the same time on the one pair of needles, using a separate ball of yarn for each. It doesn't matter if one ends up longer than the other, as the join is nearly invisible, and doesn't need to be exactly at the mid-point of the strap.
Cast Off and Join Strap
The two parts of the strap are joined and cast off simultaneously. With each of the two sets of 12sts on a separate needle, and ensuring that the strap is not twisted, hold the two needles parallel. Using a spare needle, k2tog (by knitting into the first st of each needle), k2tog again, then pass first st back over second st. Continue in this fashion until one st remains. Remove st from needle, pass end of yarn through st, and pull tight to finish.
Finishing
Turn work inside out, and use the darning needle to weave in all loose ends.
MAGIC LOOP
ork a piece such as this on circular needles, you will need to use the 'Magic Loop' metho The principle of the Magic Loop is to consider your circle of stitches as two separate 'sides', which are worked one after the other. The two 'sides' are separated by a loop of your circular needle cable (the Magic Loop), so that your work doesn't have to stretch right around the length of the needle. Your circular needle needs to be at least 80cm long to give you enough space to manoeuvre, but you'll be able to knit down to the tiniest diameter. In this photo I'm using a 120cm circular needle to work just 20 stitches!

Here's how to do it: · Cast on required number of sts ·Slide all sts along to the cable of your circular needle · The first half of your sts the miwill be 'Side A', and the remainder are 'Side B'. Your working yarn is at the end of Side B. · Fold the row of sts in half, and pull a loop of cable out between middle 2 sts. You now have a 'Magic Loop' separating Side A from Side B. · Slide the Side A stitches back onto the needle - this is your left needle · Leaving the Side B sts on the cable, join your stitches to form a circle, pulling the yarn tight as you knit the Side A stitches onto the empty needle · You have now knitted half of your first round, and your 'Magic Loop' is sitting between Side B and Side A. · Slide the Side B stitches onto the needle, and slide the Side A stitches onto the cable · Knit the Side B stitches onto the empty needle, remembering to keep the yarn tight between the end the Side A sts and the start of the Side B sts It sounds complicated, but really it's quite simple - just keep sliding the circular needle through your work, so that the two'sides' are always separated by the Magic Loop. At any point in time you will have all the stitches of the "active" Side on the needles, and the other Side on the cable.


