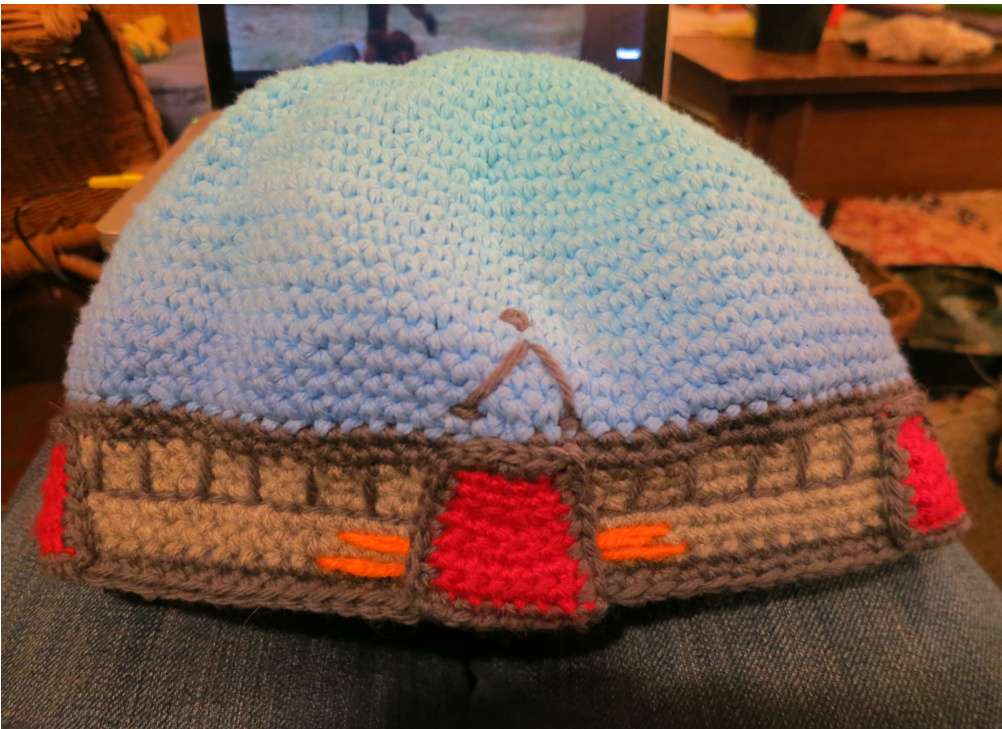
Stargate Winter Hat
This is the first pattern I have made so unfortunately it's a one-size-fits-all until I get a better feel for pattern making.
Materials
US E/3.50 mm crochet hook 4 ply Sugar'n Cream Cotton yarn white Scraps of: -Light gray, 5 ply -Darker gray, 5 ply -Red/Orange, 5 ply -Orange, 5 ply Tulip fabric dye, Aqua Tulip fabric dye, Royal Blue (The specific brand of fabric dye does not really matter, you just want to make sure that you have two different shades of blue and that the dye that you have will dye your white yarn, thus my decision to use cotton yarn as opposed to acrylic)
Hat- Event Horizon (using the white yarn)
(You can use any hat pattern for this portion of the hat or you can use the pattern below, making sure to use a scrap piece of yarn to mark rows. If you decide to use a pattern of your choosing please stop crocheting approximately 1 1% inch before you usually would be done and jump straight to the dying part.) 1) Ch 7, connect to first sc to create a ring. 2) Ch 14 sc into ring. 3) 1 sc into each st in ring. 4)2 sc into 1 st, 1 sc into next st. Repeat for the entire ring. 5)1 sc into each st in ring. 6) 2 sc into 1 st, 1 sc into next st. Repeat for the entire ring. 7)1 sc into each st in ring. 8) 2 sc into 1 st, 1 sc into next st. Repeat for the entire ring. 9)1 sc into each st in ring. 10) 2 sc into 1 st, 5 sc into next 5 st. Repeat for the entire ring. 11) 1 sc into each st in ring. 12) 2 sc into 1 st, 6 sc into the next 6 st. Repeat for the entire ring. 13) 1 sc into each st in ring. 14) 2 sc into 1 st, 7 sc into the next 7 st. Repeat for the entire ring. 15) 1 sc into each st in ring. 16) 2 sc into 1 st, 8 sc into the next 8 st. Repeat for the entire ring. 17) 1 sc into each st in ring. 18) 2 sc into 1 st, 9 sc into the next 9 st. Repeat for the entire ring. 19) 1 sc into each st in ring. 20) 2 sc into 1 st, 10 sc into the next 10 st. Repeat for the entire ring 21-30) 1 sc into each st in ring. Use a safety pin to hold your last stitch and cut yarn.
Dying the Hat
1) Following the instructions on your dye of your choice dye the incomplete white hat Aqua, or the lighter shade of blue. Rinse thoroughly. 2) Allow the hat to dry completely so the dye can set. 3) Prep the Royal Blue dye, or the darker shade of blue. Soak the hat in water. Hold the hat at the center/top and submerge the edges of hat in the dye solution, allowing it to soak upwards and achieve a gradient affect. You want darker blue on the edges and lighter blue in the center, just like the Stargate event horizon. 4) Remove from the dye, rinse and allow to dry thoroughly.
Hat- Stargate (using your two gray yarns)
Connect vour dark oray varn to vour blue (formerly white) hat removing the safety pin. 1) 1 sc into each st in ring. 2)1 sc into each st in ring. Switch to light grey yarn. 3-8) 1 sc into each st in ring. Switch back to dark gray yarn. 9-10) 1 sc into each st in ring. Fasten off and weave in end. Main chevron (using red/orange yarn and the dark gray yarn) 1) Ch 6, turn. 2)Skipping the st closest to the hook 5 sc into the next 5 st. Ch 1 and turn. 3) 2 sc into next 2 st. Sc 2 into next st. 2 sc into next 2 st. Ch 1 and turn. 4)Sc 6 into the next 6 st. Chain 1 and turn. 5) 3 sc into the next 3 st. Sc 2 into the next st. 2 sc into the next 2 st. Ch 1 and turn. 6)Sc 7 into the next 7 st. Ch 1 and turn. 7)Sc 7 into next 7 st. Switch to your dark gray yarn. ormers of thechevron youwill need tosc 2intoth same st totun theo Secondary Chevrons (using red/orange yarn and the dark gray yarn) Start with your red/orange yarn. 1) Ch 4, turn. 2)Skipping the st closest to the hook 3 sc into the next 3 st. Ch 1 and turn. 3)1 sc into the next st. 2 sc into the next st. 1 sc into last st. Ch 1 and turn. 4) Sc 4 into the next 4 st. Ch 1 and turn. 5)1 sc into the next st. 2 sc into the next st. 2 sc into the next 2 st. Ch 1 and turn. 6) 5 sc into the next 5 st. Ch 1 and turn. 7) 5 sc into the next 5 st. Switch to your dark gray yarn. 8)Sc 1. Sc around the entire chevron to create a gray border. When you reach the corners of the chevron you will need to sc 2 into the same st to turn the corner. Fasten off and leave a long yarn tail to sew the chevron onto your hat. 9) Repeat 3 more times.
Final Touches
1) Sew your main chevron to the center of your hat using the gray yarn tail. 2) Evenly distribute and sew your 4 secondary chevrons on the edge. 3) Optional: In orange embroider 2 parallel lines on either side of your main chevron (see above picture if confused). 4) Optional: In dark gray embroider a horizontal line in the center of the light gray section of crochet, running parallel to the edge of the hat. You have now essentially created two concentric rings. In the center ring embroider, in dark gray, vertical lines to indicate the where one glyph ends and another begins. 5) Optional: In dark gray embroider the Stargate point of origin glyph for Earth over top of the main chevron.


