BADCATDESIGNS 2013 GARDEN PARTY
DANDELION DOILY
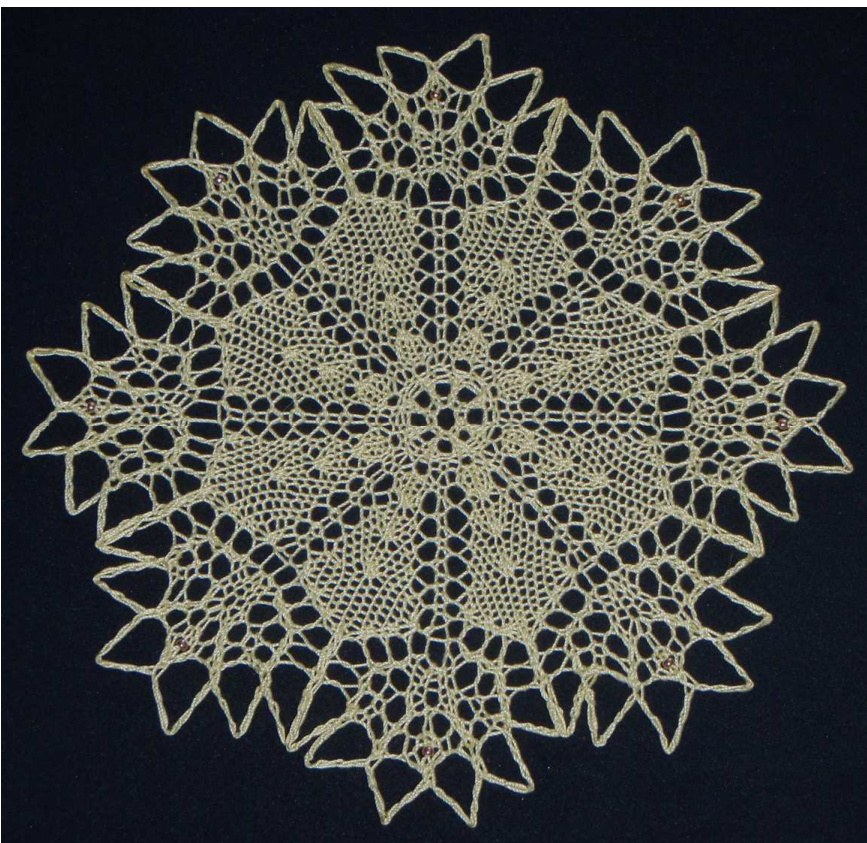
This is an 8 wedge round, shown in Universal Yarn Nazli Gelin Garden 10 yellow #10 crochet cotton. One (380 yards per 50 gram) ball will make 5 or 6 doilies. I used 8 Japanese seed beads (8/0 gold duracoat) for each doily. Each blocks to 7-8 inches in diameter.
Material
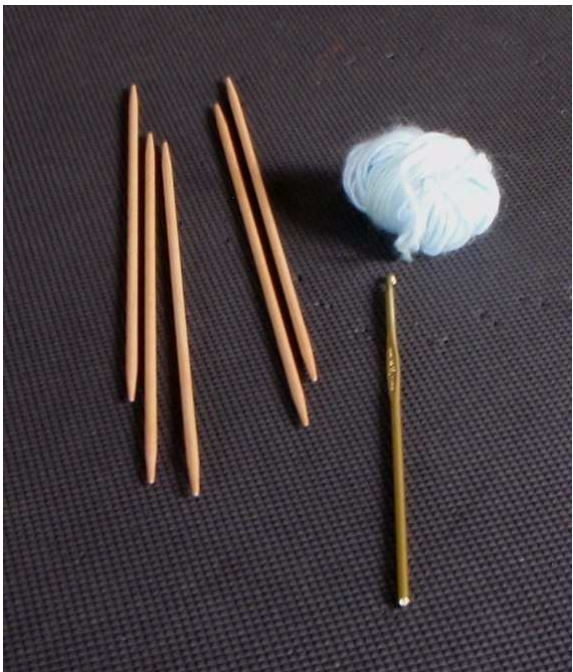
-I am suggesting #10 crochet cotton. The weight of #10 varies from maker to maker, but it is a lace weight. There are several lovely and easily available options to choose from. #8 Perle Cotton is also a great option and almost the same weight as #10 crochet cotton. -US 1 knitting needles: One set of 8 inch double points can work for any of the yarn options I suggest. If you use a different size thread or work tighter or looser than average, adjust your needles accordingly, to get the look you like. You might like a US 1, 16 inch circular for a piece with more than 40 rows, but it is not required, just a wee bit easier on thefinalrow -US 15 steel crochet hook, or size to fit your beads and yarn, to place beads -US O steel crochet hook for bind-off -8/0 Japanese seed beads: you will need just a few (8) beads for this project. -Yarn needle to weave in ends BadCatDesigns?2013. All rights reserved. Please do not copy or share. If you would like to use these patterns for teaching or any commercial purpose, please contact the designer for written permission. BadCatDesigns @ Verizon.net
BADCATDESIGNS 2013 GARDEN PARTY
-Sharp snips or embroidery scissors to clip ends -A blocking mat and stainless t-pins to block each piece. You can get “rust proof' stainless pins at most craft and sewing shops. Just read the packaging carefully. -Spray starch if you like NOTE: If you want to start with something heavier, and practice your cast-on, go for #5 or #3 crochet cotton. You will need a bit more yardage if you use a heavier thread. Adjust your needles and hook accordingly, to get a gauge you like. Gauge and finished size: -Gauge is not critical, so just try a small doily, block it and see how you like your gauge. Consider the first one you make a swatch!
Yarn Ideas
-KnitPicks Curio 100% cotton, 721 yards/100 grams http://www.knitpicks.com/yarn-fiber/product-16557.html -Red Heart Aunt Lydia's Classic 10 100% cotton, 350 yards/ball There is #3 thread available also http://www.redheart.com/crochet-thread/aunt-lydias-classic-crochet-size-10 -Universal Yarn Nazli Gelin Garden 10 100% cotton, 308 yards/50 grams There are #5 and #3 threads available also. http://www.universalyarn.com/quality_color.php?quality= 185 -#8 Perle Cotton, available at most craft shops. My local Joann's stocks #8 Perle Cotton in small packs of 6 balls (10 grams each), in assorted colors. This is a very nice thread and each ball will make a doily as large as 34 rows with no worries about running short. The brand is Iris “Sensations” and the label says Egyptian Cotton, produced in India and processed in Mexico! Very well travelled cotton... Plenty of others also! Let me know if I missed one of your favorites.
Notes
-Adding beads: Knit the stitch, slide a bead on the shaft of your crochet hook, lift the stitch with the hook, slide the bead on to the stitch, return the stitch to your right-hand needle and knit on. -Casting on: see technique section for photo tutorial with one center cast-on example. I generally use a basic long-tail cast-on, casting on the specified number of stitches to 3 needles, joining, with care not to twist, and knitting on. The technique shown here uses a crochet hook and is a little easier to manage with fine threads. -Binding off: see technique section for photos with directions for crochet bind-off Blocking: I always wet block. See technique section for blocking a doily.
Directions
-With double-point needles, cast-on 8 stitches using your preferred method, and join in the round. BadCatDesigns?2013. All rights reserved. Please do not copy or share. If you would like to use these patterns for teaching or any commercial purpose, please contact the designer for written permission. BadCatDesigns @ Verizon.net
BADCATDESIGNS 2013 GARDEN PARTY
-Knit one round -Begin chart at row 1, repeat each chart row 8 times per round. -All even (uncharted) rows are worked as per chart key, so read the key. -Complete chart through row 30 -Bind-off: see photo tutorial in technique section. [Gather 3, chain 6] across each needle, ending chain 6. Secure final chain to the first cluster you gathered, bringing yarn though the cluster and then the final loop of your chain. Cut thread leaving a 9 inch tail, and bring the tail through that loop, snugging it up securely. -Weave in ends. -Wet block as in technique section. -Clip ends and enjoy!
Now what???
-Make a few and use them as coasters on your dinner table. -Make two and use them under candle sticks. -Make a few and starch them. Hang them on your trees or in the window. -Give them to your friends. -Sew them on the back of your niece's Jean Jacket like my friend Karen will do. -Make a rug for you grand daughter's Calico Critters doll house, like my friend Sue. -Sew them on a throw pillow. -Try making one with sewing thread like my friend Mary Rose. Do you have other great ideas? Let me know and I will add them to the list? BadCatDesigns?2013. All rights reserved. Please do not copy or share. If you would like to use these patterns for teaching or any commercial purpose, please contact the designer for written permission. BadCatDesigns @ Verizon.net
Dandelion
c/o 8. Knit one round and begin row 1.
| 6 | 9 | 6 | 6 | 9 | 6 | bo 29 | |||||||||||||
| 0 | 0 | B | 0 | 0 | p | 0 | / | 0 | V | 0 | 0 | p | |||||||
| 0 | 0 | 0 | / | 0 | p | 0 | 0 | V | 0 | 0 | P | 27 | |||||||
| 13/ | 0 | 0 | 0 | 0 25 | |||||||||||||||
| t | 0 | / | 0 | 23 | |||||||||||||||
| 13/ | 0 | / | 0 | 21 | |||||||||||||||
| P | 0 | V | 0 | 19 | |||||||||||||||
| p | 0 | 0 | 17 | ||||||||||||||||
| p | 0 | V | 0 | 15 | |||||||||||||||
| p | 0 | 0 | 13 | ||||||||||||||||
| P | 0 | V | 0 | 11 | |||||||||||||||
| P | 0 | 0 | 6 | ||||||||||||||||
| P | 7 5 | ||||||||||||||||||
| p | 13/ | ||||||||||||||||||
| P | t | 3 | |||||||||||||||||
| 0 | t | 1 | |||||||||||||||||
| Repeat8xperround | |||||||||||||||||||
JKnit on odd and even rows Purl on odd and even rows tTwisted knit on odd rows and even rows Yarn-over on odds rows and knit on even rows (see note about double yarn-overs) Left-leaning decrease (SSK for most knitters) on odd rows and knit on even rows Right-leaning decrease (K2tog for most knitters) on odd rows and knit on even rows Double-vertical decrease (slip 2 together as if to knit, knit 1, pass slipped stitches over knit stitch) on odd rows and knit on even rows 3/Knit, yo, knit into the front leg of the same stitch (1 stitch becomes 3) on odd rows and knit each stitch on even rows Nostitch BKnit stitch, place bead with crochet hook on odd rows and knit on even rows BadCatDesigns@2013
Easy Center Cast-on
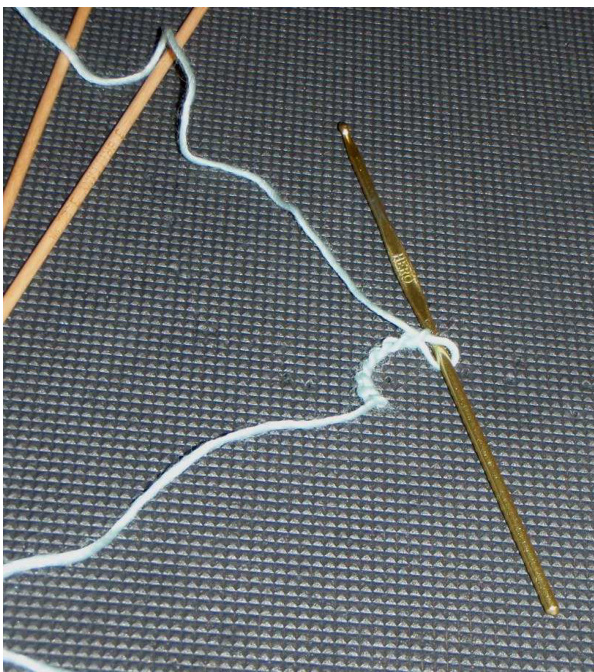
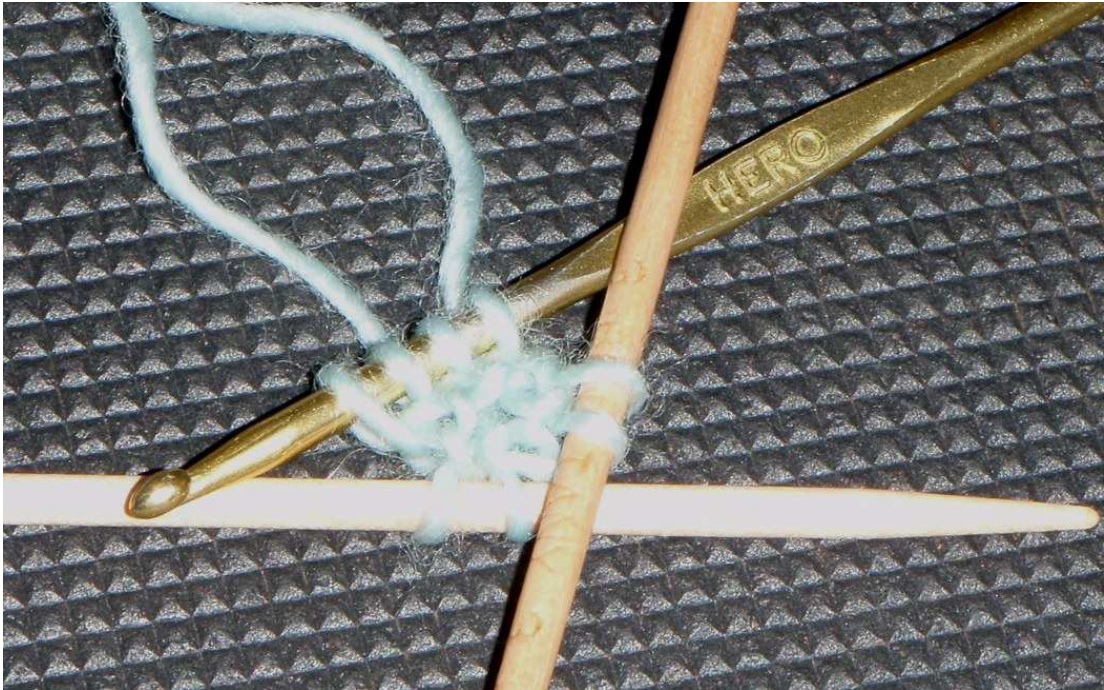
This technique for a center cast-on comes from Marianne Kinzel's Books of Modern Lace Knitting. This technique is especially helpful when using very fine yarn. Begin by selecting a set of five double pointed knitting needles in the correct size. Select a crochet hook with a head close to the same diameter as your knitting needles. The illustration shows an eight stitch cast-on.
1) Using the crochet hook and yarn, chain as many stitches as required for your castOn. Eight are shown.
2) Join the chain into a ring, using a slip stitch. The slip stitch will be your first Stitch.
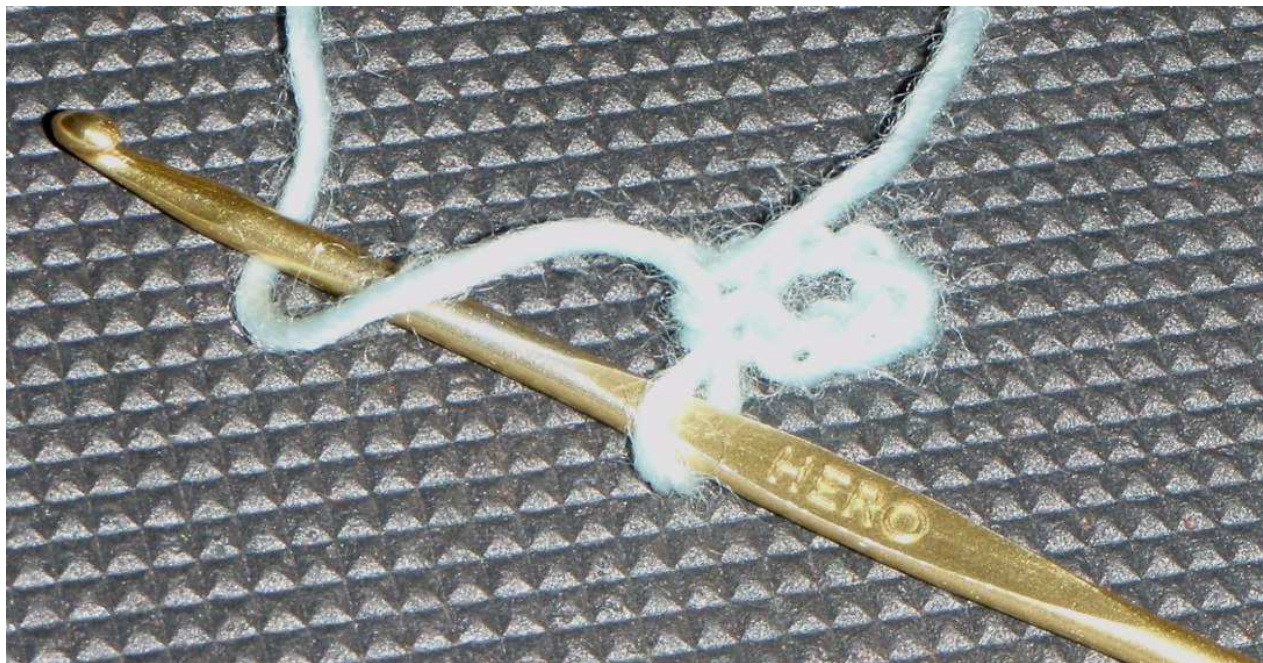
3) Make three more stitches, one each through the next three chain stitches. Slip the 4four stitches now on the shaft of the crochet hook to two double point needles. 4) Make four more stitches, one each in the remaining chain stitches.
5) Now transfer the remaining stitches to the double point needles and adjust them, so that you have two stitches on each of four needles.
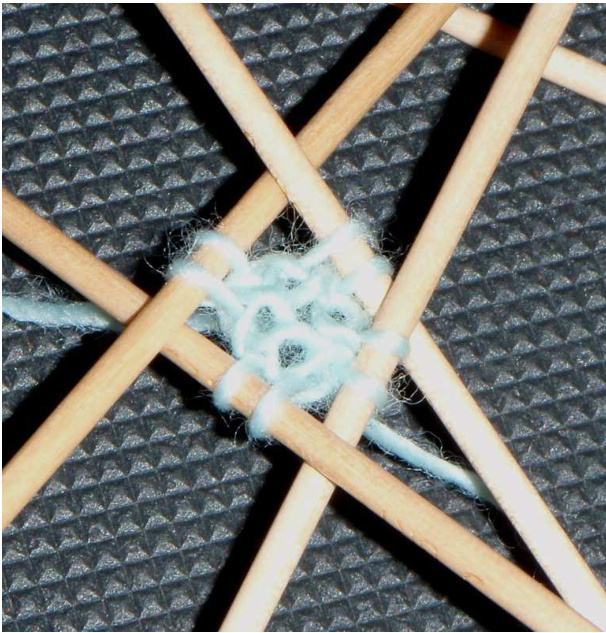
6) You are now ready to begin you chart at row one. This would bring you to the same point as if you simply did a long-tail cast-onto your double points and knit oneround.
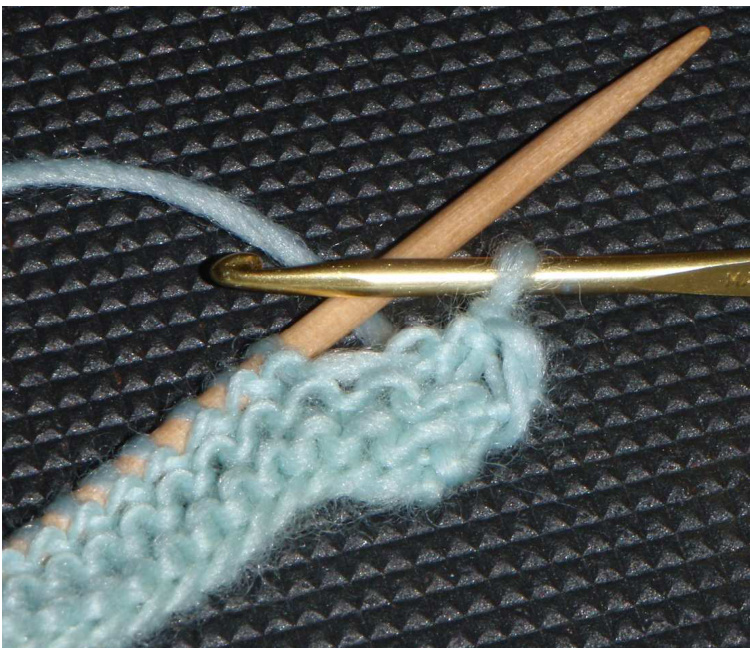
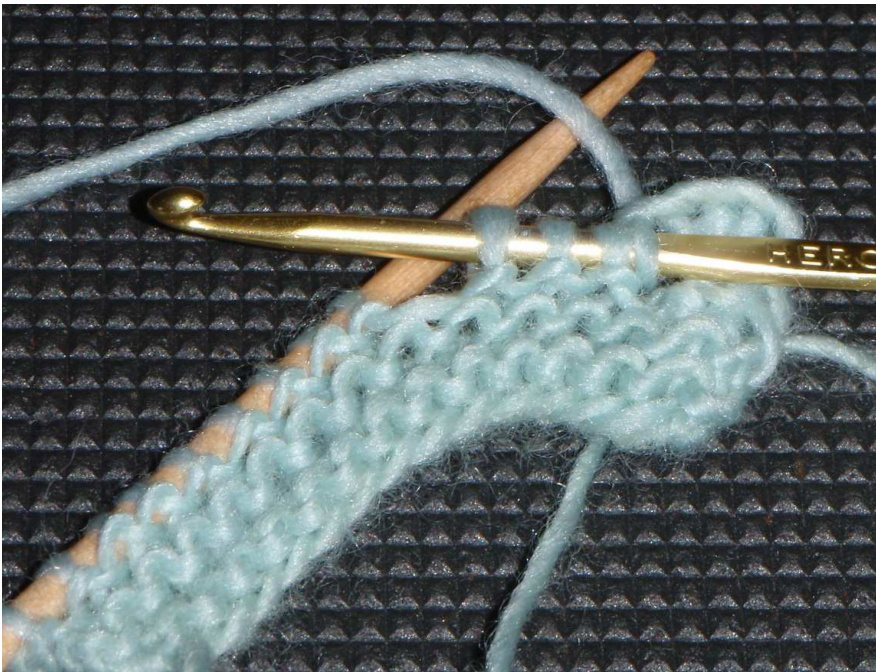
Crochet Bind-Off
This technique is used in many early doily patterns and creates a lovely, delicate edge. The illustrations show a three stitch gather and a six stitch chain. 1) Insert your crochet hook into the back of the number of stitches to be gathered (which is specified in the pattern directions and chart.)

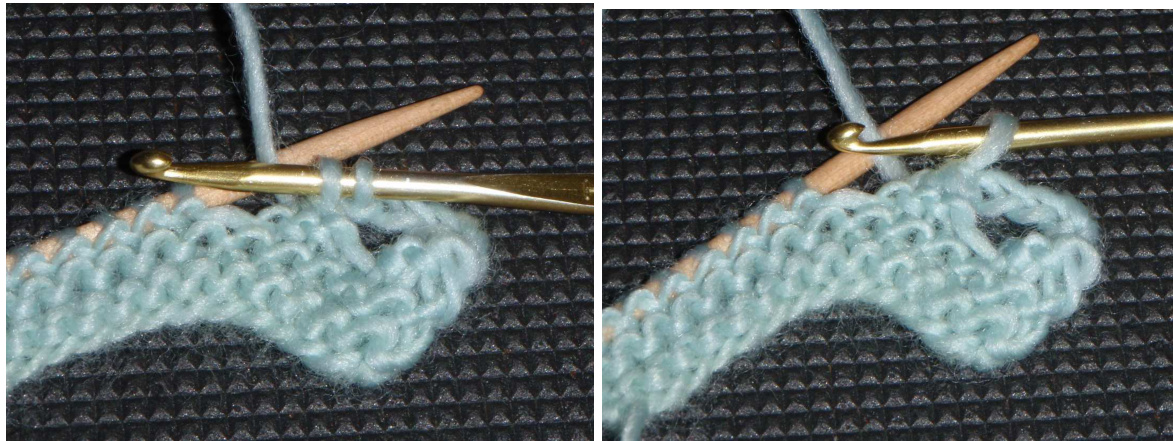
2) Bring your yarn through the group of stitches with your crochet hook.
3) Chain the correct number (specified in the pattern directions and chart.)
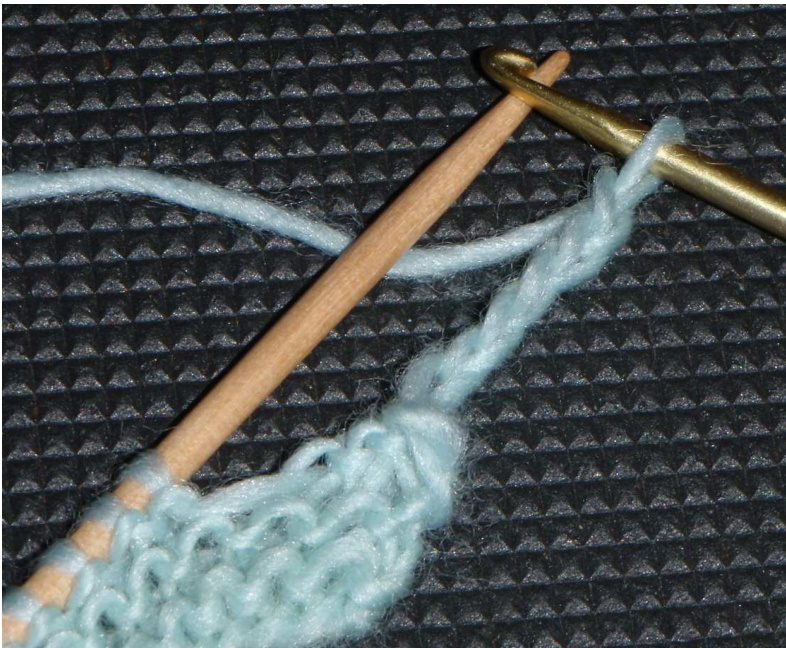
4)) Insert your crochet hook into the back of the next group of stitches to be gatherec
5)Bring your yarn through the group of stitches and then through the loop on the hook from the final stitch in your chain.
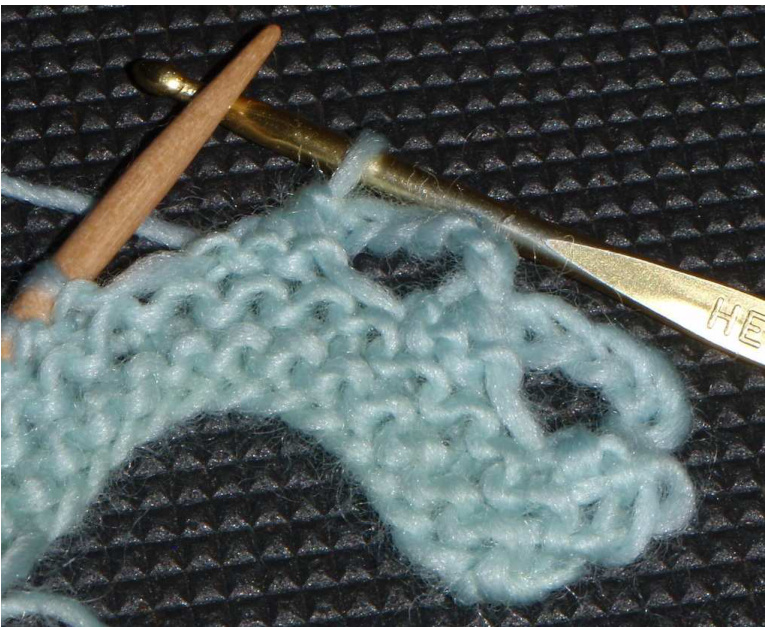
6) Continue in this way until all stitches are worked. If you are working back and forth (as in a shawl) you will end gathering the final group of stitches. If you are working in the round (as in a doily) you will end with a chain, which you will join to the base of the first group you gathered.
Blocking a Doily
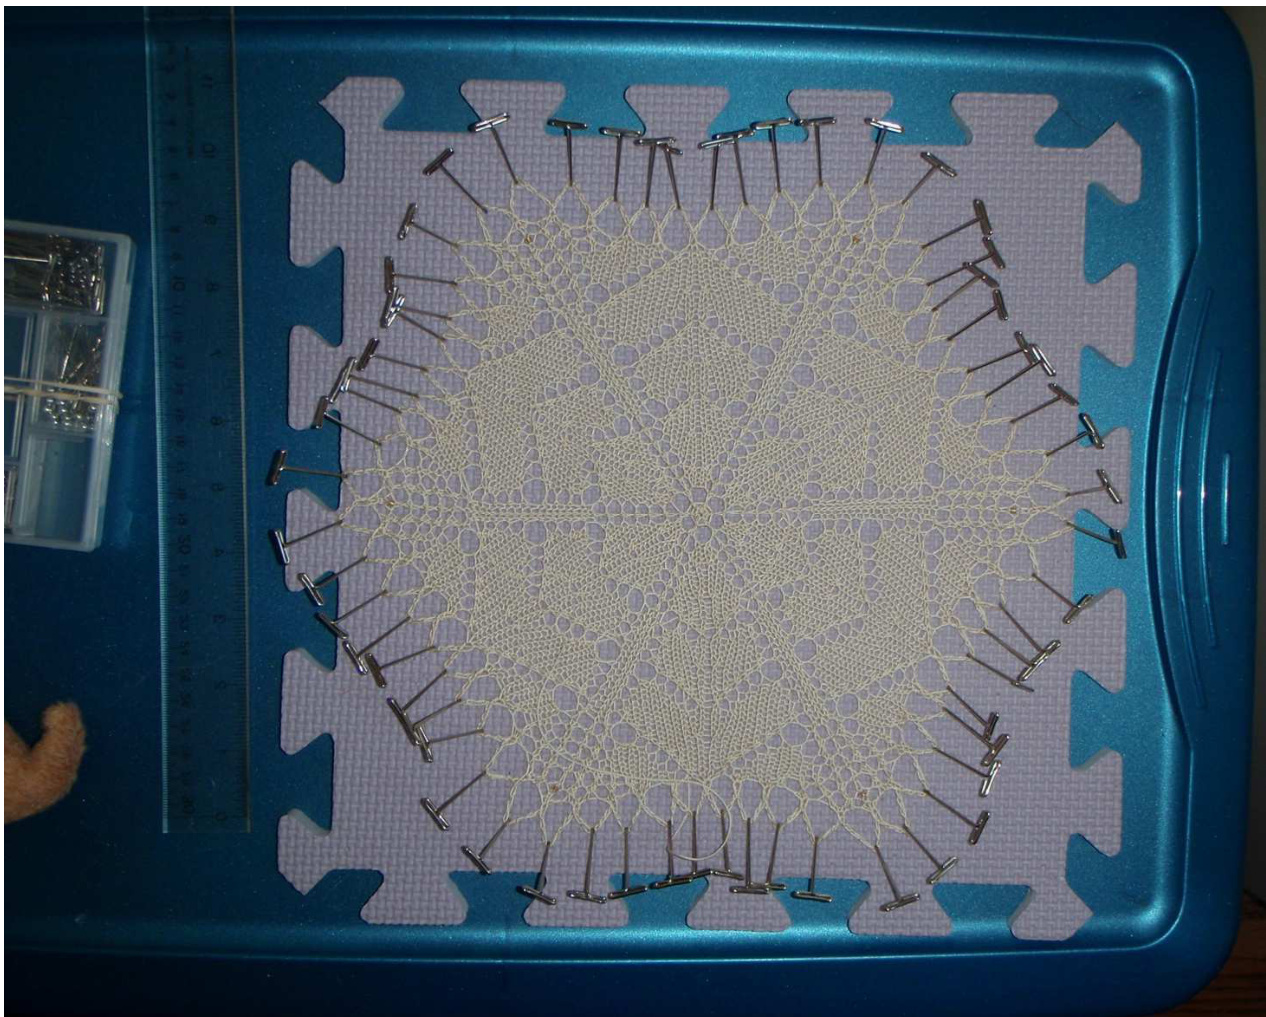
Note blocking surface, lots of pins and the tip of kitty toy?
Materials
-The doily, with ends woven in to wrong side, but not clipped. -A bowl and access to water -A blocking surface (I prefer rubber blocking mats) -Stainless steel (rust-proof) blocking pins -A sharp scissors or snip to clip ends -A cat toy to keep your cat busy
Directions
-Soak your finished piece in cool water. Feel free to wash it if needed. Let it soak for at least 30 minutes. Rinse well (if you washed it) and squeeze out the excess water. -Lay it out flat with the right side up. -Throw the cat toy into the other room and hope kitty chases it. -Start pinning out the crochet loops, with one pin per loop. Begin with the two loops at the tip of each “flower." -Pin two loops and then pin the opposite side loops. -Make a half-turn (for an eight wedge doily) or a third turn (for a six wedge doily) and pin the loops at opposite sides again. Now two loops from each quarter or third are pinned, holding out the tip of four “flowers." -Pin the two loops from each flower between the four you already pinned. -Now the tips of all six or eight flowers are pinned out. -Make sure they are equal in distance from each other in radius and also diameter. You can use a ruler or just you eyes. -Pin out a loop on either side of the first one you pinned. Repeat for each quarter or third. -Then repeat for each eighth or sixth. -Do the same thing again. Repeat as many times as the particular doily dictates. -Now all that is left will be the two loops at the base between the flowers. Pin those out too! -Let it dry completely before removing pins. Give your kitty some love. -Clip ends and enjoy!


