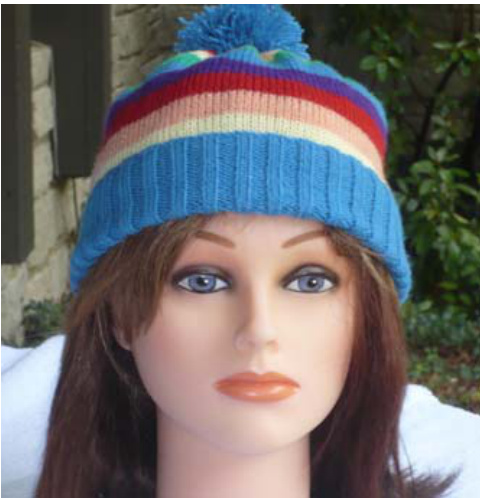
Rainbow Hat
achine knit single layer hat with flip-up cuff to make it adjustable
Materials
Standard gauge knitting machine, with ribber. Trenzado yarn: red, orange, yellow, green, blue, purple. You can mix brands as long as you use yarns that give the same gauge. If you substitute skeins of yarn, be sure you roll it into balls before you begin on the km. Yarn ndl for seaming.
Skills needed
Beginner ribber skills. Alternatives are possible: reformat sts manually or hand knit the ribbing.
Dimensions
9.5" long overall; turn up the ribbing to get a 6" or longer hat 20" circumference; stretches to 26'
Gauge
Rib:10.25 RPl Stockinette: 7 SPl and 10.46 RPI
Directions
00 COR, crochet CO 142 sts on MB, leaving a 30" tail for seaming when finished. You may do a zig zag CO if you prefer, but this gives a better, cleaner edge, and that's better when it's right up there in everyone's face. 01 K1R @ SD6, then transfer sts to ribber in 2x2 pattern Hang ribber comb and 3 large wts, or however many weights you used to get gauge. 02 ° work even in 2x2 rib @SD6 41, work last R of ribbing @SD7, end w/ COL transfer ribber sts to MB decrease weights; stockinette does not require as many Reset RC00. There are 62R allotted for rainbow stripes. Knit ea color for 6R @SD7. 01 1-6 yellow 07 7-12 orange 13 13-18 red 19 19-24 purple 25 25-30 blue 31 31-36 green 37 37-. yellow; 1R only before change @ R38! 38 SD6; transfer @ 4th st to adj ndl; put empty ndls in NWP; as a result, remaining ndls are now aligned in groups of three. Beaded Pony Designs, a.k.a ginjen on Ravelry Beaded Pony Designs continue in yellow through R42 43 43-48 orange 49 SD5; change to red 52 transfer the middle st of ea 3-st group to adj ndl to get EON config put empty ndls in NwP SD4 K3R 55 55-β purple (mostly under pom) SD3 K3R 58 SD2 K3R 61 SD1 K1R 62 SD8 K1R (makes it easier to remove and gather)
Finish
Cut 3-4' tail. Thread tail through yarn ndl. Beginning on the side opp the tail, run yarn through all sts and remove from km. Do not tighten it yet--that's why the tail is so long. Using CO tail, seam from cuff to top, taking care to reverse the side you're seaming on depending on where you fold up the cuff. Then draw up center top tail as snug as it will go. Tie the two ends tog, hide them in top loops and trim short.
Abbreviations and notes
\~ Some abbreviations might not be used in this pat adj adjacent BO bind off CC contrast color CO cast on CoC cast on comb config configuration D position holding position; this differs among km brands dec decrease EON every other needle EOS every other st Kknit km knitting machine K1R knit one row MY main yarn ndl needle opp opposite pat pattern Rrow rep repeat RPI rows per inch SPI stitches per inch st stitch TD tension dial, sometimes known as SD (st dial) TD5 tension dial 5 WY waste yarn Beaded Pony Designs, a.k.a ginjen on Ravelry
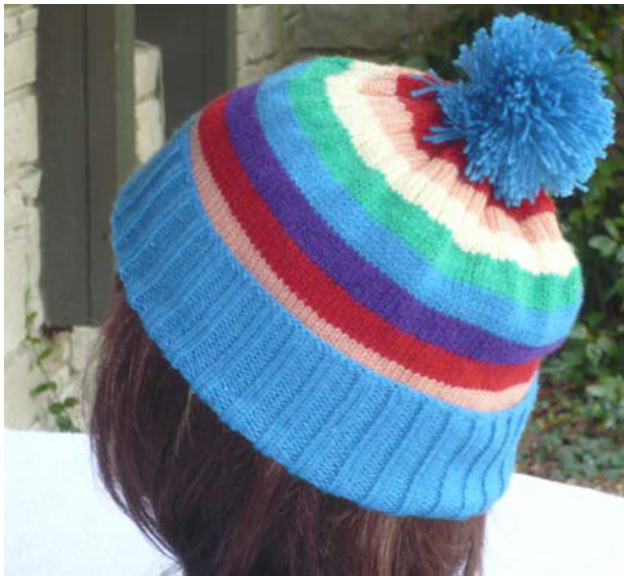
Pom-poms made with yarn winder
\~ Something new by Beaded Pony Designs and Ginny Schweiss You will need: yarn (skein, cone, or ball) 4-foot length of the same yarn, doubled ball winder several pencils, dowels, or hand-knitting needles as place holders - an even number long, sharp scissors for initial cut Thread yarn on yarn winder according to its instructions. I use a Silver Reed SHW-3, but any ball winder should work. Each turn of my yarn winder is 3 rotations, so 60 turns equals 180 wraps. Saves a lot of hand wrapping compared to the old "wrap yarn around cardboard" method. Wrap the number of rotations you want, then cut the yarn. When I slide the yarn off the winder, I slide it straight off onto a bundle of four, fat hand-knitting needles. This keeps the ball open and gives me a way to tie the yarn into two equal halves. Take the doubled piece of yarn, slip it around the yarn ball, keeping half the needles (or dowels, or whatever) on one side, and half on the other. It's important to tighten it very tightly. When I get it lined up in the middle, I remove a HK ndl from each side, giving me more room to tighten the yarn. Tie it off. Open scissors and slip into one of the two halves of the pom-pom-to-be. If you can, slide the blade along the HK ndl to guide it. Get it all the way through so you can cut the whole side at once without the center closing up on you. Repeat on other side. Shake pom out. It will appear loose and limp. Don't worry! As you shape it with scissors (l use the long ones but you might prefer a shorter pair for shaping), the shorter you go, the pom loses its limpness and firms up nicely. This might take some trial and error to get the size pom you want. I use 70 wraps of Trenzado yarn (fingering weight, lighter than Bernat Baby yarns) to make a pom-pom for a teen/adult stocking hat. Do fewer wraps w/ thicker yarn.


