Around the World Felted Bag P9
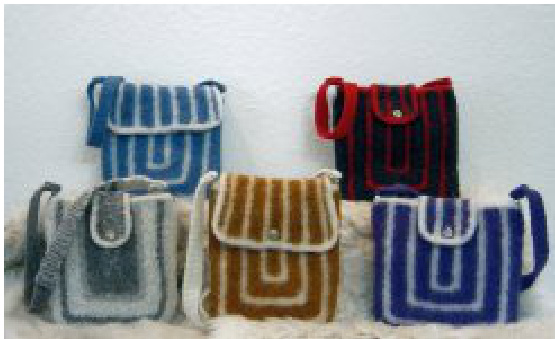
Yarns with strong contrast make Around the World Felted Bags as much fun to knit as they are to carry. Try bold and bright, black and off-white, rainbow colors or use your stash. Make them interesting, make them colorful! Make them with either a flap or a tab top. Attaching handles is no problem. Sew the ends to suspender clips and clip them on. It couldn't be easier! Pattern is written for 10 ply with 14 ply version in parentheses (). Yarns pictured: 10 plyWoolPakin Charcoal & Red,Bluebell & Natural. 14 ply in Goldstone & Natural, Blue Diamond & Natural, stash yarns in Birch, Oatmeal, Bracken, Sand & Storm. Finished size, 10 ply & 14 ply: 11"h x 10"w.
Materials
1 hank ea MC & CC (250gm/430yds) Wool Around the World WoolPak 10 ply or WoolPak 14 ply (250gm/210yds) bags require approx 210-275 yds MC & 150-165 yds CC in 10 ply or 225-230 yds MC & 150-165 CC in 14 ply US Size 11 double pointed needles & 24" circular Ring markers (2), locking stitch marker Suspender clips (2) Tapestry needle Optional: magnetic closure, snap or button
Gauge: 3 sts/inch
Techniques
ssk - slip, slip, knit: Slip the next two sts knitwise, one at a time. Insert the left needle from left to right through the slipped sts and knit. 3 Needle Bind Off: This technique joins two pieces of knitting together while binding off at the same time. Divide sts evenly on 2 needles. If using a circular, pull cable out between last st on each needle. Hold needles parallel to one another. Half of the sts are on the back needle and half are on the front needle. With dpn \*k2tog, one st from front needle, one from back needle)\*. Repeat \*\* once. Bring first st over second st and off needle. Continue to knit a front st and a back st together while binding off. Knitted Cast On: With work in left hand, \*insert needle into first st and knit. Transfer this new st back to the left hand needle\*. Repeat \*\* for desired number of sts. Pick Up and Knit: Holding yarn on WS, insert needle under st on outer edge of RS and wrap yarn knitwise around the needle. Draw the yarn (the stitch) through and leave it on the needle. I-Cord Bind Off: (3 st version) With each step of the I-Cord bind off, three things are accomplished: I-cord is produced and attached to the piece and one st of the bag is bound off. After the I-cord sts are cast on, work as follows unless otherwise noted: with dpn, \*k2, k2tog tbl (through the back loop). Slide these 3 sts back to the left needle\*. Repeat\*\* until all sts have been bound off.
Bag Front
With MC and circular, loosely CO 122 (114) sts, leaving a 30" tail for the seam and placing markers after st 44 (40) and st 78 (74). Do not join in round. Work 6 rows garter stitch (k every row). AttachCC. Row 1: (RS) \*K to 2 sts before m, ssk, slip m, k2tog, repeat \* once, k to end of row. Mark RS of bag with locking stitch marker. Row 2: K. Continue to work Rows 1-2 until 4 sts remain between markers, ending with a WS row. AT THE SAME TIME, alternate colors as follows: With MC, work Rows 1-2 four times (4 ridges). With CC, work Rows 1-2 two times (2 ridges). Wrap MC and CC around one another at the beg of RS rows to keep edge smooth. When 4 sts remain, work the following: Next Row: (RS) Work Row 1. (58/50 sts) 3 Needle Bind Off: Prepare to work bind off by using one of the methods described in Techniques Section. With right sides together, work 3 needle bind off loosely across all sts. Leave tails to mark WS of bag.
Bag Back - Flap
Cast on 122 (114) sts with MC as for Bag Front, leaving a 30" tail for the seam and placing markers after st 44 (40) and st 78 (74). Do not join in round. Work 4 rows garter stitch. Row 5: Using knitted cast-on, CO 20 sts at beg of row and work Row 1 above. (142/134 sts) Row 6: CO 20 sts at beg of row and work Row 2 above. (162/154 sts) Attach CC, mark RS, work pattern and color changes as for Front until 4 sts remain between markers, ending with awsrow. Next Row: (RS) Work Row 1. (Flap: 98/90 sts, Tab: 90/82) Holding right sides together, work 3 needle bind off loosely across all sts as for Bag Front. Leave tails to mark WS of bag.
Bag Back - Tab
Work as for Bag Front until 14 sts remain between markers, ending with Row 2. Next Row: (RS) Using knitted cast-on, CO 16 sts at beg of row and work Row 1 above. (94/86 sts) Next Row: CO 16 sts at beg of row and work Row 2 above. (110/102 sts) Continue as for Bag Back, maintaining pattern and color changes.
Bag Assembly
With WS together stitch bag sides and bottom together loosely using cast-on tails. Weave in tails. With RS facing, attach CC at top right side seam. Begin picking up stitches from this point and work across top of bag and around flap/tab. Flap Pick-up: With RS facing and circular needle, pick up and knit 40 sts from right side seam to left side seam, 23 sts along flap side, 34 sts across lower edge of flap, and 23 sts along flap side to beg point. (120 sts) Work ICord bind-off. Tab Top Pick-up: With RS facing and circular needle, pick up and knit 40 sts from right side seam to left side seam, 16 sts to tab, 46 sts around tab, and 16 sts to beg point. (118 sts) Work I-Cord bind off.
I-Cord Trim/Bind Off
With working yarn, CO 3 sts at beg of rnd. Work I-Cord bind off across bag top and around flap/tab edges (See Techniques). When all sts have been bound off, k3tog. Break yarn. Pass tail through last st and use tail to work ends of I-Cord into beginning of I-Cord. Weave in tails.
Handle
With MC or CC, CO 5 sts tightly. K six rows. Next Row: Inc in first st, k to last st, inc. (7 sts) Next Row: Work in garter st for 30-40". Next Row: K2tog, k to last 2 sts, k2tog. (5 sts) K six rows. Bind off tightly.
Use Your Stash Version
Work front and back simultaneously on two circulars. Work from both ends of one ball of yarn, changing colors as desired on RS rows only. The two rows before the cast on for the flap/tab should be in the same color as the flap/tab. Work I-Cord bind off and handle in any color.
Felting
Set washer for heavy-duty cycle, low water level and hot water. Add a few drops of liquid laundry soap to the water. Place bag and handle in a zippered bag and drop in the washer. Agitate. Check on both after 10 minutes of agitation, then every 3-5 minutes until they are the desired size. Check handle often for twisting. Reset the agitation cycle if more agitation is needed. Continue with either method listed below to finish the felting process. "Faint of Heart Method": Remove bag and handle from washer and squeeze out excess water - do not wring. Rinse in sink with cool water. Squeeze out excess water, blot with large towel, shape and let dry.
"Living Dangerously in the Spin Cycle Method":
(Disclaimer: Do not attempt this method while talking on the phone, polishing your nails or disciplining children. Undivided attention is an absolute necessity!) Remove bag and handle, let washer proceed to rinse cycle. Agitate both for 10-20 seconds. Stop washer. Reset washer to pump out water and spin. Remove bag and handle from zippered bag and place against washer tub. Once spinning begins, spin for about 20 seconds. Stop washer. Reposition in tub against tub wall. Spin for another 20-30 seconds. Most of the water will be spun out and there should be no unsightly creases. Shape and let dry.
Finishing
Bring end of handle through top of suspender clip. Fold back about 1" and stitch together with matching yarn or thread. Repeat for other end of handle. Clip handle to bag. Attach magnetic closure or sew snap under edge of flap/tab. If desired, sew button or decoration to outside of flap/tab.
Get Creative
The 4-ridge/2-ridge color change is only a suggestion. Try out different combinations for a unique look. Remember to change colors on the right side only and take care to match the front and back. It's easy! P-9 @ 2005. FiberSpace. All rights reserved. Linda Taylor Box 765, Sterling CO 80751 www.fiberspacepatterns.com 09/07


