Ginni MlitteNS by AlexndraRichars
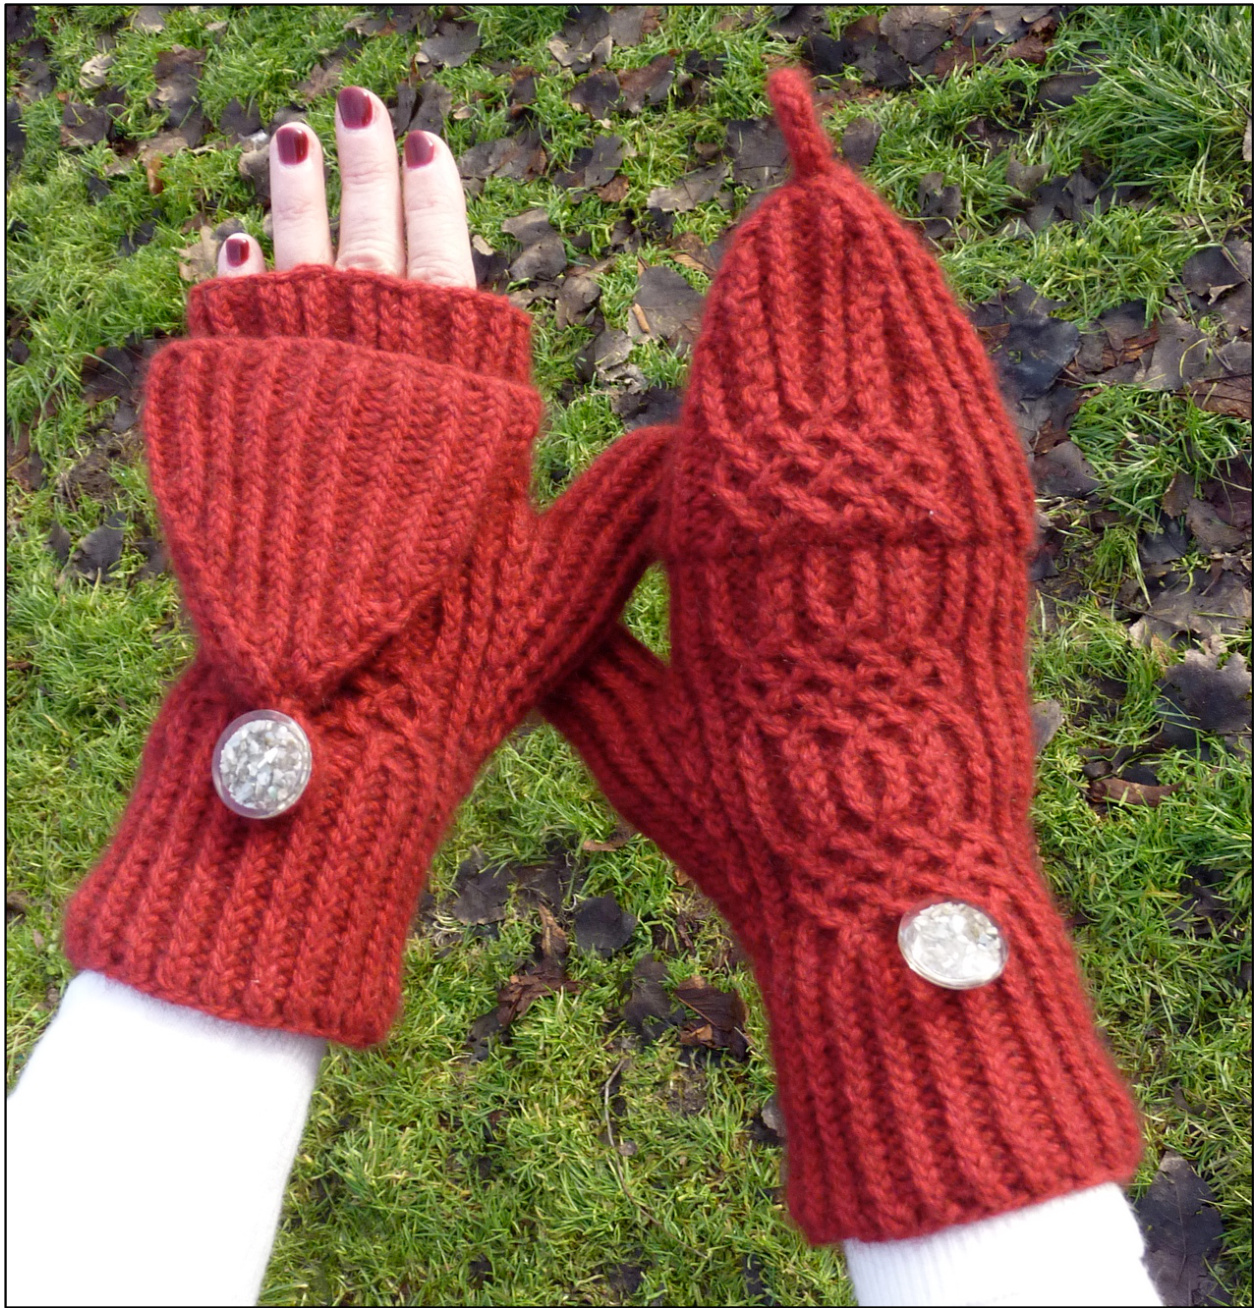
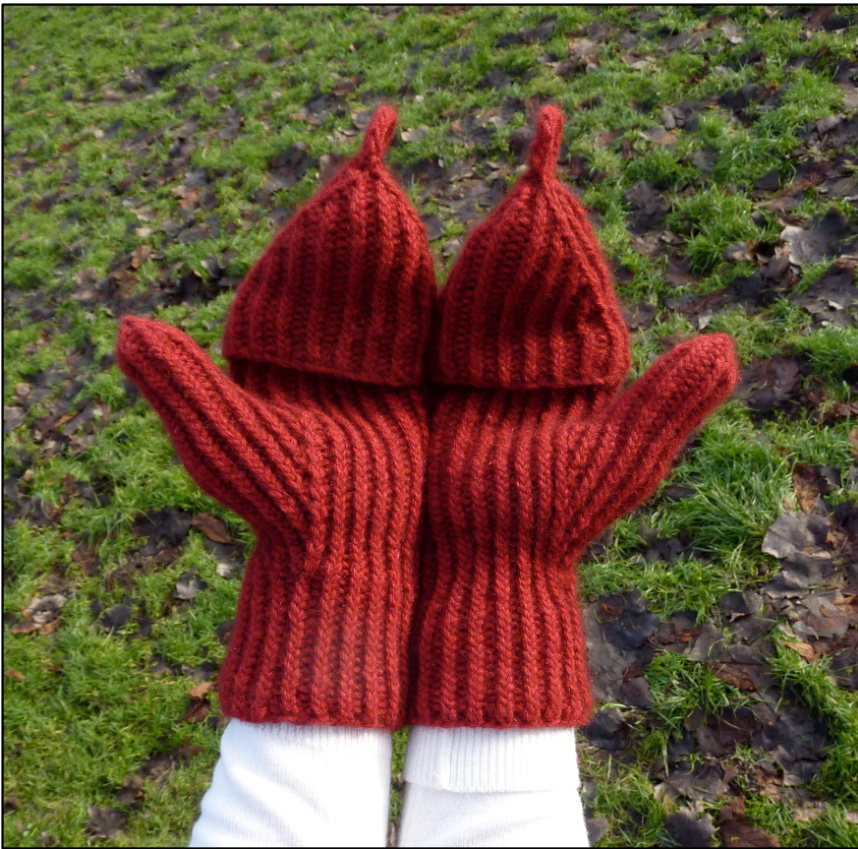
These flip-top mittens are warm and cozy and oh so practical with their button back top. They become fingerless mitts in a snap, making it easy to use your phone or find your keys without exposing your hands to the elements. The crossed stitch pattern flows naturally from the 1/1 ribbing adding structure and beauty to the ribbing. The yarn suggested is spun with possum fur, which is warmer than wool and very Soft.
Requirements
Size: The pattern is the same for both women's and men's medium. Change needle size to make the mittens smaller or larger. The women's size was knit on size 6 US (4mm) needles, which gives mittens 7.5" (4.5mm) needles, which gives mittens 8" (20.3 cm) around the palm, unstretched. The 1/1 rib is very stretchy. Supreme Possum Merino, 8ply (130 yards/120 meters to 50 grams), 2 50g balls; scrap yarn to hold thumb stitches Needles: For women's mittens, size 5 US (3.75mm) and size 6 US (4mm) both in sets of 5 double pointed needles; For men's mittens, size 6 US (4mm) and size 7 US (4.5mm) both in sets of 5 double pointed needles; Small cable needle Two buttons - the size you want for buttoning down the flip top
Gauge
With smaller needles, 26 stitches to 4" (10cm) in K1B, P1 rib, unstretched With larger needles, 24 stitches to 4" (10cm) in K1B, P1 rib, unstretched
Pattern instructions
Note: All knit stitches for these mittens are knit into the back loop creating twisted stitches. In the charts, the knit stitches are all knit into the back loop. With larger set of double pointed needles, cast on 44 stitches. Join for working in the round being careful not to twist stitches. Immediately switch to smaller needles and knit as follows: K1B (knit into the back loop), P1. Repeat for the round. Knit 14 more rounds in K1B, P1 rib. Now change to larger needles and knit one more round in ribbing, for a total of 16 rib rounds for the cuff. Begin charts. For the left mitten, follow Left Mitten chart. Knit the Right Mitten chart for the right hand mitten. The Left and Right charts only show the back of hand stitches and thumb gusset. For the remaining stitches continue in K1B, P1 ribbing.
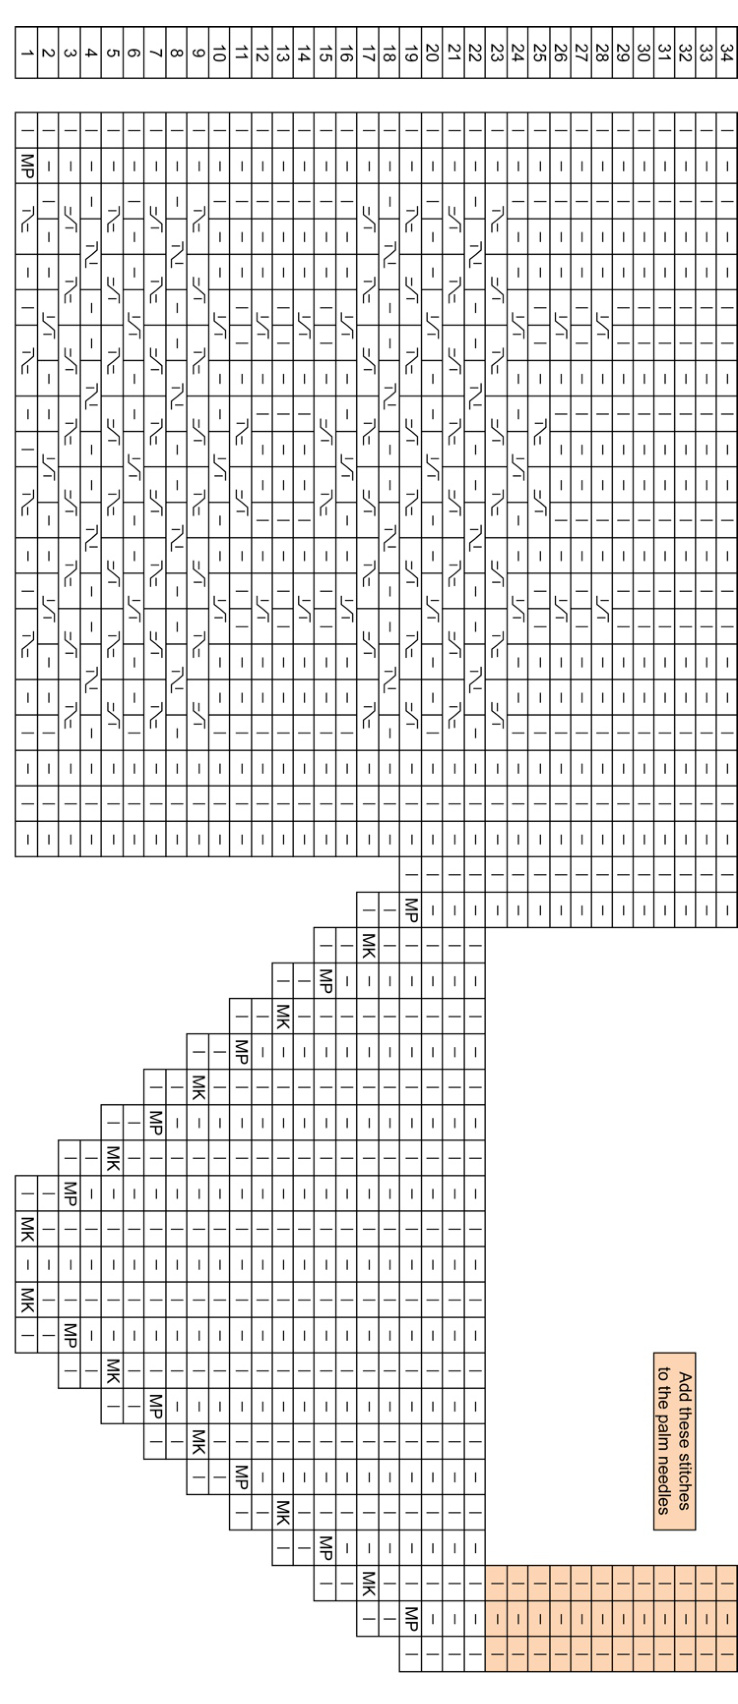
Left Mitten
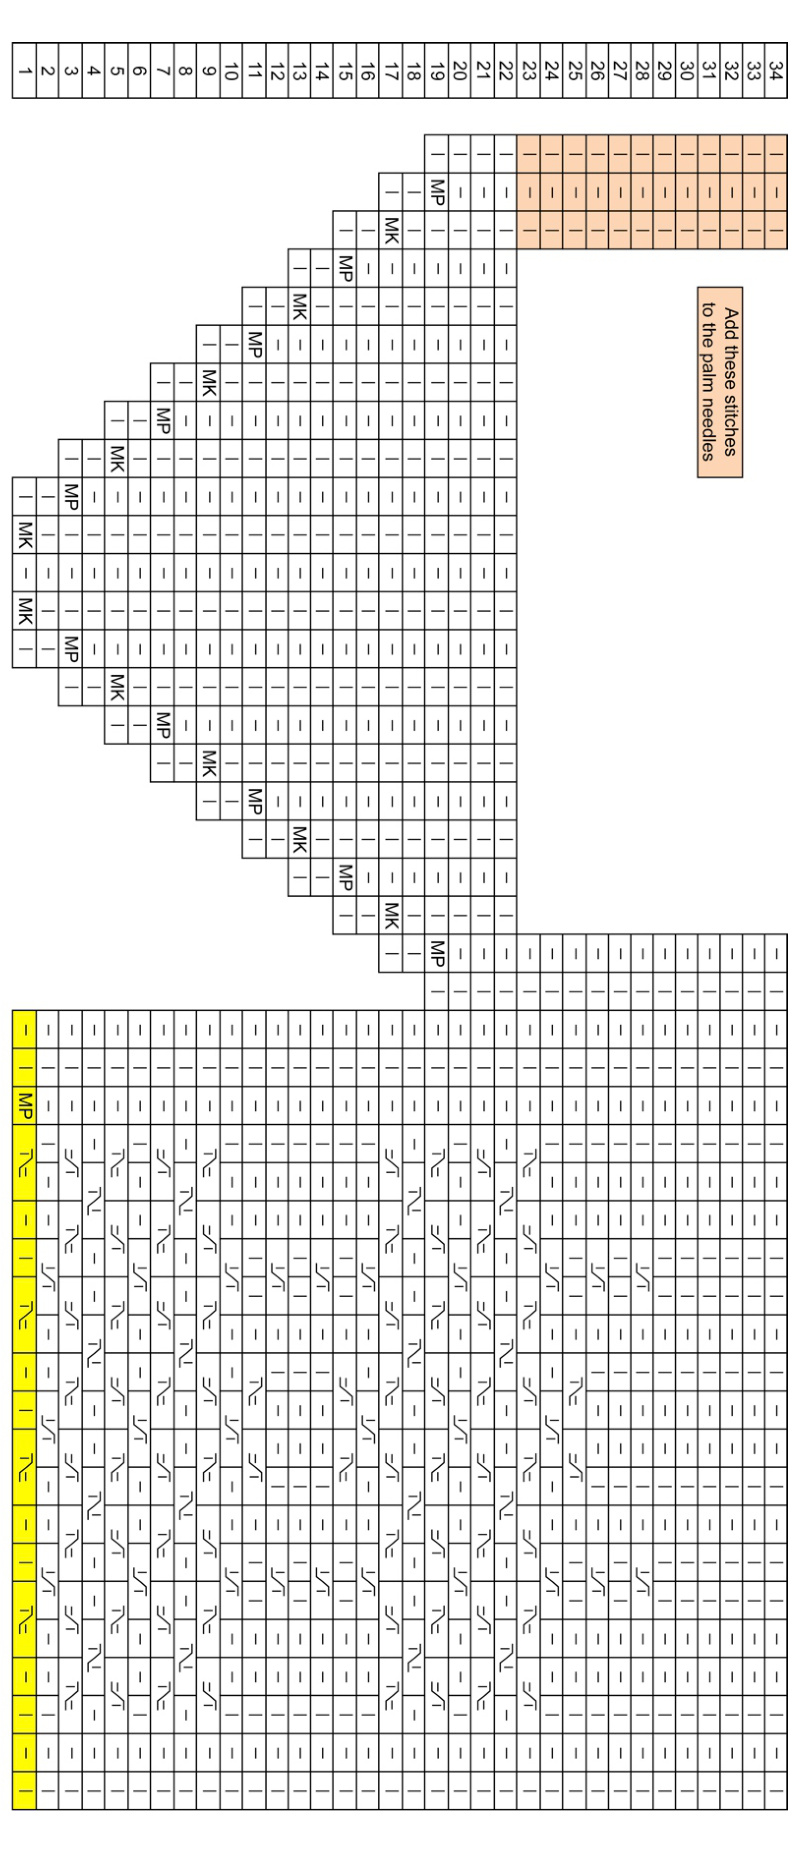
First set up your stitches on your needles: from the beginning of the round, place the next 3 stitches on needle 1 (for the thumb gusset); the next 20 stitches on needle 2 (the back of hand stitches); the next 11 stitches on needle 3; the final 10 stitches on needle 4. The first row of the chart is a set up row for the back of hand. After this round you will have 1 addition back of hand stitch (total of 21) and you will have begun the increases for the thumb gusset (on needle 1). Continue with Left Mitten chart until you have knit round 22. After this round put thumb stitches onto scrap yarn as follows: Knit the first 3 stitches from needle 1 onto needle 4, place the following 18 thumb stitches onto waste yarn, and slip the last 2 thumb stitches onto the back of hand needle (needle 2). 47 stitches now remain. Continue working the back of hand chart to the end and knit the palm stitches in K1B, P1 rib. Bind off all stitches in pattern. Right Mitten Knit the cuff as for Left Mitten. When it is time to begin the Right Mitten chart, set up your stitches on needles as follows: place the next 20 stitches on needle 1 (back of hand needle); the next 3 stitches on needle 2 (for the thumb gusset); the next 11 stitches on needle 3 and the last 10 stitches on needle 4. Follow the chart and instructions as for Left Mitten, moving stitches to palm needle and back of hand needle as shown in the chart. At the end of Right Mitten chart, bind off all stitches. Instructions for the Thumb and Flip-Top are the same for both left and right mittens.
Thumb
Put the 18 thumb stitches onto 3 double pointed needles (6 per needle). Join yarn and knit in K1B, P1 ribbing for 11 rows, or until thumb is 1/4" (.5 cm) below the end of the thumb when mitten is worn. Better a row too long than a row too short! Begin thumb decreases: If you need to rearrange your stitches so that you begin with a K1B stitch, do so now. Dec row 1: (K1B, K2T, K2T, P1) 3 times (12 stitches remaining Dec row 2: knit in pattern Dec row 3: K2T repeat around (6 stitches remaining) Break yarn leaving a tail long enough to weave in the end. Thread tail on needle and run through remaining stitches and pull tight. Weave in end. Use the tail of yarn at the base of the thumb to sew up the gap between thumb and hand and weave in the end.

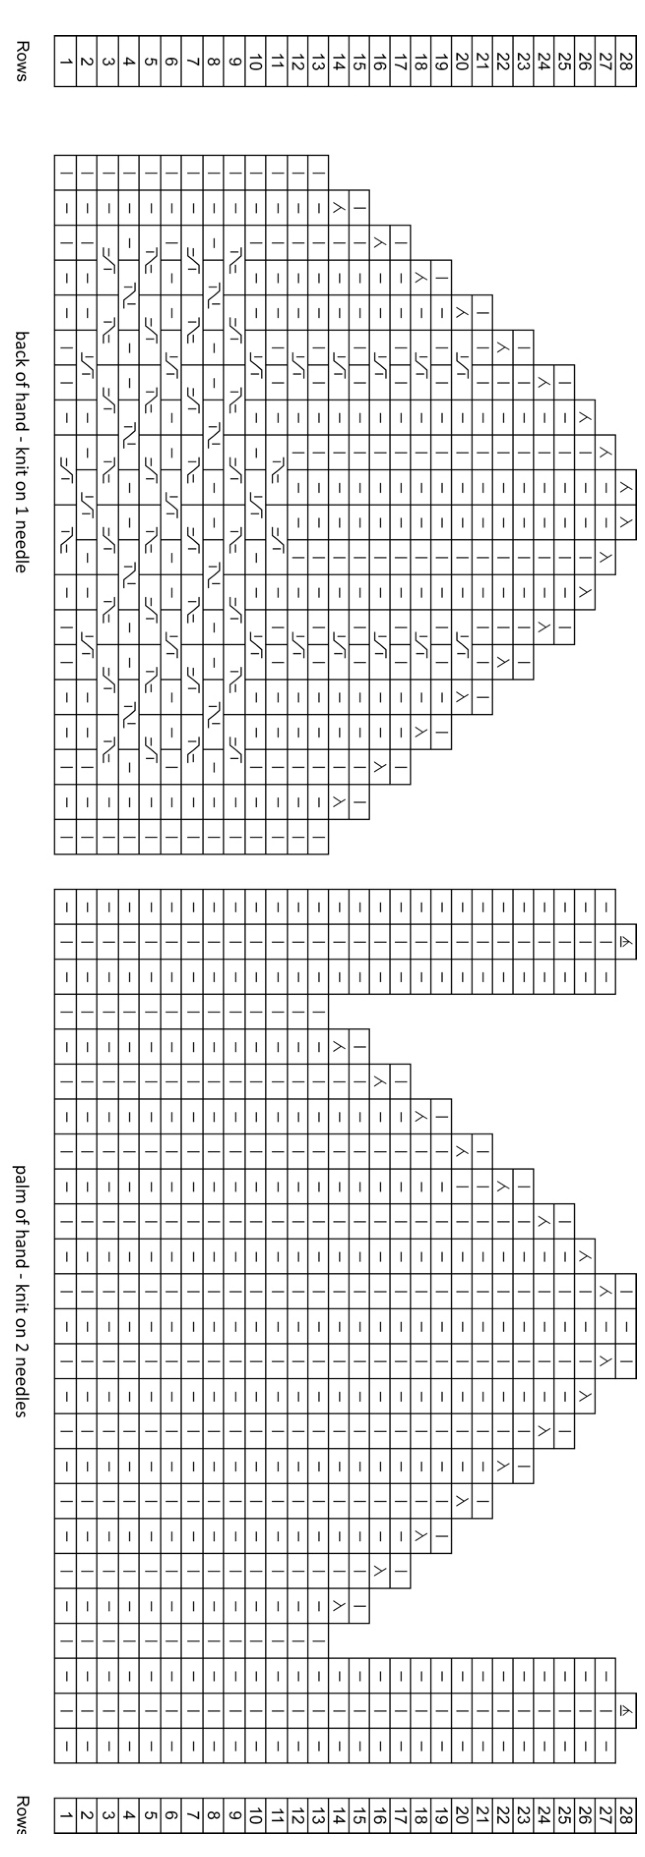
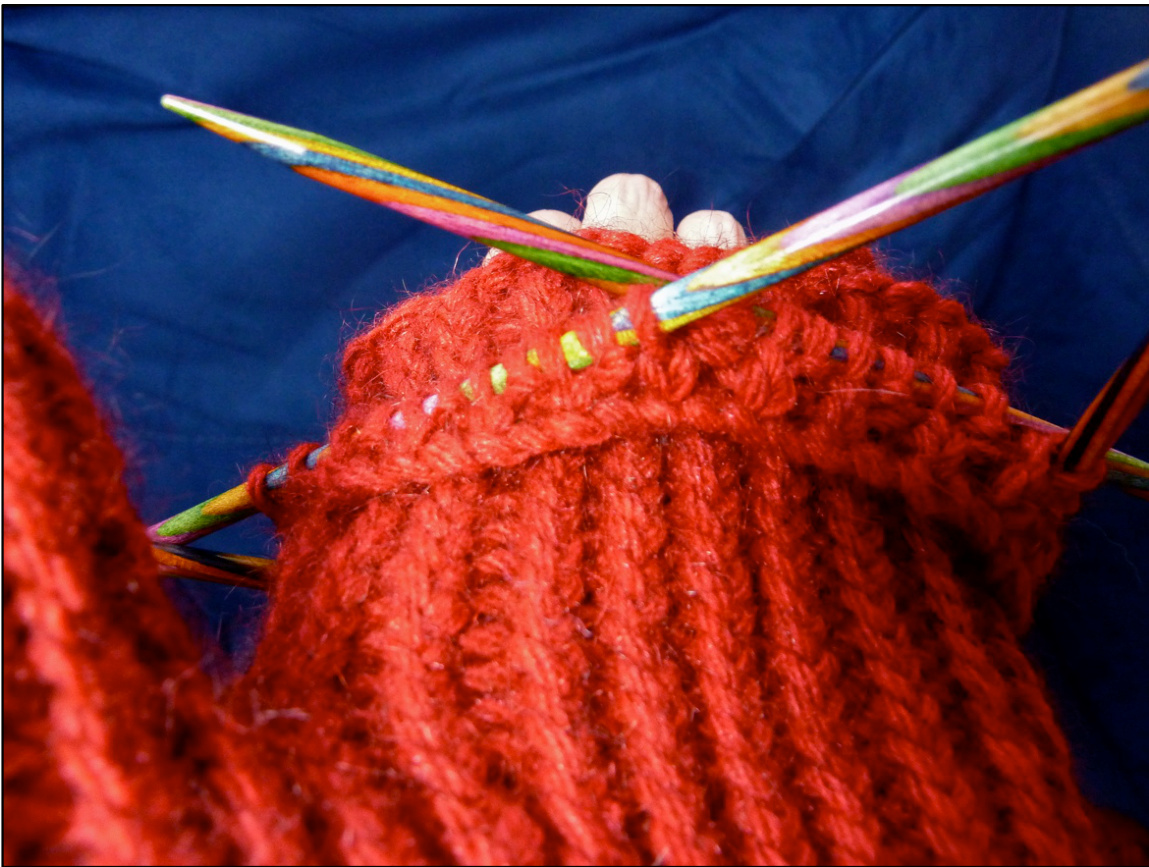
Flip-top The flip-top is made by picking up yarn through the knitted mitten. Mark the center 24 stitches of your mitten using the traveling stitch pattern as the center motif to guide you. Pick up stitches in the mitten 6 rows from the bind off row, which is row 29 of the Right and Left Mitten charts. This is the FIRST row in the mitten charts without crossed stitches. To maintain the pattern continuity, be sure to pick up at that point so as not to leave a gap in the crossed stitch pattern. Thread a needle onto working yarn. From the right side of your knitting, at the right side of the mitten, put needle through your mitten at ONE STITCH to the right of where your first stich will be picked up (thus stitch 25). Leave a very long tail on the inside of your mitten to make sure you have enough yarn to pick up all of the 24 stitches plus enough to weave in at the end. Using a crochet hook to dive into the knitted stitches and pull out a yarn loop can be easier than using a knitting needle. When you have picked up all 24 loops and placed them on knitting needles, continue by casting on an additional 21 stitches onto 2 new needles. These cast on stitches are on the palm side. Use a cable cast on as this provides a sturdy base for the flip top. Turn work and begin knitting the cast on stitches with a P1, K1B\*, repeating for the cast on stitches. Knit the back of hand stitches with the first row of the Flip top chart. Then join to the cast on stitches for working in the round, being careful not to twist your work. (45 stitches in total) This part can be a little awkward but after a few rows it will lay flat and be easier to knit.
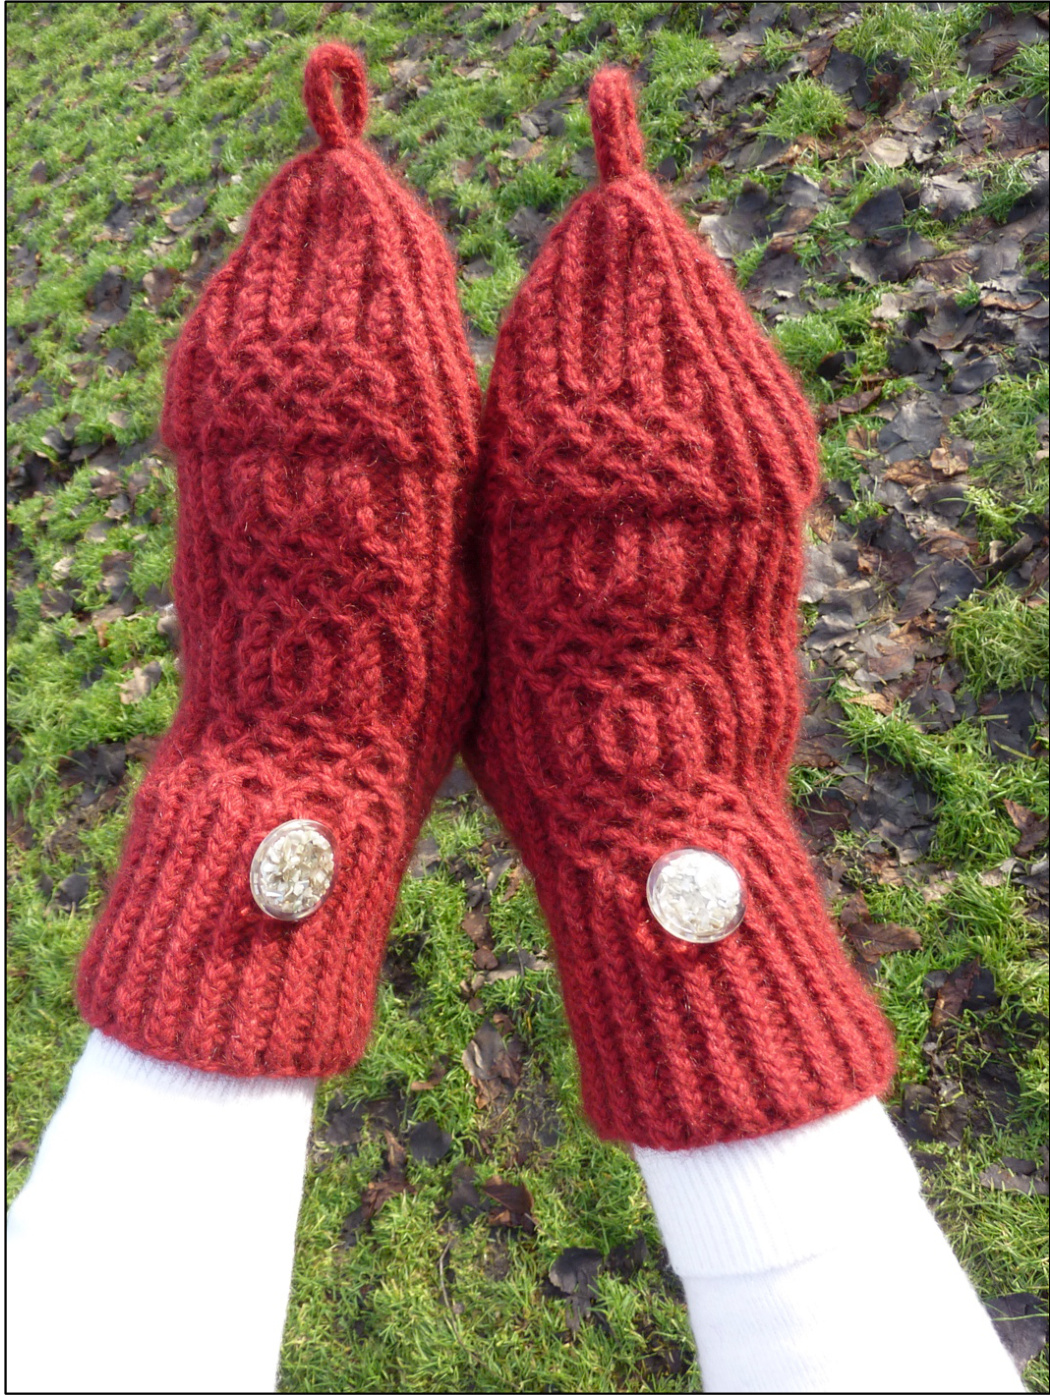
Follow the chart, including decreases, to the end, 7 stitches remaining. Place these 7 stitches on 1 needle as follows: hold the 5 palm stitches (on 1 needle) at the back of work and the 2 back of hand stitches (on second needle) at front of work. Slip these stitches onto one needle, alternating them as follows: 2 palm stitches, 1 back of hand stitch, 1 palm stitch, 1 back of hand stitch, 2 palm stitches. 7 stitches on one needle. Now work: K2T, sl1 K2T pass slip stitch over, K2T. 3 Stitches remaining. Work icord for 11 to 14 rows or long enough to use as a button loop, depending on the size button you have chosen. When the icord is the length you want, K2T, move that stitch back to the left needle and K2T again, cut yarn and fasten off. Sew the end of the icord to the beginning of the icord, making a button loop. Weave in remaining ends. Reinforce the end of the flip-top by making a couple of whip stitches before weaving in the end. Sew on button just below the beginning of the twisted stitch pattern.
Stitches used
I knit, in this pattern knit all stitches through the back loop - purl purl 3 together 入 SSK, slip slip knit 2 together through the back loops knit 2 together cross 2 knit stitches, right stitch in front; slip first stitch onto cable needle and hold in front of work, knit second stitch, then knit the stitch from the cable needle I↑ cross 2 knit stitches, left stitch in front; slip first stitch onto cable needle and hold in back of work, knit second stitch, then knit the stitch from the cable needle =/↑ slip purl stitch onto cable needle and hold in back of work, knit next stitch, purl the stitch on the cable needle = slip knit stitch onto cable needle and hold in front of work, purl next stitch, knit stitch from the cable needle MK make one knit stitch; slip left hand needle under the bar between your needles, from front to back, and knit into the back loop MP make one purl stitch; slip left hand needle under the bar between your needles, from back to front, and purl into the front loop K2T knit 2 together K1B knit 1 through the back loop
Charts
Left Mitten - back of hand and thumb chart: