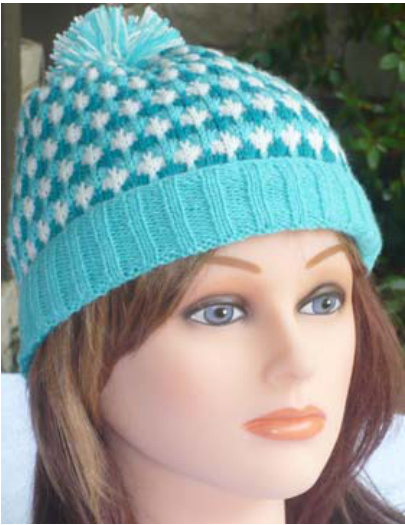
Tri-Color Tuck Hat
n original pattern by Beaded Pony Designs and Ginny Schweiss -
Materials
Standard gauge punchcard knitting machine, with ribber. Silver Reed/Singer/Studio punchcard 3A. Garter bar is essential. Yarn: hat shown is made with Millor Trenzado. Alternative yarns: Bernat Baby Solid; Red Heart: Baby Fingering; Loops & Threads: Sophie; Patons: Beehive Baby, Baby Fab; TammTrenzi; or any other yarn that gives the same gauge. Yarn changer is helpful, but not necessary. Yarn ndl for seaming.
Skills needed
Beginner ribber skills. Alternatives are possible: reformat sts manually or hand knit the ribbing. Ability to make pom-pom.
Dimensions
9.25" long overall; turn up the ribbing to get a hat that is adjustable from about 7.25" to 8.25". 17" circumference easily stretches to 22+".
Gauge
Rib: 10.16 RPI Tuck pat: 7.51 SPl and 17.20 RPI
Directions
COR. Insert Studio/Singer/Silver Reed pc 3A into slot and lock on line 1. CO Crochet CO 123 sts on MB with desired ribbing color, K1R @ SD8, then transfer sts to ribber in 2x2 pattern. Hang ribber COC and 3 large ribber wts. 01 K29R in 2x2 rib with MC @SD6. COR. Transfer all sts back up to MB. Remove 1 weight, leave 2 because tuck pat needs a lot of weight. Add CC yarns to color changer. Change to color changer arm. 30 K1R Stk SD8 in MC to get COL. 31 Change to CC, unlock pc, set cam to Tuck, continue @SD8. 101 You should be on the 4th R of tuck pat. If not, proceed until you are. Follow these instructions exactly to get an invisible decrease: Change carriage to Stk for this row only. Leave pc alone; do not lock it. Every 4t"h ndl: hang st on adj ndl. Using garter bar, move allsts toward center of bed,filing empty ndls. Normally you could use a hand knitting ndl to do this, but it is difficult with tuck st. K1R. 102 Change carriage back to Tuck. Invisible decrease done. Continue in pattern.
Begin top shaping:
Beaded Pony Designs, a.k.a ginjen on Ravelry Beaded Pony Designs 122 Change carriage to Stk. Lock pc. Every 4th ndl: transfer st to adj ndl so that ndls are now aligned in groups of 3. SD4 K3R. Continue working in Stk st from here to end. 125 SD3 K1R. 126 Move middle st of ea group to adj ndl and K2R. 128SD2 K5R 133SD8 K1R
Finish
Cut 3-4' tail. Thread tail through yarn ndl. Beginning on the side opp the tail, run yarn through all sts and remove from km. Do not tighten it yet-that's why the tail is so long. Using CO tail, seam from cuff to top, taking care to reverse the side you're seaming on depending on where you fold up the cuff. Then draw up center top tail as snug as it will go. Tie the two ends tog, hide them in top loops and trim short. Sew a pom-pom on top. If you don't have a preferred method of making one (different ideas are all over the web; different tools are available in craft stores), try my method on the last page.
Abbreviations and notes
\~ Some abbreviations might not be used in this pat adj adjacent BO bind off CC contrast color CO cast on CoC cast on comb config configuration D position holding position; this differs among km brands dec decrease EON everyotherneedle EOS every other st inc increase Kknit km knitting machine K1R knit one row MB main bed (as opposed to the ribber bed) MC main color (same as main yarn) MY main yarn ndl needle opp opposite pat pattern pc punchcard Rrow rep repeat RPI rows per inch SPI stitches per inch st stitch Stk stockinette stitch TD tension dial, sometimes known as SD (st dial); TD5 is Beaded Pony Designs, a.k.a ginjen on Ravelry
Pom-poms made with yarn winder
\~ Something new by Beaded Pony Designs and Ginny Schweiss You will need: yarn (skein, cone, or ball) 4-foot length of the same yarn, doubled ball winder several pencils, dowels, or hand-knitting needles as place holders - an even number long, sharp scissors for initial cut Thread yarn on yarn winder according to its instructions. I use a Silver Reed SHW-3, but any ball winder should work. Each turn of my yarn winder is 3 rotations, so 60 turns equals 180 wraps. Saves a lot of hand wrapping compared to the old "wrap yarn around cardboard" method. Wrap the number of rotations you want, then cut the yarn. When I slide the yarn off the winder, I slide it straight off onto a bundle of four, fat hand-knitting needles. This keeps the ball open and gives me a way to tie the yarn into two equal halves. Take the doubled piece of yarn, slip it around the yarn ball, keeping half the needles (or dowels, or whatever) on one side, and half on the other. It's important to tighten it very tightly. When I get it lined up in the middle, I remove a HK ndl from each side, giving me more room to tighten the yarn. Tie it off. Open scissors and slip into one of the two halves of the pom-pom-to-be. If you can, slide the blade along the HK ndl to guide it. Get it all the way through so you can cut the whole side at once without the center closing up on you. Repeat on other side. Shake pom out. It will appear loose and limp. Don't worry! As you shape it with scissors (l use the long ones but you might prefer a shorter pair for shaping), the shorter you go, the pom loses its limpness and firms up nicely. This might take some trial and error to get the size pom you want. I use 70 wraps of Trenzado yarn (fingering weight, lighter than Bernat Baby yarns) to make a pom-pom for a teen/adult stocking hat. Do fewer wraps w/ thicker yarn.


