Jacquelyn Jefferies Knitting Designs
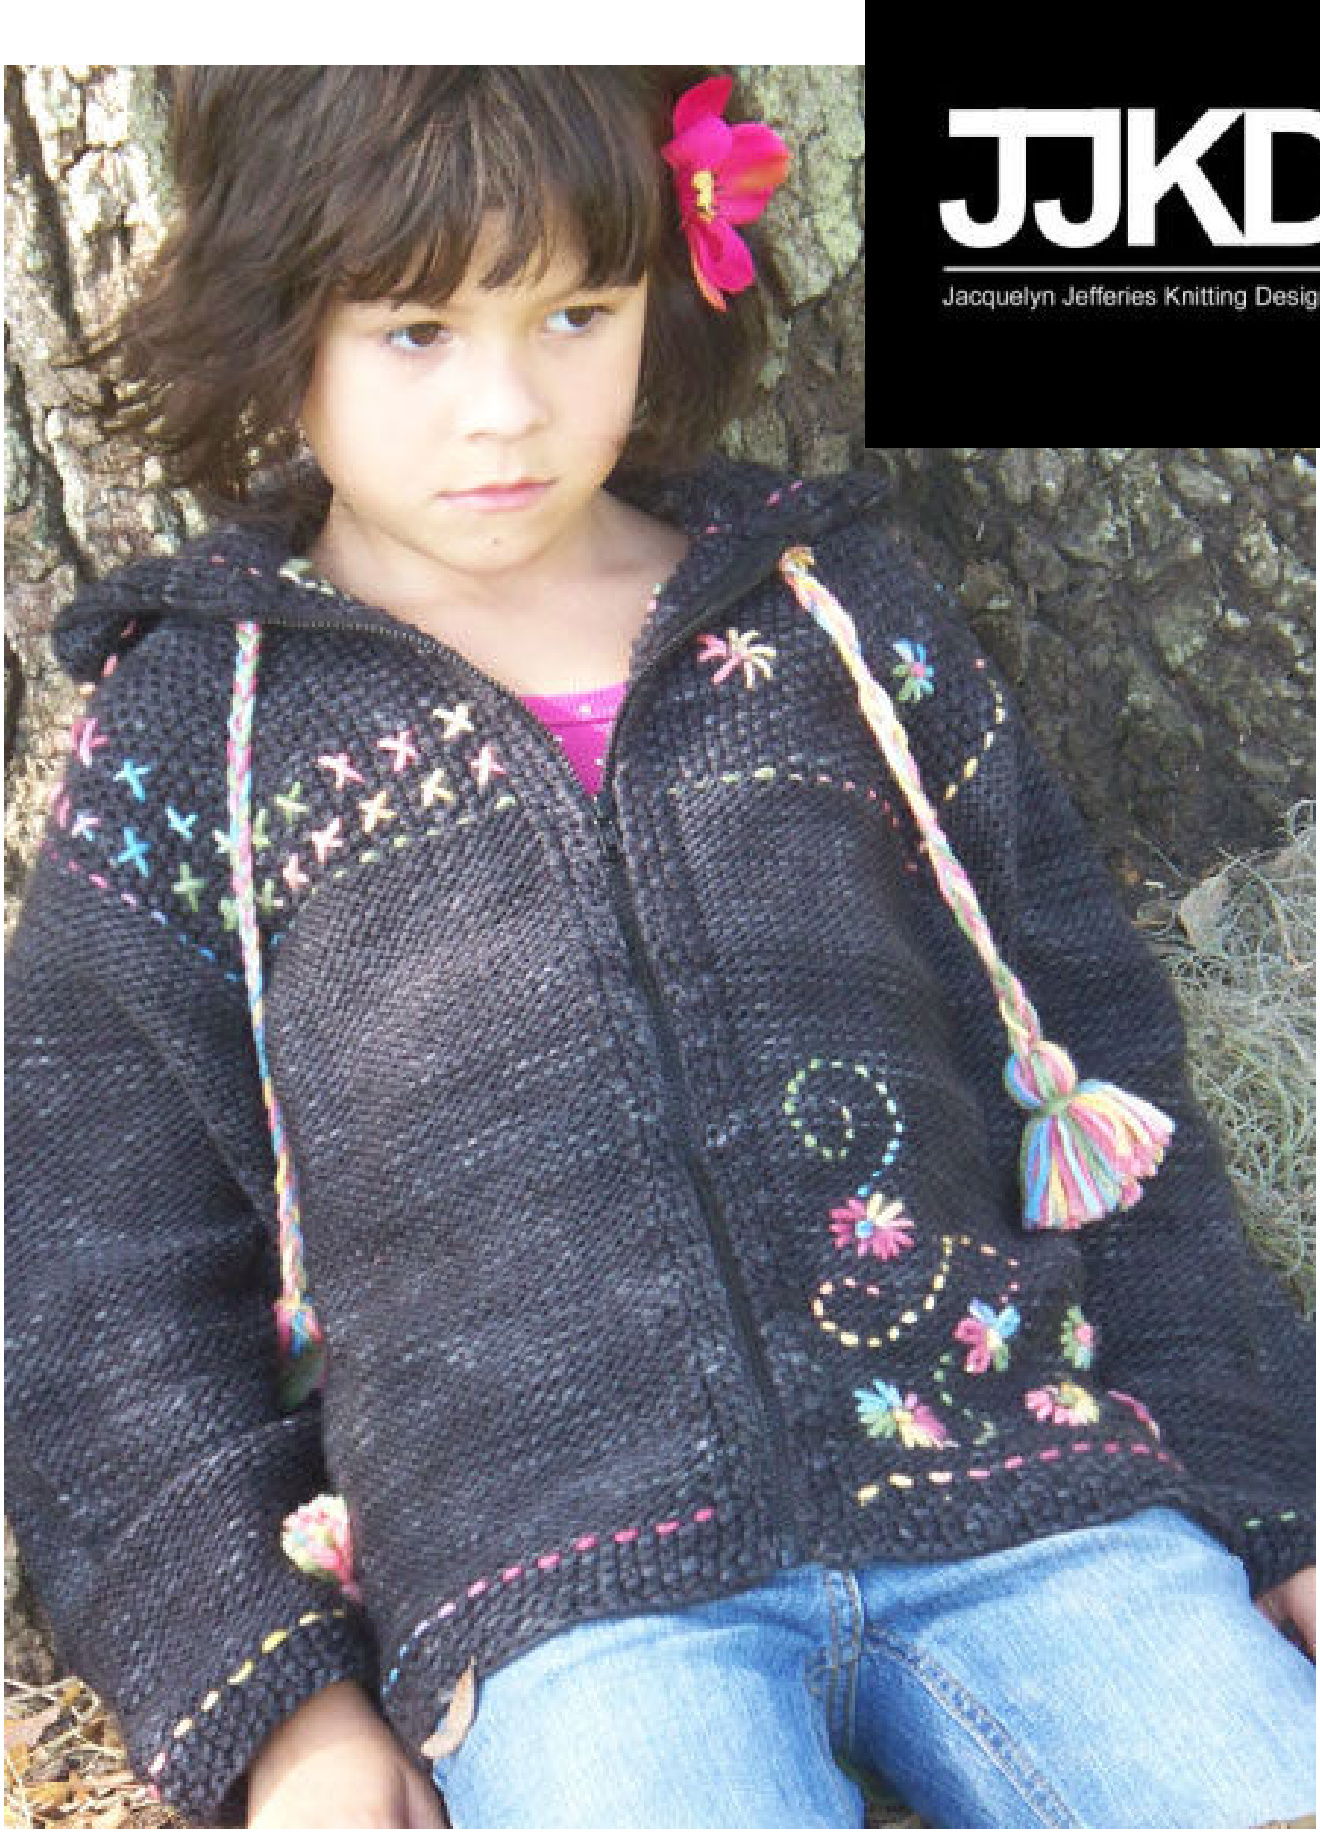
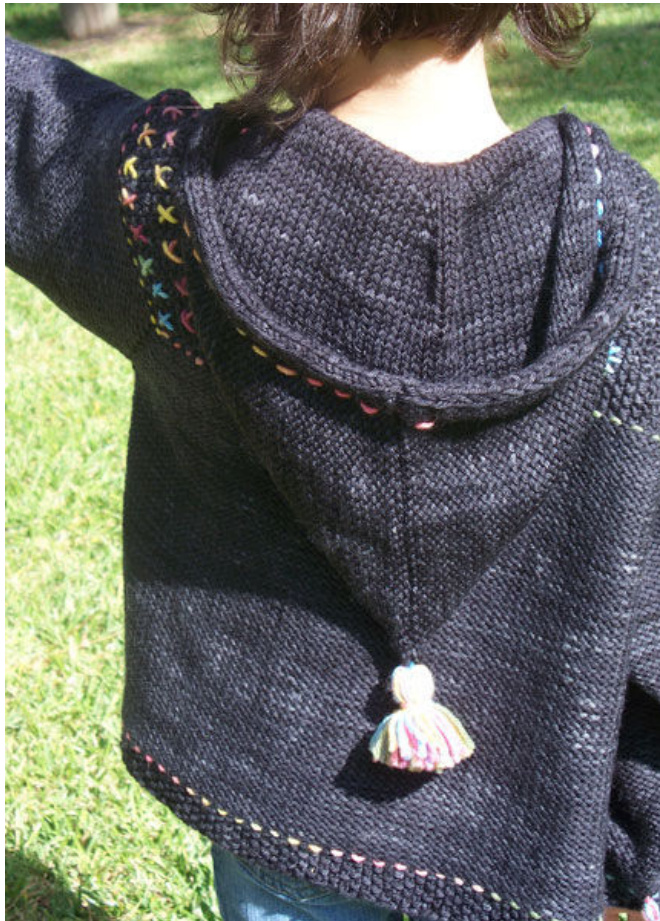
This little cardigan began as a requested by my daughter who (like mom) loves all things Harry Potter. She spotted this little gem which Ginny Weasley wore to the Quidditch World Cup in The Goblet of Fire movie and had to have it. While staying true to the feel of the movie cardigan I have taken liberties with the design and offer it now as a formula design you can customize for you and yours in any size with any weight yarn. This is not just a cardigan for the kiddos! This pattern is worked back and forth from the neck down in one piece. Increases are made in the seed stitch portion of the raglan shaping before and after each marker using a seed stitch increase (SSI). The raglan shaping is completed in Reverse Stockinette and the sleeve sts are placed on waste yarn. The body is completed and bound off. The sleeve sts are picked up and worked to desired length. Sts are picked up at the neck and cast on at both neck edges to form casing for the drawstring. The hood is worked back and forth and seamed at the top. Drawstring casing is folded towards the inside of the hood and seamed with drawstring pinned safely inside. A zipper is sewn in at the front and decorative embroidery completes the cardigan. DIFFICULTY: Intermediate.
SIZE/FINISHEDMEASUREMENTS:
This cardigan is completely customizable. I have provided a chart with standard sizing estimates, but custom measurements will give you the best results. Child sizes 5 [6, 7, 8, 9, 10, 11, 12] to fit 24 [25, 26, 26.5, 27, 28, 29, 30] in chest. Adult sizes 28 [30,32,34,36,38,40,42,44, 46, 48, 50,52, 54,56,58, 60, 62]in. Ch00se size based on the amount of ease you'd like in the garment. 2-4 inches is recommended.
YARN REQUIREMENTS:
Miss Babs Yummy Monochrome Superwash-4 ply (1oo% merino wool; 200 yards [183 meters]/13 g): Obsidian (MC),child sizes: 3 (3, 4, 4 5, 5, 6, 6) skeins; adult sizes: 5 (5, 5, 6, 7, 7. 7, 8, 8, 8, 9, 9, 9, 10, 10, 10, 11, 11) skeins; Miss Babs Yummy Hand-Painted Superwash-4 ply (1o0% merino wool; 200 yards [183 meters]/113 g): Ginny Weasley (CC), all sizes 1 skein NOTIONS: US#7(4.5 mm): 24-36" circular Stitch markers Stitch holders Tapestry needle Waste yarn H-8 crochet hook 3-4 in piece of cardboard Sewing needle Matching thread Separating zipper in appropriate length
GAUGE
Any gauge yarn can be used in a formula pattern. The gauge used in the sample is 18 sts and 24 rows = 4" in Stst.
PATTERN NOTES
When using a handpainted yarn for a large project like a garment that requires more than one skein knit alternately from 2 different balls to avoid pooling or obvious chunks of concentrated colors. Editor's Note - This pattern is well-suited to handpainted yarn; both seed stitch and Rev Stst create α lovely blending effect and help avoid the pooling and flashing that may happen with some handpainteds. Seed Stitch increase (SSl): It is worked by knitting and then purling (or purling and then knitting) into the same stitch. The order in which it is worked is determined by the previous stitch so that the seed stitch pattern remains uninterrupted. To Knit and then purl in the same stitch: Knit the stitch but do not slip it from the needle. Bring yarn to the front between needle tips and purl through the back loop. Slip both sts from the needle. To purl and then knit in the same stitch: Purl the st but do not slip it off the needle. Move yarn to back between the needle tips and knit through the back loop. Slide both sts from needle.
MEASUREMENTS
This customized raglan cardigan is based on the following measurements: CHEST: Measure at the widest point of the chest/bust. Add to this measurement your desired ease (2- 4" is recommended) = neck where you would expect a collar to fit. Hold the tape snug but not tigh LENGTH: Measure from the armpit down to the desired length of cardigan. This is the length of your body. SLEEVE: measure from your armpit to desired sleeve length. If you don't have access to the recipient of the cardigan you can use the following standard measurements (in inches) as a guideline.
| Child Sizes | 5 | 6 | 7 | 8 | 9 | 10 | 11 | 12 |
| Chest | 24 | 25 | 26 | 26.5 | 27 | 28 29 | 30 | |
| Neck | 9.75 | 10 | 10.5 | 11 | 11.5 | 12 | 12.5 | 13 |
| Sleeve | 9.5 | 10 | 11 | 11.5 | 13 | 13 | 14 14.5 | |
| Length | 11 | 11.5 | 12 | 12.5 | 13 | 13.5 | 14 | 15 |
| Adult Sizes (Chest) | 28 | 30 | 32 | 34 | 36 | 38 | 40 42 | 44 |
| Neck | 12.5 | 13 | 13.5 | 14 | 14.5 | 15 | 15.5 16 | 16.5 |
| Sleeve | 16.5 | 16.5 | 17 | 17 | 17 | 17 | 17.5 17.5 | 17.5 |
| Length | 13 | 13 | 13.5 | 14 | 14.5 | 15 | 16 15.5 | 16.5 |
| Adult Sizes (Chest) | 46 | 48 | 50 | 52 | 54 | 56 | 58 60 | 62 |
| Neck | 17 | 17.5 | 18 | 18.5 | 19 | 19.5 | 20 20.5 | 215 |
| Sleeve | 17.5 | 18 | 18 | 18 | 18 | 18.5 | 18.5 18.5 | 18.5 |
| Length | 17 | 17.5 | 18 | 18.5 | 18.5 | 18.5 | 18.5 | 18 19 |
PATTERN CALCULATIONS
Total CO sts: multiply neck measurement X stitch gauge per 1 inch= Back: multiply CO sts X o.4 (round so it's even) = Sleeves (each): multiply CO X o.10= Fronts (each): multiply Back CO x 0.5= A note on Raglan Increases: For kids' sizes and smaller women's sizes (say, up to size 36 or 38" bust) increasing every other row will typically suffice. For larger sizes, you will likely have to speed up the rate of increase so the armhole depth doesn't get too long. Try on your work often and adjust as necessary to get a better fit.
PATTERN
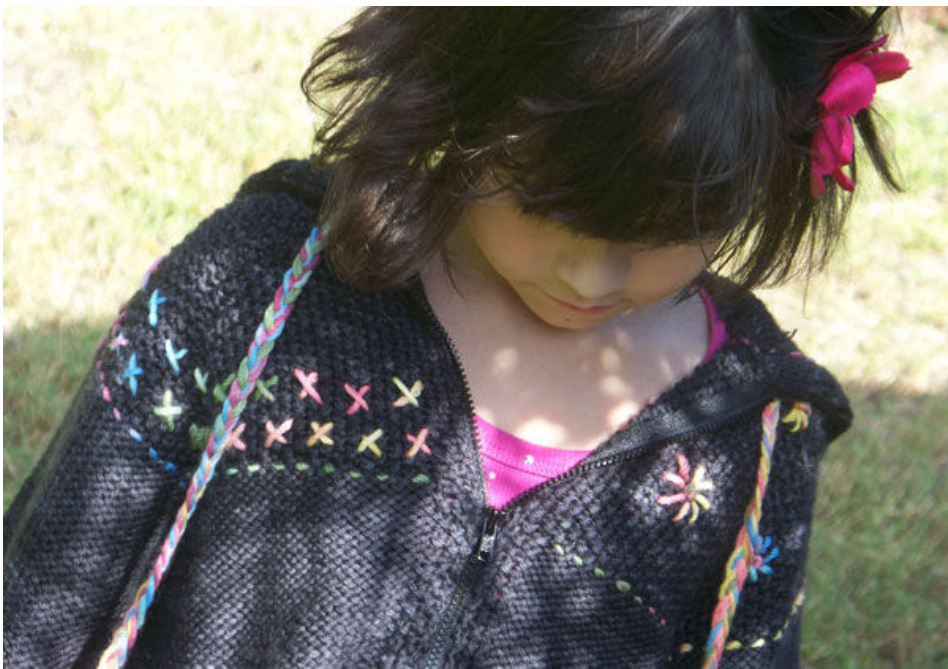
RAGLAN YOKE With US 7(4.5 mm) circular needle CO: left front sts, PM, left sleeve sts, PM, back sts, PM, right sleeve sts, PM, right front sts. (sts should= Total CO sts) Seed stitch worked over an even number of sts: Row 1 (RS): \*K1, p1, rep from \* to end of row. Row 2 (WS): \*P1, k1, rep from \* to end of row. Begin working in seed st. You will work SSlin st before and after every marker on every RS row as follows: Increase row (RS): \*Work in established seed st to 1 st before marker, SSl, sm, SSl, rep from \* three times, cont in established seed stitch pattern to end. Cont working raglan increases in seed stitch until you have reached 1/2to 34 total raglan length. The depth of the seed stitch portion is up to you. Once the seed portion of the yoke is complete you will switch to Reverse Stst (purl on RS, knit on WS) while continuing to work the first and last 3 sts of each row in seed st as follows: Increase row (RS): K1, p1, k1, \*p to 1st before marker, kfb, SM, kfb, rep from \* three times, p to the last 3 sts, k1, p1, k1. Row 2 (WS): K1, p1, k1, kto last 3 sts, k1, P1, k1. Slip sts onto waste yarn and try this portion on to be sure of fit. Return sts to circular needle to begin working body portion.
BODY
re working garment without waist shaping you can omit PM from set up rov Set up row: Work to first marker in established pattern. Remove marker and place sleeve sts on waste yarn, CO 2 underarm sts, PM, CO 2 underarm sts, remove marker, work in pattern to next marker. Remove marker and place sleeve sts on waste yarn, SM, CO 2 underarm sts, PM, CO 2 underarm sts, remove marker, work in pattern to end. Continue working in established pattern until body reaches 1" short of desired length. Work in seed st for remaining 1". If you would like to incorporate waist shaping you'll need a few more measurements: A. First count the total stitches on the needle after set up row. This number is your body stitch count= B. What is your waist measurement? Measure the thinnest part of your waist and add in any ease you want. Multiply this measurement by stitch gauge. This will be the stitch count at your waist after decreasing= C. So how many stitches do you need to decrease? Subtract the waist stitch count from the body stitch count and round so it is divisible by 4 = - D. How many rows do I decrease over? Measure vertically from the point at which you have joined the underarm down to the thinnest part of your waist minus 1 (to accommodate working even portion). Multiply this measurement by row gauge= E. How many decrease rounds? Each decrease round decreases 4 stitches. Divide C by 4=. F. How often to incorporate a decrease round? Divide D by (E-1) and round so it is divisible by 2 = G. What is your hip measurement? Measure the widest point of your hips and add in any ease you want. Multiply this measurement by stitch gauge. This will be the stitch count at your hips after increasing=. H. So how many stitches do you need to increase? Subtract the hip stitch count from the waist stitch count and round so it is divisible by 4 = _ 1. How many rows do l increase over to reach hip width? Measure vertically from the thinnest part of your waist down to the desired hem of the garment. Subtract from this measurement the amount of space you want to work even before reaching desired length (2-3 inches is usually the norm). Now multiply this by the row gauge=. ase rounds? Each increase round increases 4 stitches. Divide H by 4=- K. How often to incorporate a decrease round? Divide I by (J-1) and round so it is divisible by 2 = Now break down your measurements into instructions.
WAISTDECREASES
Decrease Row (RS): K1, p1, k1, \*p to 2 sts before M, p2tog, SM, p2tog, rep from \* once, p to last 3 sts, k1, P1, k1. Row 2 (WS): K1, p1, k1, kto last 3 sts, k1, p1, k1. Rep Decrease Row every (F) rows(E) times. Work WS rows and all other RS rows in pattern as established. After all decrease rows are completed, work even in pattern for 1 inch
HIP INCREASES
Increase Row (RS): K1, p1, k1, \*pto 1st before MiR, p1, SM, p1, MiL, rep from \* once, pto last3 sts, k1, p1, k1. Row 2 (WS): K1, p1, k1, k to last 3 sts, k1, p1, k1. Rep Decrease Row every (K) rows (J) times. Work WS rows and all other RS rows in pattern as established. After allincrease rows are completed, work even until reach i" short of desired length. Work in seed stitch for remaining 1".
SLEEVES
Place sts from waste yarn on smaller circular needle or DPN's. PUK 2 sts from underarm, PM, PUK 2 sts from underarm, join to work in round. Make note of your stitch count. Next determine how often to decrease for a tapered sleeve. Refer to sleeve measurement (the length from your armpit to desired sleeve length) and multiply by row gauge to determine the actual number of rounds to be worked over the sleeve= For example: let's say your sleeve measurement is 11 inches multiplied by a 6 row per inch gauge to get 66 total rounds inthe sleeve. Generally decreasing every 4th, 5th, or 6th round is about right. The next step is to divide your total rounds by the different rates of decrease to determine cuff circumference. Once you have determined cuff circumference you'll be able to decide which rate of decrease you prefer. For example: (66 total rounds) divided by (decrease every 4th round) = 16.5 total decreases. Round this numberto17. Now you need to multiply this number by the sts decreased per decrease row. 17 total sleeve decreases X 2 stitches per decrease round= 34. Now subtract this number from the starting number of sleeve sts from above. Let's say your sleeve sts totaled 64 after picking up underarm sts. 64 beginning sleeve sts-34 total sts decreased=3osts. Divide by the stitch gauge to determine sleeve circumference. 30 remaining sleeve (cuff sts) divided 4.5 sts per inch= 6.66 inches. Compare this measurement to your wrist/ wrist measurement. Repeat this calculation for the other rates of decrease if you want a looser cuff. Work in Rev Stst pattern and decrease 1 st before and after marker on every 4th, 5th, or 6th round for a tapered sleeve. Continue working in established pattern until sleeve reaches 1 in short of desired length. Work remaining inch in seed stitch.
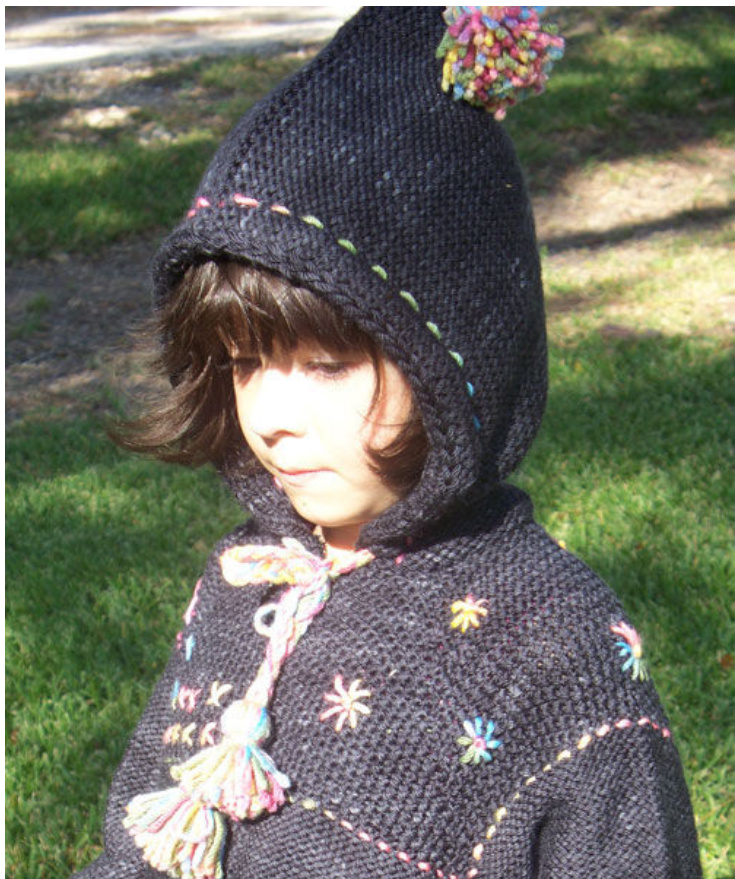
HOOD
CO 4 sts, with RS facing PUK sts from neck (same as CO number), CO 4 sts. Row 1 (WS): Sl1, P3, sl1, k1, yo, kto 1 st before marker, kfb, SM, k2, SM, kfb, kto last 6 sts, yo, k1, p5. We didn't place any markers above. Row 2 (RS): Sl1, k3, sl1, p to last 5 sts, k5. Row 3: Sl1, P3, sl1, kto 1 st before marker, kfb, SM, k2, SM, kfb, k to last 5 sts, p5.
Rep last 2 rows 7-8 times for child, 1o times for adult. Next: Sl2, P3, sla, k to last 5 sts, P5. Next: rep row 2 Work last 2 rows until hood is long enough to reach over the top of the head comfortably. Work to center of row, and with WS facing use Kitchener stitch or 3-needle bind off to close top seam.
FINISHING
DRAWSTRING Cut 3-6 lengths of CC yarn measuring 36-5o". The length of the drawstring should be long enough that it measures twice the length from top to neck of the hood plus whatever length you'd like your drawstrings to be plus 4in to use to tie tassel. Tie a tidy knot in one end and braid the length of the drawstring. Tie off end of braid
DRAWSTRING CASING
The extra sts cast on at the edges of the neck will be folded over toward the inside of the hood to form the casing for the drawstring. Thread the braided drawstring through the two eyelets on the first row of the hood and pin the casing around the drawstring. With MC and a yarn needle stitch the casing closed. Take great care not to stitch the drawstring down or it will not function.
TASSELS
Drawstring tassels- Using a 5" piece of cardboard and CC wrap around 10-25 times or until tassel is as fat as desired (keep track of the number of wraps you use). Cut wraps along the bottom edge of the cardboard. Fold these pieces in half over the braided drawstring 4 in/1ocm from the end. Tie the drawstring firmly around the group of yarn in a knot. Now tuck a tied end of the braid into the center of the tassel so that when you wrap the neck it becomes bound within and hidden. Using a separate strand of yarn, wrap the neck of the tassel tightly a few times then tie it firmly. Using a yarn needle bring each tail under the group of wraps and down through the center of the tassel. Repeat for other end of drawstring. Make a third tassel for the hood using a 2o in/5icm piece of CC to bind in place of the braided drawstring. Using the center tie of the tassel attach this tassel to point of hood. Make 2 smaller (mini) tassels for each sleeve cuff using a 4 in/ 1ocm piece of cardboard. Set aside.
DECORATIVEEMBROIDERY
Embroidery is used to border the waist and sleeve hems, the seed stitch portion of the yoke and the hood. You can make this as plain or as fancy as you like but don't stress over perfection. Molly Weasley certainly wouldn't. SLEEVE CUFFS - Use a basic running stitch and work a horizontal row beginning on the Stst portion of the sleeve. Working over one stitch and under the next will allow you to keep stitches uniform. BODY HEM - Use a basic running stitch and work a horizontal row beginning on the Stst portion of the sleeve. Working over one stitch and under the next will allow you to keep stitches uniform. On the right front portion above running stitches, stitch several simple flowers. I added a few curlicues in a simple running stitch to embellish. YOKE - Use a basic running stitch and work a horizontal row to separate seed stitch portion from reverse Stst. Stitch more simple flowers on the right seed stitch portion of the front, sleeve and onto the back. On the right front, sleeve, and back portion work two rows of crossed stitches. FLOWER - I use 2 simple flowers, a Shasta daisy and a lazy daisy. SHASTA DAISY - use long straight stitches that all begin from a general center point to create a circular flower similar to a daisy. Next you will make a French knot in the center of the flower. LAZY DAiSY - bring needle and yarn up from center point and push needle back down close to where it emerged from fabric. Pull on the yarn slowly, and when the loop that's left on the front is the size you want your flower petal to be, bring the needle back up through the work where you want the end of the petal to be, and make a short stitch here over the petal yarn to tack it in place. Repeat to make petals all around center. Next you will make a French knot in the center of the flower. FRENCH KNOT FLOWER CENTER - Bring needle up through the empty center circle. Hold the yarn down where it emerges with the left thumb and encircle the yarn twice with the needle (see A). Still holding the yarn firmly with your thumb, twist the needle back to the starting point and insert it close to where the yarn first merged (not in the exact place or it will simply pull back through). Pull the needle through to the back, leaving a small knot on the surface, as shown. You can also attach a bead in place of the French knot for the center of the daisy. CROss STITCH - make an x by stitching from bottom left to top right, then from top left to bottom right. If you're new to embroidery, the Embroiderers' Guild has a great set of tutorials: French knot, running stitch, lazy daisy, and_cross stitch
ZIPPER
Pin the zipper securely to either side of the front so that the bottom is even when the zipper is closed. Work with the zipper open for the remaining steps. With a contrasting thread baste it onto cardigan fronts so there is no wiggling while you are sewing. Running stitches in the center of the zipper tape work best so as not to interfere with the edge or the space closest to the zipper teeth where you'll be sewing (this step is purely functional and doesn't have tobepretty). Now with the WS facing sew the zipper to the cardigan front in a vertical line along the space right next to the zipper teeth. Try to let the needle grab the yarn as you backstitch rather than having these stitches show through the front. It looks neater in the end. Now sew the outer edge of the zipper tape with the RS facing. The smaller the stitches the less likely they will show. Remove the basting and repeat the process for the other side. Weave in any remaining ends. Block
easley Girl ? 2008 Jacquelyn Jefferies. All rights reserved
This pattern is available for personal use only. No unauthorized reproduction, in whole or in part, or distribution of pattern is allowed. No commercial reproduction of garments or patterns by Jacquelyn Jefferies is allowed without prior permission from the designer. Direct any inquiries to IIKDesigns@hotmail.com


