c. 2015 by Margaret Maclnnis
MATERIALS
Yarn 45 g aran weight—I used Vanna's Choice. Needles: I use 4.5 mm or Us 7 needles for a gauge of 16 st in 4 inches/10 cm in garter stitch Hook: 4.5 mm or US G Yarn Needle Stitch markers: 4
STITCH KEY AND ABBREVIATIONS
K2tog: knit 2 stitches together; right leaning decrease of one Ssk: slip as stitch as if to knit it, slip another, slide the left hand needle into the front of both sts and simultaneously knit them together through the back; left leaning decrease of one LST: Left special slip twist: interesting stitch that sounds harder to do than it is. Start by inserting needle into second stitch from the BACK, and knit it by pulling a loop through as normal, but don't drop the stitch off the needle. With the pulled through loop still on the right needle, DiP the right needle tip into the first stitch on the left needle as if to purl it, and SLIP that stitch to the right needle—while DROPPING the second stitch off. As I said, try it, sounds harder than it is. You will get a nicely crossed stitch with the top one slipped and elongated a little. RST: Right special slip twist: the easy way—-slip next st to cable needle, hold in back. Slip next st purlwise to right needle, knit the st from the cable needle. The harder but quicker way—-poke right needle as if to purl into second st, twist your wrist and the needle, knit into the first st, pull the loop up between both needles, and drop the 1't st while allowing the second st to remain on the needle. PM: place stitch marker Yo: yarn over the needle (aka yrn in English knitting), an increase of one that makes a nice decorative hole (p)Vinc: knit (or purl if indicated) into the axis or stitch on the row below (if it's got a purl bump on it, you use that. If it's got a V shape base, use the right side of that). Then knit (or purl) the stitch itself. An increaseof one. M1: make one stitch by using the crossbar between two stitches (the stitch just made on the right, and the stitch coming up on the left). This does not 'use' a stitch. Pick the crossbar up with the tip of your right needle, put it on your left needle, and knit into the back of it. P2tog: purl two stitches together Sl1-k2tog-psso: slip one stitch as if to purl, k next 2 stitches together, pass the slipped stitch over the k2tog stitch. A double decrease. SI2-k1-p2sso: slip two sts tog as if to knit them, k1, pass two slipped sts over the knit st as a unit. A centered, double decrease. Yf: yarn forward Yb: yarn back
INSTRUCTIONS
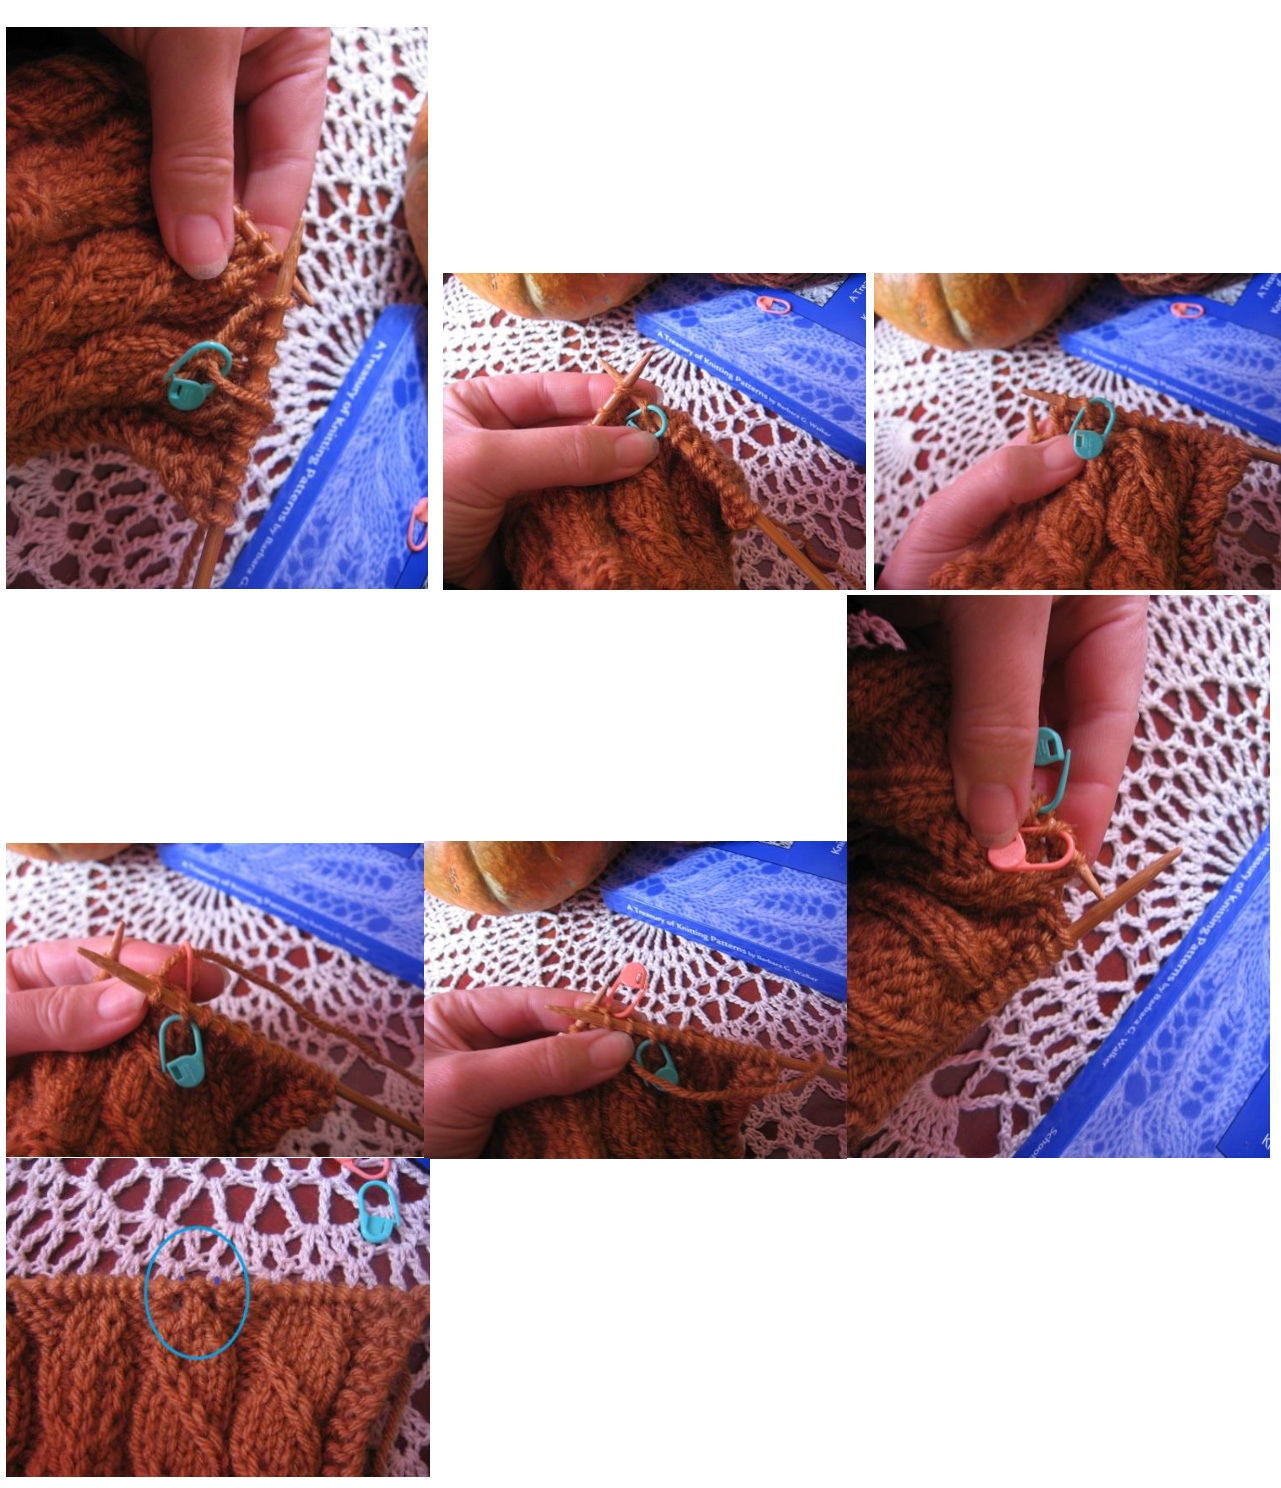
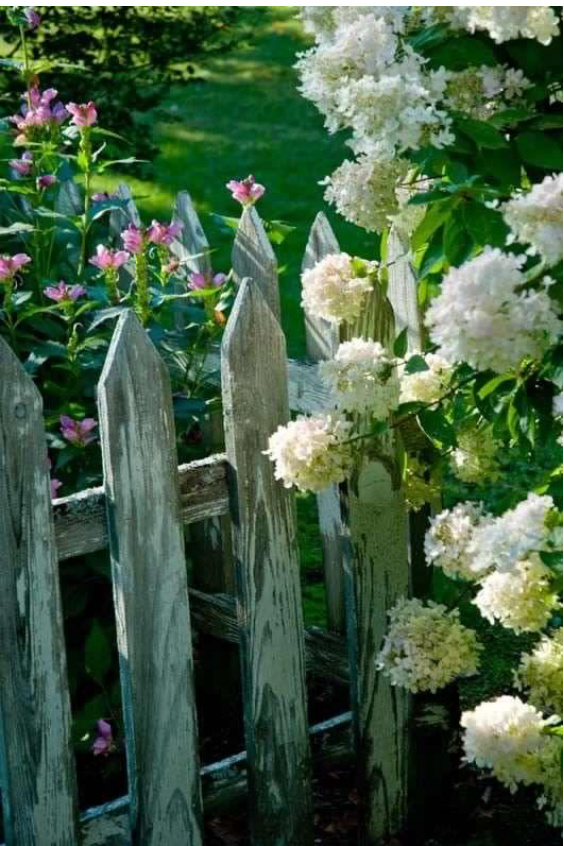
Cast on 33 sts Rows 1-3: knit Note: slip stitches as if to purl unless otherwise noted. Please also note that when increasing with Vinc/pVinc, that uses a stitch. Work the increase AND the stitch itself. Row 4: WS k2, PM, (Vinc, p2, pVinc, p1) ×2, (k2, p2, pVinc, p1)×2, (Vinc, p2, pVinc, p1) x1, k2, PM, k2 (41 sts) Row 5: RS k2, p2, (LST, k3, p2) × 2, (RST, sl 1, LST), p2, (k3, RST, p2) x 2, k2 Warning: When purling through the 5 st twist section, be careful to separate the two stitches of the twists. Row 6: WS k2, (k2, p5) x 5, k4 Row 7: RS k2, p2, (k1, LST, k2, p2) x 2, (sl 1, k1, sl 1, k1, sl 1), p2, (k2, RST, k1, p2) x 2, k2 Row 8: As Row 6 ow 9: k2, p2, (k2, LST, k1, p2) x 2, (sl 1, k1, sl 1, k1, sl 1), p2, (k1, RST, k2, p2) x 2, k2 Row 10: As Row 6 Row 11: k2, p2, (k3, LST, p2) x 2, (sl 1, k1, sl 1, k1, sl 1), (p2, RST, k3) x 2, p2, k2 Row 12: As Row 6 Rows 13-20: Rep Rows 5-12 Row 21: RS k2, p2, (LST, k3), PM, p2, ssk, k1, k2tog, p3, sl1, k1, sl 1, p3, ssk, k1, k2tog, p2, PM, (k3, RST), p2,k2 (37sts) Row 22: WS k2, (k2, p5), k2, (p3, k3) twice, p3, k2, (p5, k2), k2 Tutorial Photos for ROw 23 are at end of pattern. Row 23: Note: the keep yf' and 'keep yb' are intended to make small diagonal lines, which su form smaller holes' in Row 24 than a traditional yo would. k2, p2, (k1, LST, k2), p2, \*keep yf, p2sso, keep yb\*, p1, then yf as normal and p2, sl 1, k1, sl 1, p3, rep \* to \*, p1, then yf as normal and p1, (k2, RST, k1), p2, k2 Row 24: Note: ensure you work the lines of yo that were formed when yb/yf were kept in Row 23. Note: If you wish to 'purl over the tips of the fence boards, just for this row, might make them a litt peaky. k2, (k2, p5), (k8, p3, k8), (p5, k2), k2 Row 25: k2, p2,(k2, LST, k1), p2tog, p6, k1, (yo, k1)x2, p6, p2tog, (k1, RST, k2), p2, k2 (37 sts) Row 26: k2, (k2, p5), (k7, p5, k7), (p5, k2), k2 Row 27: RS k2, p2, (k3, LST), (p2tog, p5, k2, yo, k1, yo, k2, p5, p2tog), (RST, k3), p2, k2 (37 sts) Row 28: WS k2, (k2, p5), (k6, p7, k6), (p5, k2), k2 Row 29: k2, p2, (LST, k3), (p2tog, p4, k3, yo, k1, yo, k3, p4, p2tog), (k3, RST), p2, k2 Row 30: k2, (k2, p5), (k5, p9, k5), (p5, k2), k2 (37 sts) Row 31: k2, p2, (k1, LST, k2), (p2tog, p3, k4, yo, k1, yo, k4, p3, p2tog), (k2, RST, k1), p2, k2 Row 32: k2, (k2, p5), (k4, p11, k4), (p5, k2), k2 (37 sts) Row 33: k2, p2, (k2, LST, k1), (p2tog, p2, k5, yo, k1, yo, k5, p2, p2tog), (k1, RST, k2), p2, k2 Row 34: k2, (k2, p5), (k3, p13, k3), (p5, k2), k2 Row 35: k2, p2, (k3, LST), (p3, ssk, k4, yo, k1, yo, k4, k2tog, p3), (RST, k3), p2, k2 Row 36: rep Row 34 Row 37: k2, p2,(LST, k3), (p3, ssk, k3, yo, k3, yo, k3, k2tog, p3), (k3, RST), p2, k2 (37 sts) Row 38: rep Row 34 Row 39: k2, p2, (k1, LST, k2), (p3, ssk, k2, yo, k2tog, yo, k1, yo, sk, yo, k2, k2tog, p3),(k2, RST, Row 40: rep Row 34 Row 41: k2, p2, (k2, LST, k1), (p3, ssk, k1, yo, k2tog, yo, k3, yo, ssk, yo, k1, k2tog, p3), (k1, RST, k2), p2, k2 Row 42: rep Row 34 Row 43: k2, p2, (k3, LST), (p3, sk, k1, yo, ssk, yo, k3, yo, k2tog, yo, k1, k2tog, p3),(RsT, k3), p2, k2 (37 Sts) Row 44: k2, (k2, p5), (k5, p9, k5), (p5, k2), k2 Row 45: k2, p2, ssk, k1, k2tog, (p5, k1, yo, ssk, yo, sl1-k2tog-psso, yo, k2tog, yo, k1, p5, ssk, k1, k2tog, p2, k2 Row 46: k2, (k2, p3), (k6, p7, k6), (p3, k2), k2 Row 47: k2, p2, work \* to \* from Row 23, (p6, k1, yo, ssk, k1, k2tog, yo, k1, p6), work \* to \* from Row 23, p2, k2 Row 48: Note: ensure you work the lines of yo that were formed when yb/yf were kept in Row 23. If you wish to 'purl' over the tips of the fence boards, just for this row, might make them a little more peaky. k14, p5, k14 Row 49: k2, p12, k1, yo, sl2-k1-p2sso, yo, k1, p12, k2 Row 50: k15, p3, k15 NOTE: Before you continue and decide how many rows you need to do, please block or lightly steam from back to flatten block to 8.25" wide and measure from bottom as well; should be 7.5 to 7.75". The final 4 rows add about .75", so you 'could' add 2 more rows here if needed if you are short.
Rows 51-53: k33
Bindoff onw54ifdesird,orprcedtCrocht
CROCHET BORDER FOR 9" KNIT BLOCKS: Aran-weight
instructions—-goal 27-28 sl stitches per side, including corner st Using crochet hook, pull a loop through between first and second knit rows, on the right. I like to take the hook out and re-orient that stitch, too...(if you are on the left edge, work from there—it doesn't matter. Work from \*\* and come back around. You will have to move your stitches to another straight if you are working with straights, in order to access the other end when you come around.) Slip first st onto hook, yo, slip through both stitches LOOSELY (corner st made), slip next st onto hook, yo, slip through. \*Slip next 2 sts onto hook, yo, slip through LOOSELY. (Slip next st onto hook, yo, slip through LOOSELY) 5 times.\* Repeat \* to \* to last 6 sts. Continue slipping until 28 sts are reached (including corner st at beg of row), dec again if necessary. \*\*Slip last st from needle onto hook. Insert hook into between last two rows on the left(just under the edge thread there), pull up a loop and slip through alloops on hook (corner st made). When hooking between the rows on the sides, just hook under the first thread, don't go too deeply. Rotate. Working between garter ridges or between seed st edge rows, slip into each in turn. About every 5 or 6 or even 7 stitches, also slip into the row itself using the first 'bump'. If you think about it, this stitch count and the number of increases will depend on how many rows in your complete project. I worked 54 rows—-so I will have 27 spaces, necessitating once increase along the sides, and a decrease five times along the top and bottom—-on the bottom, I just skip stitches instead of working two together (with 33 stitches coming down to 28, leaving one stitch for the other side corner). The goal is to make the count the same on all four sides. On the top and bottom, decrease (or skip on cast-on edge) as necessary. My personal goal is 27 or 28 stitches per side (including corner st) for the aran-weight blocks. Count ahead and determine how many you have to decrease or increase to achieve that, and work the decreases or increases as evenly spaced as you can. Working LOOsELY is mandatory for working the sc or hdc edge after; you'll thank me. SC or HDC edge: Depending on your size required, work a round of sc or hdc. Do this: slip into first st, ch 1, 3 sc in first st, sc in each st, 3 sc in corner sts around. If the block is already 9", fasten off. The sl st edge will be adequate for the crocheters to join with your work. I work 3 sc in each corner st, with a final count of 30 sts per side, or 120 for the block. Finish your last st with an Invisible Join to the first. Resist the urge to MASH it together, work the nice join and finish with pride. Weave in ends securely.