Cabled Hood/Neck Warmer v2 By Rose Brown
CONSTRUCTION NOTES
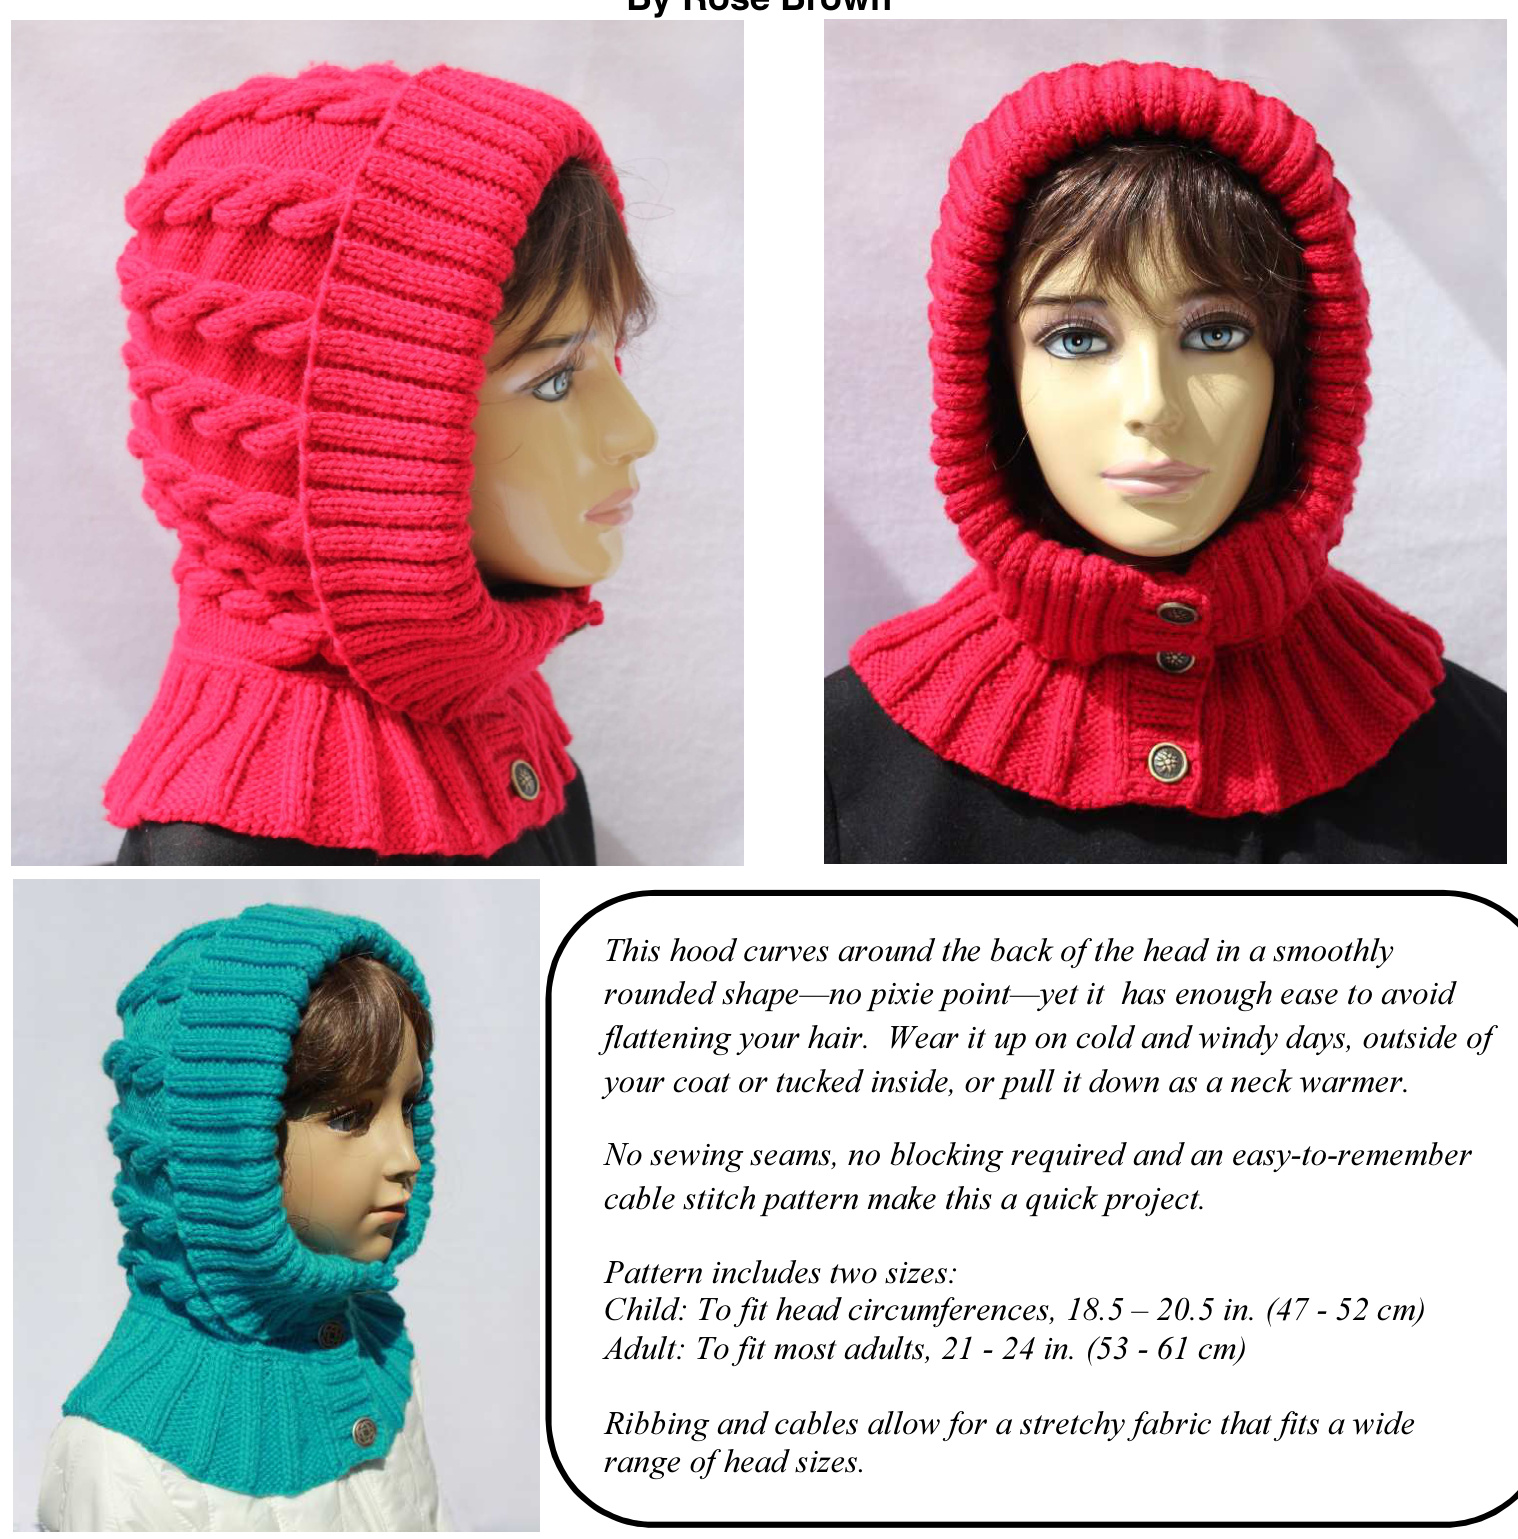
This relaxed-fitting hood is worked from front to back (from the face edge to the back of the head) after a provisional cast on, in the shape of a wide rectangle with small extensions at each side of the front edge. When the rectangle is folded in half and seamed up the back, the extensions curve under the chin. Decreases near the back edge of the hood give it a rounded shape, and three-needle bind off joins the seam. The provisionally cast on stitches around the face are retrieved to add a ribbed, fold-back cuff. Stitches are picked up around the neck edge to add ribbing that flares over the shoulders. Finally, stitches are picked up in front to add button and buttonhole bands. SIZES Child: to fit head circumferences 18.5 to 20.5 inches (47 to 52 cm) Adult: to fit most adult head circumferences, 21 to 24 inches (53 to 61 cm) Variations for Adult size are shown in square brackets.
YARN
3 [4] skeins Cascade 220 Superwash Aran; 150 yds/137.5 m per 100 g skein; 100% Superwash Merino wool. Samples shown in colors 849/Dark Aqua and 809/Really Red. Hood requires approximately 390 [470] yds / 360 [430] m of Aran weight yarn. Finished weights of Child and Adult samples shown, using Cascade 220 Superwash Aran: 255 [305] g
NEEDLES
One 24- or 32-inch (60 or 80 cm) circular needle in size US 8 (5.0 mm) or size needed to obtain stockinette gauge One circular needle, any length, used only for three-needle bind off
GAUGE
19 stitches & 26 rows = 4" / 10cm in Stockinette stitch with gauge needle. 27 stitches & 26 rows = 4" / 10cm in CABLED STITCH PATTERN, unstretched, with gauge needle.
NOTIONS
Cable needle, blunt tapestry needle, 3 removable stitch markers, 2 stitch holders or double pointed needles to temporarily hold 17 stitches, waste yarn and crochet hook for provisional cast on, row counter (optional). Three 3/4" / 19 mm buttons.
SKILLS USED
Increase and decrease, cables, pick up and knit, provisional cast on, three-needle bind off. Links are provided on last page for demonstrations of provisional cast on and three-needle bind off.
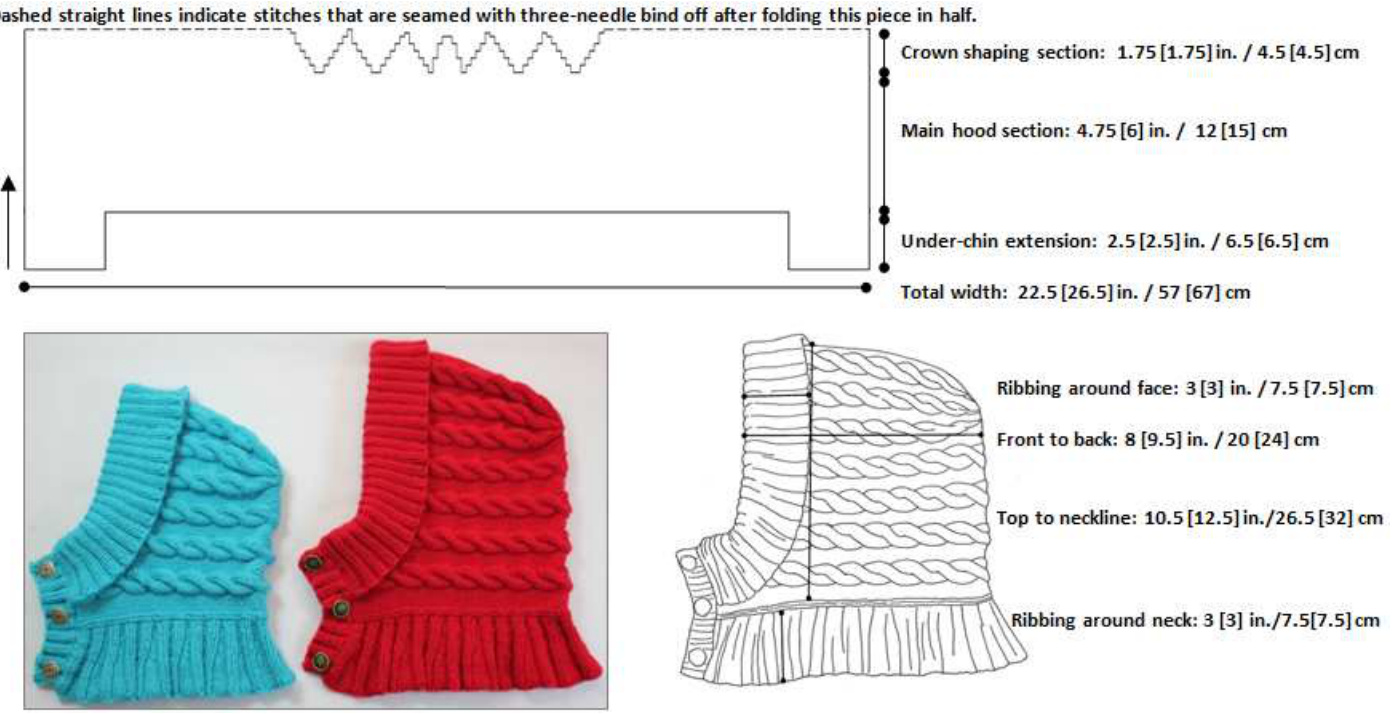
SCHEMATIC and FINISHED MEASUREMENTS (shown with cables relaxed)
INSTRUCTIONS
LEFT UNDER-CHIN EXTENSION
Using gauge needle, cast on 17 sts. Work the following 8 rows, as shown in chart: Rows 1, 3, 5 & 7 (WS): P2, k1, p6, k6, p2. Rows 2, 4 & 6 (RS): K2, p6, k6 p1, k2. Row 8 (RS): K2, p6, C6B, p1, k2.
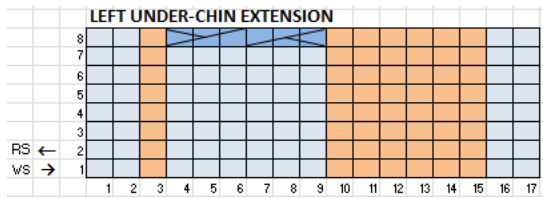
Repeat Rows 1-8 one time. Cut yarn, leaving a tail for finishing. Place sts on a stitch holder or double pointed needle and set aside.
| C6B | Purl on RS,Knit on | SA | |||||||||||
| C6F | Knit on RS, Purl on WS |
RIGHT UNDER-CHIN EXTENSION
Using gauge needle, cast on 17 sts. Work the following 8 rows, as shown in chart: Rows 1, 3, 5 & 7 (WS): P2, k6, p6, k1, p2. Rows 2, 4 & 6 (RS): K2, p1, k6, p6, k2 Row 8 (RS): K2, p1, C6F, p6, k2.
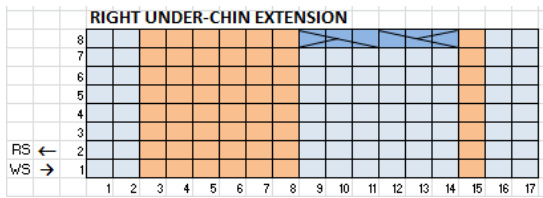
Repeat Rows 1-8 one time. Do not cut yarn because it will be used when continuing on to join the two extensions to the Main hood section. Place sts on a stitch holder or double pointed needle and set aside.
MAINHOODSECTION
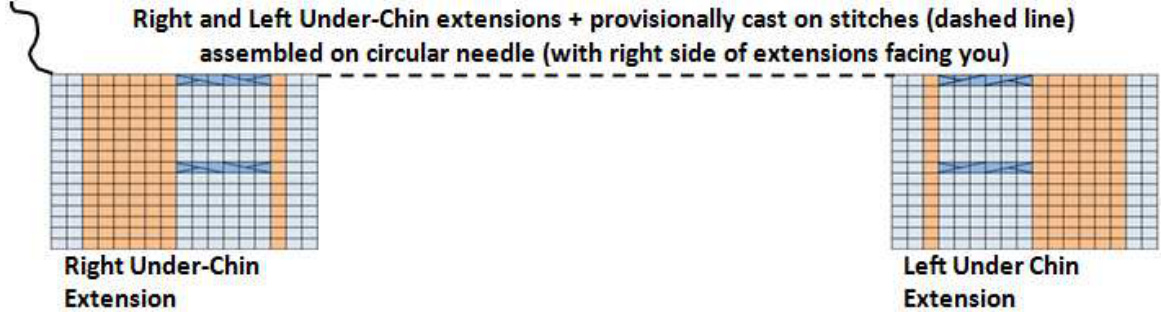
Using waste yarn and a crochet hook, provisionally cast on 120 [144] sts onto your circular gauge needle. Assemble the two extensions at the ends of the circular needle as follows: · Hold the circular needle so that the last stitch of the provisional cast on is at the left end. This is to ensure that you will be able to unravel the provisional sts from that end. With the right side of the Right under-chin extension facing you (the one with the working yarn still attached) slide these sts from the holder or double pointed needle onto the left end of the circular needle. With the right side of the Left under-chin extension facing you, slide these sts from the holder or double pointed needle onto the right end of the circular needle. The assembled sections should look like the diagram below. Notice that the working yarn is still connected to the Right under-chin extension. You will be connecting the two extensions to the 120 [144] sts in the middle when you work the Setup row across all 154 [178] sts.
Setup Row (WS): Using the yarn still attached to the Right Under-Chin Extension, this row starts by working across those 17 sts, then continues across the provisional cast on sts in the middle, and finally across the 17 sts of the Left Under-Chin Extension, as follows: p2, k6, p6, knit across to last 14 sts, p6, k6, p2. Total 154 [178] sts. Place a marker on the needle between the two center sts. There will be 77 [89] sts each side of marker. This marker will help to indicate which way the cables are crossed in the Main hood section: before the marker one way, after the marker the other direction. Next8rows: Rows 1, 3 and 5 (RS): K2, p6, \* k6, p6; repeat from \* until 2 sts remain, k2, slipping marker as you come to it. Rows 2, 4, 6 and 8 (WS): P2, k6, \* p6, k6; repeat from \* until 2 sts remain, p2, slipping marker as you come to it. Row 7 (RS): K2, \* p6, C6B; repeat from \* until 3 sts before marker, p3, slip marker, p3; \* C6F, p6; repeat from \* until 2 sts remain, k2. These 8 rows comprise the CABLED STITCH PATTERN. Repeat the CABLED STITCH PATTERN 2 [ 3] times. Next 6 rows: Work Rows 1 through 6 of CABLED STITCH PATTERN.
Crown Shaping Rows
The next 12 rows, which must start after Row 6 of the CABLED STITCH PATTERN, have decreases worked in the center 66 sts to achieve a rounded shape at the back of the hood. Place two more markers on the needle, each one 33 stitches away from the center marker, to indicate the center 66 sts. Then remove the center marker. When working the crown shaping rows, slip these 2 markers as you come to them. To make it easy to pay attention to these center sts, the table below gives directions divided into the beginning, center and end of each row, followed by the number of center sts remaining after the row. Work the 12 crown shaping rows as follows:
| CROWNSHAPINGROWS | ||||
| Row | Beginning of Row | Center Stitches | End of Row | Center Sts Remaining |
| 1(RS) | k2, p6; * C6B, p6, repeat from * to marker. | (C6-5B, p2tog, p4) 2x; C6-5B, p6, C6-5F; (p4, p2tog, C6-5F) 2x | p6; * C6F, p6, repeat from * to last 2 sts, k2. | 56 |
| Note: To work C6-5B, slip next 3 sts onto cable needle and hold inbackofwork,knit 3from left needle,thenfromcable needleknit 2 sts together,knit 1. To work C6-5F, slip next 3 sts onto cable needle and hold in front ofwork, from left needle knit 2 sts together, knit 1, then fromcableneedleknit3. | ||||
| 2 (WS) | p2, k6; * p6, k6, repeat from * to marker. | (p5,k5) 2x; p5,k6, p5; (k5, p5) 2x | k6; * p6, k6, repeat from * to last 2 sts, p2. | 56 |
| 3(RS) | k2, p6; * k6, p6, repeat from * to marker. p2, k6; * p6, k6, | (k3, k2tog, p2tog, p3) 2x; k3, k2tog, p6, ssk, k3; (p3, p2tog, ssk, k3) 2x | p6; * k6, p6, repeat from * to last 2 sts, k2. | 46 |
| 4(WS) | repeat from * to marker. | (p4,k4)2x; p4,k6, p4; (k4,p4) 2x | k6; * p6, k6, repeat from * to last 2 sts, p2. | 46 |
| 5(RS) | k2, p6; * k6, p6, repeat from * to marker. | (k2, k2tog, p2tog, p2) 3x; p2tog, ssk, k2; (p2, p2tog, ssk, k2) 2x | p6; * k6, p6, repeat from * to last 2 sts, k2. | 34 |
| 6 (WS) | p2, k6; * p6, k6, repeat from * to marker. | (p3,k3) 2x; p3, k4, p3; (k3, p3) 2x | k6; * p6, k6, repeat from *to last 2 sts, p2. | 34 |
| 7 (RS) | k2, p6; * k6, p6, repeat from * to marker. | (k1, k2tog, p2tog, p1) 2x; k1, k2tog, p4, ssk, k1; (p1, p2tog, ssk, k1) 2x | p6; * k6, p6, repeat from * to last 2 sts, k2. | 24 |
| 8 (WS) | p2, k6; * p6, k6, repeat from * to marker. | (p2,k2)2x; p2,k4,p2; (k2,p2) 2x | k6; * p6, k6, repeat from * to last 2 sts, p2. | 24 |
| 9 (RS) | Don't overlook the p2tog shown inbold here. | (k2tog, p2tog) 2x; k2tog, s2pp, p1, k2tog; (p2tog, k2tog) 2x | Don'toverlookthe p2tog shown in bold here. | 12 |
| k2; * p6, C6B, repeat from * to 6 sts before marker, p2, p2tog, p2. | Note: To work s2pp, with yarn in front slip next 2 sts purlwise to right needle; purl next st, then pass the two slipped sts over st just purled. | p2, p2tog, p2; * C6F, p6, repeat from * to last 2 sts, k2. | ||
| 10(WS) | p2; * k6, p6, repeat from * to 5 sts before marker, k5. | (p1, k1) 3x; (k1, p1) 3x | k5; * p6, k6, repeat from * to last 2 sts, p2. | 12 |
| 11(RS) | k2; * p6, k6, repeat from * to 5 sts before marker, p5. | (k2tog) 6x | p5; *k6, p6, repeat from * to last 2 sts, k2. | 6 |
| 12(WS) | p2; * k6, p6, repeat from*to 5 sts before marker, k5. Remove marker. | s2pp, p1, slip the st just purled back onto the left needle; turn the work around so that the RS is facing you (The purled stitch is now on the right needle); pass the two sts next to that purled st over it, one at a time, and off the right needle. Turn the work around again so that the Ws is facing you; with yarn in back, slip that purled st back to the right needle. Note: To work s2pp, with yarn in front slip next 2 sts purlwise to right needle; purl next st, then pass the two slipped sts over st just purled. | Remove marker. k5;* p6,k6,repeat from * to last 2 sts, p2. | 2 |
After Row 12 there will be a total of 88 [112] stitches. Place the first 44 [56] stitches on a second circular needle. Fold the work in half with right sides together. Your gauge needle is now in front with the remaining 44 [56] stitches. Using the left end of the front needle as the third needle, do a three-needle bind off. Cut yarn, leaving approximately 10-inch (25 cm) tail. Using a tapestry needle, bring the tail to the right side and thread it neatly through the semi-circle of stitches that surround the end of the seam to pull them together and prevent a hole. Then bring the tail back to the wrong side and fasten off to secure it.
RIBBING AROUNDFACE
Retrieve the 120 [144] stitches from the provisional cast on onto a 24- or 32-inch (60 or 80 cm) circular needle. You can retrieve the stitches onto your gauge needle or, if you have a thinner needle with finer points, you can use that for easierretrieval. Note: Whenever you retrieve live stitches from a provisional cast on, there will always be one fewer live stitch to retrieve than the mumber of stitches that you cast on. To compensate when making this hood, before retrieving the first live stitch, simply slide your retrieval needle through a loop of the stitch in the fabric immediately before it, thus picking it up to create a stitch out of it. Then continue by retrieving all the live stitches. You can refer to the section on ABBREVIATIONS AND TECHNIQUES on the last page of this pattern for a link to detailed information on retrieving the correct number of stitches from a provisional cast on. Lay the hood right side out with the Right under-chin extension facing you. Using your gauge needle and beginning at the bottom inner corner of this extension, pick up and knit 16 stitches evenly along its edge. Work one stitch in from the edge so that you are catching the bar between the two knit edge stitches. To avoid a hole at the corner where the extension meets the main hood section, pick up and knit one stitch at the corner gap and place a marker after it. Purl and knit across the 120 [144] stitches that were retrieved from the provisional cast on, working either knit or purl as the stitches appear. To avoid a hole at the second corner as well, pick up and knit one stitch at the corner. (The two corner stitches will be decreased out in the next row.) Then pick up and knit 16 stitches evenly along the inner edge of the Left under-chin extension, in the same way that you did for the Right extension. You should have 154 [178] stitches.
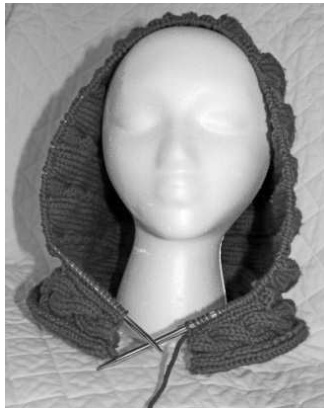
Photo at right shows the hood after stitches have been picked up. Row 1 (WS, decrease row): k3, (p2, k2) 3x, pl, p2tog; \* k2, p2, repeat from \* until one stitch before marker; pl, remove marker, p2tog; (k2, p2) 3x, k3. 2 sts decreased, 152 [176] sts remain. You need a multiple of 4 stitches in order to work 2x2 ribbing with one selvage stitch at each end. Row 2 (RS): p3, \* k2, p2; repeat from \* until 5 stitches remain; k2, p3. Row 3: k3, \* p2, k2; repeat from \* until 5 sts remain; p2, k3. Repeat Rows 2 and 3 until ribbing measures 4.75 inches (12 cm), ending after a right-side row. At gauge, this will be afterrow30.
RIBBING AROUNDNECK
Using your 24” or 32" (60 or 80 cm) circular gauge needle, with right side of fabric facing you and beginning at the Left under-chin extension, pick up and knit 96 [108] stitches evenly around neck edge of the hood. Pick up 48 [54] stitches in each half (before and after the back seam). You need a multiple of 4 stitches in order to work 2x2 ribbing with one selvage stitch at each end. Work one stitch in from the edge so that you are picking up the bar between the two knit edge stitches. By catching the bar between the two knit edge stitches, you will create a nice border for the neck ribbing, which will be a single column of knit stitches formed by the innermost of the two knit edge stitches. Row 1 (WS): p3, k2, \* p2, k2; repeat from \* to last 3 sts, p3. Row 2 (RS): k3, p2, \* k2, p2; repeat from \* to last 3 sts, k3. Row 3 (WS, increase row): p3, kfb, k1, \* p2, kfb, k1; repeat from \* to last 3 sts; p3. 23 [26] sts increased, total 119 [134] sts Row 4: k3, p3, \* k2, p3; repeat from \* to last 3 sts, k3. Row 5: p3, k3, \* p2, k3; repeat from \* to last 3 sts, p3. Row 6: k3, p3, \* k2, p3; repeat from \* to last 3 sts, k3. Row 7 (WS, increase row): p3, k1, kfb, k1, \* p2, k1, kfb, k1; repeat from \* to last 3 sts, p3. 23 [26] sts increased, total 142 [160] sts Row 8: k3, p4, \* k2, p4; repeat from \* to last 3 sts, k3. Row 9: p3, k4, \* p2, k4; rep from \* to last 3 sts, p3. Row 10: k3, p4, \* k2, p4; repeat from \* to last 3 sts, k3. Row 11 (WS, increase row): p3, k2, kfb, kl, \* p2, k2, kfb, kl; repeat from \* to last 3 sts, p3. 23 [26] sts increased, total 165 [186] sts Row 12: k3, p5, \* k2, p5; repeat from \* to last 3 sts, k3. Row 13: p3, k5, \* p2, k5; repeat from \* to last 3 sts, p3. Repeat Rows 12 and 13 until ribbing measures 3 inches (7.6 cm), ending after a wrong-side row. At gauge, this will 1 after Row 19. Bind off in pattern, but when there is one stitch left on the right needle, do not cut yarn. Instead, insert a removable stitch marker or safety pin into that stitch to prevent the work from unraveling while you prepare to pick up stitches for the buttonhole band. This stitch will be used as the first stitch when you pick up stitches for the buttonhole band. Note: Continuing the yarn from the neck ribbing into the buttonhole band avoids having to weave in a tail that would otherwise be created if you were to start the band with a separate ball of yarn. However, if you don't have enough yarn left in the current ball of working yarn to complete the buttonhole band, you can go ahead and cut the yarn after binding off the neck ribbing and start the buttonhole band with a new ball of yarn in order to avoid a splice in the middle of the buttonhole band. The buttonhole band will require about 10 yards of yarn.
BUTTONHOLE/BUTTON BANDS
Fold back the ribbing around face so that approximately 3 to 3-1/4 inches (7.6 to 8.3 cm) of it shows on the outside of hood, making sure that both ends are turned back equally. Use pins or a basting yarn to temporarily hold this cuff in place at both ends while you pick up stitches for the buttonhole and button bands. Measure the length of each front edge after folding back the ribbing, and attach a removable marker or safety pin at the mid-point to help you distribute stitches evenly by picking up half of them above and below the marker.

Buttonhole Band
With right side of fabric facing you and beginning at the bottom edge of neck ribbing on the Right side of the hood, where the one stitch you are holding on a removable stitch marker is still attached to the working yarn, place that stitch on your gauge needle and count it as the first stitch to be picked up for the buttonhole band. Pick up and knit 39 more stitches evenly along the front edge of the hood, for a total of 40 stitches. Go through both layers of the folded-back cuff when you come to it. Work one stitch in from the edge so that you are catching the bar between the two knit edge stitches. Use a crochet hook to help pull stitches through the double layers. Photo above shows stitches picked up for the buttonhole band. Row 1 (WS): P3, k2, \* p2, k2; repeat from \* to last 3 stitches, p3. Row 2: K3, p2, \* k2, p2; repeat from \* to last 3 stitches, k3. Row 3: P3, k2, \* p2, k2; repeat from \* to last 3 stitches, p3. Row 4 (RS, buttonhole row): To ensure the buttonholes are not too large, work the yarn overs in this row snugly. K2, \* slip 1 knitwise, kl, pass the slipped stitch over the knit stitch, yarn over two times, k2tog; k1, (p2, k2) 2x, p2, k1 \*; repeat between \* \* one time; slip 1 knitwise, kl, pass the slipped stitch over the knit stitch, yarn over two times, k2tog, k2. Row 5: When you come to the yarn overs in this row for each buttonhole, knit the first one, and knit the second one twisted by knitting into its back leg, as follows: P3, \* k1, kltbl; (p2, k2) 3x, p2 \*; Repeat between \* \* one time; kl, kltbl, p3. Row 6: K3, p2, \* k2, p2; repeat from \* to last 3 stitches, k3. Row 7: P3, k2, \* p2, k2; repeat from \* to last 3 stitches, p3. Bind off in pattern. The chart below indicates buttonhole placement. Buttonholes are worked in the purl ribs at the center and both ends of the band.

Button Band
With right side of fabric on the Left side of the hood facing you, and beginning at the fold edge of the cuff, pick up and knit 40 stitches evenly along the front edge of the hood. Be sure to match the spacing of the turned back cuff and picked up stitches with the buttonhole band you completed on the other side. Go through both layers of the folded back cuff. Work one stitch in from the edge so that you are picking up the bar between the two knit edge stitches. Use a crochet hook to help pull stitches through the double layers. Work seven button band rows as follows: Rows 1, 3, 5 and 7 (WS): P3, k2, \* p2, k2; repeat from \* to last 3 stitches, p3. Rows 2, 4 and 6: K3, p2, \* k2, p2; repeat from \* to last 3 stitches, k3. Bind off in pattern.
FINISHING
Sew on buttons. Weave in ends.
ABBREVIATIONS&TECHNIQUES
C6B (Cable 6Back) Slip next 3 sts onto cable needle and hold in back of work, knit 3 from left needle, knit 3 from cable needle. C6F (Cable6 Front) Slip next 3 sts onto cable needle and hold in front of work, knit 3 from left needle, knit 3 from cable needle. Two special cable crossing techniques are worked in Row 1 of the crown shaping rows in order to reduce the number of stitches in the cable from 6 to 5 while at the same time crossing the cable. There is no standard abbreviation for these techniques, so they will be abbreviated in this pattern as C6-5B and C6-5F and worked as follows: C6-5B (Cable 6 stitches, reducing to 5, and holding to Back) Slip next 3 stitches onto cable needle and hold in back of work, knit 3 from left needle, then from cable needle knit 2 stitches together, knit 1. (1 stitch decreased) C6-5F (Cable 6 stitches, reducing to 5, and holding to Front) Slip next 3 stitches onto cable needle and hold in front of work, from left needle knit 2 stitches together, knit 1, then from cable needle knit 3. (1 stitch decreased)
k1tbl
(Knit one stitch through the back loop). Insert right needle from right to left into the back leg of the stitch on the left needle and knit it from that position. This twists the resulting stitch. k2tog knit next 2 stitches together (1 stitch decreased). kfb (Knit in front & back of stitch). Knit a stitch, leaving stitch on left needle; knit into the back loop of this stitch. (1 stitch increased) p2tog purl next 2 stitches together (1 stitch decreased). (slip, slip, knit). Slip one stitch as if to knit, slip another stitch as if to knit, insert the left needle into the two slipped stitches in front of the right needle and knit them together from this position (1 stitch decreased). (A double decrease). With yarn in front, slip next 2 stitches purlwise to right needle; purl next stitch, then pass the two slipped stitches over the stitch just purled.
provisional cast on
The following YouTube video has a demonstration of this technique: http://www.youtube.com/watch?v=R3J-sUx whE
retrieve live stitches from a provisional cast on
Carefully unravel the waste yarn chain, one stitch at a time, and slip each live stitch onto a needle as you do so. Whenever you retrieve live stitches from a provisional cast on, there will always be one fewer live stitch to retrieve than the number of stitches that you cast on. TechKnitter provides a detailed explanation of why this is so on her blog at: http://techknitting.blogspot.com/2007/01/knitted-fabric-knitting-up-vs-knitting.htm1. When making this hood, it isn't necessary to compensate for this fact by casting on an extra stitch or by doing an increase after retrieving all the available live stitches. Instead, before retrieving the first live stitch, simply slide your retrieval needle through a loop of the stitch in the fabric immediately before the first live stitch, thus picking it up to create a stitch out of it. Then continue by retrieving all the live stitches.
three-needle bind off
The following website has a photo tutorial showing this technique: http://knitty.com/ISSUEfal106/FEATfal106TT.html
bind off in pattern
e has a video demonstration of this technique: http://knitpurlhunter.com/blog/?p=64


