Norn
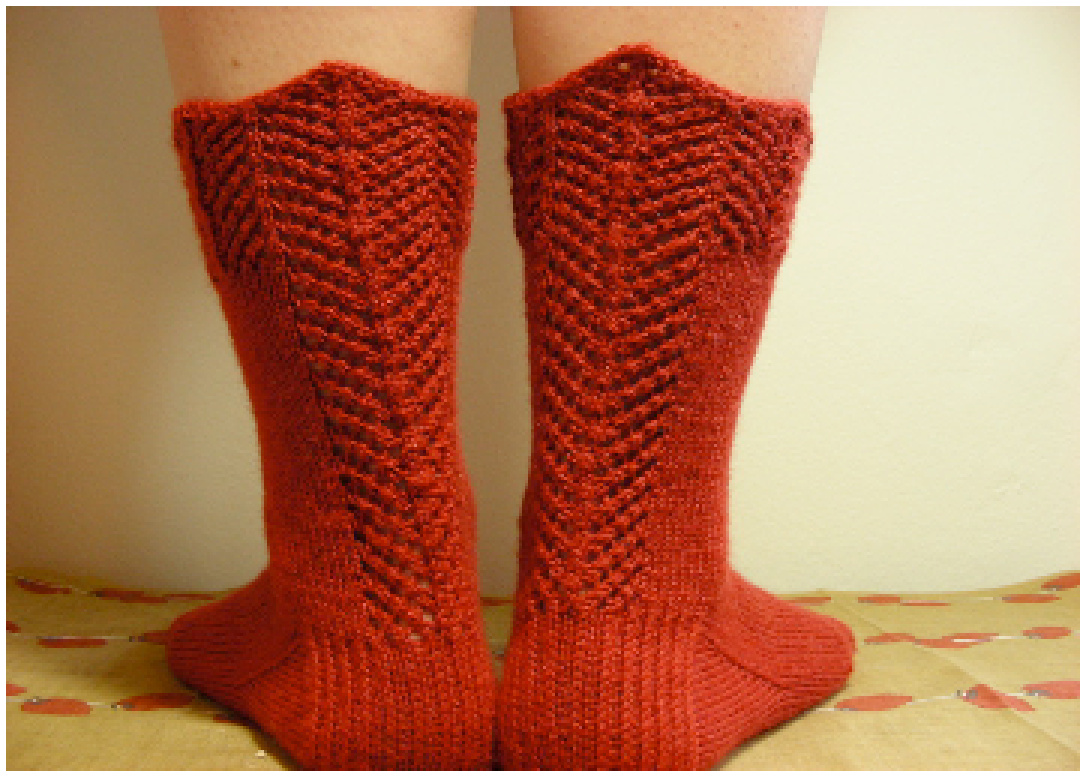
Cassandra Thoreson (TooMuchWool) Norn: an easy-to-memorize, four-row lace pattern creates a deep and dramatic cuff, while the simple stockinette of the leg provides contrast to the lace panel running down the back. Yarn: a variety of sock-weight yarns will work for this pattern, from very fine sock yarn to slightly rounder, thicker yarns. ("very fine": Trekking, Regia, Opal, for example) Gauge: 8.5-9 spi/60 sts in st st with medium sized needles (see below) fits a women's medium (37/7), using fine sock yarn
Needles:
Several needle sizes are used to get the stated gauge: 60 stitch: 2.75mm/US2 (cast on), 2.25mm/US1 (lace cuff and leg), 2.5mm (transition from cuff to leg) 72 stitch: 2.5mm/US1.5 (cast on), 2mm/Us0 (lace cuff and leg), 2.25mm/Us1 (transition from cuff to leg) A note about "sizes": There are two stitch-count versions of the pattern given below. Depending upon your yarn weight, gauge, and needle sizes used, you can create either two different sizes using the same yarn/needles, or the same size using different yarn/gauges. [NB: it is helpful to know if your "normal" sock uses closer to 60 or 72 sts, otherwise swatching is important.] The pattern is written assuming that the 72 st version is a finer gauge. Please adjust needle sizes to get desired gauge.
Norn Lace Chart : 12 sts x 4 rows
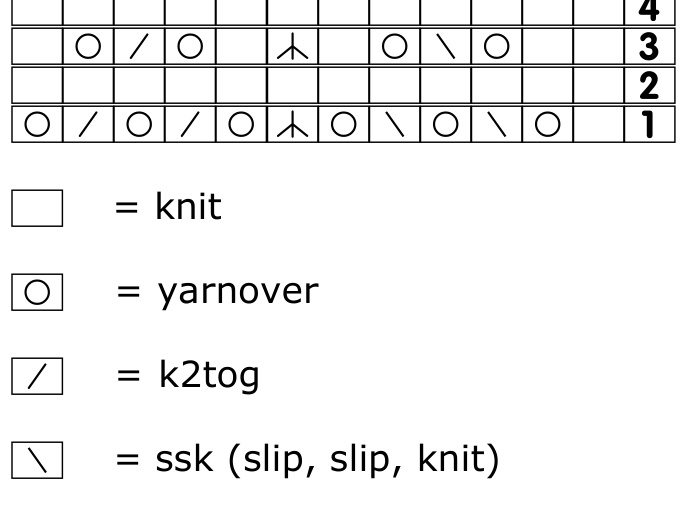
$=$ sl2k1p2sso (slip 2 together knitwise, knit 1, pass 2 sld sts over) i.e., double centered decrease (alternately - slip 1 knitwise, k2tog, psso) Note: for the double decrease in the chart above, the first option creates a slight ridge, while the second/alternate option creates a lower profile and leans slightly to the left. The photo at the top of the pattern uses the first option. Norn page 2
A note about the lace chart and needle sizes:
Norn's lace cuff is very open. It fits nicely at the part of the leg where the calf begins to shape. In order to avoid flare from the open lace cuff to the mostly stockinette leg section, I've used an interim needle-size for the "transition". Knitting several rows after the lace cuff on a medium-needle size will shape the calf slightly. Finishing the sock leg in the original needle size (used for the lace cuff) will slightly taper the sock towards the ankle.

Lace cuff:
Cast on 60(72) sts on 2.75mm/US#2 (2.5mm/US#1.5) needles, using long-tail cast-on. [Alternately, cast on onto two 2.25mm (2mm) needles held together.] A loose cast-on is necessary to allow the lace pattern to stretch. Join into a round. The 60-stitch version works best arranged on 3 needles with needle # $1=24$ sts, # $2=17$ sts, # $3=19$ sts.This will require moving a stitch every other row (from the 2nd to the 3rd needle) to work the decreases. The 72 stitch version can be arranged with 24 sts each on 3 needles. Change immediately after casting on to 2.25mm/US1 (2mm/Us0) needles. Purl one round. Knit one round. Begin Norn lace chart (above), knitting 7 repeats of the 4-row lace chart - 28 rows total. Or knit as many repeats as desired. This sock looks best with a deep lace cuff. \* Row 1 of the chart leaves you with a yarnover at the end of each needle - take care not to drop or lose the yo's.
Begin leg:
Change immediately to 2.5mm/#1 (2.25mm/#1) needles after cuff. Continue 12-stitch Norn pattern for first 12 stitches of round, then proceed to knit the next 48(60) sts in stockinette (all knit stitches). Knit at least 8-12 rows using the slightly larger needles. I found that this was enough to transition from lace cuff to mainly stockinette leg. If desired, after 8-12 rows of leg using larger needles, you may wish to go back to the same needle size you used for the lace cuff. This will slightly taper the leg towards the ankle. Continue down leg, keeping first 12 sts in Norn lace pattern and the remainder of the leg sts in stockinette. Knit leg as long as desired through row 3 of Norn lace chart, then begin setting up heel.
Heel flap:
Beginning with row 4, knit across 51(60) sts - within 9(12) sts of the end of the round. The stitches on your needles will now be rearranged to center the back lace panel at the middle of the heel flap. Arrange sts on needles so that you have the last 9(12) sts of the round, plus 12 sts that have been knit in Norn lace, and then the 9(12) sts immediately following lace panel on one needle for heel flap. 30(36) sts total for heel flap. The other 30(36) stitches for the front of the foot will be picked up later, after the gusset. With sts rearranged, begin heel flap: Round 1: slip 1, knit 1 across 30(36) sts, turn Round 2: slip 1, purl across 29(35) sts, turn Repeat rounds 1 and 2, 17(20) times for a total of 34(40) rows. You will have 17(20) slipped sts in the heel flap.
Turn heel:
Row 1: knit across 17(20) sts, ssk, k1, turn Row 2: slip 1, p5, p2tog, p1, turn Row 3: slip 1, knit to within one stitch of the gap, ssk, k1, turn Row 4: slip 1, purl to within one stitch of the gap, p2tog, p1, turn. Repeat rounds 3 and 4 until all sts are used up. The larger size will end with a decrease rather than knit (or purl) 1. You will have 18(20) heel sts.
Gusset:
Knit across 18(20) heel sts. Pick up and knit through the back loop (TBL) 19(22) sts along the first side of the heel flap. Knit across 30(36) foot sts, pick up and knit TBL 19(22) gusset sts along the second side of the heel flap. Knit half the number of heel sts - 9(10)- onto the last needle. The beginning of the round will now start at the middle of the heel. Row 1: Knit to within three sts of end of heel flap, k2tog, k1. Knit 30(36) foot sts in stockinette, k1, ssk, knit to end of round. Row 2: knit all sts. Repeat rows 1 and 2 until stitch count is reduced to the original number (60 or 72 sts total). Alternately, you may want to allow a slightly larger foot (for the smaller size especially) as the lace panel is no longer there to provide some extra width. Knitter's choice. Continue knitting foot in stockinette st until about $z^{\prime\prime}$ from desired length. Begin toe decreases.
Toe:
Row 1: K12(15), K2tog, K1, K1, SSK, K24(30), K2tog, K1, K1, SSK, K12(15) Row 2: knit across (no decreases) Repeat rounds 1 & 2 until there are 8 sts on each needle, then decrease every row (as established) until there are 8 sts left. Break yarn, thread through tapestry needle, and gather the 8 sts tightly. Weave in ends and block.
Options and Variations:
1. An option for making a taller sock, or even a knee sock, would be to start with the larger stitch count (at a larger gauge) and decrease while knitting the leg section, on either side of the lace panel. 2. For a less open, less lacy leg, rather than continuing the full 12 stitch repeat of the lace pattern down the back of the leg, you can continue only the \*yo, double-decrease, $\mathsf{y o}^{*}$ portion of the lace pattern (at the center of the chart). This creates a cute back "seam." 3. You can also use #2 in combination with the full lace panel, adding yo, double-decrease, yo "seams" on both sides of the full lace panel. To do this, continue down the leg the center double dec and yo's from the lace chart repeats on either side of the full lace panel, after the cuff is completed. \*\*\*\*\*\*\*\*\*\*\*\*\*\*\*\*\*\*\*\*\*\*\*\*\*\*\*\*\*\*\*\*\*\*\*\* If you have any questions, comments or suggestions, I'd love to hear from you. You can email me at toomuchwool@verizon.net


