Deborah Tomasello Copyright ? 2012 by Deborah Tomasello All rights reserved. This pattern or any portion thereof may not be reproduced or used in any manner whatsoever without the express written permission of the publisher. WARNING: Giving or accepting a free copy of this pattern to another, without permission of the designer, is stealing.
STRANDED KNITTING: It's Easier Than You Think!
I am constantly surprised by the number of seasoned knitters who are overwhelmed at the thought of attempting colorwork. They have knitted cables or extremely delicate lace patterns, but they stop short of entering the world of colorwork, be it intarsia, stranded, or Fair Isle. Because some of the designs produced look quite complex and intricate, some knitters feel knitting them must be difficult. I am about to destroy a myth here. Are you ready? Here goes: Knitting with color is easy. It isn't rocket science. Shoot, it isn't even algebra. It's more akin (keeping with the spirit of my lazy metaphor) to elementary arithmetic. Contrary to what you may have heard, there is no right/wrong way to hold your yarn when knitting. Even stranded knitting. There are no knitting police. You will not get a ticket or be arrested for anything remotely close to “yarn-holding unbecoming a knitter." You do what works for you, what feels comfortable and allows you to achieve an even tension. (When I discuss tension here, I refer to the force or tautness of the knitted work, not gauge.) To achieve proper tension (tautness) I hold one yarn with my toes. Yup. I do. But more on that later. Having said all that, I have learned some useful tricks along the way, and I am happy to share these with you. I am so keen on sharing the joy of stranded knitting with you that, although I am not known for my technological skills, I am going to learn to make a few, short videos that you might find helpful. So, here we go. A whole new world is about to be opened to you. Once you enter, my bet is you'll never look back! Have fun!!!
TABLE of CONTENTS
Introduction pg 2 Chapter 1 Where to Start yo, k1, repeat [] until last 6 sts, k1, sl1, k1, yo, k3. Chapter 2 Color Choices pg 5 Chapter 3 Pattern Choice pg 6 Chapter 4 So, What's Next? pg 7 Chapter 5 Most Important Information is Last Row 14: k3, yo, p5, sl1, [p1, sl1, p4, sl1] until 8 sts before Chapter 6 Monocromacity: The Sock pg 10 Chapter 7 Musica: The Hat Row 15: k3, yo, k4, T3R, [k1, T3L, T3R] until 8 sts before Chapter 8 Pointillism: The hat pg 18 Chapter 9 Brilliant Twilight: The Hat pg 20 Chapter 10 Knitter's Project Bag: Flowers marker, yo, k4, T3R, repeat [] until last 11 sts, k1, T3L, Contact Info pg 28
WHERE TO START
I am one of the aforementioned seasoned knitters who were overwhelmed at the idea of attempting colorwork. When Wendy Preston first joined our local knitting group (HoH), she brought some of her lovely projects in to show us. One of them was her Mardi Gras sweater (by Alice Starmore), and I was slack-jawed-blown-away. "You knit that???? How did you DO that?! She told me it was Fair Isle and, honest-to-kapoopy, I had never heard of it. I had been knitting for 45 years, and I had never come across “Fair Isle,” or more likely, my middle-aged memory failed me on that one. Nevertheless, I was blown away, and I knew I had to learn this technique. So, I got two balls of contrasting wool, a how-to book, and I practiced. Ever compliant, I did just as the instructions demanded. I held one yarn in my right hand and one in my left. But try as I might, I could not achieve even tensions between the two. I am a thrower. My left hand is useless except for holding a needle or getting coffee to my mouth (and, make no mistake, coffee is as important an element of knitting as wool). So, I kept practicing, but now, I simply knitted with one yarn in my right hand, dropped it and picked up the other strand as I needed it. This worked, but it was clumsy. I needed something more convenient. Enter: toes! I put the second (sometimes called background) yarn between my toes and sat back. It worked like a charm. I threw the first (foreground strand) yarn with my right hand as usual and then, when I needed to knit a stitch with the other strand, I just hooked it with my pinky, or any other convenient digit, and kept going. This bizarre method still works for me today.
COLOR CHOICES
As you might imagine, color is a key element in colorwork. But again, there are no right or wrong colors. You use what you like. Color sets mood, delivers a message, and conveys feelings. Contrasting colors work well in some projects but often, graduated or coordinating colors can achieve the desired effect. What are you looking to achieve? In my designs, I knit a sample, and I list colors I use as a guideline. These, however, are not the only choices available to you, and my choices--or any designer's color choices--are not etched in stone. As the creator of your own piece, feel free to create your own color combinations. (See Monochromacity, Musica, Pointillism, Brilliant Twilight, and Knitter's Project Bag below.)

PATTERN CHOICE
Again, you are the knitter, and the choice is yours, but for a first-time colorwork project, I would start with an easy-to-follow chart, and an easy-to-knit design. One that gives you immediate, or near immediate, results will inspire you to keep going. Avoiding a difficult pattern in the beginning will keep you from getting discouraged, blaming yourself rather than the difficulty of the pattern. (Always feel free to blame the pattern designer!) Brilliant Twilight is more difficult to knit than Pointillism because, for one thing, it has a few rounds containing three colors. Also, the tree branches are more difficult to knit because, well, they're tree branches. Still, if you have your heart set on knitting Brilliant Twilight, you can do it! Remember, tree branches are regulated on the chart, but they needn't be. Free yourself to make your tree branches go a little crazy. They do in “real life,” anyway! Pointillism, on the other hand, is a great beginner pattern. It allows you to explore all facets of colorwork, get practice, and create a greatlooking hat (or socks, or scarf, or mittens, etc.)! I have included both Brilliant Twilight: The Hat and Pointillism: The Hat patterns at the end of this text. And now, for your edification, or at least for your entertainment, I give you my first YouTube video. And please watch it. I shaved my legs for this:
VIDEO I: Decision-Making Time
http://www.youtube.com/watch?v=1dhm2-bBRp8 Is there a lesson here? Why, yes, there is! Do what works for you. Employ your toes, your neck, your elbow, whatever. But find what is comfortable for you. Just practice a little bit until it feels “natural' and the yarn tensions are even. You don't want any of the strands pulled too tightly, or the work will be puckered on the front. It's all about even tension. And fun. It's also about fun. SO, WHAT'S NEXT? Reading charts. That's what. It is helpful to know how to knit from a chart. More and more patterns are written this way, and ultimately, charts are user-friendly ways to know where you are in your project at a glance. My patterns have some written instructions, but they rely heavily on charts. Charts can be coded with symbols (which should always be explained in a legend) or with colors. Sometimes they contain both. Generally, charts are read from bottom to top and from right to left, just as you knit. All of my patterns are designed to be worked in the round. You can knit stranded back and forth. It just requires looking at the chart a little differently, and it necessitates purling. I'll do just about anything to avoid having to purl. Hence, my in-the-round patterns. Patterns knitted in the round will have numbers to the right of the chart lines (mine are always numbered this way). Most stranded color knitting (and all that I do) is knitted in the round, so stockinette is created without ever purling (my own bete noire). YO and other lacecreating stitches are rare in colorwork charts. If there is purling, the symbol will appear in the corresponding stitch on the chart. Take a few minutes to watch the second YouTube video:
VIDEO 1I: Following a Chart
http://www.youtube.com/watch?v=rMyZXIsxFhw
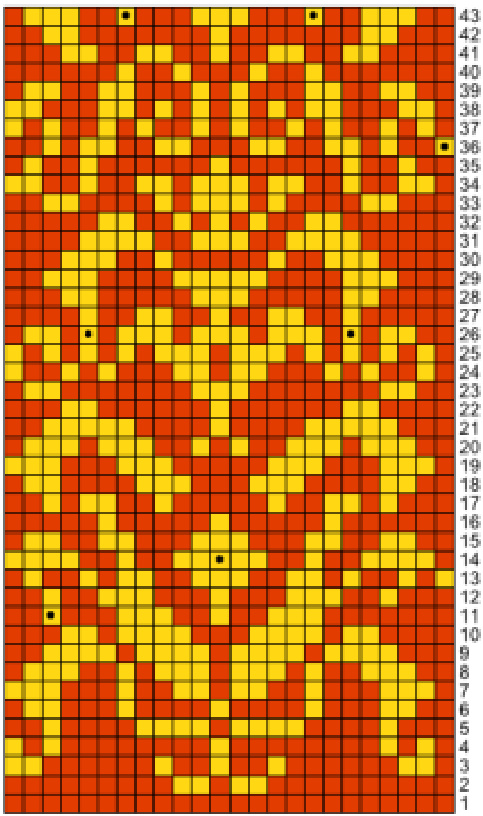
The pattern will explain how many repeats of the chart pattern there are in each round, and how many rounds to knit. The colors are designated in the squares, with each square equaling one knit stitch. You begin knitting, according to the chart, with round 1 on the bottom right, from right to left, and bottom to top. Round 1, for example is knitted in solid red all the way around. Round 2 requires 11 red stitches, tono wed by z goid stitcnes, then I re In this pattern, the black dots indicate the placement of bead, which is explained in the pattern legend....
MOST IMPORTANT INFORMATION IS LAST
Perhaps the most important element of stranded knitting is tension. Achieving and maintaining an even, smooth tension between the two strands in your work is critical. Perfection, they say, comes from practice. Just as it took time and practice to get comfortable holding your needles and yarn when you began to knit, it will take time and practice to feel completely natural knitting with two strands. You will find your own way to hold the strands as you work a color design. Relax and have fun. It's all about the process! Creating a good tension involves knitting even “floats" across the back. Floats are created as you carry or “catch" the unused yarn every few stitches across the back to keep it from hanging too loosely between uses. Floats should be created every four or five stitches. (This number of stitches is standard when using a fingering-weight wool. If using a heavier weight, like worsted, floats are typically created every three stitches.) And floats should not be too tight. To avoid puckers, keep floats gently loose and be consistent. Again, this comes with practice. And you'll have it down in no time. You probably have it down already, right?!
As you create floats, remember that it is also important that you remain consistent when crossing one yarn over and under the other in the back. It might seem an insignificant detail, but inconsistent crossing of floats does change the appearance of the knitted fabric on the front. The back side of your garment should look as neat as the front. And now, another video!
VIDEO III: Tension and Floats
http://www.youtube.com/watch?v=jQlc4UQWuzc
JUST ANOTE
Remember, the world won't implode, explode or self-destruct in any other manner if you make a mistake. “Ehh, nobody will ever see it,”" is among my most frequently uttered sentences. Mistakes are inevitable, always fixable, and sometimes they're just charming. Knitting is joy. It has taught me how to live better, to be at peace with my imperfections, and to enjoy the process. So, off you go, Dear Friend! There is a world of color and joy waiting for you. And there are eager, experienced hands ready to help you keep going! Choose a pattern, and let's get started!
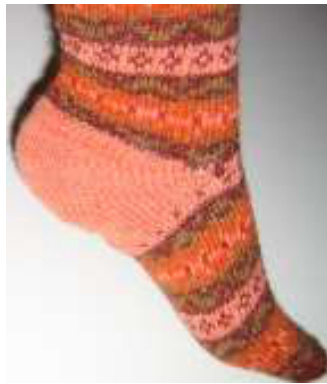
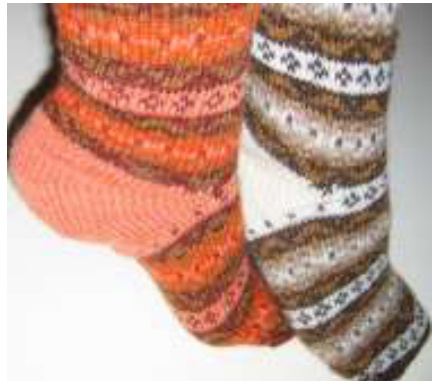
MONOCHROMACITY: The SockO by Deborah Tomasello
For Her
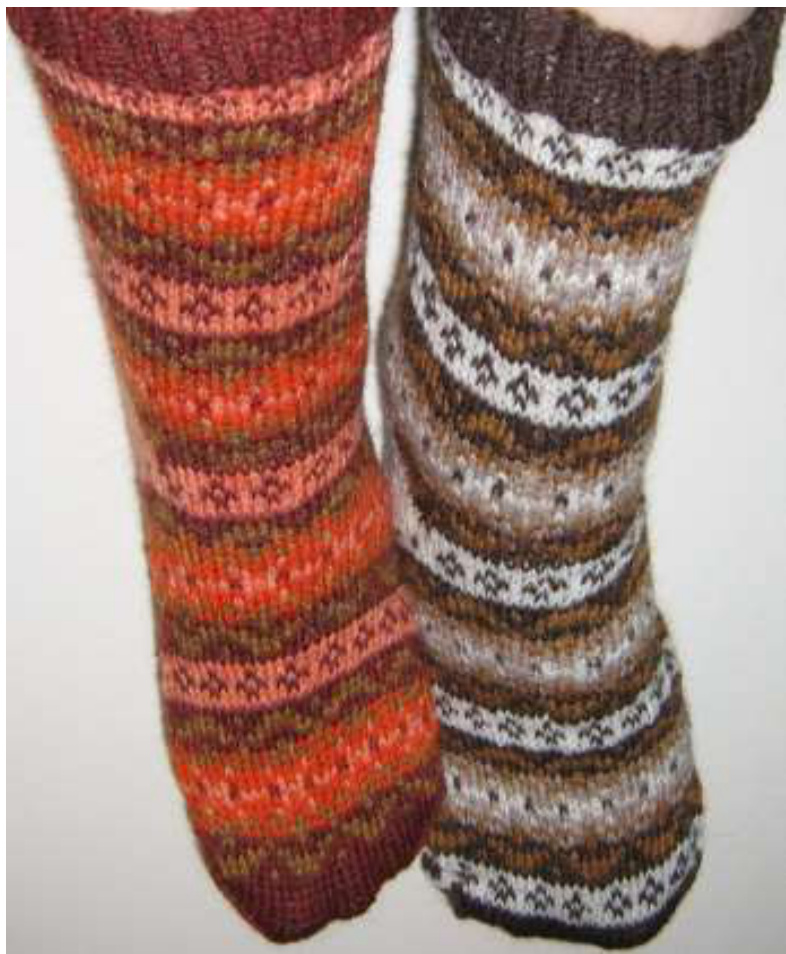
Size: Women's Medium-Large Men's Medium-Large Materials: For women's sock: 1 ball each of any 4 KnitPicks Palette colors. This pattern features Autumn Heather, Masala, Mai Tai Heather and BrassHeather. For men's sock: 1 ball each of any 4 KnitPicks Palette colors. This pattern features Grizzly Heather, Camel Heather, Brass Heather and OysterHeather. One long circular needle, two circular needles, or 5 DPNs, size #3 or whatever size gives you the correct gauge working in the round; two stitch markers; tapestry needle Gauge: 32 stitches and 32 rounds = 4" Abbreviations: K2TOG= knit 2 stitches together SSK= slip one stitch, then slip the next. Insert left needle into the front loops of the slipped stitches and knit them together from this position Instructions: Socks are worked top-down.
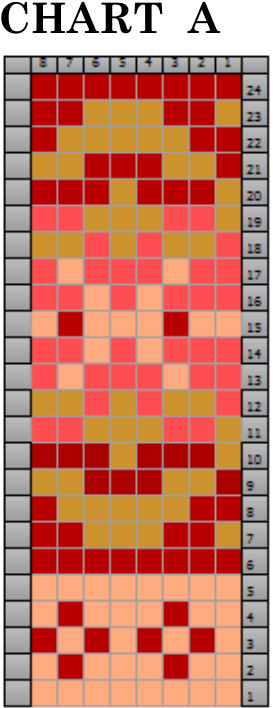
LEG: Women's Sock
With circular needle or DPNs, CO 64 sts using Autumn Heather (16 sts on each of 4 DPNs). Join to work in round, placing marker and being careful not to twist stitches. Knit 15 rounds 2x2 rib. Follow CHART A (8 repeats per round--two 8-stitch pattern repeats per needle) twice, for a total of 48 rounds. Last leg row will be a solid color (Autumn Heather). Rearrange sts on this round as you go, setting up for the heel as follows: knit 16 sts on first needle plus 5 more from second needle. This gives you 21 sts on the first needle. Now, on next needle knit 11 stitches. On third needle, knit 11 stitches and move the last 5 sts to the 4th needle. Knit those 5 plus the 16 already on needle 4 for a total of 21 sts on needle 4. Needle 1 has 21 sts Needle 2 has 11 sts Needle 3 has 11 sts Needle 4 has 21 sts NOTE: Remember to create floats every 3 or 4 sts on socks so toes don't get caught when putting on the sock!
HEEL: Women's and Men's Sock
My socks feature the Sweet Tomato Heel (STH). You may use the heel of your choice, but I recommend one that does not employ a flap or gussets to allow for an even design flow through the instep. For a tutorial on the STH, see this video: http://tinyurl.com/
Women's Sock:
Once you understand the STH, proceed with sock. Follow the designer's heel instructions, knitting heel with Mai Tai Heather. Work three wedges on the 42 sts. Work wedges leaving 8 stitch pairs on each side (10 heel sts left unpaired between pairs). Continue knitting following the chart and lining stitches up as if you were knitting all 64 sts. (In other words, when you reach the instep, begin with the 22nd stitch of round 1 on first wedge, round 2 on second wedge and round 3 on 3rd wedge across the front stitches between wedges).
FOOT: Women's Sock:
Working all sts on circular needle or split evenly on DPNs as with leg, 16 sts per needle, pick up pattern with round 4 on chart, 2 pattern repeats per needle for 8 pattern repeats per round. Continue to work color pattern according to CHART A completing 24 rounds twice, for 48 rounds.
TOE: Women's Sock:
Using Autumn Heather, decrease for toe as follows: Needle 1: K to last 3 sts of NEEDLE 1, K2TOG, K1 Needle 2: K 1, SSK, knit until the last 3 stitches of NEEDLE 3 Needle 3: K to last 3 sts, K2TOG, K1 Needle 4: K1, SSK knit to last 3 sts of NEEDLE 1 Repeat this until there are 8 sts left on each needle. Place sts from needles 4 and 1 onto one needle (16 sts). Place sts from needles 2 and 3 onto another needle (16 Ssts). Graft the remaining stitches together using Kitchener st, and weave in all ends. Finishing: Tie and weave in or trim all color change ends at beginning and ends of rounds. Wash and block to fit.
LEG: Men's Sock:
With circular needle or 3 DPNs, CO 72 sts using Grizzly Heather (20 sts on first and last DPNs, and 16 on the 2nd and 3rd DPNs). Join to work in round, placing marker and being careful not to twist stitches. Knit 15 rounds 2x2 rib. Follow CHART B (9 repeats per round) completing 24 rounds twice, for 48 rounds. Last leg row will be a solid color (Grizzly Heather). Rearrange sts on this round as you go, setting up for the heel as follows: knit 20 sts on first needle plus 4 more from second needle. This gives you 24 sts on the first needle. Now, on next needle knit 12 stitches. On third needle, knit 12 stitches and move the last 4 sts to the 4th needle. K those 4 plus the 20 already on needle 4 for a total of 24 sts on needle 4. Needle 1 has 24 sts Needle 2 has 12sts Needle 3 has 12 sts Needle 4 has 24 sts NOTE: Remember to create floats every 3 or 4 sts on socks so toes don't get caught when putting on the sock! HEEL: See Cat Bordhi's Sweet Tomato Heel instructions above. Once you understand Cat Bordhi's STH, proceed with sock. Follow Cat Bordhi's heel instructions, knitting heel with Oyster Heather. Work three wedges on the 48 sts. Work wedges leaving 9 stitch pairs on each side (for 6 heel sts left unpaired between pairs). Knit across instep between wedges keeping the pattern going uninterrupted according to CHART B.
FOOT: Men's Sock:
Working all sts on circular needle or split evenly on DPNs as with leg, continue to work color pattern according to CHART B twice all the way through, and the first 5 rounds of the third time, for a total of 53 rounds.
TOE: Men's Sock:
Using Grizzly Heather, decrease for toe as follows: Move sts to 4 DPNS, 18 sts per needle Needle 1: K to last 3 sts of NEEDLE 1, K2TOG, K1 Needle 2: K 1, SSK, knit until the last 3 stitches of NEEDLE 3 Needle 3: K to last 3 sts, K2TOG, K1 Needle 4: K1, SSK knit to last 3 sts of NEEDLE 1 Repeat this until there are 10 sts left on each needle. Place sts from needles 4 and 1 onto one needle (20 sts). Place sts from needles 2 and 3 onto another needle (20 Ssts). titches together using Kitchener st, and weave in all ends Finishing: Tie and weave in or trim all color change ends at beginning and ends of rounds. Wash and block to fit.


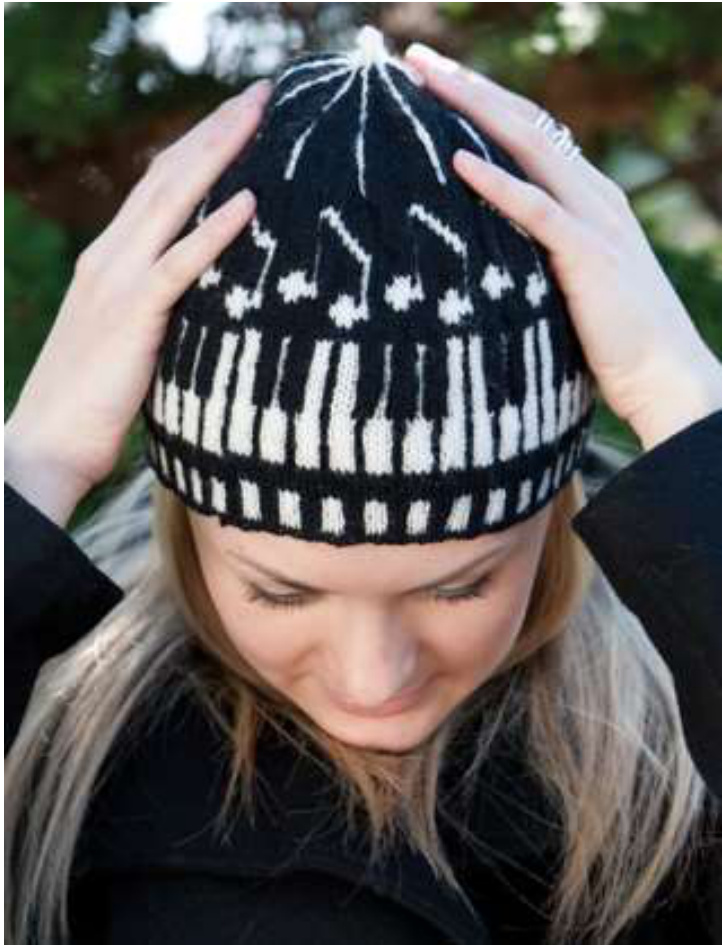
Note: Pattern has new and imroved top not shown in photo Size: Adult (Male and Female) 21"-23" Materials: 1 ball each KnitPicks Palette, Black and Cream One 16" #3 circular needle, four #3 DPNs (or size needed to obtain gauge), stitch marker, and tapestry needle Gauge: 32 stitches and 32 rounds = 4" using #3 needles. Abbreviations: K2TOG = Knit two stitches together. SSK = Slip one stitch, then slip the next. Insert left needle into the front loops of the slipped stitches and knit them together from this position. Instructions: With circular needle, CO 136 sts using Black. Join to work in round, placing stitch marker and being careful not to twist stitches. Knit six rounds corrugated rib (see CHART A) using Cream for knit sts and Black for purl sts. Increase round: Using Black, inc to 168 sts (knit 4 sts, then, inc every 4th st evenly to last 4 sts. Knit last 4 sts). Follow CHART B (6 repeats per round) for 69 rounds, decreasing as indicated and switching to DPNs when necessary. (Each dec round has 2 decreases next to each other; k2tog for first dec, and ssk for second each time.) After round 69, with 12 sts on the needles, k2tog around. 6 sts remain. Knit last six sts for 5 rounds; cut yarn leaving a tail several inches long. Move all sts from needles to tapestry needle, and pull tightly. Secure from the inside. Finishing: Tie and weave in or trim all color change ends at beginning and ends of rounds. Wash and block to fit.
CHART A
Knit cream sts and purl black sts.
| 4 | 3 | 2 | 1 | ||
| 6 | |||||
| 5 | |||||
| m | |||||
| 2 | |||||
| 1 |
8765432109876543210987664321 2222222221111
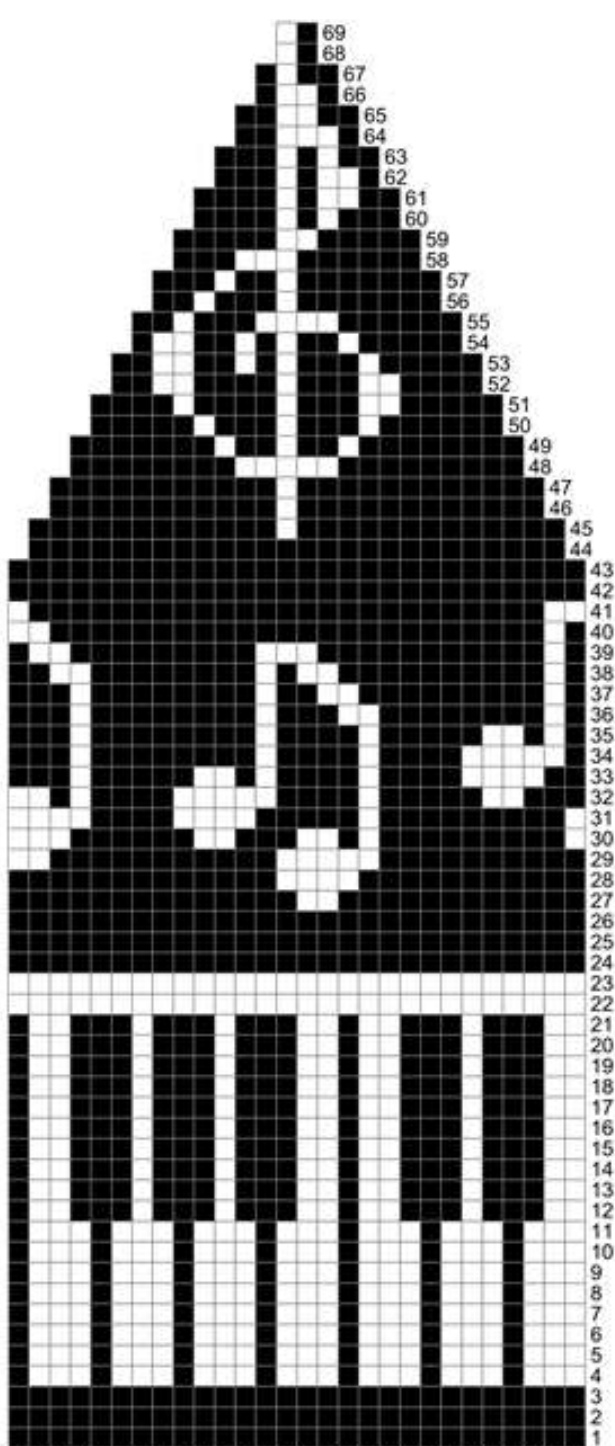
POINTILLISM: The Hat C
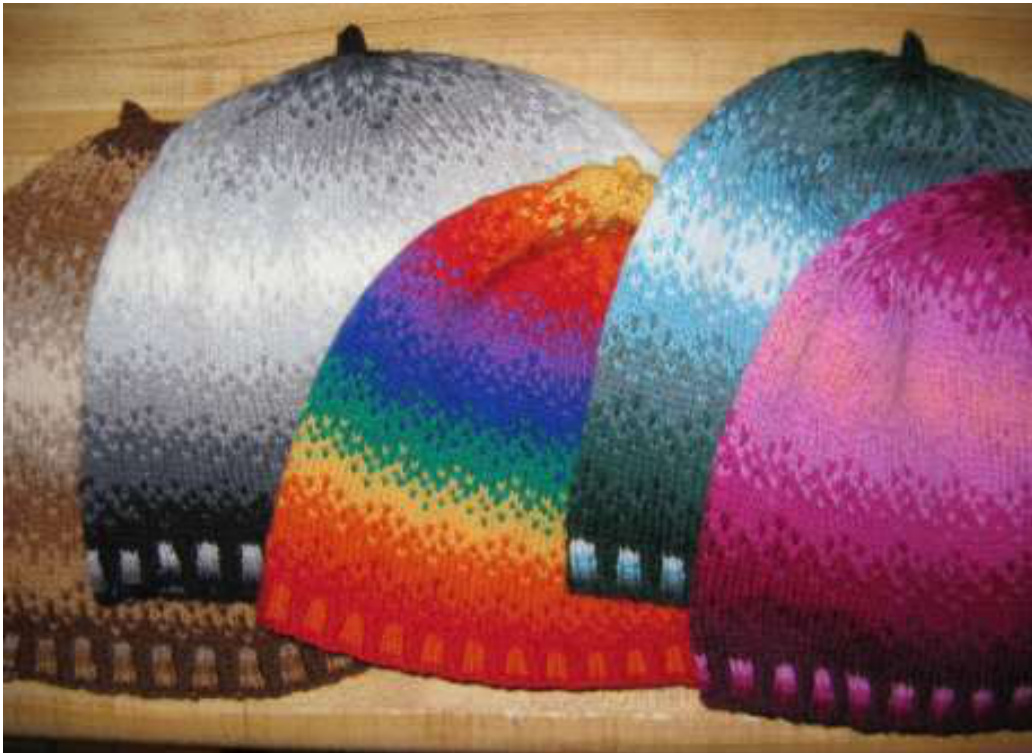
(left to right) Frappuccino; Fido Sees a Rainbow; The Visible Spectrum; Earth, Sea & Sky; Wild Berry Parfait
FIDO SEES A RAINBOW
Size: Adult (Male and Female) 21"- 23" Materials: 1 ball each KnitPicks Palette, Black, Ash, Marble Heather, Silver, and Mist One 16" #3 circular needle, four #3 DPNs, stitch marker, and tapestry needle Gauge: 32 stitches and 30 rounds = 4" using #3 needles. Abbreviations: K2TOG = Knit two stitches together. SSK = Slip one stitch, then slip the next. Insert left needle into the front loops of the slipped sitches and knit them together from this position. Instructions: With circular needle, CO 136 sts using Black. Join to work in round, placing stitch marker and being careful not to twist stitches. Knit eight rounds corrugated rib (see CHART A) using Ash, Marble Heather, Silver and Mist for purl sts and Black for knit sts. (or vice versa). Increase round: (Round 1 of CHART B) Using Black, inc evenly to 168 sts (knit 4 sts, knit 4 make 1 around until last 4 sts, knit last 4 sts.) Follow CHART B (7 repeats per round) for 75 rounds, decreasing as indicated and switching to DPNs when necessary. (Each dec round has 2 decreases next to each other; k2tog for first dec, and ssk for second each repeat.4 dec each dec round). After round 75 with 14 sts on the needles, k2tog around. 7 sts remain. Knit last seven sts for 5 rounds; cut yarn leaving a tail several inches long. Move all sts from needles to tapestry needle, and pull tightly. Secure from the inside. ave in or trim all color change ends. Wash and block to fi Use Ash, Marble Heather, Silver and Mist for purl sts and Black for knit sts. (or vice versa).
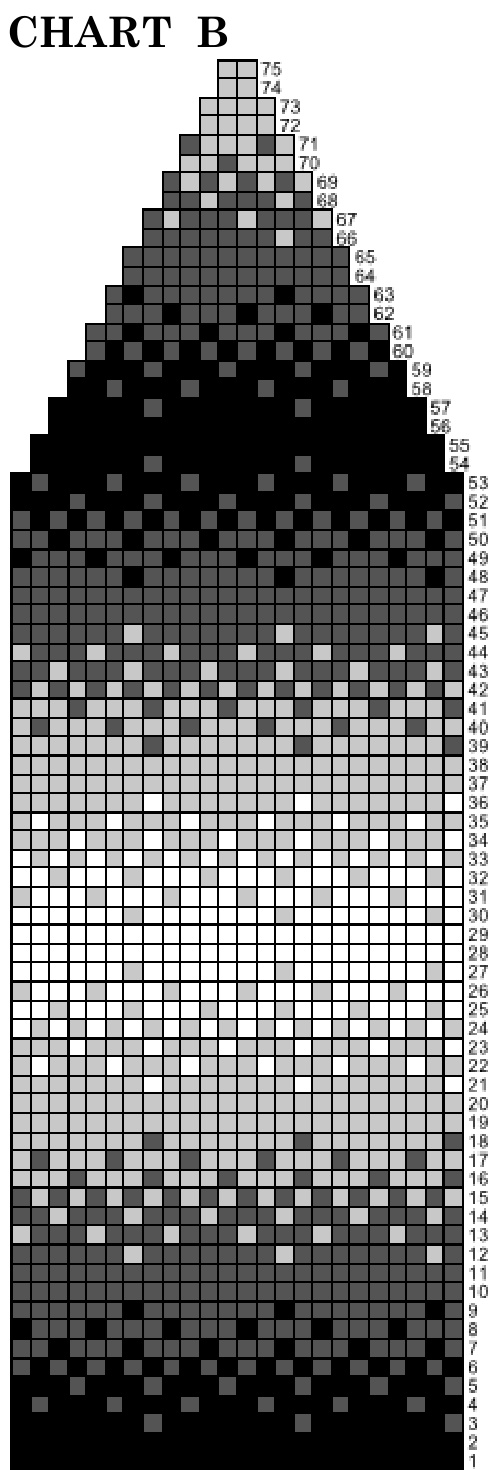
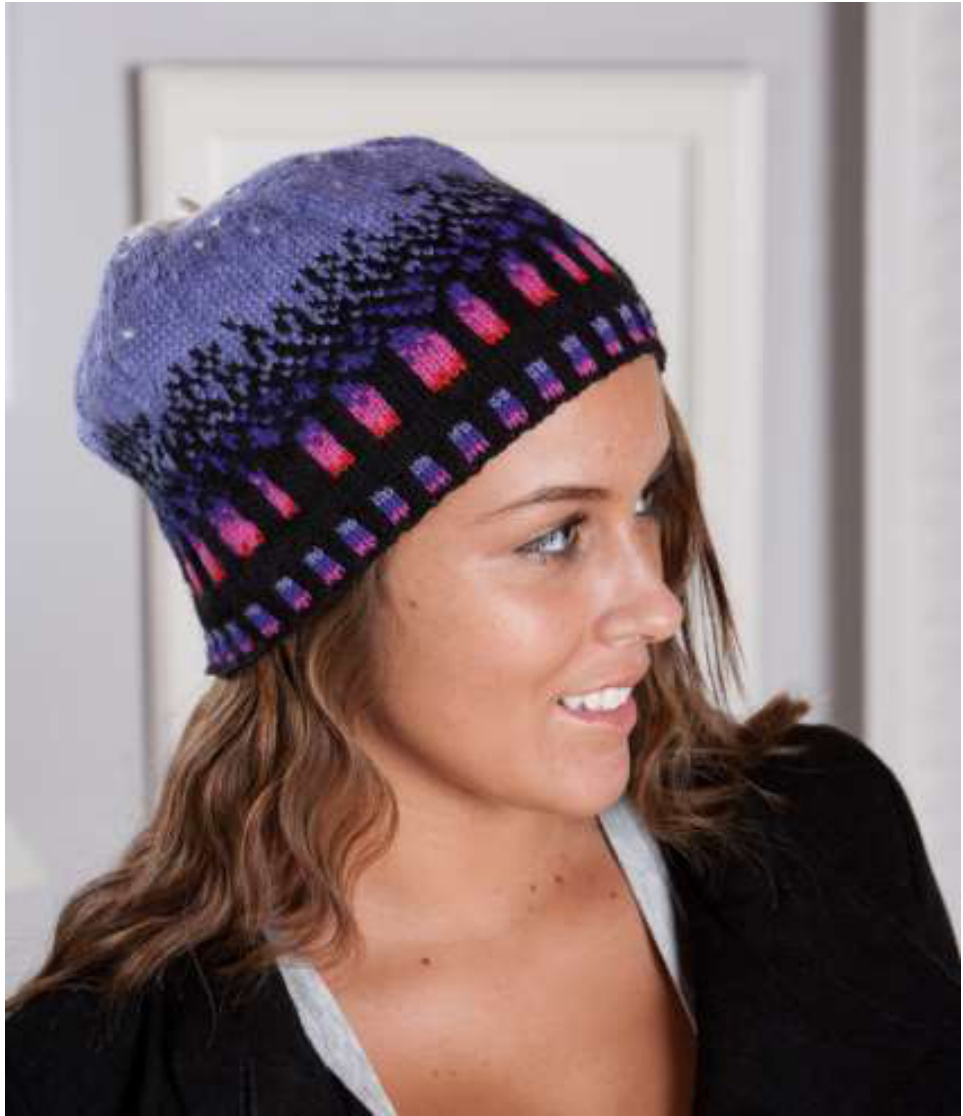
BRILLIANT TWILIGHT:TheHat
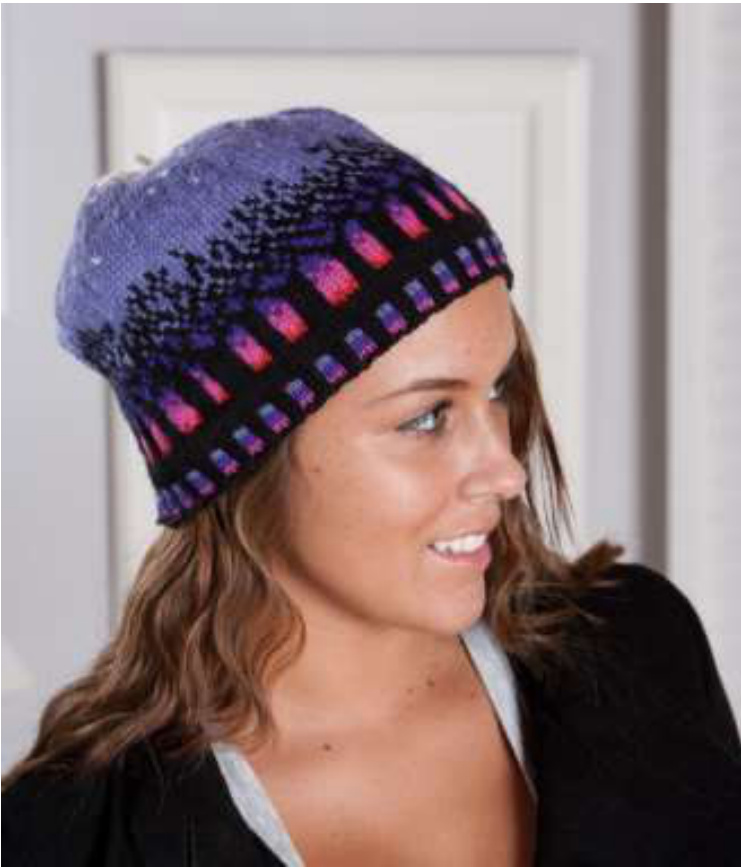
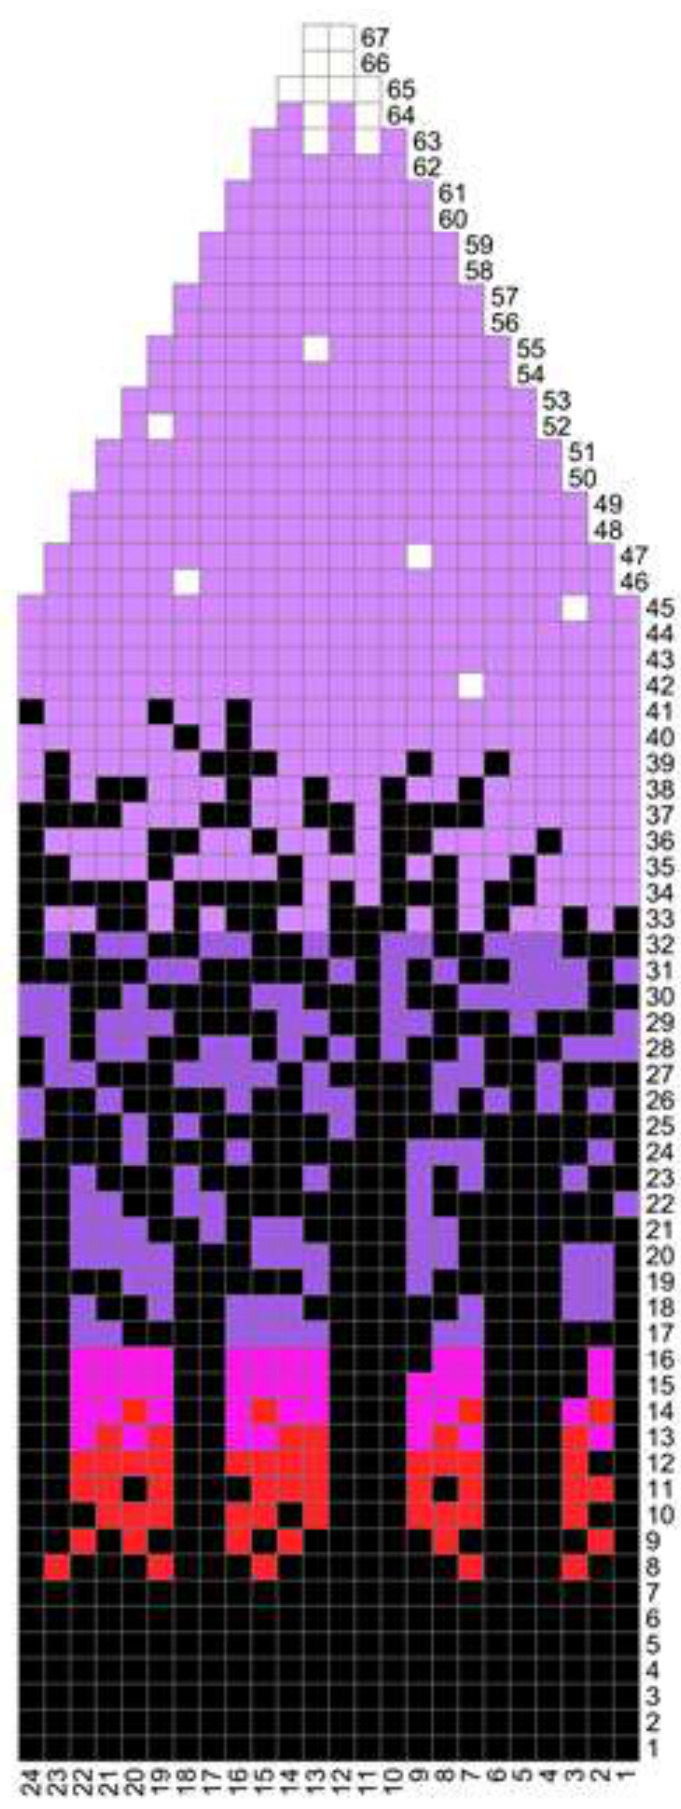
Size: Adult and Teen (Male and Female) 21"-23" Materials: 1 ball each KnitPicks Palette, Black, White, Majestic, Serrano, Aster, and Cosmopolitan (You will use only small amounts of most.) One 16" #3 circular needle, four #3 DPNs (or size needed to obtain gauge), stitch marker, and tapestry needle Gauge: 32 stitches and 32 rounds = 4" using #3 needles. Abbreviations: K2TOG = Knit two stitches together. SSK = Slip one stitch, then slip the next. Insert left needle into the front loops of the slipped stitches and knit them together from this position. Instructions: With circular needle, CO 136 sts using Black. Join to work in round, placing stitch marker and being careful not to twist stitches. Knit six rounds corrugated rib (see CHART A) using Cosmopolitan, Majestic, and Aster for knit sts and Black for purl Sts. Increase round: (round 7) Using Black, inc to 168 sts (knit 4 sts, then, inc every 4th st evenly to last 4 sts. Knit last 4 sts). Follow CHART B (7 repeats per round) for 67 rounds, decreasing as indicated and switching to DPNs when necessary. (Each dec round has 2 decreases next to each other; k2tog for first dec, and ssk for second each time.) After round 67, with 14 sts. on the needles, k2tog around. 7 sts remain. Knit last seven sts for 5 rounds; cut yarn leaving a tail several inches long. Move all sts from needles to tapestry needle, and pull tightly. Secure from the inside. Finishing: Tie and weave in or trim all color change ends. Wash and block to fit.
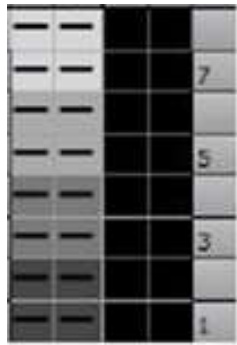
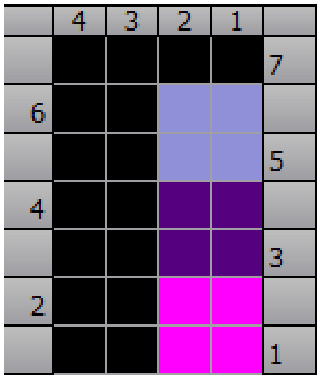
CHART A
Knit colored sts and purl black sts. Round 7 is increase round
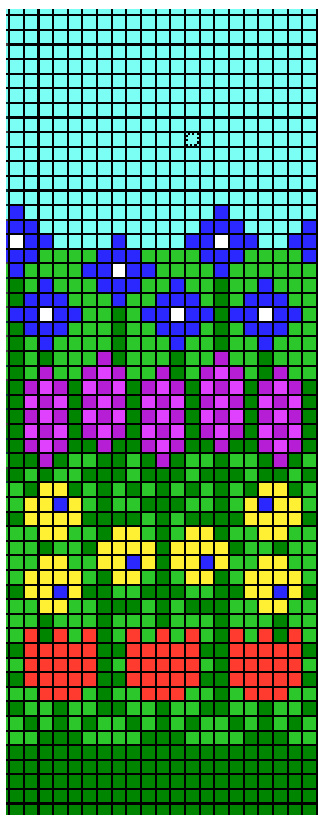
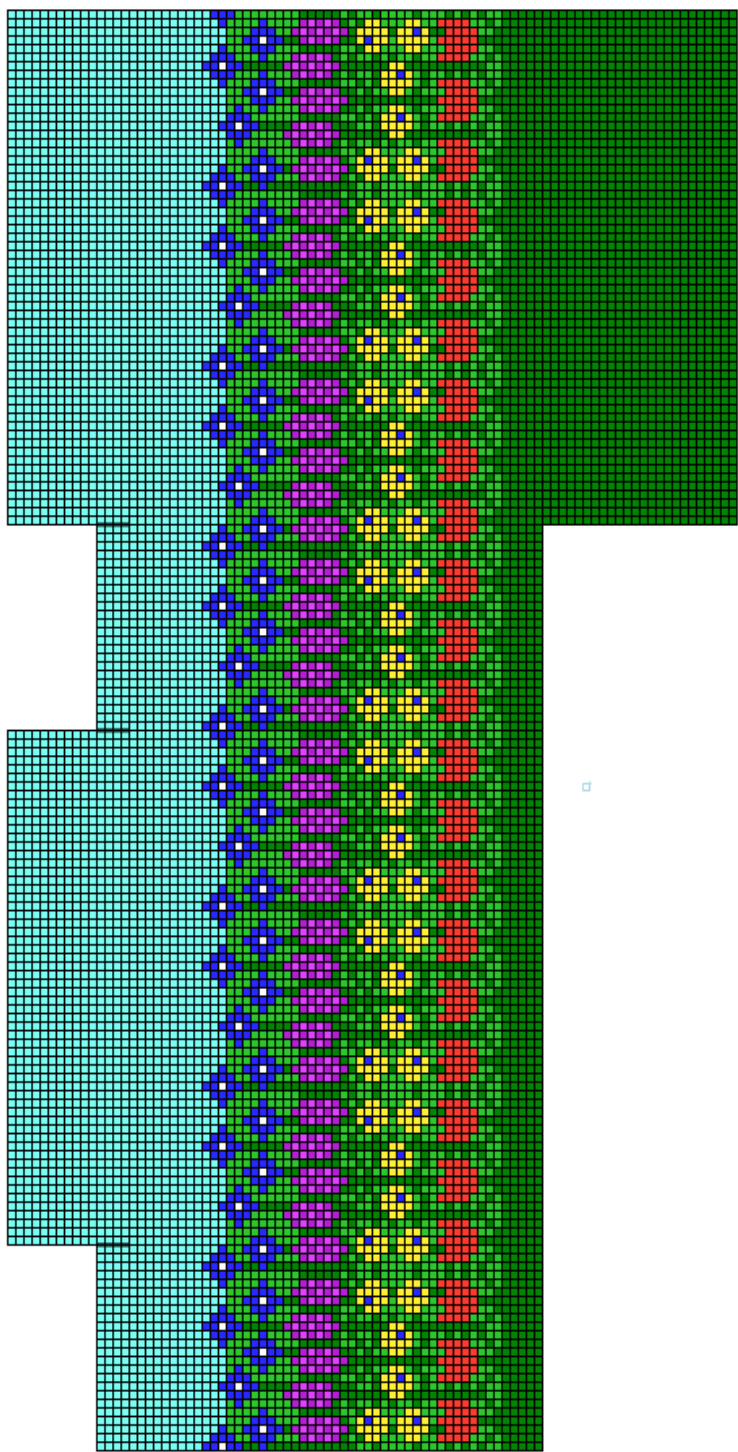
KNITTER'S PROJECT BAG: Flowers ?
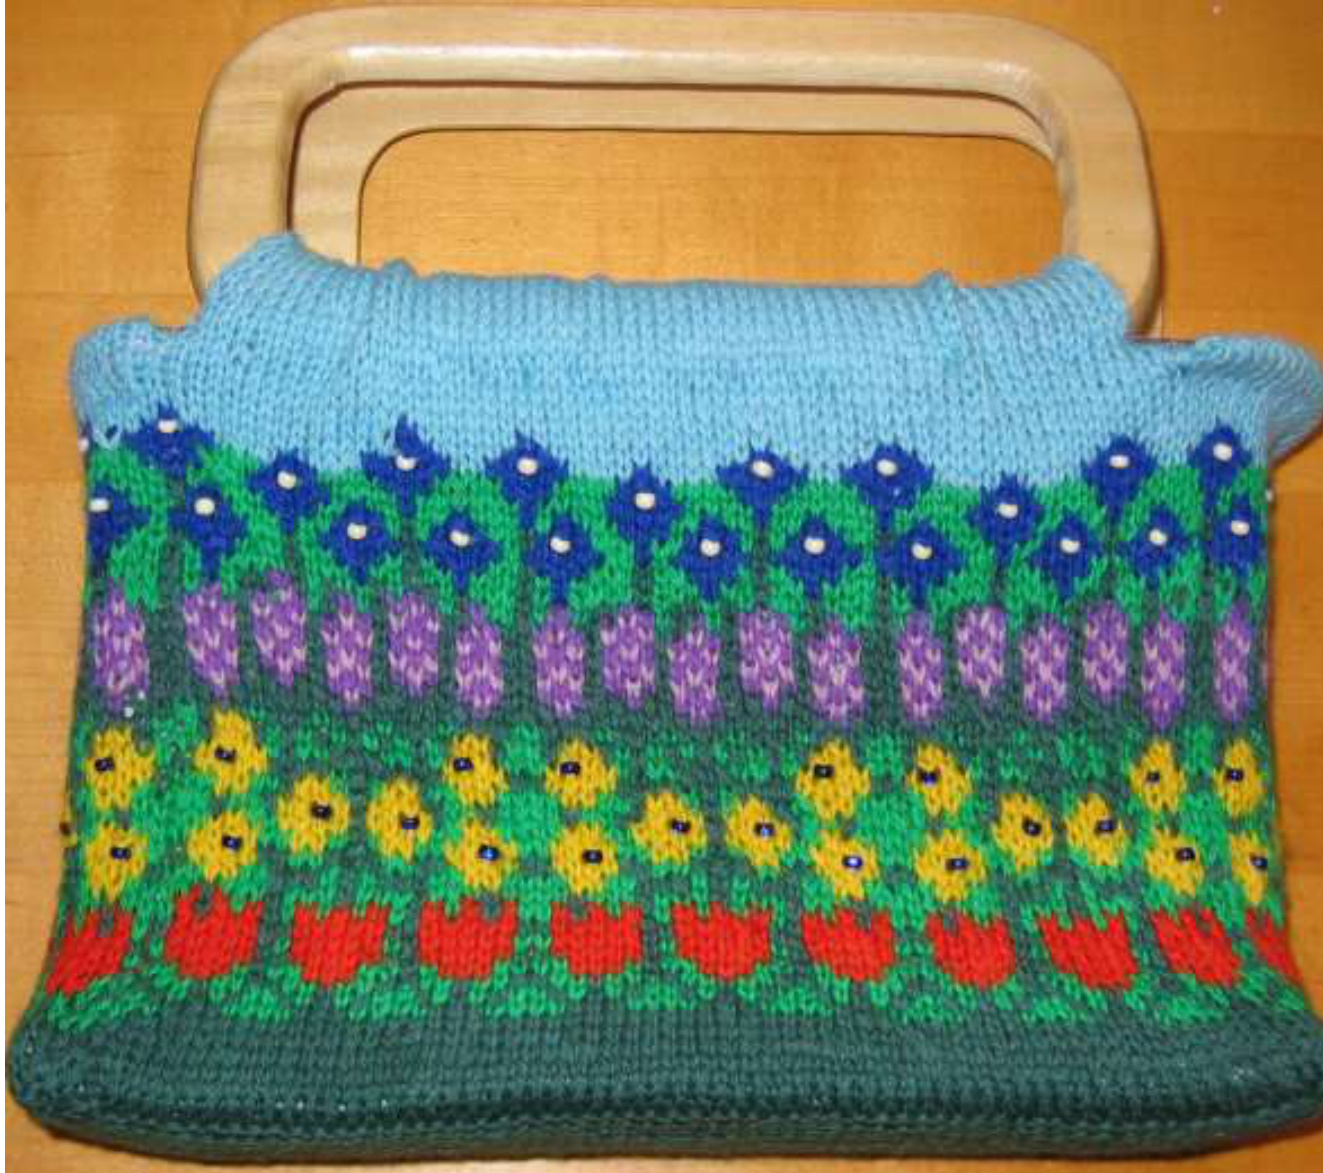
Features: Stranded-knit wool bag with fabric lining. End pocket for needles and extras. Key ring loop. Sturdy bottom insert. 7" deep by 7.5" long and 3”" wide. Wooden handles. Materials: 1 ball each of KnitPicks Palette colors. Cover photo bag knit using Forest Heather, Macaw, Tomato, Canary, French Lavender, Hyacinth, Celestial and Sky. One 16" #3 circular needle, four #3 DPNs, #3 straight needles,(or size needed to obtain gauge), stitch marker, and tapestry needle, % yard lining fabric, thread, 1 pair rectangular handbag handles (8-1/8" X 4"), sturdy cardboard, glue stick, key ring or key loop and blue and white 6mm glass beads (plus tiny crochet hook for attaching beads). Gauge 32 stitches and 32 rounds = 4" using #3 needles.
\*\*\*\*READ THROUGH ALL INSTRUCTIONS CAREFULLY BEFORE STARTING\*\*\*\*
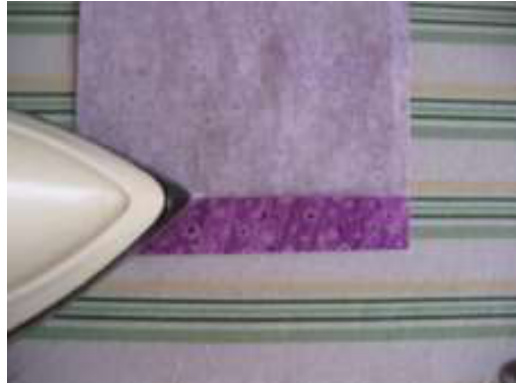
Instructions With straight needles, CO 60 sts using Forest Heather. Knit garter st for 24 rows. Then, using DPNs, pick up 24 sts on short side of garter piece, with another DPN, pick up 60 sts. on other long side and, with yet another DPN, pick up 24 sts on the other short side for a total of 168 sts. Knit using DPNs all 168 sts in Flower pattern (see CHART A) for several rounds and then switch to a circ. needle. Add marker and join, taking care not to twist sts. Knit 55 rounds, total, following pattern in CHART A (8 repeats per round), adding blue beads in center of yellow flowers and white beads in center of blue flowers, as shown in chart and cover photo. Then\*\* work stockinette back and forth on 60 sts as indicated for 14 rows. BO, leaving a long piece of yarn with which to hand sew later. Attach yarn and work stockinette back and forth on next (end) 24 sts for 4 rows. BO.\*\* Repeat between \*\* once more. Tie and trim all color change ends. Wet block with damp cloth and steam iron to smooth and flatten stockinette edges. Proceed to Lining Instructions.
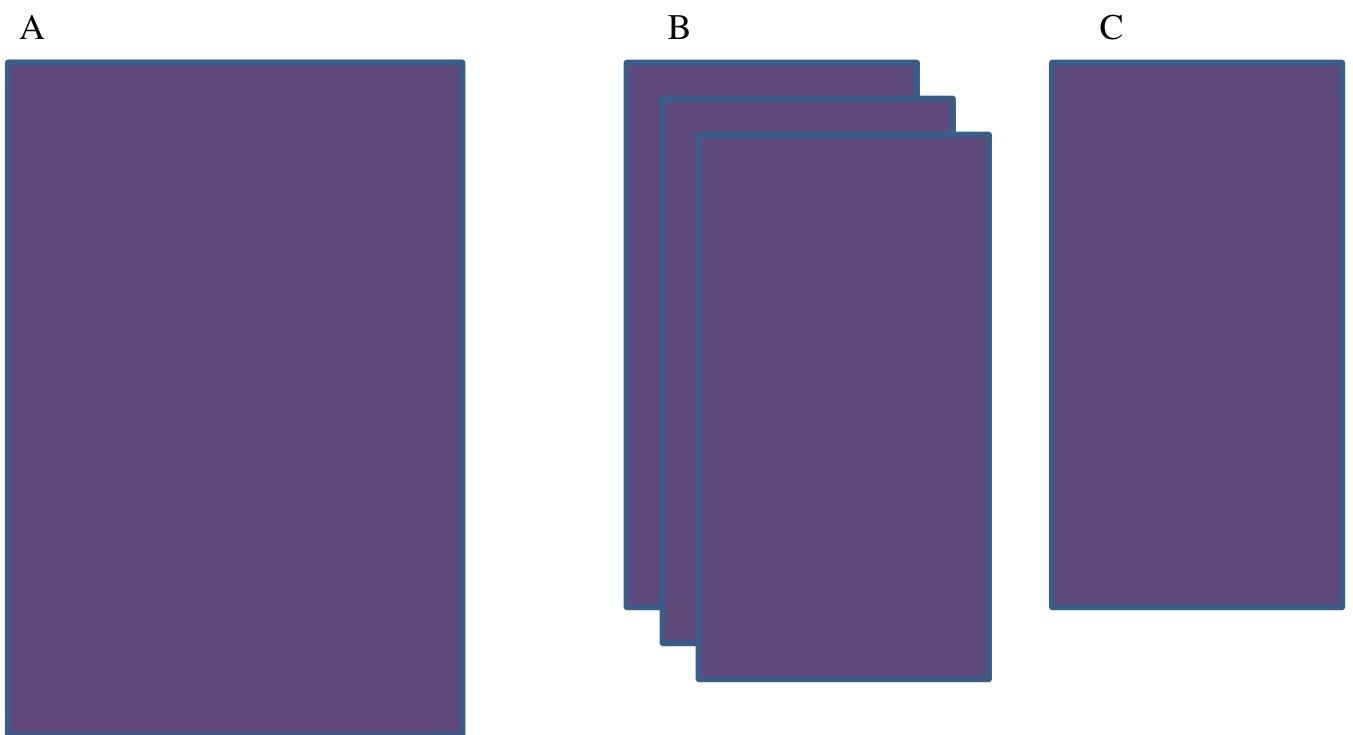
Basic Pattern Layout
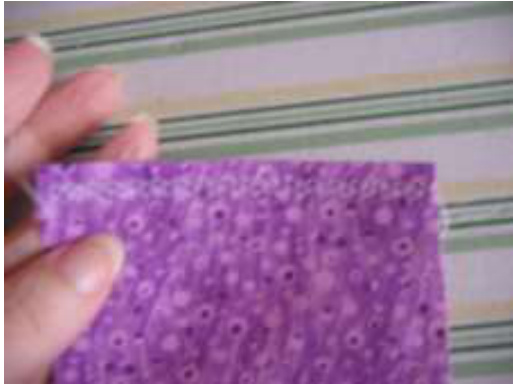
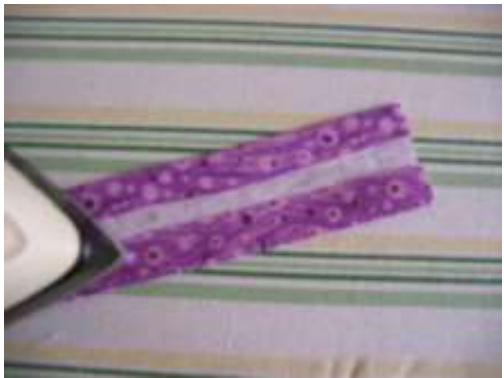
LINING INSTRUCTIONS: Cut one fabric piece (A) 8.5 inches wide (allowing for 1/4inch seams) and 21 inches long This will become the lining for the bottom and wide sides of the bag. Cut three fabric piece (B) 4x7 inches. On one piece B, turn top edge under and turn under again. Press and stitch across turned edge. This will become the end pocket. See photos i and i. Other two B pieces will become the short end sides of the lining. Cut one fabric piece (C) 3x6 inches. Fold in outer edges of long side toward center, then fold in half and press. Stitch in place. See photo ii and iv. This will become the key ring loop.
Cut one piece fabric (D) to cover cardboard, cut to fit in the bottom of the bag. With glue stick, glue fabric to cardboard and place in bottom of bag. See photo v.
ii iv

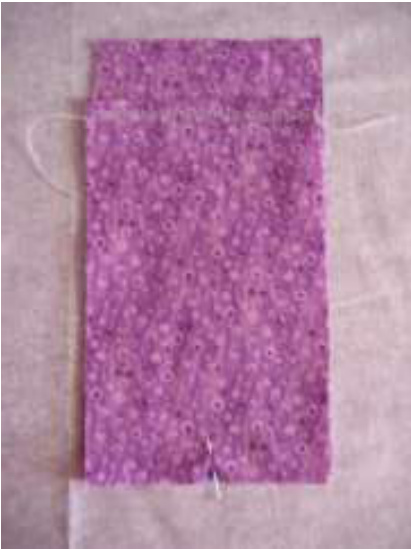
Place stitched pocket piece B on fabric piece B.

Put lining pieces together so the pocket and key loop are set in place. Pin pieces B and B together in center of fabric piece A as shown. Machine stitch only across the part where all three pieces join at bottom of B pieces. Turn pocket and end piece 90° and stitch up side. Turn so other side edges meet and stitch together to form lining shape. Repeat with other side, pinning stitched key loop (D) before stitching. Place lining in knitted bag. Place fabric-covered cardboard in bottom. Finishing: Place handle in position, wrap lined knitted piece around handle and hem stitch in place using long yarn left over from BO. Repeat on other side. Turn end edges over lining and hem stitch with long yarn piece left over from BO. Deborah Tomasello's contact information: E-mail: CoeDeborah@aol.com Ravelry Group: ColorworksByDebi http://www.ravelry.com/groups/colorworksbydebi deborah-tomasello-designs Ravelry: PatchworksByDebi My Original Designs Deborah Tomasello


