Hand Knitted Gift Wraps
Copyright @ 2015 by Deborah Tomasello All rights reserved. This book or any portion thereof may not be reproduced or used in any manner whatsoever without the express written permission of the author except for the use of brief quotations in a book review. WARNING: Giving or accepting a free copy of this pattern, without permission of the designer, is stealing.
Dedication
In memory of my father who taught me not to be wasteful long before it was PC.
Preface
We live at a time of heightened public awareness concerning the health of our planet. Questions about the very existence of life on Earth are being raised by scientists. We are told much of the problem is a result of human over-consumption and waste of our world's resources. We have been encouraged to take note of, and shrink, the size of our carbon footprint, both as individuals and as a global society. Rather than live in fear of the predicted consequences of our frivolous, careless wastefulness, we endeavor to change Earth's ecological trajectory, one person at a time, and one small step at a time. We recycle. We conserve. We look for ways to be lesswasteful. It is in this spirit that I wrote Hand Knitted Gift Wraps. I have created patterns for gift wraps that use left-over yarns from other projects, reclaimed yarns from old garments, and yarns we have in our stashes. Readers are encouraged to think of creative ways to wrap their gifts, to use materials on hand that would otherwise not have a use. For knitters, this means using yarn we already have—even yarns we have already used! Who among us has cleaned up all that expensive wrapping paper after a holiday celebration and not thought about the wastefulness? Hand knitting gift wraps is an attractive option over using disposable wrapping paper. And the best part is that the gift wraps you make from the patterns in this book are not thrown away! I have designed them so that they can be repurposed as useful and attractive items once they no longer serve as gift wraps. It is my hope that the reader won't limit herself to working my designs strictly as written, but that she will use the information included here as a starting point from which to launch her own creativity. Don't be constrained by my instructions. Use them, expand on them, and add your own ideas. Knowing we are helping the Earth and securing our future on our planet can only add to the already great joy we get from knitting.
Contents
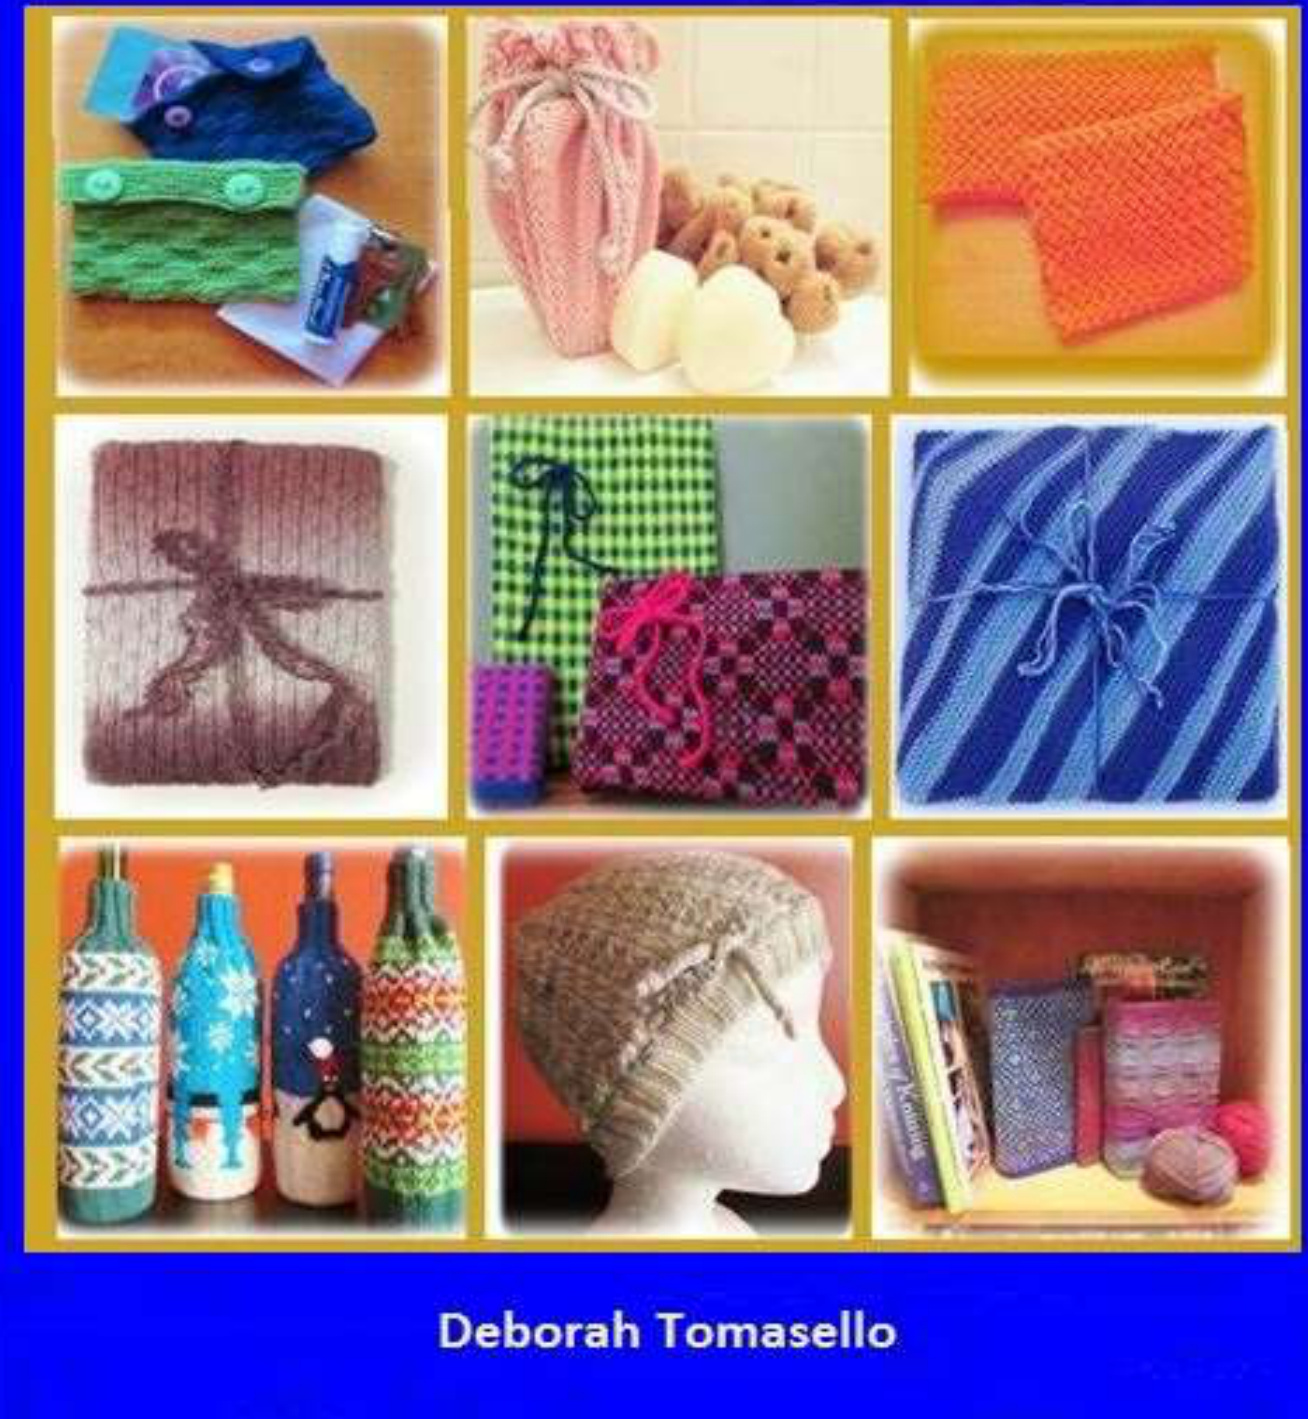
Dedication 3 Preface 5 Introduction 9 Abbreviations 11 What is stranding? 13 Color Dominance Explanation 15 Choosing the Right Wrap for Your Gift 17 Secrets: Gift Card Pouch 19 Cotton Cloth Wrap 23 Wine Bottle Sweaters 27 Soft Serve Swirl 37 Fern Lace Wrap 45 Mini Wicker-Stitch Wraps 49 Book Cover Wraps 51 Wrap a Box 57 Reversible Slip-Stitch Wrap 61 Stripes on the Bias: Garter-Stitch Wrap 65 About the Author 67 Contact Information 68
Introduction
Presentation is everything, so the saying goes. Spend hours making a delicious homemade lasagna from your favorite aunt's time-honored recipe, plop it on a paper plate, and hand the recipienta plastic fork. Or, spend hours making a delicious homemade lasagna from your favorite aunt's time-honored recipe, place a perfectly shaped slice on fine bone china, garnish it with Parmesan shavings, add a sprig of bright green parsley, and lay it on a table dressed in white linen. Pour a glass of vintage merlot. The more thoughtfully presented lasagna will taste better. What better way is there to present a hand-knitted gift item than in a handknitted gift box, gift bag, pouch or cozy? The thoughtfulness that went into the knitted gift can be extended to the gift wrap, and this will enhance the recipient's happiness and appreciation. In Hand Knitted Gift Wraps, I explain the importance of presenting a present. Well-planned presentation adds to the joy of the gift giving experience for the gifter as well as for the giftee.I include a variety of gift-wrapping ideas, shapes, and sizes. Thanks in large part to sites like Ravelry, knitters are flooded with an infinite array of prospective knitting projects. Many of us realize we can't knit fast enough to make all the beautiful things we want to knit. And we can't use all the projects we have finished. We enjoy giving them away. Hand Knitted Gift Wraps is something fresh and new. The fact that the book contains a wide variety of project ideas, ranging from small to large, from simple to complex, from practical to ornamental means most knitters will see, within its pages, at least a few items they'll want to knit. In Hand Knitted Gift Wraps, I think outside the box. All instructions are clearly written and easy-to-follow. The book is user-friendly. You will find the language is relaxed and entertaining, as well. The patterns included in these pages range in complexity from a simple garterstitch wrapping to lace patterns, to a more complex, stranded wrapping. There are instructions for gift boxes, gift bags, book covers, and a knitted pouch in which to wrap hand-knitted socks, (and this wrap itself becomes an attractive, wearable accessory after the sock gift is unwrapped). I add a special knitted wrap for gifting needles or a needle gauge in addition to, for example, a gift of yarn to a fellow knitter. It gets better. The wrap is repurposed as a small project bag or hat! Giving a device, such as a smart phone or tablet? I include handknitted wraps for items like these, as well. Giving a bottle of wine? Got it covered. And no gift wrapping would be complete without ribbons and bows. I include ideas for these final touches, as well. I have written and worked up the patterns using fingering-weight yarn, because as a stranded knitting pattern designer, that is what I have so much of. However, you can use any weight yarn you have in stash, left-over from other projects, or reclaimed from discarded garments. You will simply need to adjust needle size and gauge to suit your needs. As knitters, we never stop learning new techniques. For the more advanced wraps, like stranded ones, I explain what stranding is, what color dominance is and how it works, the choices involved before beginning a project, and the importance of maintaining an even tension and floats when stranding. I also discuss how to read colorwork charts and how these differ from other knitting charts. I include links to the helpful visuals available via Youtube. Whether a knitter prefers to knit lace or Fair Isle, garter stitch or stockinette, whether she wants to embellish with buttons, pockets, or bows, certainly she will find something in Hand Knitted Gift Wraps she wants to make. And that's a wrap!
Abbreviations
BO — bind off Bumpless M1 -- Modified KFB. Make a st in st just knitted by knitting in the front of t st and then, after re-orienting st legs, knit the st again in the front of the st. Please watch my "Bumpless M1" video: https://www.youtube.com/watch?v=syFeOy1B90k cC — contrast color co — cast on DPN - double-pointed needle Dec — decrease Inc — increase K- knit KFB — knit in front of st and then again in back loop of st K2TOG — knit two stitches together M1 — knit in front loop and then again in the back loop of stitch MC — main color P-purl PM — place marker PSso — pass slipped stitch off Rnd — round SSK — slip one stitch, then slip the next. Insert left needle into the front loops of the slipped stitches and knit them together from this position ST — stitch WYF — with yarn in front WYB - with yarn in back YO — yarn over
What is stranding?
Some of you might be new to the idea of colorwork knitting, particularly stranding. You might have felt intimidated by the seeming complexity of the method. Fear not! Stranding is easier than you might think. A few of the designs I created for Hand Knitted Gift Wraps employ stranding. Below is a brief explanation of the technique, plus things to look for and to concentrate on as you begin your foray into colorwork knitting. Stranded knitting is a technique that allows a knitter to work more than one color, or strand of yarn, into a row or round at a time. You carry, or "float," the yarn not currently used on the back of the work for a stitch or series of stitches, picking up that color and releasing the other as needed per design. As with any technique, to get a nice, even-tensioned project, you need merely get comfortable with the way you hold your yarns and practice until you achieve an even tension. It will help to watch my two, brief, easy-tofollow Youtube videos that demonstrate the method, how to read a colorwork chart (which differs from lace charts), and explain the importance of maintaining even tension and floats. https://www.youtube.com/watch?v=rMyzXlsxFhw https://www.youtube.com/watch?v=iQlc4UQWuzc Because stranding can be accomplished almost exclusively in-the-round (as opposed to flat, or back and forth) the knitter can avoid purling, for the most part. You certainly can strand "flat," but you don't have to. In order for a colorwork design to best be seen, it is important to use contrasting colors, when stranding. A hardtwist yarn that yields good stitch definition is a better choice for stranding than a soft yarn with a halo. But, even this is always a choice left to the individual knitter's taste. Traditionally, rules have existed for the "proper" way to hold yarns while stranding. We have the Portuguese method where the knitter holds her yarns around her neck. The yarn is sometimes placed in a pin on her lapel. This practice frees up her hands, gives relief to that poor index finger used for tensioning in Continental knitting, and yarn tension issues are taken care of almost unconsciously. The technique also helps prevent the yarns from tangling. We also have the Continental method where the knitter holds her dominant yarn in one hand and her background yarn in the other. She scoops the yarn she wants for a given stitch, as needed. Also, we have the practice of holding both yarns in one hand, called One-hand stranding. For knitters, like me, who are throwers, this method works best. By simply picking up the desired strand, knitting as needed, dropping it and grabbing the other strand, we accomplish our colorwork designs. There are no right-or-wrong rules when it comes to holding your yarn. Do what works for you. If you can accomplish a piece that looks as nice on the back as it does on the front, you are doing it correctly. Practice, and you will find a method that is comfortable for you. Most important is to find a way that makes stranding the joy it should be. The stranding patterns I include in this book are wonderful patterns for beginning stranders. The projects are small, the repeats are easy, and I use no more than two colors per round. Give it a go! I bet you and your gift recipient will both love the results.
Easy Color-Dominance Explanation
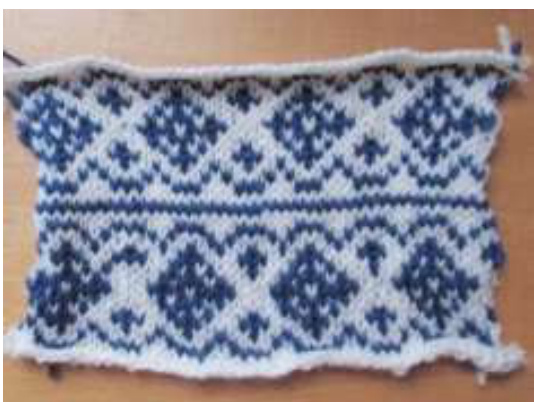
In the above swatch, I knitted the same motif across the piece, and then I repeated it. The only difference I made was the position in which I held my yarns. In the bottom half, I held my yarns so that the blue was dominant, that is to say more obvious than the white, on the front of the work, and the white receded into the background. On the top half, I knitted the same stitches but I held my yarns so that the white dominated and the blue receded. You see a definite difference in the appearance of the motifs when comparing the bottom and top halves of my swatch.
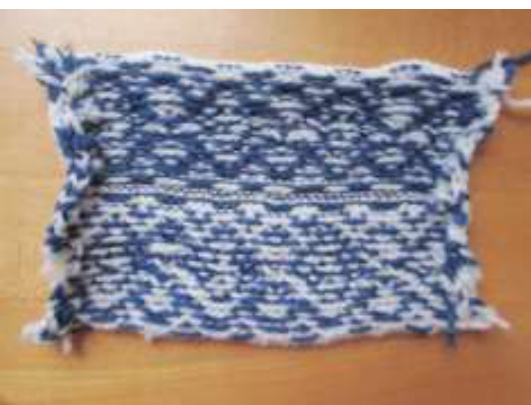
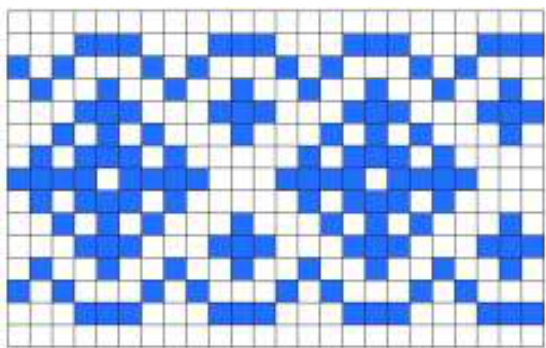
Viewing my swatch from the back, you notice that the color that dominated on the front recedes on the back, and the color that was recessive on the front dominates on the back. A color cannot be dominant both on the front and the back at the same time. So, how do you control for this? How does a color become dominant? I have read many explanations of color dominance, and frankly, they all leave me scratching my head. Terms are used like "over" and "under," which are nonsensical to me. Over where? Under where? Also, each knitter has her own yarn-holding method. We need an explanation that works no matter how we hold our yarns. First, it is important to point out that, whatever way you hold your yarns when stranding, you want to maintain the same position throughout the piece so that you catch your floats the same way, consistently. That said, here's how color dominance happens. (And it happens whether you like it or not!) The color that will dominate---or stand out—on the front of your work is the color that consistently lies closer to your work as you go. In the above example, on the bottom half of the front of the piece, the blue is more prominent than it is on the top portion of the piece. This is because it lay closer to the piece as I was working the bottom half. How do we know this? Look at the back of the swatch. The bottom on the back shows more white relative to the top of the swatch. You see more white because the floating yarn, the white, is floating over, or around, the blue...it lies further from the piece, has farther to travel, than the blue. Because the white lies closer to you on the bottom half when viewing the back, it is more visible to you than is the blue. Because it is more visible—dominant—on the back, it cannot be, at the same time, the dominant color on the front. No matter how you choose to hold your yarns, one in each hand, both in the right hand, or between your toes as I do, the above rules apply. Try a swatch as I did. Try knitting with the yarns in one position and then switching them. Take note of the color that has to travel to float around the color that lies closer to the work. The one that has to travel to float around the close color is not the color that will dominate on the front of your swatch, but it is the color that will be most evident on the back. Try knitting this chart with two, highly-contrasting colors and DPNs so that you are working in-the-round. You will cut the swatch open when you complete it:
Choosing the Right Wrap for Your Gift
We give gifts in all shapes and sizes. Finding the right pattern in which to wrap our gift is important. While I give instructions and dimensions for a particular size, generally, you can adapt any of the designs to suit your needs. Is your gift in a box? You need to determine your box's dimensions and work the design in my Wrap a Box pattern as I instruct, to get the size and shape you need for that particular box. After your project is no longer being used to wrap a gift, it can become a project bag or a market bag. The uses are only as limited as the knitter's imagination. Perhaps you are giving a gift card, which is an increasingly popular gift choice. You might choose to work the Secrets pattern, which will repurpose, after the gift is opened, to a hand-knitted, button-closed pouch in which to carry tissues, keys, Chapstick, or other personal items. If you are a knitter who prefers lacework, you have some choices, too. Knit the Fern Lace Wrap to enclose a gift of yarn to a fellow knitter, for example. The knitter will have an additional gift of project bag once the wrapping is no longer needed. We never have too many project bags. And, if the gift recipient is a nonknitter? Well, she can use her Fern Lace Wrap as a hat. Are you giving a bottle of cologne, lotion, soap or other toiletry gift? Knit the Cotton Cloth Wrap and the giftee receives an additional gift of a lacy, cotton washcloth. Maybe you're giving a clothing item, such as a blouse, sweater or pajamas. You might choose to knit the Stripes on the Bias: Garter-Stitch Wrap, secured with a curly yarn ribbon and bow. And the recipient will have a decorative pillow cover after the wrapper is repurposed. Giving a bottle of wine? I have included designs for Wine Bottle Sweaters for all occasions. After you have given your wrapped wine gift, the recipient can use the sweater when she next has occasion to give a bottle of wine. The sweater can be used over and over as it travels from recipient to recipient. This wrap is the gift that keeps on giving! If you are knitting mittens or socks, you might want to knit the Soft Serve Swirl wrap. It is temporarily stitched closed along the edges to enclose your handknitted gift. Once the running stitch is pulled loose, the wrapper is transformed into a beautiful cowl! Two, two, two gifts in one! Books are always popular gifting items. Wrap your book in a hand-knitted book cover. I have included three options for knitting your book cover, and these are worked flat. After the gift is opened, the wrapper becomes its permanent protective cover. Or it can transform into a needle case for knitters. You might have your own repurposing ideas for this one, too. Gifting a box of candy? Or perhaps you're giving a Tablet or other device this year. I like the Reversible Slip-Stitch Wrap for this. The dimensions are easily adjustable; the wrapper is completely reversible, with each side comprising an attractive stitch design. It is held closed for the purpose of gift giving with a curly yarn ribbon. Want something unique and eye catching for a gift of jewelry? Knit the Mini Wicker-Stitch Wrap. You can change up the size as needed to accommodate an earring box, bracelet box or even a necklace box. Use neon yarn, and the repurposed pouch can hold tissues or sunglasses, and it will be readily spotted in your bag or purse.
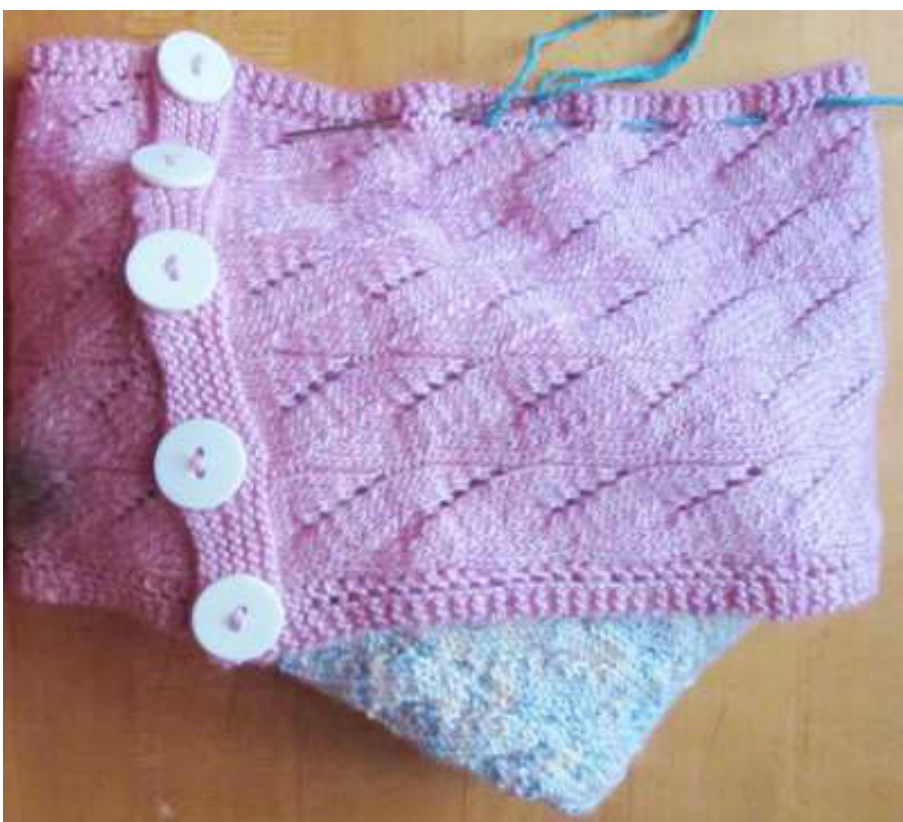
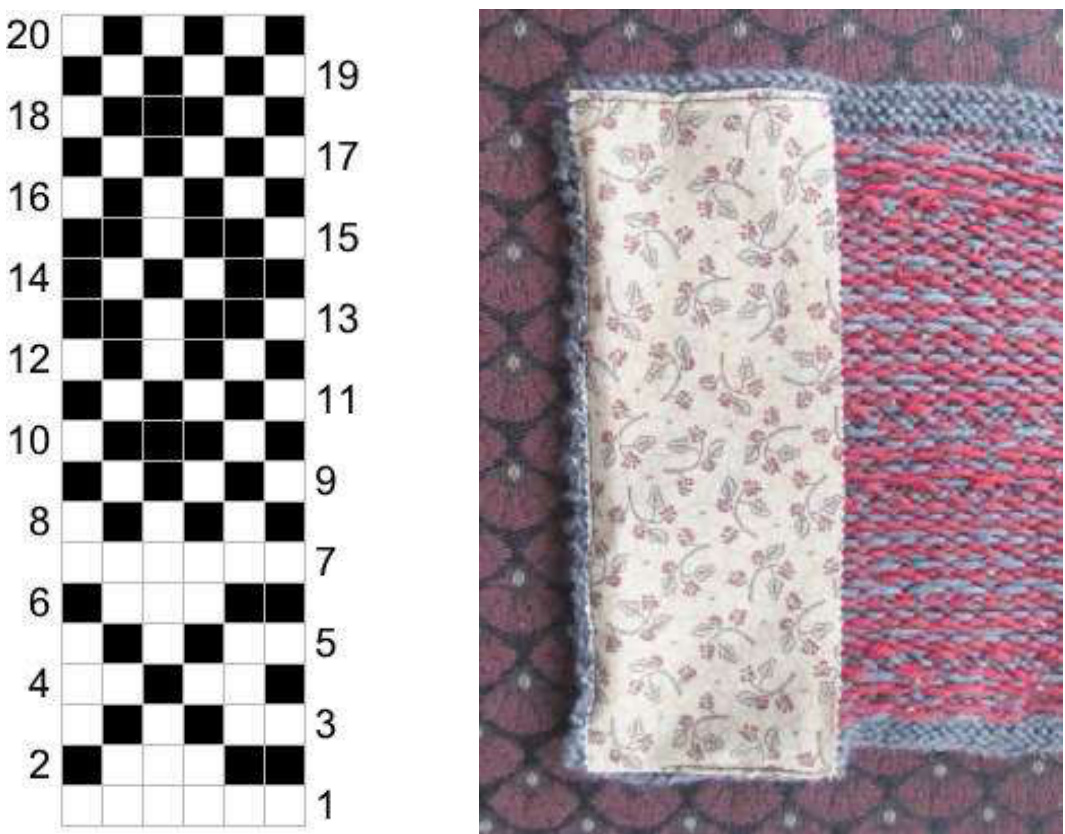
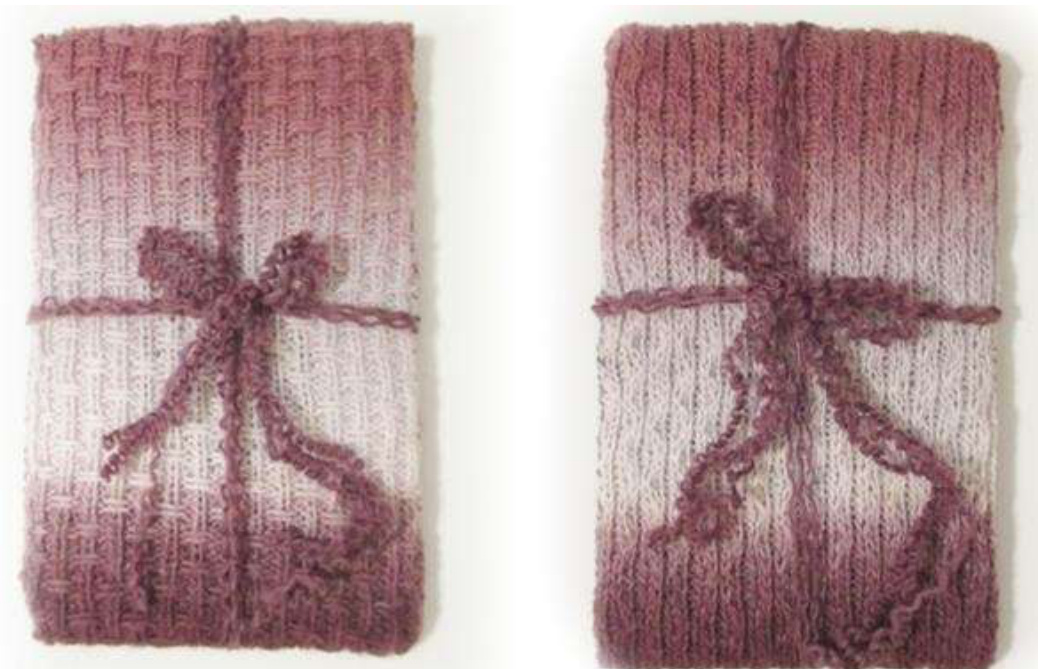
SECRETS: Gift Card Pouch Re-Purposed: Pouch for Personal Items
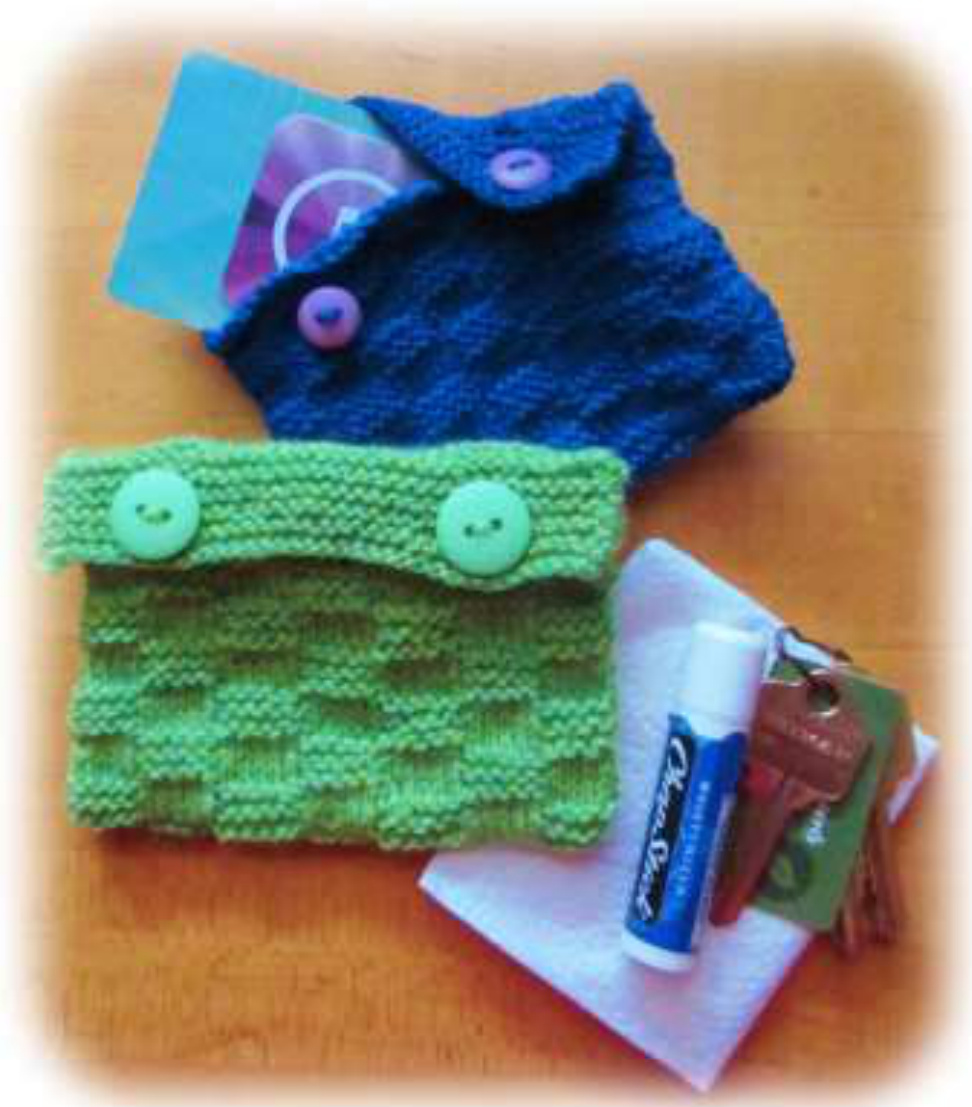
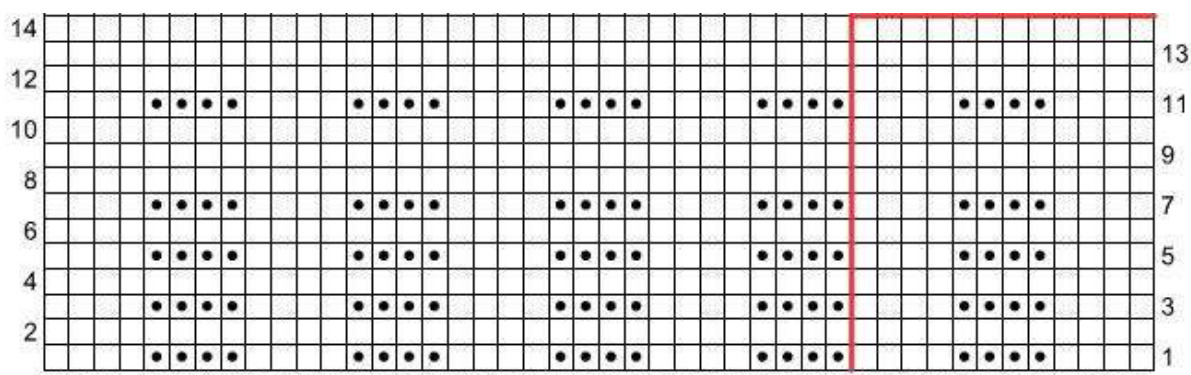
You will use less than 15 g of fingering yarn to wrap a gift card. Once the recipient has opened her gift, she will have an additional gift in the wrapper itself! She will have a hand-knitted, button-closed pouch in which to carry tissues, keys, Chapstick, and other personal items. SIZE: TBD by knitter, but cover pouch measures 3" x 4". MATERIALS: Approx. 15g (50-70 yds) of fingering yarn Two #1 needles (Straight needles or 2 DPNS used as straight needles) Two %-inch or %-inch buttons Tapestry needle GAUGE: Gauge is not critical, but you will get approx. 7-8 sts per inch using #1 needles and fingering-weight yarn. INSTRUCTIONS: Leaving a long tail for sewing side seam later, CO 35 sts. Follow chart or written instructions below until your piece measures about 7 inches.
Written Instructions for pattern repeat:
Row 1: k5, p5 across, ending with k5. Row 2: purl across. Row 3: k5, p5 across, ending with k5. Row 4: purl across. Row 5: k5, p5 across, ending with k5. Row 6: k5, p5 across, ending with k5. Row 7: knit across. Row 8: k5, p5 across, ending with k5. Row 9: knit across. Row 10: k5, p5 across, ending with k5 A word about the chart: Traditionally, lace charts have been written to be a symbolic representation of what the knitted piece should look like as seen from the front side. This means that, if you were knitting back and forth, you'd have to create a st on the back side that would result in the st that appears on the chart from the front side. (You are, no doubt, familiar with the blank square meaning k on the rs and p on the ws). Charts were written this way so the knitter could visualize what the design would look like when knitted, but it necessitated some fancy stitch-translating in the knitter's brain. We no longer need to have charts represent the design. We have digital cameras and can show actual swatches of the piece, so we can know what it looks like without having to interpret chart symbols. This makes life easier and eliminates that mental translation step. You simply notice which side of the chart a particular row is numbered, and you begin working from that side across, knitting the st the symbol represents. If you see a blank square, you always knit the st, and if you see a black dot in the square, you always purl that st, regardless of the direction from which you read the chart. Easy! And, you can always use the written instructions if you have chart allergies.
CHART for pattern repeat:
| 10 | |||||||||||||||||||||||||||||||||||
| 9 | |||||||||||||||||||||||||||||||||||
| 8 | |||||||||||||||||||||||||||||||||||
| 7 | |||||||||||||||||||||||||||||||||||
| 6 | |||||||||||||||||||||||||||||||||||
| 5 | |||||||||||||||||||||||||||||||||||
| 4 | |||||||||||||||||||||||||||||||||||
| 3 | |||||||||||||||||||||||||||||||||||
| 2 | |||||||||||||||||||||||||||||||||||
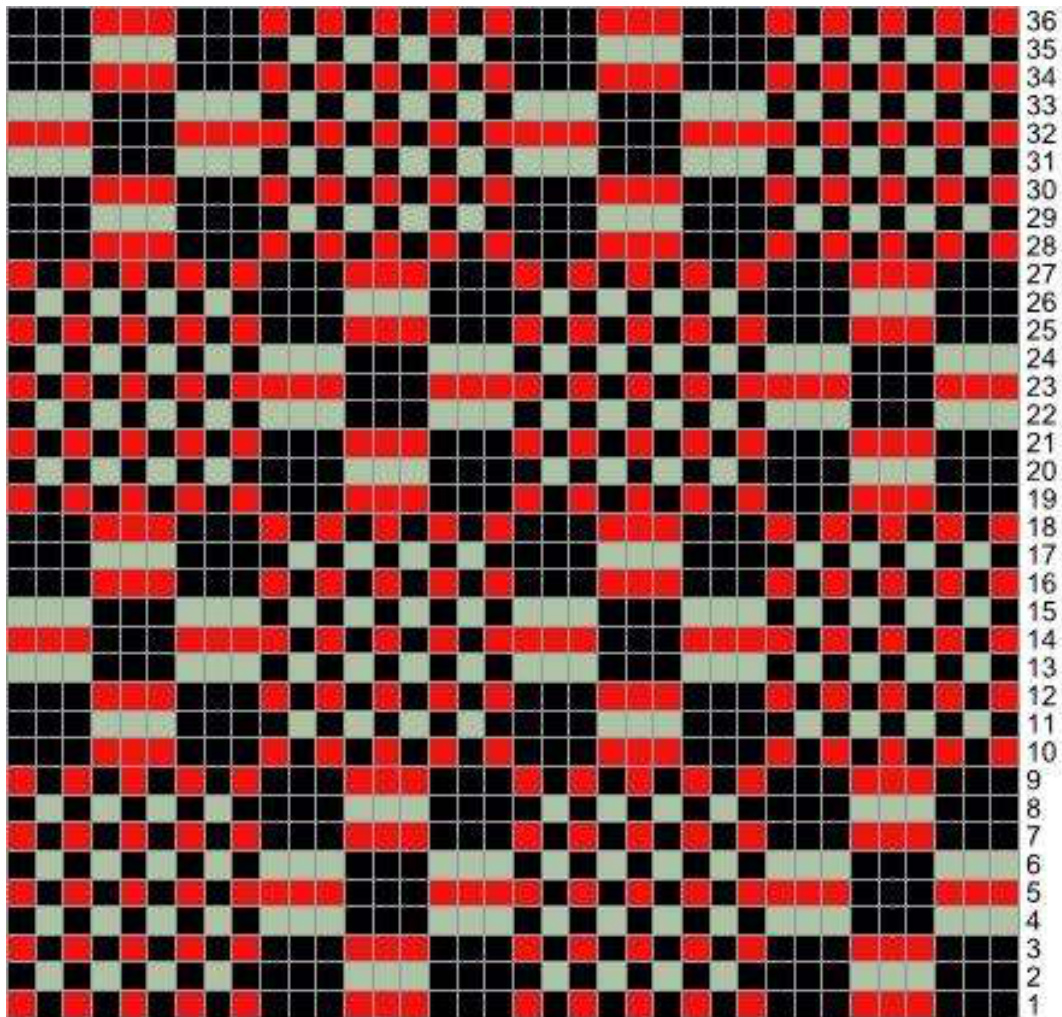
135343333029876548222019876154131210987654321 Once you have achieved the length you want (about 7")by knitting chart the desired number of repeats, you are ready to knit the closure border. Do this by knitting five rows of garter st. Turn. On next row, you will be creating button holes: k7, BO2, k to last 9 sts, BO 2, kfinal 7 sts. Turn. K7, CO 2 sts, knit to last 9 sts, CO 2 sts, k final 7 sts. Work 4 more rows of garter st. BO. Finishing: Using long tail left from initial CO, and with right sides together, sew side seam up, leaving a few rounds plus your closure border unseamed. Sew the other side seam of your pouch the same way. Turn work right-side out. Attach buttons to align with the button holes. Tie and trim all yarn ends.
Cotton Cloth Gift Wrap Re-Purposed: Feminine Wash Cloth
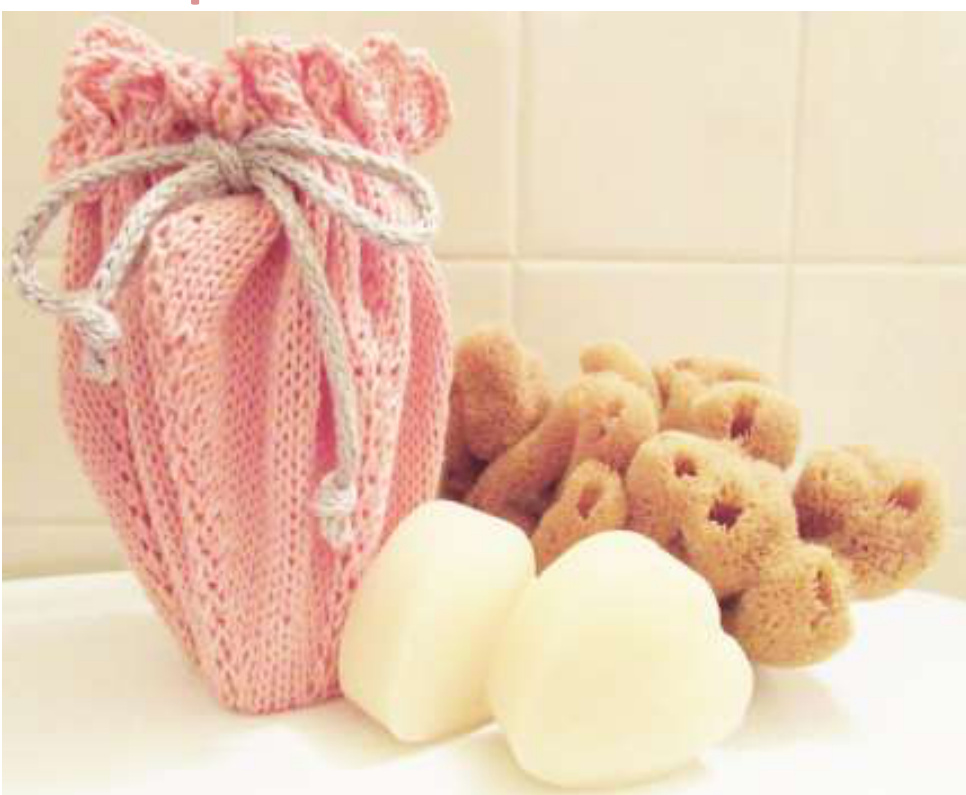
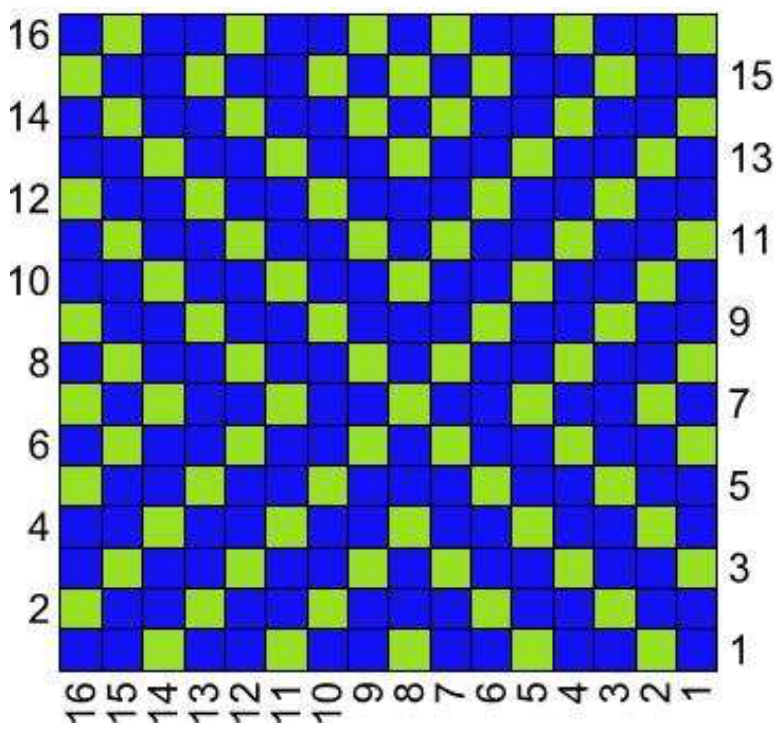
This sweet wrap is knitted with fingering-weight cotton, it is knit in-the-round, and it finishes with a lace edging. It can be knit to any desired size, and the border can be as narrow or deep as the knitter desires. When complete, you can wrap it around gift soaps, lotions, shower gel, or perfume. After the gift is unwrapped, the recipient gets an additional gift of a hand- knitted, cotton washcloth! With one 50g skein (about 230 yds) of cotton yarn, you can knit an 18" diameter washcloth. The cover wrap measures 16" and used about 200 yds of cotton yarn. SIZE: TBD by knitter: Cover cloth measures 16 inches across the diameter MATERIALS: Approx. 50g of fingering cotton yarn (230 yds--or more if you want a bigger cloth) One 16" #3 circular needle and 5 #3 DPNS for beginning Stitch markers Tapestry needle Two #2 DPNs or straight needles and contrasting fingering yarn for i-cordbow GAUGE: Working pattern as described should yield 16-18 inches diameter after blocking.(approx. 7 sts/inch) INSTRUCTIONS: Working on two DPNs to start, and leaving a tail about 12" long for sewing later. CO 4 sts. [K1, bumpless m1] across for 8 sts total. (See bumpless m1 video linked above.) Turn. Purl 8 sts. Turn. K1, M1 for 16 sts total. Turn. Purl 16 sts, placing markers very 2 sts so that you have 8 sections of 2 sts each. Turn. K1, (K1, M1), pass marker, across for 24 sts total. Split sts evenly on four DPNs, (6 sts on each needle). Continue to work in the round. (You will sew opening closed later.) From here on, you will be working the next two rounds (See CHART A): Round 1: knit Round 2: Pass marker. k1m1 in first st after marker. K across to last st before marker, k1,m1. Pass marker. Work this pattern until you have at least 6.5 inches (more if you want a larger wrap/cloth). Then, on the next round, YO, K2TOG around. Next round: Knit. Then begin following the lace chart (CHART B). Work lace edging to desired size, ending with a knit round. BO loosely. Finishing: With tail from CO, sew closed small slit left at the beginning when knitting the first few rounds. Tie and weave in or trim all color change ends. Wash and block flat. Meanwhile, with contrasting color for bow, and two #2 needles, knit an i-cord that will be long enough to weave through the holes created in your YO, K2TOG round and tie in a bow. Do this to wrap your gift and tie in a bow. CHART A Knit all the odd-numbered rounds and increase on all the even-numbered rounds. Work in established pattern until you reach the desired size, remembering that you will be adding diameter with the lace edging.
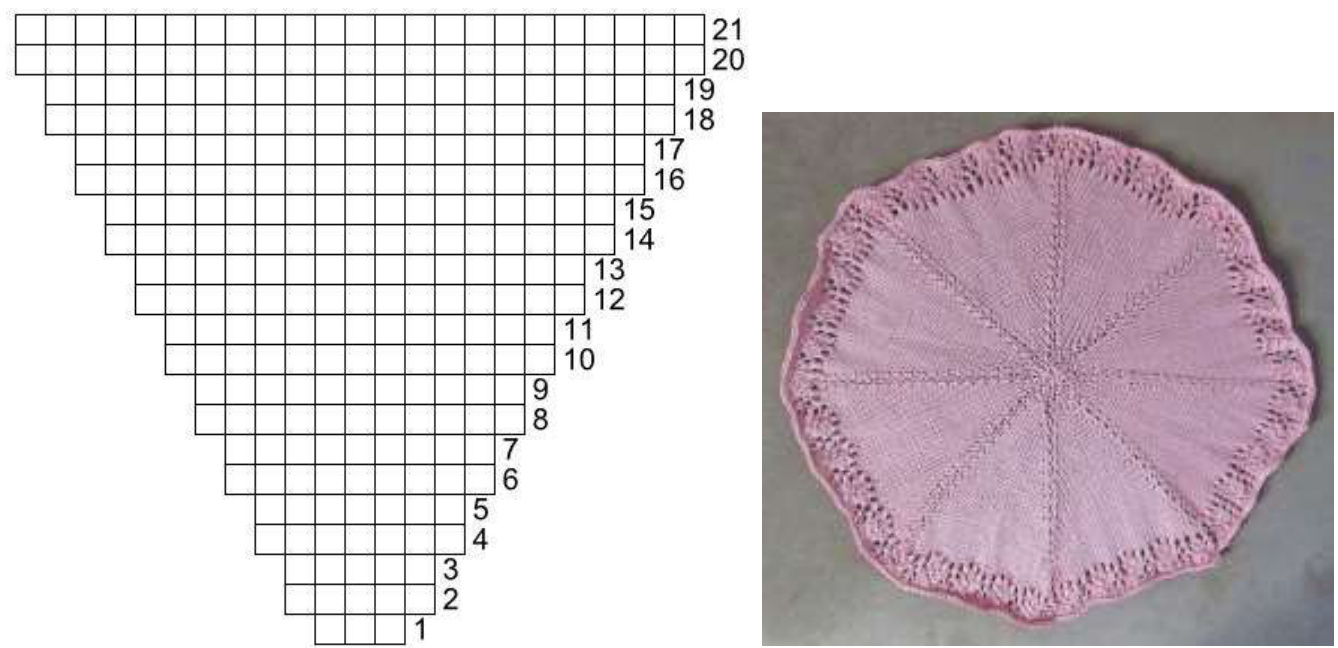
CHART B Lace Edging : Work these two lace rounds around for as many as you'd like, but a minimum of6rounds.Endwith akround.
LEGENDKnitYarnOverSlip1,2tgOasslpedstff)
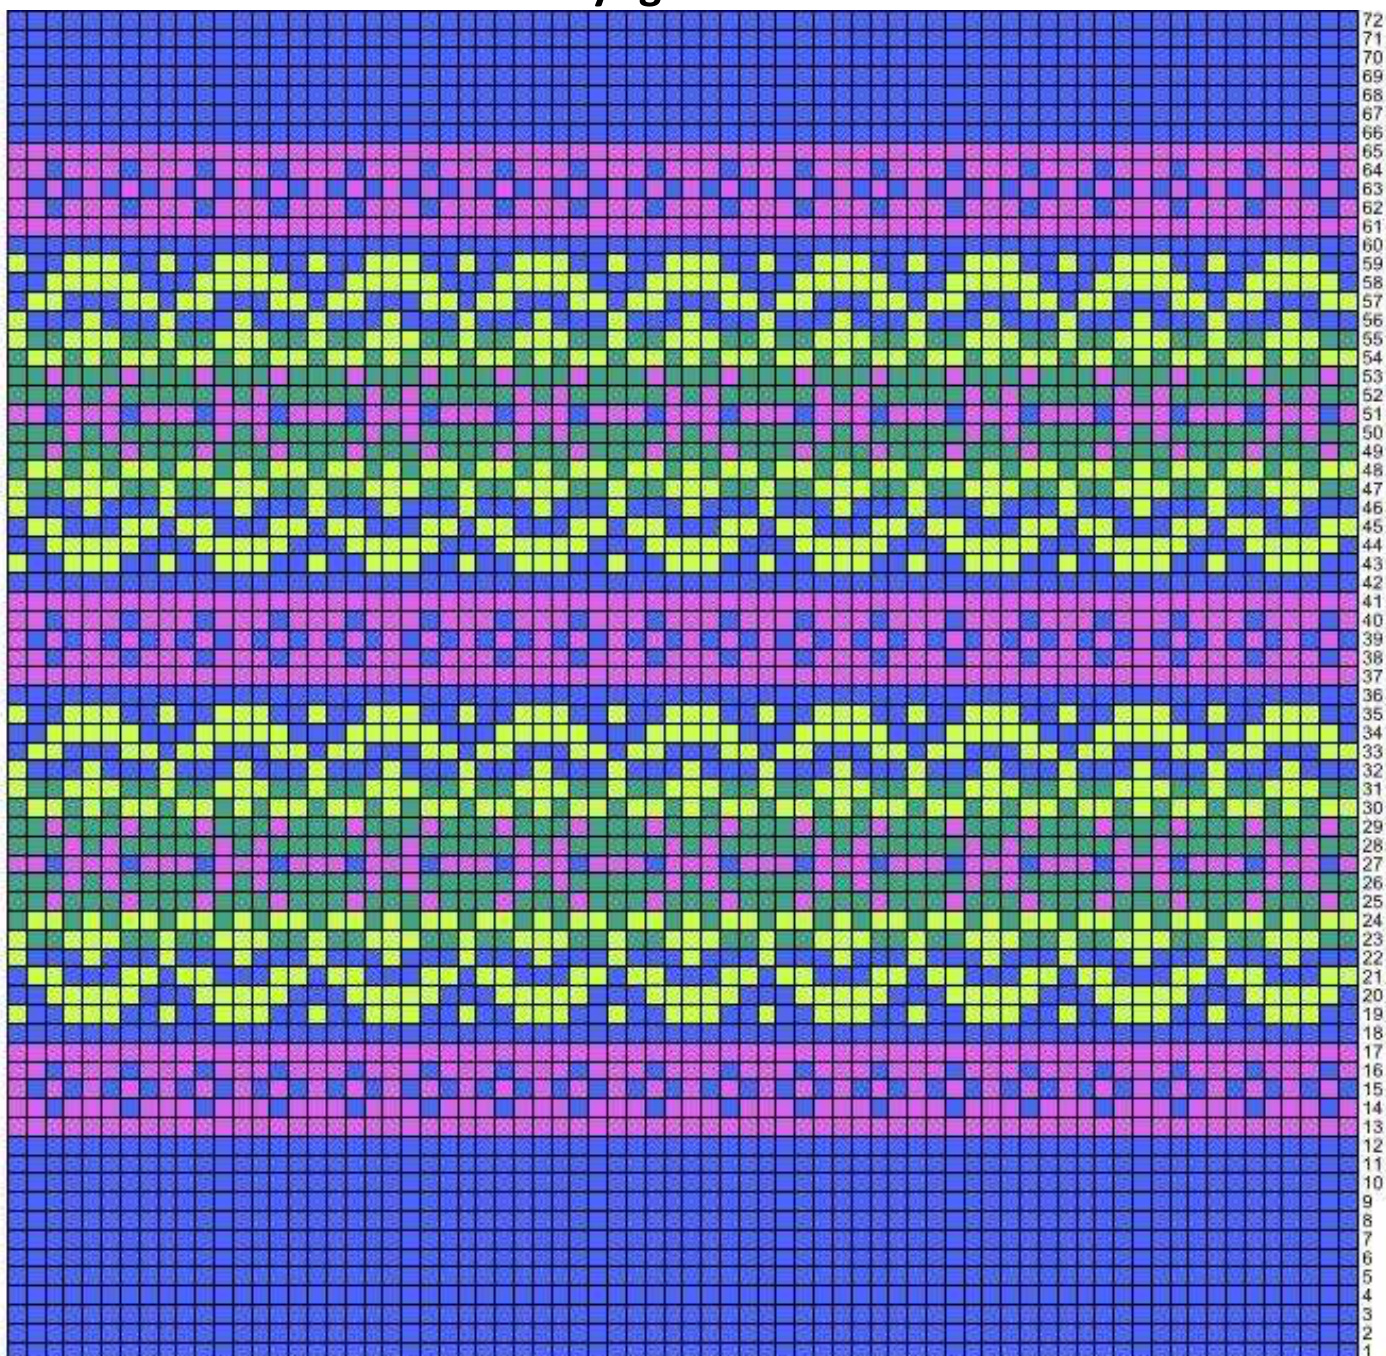
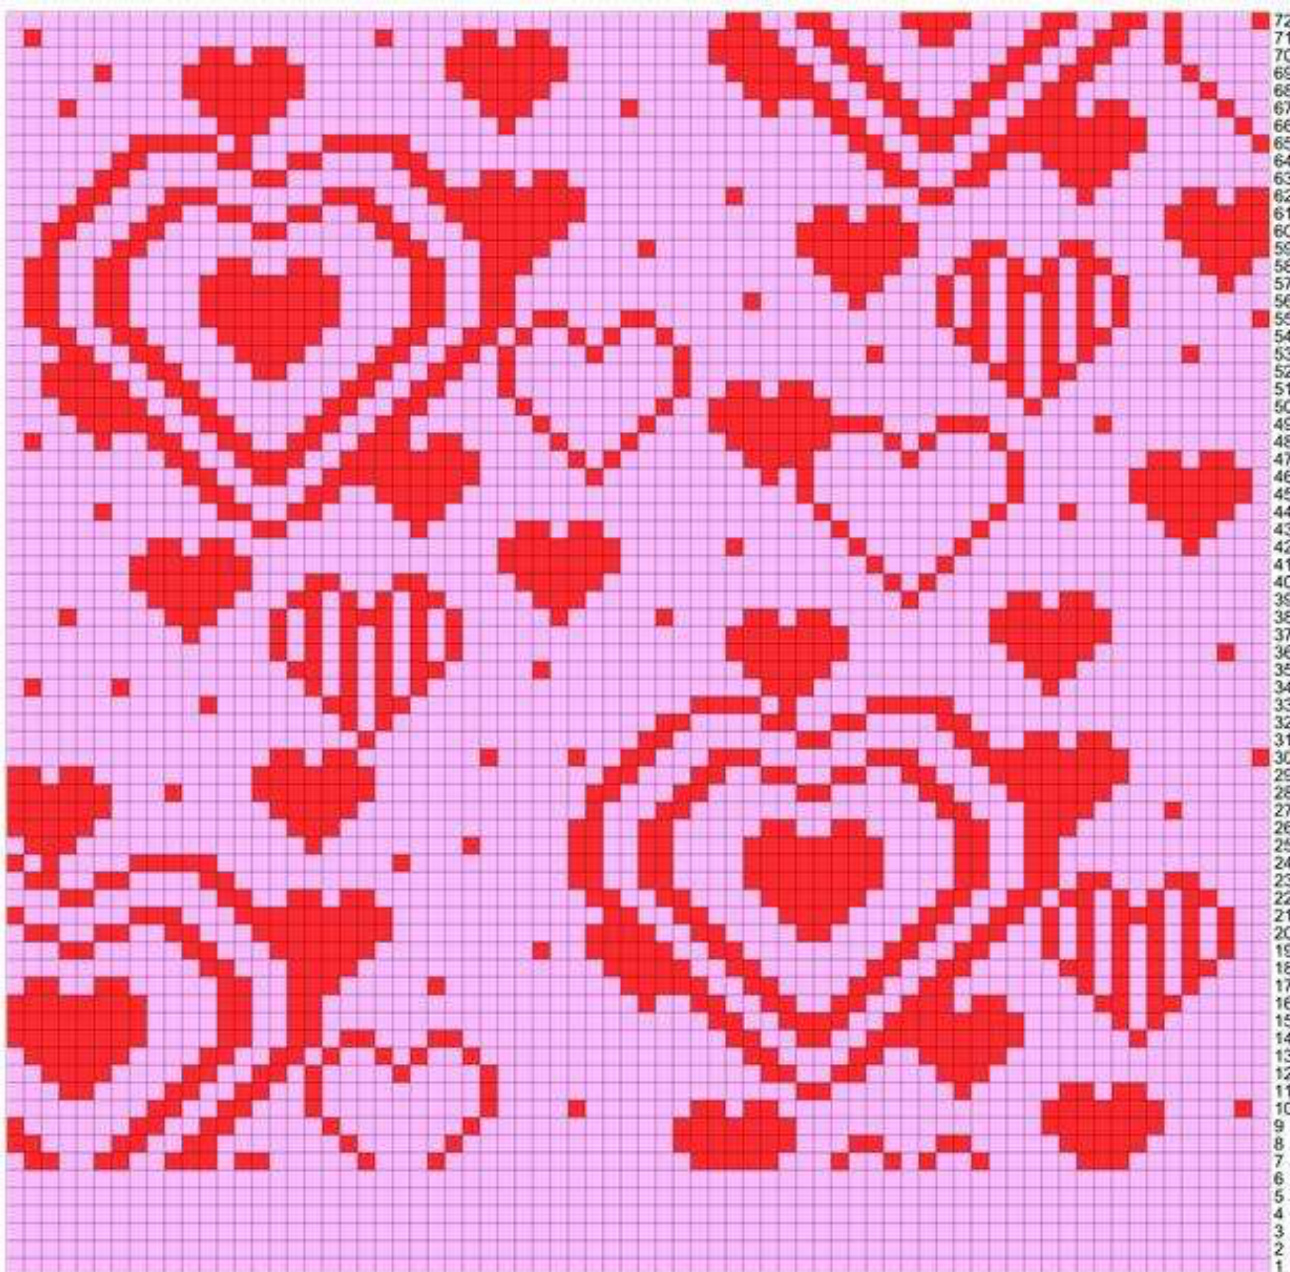
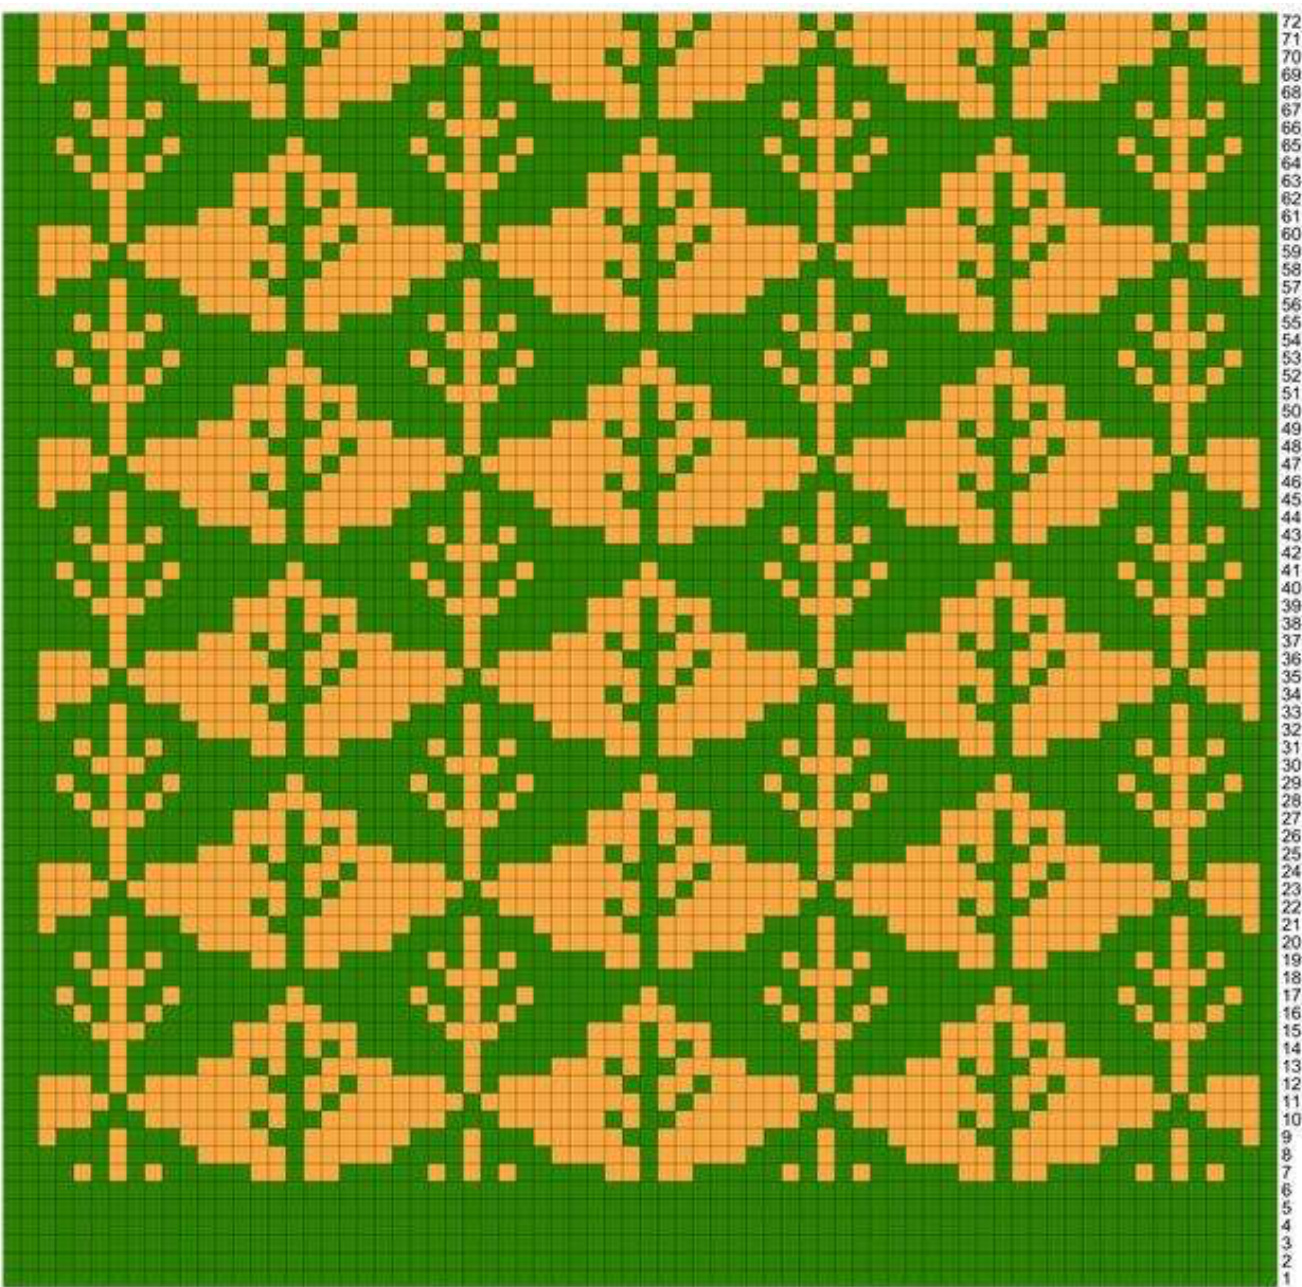
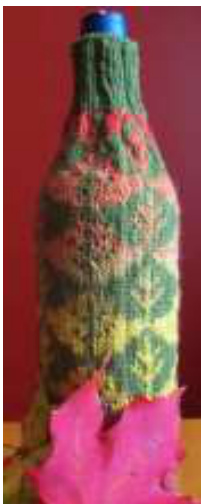
Wine Bottle Sweaters
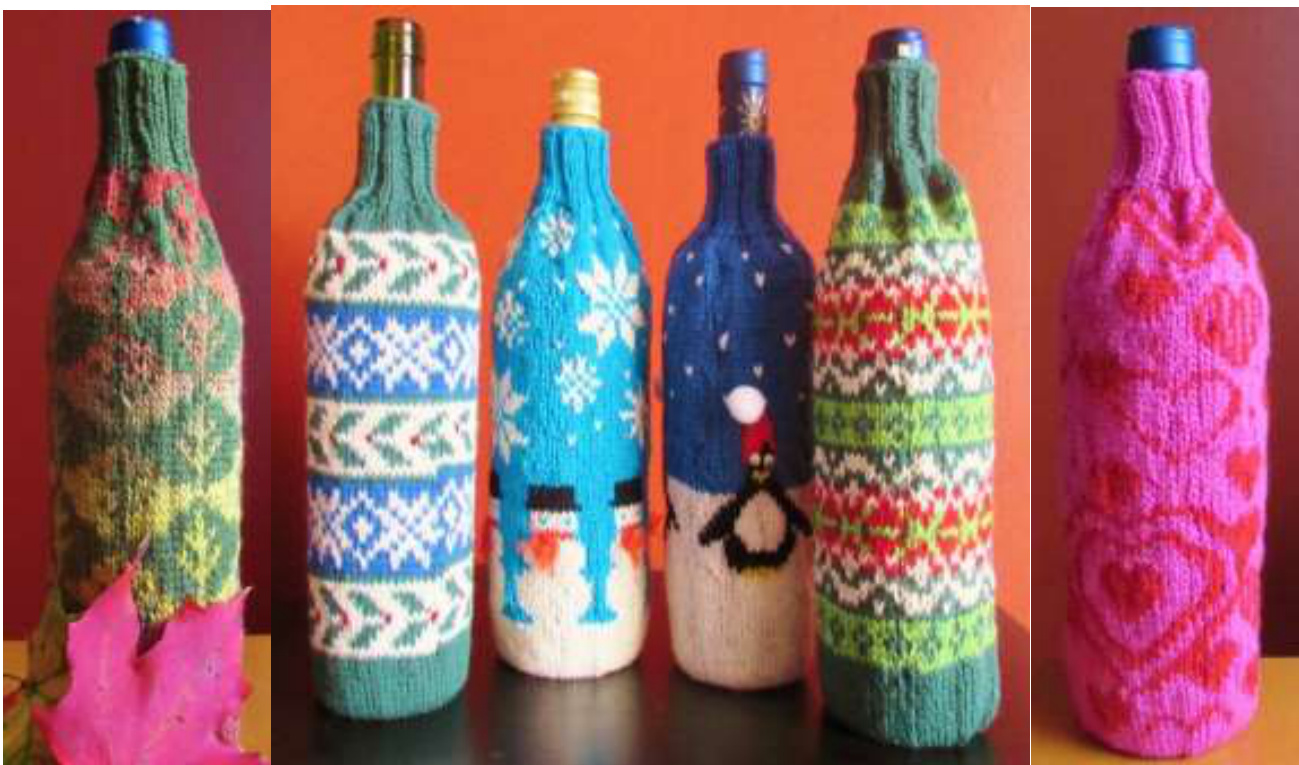
This pattern includes design charts for four winter and holiday bottle sweaters. And because wine is a year-round gift, I have also included a Valentine-themed sweater, an autumnal design, and a chart that shows a festive all-occasion sweater. Once your gift is received, the recipient can use it to wrap a bottle of wine she intends to gift to someone else. It's the gift that keeps on giving. Share the joy! None of the wine sweaters uses more than 40 g of yarn, and two of them useless than 25 g total. SIZE: Fits standard wine bottles (approx. 9.5 inches in diameter) MATERIALS: Approx. 40g of any Knit Picks Palette yarn (25 g for Monochromacity and Deck the Halls) 5 #3DPNS Tapestry needle One hair elastic band For the Chilly Willy sweater, you will also need 6 small googly eyes and 3 small pom-poms and hot glue to attach GAUGE: Approx. 7.5 sts per inch, but gauge is not overly critical here INSTRUCTIONS: Wine Sweater is worked from the bottom up. With DPNs and leaving a 40" tail, CO 72 sts using color specified in the chart you are working. (18 sts on each of 4 DPNs). Join to work in round, placing marker and being careful not to twist stitches (if using a circular needle). Using colors charted or colors you desire, knit chart of choice: CHART A Chilly Willy CHART B Let it Snow CHART C Deck the Halls CHART D Monochromacity (Chart "a" for Christmas and Chart "b" for generic wine sweater) CHART E Valentine's or I Love You Sweater CHART F Fall Out Once your chart is complete, knit 2 together around for a total of 36 sts. Work a 2x2 rib for 16 rounds to create sweater "collar." BO. Finishing: Tie and weave in or trim all color change ends at beginning and ends of rounds. Using long tail left from CO, thread needle and attach elastic band to CO round, sewing around the band to attach to all 72 sts around. The band must be able to move freely within the loops you create by sewing, so be careful not to catch the band in the needle when sewing.
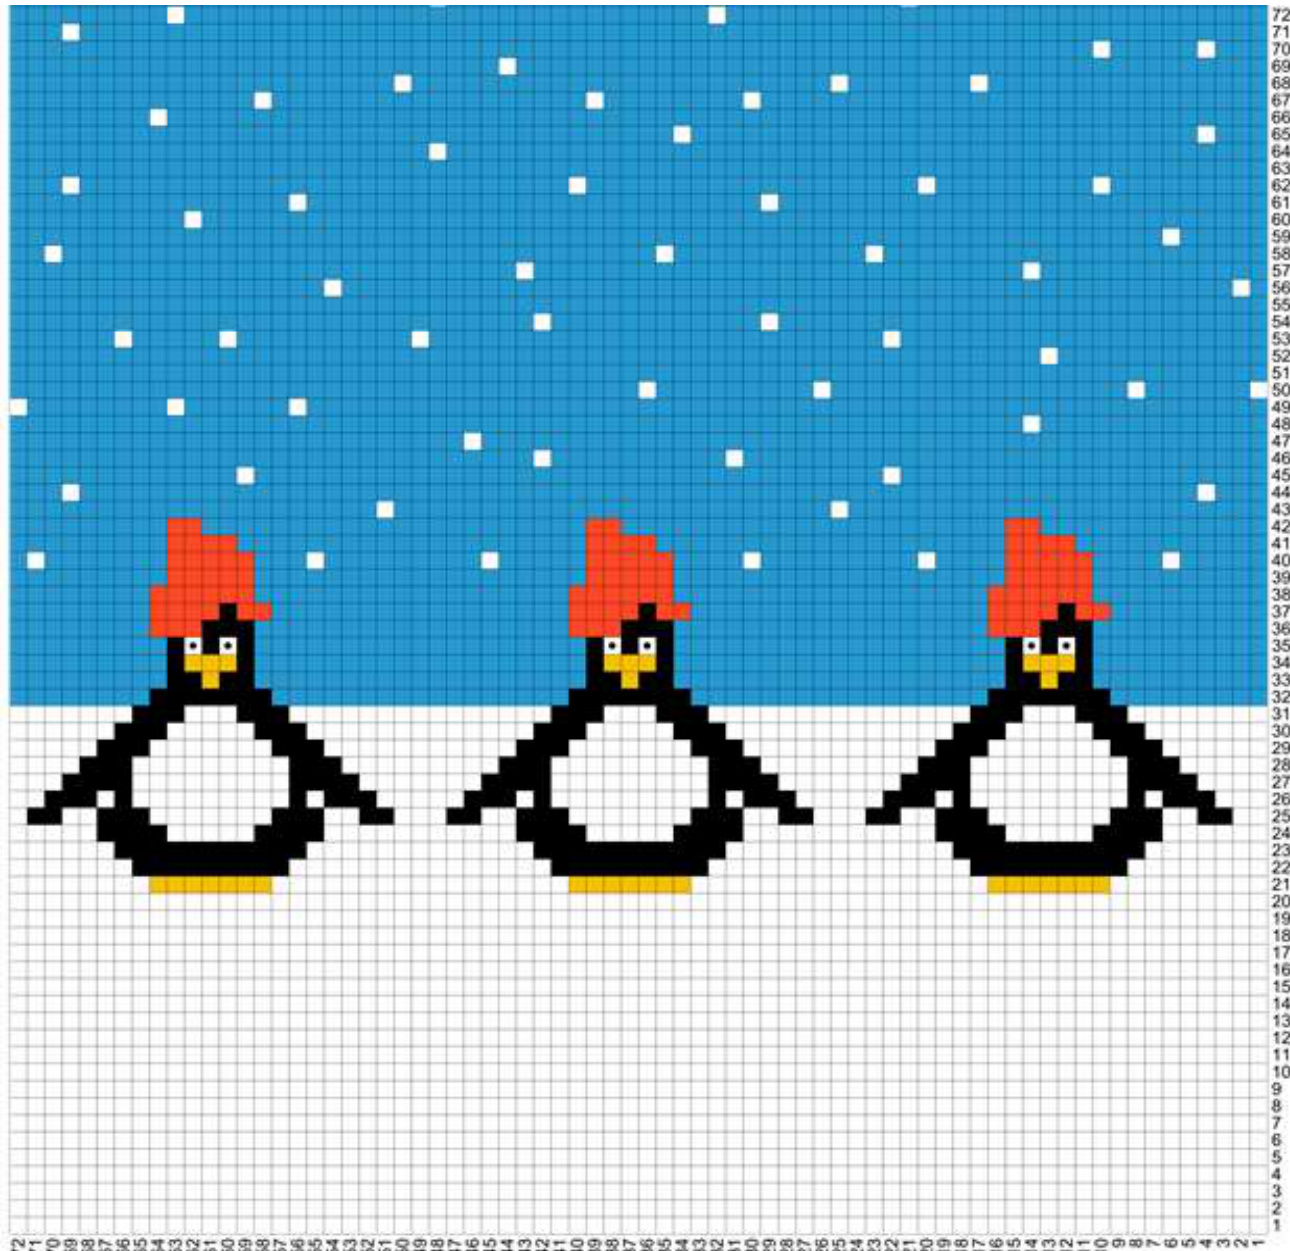
CHART A Chilly Willy - duplicate st in yellow beak after knitting is complete. Glue on or st eyes and hat pom-pom after sweater is complete. Keep floats loose so sweater doesn't pucker.
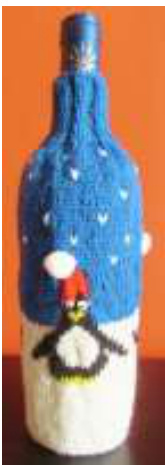
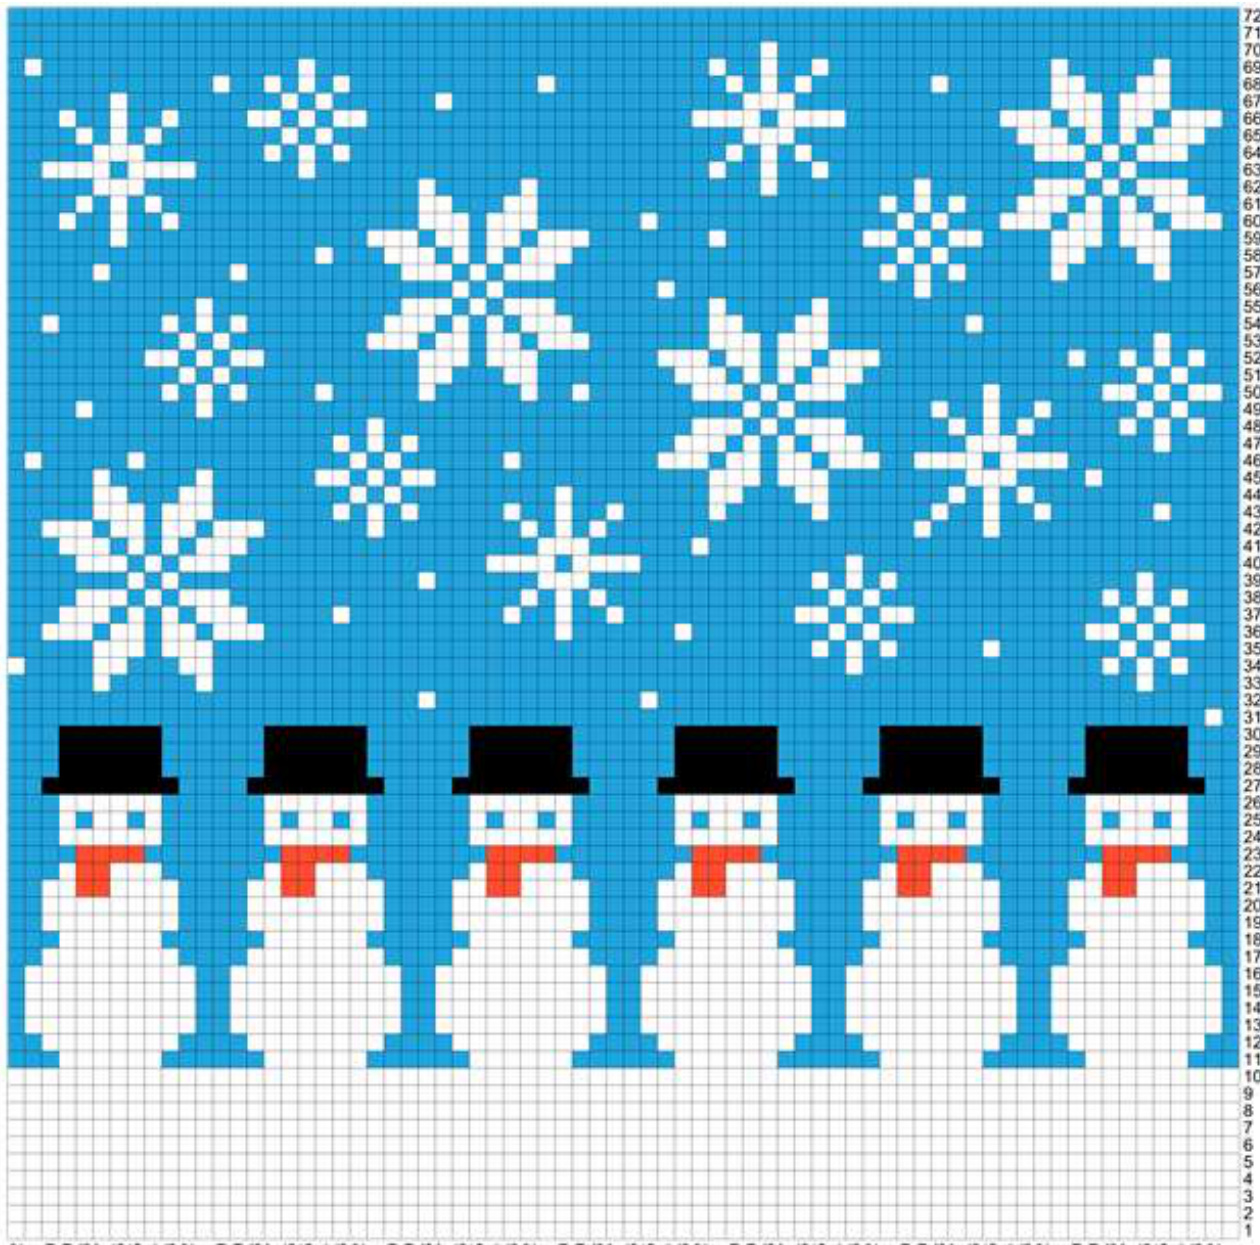
CHART B Let it SnoW - duplicate st rounds 21 and 22 of red scarf and add “fringe' after sweater is complete. I simply tied yarns and frayed it for fringe. Keep floats loose so sweater doesn't pucker.
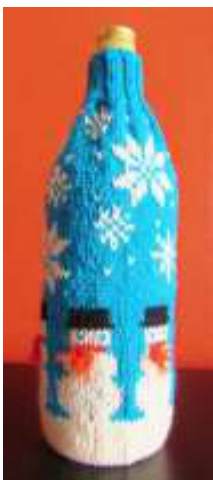
CHART C Deck the Halls
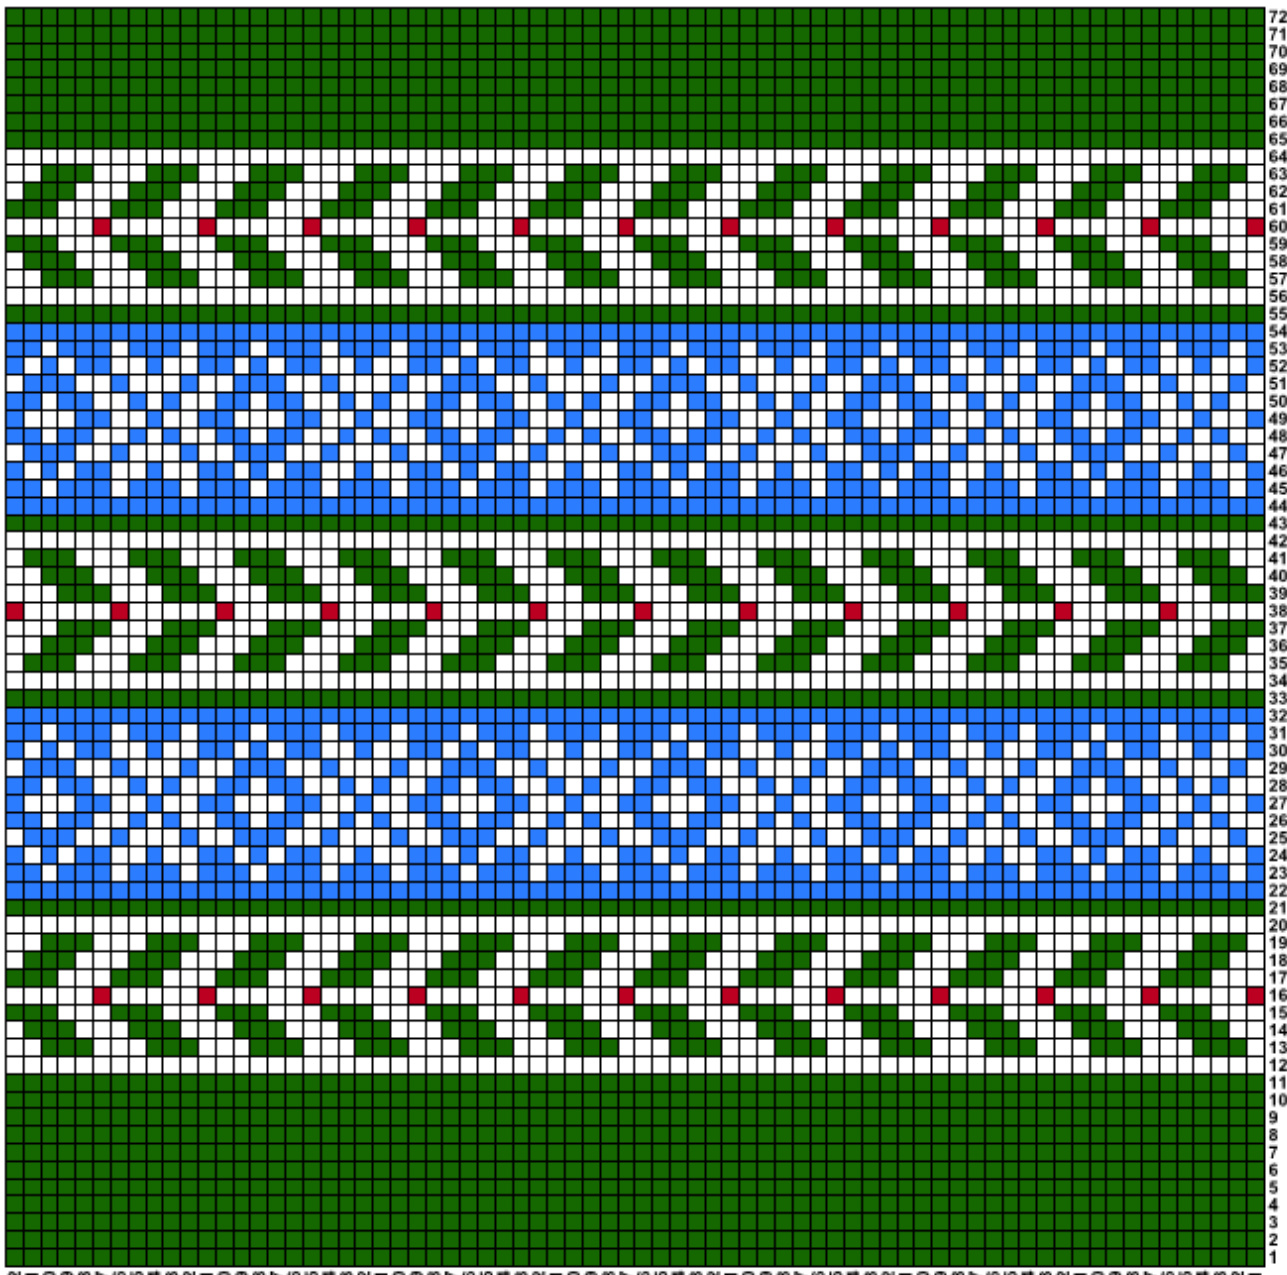
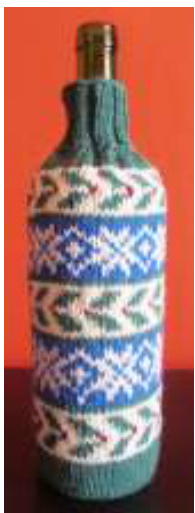
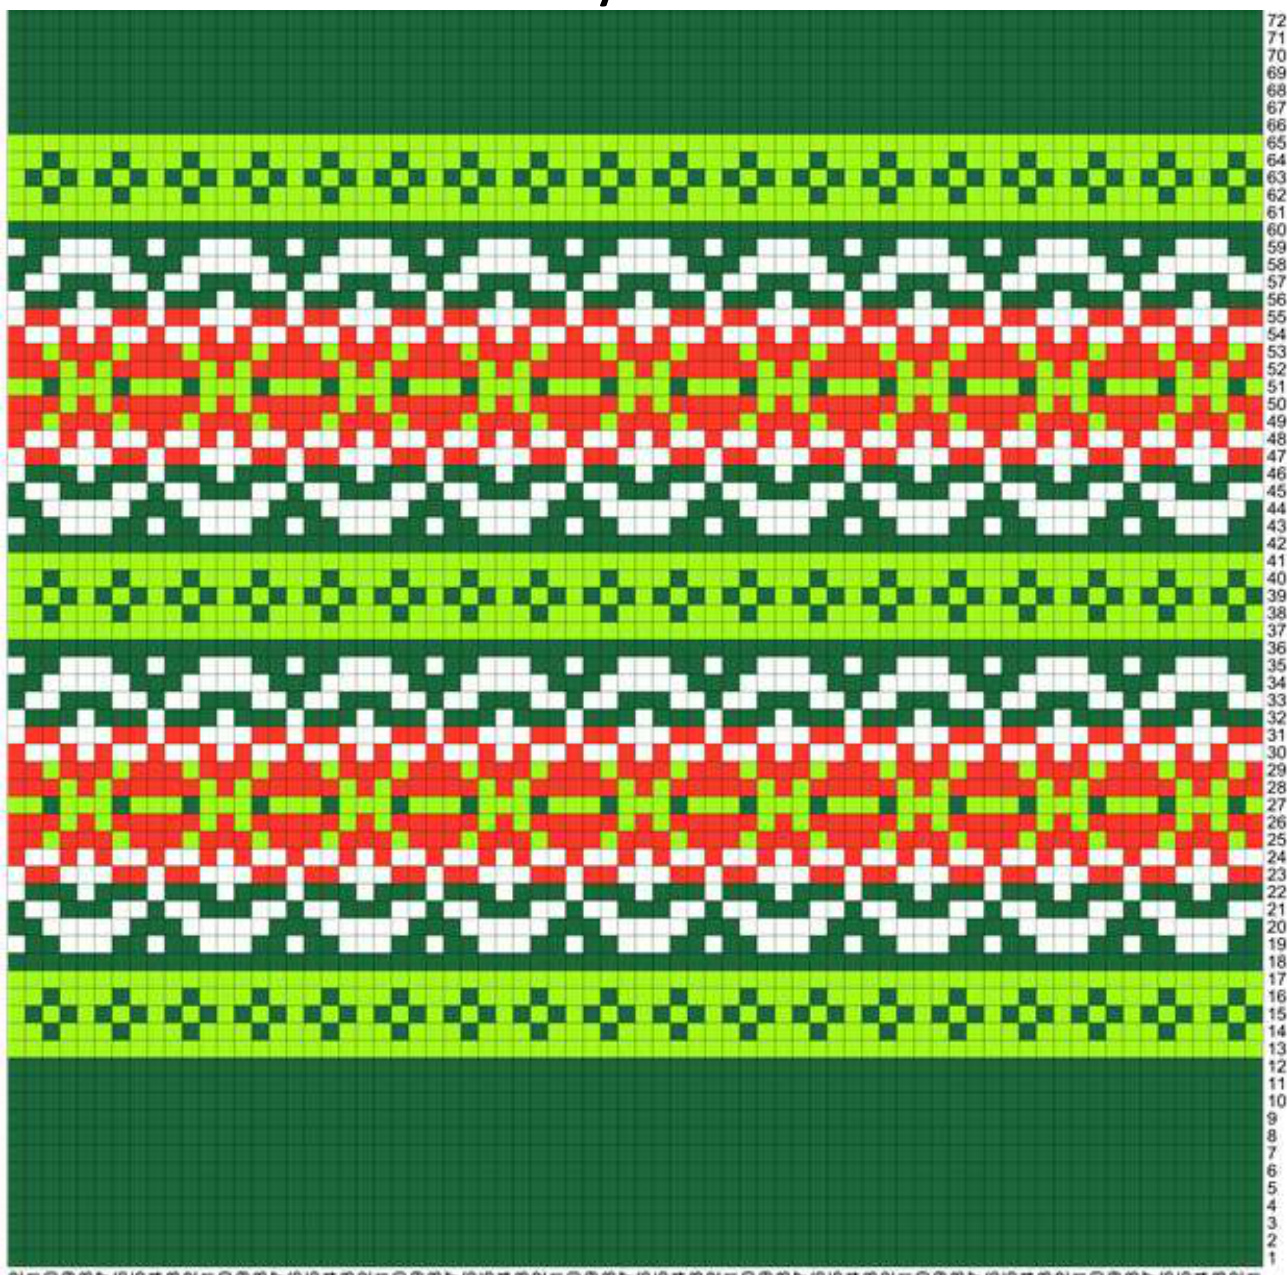
CHART D "b" Monochromacity- generic
2170987654826998766543250947643240938765332082726524222120191876151482110987654321
CHART E Valentine's or I Love You Sweater
32222222 0987654321
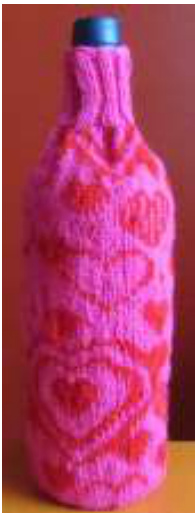
CHART F Fall Out
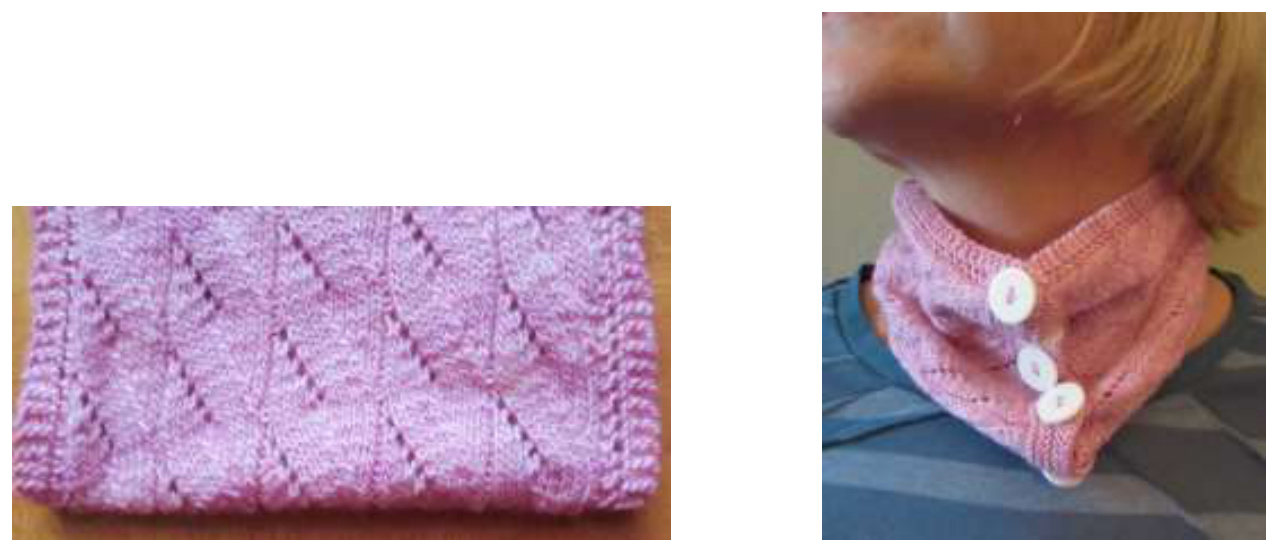
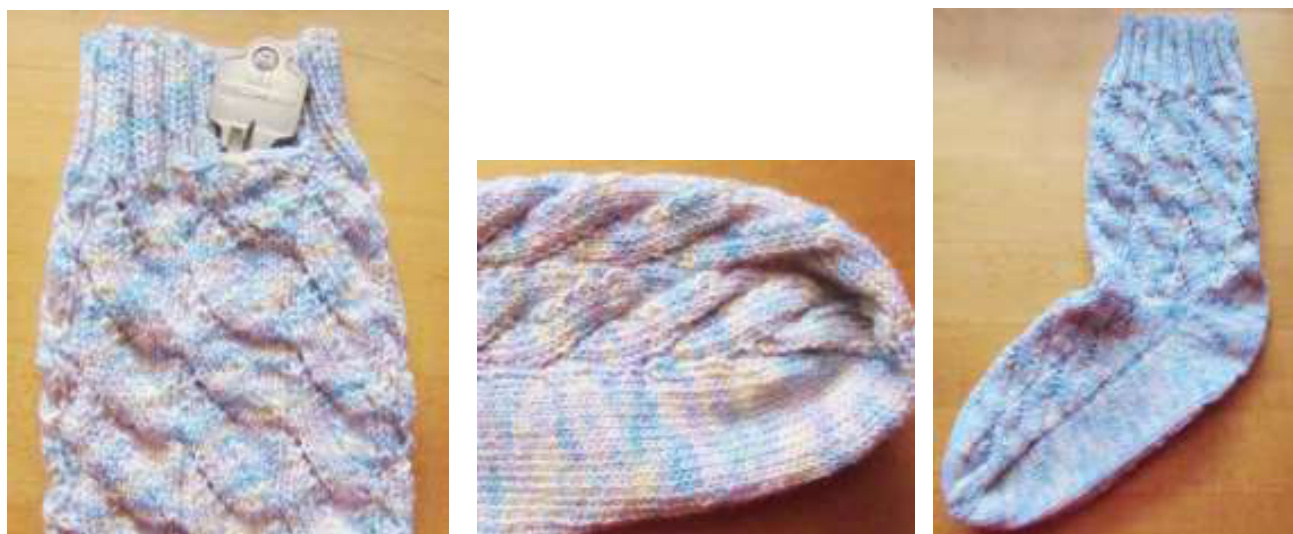
Soft Serve Swirl Gift Wrap Re-Purposed: Cowl and Socks
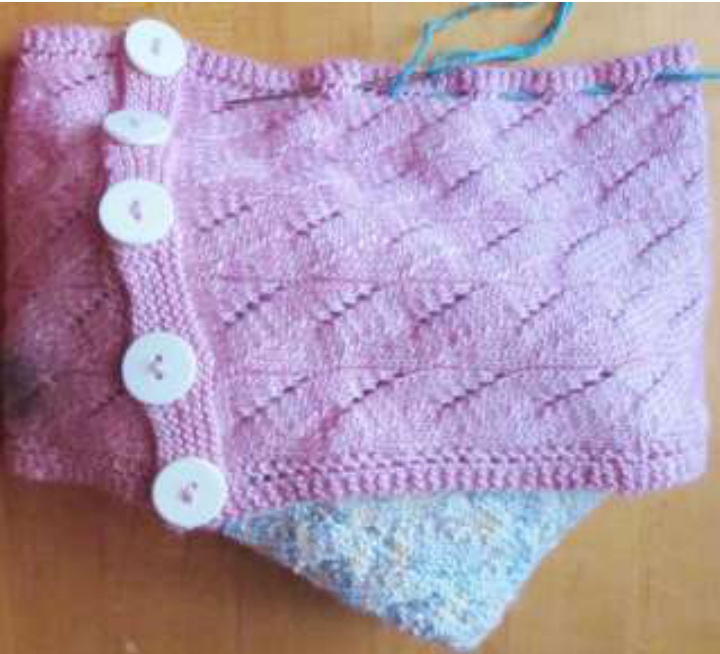
Soft Serve yields a beautiful wrapping for hand-knitted socks, mitts or any other gift item that becomes, after the gift is opened, a beautiful cowl! Instructions are included for matching socks and cowl/wrapper. SIZE: TBD by knitter. Cover cowl is short-- only 24". But by working additional pattern repeats, or using a larger needle or yarn weight, you can make your cowl/gift wrap as wide and as long as desired. Socks are Woman/Teen Small (#1 needle), Med. (#2 needle), or Large (#3 needle), depending on needle size used. MATERIALs: Cowl/Wrap: Approx. 5Og of fingering yarn (or more if you want a longer cowl) #1, #2, or #3 needles. Five %-inch or % inch buttons Tapestry needle Scrap yarn for closing wrapper Socks: Approx. 100 g fingering yarn Five #1, #2, 0r #3 DPNS Tapestry needle GAUGE: Working pattern as described, using #1 needles, should yield approx. 8" sock circumference. Larger needles will result in larger socks INSTRUCTIONS: Cowl/Wrap: Using desired needle size, CO 61 sts. Work 10 rows garter st. Then begin following chart. NOTE: Every stitch in every row is worked as seen on the chart. Please read "A Word About the Chart" before beginning. You will be working a garter edge on each side, and you will be adding YOs that will serve as holes through which yarn will be added to close cowl as gift wrapper later. Work chart as many times as you want until you reach your desired cowl length. Create button band: knit 4 rows garter st. Turn. K4, BO2, k11, BO2, k11, BO2, k11, BO2, k11, BO2, k3. Turn. K3, CO2, k11, CO2, k11, CO2, k11, CO2, k11, CO2, k4. Turn. Work 4 more rows garter st. BO. Finishing: Tie or weave in any/all yarn ends. Soak and block flat to desired shape. Attach buttons to line up with buttonholes.
INSTRUcTlONS: Socks: Socks are worked top-down. Different sizes are achieved simply by changing needle sizes. LEG: Using either #1, #2, or #3 DPNs (depending on size desired), CO 68 sts. (17 sts on each of 4 DPNs). Join to work in round, placing marker and being careful not to twist stitches (if using a circular needle). Knit 18 rounds 2x2 rib. Add pocket on last ribbing round if desired. Also on last ribbing round, increase 2 sts evenly around to work sock on 70 sts, rather than 68. After ribbing, begin following sock chart. OPTIONAL SECRET POCKET: (One sock only): On last ribbing round, knit first 11 stitches. Using spare needle, knit the next 14 stitches (DO NOT RIB). Turn. Work back and forth ON THESE 14 STS ONLY, in stockinette, for 24 rows. BO. Set spare needle aside. Leaving another long tail, cO 14 sts, and continue ribbing around. Follow sock leg chart through round 46 or 58, depending on desired leg length. HEEL: My socks feature the Sweet Tomato Heel (STH). You may use the heel of your choice, but I recommend one that does not employ a flap or gussets to allow for an even design flow through the instep. For a tutorial on the STH, see this video: https://www.youtube.com/watch?v=IRc3309JUyc Once you understand how to knit the STH, proceed using the STH heel instructions, knitting heel working three wedges. Rearrange stitches so that you have 18 sts on needle 1, 17 sts on each of needles 2 and 3 (these comprise the 34 instep sts) and 18 sts on needle 4. You will be working your heel on the 36 sts on needles 1 and 4. Work wedges leaving 8 stitch pairs on each side (4 heel sts left unpaired between pairs). Knit according to pattern across the instep stitches between wedges. Follow the chart for the instep stitches (the sts you have on needles 2 and 3). After working the first half of wedge one, work across the instep per round 59 of the chart (all knit sts), then work 2 rounds around before beginning 2nd wedge. The 2nd wedge will use the appropriate part of charted lace pattern on instep sts in round 62. Then work 2 rounds around before beginning 3'd wedge. The 3'd wedge will use the appropriate part of charted lace pattern on instep sts in round 65. FOOT: Rearrange sts again for the foot, placing 15 sts on needle 1, 20 sts on needle 2, and 20 sts on needle 3, and 15 sts on needle 4. Work chart for about 50 rounds (Knit additional rounds if you want the foot longer). END on a knit round, decreasing 2 sts evenly around so that you work toe on 68 sts. Arrange sts for toe so that you have 17 sts on each of the 4 needles. TOE: Decrease for toe as follows: Needle 1: K to last 3 sts of NEEDLE 1, K2TOG, K1 Needle 2: K1, K2TOG, knit remaining sts. Needle 3: K to last 3 stitches of NEEDLE 3, K2TOG, K1 Needle 4: K1, K2TOG, knit remaining sts. Repeat rounds until there are 14 sts total on needles 1 and 4 and 14 sts total on needles 2 and 3. (7 sts on each needle) Place sts from needles 4 and 1 onto one needle (14 sts). Place sts from needles 2 and 3 onto one needle (14 sts). Graft the remaining stitches together using Kitchener st. Finishing: With long tails left from detaching and CO pocket sts, sew pocket down to inside of sock. On the front of the sock, if ribbing is desired on top of pocket, pick up the 14 C0 st loops andwork a 2x2 rib (starting and ending odd rows with knit 2, and even rows with purl 2), back and forth for 6 rows. B0. Secure ribbing sidestosock. Tie and weave in or trim all yarn ends at beginning and ends of rounds. Wash & block to fit.
CREATING Gift Wrap:
As shown in photo, use tapestry needle and weave a running st with scrap yarn through the edge holes of cowl created by YOs when knitting. Weave through both layers of cowl to close edge. Place socks (or other gift) inside and repeat the running st process with scrap yarn on the other side to complete closure. To open gift, simply pull the scrap yarns out.
A word about the chart: Traditionally, lace charts have been written to be a symbolic representation of what the knitted piece should look like as seen from the front side. This means that, if you were knitting back and forth, you'd have to create a st on the back side that would result in the st that appears on the chart from the front side. (You are, no doubt, familiar with the blank square meaning k on the rs and p on the ws). Charts were written this way so the knitter could visualize what the design would look like when knitted, but it necessitated some fancy stitch-translating in the knitter's brain. We no longer need to have charts represent the design. We have digital cameras and can show actual swatches of the piece, so we can know what it looks like without having to interpret chart symbols. This makes life easier and eliminates that mental translation step. You simply notice which side of the chart a particular row is numbered, and you begin working from that side across, knitting the st the symbol represents. If you see a blank square, you always knit the st (see legend), and if you see a black dot in the square, you always purl that st, regardless of the direction from which you read the chart. Easy! And, you can always use the written instructions if you have chart allergies.
CHART (Cowl/ Wrap) WORKED FLAT
Legend:
Knit Purl YarnOver K2tog SSK Slip1,knit1,passslipstoff (PSS)

SOCK LEG CHART:

SOCK FOOT CHART: (Numbering begins as 1, but it equates to round 66.)
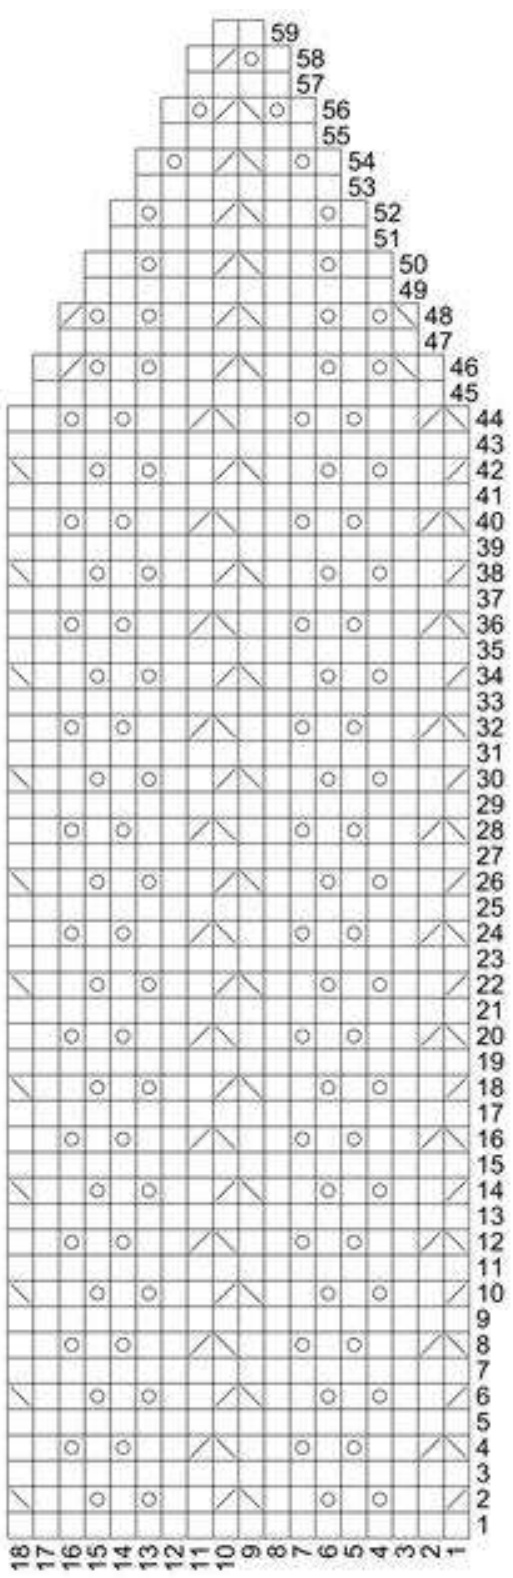
Fern Lace Gift Wrap Re-Purposed: Project Bag or Hat
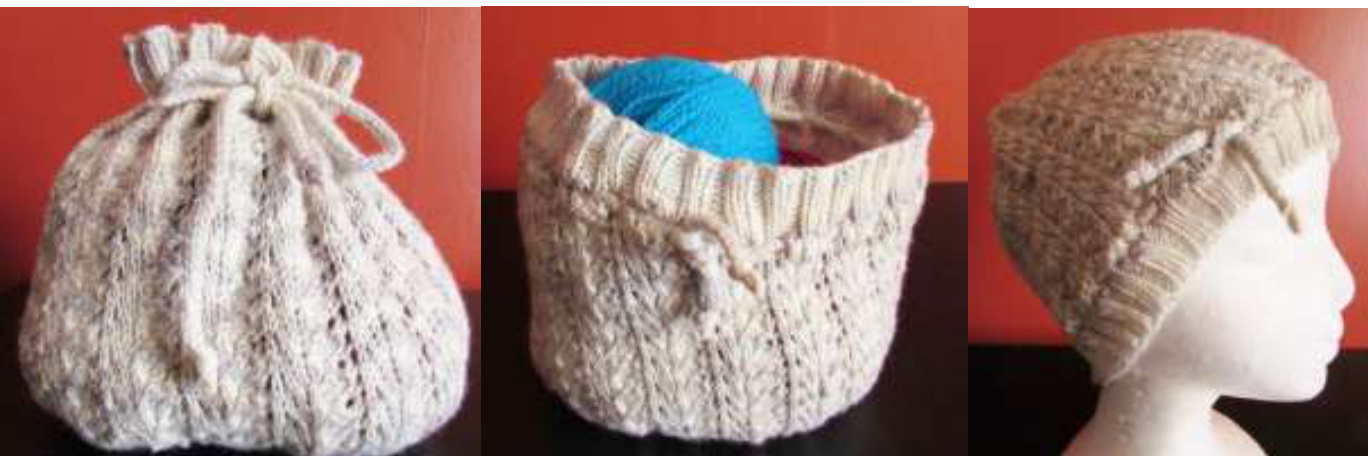
When working this gently swirling lace design pattern, you will use less than 50 g of fingering yarn to wrap a gift of your recipient's favorite yarn (if she is a knitter), and after she has opened her gift, voila! The wrapping becomes her own project bag. If your recipient is a non-knitter, wrap a hand-knitted project in the Fern Lace Wrap, and after the gift is opened, your giftee has a new hat! SIZE: Teen or Women's Medium: fits 21"-23" head circumference MATERIALS: Approx. 40g of fingering yarn (or more if you want a deeper projec bag or slouchier hat) One 16" #2 circular needle and 5 #2 DPNS for decreases. Stitch markers Tapestryneedle Beads, if desired GAUGE: Working pattern as described should yield approx. 22" circumference after blocking. INSTRUCTIONS: With circular needle, CO 144 st. Join to work in round, placing stitch marker and being careful not to twist stitches. Knit 12 rounds 2x2 rib. Increase round (first round of chart) Inc 18 sts to work pattern on 162 sts. (9 wedge repeats: 9 x 18 sts = 162 sts). To increase, \*k1m1, k1, p2—which will give you 5 sts into 4--, then k2, p2. Repeat these 9 sts from\* 18 times around. To make a m1 st, work the Bumpless m1 Increase (see tutorial: https://www.youtube.com/watch?v=syFeOy1B9ok) Follow CHART (9 repeats per round) for 60 rounds, (or longer if you want a slouchier project, being sure to end up on a round that looks like round 45) decreasing as indicated and switching to DPNs when necessary. I find it helpful to place markers between each of the wedge repeats to keep track of where decreases occur. Add beads as you work, if desired. Begin top decreases on round 46. Each dec round has 2 decreases next to each other; k2tog for first dec at beginning of dec wedge and ssk for second each time at the end of each dec wedge.) On the last round, round 60, with 18 sts on the needles, k2tog around. 9 sts remain. Cut yarn leaving a tail several inches long. Move all sts from needles to tapestry needle, and pull tightly. Secure from the inside. Finishing: Tie and weave in or trim any yarn ends. Wash and block to fit. Knit a 25", 4-st i-cord (or length desired). Wash and block to dry. Then weave i-cord through the holes in the first lace round, making sure both i-cord ends are on the outside. Tie knots in each end of the i-cord as shown in cover photos.
Mini Wicker-Stitch Wrap
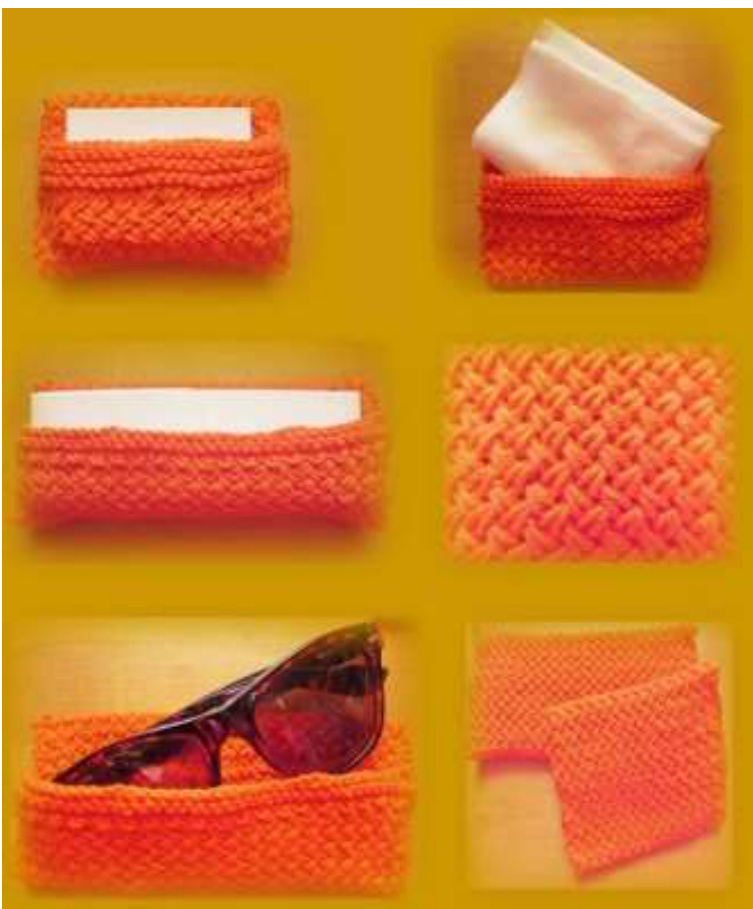
This lovely, crisscross design is fun to knit, and it creates a sturdy fabric for both the gift wrap and the repurposed after-project. The small size makes the perfect wrapper for an earring box or other small gift. It repurposes to conveniently carry tissues in your purse. The larger size can wrap a larger jewelry boxed gift, like a bracelet. Of course, you can adjust the dimensions to achieve any size you desire. Because the wraps are knit using cotton, after the gift is opened the wrapper becomes the perfect, non-scratching sunglasses case or tissue holder. Work it in a neon yarn, and the items will be super easy to find in your bag! SIZE: TBD by knitter Tissue Holder finished dimensions: 3" x 5" Sunglasses Case finished dimensions: 3" x 6" MATERIALS: Small amounts of Premier Cotton Fair fingering yarn: Persimmon. #3 and #5 knitting needles Tapestryneedle GAUGE: 10 sts/inch, but gauge isn't critical and depends on yarn and needle size used. Swatching is recommended. INSTRUcTlONS: Projects are worked flat. CO any multiple of 2 sts +1. For the small wrapper shown, and using #3 needles, C0 33 sts. For larger wrapper shown, and using #3 needles, CO 45 sts. Work garter edge on #3 needles for 8 rows. Switch to larger (#5) needles and begin working the pattern, which comprises a 2- row repeat, as follows: Row 1: (Right side): Slip 1 with yarn in back, \* knit through the back loop of the second stitch on the left needle, then knit through the front of the first stitch, and drop them both from the needle at the same time; Repeat from \* to end. Row 2: (Wrong side): Slip 1 with yarn in front, \* purl the second stitch on the left needle, then purl the first stitch, and drop them both from the needle at the same time; Repeat from \* to end. See video tutorial here: https://www.youtube.com/watch?v=nGEPU4PtVNg Work pattern to desired length, allowing for at least an inch-and-a-half overlap when folding. For smaller wrapper shown, with a 3" height, knit pattern for 6.5". For larger wrapper shown, knit for 6.5" - 7", or to desired height. For both sizes, switch back to #3 needles and repeat garter edge, as in beginning, for 8 rows. BO. Finishing: Fold items so that beginning and ending edges overlap by an inch-anda-half. Thread tapestry needle with length of yarn and whip stitch sides closed, making sure to include all layers. Tie and weave in all ends.
BookCoverWrap Re-Purposed: Book Cover or Needle Case
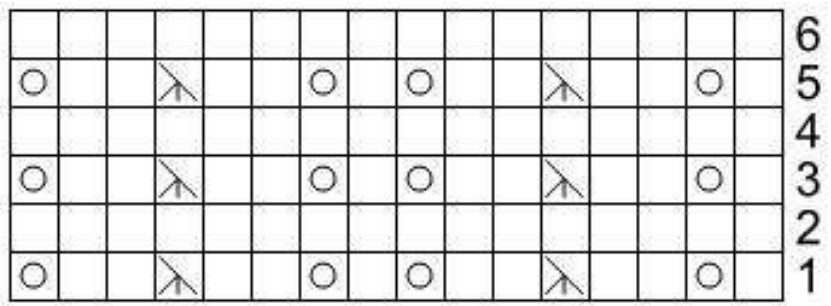
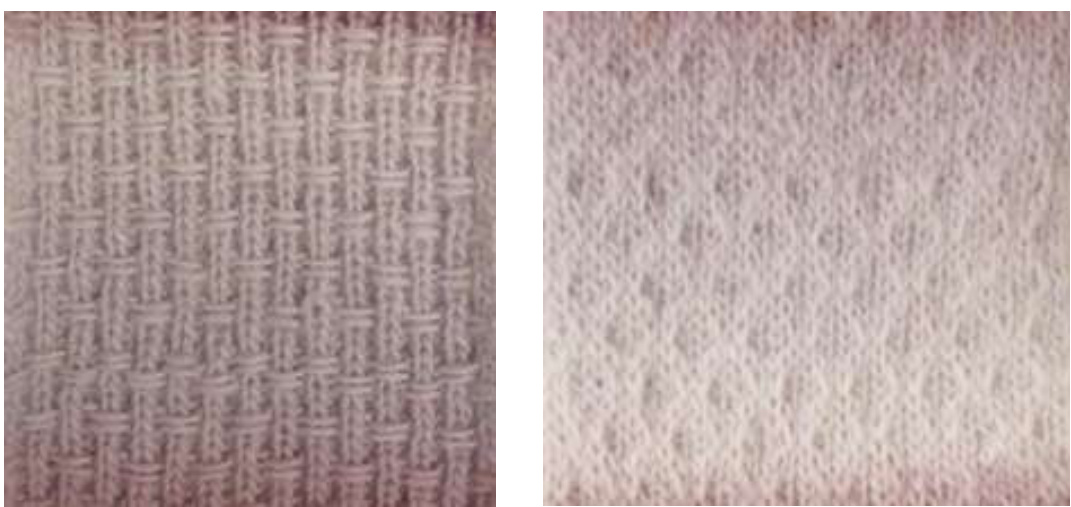
In this gift wrap pattern, I include three, separate design choices. Want a paperback-size cover? You can knit it. Want a larger cover for a uniquely sized book? No problem. Each can be knit to any size, and each can be used as a book cover or needle case when complete. All projects are stranded flat. In other words, they are worked back and forth. SIZE: TBD by knitter. Achieve any size you want by choosing needle size, and swatch to determine gauge in order to figure needed number ofcOsts MATERIALS: Sampler Cover: Two contrasting fingering yarns. For a paperback cover, you will only need about 25g yarnobviously, more will be needed for a larger cover.) #2 needles for working garter edge on bottom and top #3 needles for working colorwork portion of cover Two stitch markers Two 2-inch wide ribbons or strips of fabric for holding book cover in place on book Diamonds Cover: Two contrasting fingering yarns. For a paperback cover, you will only need about 25g yarn—obviously, more will be needed for a larger cover.) #2 needles for working garter edge on bottom and top #5 needles for working colorwork portion of cover Two stitch markers Two 2-inch wide ribbons or strips of fabric for holding book cover in place on book Gradient Cover: Gradient fingering yarn #4 needles Stitch markers Tapestry needle GAUGE: TBD by knitter. Determine the size cover you want, then knit a 4" x 4" swatch to see how many sts you getting to the inch. Multiply that number by the number of inches you want to determine the number of sts to CO. You might need to adjust the number slightly to make sure the chart design repeats fit evenly into the number. EXAMPLE: Say you knit 6 sts per inch, and you want a total of 20 inches. This mean s you'd need to CO 120 sts. (Plus an additional 6 for your garter edges) But say you have chosen to knit the Diamonds design, with a pattern repeat of 16 sts. 8 repeats = 128 sts, s0 you need to C0 8 additional sts to accommodate the design as written. INSTRUCTIONS: To work the Sampler Cover, CO any multiple of 6 sts that will get you closest to the size you want, once you have determined your gauge. Then, using #2 needles, work a garter edge for 6 rows. Knit the first 3 sts and place a marker. Work across to the last 3 sts. Place marker, knit last 3 sts. Switch to #3 needles and work CHART A between markers for as many repeats across and as many chart repeats as needed to achieve the size cover you want. The markers you placed serve as a reminder to begin and end each row with a 3-st garter edge. NOTE: Remember to keep your yarns and floats always on the back side of work. 2 needles and work an additional 6 garter rows at t After cover is complete, Tie or weave in ends. Soak and block flat. Cut ribbon or fabric and machine st to inside of each side edge to hold book in place. (See photo). CHART A Knit on odd-numbered rows and purl on even-numbered rows. Remember to switch yarn positions front and back for even color dominance throughout. (See explanationbelow)
To work the Diamonds Cover, CO any multiple of 16 sts ( then add an additional 6 for side garter edges) that will get you closest to the size you want, once you have determined your gauge. Then, using #2 needles, work a bottom garter edge for 6 rows. Knit the first 3 sts and place a marker. Work across to the last 3 sts. Place marker, knit last 3 sts. Switch to #5 needles and work CHART B between markers for as many repeats across and as many chart repeats as needed to achieve the size cover you want. The markers you placed serve as a reminder to begin and end each row with a 3-st garter edge. NOTE: Remember to keep your yarns and floats always on the back side of work. After cover is complete, Tie or weave in ends. Soak and block flat. Cut ribbon or fabric and machine st to inside of each side edge to hold book in place. (See photo). CHART B Knit on odd-numbered rows and purl on even-numbered rows. Remember to switch yarn positions front and back for even color dominance throughout. (see explanation below)
The Gradient Cover is not stranded. The design is created by working a pattern of knit and purl sts. To work the Gradient Cover, CO any multiple of 4 sts that is NOT ALSO A MULTIPLE OF 8 (then add an additional 8 for side garter edges) that will get you closest to the size you want, once you have determined your gauge. Work a bottom garter edge for 6 rows. Knit the first 4 sts and place a marker. Work across to the last 4 sts. Place marker, knit last 4 sts. Work CHART C between markers for as many repeats across and as many chart repeats as needed to achieve the size cover you want. The markers you placed serve as a reminder to begin and end each row with a 4-st garter edge. Work and additional 6 garter rows at the top. BO. After cover is complete, Tie or weave in ends. Soak and block flat. Fold over garter edges in on sides and tack to cover front and back to create lips that will hold the cover in place on the book. One the gift is "unwrapped," the wrap can remain a book cover, or it can be turned inside out to become a needle case. (See photo.)
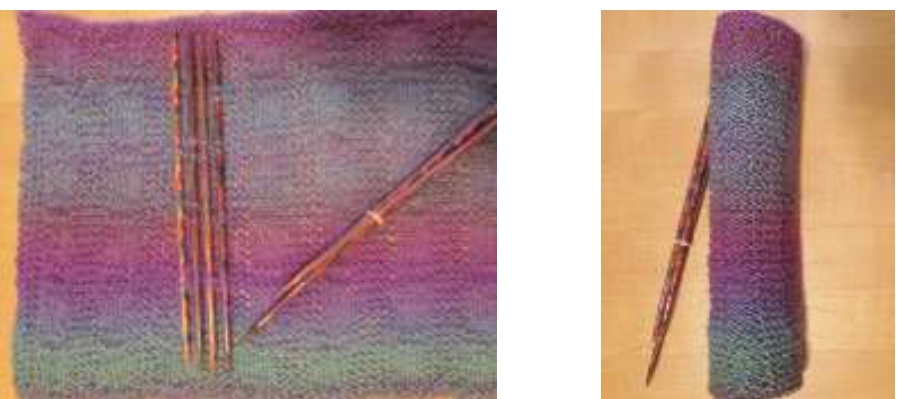
CHART C Even-numbered rows are the front and odd-numbered rows are the back. The design is created as you are working the back side of the piece. This is the opposite of convention, so the odd numbers (back) are on the right hand side of the chart and even numbers (front) are on the left side of the chart.
43210987654321098765432109876543210987654321 44444333333333322222222221111111111 On page 15, you will find an easy explanation of the importance of tending to the issue of color dominence. The explanation addresses stranding in-the-round. But, I found out the hard way on this project that color dominance is an issue when stranding flat (back and forth), too. You can see the difference in my Diamonds book cover where I neglected to address the dominance issue. And you can readily spot the place where the concept hit me. (See pic below.) Please refer to my colorwork dominance article on page 15, and then do the following to highlight the pattern design when working flat: On the purl side, you must switch the yarns from the position they were in on the front side. Then when knitting on the front, swith them back. Remember to switch yarn positions on each row.
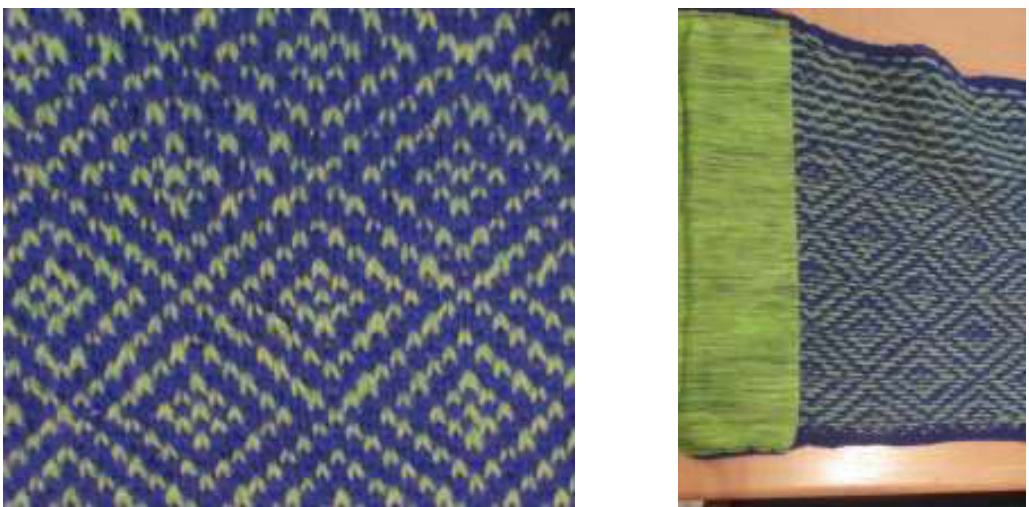
a view from the back
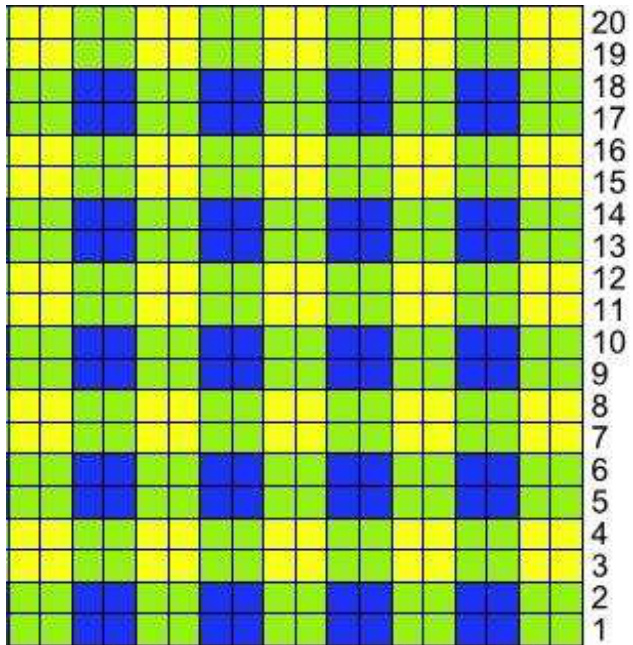
Wrap a Box Gift Wrap Re-Purposed: Market Bag, Project Bag or Smart Phone Case
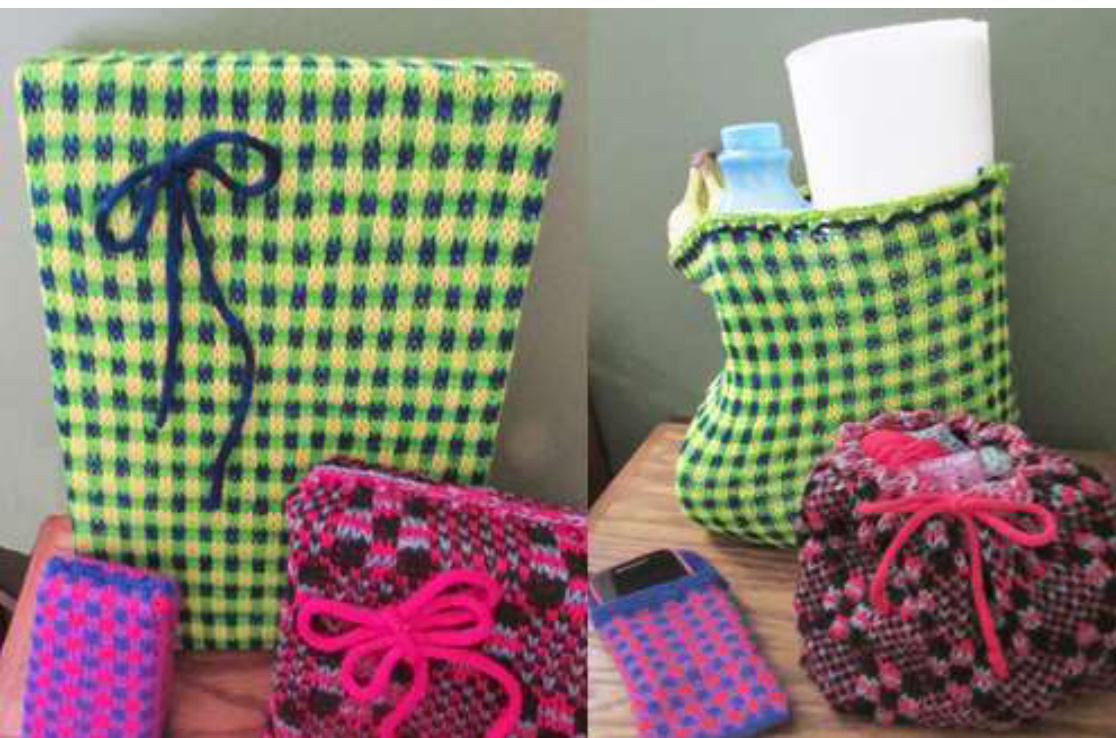
I offer two design choices here. I have knitted three size options, but these wraps can be worked up to fit virtually any size or shape gift box that needs wrapping. After the recipient opens her present, the gift bow becomes the handle on the project bag or sturdy, planet-friendly market bag (depending on the size knitted). For a small boxed gift, you can knit a small wrap with a flap closure. It will transform into a soft, secure smart phone case that will continuously remind the recipient of what a thoughtful gift giver you are. At the same time, it will be protecting her phone, making it easy to spot if she misplaces it. SIZE: TBD by knitter, from very small (to cover a cell phone) to very large (a clothing box cover that transforms into a market bag). Simply measure the box circumference and multiply by the sts/inch your gauge determines to figure the number of sts required. MATERIALs: For a clothing box that measures 10 x 15 x 3 inches, using fingeringweight wool, you will use approx. 25g of your two primary colors, (blue and yellow) and 50g of the overlap color (green). About 400 yds total. Obviously, you will use less for a smaller box, and very small amounts for the smallest sizes. One 16" #9 circular needle for medium and large wraps Five #5 DPNs for small wraps Two #2 needles for knitting i-cord Stitch markers Tapestry needle GAUGE: Medium and large wraps worked on #9 needles yield about 6 sts/inch, but gauge is not entirely critical as the piece willstretch considerably to fit over the box. INSTRUCTIONS: For large Gingham Check design, using the overlap color and a #9 needle, determine your box circumference and CO a multiple of 6 sts that is closest (but not under) the total inches required. EXAMPLE: for the 10 x 15 x 3 box shown, the circumference is the width plus the depth of the box doubled (10" each across the top and bottom surfaces, and the two 3" sides). This is a total of 26". 26 inches x 6 sts/inch = 156. So, 156 is the CO number. Join to work in-theround, placing stitch marker at round beginning and being careful not to twist stitches. Knit chart to desired length. Length is determined by adding the length plus the depth of the box (or slightly less because the wrap stretches well). So, 15" plus 3" = 18". And 18 is the number of inches long you knit. Then, work one round as follows: Using yellow and green together (no blue),YO, K2TOG around. Now, still using two strands, knit one round. BO. Using the color not used in the final rounds of the wrap/bag, in this case blue, and using #2 needles, knit and i-cord approx. 30" long. Finishing: Using the same color you used to CO, sew closed the bottom seam. Tie or weave in all yarn ends. To wrap box, slip it into the knitted bag and, with a piece of yarn and tapestry needle, align the holes created by your YO/ K2Tog round so they overlap, and weave through both layers to temporarily enclose your gift box. Tie your i-cord into a bow and safety pin it as the ribbon on the box. To open the gift, the recipient need only remove the bow, pull the closure yarn out, and remove the gift. Weave the i-cord through the holes created by your YO/ K2Tog round, securely tie ends and pull closed as needed to re-purpose as a sturdy, planet-friendly market bag. For the small Cingham Check size, the same chart is used. However, use #5 DPNs and cO only 48 sts. Work chart for 34 rounds (or more for a taller wrap). After desired length is reached, work 5 rounds garter st. Then BO first % of sts (in this case, 24 sts) and, continuing garter stitch, work remaining sts back and forth for about 2 % inches to create flap. BO. Using the same color you used to CO, sew closed the bottom seam. Gingham check CHART NOTE: Use any color combination, making sure the "overlap" color works into each round. EXAMPLE: In the first chart, you are knitting blue, yellow and green. Because you get green when you combine blue and yellow, green works into every round where, theoretically, the blue and yellow intersect.
87 321 987654321
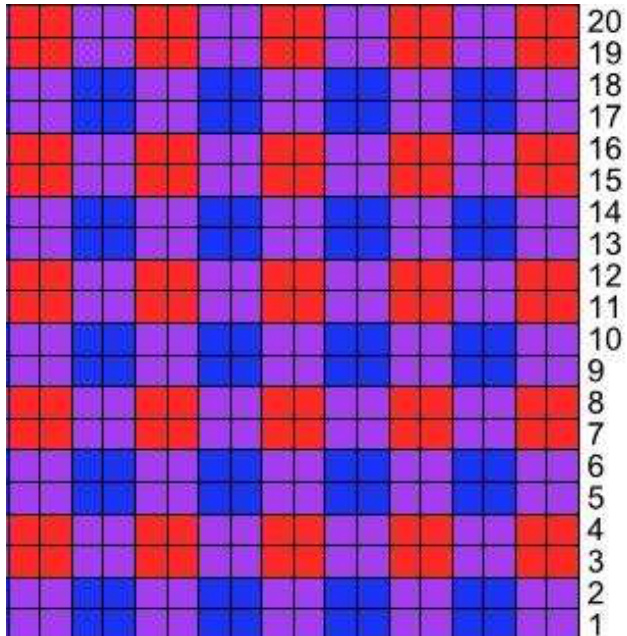
87654321 987654321 INSTRUCTIONS: For It's a Plaid Plaid Wrap, and a medium-size box (box shown on cover measures 7 x 10 x 3 inches, and I turned it sideways, swapping width and height)—-Using a #9 needle and black yarn, CO a multiple of 18 sts (in this case, 126). Join to work in-the-round, placing stitch marker at round beginning and being careful not to twist stitches. Knit chart to desired length. Length is determined by adding the length plus the depth of the box (or slightly less because the wrap stretches well). In this case, because I turned the box, I only needed to knit 10 inches (7" plus the 3" for the depth of the box). Then, work one round as follows: Using red and green together, YO, K2TOG around. Then, still using two strands, knit one round. BO. Using red, or any color you want, and using #2 needles, knit and i-cord approx. 30" long. Finishing: Using the same color you used to CO, sew closed the bottom seam. Tie or weave in all yarn ends. To wrap box, slip it into the knitted bag and, with a piece of yarn and tapestry needle, align the holes created by your YO/ K2Tog round so they overlap and weave through both layers to temporarily enclose your gift box. Tie your i-cord into a bow and safety pin it as the ribbon on the box. To open the gift, the recipient need only pull that yarn out and remove the gift. Remove the i-cord bow and weave it through the holes created by your YO/ K2Tog round, securely tie ends and pull closed as needed to re-purpose as a project bag or small tote.
It's a Plaid Plaid Wrap CHART
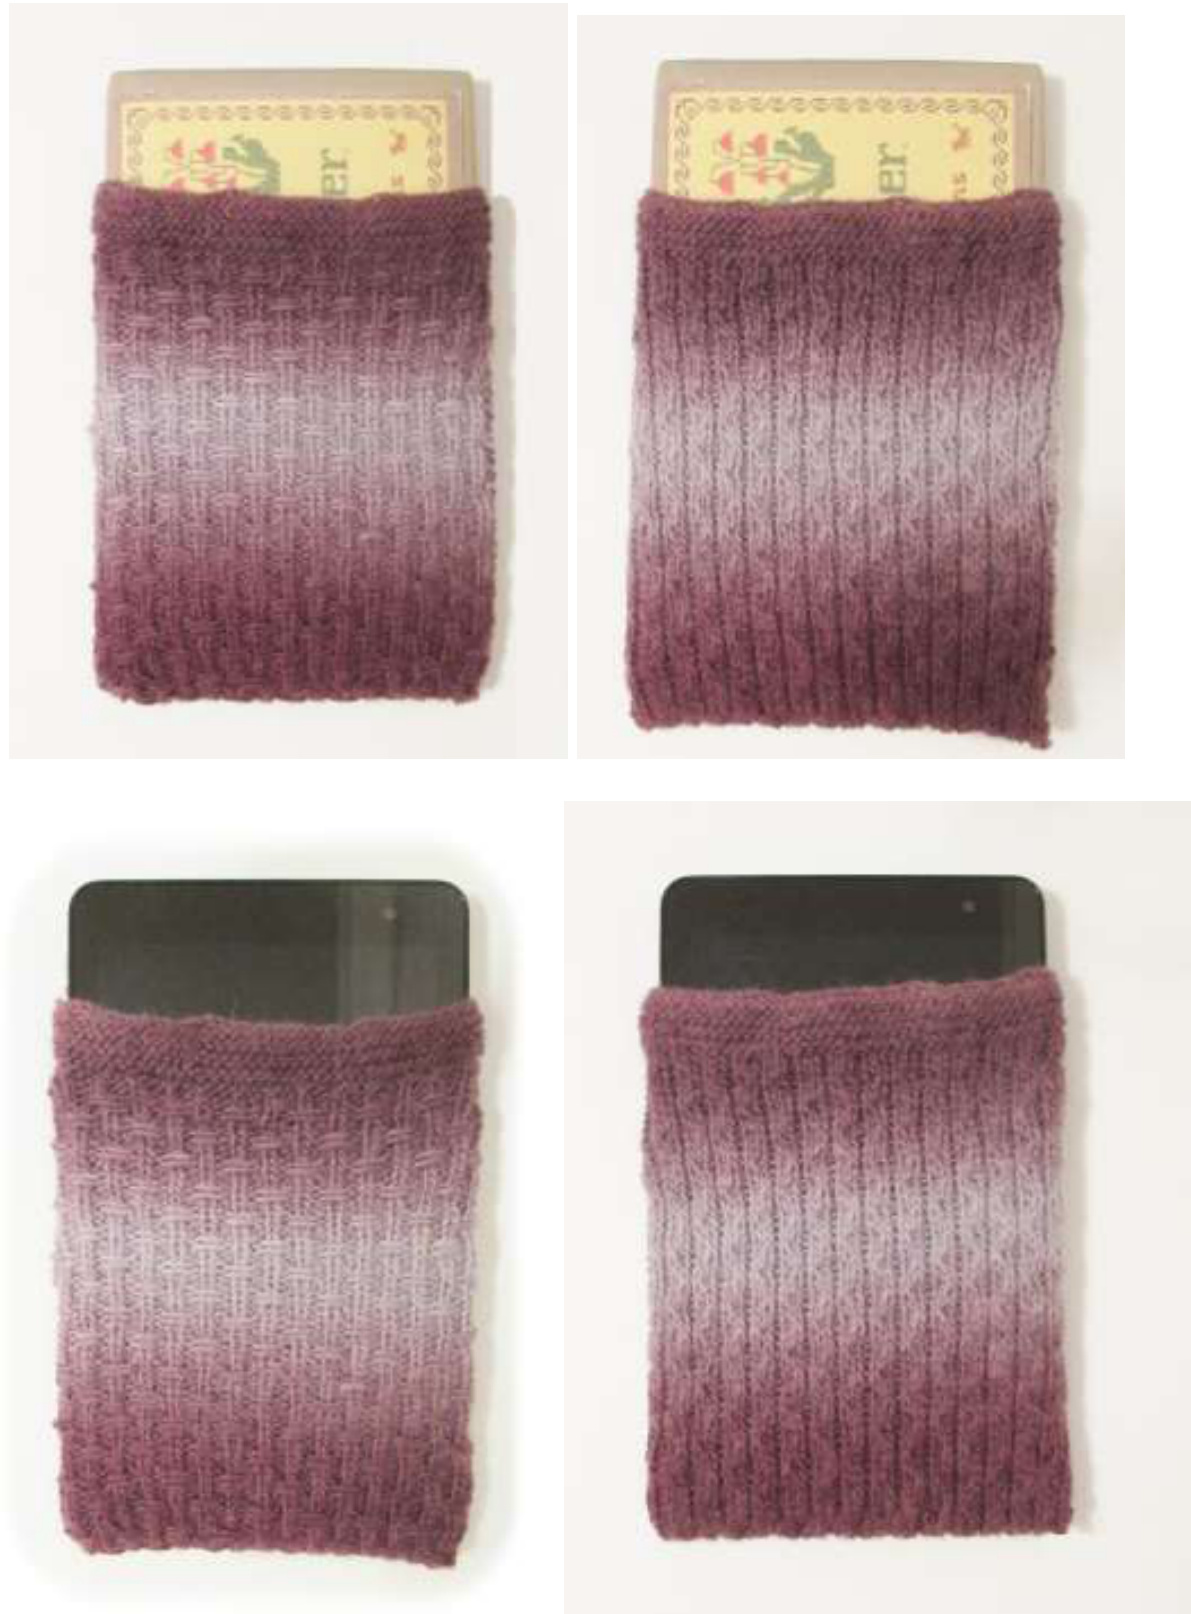
Reversible Slip-Stitch Gift Wrap
The Reversible Slip-Stitch Gift Wrap can be knitted to any size. Working this design results in a burlap-like weave stitch on one side and a very subtle diamond pattern on the reverse side. Both are equally beautiful, and I couldn't decide which side I liked better to call it the right side. So, I made it reversible. Perfect for gifting a box of candy. After the gift is opened, the wrapper makes a perfect protective cover for a tablet or other device. SIZE: TBD by knitter. This can be knitted to any dimensions desired. Cover wrap measures 5" x 18" (5" x 20" after blocking). After folding and seaming, it holds a gift or a tablet 5" x 8.5". When determining size needed, note that the fabric created is stretchy and has a good bit of give. MATERIALs: For size knitted above, you will need about 250 yds of any gradient fingering-weight yarn. I used Knit Picks Chroma fingering from stash in a discontinued colorway. #1 AND #3 needles Tapestryneedle GAUGE: Swatch to determine gauge based on yarn choice and needle size: working with #3 needles, this pattern yielded approx. 10 sts per inch. Be sure to swatch on pattern portion rather than garter-stitch edges. INSTRUcTIONS: Determine gauge (using a #3 needle) and multiply your sts per inch number by the number of inches wide you need in order to figure your CO stitch number. You willbe CO using #1 needles. EXAMPLE: The cover wrap required a 5-inch width, and I achieved 10 sts per inch in my swatch. 10 x 5 = 50. But the pattern requires a multiple of 6 sts + 5. The closest number, that fits this criterion, to my desired number of 50 sts is 47, so I CO 47 stitches. Still using #1 needles, work 8-10 garter-stitch rows. Switch to #3 needles and begin working pattern flat (back and forth) as follows: CO a multiple of 6 + 5 stitches. Row 1: \*p2, k1. Repeat from \* to last 2 sts, p2. Row 2: \*k2, p1. Repeat from \* to last 2 sts, k2. Row 3: p1, \*slip 3 wyf, p1, k1, p1. Repeat from \* to last 4 sts, slip 3 wyf, p1. Row 4: k1, slip 3 wyb, \*k1, p1, k1, slip 3 wyb. Repeat from \* to last st, k1. Row 5: \*p2, k1. Repeat from \* to last 2 sts, p2. Row 6: \*k2, p1. Repeat from \* to last 2 sts, k2. Row 7: p1, \*p1, k1, p1, slip 3 wyf. Repeat from \* to last 4 sts, p1, k1, p2. Row 8: k2, p1, k1, \*slip 3 wyb, k1, p1, k1. Repeat from \* to last st, k1. Repeat these 8 rows until you have reached your desired length, taking into account you will be adding a garter edge to the end to match your beginning garter edge. Length is determined by doubling the length of the gift/device you will cover, plus 2-3 inches for overlapping flap opening. Switch back to #1 needles, and knit garter-stitch rows (8-10 as in beginning). BO. Soak and block flat so that you have the width and length desired. My device measured 8.5 inches, so I needed twice that plus 3" for flap overlap, or 20". Meanwhile, using #1 needles, CO about 40 sts (number of sts is not critical) and work stockinette for an inch or two (depending on the size you need). Do NOT BO...simply remove piece from needle. Soak and dry. Finishing: Once wrap is dry, fold it in half; now overlap 3" so that the edges lie in the top quarter of the project. (See photos). Pin in place. Using yarn and tapestry needle, whip-stitch, on both long sides, through the outermost sts only. Take care to include allayers at overlap points. Tie and weave in all yarn ends. The piece shouldbereversible. Once your stockinette piece is completely dry, frog the piece. You will have a long, curly piece of yarn. Cut into 3 equal lengths and wrap, as a ribbon, both ways around your gift. Tie in a bow. (See photo above)
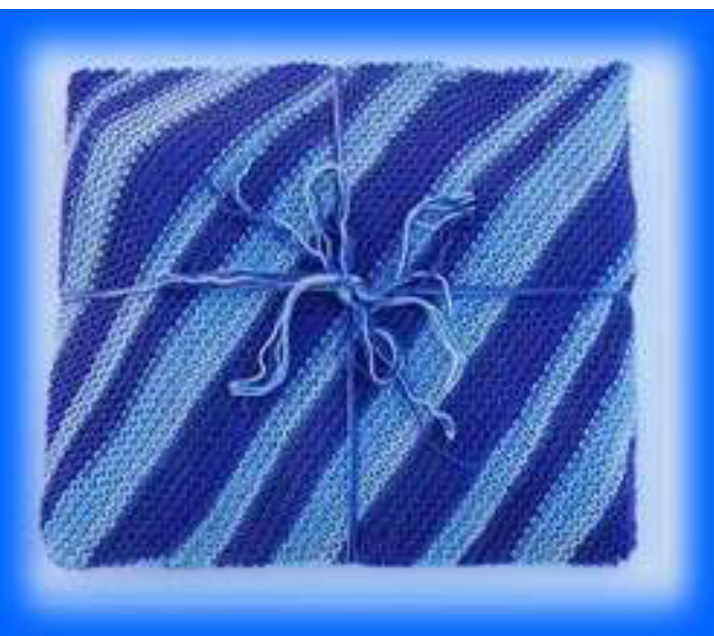
Stripes on the Bias: Garter Stitch Wrap Repurposes as a Pillow Cover
Stripes on the Bias is an easy gift wrap project that transforms to a great throw pillow cover once the gift is opened. It employs the garter stitch, and it is worked in such a way so stripes occur on the diagonal. Use self-striping sock yarn to create a great-looking gift wrap for a blouse, turtleneck, pajamas, or any other soft garment. Closes using a yarn ribbon and bow. Once the gift is opened, insert pillow form in back opening to cover for a decorative throw pillow. SIZE: TBD by kniter: As written, following the instructions will result in a 16" squarepillow MATERIALS: One 50g skein (approx. 220 yds) of self-striping fingering-weight yarn. Cover photo used Knit Picks Felici: Atmosphere. Use any self-striping fingering yarn you choose. You will need more for a larger wrapper/pillow. #4 needles, or size needed to obtain gauge Tapestry needle Pillow form of desired size GAUGE: TBD by knitter, and gauge is not critical. This knitter achieved 5 sts per inch, but your gauge will depend on yout knitting style as well as the needles and yarn used. INSTRUCTIONS: This project is worked flat, or back-and-forth. For an eventual 16- inch square, CO 80 sts. Knit the following two-row pattern until the piece measures 34 inches (or, two times the width plus 2 inches for overlapping opening when finished.)
Diagonal stripes pattern:
Row 1: Slip first stitch, purlwise. Knit next two stitches together. Knit across to last stitch, KFB in last stitch to increase sitch. Turn. (80 sts) ow 2: Slip first stitch, purlwise. Knit across row. Tur Repeat these two rows until desired length is reached. BO. Finishing: Fold piece so that you have a square, with the CO and BO edges, angled in the middle of the back, overlapping about 2 inches. Securely whip-stitch side edges closed, taking care to include all layers at overlap points. Tie or weave in all yarn ends. Now you have an opening and can insert your gift. Cut 3 equal lengths of yarn to tie around package to secure, and tie a bow. (See photo)

About the Author
Deborah Tomasello learned to knit and sew at her grandmother's knee when she was about five years old. Some of her fondest memories of her Gramma involve yarn and needles. She would start with grand ideas of knitting a scarf, but after working a few inches, when something of a lacy trapezoid would appear, she'd turn that scarf-gone-awry into a skirt for her Barbie. Over the years, her scarves became straighter, and her imagination broadened. Wools and fabrics have woven themselves into Deborah's very being, and she spends all her days happily designing and knitting her colorwork patterns. Deborah has published several e-Books, Stranded Knitting: It's Easier Than You Think, Four Strand Knitting: It's Easier Than You Think, Stranded for Christmas, and Socks for Jeans. She has published two books: her first book, Wrapped in Color: Stranded Knitting in the 21st Century was followed by Knitting 2oth Century Art. She has designed and published scores of colorwork patterns on Ravelry, Craftsy, Knit Picks and Patternfish. She has sold patterns to WEBs, and she won first place in Accord Publishing's 2014 Knitting Calendar for her Brilliant Twilight colorwork hat design.
Contact Information
Email Address: CoeDeborah@aol.com Ravelry Group: Colorworks by Debi http://www.ravelry.com/groups/colorworksbydebi-deborah-tomasello-designs Facebook Group: Colorworks by Debi https://www.facebook.com/groups/1542625356000027/


