about
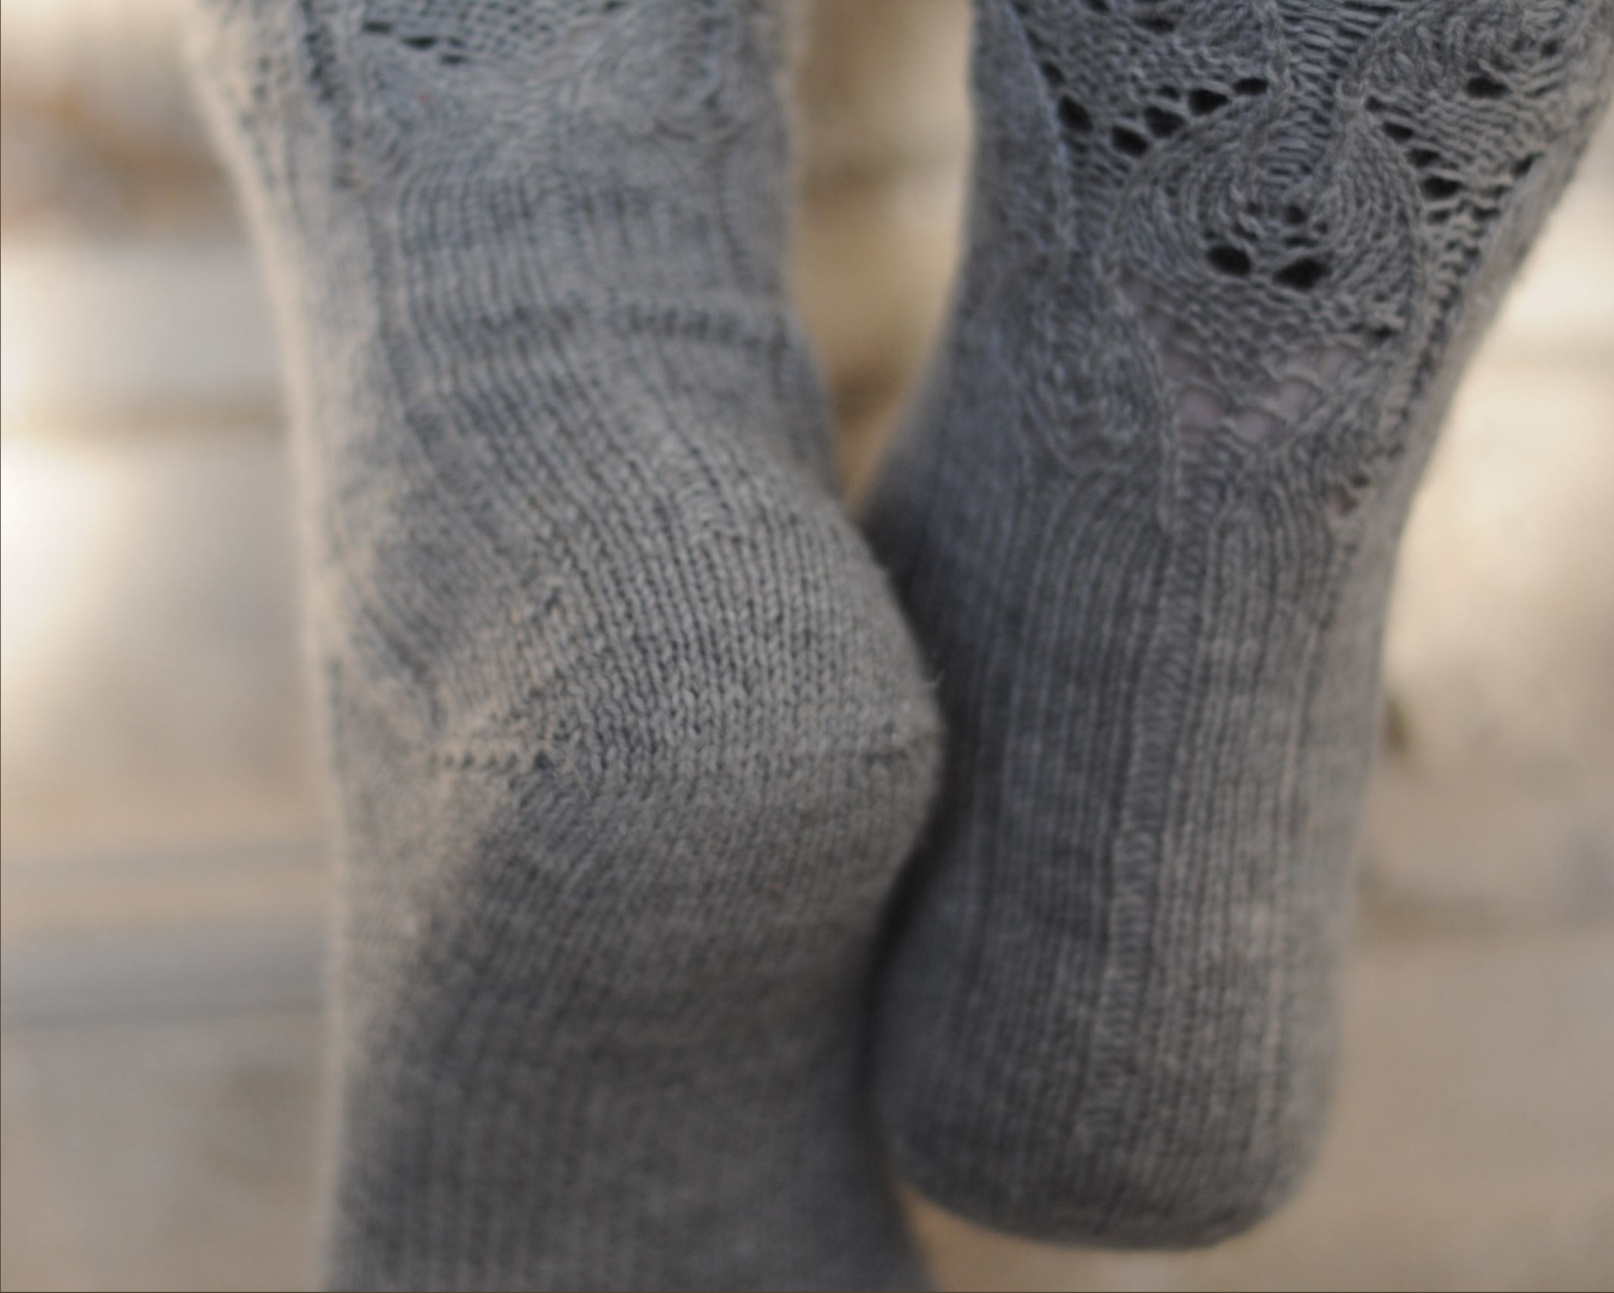
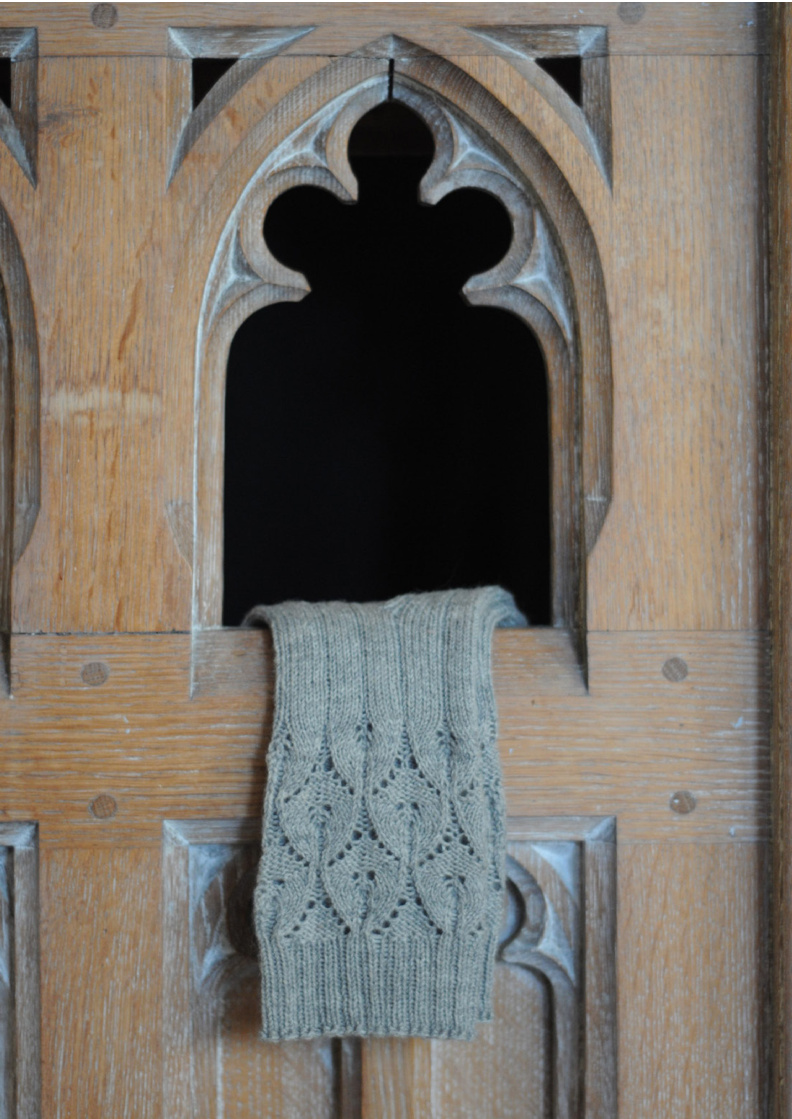
An irony of lace knitting is that, very often indeed, the people most likely to geek out over a complex lace pattern are those least likely to wear the fruits of their efforts. Designed to let closet lace knitters get their geek on, Tintern Abbey socks feature a plain ribbed instep and leg.The delicate Gothic lace pattern can be hidden from view, if need be, under a trouser cuff, or allowed to peek out from the topof a boot.
sizes
Circumference at mid foot: 8.75 inches (22cm) [9.25 inches (23.5 cm)] Length: Adjustable to fit
gauge
28 sts/36 rows = 4 inches in stockinette stitch using US 1/ 2.25mm needles
materials
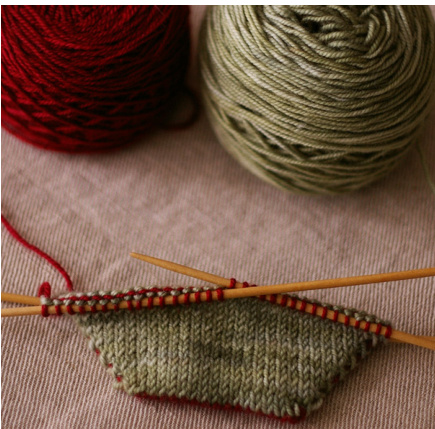
Regia Extra Twist Merino, I00% Merino Wool “9358Grey" 402 metres (440 yards) per 100g US I/ 2.25mm needles for knititng in the round: DPNs, 2 circulars or one long circular Stitch markers Darning needle
notes
The beginning/end of the round always occurs at the middle of the sole, between the two needles holding the sole stitches. Stitch count remains constant, however, the number of stitches on each needle will change. Periodic adjustment of stitches between needles may be necessary.
Gusset
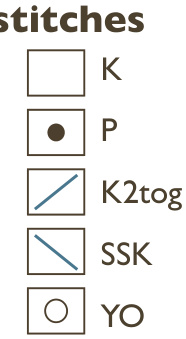
RoundI:Work to within 3 sts of end of needlel,MlR, k3. Work instep pattern as set. K3, MIL, k to end of needle 4. Round 2:Work sole stitches in stockinette, and instep pattern asset. Work these gusset rounds a total of Il times for a total of 31 [33] instep stitches, and 51 [55] sole stitches. terms K Knit. P Purl. K2tog Knit 2 together. SSK Slip slip knit. YO Yarn over.
Heel
Work Sherman Heel over sole stitches using method given on page page 9 ending with a wrong side row. Incorporate gusset stitches as follows:
Size M
Right Side Row: Sl I, kl, [pl, k5] four times, pl, kl, ssk (last heel stitch with first gusset stitch). Turn. Wrong Side Row: Sl, pl,kl, [p5, kl] four times, pl, p2tog (last heel stitch with first gusset stitch). Turn.
directions
Toe
Work Judy's Magic Cast On over 62 [66] and knit Sherman Toe per instructions given on page page 7 When toe is complete, divide sole stitches between needles I and 4, and instep stitches betweeen needles 2 and3. 31 [33] instep, and 29 [33] sole stitches. Repeat these rows until all gusset stitches on left side of heel have been incorporated, ending with a right side row. Final (WS) gusset stitch will be worked on the first round of leg.
Size L
Right Side Setup: Sl I, kl [p2, k5, pl,k5] two times, p2, k2tog, ssk (last heel stitch with first gusset stitch). Turn.
Instep
Size M
From start of round work sole stitches in stockinette; work instepstitches as follows: K3, pl, k5, [pl, k5] three times, pl, k3.
Size L
From start of round work sole stitches in stockinette, and work instep stitches as follows: K3, pl, [k5, p2, k5, pl] two times, k3. Work until instep measures 31/2 [4] inches less than total foot length. Wrong Side Row: Sll, pl [k2, p5,kl, p5] two times, k2, pl, p2tog (last heel stitch with first gusset stitch). Turn. Right Side Row: Sll, kl,[p2, k5, pl, k5] two times, p2, kl, ssk (last heel stitch with first gusset stitch). Turn. Repeat last two rows until all gusset stitches on left side of heel have been incorporated, ending with a right side row. Final (WS) gusset stitch will be worked on the first round of leg.
Leg
Begin working in the round again, working pattern as set across instep stitches to final gusset stitch. Close the gap that forms between instep and gusset stitches as follows: Lift the strand between last instep stitch and gusset stitch onto needle to create an extra stitch, then K3 together to get rid of the extra stitch.60 [65] sts Continue pattern as set until leg measures 2'/2 [3] inches from final gusset stitch. On final round of leg, from beginning of round, place markers as follows:
Size M
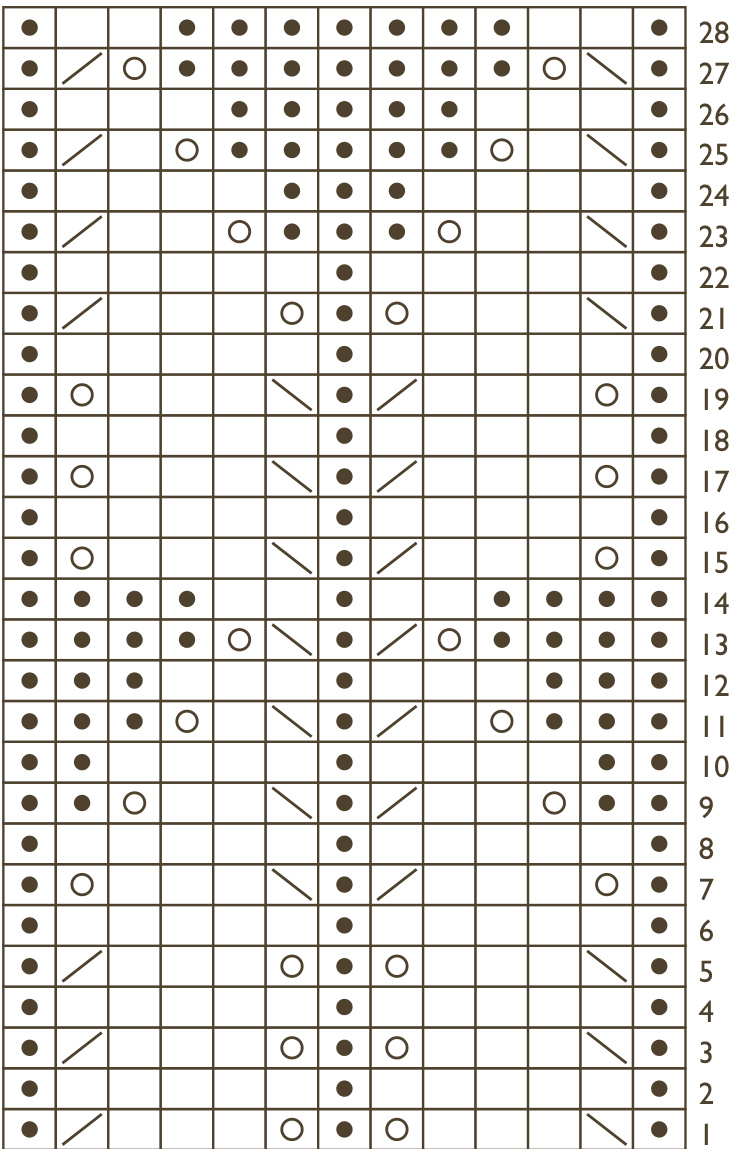
[Pl, k5, pl k5, PM] four times. Size L [PI, k5, pl, k5, pl, PM] four times. Begin lace pattern using chart appropriate for size. Work five repeats of chart per round.
Ribbing Size M
Beginning with first stitch of next round \*[pl, k2]; repeat from \* across all stitches for I6 rounds.
Size L
Beginning with first stitch of next round \*[pl, k2] four times, pl; repeat from \* across all stitches for 20 rounds.
Finishing
Bind off using Jeny's Surprisingly Stretchy Bind Off. Weave in all ends, lightly steam block. Make a second sock to match the first.
size medium

Gothic Arches M (repeats over I2 sts) Row I, 3 & 5: [Pl, ssk, k3, yo, pl yo, k3, k2tog] Row 2, 4,6 & 8: [Pl, k5, pl, k5] Row 7: [Pl, yo, k3, k2tog, pl, ssk, k3, yo] Row 9: [P2, yo, k2, k2tog, pl, ssk, k2, yo, pl] Row 10: [P2, k4, pl, k4, pl] Row Il: [P3, yo, kl, k2tog, pl, ssk, kl, yo, p2] Row 12: [P3, k3, pl, k3, p2] Row I3: [P4, yo, k2tog, pl, ssk, yo, p3] Row 14: [P4, k2, pl, k2, p3] Row 15, 17 &19: [Pl, yo, k3, k2tog, pl, ssk, k3, yo] Row 16, 18,20 & 22: [Pl, k5, pl, k5] Row 2l: [As row I.] Row 23: [PI, ssk, k2, yo, p3, yo, k2, k2tog] Row 24: [P1, k4, p3, k4] Row 25: [Pl, ssk, kl, yo, p5, yo, kl, k2tog] Row 26: [P1,k3, p5,k3] Row 27: [Pl, ssk, yo, p7, yo, k2tog] Row 28: [Pl, k2, p7, k2]
size large
Gothic Arches L (repeats over I3 sts) Row I, 3 & 5: [Pl,ssk, k3, yo, pl yo, k3, k2tog, pl] Row 2, 4,6 & 8: [Pl, k5, pl, k5, pl] Row 7: [Pl, yo, k3, k2tog, pl, ssk, k3, yo, pl] Row 9: [P2, yo, k2, k2tog, pl, ssk, k2, yo, p2] Row I10: [P2, k4, pl, k4, p2] Row Il: [p3, yo, kl, k2tog, pl, ssk, kl, yo, p3] Row 12: [P3, k3, pl, k3, p3] Row I3: [P4, yo, k2tog, pl, ssk, yo, p4] Row 14: [P4, k2, pl, k2, p4] Row 15, 17 &19: [Pl, yo, k3, k2tog, pl, ssk, k3, yo, pl] Row 16, 18, 20 & 22: [Pl, k5, pl, k5, pl] Row 2l: [As row I.] Row 23: [Pl, ssk, k2, yo, p3, yo, k2, k2tog, pl] Row 24: [Pl, k4, pl, k4, pl] Row 25: [Pl, ssk, kl, yo, p5, yo, kl, k2tog, pl] Row 26: [Pl, k3,p5,k3, pl] Row 27: [Pl, ssk, yo, p7, yo, k2tog, pl] Row 28: [Pl,k2, p7, k2, pl]
Sherman Toes and Heels
The Sherman method for short-row toes and heels solves many of the problems inherant in other short row methods. It's worked from the outside in, and requires no wrapping of stitches, no yarn overs, and no extra equipment. Easily adaptable to all sizes, it's fast to work, and very durable.
toes
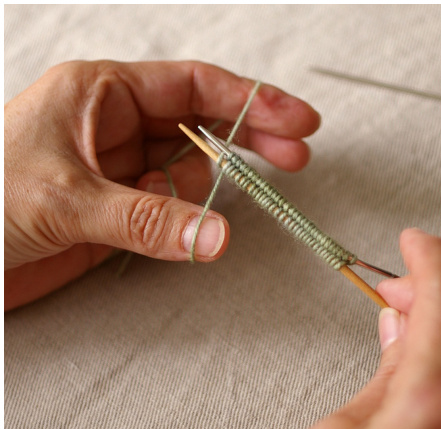
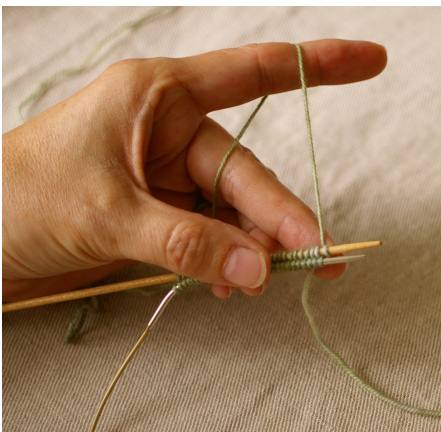
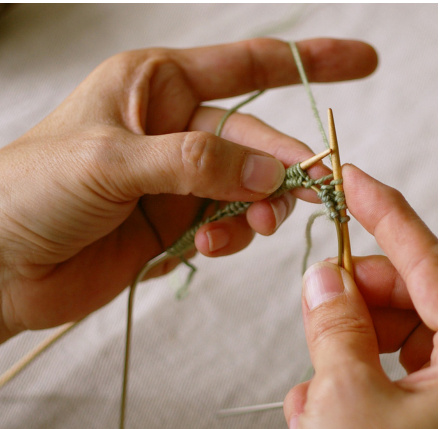
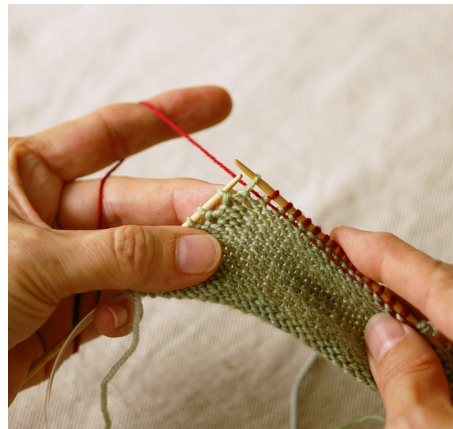
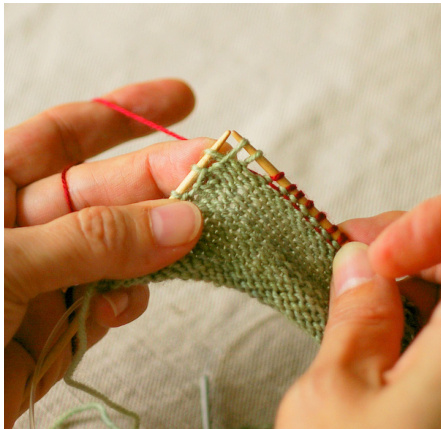
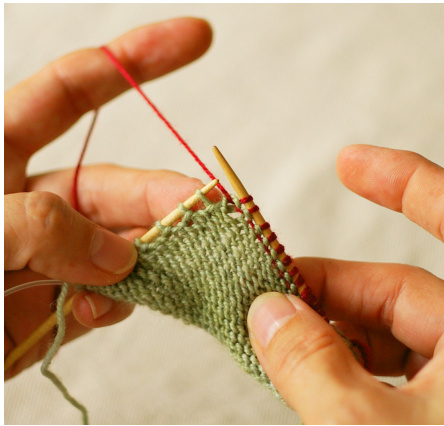
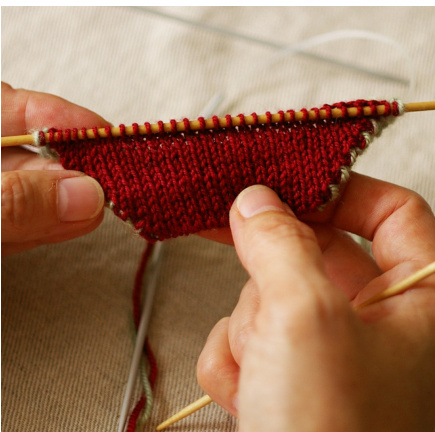
Work Judy's Magic Cast On over the given number of stitches, using one circular needle and a single double pointed needle (dpn) held together as shown in image a. With both needles in your left hand, as shown in image b, pull the circular needle until all the cast on stitches are resting on the cable. These are your provisional stitches, and will become the sole stitches when the toe is complete. Toe is worked back and forth over half the cast on stitches using a second dpn, as shown in image C.
Alternatively, using provisional cast on of your choice, CO half the number of stitches given. Work first half of toe as follows: Row I : K across all sts. Row 2: Sll, P to I stitch before end of needle.Turn. Row 3: Sll, K to I stitch before end of needle.Turn. Row 4: Sll, P to gap before last slipped stitch.Turn. Row 5: Sll, K to gap before last slipped stitch. Turn. Repeat rows 4 and 5, working one fewer stitch in each row, to complete the bottomhalf of thetoe.
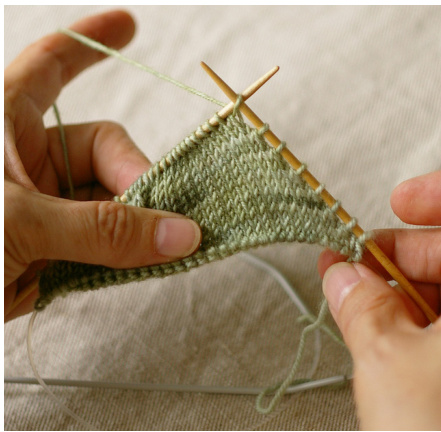
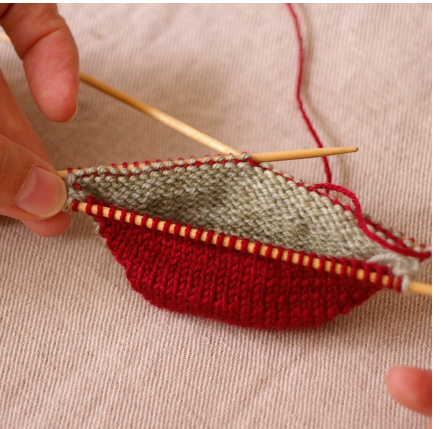
The final knit row of the first half of the toe begins with 7 slipped sts on the right needle.As you begin this row you'll slip an 8th stitch, as shown in image d.Work across as for Row 5, and turn the work to complete the first half of thetoe. The first purl row of the second half of the toe begins with 7 slipped sts on the right needle.As you begin this row you'll slip an 8th stitch. Note: For the purpose of this tutorial the second half of the toe is worked in a contrastingyarn. Work second half of toe as follows: Row I: P across to the last unworked stitch and slip this stitch purlwise as shown in image e. Insert tip of right needle into the slanted slipped stitch below next stitch, lift stitch onto left needle as in image f. Move the slipped purl stitch back to the left needle. Purl the slipped stitch together with the lifted stitch thorugh the back of both sts as in image g. Turn. Top Row 2: K across to the last unworked stitch and slip this stitch knitwise. In image h, this is the red stitch near the tip of the right needle. Insert tip of right needle into the slanted slipped stitch below next stitch, lift stitch onto left needle. In image h, the slanted stitch is being lifted by the right needle. Move the slipped knit stitch back to the left needle. Knit the slipped stitch together with the lifted stitch through the back loops as shown in image i. Turn. Repeat these rows until all stitches have been worked, leaving one unworked stitch at each end of the dpn as shown in image j. The stitches on this needle are the instep stitches. Divide remaining stitches equally between two dpns as shown in image k. If using a different provisional cast on, unzip and place live sts on two needles. These needles now hold the sole stitches. Your Sherman Toe is now complete, and you may begin working in the round immediately.Adjust stitch count if necessary by knitting together unworked stiiches at one or both ends of the needles.

heels
Just like commercially knit socks, the Sherman heel is worked exactly the same as a Sherman toe. Divide for heel by placing half the number of stitches given onto waste yarn or stitch holder. Place markers to separate gusset stitches from heel flap, or arrange stitches so that marker placement falls between needles. Use short rows to turn heel as follows: Row I: K across until one stitch remains before marker/end of left needle; turn.
Row 2: Sl I, p across stitches until one stitch remains before marker/end of left needle; turn. Row 3: Sll, k to gap before last unworked stitch. Turn. Row 4: Sll, p to gap before last unworked stitch.Turn. Repeat rows 3 and 4, working one fewer stitch in each row, to complete the bottom of the heel. (Just as for toe, the last knit row begins with 7 slipped sts on the right needle; as you begin this row you'll slip an 8th stitch.)
Work second half of heel as per instructions for second half of toe of toe. Repeat until all stitches have been worked, leaving one unworked stitch at the outside end of needles. Continue working back and forth across stitches of heel flap,incorporating gusset stitches as follows: First Right Side Row: Sl I, work in pattern to last stitch of heel flap; Ssk last stitch of heel flap with first stitch of gusset. Turn. Wrong Side Row: Sl I, work in pattern to last stitch of heel flap; p2tog last stitch of heel flap with first stitch of gusset. Turn.
Work these rows until all gusset stitches have been incorporated.Your Sherman heel is now complete, and you begin working in the round again.


