Sweeties
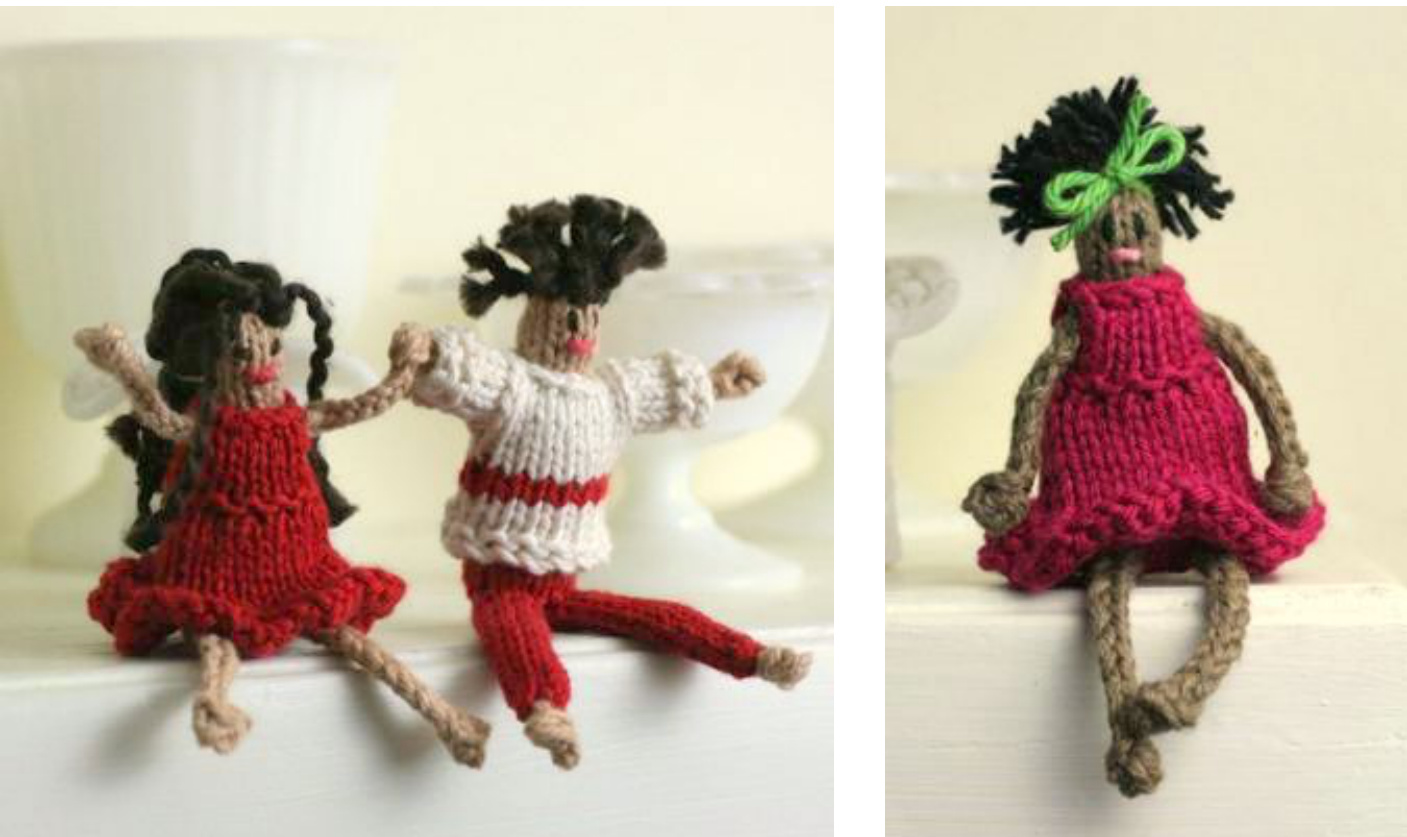
Materials
-Set of four DPNs US size 3 (or size appropriate to your chosen yarn) -Small amounts of worsted weight yarn in various colors for: skin, britches or pants, sweater or dress, eyes, mouth and hair. The largest amount needed is about 16 yards (10g) for the dress. Examples are in KnitPicks Simply Cotton and Blue Sky Alpacas Worsted Cotton. -Stuffing -Yarnneedle -Removable marker for sweater (safety pin) -Crochet hook to attach hair (optional, you can use a yarn needle in a pinch)
Gauge
5 sts to an inch with worsted weight yarn yields a 5.5 inch tall doll.
Notes
-Several kinds of increases are used. -Tutorials for unfamiliar techniques (including i-cord and grafting) can be found at http://yarnmiracle.com/techniques -Stitch counts for dividing stitches on DPNs are given as “2-3-2". That is, 2 sts on needle #1, 3 0n needle #2 and 2 on needle #3. -Stitch counts for critical rows or rounds will appear in parentheses: (17 sts) -If changing skin color between handholding dolls, leave long tails to weave up to the shoulders. -Clothes are knit flat and seamed on the sides so that handholding dolls can be dressed after joining. -Dolls can be made as individuals or attached in chain. Arms are attached as the doll is made, so the longer the chain, the more dolls will be hanging off the needle as you work. Just warning you if you are planning a paper doll or garland situation. -I encourage you to look through the pattern before starting to determine what pieces you will need for your dolls. There are lots of possibilities!
Abbreviations
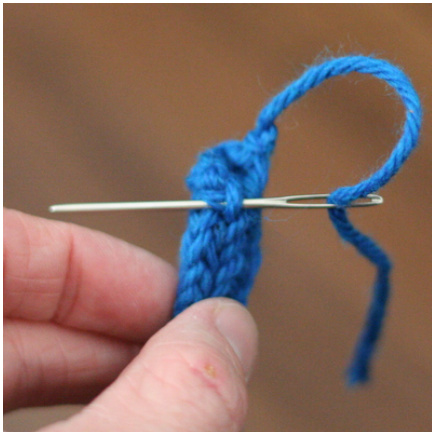
MiR- lift the strand between the stitches from front to back with the LH needle and knit through the back loop MiL- lift the strand between the stitches from back to front with the LH needle and knit MH- Knit into front and back of stitch three times and then into the front again (creating seven stitches). Working with the loaded needle, pass 2nd through 5th stitches one by one over the 1st stitch on the needle (the last stitch made) and off of the needle creating a bobble. Two stitches should remain on the needle. Confused? There is a video at http://yarnmiracle.com/techniques M3- knit into the front, back and front again, making 3 stitches of one stitch sts-stitches All other abbreviations are standard.
\*\*Make arms and legs BEFORE starting body!\*\*
Bare Legs (make 2 per dress-wearing doll Using two double pointed needles as straight needles and skin color, cast on 1 leaving a 5" tail. Next:MH Next: Work i-cord on remaining two stitches for 14 rows. Break yarn, drawing tail through the two remaining stitches and pulltighi With yarn needle, draw cast on tail through bobble and weave it up the leg so that both tails stick out the top. Pants Legs (make 2 per pants-wearing doll) Using two double pointed needles as straight needles and skin color, cast on 1 leaving a 4" tail. Next: MH Break skin color, attach pants color, K2 and continue in pants. Next: Working as if for i-cord (slide the stitches over so that the working yarn is pulled behind the stitches to knit on the right side again), M3 out of each stitch. (6 sts)
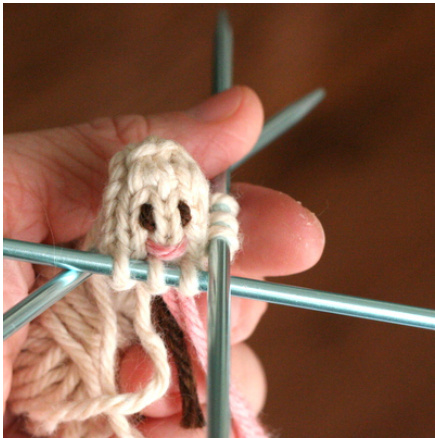
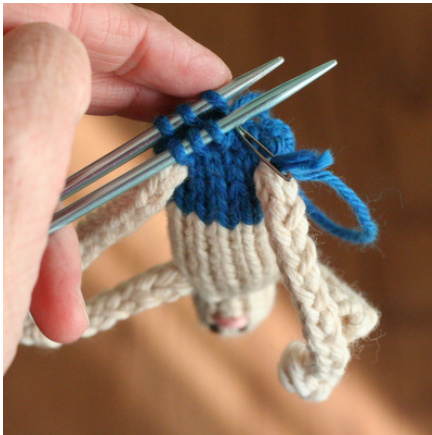
Next: Work i-cord on these six stitches for 14 rows. Bind off, break yarn leaving a 4" tail. Use the cast off tail to join the edges of the bound off row (picture). Secure and hide all the loose foot ends inside pants leg. Arms (make two per individual doll or two for outside dolls in a chain) Using two double pointed needles as straight needles and skin color, cast on 1 leaving a 4" tail. Next: MH Next: Work i-cord on remaining two stitches for 10 rows. Break yarn leaving a 4" tail. Draw tail through live stitches and pull tight. With yarn needle, draw cast on tail through hand and weave it up the arm so that both tails stick out the top. Handholding Arms (make one per two dolls in a chain) Using two double pointed needles as straight needles and skin color, cast on 2 leaving a 4" tail. Next: Work i-cord on those two stitches for 10 rows. Next: Knit into front and back of first stitch three times making six stitches. One by one, pass each of the last five stitches (the first ones made) over the first one on the needle (the last one made) and off of the needle, K1 \*\*Confused? Find a video at http://yarnmiracle.com/techniques\*\* Next: Work i-cord on remaining 2 stitches for 10 rows. Break yarn leaving a 4 inch tail. Draw tail through live stitches and pull tight Body (make one per doll) Beginning at the top of head, cast on 6 stitches with skin color. Arrange stitches evenly on three double pointed needles and join to work in the round. Round 1: Knit Round 2: \*K1, M1R, K1 repeat from \* to end of round (9 sts) Rounds 3-7: Knit (5 rounds) Use cast on tail to close up hole in head, hide remaining tail on inside of doll's noggin. Embroider face now, securing and hiding ends inside the doll. Round 8: K2, K2TOG, K1, SSK, K2 (7 sts, 2-3-2) Round 9: Knit Round 10: (K1, M1R) 3 times, K1, (M1L, K1) 3 times (13sts, 4-5-4 Stuff head - you may need to poke the stuffing in with a DPN. Rounds 11-15: Knit (5 rounds)
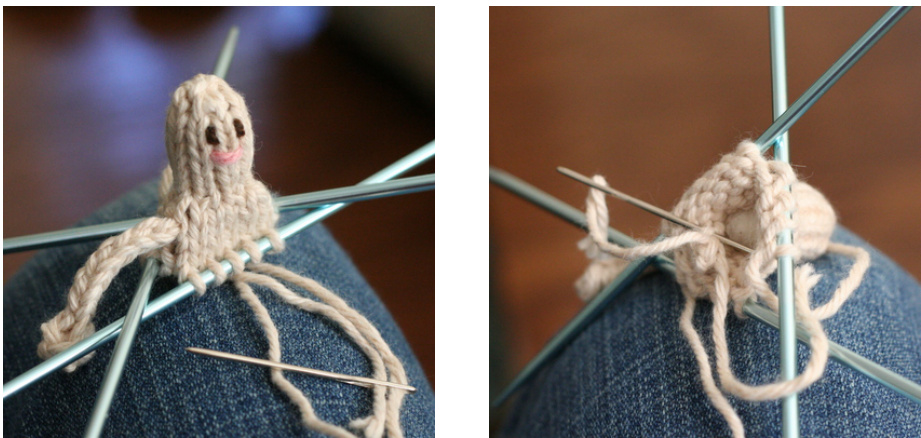
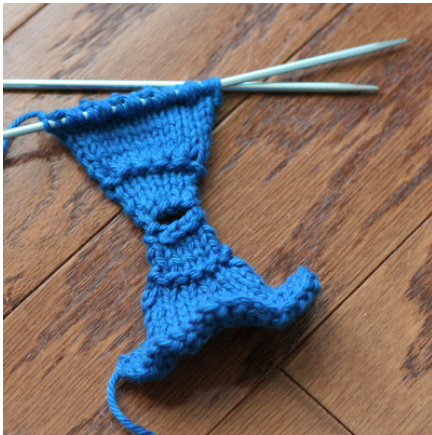
Attach arms: using the breaks between needles as a guide, shove the ends of the arms through the stitches at the doll's shoulders (Round 10). Use the arms yarn ends to secure them to the inside. If attaching hand holding arms to the second (or more) doll, make sure the bodies are facing the same way. Ask me how I know. Rounds 16-20: Knit (5 rounds) Round 21: K2, M1L, K9, M1R, K2 (15 sts, 5-5-5) Break skin color and attach britches color (this should be pants color for a pants wearing doll). Continue in britches color. Rounds 22-26: Knit (5 rounds) Round 27: K2TOG, K1, K2TOG, K5, SSK, K1, SSK (11 sts, 3-5-3) If this doll will wear a dress, shove legs through the stitches using the needle breaks as a guide. Use the leg tails to secure them to the inside. Secure any loose yarn ends and hide them inside the doll. Stuff body. Next: Knit all stitches from needle one onto needle three. There will be 6 stitches on needle three (back) and 5 on needle 2 (front). Graft (kitchener stitch) live stitches together. If doll is in pants, sew tops of pants legs to britches above seam.
Dress (make 1 per dress-wearing doll) Using two double pointed needles as straight needles, cast on 24 in dress color. Leave a 5" tai Rows 1-4: Knit (4 rows) Row 5: \*K3TOG, K1 repeat from \* to end of row (12 sts) Rows 6-14: Starting with a purl row, work in stockinette stitch. (9 rows) Row 15: K2TOG across row (6 sts) Row 16: Knit (on wrong side) Row 17-21: Beginning with a knit row, work in stockinette stitch. (5 rows) Row 22: P1, bind off 4 purlwise (2 sts - shoulder straps around the neck opening) Row 23: K1, TURN cast on 4 with a knit cast on, TURN, K1 (the other shoulder strap) (6 sts) Rows 24-28: Beginning with a purl row, work in stockinette stitch. (5 rows) Row 29: Purl (on right side) Row 3o: Purl into the front and back of each stitch, making each stitch into two. (12 sts) Rows 31-39: Beginning with a knit row, work in stockinette stitch. (9 rows) Row 40: \*M3, K1 repeat from \* to end of row (24 sts) Rows 41-44: Knit (4 rows) Bind off. Break yarn leaving a 5" tail.
If dress is for an individual doll, fold dress in half, lining up hem, ruffles and purl row. Use yarn tails to seam from hem to purl 'belt' on each side. Secure and weave in yarn ends. Dress doll. If dress is for a handholding doll, slip doll's head through neck hole in dress and arrange around arms. Finish as above with doll inside. Sweater (make one for each pants-wearing doll) SweaterBody Using two double pointed needles as straight needles, cast on 10 with selected sweater color. Rows 1-2: Knit (2 rows) Rows 3-16: Beginning with a knit row, work in stockinette stitch. (14 rows) If you choose to add a stripe or other pattern, just make sure to do it in the same place on the oppositeside. Row 17: Knit 3, bind off 4, knit 3 (6 sts - shoulders around a neck opening) Row 18: Purl 3, TURN, cast on 4 with knit cast on, TURN and purl the last three stitches (10 sts) Rows 19-32: Continue in stockinette stitch. (14 rows) Rows 33-34: Knit (2 rows) Bind off knitwise. SweaterSleeves With right side of sweater body facing, count 9 rows of stockinette stitch from garter band. Place removable marker through edge of sweater at that row. Beginning at marker, pick up and knit 10 stitches along that edge of the sweater. Rows 1-4: Work in stockinette stitch. (4 rows) Rows 5-6: Knit (2 rows) Bind off knitwise leaving a 6" tail. Repeat on other side of sweater body for second sleeve. Weave in all ends except the 5" cast off tails on the sleeves. For a single doll, fold sweater in half, lining up hem, sleeves and sides. Use the long yarn tails on the sleeves to seam the bottom of the sleeves and sides of the sweater. Dress doll. For a hand holding doll, slip doll's head through the neck hole and arrange sleeves around arms. Finish as above with doll inside. NOTE - using the sleeve tails to seam the sides is important when you are putting the sweater on a handholding doll: the sleeves are too small to get the ends woven in, but on the body of the sweater you can just manage.
Finishing
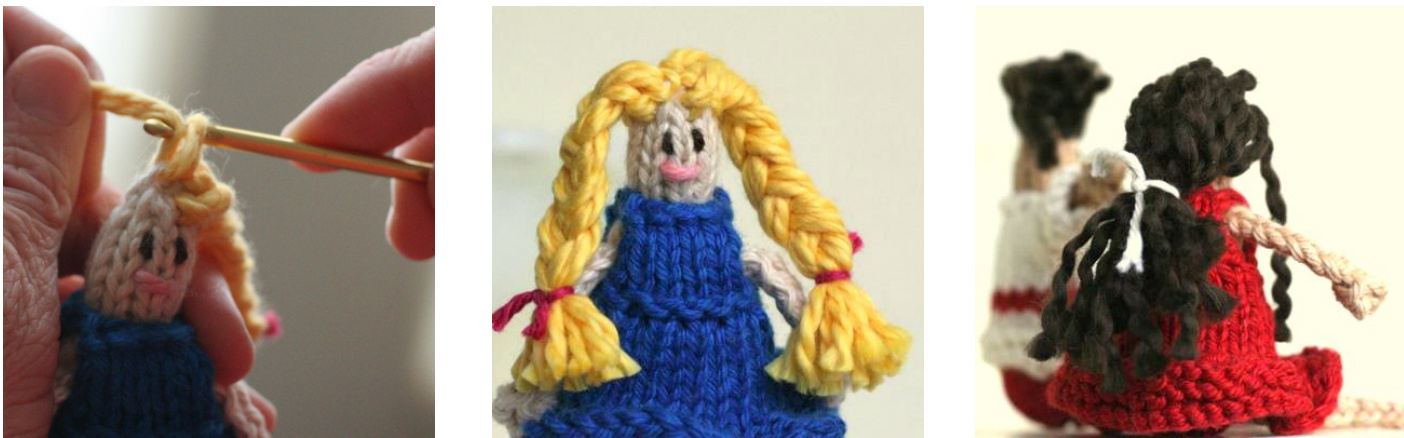
Cut strands of yarn in hair color and attach them as fringe to doll's scalp. It's easiest to cut the strands longer than you think you'll need and then trim them after they are attached to the doll. Style and trim hair as it suits your fancy. I used strands 1o inches long for the braids.
Copyright 2011, Emily Ivey, emily@yarnmiracle.com, http://yarnmiracle.com You may not distribute this pattern in any form without the express, written permission of Emily Ivey. The toys you (the purchaser) personally make from this pattern are yours and you can do with them as you please. If you choose to sell your creations, please link to yarnmiracle.com as the source of the pattern.


