Bilskirner Set: Hat, Mitts, and Mittens by Astrid Colding Sivertsen Sizes Child (Adult) with 50 (57) .cm head circumference. The child set will fit a 3-4 year-old. Mitts will fit medium-sized hands.
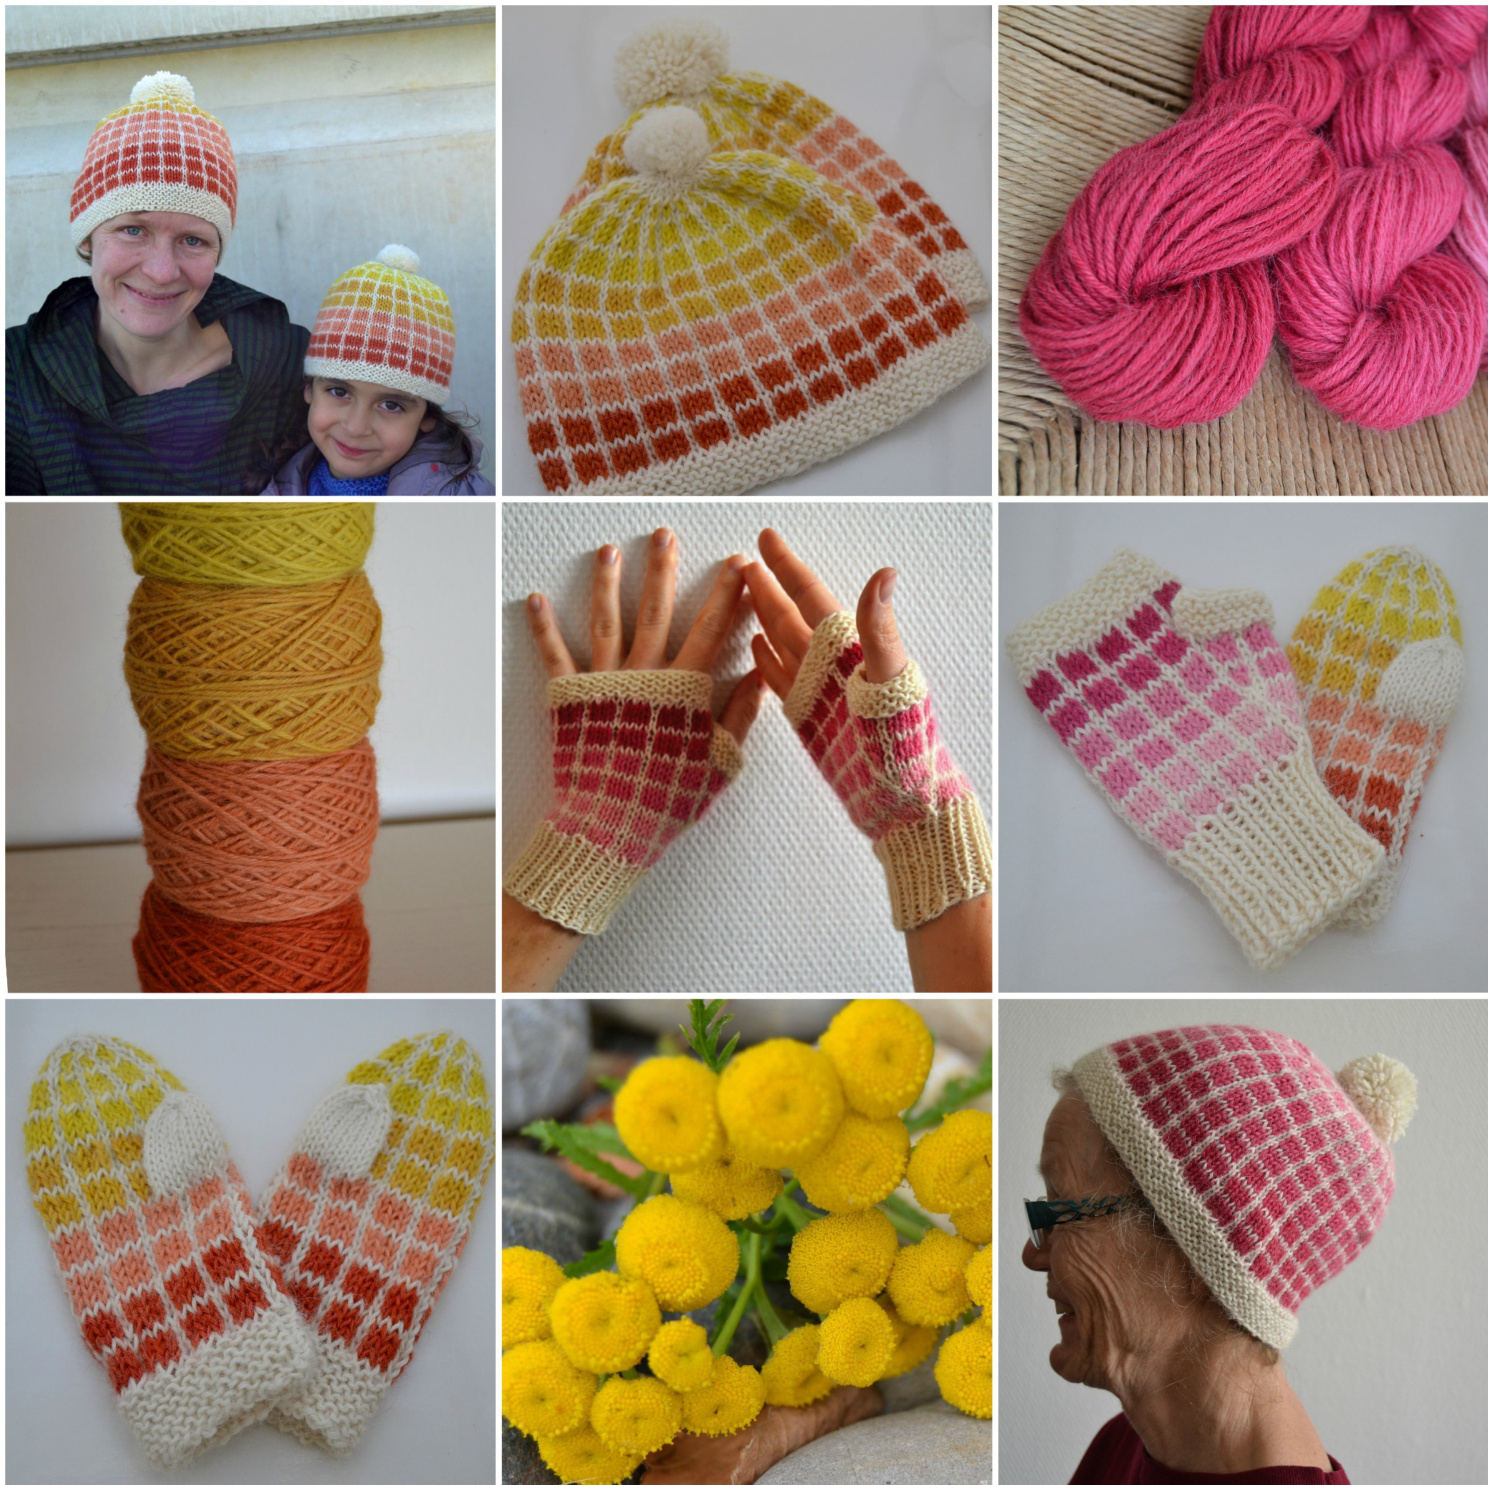
Bilskirner is a set of an easy-to-wear beanie. child's mittens. and adult's Fingerless mitts with a simple geometric pattern in stranded knitting. Knit in Guldfaxe worsted weightalpacal
Yarn
Midgaard Naturals Guldfaxe, 100% alpaca, 100m/50 Shown in pink Freja kit and yellow/red Loke kit. All four contrast colors for the Freja kit are dyed with cochineal. The contrast colors for the Loke kit are dyed with madder and tansy. You'll need 2 skeins of natural white main color (MC) for either a child's or adult's set, and less than 12 g of each contrast color (CC). If making a 2-color version, you will need about one skein of a singie CC.
Needles and Gauge
22 sts x 24 rounds = 10 × 10 cm (4 × 4 inches) in stranded knitting in the round on larger (4.5 mm, Us7) needle. For the. edge, use a needle one size smaller (4 mm, US6) - or needle sizes to obtain gauge. Please take time to check gauge and adjust needle size in order to ensure a good result! The gauge in flat, one-color stockinette will most probably not be the same as color knitting gauge in the round, so checking fliat gauge will not be helpful.
Circular or Double Pointed Needles?
I personally prefer using a long (at least 1o0 cm) circular needle for a stranded hat. The long wire is easy to loop out here and there. You can also use a very short circular or double pointed needles, or begin with a circular, switching to double pointed needles (dpn's) when it seems comfortable during the crown decreases - knitter's choice! For the mitts and mittens, I also used long circular needles, working in magic loop technique - you can see a tutorial here: http://www.knittinghelp.com/video/play/magic-loop. You can of course use double pointed needles if you prefer. When you work in magic loop technique, you will not have an endof-round marker, since this is one of the places the needle cable is looped out. The cable is also looped out in the opposite side, so if you want to be sure which side is the change of round, you can put a small safety pin in the knitted fabric to mark it.
About Color Knitting
When knitting the stranded part of the hat, mitts, and mittens, hold your yarns so that the CC is dominant over the MC. Abbreviations k- knit k2tog -knit 2 together kfb - knit into front and back of same stitch, increasing one p-purl p2tog -purl 2 together st(s) - stitch(es) sl-slip ssk - slip, slip, knit the 2 slipped stitches together through the back loops psso -. pass slipped stitch over MC - main color CC1, 2, 3, 4 - contrast colors 1, 2, 3, and 4 Square brackets [...]. hold instructions that should be repeated across an entire round. Bilskirner Set \~ Astrid Colding Sivertsen \~ Midgaard Naturals \~ www.midgaardnaturals.dk \~ 2 The dominant position in continental knitting is the yarn that sits on your index finger, and the non-dominant yarn sits behind it on your index and middle fingers. In English knitting ('m told) it's the opposite. If you are not sure about dominance in your preferred knitting technique, you should swatch. It's also. possible that you may like the look when the CC is dominant. In the end, what matters is that you hold the yarns in the same positions throughout the project. If you work on dpn's, make sure that the floating yarn on the back of the work is not too tight in the transition between needles. If you work the hat on a long circular, and loop the extra cable out randomly, or use a very short circular, then you should not experience any problems with tight floats on the back. When you work mitts or mittens using magic loop. technique, you will need to flip the work inside out just before you start working the stranded part. You will knit the stranded color work just like you always do, only the orientation of the work will be different! This will automatically prevent the floating yarns on the back from becoming too tight. You can see a tutorial here: https://www.youtube.com/watch?v=KgU-1QiEWts.
Backwards Loop Cast On
A simple cast on method with one yarn, ideal for use in the middle of the work. You can see a tutorial here: https://www.youtube.com/watch?v=BE_XD854iMo. Only use the cast on instructions in this video, do not make a slip knot.
Pom Pom
The easiest way to make a pom pom is to use a pom pom maker, but if you don't have one, you ,can simply cut..out a form from cardboard. You can’ see more here http://www.wikihow.com/Make-a-Pom-Pom
Directions - Hat
Brim
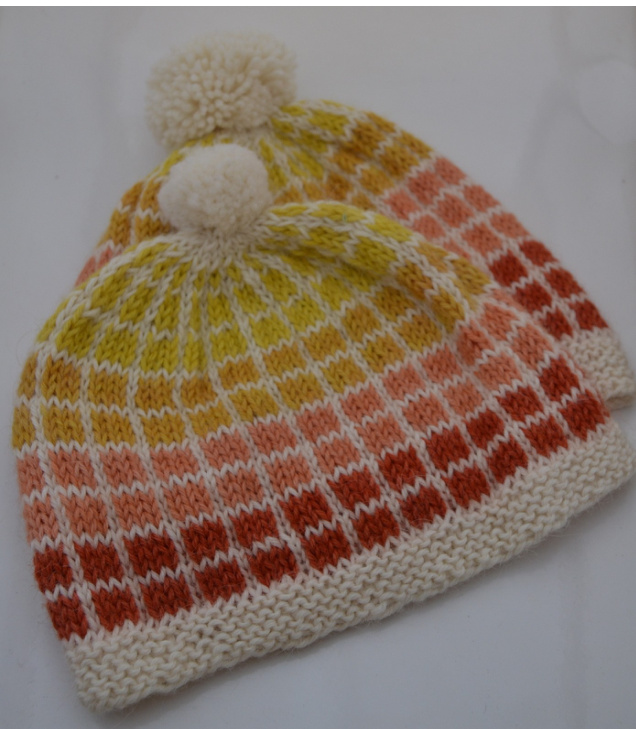
Using MC and smaller (4 mm) needle, cast on 80 (92) sts. Begin knitting in the round and work a garter edge by alternating k and p rounds. Begin with a k round and end with a p round, and work 4 (5) garter ridges, a total of 8 (10) rounds. Change to larger (4.5 mm) needle and work one increase round: For child's hat: [k4, kfb] around For adult's hat: [(k5, kfb) 3 times, k4, kfb] around You now have 96 (108) sts. Stranded Pattern Repeat Main Body of Hat Change to stranded knitting using MC and CC. Rounds 1-3: [k3 with CC, k1 with MC] around Round 4: k all sts with MC Using CC1, knit 2(3) pattern repeats. Using CC2, knit 2(3) pattern repeats. Using CC3, knit 2(2) pattern repeats. Child size only: Using CC4, knit 1 pattern repeat. Note: If your row gauge is not correct, you can adjust the overallength of the hat as you like while knitting the main body.
Crown Decreases
The decreases section is worked using MC and CC4 for both child and adult sizes. Round 1: 。 [k1 with CC, k2tog with CC, k1 with MC] around; you now have 72 (81) sts Rounds 2-3: [k2 with CC, k1 with MC] around Round 4: [k with MC] around Round5: [k2tog with CC, k1 with MC] around; you now have 48 (54) sts Round 6: [k1 with CC, k1 with MC] around For all remaining rounds, use MC only. Round 7: [k2tog] around; you now have 24 (27) sts Round 8: k all sts Round 9: For child's hat: [k2tog] around For adult's hat: [k2tog] until 1 st remains, k1 You now have 12 (14) sts Round 10: For child's hat: [sl1, k2tog, ppso] around For adult's hat: [(sl1, k2tog, psso) 2 times, k1] around You now have 4 (6) sts Round 11: For adult's hat only: [k2tog] around; you now have 3 sts. Cut yarn and thread through remaining 4(3) sts. Fasten end so sts cannot slip, but do not trim end yet. Sew in all other yarn ends. Using MC or a mix of MC and all CC's, make a pom pom that is 6 cm across. Try to resist the temptation to make a big fat pom pom - it will be too heavy and weigh the hat down. Use the pom pom's yarn tails for sewing it onto the top of the hat, and make some extra sts using the saved yarn tail from earlier. This will secure the pom pom nicely.
Finishina
Directions - Child's Mittens
Mittens are knit one at a time using magic loop technique on a long circular needle. The stranded pattern for the left and right mitten are subtly different - the only purpose is to make sure that the two mittens are mirror images of each other.
Right Mitten
Cuff
Using MC and smaller (4 mm) needle, cast on 26 sts. Begin knitting in the round, using magic loop technique with 13 sts on each half of your circular needle. Work a garter edge by alternating k and p rounds: begin with a k round and end with a p round. Work 5 garter ridges, a total of 10 rounds. Change to larger (4.5 mm) needle and work one increase round: [(k2, kfb, k1, kfb) 2 times, k2, kfb] around. You now have 36 sts, 18 on each half of the needle.
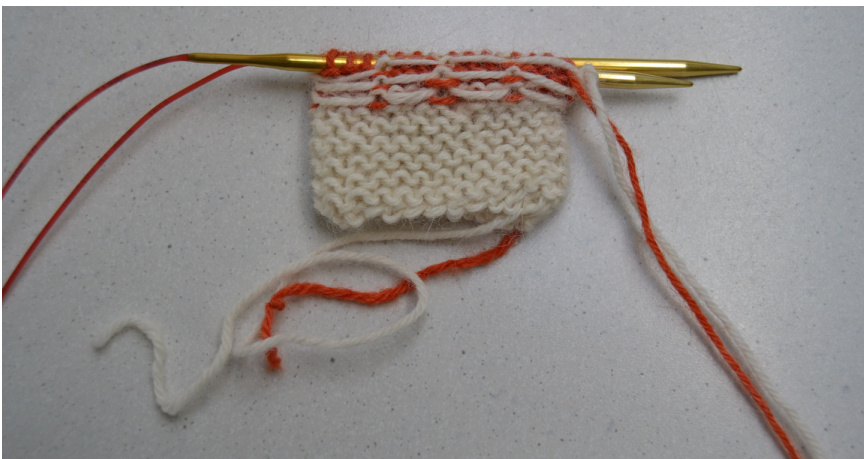
[Flip work inside out before proceeding. Bilskirner Set \~ Astrid Colding Sivertsen \~ Midgaard Naturals \~ www.midgaardnaturals.dk \~ 5
Main Part of Mitten
Change to stranded knitting using MC and CC. Using CC1, knit 2 pattern repeats. Using CC2, knit 1 pattern repeat, then the first 3 rows of a pattern repeat. K the first 5 sts of the round with a piece of scrap yarn, then slide the sts back to the left needle. K the round using MC. Using CC3, knit 2 pattern repeats. Using CC4, knit 1 pattern repeat.
Right Mitten Stranded Pattern Repeat
Rounds 1-3: [k3 with CC, k1 with MC] around Round 4: k all sts with MC
Decreases
The decrease section is worked using MC and CC4. Round 1: . [k1 with CC, k2tog with CC, k1 with MC] around; you now have 27 sts Rounds 2-3: [k2 with CC, k1 with MC] around Round 4: [k with MC] around Round 5: [k2tog with' CC, k1 with MC] around; you now have 18 sts Round 6: [k1 with CC, k1 with MC] around For all remaining rounds, use MC only. Round 7: [k2tog] around; You now have 9 sts Round 8:k all sts Round 9: 。 [sl1, k2tog, psso] around. You now have 3 sts. Cut yarn and thread through remaining 3 sts.
Thumb
Knit with MC using larger (4.5 mm) needle. Remove the scrap yarn, putting 5 live stitches on each part of your needle (top and bottom). K the 5 bottom sts, pick up and k 2 sts at the side, k 5 top sts, pick up and k 2 sts at the other side. You now have 14 sts. K in the round until thumb measures 4 cm or desired length. Decrease round 1: k2tog around. You now have 7 sts. Decrease round 2: sl1, k2tog, psso, k1, sl1, k2tog, psso. You now have 3 sts. Cut yarn and thread through remaining 3 sts. Sew in ends. Left Mitten Cuff: Work in the same way as for the right mitten.
Main Part of Mitten
Change to stranded knitting using MC and CC. Using CC1, knit 2 pattern repeats. Using CC2, knit 1 pattern repeat, then the first 3 rows of a pattern repeat. Using MC, k until 5 sts remain. K the last 5 sts with a piece of scrap yarn, then slide them back to the left needle and k them with MC. Using CC3, knit 2 pattern repeats. Using CC4, knit 1 pattern repeat.
Decreases
The decrease section is worked using MC and CC4. Round 1: . [k1 with MC, k1 with CC, k2tog with CC] around; you now have 27 sts Rounds 2-3: [k1 with MC, k2 with CC] around Round 4: [k with MC] around Round 5: [k1 with MC, k2tog with CC] around; you now have 18 sts Round 6: [k1 with MC, k1 with CC] around For all remaining rounds, use MC only. Round 7: 。 sl1, [k2tog] around (the last st on this round is the one you initially slipped); You nowhave9sts Round 8: k all sts Round 9: 。 [sl1, k2tog, psso] around. You now have 3 sts. Cut yarn and thread through remaining 3 sts. Thumb: Work in the same way as for the right mitten.
Directions - Adult's Mitts
Mitts are knit one at a time using magic loop technique on a long circular needle. Please note that the cast on is the edge by the fingers - you then knit towards the wrist. Make two alike, one at a time.
Edge
Using MC and smaller (4 mm) needle, cast on 28 sts. Begin knitting in the round, using magic loop technique with 14 sts on each half of your circular needle. Work a garter edge by alternating k and p rounds: begin with a k round and end with a p round. Work 4 garter ridges, a total of 8 rounds. Bilskirner Set \~ Astrid Colding Sivertsen \~ Midgaard Naturals \~ www.midgaardnaturals.dk \~ 7 Change to larger (4.5 mm) needle and work one increase round: [(k1, kfb) 2 times, k2, kfb] around. You now have 40 sts, 20 on each part of the needle.
Stranded Pattern Repeat
Rounds 1-3: [k3 with CC, k1 with MC] around Flip work inside out before proceeding. Round 4: k all sts with MC
Main Part of Mitt
Change to stranded knitting using MC and CC. Using CC1, knit 1 pattern repeat. Using CC2, knit the first 3 rows of a pattern repeat.
Putting away thumb sts
Put the first 3 sts on a piece of scrap yarn. Using MC, cast on 11 sts using backwards loop cast on, then k the rest of the round. You now have 48 sts. Thumb gusset Rounds 1-8 are knit using MC and CC3 Rounds 1-2: k the first two rows of a pattern repeat. Round 3: ssk with CC, k1 with CC, k1 with MC, k3 with CC, k1 with MC, k1 with CC k2tog with CC, k1 with MC, then k in stranded pattern for the rest of the round. You now have 46 sts. Round 4: . [k with MC] around. Rounds 5-6: k2 with CC, k1 with MC, k3 with CC, k1 with MC, k2 with CC, k1 with MC, then k in stranded pattern for the rest of the round. Round 7: ssk with CC, k1 with MC, k3 with CC, k1 w MC, k2tog with CC, k1 w MC, then k in stranded pattern for the rest of the round. You now have 44 sts. Round 8: [k with MC] until one st remains Rounds 9-15 are knit using MC and CC4 Round9: ssk together the last st of round 8 with the first st of round 9 with MC, k1 with MC, k3 with CC, k1 with MC, k2tog with MC, then k in stranded pattern for the rest of the round. You now have 42 sts. Round 10: k2 with MC, k3 with CC, k2 with MC, then k in stranded pattern for the rest of the round. Ind 11: ssk with MC, k3 with CC, k2tog with MC, then k in stranded pattern for the rest of the round. You now have 40 sts. k1 with MC. then k the rest of the round in stranded pattern. k1 with MC, (sl1, k2tog, psso) with CC, k1 with MC, then k the rest of the round in stranded pattern. You now have 38 sts. Round 15: k1 with MC, k1 with CC, k1 with MC, then k the rest of the round in stranded pattern. The rest of the mitt is knit using only MC Round 16: sl1, k2tog, psso, k the rest of the round. You now have 36 sts. Bilskirner Set \~ Astrid Colding Sivertsen \~ Midgaard Naturals \~ www.midgaardnaturals.dk \~ 8 If you like, and if your amount of yarn permits, you can lengthen the mitt by knitting one or more extra repeats of the stranded pattern at this point.
Rib Cuff
Change to smaller (4 mm) needle, flip work so it has the right side out. Work rib setup round: [(k1, p1) 3 times, k1, p2tog]. You now have 32 sts. Work rounds of [k1, p1] until rib cuff measures 4.5 cm or desired length. Cast off loosely, or use a stretchy bind-off.
Thumb Edge
Worked using MC on smaller (4 mm) needle. Put the 3 saved sts on the needle and k them. Pick up 2 sts at the side, 11 sts in the backwards loop cast on, and 2 sts at the other side. You now have 18 sts. Work a garter edge by alternating k and p rounds: begin with a p round and end with a p round. Work 3 garter ridges, a total of 5 rounds. Bind off loosely.
And Finally....
Wash your finished set in lukewarm water with wool soap. Lay flat to dry, or block it if you like.
Acknowledgement
A big thank you to my wonderful testers, Ravelers dragknit, ilkaynazli, Lintera, kbh, and rcmarcks. Your hard work improved this pattern so much!


