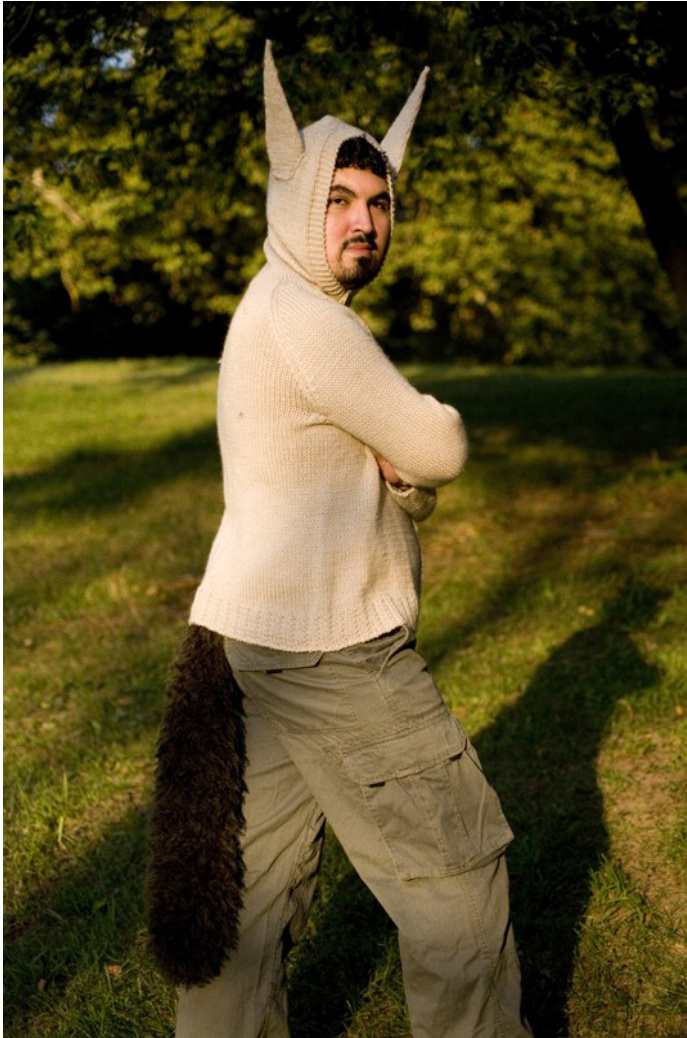
Wild Thing

If I had been tasked with coming up with a knitting pattern that would appeal to everyone, from toddlers to adults across alboundaries, I think I would be hard-pressed to think of something more perfect than a hoodie based on one of the most popular books in recent memory. I would imagine that most knitters today either grew up with Maurice Sendak's Wbere the Wild Things Are, or at the very least have been keenly aware of it since its publication in 1963 and subsequent rise to its place in the American Cultural Lexicon. It's rare for a children's book to gain a place in our minds as a memorable piece of Literature and as an incredible bit of Pop Culture, but this book has done just that. When I saw the traler for the upcoming movie, I realised that Id really(reallyreally really really) like t have a Rumpus Suit of my own. Surely there are others out there just as goofy as I am, no? This pattern is writen in nineteen (19l sizes,from infant to the largest Adult size with a $56^{\circ}$ finished chest measurement. It is divided into a “Smaller” set and a “Larger” set, in order to make the pattern more manageable. The “Smaller’ patern set includes finished sizes $20^{\circ}$ $22^{\bullet}$ , $24^{\circ}$ , $26^{\circ}$ , $28^{\circ}$ , $30^{\circ}$ ,32", 34", $36^{\circ}$ and begins on Page 3. The “Larger” paern set includes finished sizes $38^{\circ}$ $\mathrm{^{40^{\circ}}}$ $42^{\circ}$ , $44^{\circ}$ , $46^{\circ}$ $48^{\circ}$ , $50^{\circ}$ $52^{*3},\,54^{*3},\,56^{*3}$ and begins on page 8. A note on sizing: I've provided standard size names for the baby/children's sizes (see page 3), but, as $^{\epsilon\varsigma}\mathrm{\DeltaM}$ L XL" sizing tends to become subjective and variable above these, I only give finished chest circumferences for the sizes larger than these. For these (and, even in the case of the baby/children's sizes), the best way to ensure a pleasant fit is to take one of the intended wearer's cardigans or light jackets and lay it flat. Measure this across the chest, multiply this number by two, and there you'l have the circumference of the garment youll make.
Abbreviations, etc for this pattern:
KRL - “knit right loop'". Instructional videos for this increase are available at KnittingHelp.com: http://www.knittinghelp.com/videos/increases CO - Backwards-Loop Cast-on. Not recommended to start work, but it's used as an increase in the pattern. A video is available here (where it's called “single cast-on") : http:/www.knittinghelp.com/videos/cast-on SSK - “"slip, slip, knit", a decrease method. Videos for this and the next decrease listed are available here: http:/ /www.knittinghelp.com/videos /decreases K2tog - “knit 2 together". Another decrease Grafting/Kitchener Stitch - two names for the same technique for invisible joining of two pieces of knit fabric. This technique is used to finish the hood, and is also used to close up the under-arm seams. There's a video under the header “Finishing” here: http://www.knittinghelp.com/videos/knitting-tips where it's called “Kitchener Stitch". Short Rows - used in some sizes to raise the back of the neck a bit, there is an instructional video here, under “Short row with wrap": http:/ /www.knittinghelp.com/videos/advanced-techniques
Making Buttonholes:
Sizes $18^{\circ}-30^{\circ}$ feature a 5-stith wide button band on either side of the cardigan. All other sizes have a 6- stitch wide button band. For 5-stitch button bands: K4, BO1, K1. On the next row: K2, CO 1, K2. For 6-stitch button bands: K4, BO2, K1. On the next row: K2, CO 2 , K2. For all sizes: make buttonholes at both ends of “buttonhole rows"'; this way you can use the 'blanks'-the buttonholes you won't actually be using--to easily align your buttons when you're sewing them on.

WILD THING Smaller Sizes:
Finished Size: $20^{\circ}\:(22^{\circ},\:24^{\circ},\:26^{\circ},\:28^{\circ},\:30^{\circ},\:32^{\circ}{}_{\!\!\!\!\!\!\!\!\!\!\!\!\!\!})$ $34^{\circ},36^{\circ})$ chest circumference To Fit: $18^{\circ}$ [3 mos] $\langle20^{\circ}$ [6 mos], $22^{\circ}$ [12 mos], $24^{\circ}$ [24 mos], $26^{\circ}$ [child's 6] , $28^{\circ}$ [child's 10], $30^{\circ}$ child's 12], $32^{\circ}$ [child's 14], 34")
Materials for Smaller Sizes:
Universal Yarn Deluxe Worsted 2 (2, 2, 3, 3, 4, 4, 5, 5) skeins in Color “White Ash" #71006 for the body and ears, and 1 skein in color “Dark Oak" #12179 and for the tail, all sizes. For the tail, you will also need GGH Lara in color $17.\;1\;(1,\,1,\,1,\,1,\,1,\,2,\,2)$ balls. Knitting Needles: $\mathrm{US7}\mathrm{~-~}24^{\circ}$ or $32^{\circ}$ circular for knitting the bodyit's knit flat, but a circular needle will be better able to handle the weight of the sweater. US7 - double-pointed needles, $16^{\circ}$ circular needle, or $32^{\circ}$ circular needle for magic-loop—-whichever is your preference for knitting smallcircumferences in the round. US9 - as above for working small circumferences in the round; this will be for knitting the tail US4 - again for working small circumferences in the round. Will be used to knit the ears at a nice firm gauge so they'll stand up. 7-9 buttons in a color close to the body color and one in a color to match the tail. Buttonholes will be worked every $\scriptstyle2^{\circ}\ -\ 3^{\circ}$ along the button band; I recommend waiting to purchase buttons until after the sweater is complete so you have a final count of how many you'll need. $1/2^{\circ}$ buttons should work for all but the two larger sizes, which should require $3/4^{\circ}$ buttons. The color of the button to match the tail isn't super-important, as this button will go inside the lower edge of the hem on the back of the hoodie. You may decide you prefer a button the same color as the body--it's up to you. $1/4^{\circ}$ yard of heavyweight interfacing to help give the ears shape and structure. They're knit at a tight gauge to make them firmer, but this will help ensure they stand upright. Stitch markers Scrap yarn Tapestry needle Sewing needle and thread for attaching buttons. 2 yds $1^{\circ}$ wide grosgrain ribbon in a color to match the body (optional—-see “finishing") Gauge: Body: 5 stitches and $7\,\mathrm{\Deltafows}\,=\,1^{\circ}$ in stockinette stitch on US7 -or the size you need to obtain gauge. Ears: 6 sts and $\mathrm{9\rows}=1^{\circ}$ in stockinette stitch on US4 - or the size you need to obtain gauge.
MAKE IT!
BODY:
Using Longtail Cast-on and US7 needle, CO 105 (114, 126, 135, 144, 156, 165, 176, 185) Row 1 (ws): k5 (5, 5, 5, 5, 5, 5, 6, 6) sts, $^{*}\mathrm{p}2$ $\mathrm{k}1^{*}$ to last 7 (7, 7,7, 7,7,7, 8, 8) sts, p2, k5 (5, 5, 5, 5, 5, 5, 6, 6) sts.
Row 2 (rs): k all sts
Repeat rows 1 and 2, making your first buttonhole on the $3^{\mathrm{rd}}$ $\mathrm{~\ensuremath~{^{1}~}(3^{r d},~3^{r d},~4^{t h},~4^{t h},~4^{t h},~4^{t h},~4^{t h},~4^{t h},~4^{t h})~}$ rowbereafter, you'll work $^{\,a}$ buttonbole row every $2^{\,,\ast}\;(2^{\,,\ast},\;2^{\,,\ast},$ $2^{,\mathfrak{p}},2^{,\mathfrak{p}},2.5^{,\mathfrak{p}},\;3^{,\mathfrak{p}},\;3^{,\mathfrak{p}},\;3^{,\mathfrak{p}})$ Repeat rows 1 and 2 until the entire piece measures approx $1^{\,\prime\prime}(1^{\,\prime\prime},\,1^{\,\prime\prime},\,1^{\,\prime\prime},\,1^{\,\prime\prime},\,1.5^{\,\prime\prime},\,1.5^{\,\prime\prime},\,2^{\,\prime\prime},\,2^{\,\prime\prime})$ ,ending with a WS row. Begin Body: Row 1: k all sts (all sizes) Row 2: k5 (5, 5, 5, 5, 5, 5, 6, 6) sts, p to last 5 (5, 5, 5, 5, 5, 5, 6, 6) sts, k all rem sts. Continue rows 1 and 2 until body measures 7 (8, 9.5, 10.5, 11, 12, 13, 16, 16). Place allsts on scrap yarn. Break yarn.
SLEEVES:
Make two. Using longtail CO and your preferred type of Size US7 needle for small-circumference knitting, CO 33 (36, 39, 33, 36, 36, 39, 42,45) sts. PM and join to work in the round. Row 1: $\ast\boldsymbol{1}_{\mathrm{k}\mathcal{2}}$ , $\mathrm{p}1^{*}$ around Row 2: k all sts Repeat rows 1 and 2 until the entire piece measures approx $1^{99}(1^{99},\,1^{99},\,1^{99},\,1^{99},\,1.5^{99},\,1.5^{99},\,2^{99},\,2^{99})$ then: Sleeve increases: Starting with the first round and repeating every 0 $(0,\,0,\,4^{\mathrm{ih}},\,4^{\mathrm{th}},\,5^{\mathrm{th}},\,5^{\mathrm{th}},\,9^{\mathrm{th}},\,9^{\mathrm{th}})$ round: KRL, k all sts to last st, KRL note—on the tbree smalles sizes tbere are no sleve increases. After the ribbed edging, you will knit straigbt until tbey are the lengths noted below Continue knitting in stockinette stitch and working increases as noted above until you have 33 (36, 39, 45, 46, 46, 53, 56, 59) sts, then continue in stockinette stitch until sleeve measures 6, 7, 10.5, 13, 14.25, 15.5, 16, 16, 16) inches. On the inside of each sleeve, set 8 (9, 10, 10, 11, 12, 13, 14, 14) sts on scrap yarn. Break yarn. If you don't have spare needles on which to knit the other sleeve, set the remaining sleeve stitches on another piece of scrap yarn while you knit sleeve #2.
JOIN ALL PIECES:
On one long Size US7 circular needle, join body and sleeves. Slip 22 (24, 26, 28, 28, 30, 32, 34, 36) stitches from one side of the body front onto your needle, then place the next 8 (9, 10, 10, 11, 12, 13, 14, 14) body stitches on scrap yarn, pm and slip the “outside” 25 (27, 29, 35, 35, 34, 40, 42, 45) stitches of one sleeve onto your needle, pm and slip 45 (48, 54, 58, 66, 72, 76, 80, 85) stitches from the body onto your needle—this will be the back of your hoodie. Place 8 (9, 10, 10, 11, 12, 13, 14, 14) body stitches on scrap yarn, then pm and slip the “outside" stitches of your other sleeve onto your needle as before, pm and slip the remaining body sts onto your needle. 139 (151,164,181,192,200, 219,232,243)stitches. Work O $(0,\ 0,\ 0,\ 0,\ 1^{\circ},\ 1^{\circ},\ 2^{\circ},\ 2^{\circ})$ plain before starting decrease rounds. Don't forget to continue to work buttonboles at the establishbed intervals from your last buttonbole Plain rows: Row 1 (RS): k all sts Row 2 (WS): k5 (5, 5, 5, 5, 5, 5, 6, 6) sts, p to last 5 (5, 5, 5, 5, 5, 5, 6, 6) sts, k all rem sts. Decrease rows: Row 1 (RS): $\ast_{\mathrm{k}}$ to 2 sts before marker, ssk, sl m, k1, k2tog, k to 3 sts before marker, ssk, k1, sl m, $\mathrm{k}2\mathrm{tog^{*}}$ , repeat around. Row 2 (WS): k5 (5, 5, 5, 5, 5, 5, 6, 6) sts, p to last 5 $(5,5,5,5,5,5,6,6)$ sts, k all rem sts. Continue alternating plain rows and decrease rows until you have 51 (55, 60, 69, 80, 88, 99, 104, 107) sts remaining, ending with a RS row. For sizes 20, 22, 24, and 26, move ahead to knitting the hood.
NECK SHAPING:
for sizes 28, (30, 32, 34, and 36): k 5 (5, 5, 6, 6), purl 20 (22, 24, 26, 26) sts, pm, purl 40 (44, 50, 52, 54) pm, turn work and begin working short-rows between these markers, working decreases as before at the stitch markers. When you have 72 (76, 83, 88, 91) stitches remaining in total, work one more WS row, purling across to the button band, then k the last 5 (5, 5, 6, 6) sts and proceed to knitting the hood.
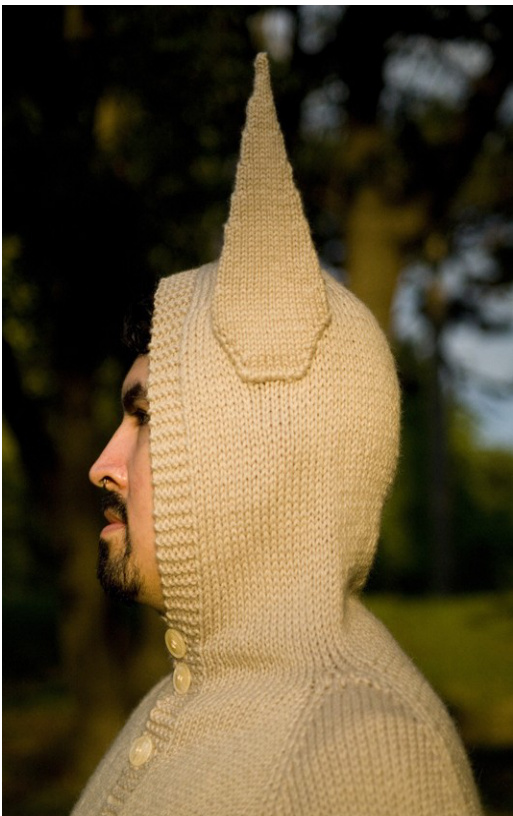
KNITTING THE HOOD:
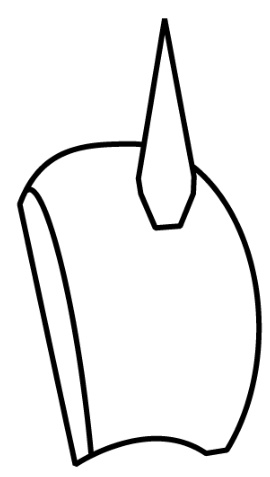
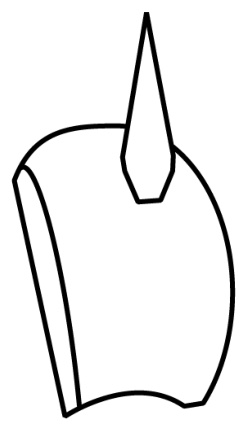
Continue knitting as follows: There are two sizes for the ears; Size A is for pattern sizes 20-28 and size B is a little larger, and is for sizes 30-36. The numbers for the ear pattern indicate size A (B). On US4 needles (or a size about 3 sizes smaller than what you used to make the body and sleeves) w/body-color yarn, CO 9 (9) sts. Row 1 (RS): k all sts. Row 2 (WS): k5 (5, 5, 5, 5, 5, 5, 6, 6) sts, $\mathsf{p}$ to last 5 (5, 5, 5, 5, 5, 5, 6, 6) sts, k all rem sts. Make one last buttonhole on the $3^{\mathrm{rd}}\,(3^{\mathrm{rd}},\,3^{\mathrm{rd}},\,4^{\mathrm{th}},\,4^{\mathrm{th}},\,$ $4^{\mathrm{th}},\;4^{\mathrm{th}},\;4^{\mathrm{th}},\;4^{\mathrm{th}})$ row. This will allow the wearer to button the hood close under the chin to give that “only my face uncovered" look that Max has when wearing his Rumpus Suit! Continue rows 1 and 2 (as above) until hood measures approx 4.5 (5, 5, 6.5, 6.5, 8, 10, 10, 10) inches, then work one decrease row on the RS as follows: hood decr: k5 (5, 5, 5, 5, 5, 5, 6, 6) sts, $\ast\boldsymbol{1}_{\mathrm{k}1}$ $\mathrm{k}2\mathrm{tog^{*}}$ repeat around to last 5 (5, 5, 5, 5, 5, 5, 6, 6) sts, $\mathrm{k\Omega}$ all rem sts, then work Row 2 (WS) as above $_A$ note about these decrease rounds: you may find that, after working \*k1, k2tog\* around, you're only left with 2 stitcbes before the button band.K these sts; the decreases that you've alreadyworked on therest oftherowwill provide plenty of shapingfor the bhood. Continue working Row 1 (RS) and Row 2 (WS) as above. at 5.5 (6.5, 6.5, 7.5, 7.5, 9.5, 11.5, 12, 12) inches, work one more decrease round as before. Finsh with a WS row, then divide remaining sts in half and, with right sides on the outside, kitchener stitch together, beginning at the front/outside edge of the hood. For some sizes, you may end with an odd number of stitches. In this case, put that 'extra' stitch on the back needle. When you come to it at the end of the kitchener stitch row, draw your yarn through this stitch purlwise, then push your tapestry needle through to the inside of the hood and weave this end in. Row 1 (WS): purl ll sts Row 2 (RS): k1, BL CO1, k to last st, BL CO1, k1 Repeat rows 1 & 2 until you have 15 (17) sts total, work 1 WS row, then pm, CO 15 (17) sts, K across all sts, pm, join to work in the round. ALL SIZES: k all sts for 5 rounds, then work one DECREASE ROUND ears decr: \*k2tog, k to 2 sts before marker, ssk\* repeat around. Continue working in stockinette stitch, working one decrease round every $6^{\mathrm{th}}$ round until 6 sts remain, then: k all sts for 3 rounds next round: $\ast\boldsymbol{\mathrm{l}}_{\mathrm{k}\,2}$ tog, $\mathrm{k}1^{*}$ around $\textrm{k}2$ more rounds next round: ssk, ssk BREAK YARN, leaving a $10^{\circ}$ tail. Thread this onto a tapestry needle and push this through to the inside of the ear. You may need to turn the ear inside-out slightly to get to weave this in. ALL SIZES: Use your ears to trace a template on a piece of INTERFACING. Cut ear forms out of interfacing, then trim approx. $^{1}\!/\!_{4}\!>\!}$ from all edges. Insert one ear form into each ear before sewing to the sides of the hood with body-color yarn. Use the diagram below as a guide for ear placement. EARS: Make two. On finishing the ears: my ears were prety firm and stood up on their own pretty well before I washed and blocked them. Afer washing,they were floppy and wouldn't stand up, even with 2 pieces of heavyweight interfacing inside them. I ended up using cardstock to get them to stand upright, so I recommend not washing your ears. Wash and block the body separately before adding the ears to the hood.
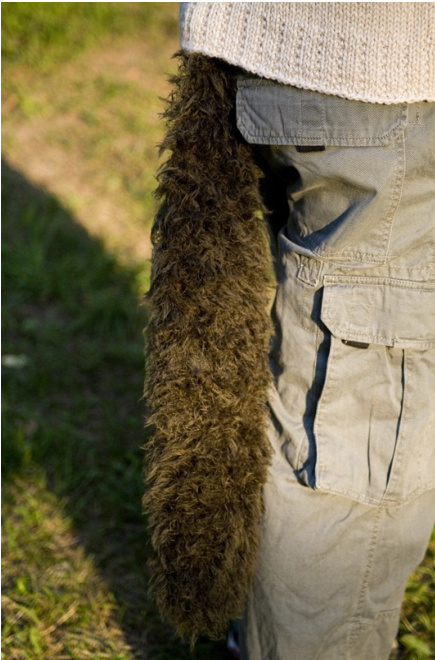
TAIL:
The Tail also has a smaller size—Size A, for pattern sizes 20-28—and a larger size—Size B, for pattern sizes 30-36. For both sizes : Using US9 needles (or a needle 2 sizes larger than the one you used for the body) and dark brown yarn, CO 4 sts, pm, co 4 sts and join to work in the round. $\mathrm{K}$ all sts for 2 rounds, next round, $\ast\boldsymbol{1}_{\mathrm{k},3}$ , BO 2, $\mathrm{k}1^{*}$ repeat around, next round $\ast\boldsymbol{\mathrm{k}}1$ , CO2, $\mathrm{k}1^{*}$ repeat around, next round $\ast\boldsymbol{1}_{\mathrm{k}\,2}$ $\mathrm{pm^{*}}$ repeat around On the next round, begin holding the eyelash yarn together with the dark brown yarn. K 1 round plain, then work an increase round: Incr round: ${}^{*}C O1$ ,k to m, $\mathrm{sl}\;\mathrm{m}^{*}$ repeat around. Work 5 rounds plain between increase rounds. (increase every $6^{\mathrm{th}}$ round) For size A (B): When you have 12 (26) sts total, knit plain until entire piece measures 8.5 (18) inches, then begin decreases: Decr round: $\ast\boldsymbol{1}_{\mathrm{k}\,2}$ tog, k to m, $\mathrm{sl}\;\mathrm{m}^{*}$ , repeat around. Work 1 round plain beteen decrease rounds. Work 4 (8) rows—2 (4) decrease rounds—then work a decrease round every row until you have 4 sts remaining, break yarn and use a tapestry needle to thread this tail through remaining sts, pulltight, weave in ends.
FINISHING:
-Weave in all ends -Kitchener stitch underarms -Sew buttons to the button band on the side appropriate to the wearer, using the “blanks" as a guide for lining up your buttons. I recommend sewing buttons in before blocking the body. -For sizes 30-36, the weight of the tail may pull the back of the hoodie and cause some stretch in the knit fabric. To reinforce the back of the hoodie, sew a length of $1^{\circ}$ wide grosgrain ribbon inside the hoodie across the shoulders (from shoulder to shoulder), and another down the center back from the shoulder reinforcement to the lower hem. In this case, it would be best to sew the “"tail' button on top of the reinforcing ribbon. -Sew “"tail’ button inside back hem at the centerpoint and $1/2^{\circ}$ to $1^{\circ}$ from the edge -Block body, but not the ears! -Sew ears to hood, as indicated in “ears” section.
WILD THING Larger Sizes:
Finished Size: $38^{99}\;(40^{99},\,42^{99},\,44^{99},\,46^{99},\,48^{99},\,50^{99},\,52^{99},$ $54^{\circ},56^{\circ})$ chest circumference To Fit: $36^{\circ}$ $(38^{\circ}$ , $40^{\circ}$ , $42^{\circ}$ ,44", 46", 48", 50", 52", 54”)
Materials for Larger Sizes:
Universal Yarn Deluxe Chunky 9 (10, 10, 11, 12, 13, 13, 14, 15, 16) skeins in Color "White Ash" #71006 for the body and ears, and 1 skein color "Dark Oak’ #3730 for the tail, all sizes. For the tail, you will also need GGH Lara in color 17. 2 balls, all sizes. Knitting Needles: $\mathrm{US9}\mathrm{~-~}24^{\circ}$ Or $32^{\circ}$ circular for knitting the body—it's knit flat, but a circular needle will be better able to handle the weight of the sweater. US9 - double-pointed needles, $16^{\circ}$ circular needle, or $32^{\circ}$ circular needl for magic-loop-whichever is your preference for knitting small circumferences in the round. $\mathrm{US}10.5-{\mathrm{as}}$ above for working small circumferences in the round; this will be for knitting the tail US7 - again for working small circumferences in the round. Will be used to knit the ears at a nice firm gauge so they'll stand up. 7-9 buttons in a color close to the body color and one in a color to match the tail. Buttonholes will be worked every $3^{\circ}$ along the button band; I recommend waiting to purchase buttons until after the sweater is complete so you have a final count of how many youll need. I believe that $3/4^{\circ}$ buttons should be appropriate in most cases. The color of the button to match the tail isn't super-important, as this button will go inside the lower edge of the hem on the back of the hoodie. You may decide you prefer a button the same color as the body-it's up to you. $1/4^{\circ}$ yard of interfacing to help give the ears shape and structure. They're knit at a tight gauge to make them firmer, but this willhelp ensure they stand upright. Stitch markers Scrap yarn Tapestry needle Sewing needle and thread for attaching buttons. 2 yds $1^{\circ}$ wide grosgrain ribbon in a color to match the body (optional-see “finishing")
Gauge:
Body: 4.5 stitches and $5\ \mathrm{rows}=1^{\circ}$ in stockinette stitch on US9 -or the size you need to obtain gauge. Ears: 5.25 sts and $7\ \mathrm{rows}=1^{\circ}$ in stockinette stitch on US7 - or the size you need to obtain gauge.
MAKE IT!
BODY:
Using Longtail Cast-on and US9 needle, CO 176 (185, 194, 203, 212, 221, 230, 239, 248, 257) sts
ALL SIZES:
Row 1 (ws): k6 sts, $*_{\mathrm{p}2,\ \mathrm{k}1^{*}}$ to last 8 sts, p2, k6 sts. Row 2 (rs): k all sts Repeat rows 1 and 2, making your first buttonhole On the $4^{\mathrm{th}}$ row—-bereafter, you'll work a buttonbole row every3" Repeat rows 1 and 2 until the entire piece measures approx $2.5^{\circ}$ , ending with a WS row. Begin Body:
ALL SIZES:
Row 1: k all sts Row 2: 6 sts, p to last 6 sts, k allrem sts. Repeat rows 1 and 2 until the entire piece measures approx 16 (16, 16, 16, 16, 16, 16, 18, 18, 18) inches, ending with a WS row. Place all stitches on scrap yarn. Break yarn.
SLEEVES:
Make two. Using longtail CO and your preferred type of Size US9 needle for small-circumference knitting, CO 45 (45, 48, 48, 51, 51, 57, 57, 60, 60) sts. PM and join to work in the round. Row 1: $\ast\boldsymbol{1}_{\mathrm{k}\mathcal{2}}$ , $\mathrm{p}1^{*}$ around Row 2: k all sts Repeat rows 1 and 2 until the entire piece measures approx $2.5^{,}$ Sleeve increases: Starting with the first round and repeating every $6^{\mathrm{th}}$ round thereafter: KRL, k all sts to last st, KRL Continue knitting in stockinette stitch and working increases every $6^{\mathrm{th}}$ round until you have 57 (57, 62, 62, 69, 69, 75, 75, 80, 80) sts, then continue in stockinette stitch until sleeve measures 16.5 (17, 17.5, 18, 18.5, 19, 19.5, 20, 21, 22) inches. On the inside of each sleeve, set 14 (14, 15, 16, 17, 17, 18, 19, 19, 20) sts on scrap yarn. Break yarn. If you don't have spare needles on which to knit the Other sleeve, set the remaining sleeve stitches on another piece of scrap yarn while you knit sleeve #2.
JOIN ALL PIECES:
On one long Size US9 circular needle, join body and sleeves. Slip 34 (36, 38, 40, 42, 44, 46, 47, 49, 50) stitches from one side of the body front onto your needle, then place the next 14 (14, 15, 16, 17, 17, 18, 19, 19, 20) body stitches on scrap yarn, pm and slip the “outside”’ 43 (43, 47, 46, 52, 52, 57, 56, 61, 60) stitches of one sleeve onto your needle, pm and slip 80 (85, 88, 92, 95, 100, 103, 108, 113, 116) stitches from the body onto your needle—this will be the back of your hoodie. Place 14 (14, 15, 16, 17, 17, 18, 19, 19, 20) body stitches on scrap yarn, then pm and slip the “outside" stitches of your other sleeve onto your needle as before, pm and slip the remaining body sts onto your needle. 234 (243, 258, 263, 282, 291, 308, 313, 332, 337) stitches. Work 1 (1, 1, 1, 1, 2, 2, 2, 2, 2) inches plain before starting decrease rounds. Don't forget to continue making buttonboles every 3". Plain rows: Row 1 (RS): k all sts Row 2 (WS): k6 sts, p to last 6)sts, k all rem sts. Decrease rows: Row 1 (RS): $\ast_{\mathrm{k}}$ to 2 sts before marker, ssk, sl m, k1, k2tog, k to 3 sts before marker, ssk, k1, sl m, $\mathrm{k}2\mathrm{tog^{*}}$ , repeat around. Row 2 (WS): $\mathrm{k}6$ sts, p to last 6 sts, k allrem sts. Continue this way until you have 106 (107, 114, 119, 122, 123, 132, 137, 132, 137) sts remaining, and finishing with a RS row.
NECK SHAPING:
k6, Purl 20 (20, 22, 23, 24, 24, 27, 28, 27, 28) sts, pm, purl 53 (54, 57, 60, 61, 62, 66, 69, 66, 69) sts, pm, turn work and begin working short-rows between these markers, working decreases as before at the stitch markers. When you have 86 (87, 94, 95, 98, 103, 108, 105, 108, 105) stitches remaining in total, work one more WS row, purling across to the button band, then k the last 6 sts and proceed to knitting the hood.
KNITTING THE HOOD:
Continue knitting as follows: Row 1 (RS): k all sts. Row 2 (WS): $\mathrm{k}6$ sts, p to last 6 sts, k all rem sts. Make one last buttonhole on the $4^{\mathrm{th}}$ row. This will allow the wearer to button the hood close under the chin to give that “only my face uncovered" look that Max has when wearing his Rumpus Suit! Continue rows 1 and 2 (as above) until hood measures approx 10 inches (all sizes), then work one decrease row on the RS as follows: hood decr: k6 sts, k1, k2tog to last 6 sts, k all rem sts, then work Row 2 (WS) as above $_A$ note about these decrease rounds: you may find that, after working \*k1, k2tog\* around, you're only left with 2 stitches before the button band.K these sts; the decreases that you'vealreadyworked on therest oftherowwill provide plenty of shapingfor the bood. Continue working Row 1 (RS) and Row 2 (WS) as above. at 12 (12, 12, 12.5, 12.5, 12.5, 12.5, 12.5, 12.5, 12.5) inches, work one more decrease round as before. Finsh with a WS row, then divide remaining sts in half and, with right sides on the outside, kitchener stitch together, beginning at the front/outside edge of the hood. For some sizes, you may end with an odd number of stitches. In this case, put that 'extra' stitch on the back needle. When you come to it at the end of the kitchener stitch row, draw your yarn through this stitch purlwise, then push your tapestry needle through to the inside of the hood and weave this end in.
EARS:
Make two. On US7 needles (or a size about 2 sizes smaller than what you used to make the body and sleeves) w/body-color yarn, CO 9 sts. Row 1 (WS): purl all sts Row 2 (RS): k1, BL CO1, k to last st, BL CO1, k1 Repeat rows 1 & 2 until you have 17 sts total, work 1 WS row, then pm, CO 17 sts, K across all sts, pm, join to work in the round. k all sts for 5 rounds, then work one DECREASE ROUND ears decr: \*k2tog, k to 2 sts before marker, ssk, sl $\mathfrak{m}^{*}$ repeat around. Work one decrease round every $6^{\mathrm{th}}$ round until 6 sts remain, then: k all sts for 4 rounds next round: $\ast\boldsymbol{\mathrm{l}}_{\mathrm{k}\,2}$ tog, $\mathrm{k}1^{*}$ around k 3 more rounds next round: ssk, ssk BREAK YARN, leaving a $10^{\circ}$ tail Thread this onto a tapestry needle and push this through the tip of the ear to the inside. You may need to turn the ear inside-out slightly to get to weave this in. Use your ears to make a template on a piece of plain paper, or trace them directly on a piece of INTERFACING. Cut ear forms out of interfacing, then trim approx. $^{1}\!/\!_{4}\!>\!}$ from all edges. Insert one ear form into each ear before sewing to the sides of the hood with body-color yarn. Use the diagram below as a guide for ear placement. On finishing the ears: my ears were pretty firm and stood up on their own pretty well before I washed and blocked them. After washing, they were floppy and wouldn't stand up, even with 2 pieces of heavyweight interfacing inside them. I ended up using cardstock to get them to stand upright, so I recommend not washing your ears. Wash and block the body separately before adding the ears to the hood.
Using US10.5 needles (or a needle approx. 2 sizes larger than the one you used for the body), CO 4 sts, pm, co 4 sts and join to work in the round. decrease round every row until you have 4 sts remaining, break yarn and use a tapestry needle to thread this tail through remaining sts, pull tight, weave in ends.
FINISHING:
K all sts for 2 rounds, next round, $\ast\boldsymbol{1}_{\mathrm{k},3}$ ,BO 2, $\mathrm{k}1^{*}$ , repeat around, next round $\ast\boldsymbol{\mathrm{k}}1$ ,CO2, $\mathrm{k}1^{*}$ , repeat around, next round $^{*}\mathrm{k}2,\mathrm{pm^{*}}$ repeat around -Weave in all ends -Kitchener stitch underarms -Sew buttons to the button band on the side appropriate to the wearer, using the “blanks"” as a guide for lining up your buttons. I recommend adding buttons before blocking the body. On the next round, begin holding the eyelash yarn together with the dark brown yarn. K 1 round plain, then work an increase round: Incr round: ${}^{*}C O1$ , $\mathrm{k\Omega}$ to m, $\mathrm{sl}\;\mathrm{m}^{*}$ repeat around. Work 5 rounds plain between increase rounds. (increase every $6^{\mathrm{th}}$ round) -For these sizes, the weight of the tail may pull the back of the hoodie and cause some stretch in the knit fabric. To reinforce the back of the hoodie, sew a length of $1^{\circ}$ wide grosgrain ribbon inside the hoodie across the shoulders (from shoulder to shoulder), and another down the center back from the shoulder reinforcement to the lower hem. In this case, it would be best to sew the “tail' button on top of the reinforcing ribbon. When you have 32 sts, knit plain until entire piece measures 21 inches, then begin decreases: Decr round: \*k2tog, k to m, $\mathrm{sl}\;\mathrm{m}^{*}$ , repeat around. Work 1 round plain beteen decrease rounds. -Sew “tail’ button inside back hem at the centerpoint and $1/2^{\circ}$ to $1^{\circ}$ from the edge -Block body, but not the ears! Work 8 rows—4 decrease rounds—then work a -Sew ears to hood, as indicated in “ears"” section.