NEW BABY HOODIE ? 2010 Woolz'N'yarnZ
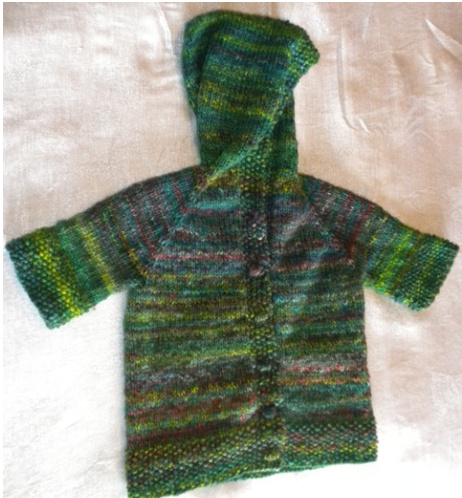
This pattern has been designed for hand spun. Thicker yarn and larger needles will increase the size, the opposite for finer needles and yarn. You can add extra stitches for added width if so desired, just remember to do it evenly and also add more rows for length. Increases and decreases generally stay in the same places regardless of the extra stitches or length. 544m hand spun 230g 14wpi 3.5 mm needles Figure 8 Cast on can be found here http://www.helloyarn.com/wp/?p=390 Moss stitch kl, pl, then reverse so k is on the p and visa versa. K = knit st= stitch P = purl sts= stitches Tbs = through the back of the stitch M1 = Make one by lifting and twisting the yarn in between the stitches and tbs K2tog = knit two together PM = Place marker on the next stitch KM= Knit marker stitch
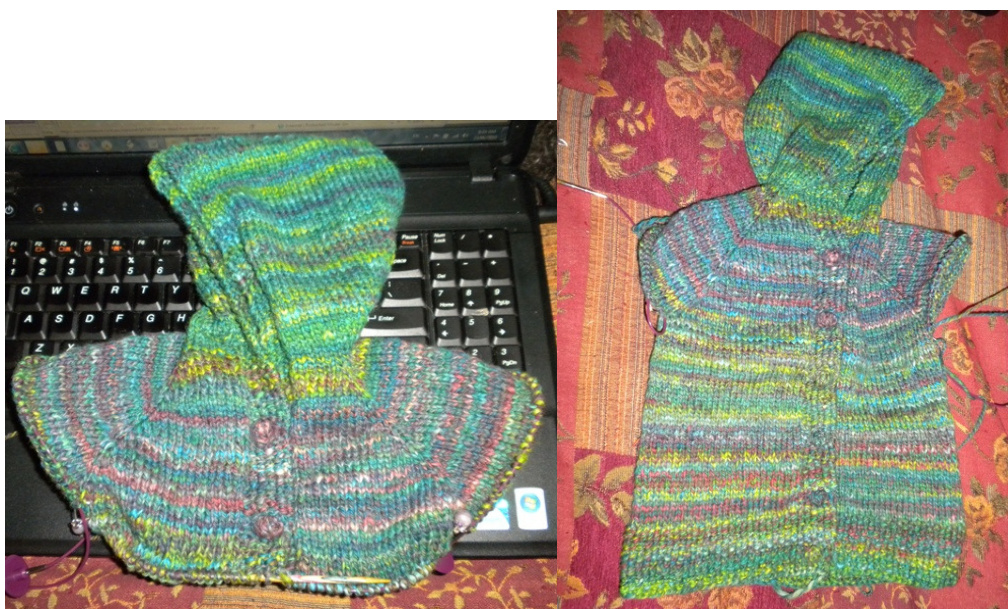
HOOD
Using the figure 8 cast on method cast on 68 sts on a circular needle. Knit tbs first row into the back of the sts, turn. Moss st 6 sts (k1, pl, kl, p1, kl, p1), p to last 5, Moss st, kl, p1, k1, pl, kl, turn Moss st 6 sts, k to last 3, m1,k 6, m1, k to last 6, Moss st 6 sts, turn (70st). Moss st 6 sts, p around to last 6, Moss st 6 sts Moss st 6 sts, k around to last 6, Moss st 6 sts Moss st 6 sts, p around to last 6, Moss st 6 sts, turn. Moss st 6 sts, k to last 3, m1,k 6, m1, k to last 6, Moss st 6 sts, turn (72st). Moss st 6 sts, p around to last 6, Moss st 6 sts Moss st 6 sts, k around to last 6, Moss st 6 sts Moss st 6 sts, p around to last 6, Moss st 6 sts, turn. Moss st 6 sts, k to last 3, m1,k 6, m1, k to last 6, Moss st 6 sts, turn (74st). Moss st 6 sts, p around to last 6, Moss st 6 sts Moss st 6 sts, k around to last 6, Moss st 6 sts Moss st 6 sts, p around to last 6, Moss st 6 sts, turn. Moss st 6 sts, k to last 3, m1,k 6, m1, k to last 6, Moss st 6 sts, turn (76st). Moss st 6 sts, p around to last 6, Moss st 6 sts Moss st 6 sts, k around to last 6, Moss st 6 sts Moss st 6 sts, p around to last 6, Moss st 6 sts, turn. Moss st 6 sts, k to last 3, m1,k 6, m1, k to last 6, Moss st 6 sts, turn (78st). Moss st 6 sts, p around to last 6, Moss st 6 sts Moss st 6 sts, k around to last 6, Moss st 6 sts Keep to the last two rows until 11cm is reached, ending with a p row. Decrease in the reverse of the above additions (eg, moss st 6, then k to 5 before the middle, k2tog, k6, k2tog, k to last 6, moss st), every second row instead of 4"h. Continue decreasing every 2"d row until you have 68sts once again. Moss sts the edges and purl one row. Do two more rows without decreasing. Next k row, moss st the 6 sts then k, decreasing 7 st evenly each side of the bands (54sts). P and K a row with moss sts on the bands at each end 4 times.
PLACING THE MARKERS FOR THE BODY
Moss stitch 6 sts, k6, place marker on next st, k5, PM, k16, PM, k5, PM, k6, moss st 6 stitches. Next row purl, keeping moss st bands. Moss st 6, k to marker, make a stitch on either side of the marker stitches, moss stitch 6. Moss st 6, p to end band, moss st 6. Repeat last two rows 7 times Moss st, then purl to the stitch before the marker, turn and k back, turn and continue as normal repeating the 3 short rows on the other side.
MAKINGOFF THEBOBBLE BUTTONS ANDBUTTONHOLES
K1, P1, next st m3 (k1, p1, k1), next st m3 (p1, k1, p1), Turn, p6, turn, k6, turn p2tog, p2tog, p2tog, turn k2tog, p1, continue pattern, increasing either side of markers, on other side band make a button hole by casting off 2 sts in the middle and adding them on the way back. Continue adding at the markers on alternate rows and evenly placing bobbles and button holes along the bands until you have the desired size and number of buttons. After a purl row when you have enough length, just to the under arm. The stitches are approx, 30(front), 39 (sleeve), 50 (back), 39 (sleeve), 30 (front), if it's not this it doesn't matter, the joy of top down is that you can adjust it to your needs.
DIVIDEFOR THE ARMS
Moss st the band and knit the front including the marker stitch, cast on 5 stitches, put the sleeves stitches onto a holder, from the marker stitch at the back, knit along the back and do the same 5 st cast on and put the other sleeve onto a holder, knit the rest of the front, moss stitch the band. Continue knitting the body, adding bobble buttons and holes evenly along the way till you have your desired length. Do enough moss stitch to be even width with the front bands and cast off loosely.
PICKINGUP THESLEEVES.
With your wool pick up 5 sts on the added stitch edge under the arm. Knit around. Any holes you may see can be fixed up on the next row by picking up the thread in between and knitting into the back of it. Cast off any extra sts you made in the next round. Knit around evenly on both sleeves. (I did about 16 rows) If you desire the sleeves to be skinnier at the wrist, cast off a stitch every couple or more rows, keeping it even on both sleeves. (I cast off one stitch every 4 rows, a total of 3 sts each sleeve) Do a few rows of moss stitch to match the body on the cuffs. Cast off loosely.
FINISHING
To finish, simply sew in your ends and use the wool cut off these to stuff the bobbles to help them hold their shape.
NB: I have also made this pattern really long and buttoned the bottom to make a sleeping bag. You don't need to make bobble buttons either, just knit normally and put your own cute buttons on. Adjust the length to your needs on the body or sleeves.


