UPLANDSARAN
Ardtailte
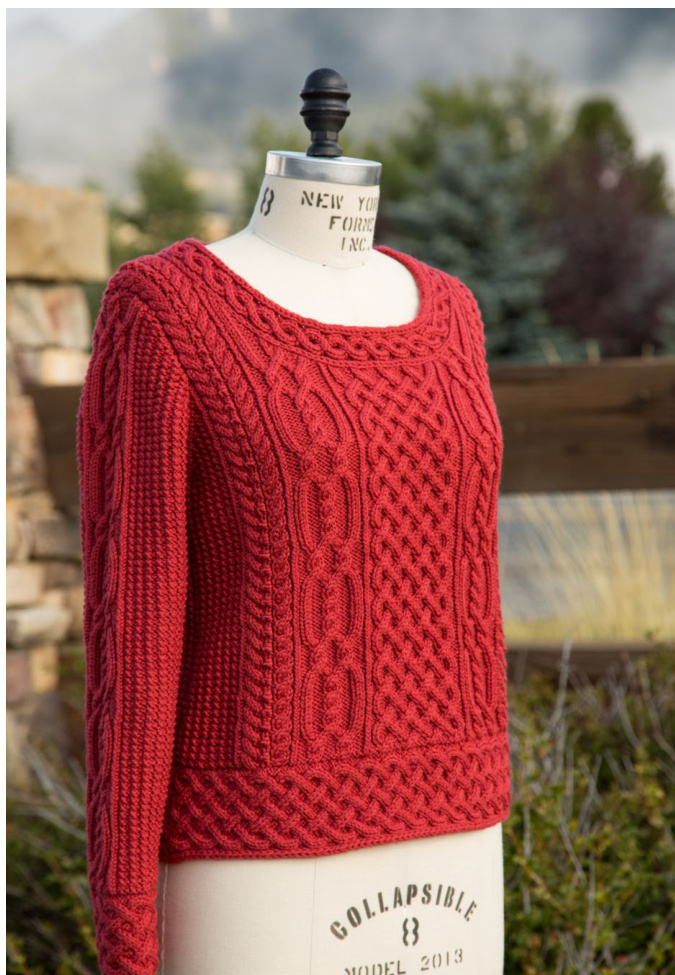
by Bonnie Dean My final project for the TGKA Master Hand Knitting Program is a modern Aran design with a Celtic flair. This bottom-up pullover sweater, in Sally Melville's attractive "balance point" length, is worked flat and features horizontal braided bands around the bottom of the body and the set-in sleeves. The bands, edged in slipped stitches, are worked first then stitches picked up to continue knitting the body and sleeves. Stitches picked up around the wide portrait neck are worked with Lily Chin's join-as-you-go technique (full instructions included) and finished with a single braid with a slipped stitch edge, framing the face.

Designer Notes: Throughout the pattern, picked up stitches and set up rows do not count towards the row or chart row counts. One selvedge stitch in St st along all side and armhole edges is included in the written instructions. Mirrored increases and decreases are included. Picking up stitches from the bottom bands eliminates the need for adding stitches to compensate for cable flare on the body and sleeves. The written instructions include decreases in the cable sections just before (or during) binding off neck edges and tops of sleeves. With each Row 1 of Twist Stitch w/Popcorn Chart, the stitch count temporarily increases by 4 stitches (not included in the stitch counts as they are eliminated in the next row).
STITCH PATTERN
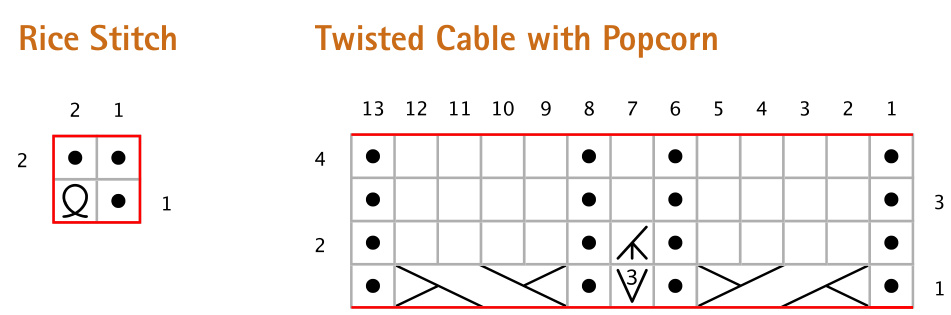
Rice Stitch Row 1 (RS): \*P1, k1tbl; rep from\*. Row 2 (WS): Knit. Rep rows 1 and 2. TECHNICALTIPSFORINCREASESANDDECREASES: For the sleeve increases: M1R at the beg of a sleeve row and M1L at the end. When combining the twisted st separator and the sel st at the end of the front and back armhole decreases, k2tog tbl at row at the beg and k2tog at the end of the row. The sel st then becomes a plain St st. The suggested mirrored decreases in the Rice Stitch in sleeve caps and body (armholes):
At the beg of the row:
When eliminating a k tbl st: p2tog. When eliminating a p st: k2tog tbl.
At the end of the row:
When eliminating a k tbl st: ssp. When eliminating a p st:sl 2 sts kwise one at a time, return sts to LH needle twisted, k2tog.
BODY AND SLEEVE HEM BANDS (make 2 of each)
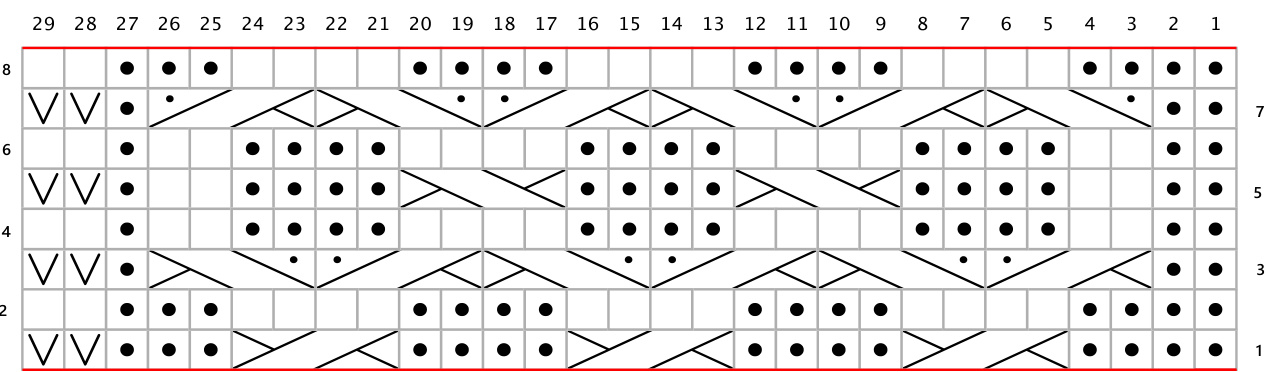
CO 29 sts. Work Band Cable Chart 20 [22, 24] times for the body bands and 9 times for the sleeve bands. On the next Row 1, p2tog sts 3+4, 11+12, 19+20 and 26+27 - 25 sts. BO all sts. Block to schematic measurements Designer Note: Even row sts are worked as they present themselves except where indicated (Twist Cable w/Popcorn, Rice Stitch, Neck Edge Charts).
BACK
With RS of body band facing, along the long edge opposite the slipped stitches, pick up and k134 [146, 158] sts as follows: Pick up 16 [22, 28] sts evenly over 2.75 [4, 5]"/7 [10, 13] cm at each end of band, and 102 sts evenly over the 13.5"/34 cm in the center of the band to compensate for the different st gauges of the Rice Stitch v. cable sections. Set up row (WS): P1, k15 [21, 27], p1, k1, p4, k1, p1, k1, p4, k1, p1, k3, p4, k4, p4, k3, p1, k3, (p4, k4) 3 times, p4, k3, p1, k3, p4, k4, p4, k3, p1, k1, p4, k1, p1, k1, p4, k1, p1, k15 [21, 27], p1. Row 1 (RS): K1, work 7 [10,13] rep of Rice Stitch Chart, p1, k1 tbl, pm, Row 1 of Twist Cable w/Popcorn Chart, k1 tbl, pm, Row 1 Side Cable A Chart, k1 tbl, pm, Row 1 Central Braided Cable Chart, k1 tbl, pm, Row 1 of Side Cable B Chart, k1 tbl, pm, Row 1 of Twist Cable w/ Popcorn Chart, k1 tbl, pm, work 7 [10,13] rep of Rice Stitch Chart, p1, k1 - 134 [146,158] sts (plus the 4 sts each size that will be eliminated Row 2) Row 2 (WS): P1, k1, work 7 [10,13] rep of Row 2 of Rice Stitch Chart, sm, p1 tbl, Row 2 of Twist Cable w/ Popcorn Chart, sm, p1 tbl, k3, p4, k4, p4, k3, sm, p1 tbl, k3, (p4, k4) 3 times, p4, k3, sm, p1 tbl, k3, p4, k4, p4, k3, sm, p1 tbl, Row 2 of Twist Cable w/Popcorn Chart, sm, p1 tbl, k1, work 7 [10,13] rep of Row 2 of Rice Stitch Chart, p1. Work in pat as est maintaining each sel as 1 St st and twisted st separators bet chart sections by k1 tbl on all RS rows and p1 tbl on all WS rows, until length from bottom edge of band is 14.25"/36 cm ending on a WS row. Shape armholes: See Technical Tips for suggested dec. BO 3 [5, 8] sts at the beg of the next 2 rows - 128 [136, 142] sts. Next RS row: K1, dec 1 st, work in pat to last 3 sts, dec 1 st, k1 - 126 [134, 140] sts. While maintaining 1 St st at each sel and cont in pat, dec 1 st at each end of each RS row 11 [12, 11] more times - 104 [110, 118] sts.
THE PATTERN
Next RS row (for Medium only): K2tog tbl, work in pat to last 2 sts, k2tog - 102 [110, 118] sts. Work even until length is 21.25 [21.5, 21.75]"/54 [55, 55] cm, ending after working a WS row. Shape neck: Work 22 [26, 30] sts in pat, join a new ball and B0 58 sts, at the same time to minimize cable flare, dec 6 sts across back neck when binding off using k2tog dec on sts 11+12 back right, sts 7+8, 15+16, 23+24 and 31+32 in central braid, and sts 7+8 in back left. Work in pat to end of row. Work each side of neck separately. Right neck: While working in pat and maintaining 1 St st at each sel, BO every WS row as follows: 2 sts three times - 16 [20, 24] sts. B0 all rem sts kwise while at the same time k2tog last 2 neck edge sts before B0 - 15 [19, 23] Sts. Left neck: While working in pat and maintaining 1 St st at each sel, BO every RS row as follows: 2 sts three times, then 1 st once - 15 [19, 23] sts. B0 sts kwise. Use new yarn ball tail to close the gap bet first BO sts bet center neck and left neck before tail weave in.
FRONT
Work as for back including armhole dec, until length is 16.75"/43 cm, ending after working a WS row, corresponding to row 6 of the 13th repeat of the Central Braided Cable. Cont armhole dec until complete and at the same time shape neck. Shape neck: Work 33 [37, 41] sts in pat, join a new ball and B0 36 sts, at the same time to minimize cable flare, dec 4 sts across front neck when binding off using k2tog dec on sts 7+8, 15+16, 23+24, and 31+32 of the Central Braided Cable. Work in pat to end of row. Work each side of neck separately. Right neck: While working in pat and maintaining 1 St st at each sel, BO every RS row as follows: 3 sts once, 6 sts once (dec by 1 st in cable crossing before BO to reduce cable flare), then 1 st 8 times - 16 [20, 24] sts. Next RS row beg with k2tog tbl to eliminate twisted st separator - 15 [19, 23] sts. Cont in pat until length from bottom of band is 21.75 [22, 22.25]"/55 [56, 57] cm. B0 all sts. Left neck: While working in pat and maintaining 1 St st at each sel, BO every WS row as follows: 3 sts once, 6 sts once (dec1 st in cable crossing before BO to reduce cable flare), then 1 st 9 times - 15 [19, 23] sts. Cont in pat until length from bottom of band is 21.75 [22, 22.25]"/55 [56, 57] cm. B0 all sts. Use new ball yarn tail to close the gap bet center section and left neck before tail weave in.
SLEEVES (the right and left sleeve cables are mirrored)
With RS of sleeve band facing, along the long edge opposite the slipped stitches, pick up 56 sts as follows: Pick up 18 sts evenly over 3"/8 cm at the each end of band, and 20 sts evenly over the center 3"/8 cm of the band to compensate for the different st gauges of the Rice Stitch and cable sections. Set up row (WS): P1, k17, p1, k3, p4, k4, p4, k3, p1, k17, p1. Row 1 (RS): K1, work 9 rep of Rice Stitch Chart, pm, Row 1 LEFT OR RIGHT SLEEVE CABLE, k1 tbl, pm, 8 rep of Rice Stitch Chart, p1, k1. Row 2 (WS): P1, k17, sm, p1 tbl, K3, P4, K4, P4, k3, sm, p1 tbl, k17, p1. Maintaining pat as est and 1 sel st at each edge in St st, work even to end of Sleeve Cable Chart Row 8. See Technical Tipsforsuggestedinc. Shape sleeve (RS): Keeping 1 sel st at each edge in St st, incorporating new sts into Rice st pat, inc 1 st on each edge, then inc every 5th RS row 5 [4, 1] times, every 4th RS row 5 [7, 9] times, then every RS row 0 [2, 7] times - 78 [84, 92] sts. Work even until piece with band measures 17.5"/44.5 cm ending on a WS row. Shape cap: B0 3 [5, 8] sts at the beg of the next 2 rows - 72 [74, 76] sts. Keeping 1 sel st at each edge in St st, dec 1 st on each edge this RS row and next 21 [22, 23] RS rows - 28 sts. See Technical Tips for suggested dec. BO 4 sts beg of next 2 rows - 20 sts. B0 all sts pwise, reducing 2 sts symmetrically while binding off to reduce cable flare.
FINISHING
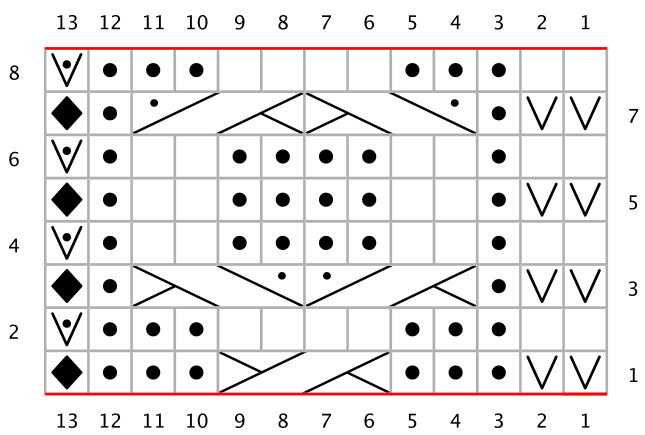
Block all pieces to schematic measurements. Sew back to front at shoulders. With 24"/60 cm circular needle and starting at the center back, pick up 120 [124, 128] sts as follows: 16 sts from center back to left back diagonal section, 7 sts to left shoulder, 9 [11, 13] sts left shoulder to start of front diagonal section, 17 sts front left diagonal section, 22 sts straight center front section, 17 sts front right diagonal section, 9 [11, 13] sts to right shoulder, 7 sts right back diagonal section, and 16 sts to center back. With RS facing, using cable CO, CO 13 sts as follows: knit into the first pick up stitch, leaving the stitch on the left needle. Rotate the right needle clockwise and insert the left needle into the new stitch from left to right, then remove right needle. \*lnsert the right needle bet the two stitches closest to the tip on the left needle. Wrap the working yarn around the right needle as if to knit and pull the loop through, rotating the right needle and picking up stitch with left needle from left to right, removing right needle, then tightening the stitch; rep from\* until 13 sts have been casted-on. Work collar per Lily Chin's join-as-you-go technique using Neck Edge Chart instructions: k2tog tbl (last RS collar st and the next PU st on sweater body) and sl the first st of every WS row with yarn Ws. Cont working Neck Edge Chart and joining neck edge until reaching center back, joining last center back PU st with the last collar st (k2tog tbl). BO next row pwise, and dec 2 sts evenly in cable sts to reduce cable flare. Seam center back neck edge. Wet block Neck Edge section only to allow it to lie flat. Seam sleeve cap to sleeve opening, then seam the sides of the body and the sleeve seam. Reblock only if necessary. Neck Edge with Knitted Join Tutorial Link https://www.youtube.com/watch?v=fnW82Lqlmic
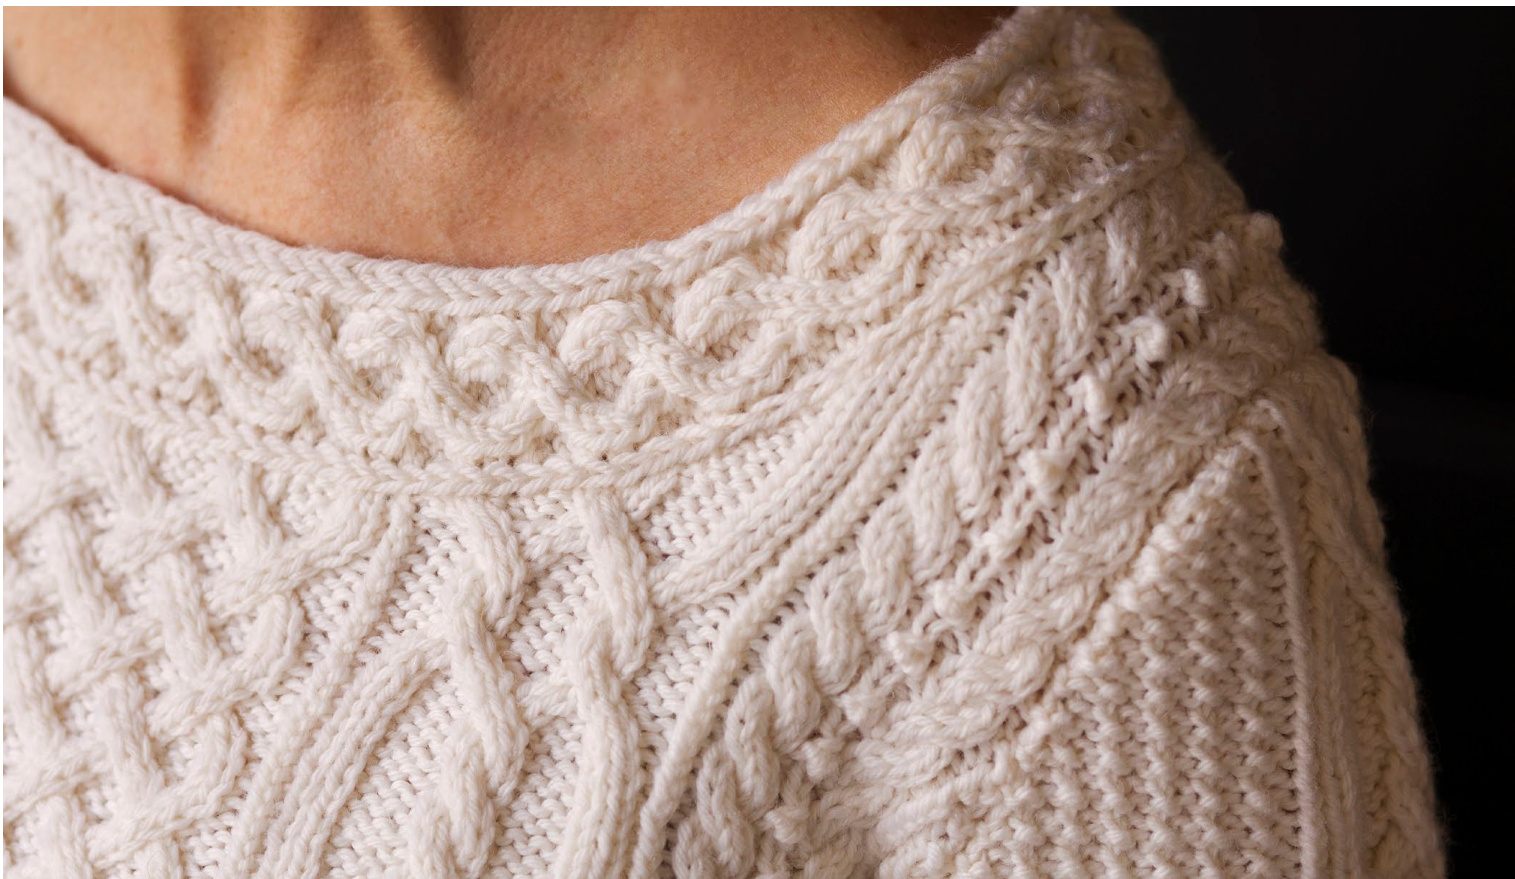
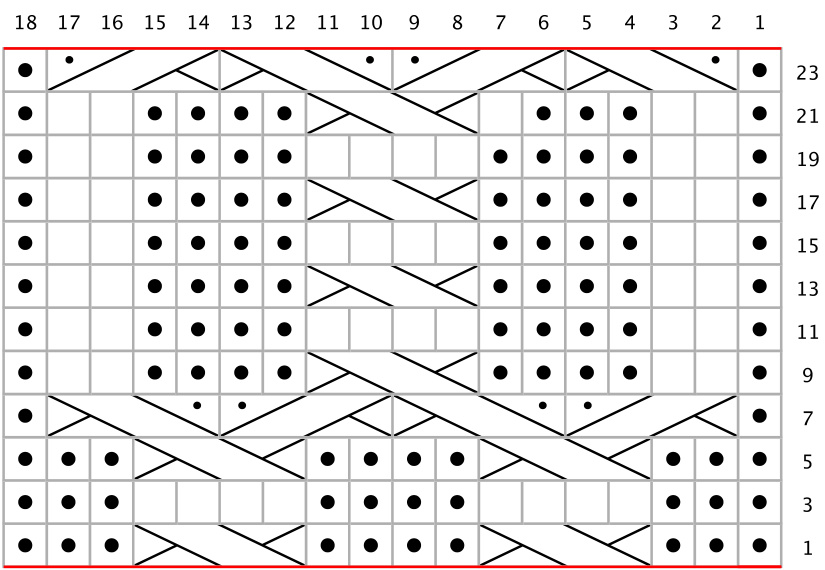
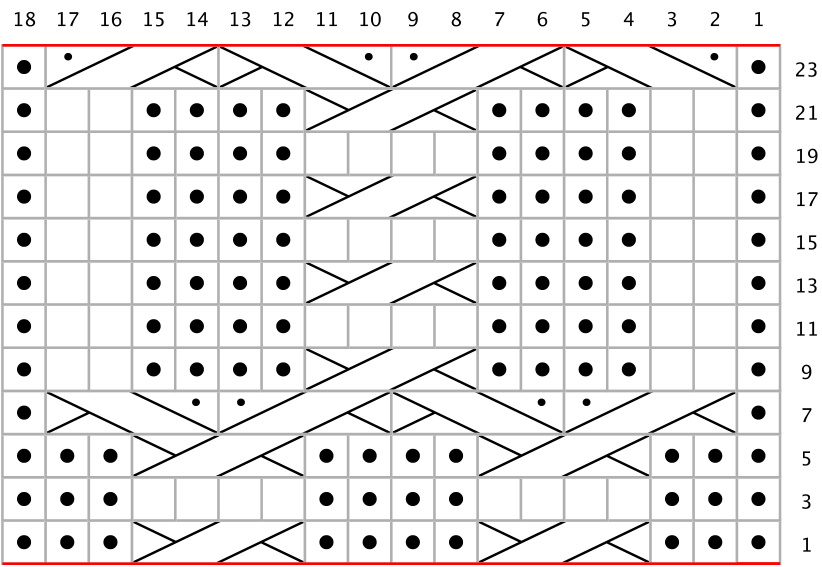
The charts are worked flat by reading odd-numbered RS rows right to left and (where indicated) even-numbered WS rows from left to right. Where even rows are excluded from charts, work stitches as they present themselves. Note: The charted sections are separated by a 1 st column of twisted sts: k1 tbl on all RS rows and p1 tbl on all WS rows on Front, Back and Sleeves.
Side Cable A and Left Sleeve Cable
Side Cable B and Right Sleeve Cable
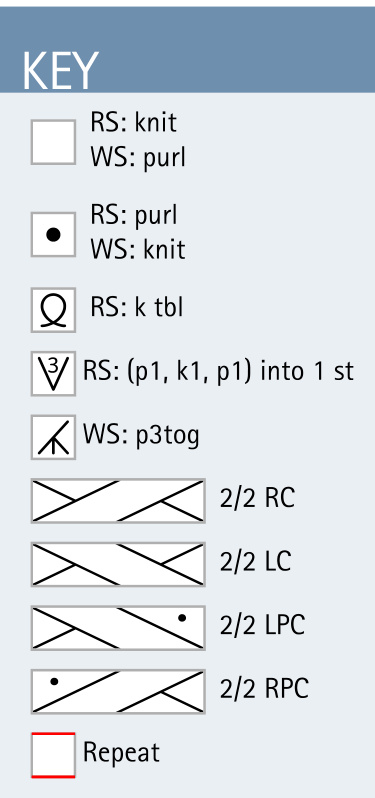
The charts are worked flat by reading odd-numbered RS rows right to left and (where indicated) even-numbered WS rows from left to right. Where even rows are excluded from charts, work stitches as they present themselves. Note: The charted sections are separated by a 1st column of twisted sts: k1 tbl on all RS rows and p1 tbl on all WS rows on Front, Back and Sleeves.
Central Braided Cable

Band Cable
Neck Edge

Abbreviations and Special Stitches
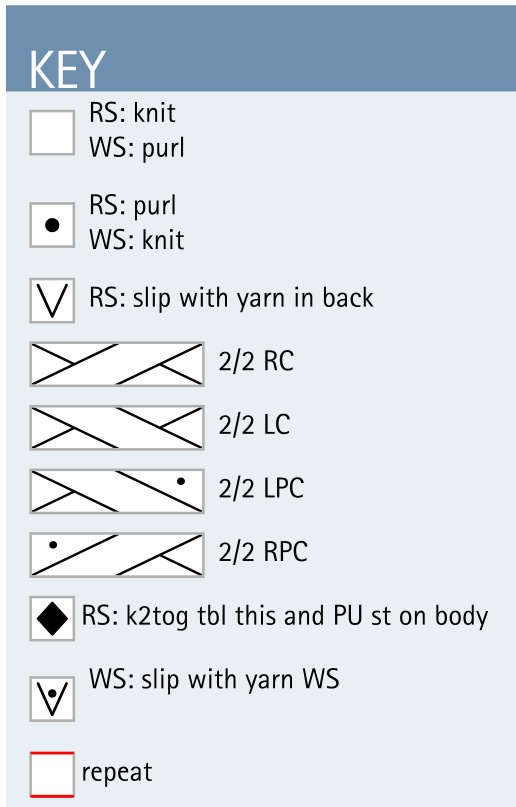
2/2RC Sl 2 st to cn, hold to back, k2, k2 from cn 2/2LC Sl 2 st to cn, hold to front, k2, k2 from cn 2/2RPC Sl 2 sts to cn, hold to back, k2, p2 from cn 2/2LPC Sl 2 sts to cn, hold to front, p2, k2 from cn beg begin(ning) bet between BO bind off cn cable needle CO cast on cont continue dec decrease est established inc increase kwise knitwise k2tog knit 2 together M1L Make 1 Left: with LH needle tip, lift strand bet needles from front to back. Knit the lifted loop through the back M1R Make 1 Right: with LH needle tip, lift strand bet needles from back to front. Knit the lifted loop through the front pat pattern pm place marker pwise purlwise p2tog purl 2 together rem remaining RS right side sel selvedge sl slip sm slip marker ssp slip, slip, purl: sl 2 sts kwise one at a time, replace on left needle, p2 tog tbl tbl through the back loop WS wrong side
Experience
EXPERIENCED
Skills needed: advanced seaming techniques, cable Co (instructions included), cables, Lily Chin's join-as-you-go technique (instructions included), paired increases and decreases, picking up stitches, reducing cable flare at the end of a cable section (instructions included), twisted stitches, working from a chart without equivalent written instructions
Sizes
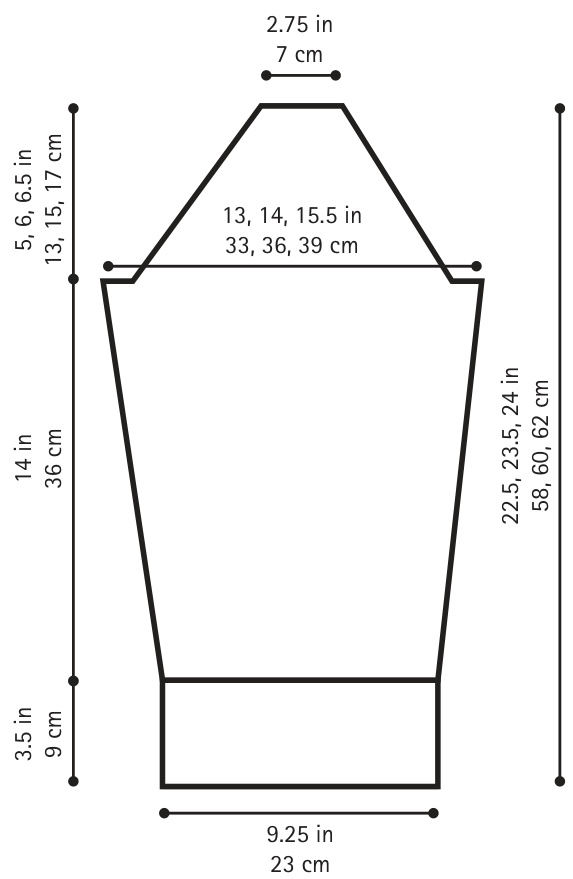
Women's Medium [Large, 1X]; fits chest 36-38 [40-42, 44-46]"/91-97 [102-107, 112-117] cm - (ease 0-2"/0-5 cm)
Finished Measurements
Chest 38 [42, 46]"/97 [107,117] cm Length 21.75 [22, 22.25]"/55 [56, 57] cm Sleeve from underarm 17"/43 cm
Materials
Approximately 1530 [1700, 1800] yds of worsted-weight yarn Shown in ROWAN Pure Wool Worsted (100%o superwash wool, 3.5 oz/100 g. 219 yds/200 m] - color #101 lvory - 7 [8, 9] skeins Shown in CASCADE YARNS CASCADE 22O (100% Peruvian Highland wool, 3.5 oz/100 g, 220 yds/200 m] - color #8035 Mineral Red - 7 [8, 9] skeins
Needles
US 7 (4.5 mm) or size needed to obtain gauge, including 24"/60cm circular for neck edge application
Gauqe
In Rice Stitch: 22 sts and 32 rows = 4"/10 cm.
Notions
Cable needle (cn) Stitch markers (6) Yarn needle
Credits
Technical editing: Sharon Levering Test Knitting: Marcy Holtz Layout: Carla Pera
Copyright and Usage Statement
This pattern was created and written by Bonnie Dean [Designer]. It is intended for personal use only [that is, you may use the finished items for yourself or for gifts]. The pattern is not to be distributed, for free or for money, in any format, without the permission of the Designer. Items created from this pattern are not to be sold or used for commercial gain without the permission of the Designer. If you are interested in working out an agreement to distribute this pattern or to sell products made from this pattern, please contact Bonnie Dean at chieflefthandknits@ gmail.com or Ravelry ID bonniedean.
Bonnie Dean
Bonnie Dean became a TKGA Master Knitter in April 2015. She lives in Billings, MT with her husband Edward. Their Boulder, CO son Gavin introduced Bonnie to the knowledge of Chief Left Hand, a Southern Arapaho Chief who lived in the mid-1800's near Boulder. She launched her company Chief Left Hand Knits in February 2014, incorporating her love of hand knitting and her longstanding love of decorative and fine arts of Native American artists along with the beauty of the spaces around Boulder where Chief Left Hand wintered. Bonnie is enjoying applying her experience in fabricbased garment construction and design to a new medium. Her designs focus on modern embellishment, texture and cables.