
Slip Stitch Hat by Sarah Margaret Crittenden
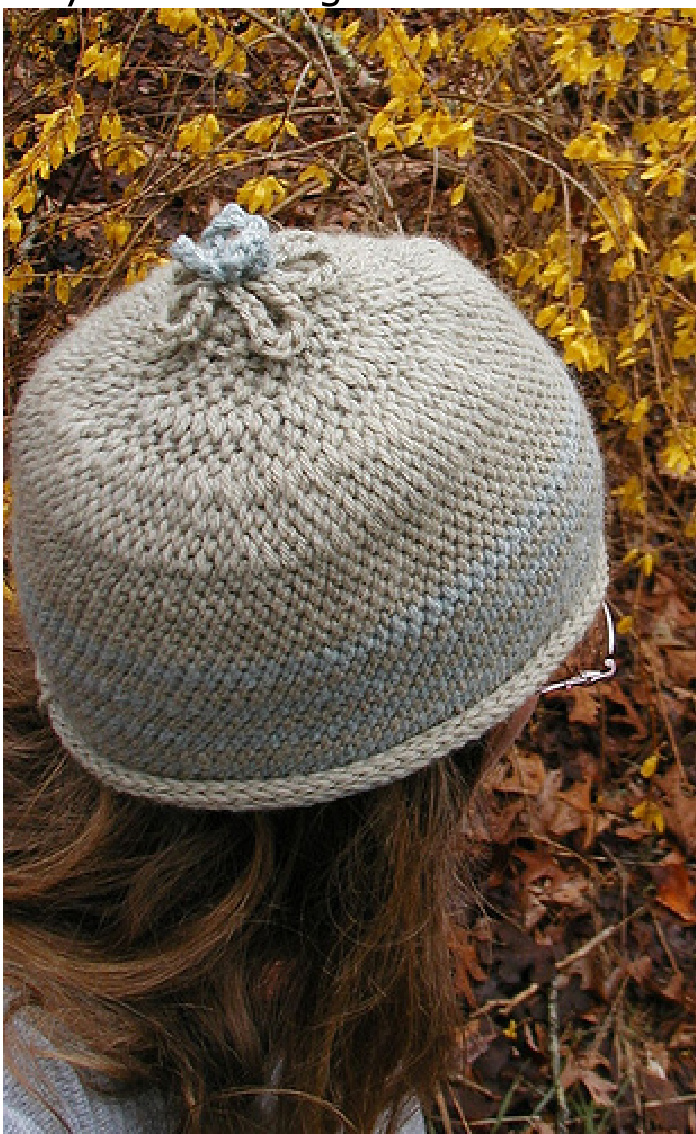
Introduction Okay! Here goes the pattern for my slip stitch hat. I use slip stitch in the round, in the front loop only for the bulk of the hat. It is not as quick as some other stitches, but I love the fabric it produces - smooth, solid and lightweight. Another result of this stitch is that it curls up on itself, creating the rolled brim, therefore you need to create a bit more length to make up for the curl.
Materials
Yarn: about 200 yds worsted (I used 2 balls KnitPicks Andean Silk in Merryweather for the green one and 200yds of bare Peruvian Highland Wool worsted in two of my own natural dye colors for the grey/blue stripey one This pattern works best with a yarn that has some stretch (like wool), so if you are using acrylic, it is extra important to keep really loose tension. Hook : K - 6.5mm and I - 5.5 mm Stitch Marker or piece of yarn of a contrasting color, or whatever you want to use to keep track of rounds Tape Measure
Gauge
20 sl st flo per 4" (10cm) and 20 rounds per 4" (10 cm) in the portion worked with the I hook.
Stitches US terms
slip stitch - sl st - Insert hook into indicated stitch. Yarnover and draw up a loop through both the stitch and the loop on your hook. Slip stitch is complete. slip stitch front loop only - sl st flo - make a slip stitch through the front loop only of the next stitch slip stitch increase - sl st inc - make 2 slip stitches in the next stitch, one in the back loop and one in the front loop of that same stitch
Notes
I suggest loosening up your gauge when using slip stitch because tight slip stitches are very difficult to get the hook into. I repeat - loosen up your stitches, relax your tension to the point of sloppy! Try just threading the yarn through your finger rather than wrapping around to help loosen your tension. This pattern is done in continuous rounds with no joining. Use a stitch marker or a piece of yarn in a contrasting color to keep track of your rounds. The sizes given are guidelines. My head measures 22 inches around where a hatband would be and size medium works for me.
Pattern
with worsted weight yarn and a K hook Start with a magic ring Donna Hulka's Magic Ring tutorial
For size Small:
1 - 5 sc in magic ring - 5sc 2 - sl st inc in each sc - 10 sl st 3 - sl st inc in each sl st - 20 sl st 4 - sl st flo in each sl st - 20 sl st 5 - repeat round 3 - 40 sl st 6 - repeat round 4 - 40 sl st 7 - repeat round 3 - 80 sl st 8 - repeat round 4 - 80 sl st Note - your hat will look like a small ruffly disk right now, but don't worry, it will straighten itself out in the next rounds. 9-30. (or desired height) Change to I hook and slst flo in each slst until hat is desirec height.
For size Medium:
1. 6 sc in magic ring - 6sc 2. sl st inc in each sc - 12 sl st 3. sl st inc in each sl st - 24 sl st 4. sl st flo in each sl st - 24 sl st 5. repeat round 3 - 48 sl st 6. repeat round 4 - 48 sl st 7. repeat round 3 - 96 sl st 8. repeat round 4 - 96 sl st Note - your hat will look like a small ruffly disk right now, but don't worry, it will straighten itself out in the next rounds. 9-30. (or desired height) Change to I hook and slst flo in each slst until hat is desired height.
For size Large:
1. 7 sc in magic ring - 7sc 2. sl st inc in each sc - 14 sl st 3. sl st inc in each sl st - 28 sl st 4. sl st flo in each sl st - 28 sl st 5. repeat round 3 - 56 sl st 6. repeat round 4 - 56 sl st 7. repeat round 3 - 112 sl st 8. repeat round 4 - 112 sl st Note - your hat will look like a small ruffly disk right now, but don't worry, it will straighten itself out in the next rounds. 9-30. (or desired height) Change to I hook and slst flo in each slst until hat is desired height.
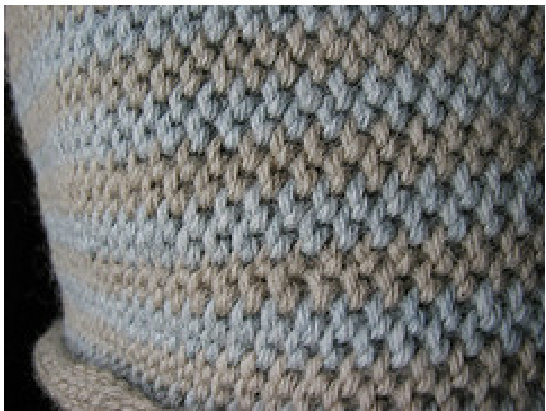
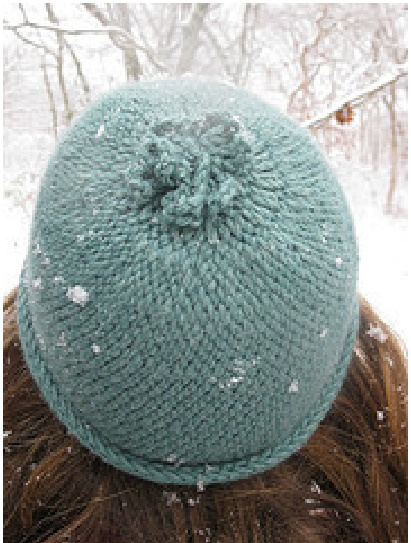
I added five stripes of blue for interest, it seemed to make the slip stitching go faster :0) I added a chain stitch flower at the top to make it more girly, otherwise this could be a good men's hat, too. I suggest blocking your hat for the best look, feel, and fit.
Chain Stitch Flower
large flower: in magic ring (sc, ch 9)x5, slst to first sc small flower: in magic ring (sc, ch 9)x3, slst to first sc place small flower on top of large flower and sew both to the center top of hat If you have any questions or comments, please feel free to contact me at rustysarah@comcast.net, or send me a message on Ravelry, I am MsBusyFingers Copyright 2010, Sarah Margaret Crittenden, All Rights Reserved


