Shaul
Citigen Shaul
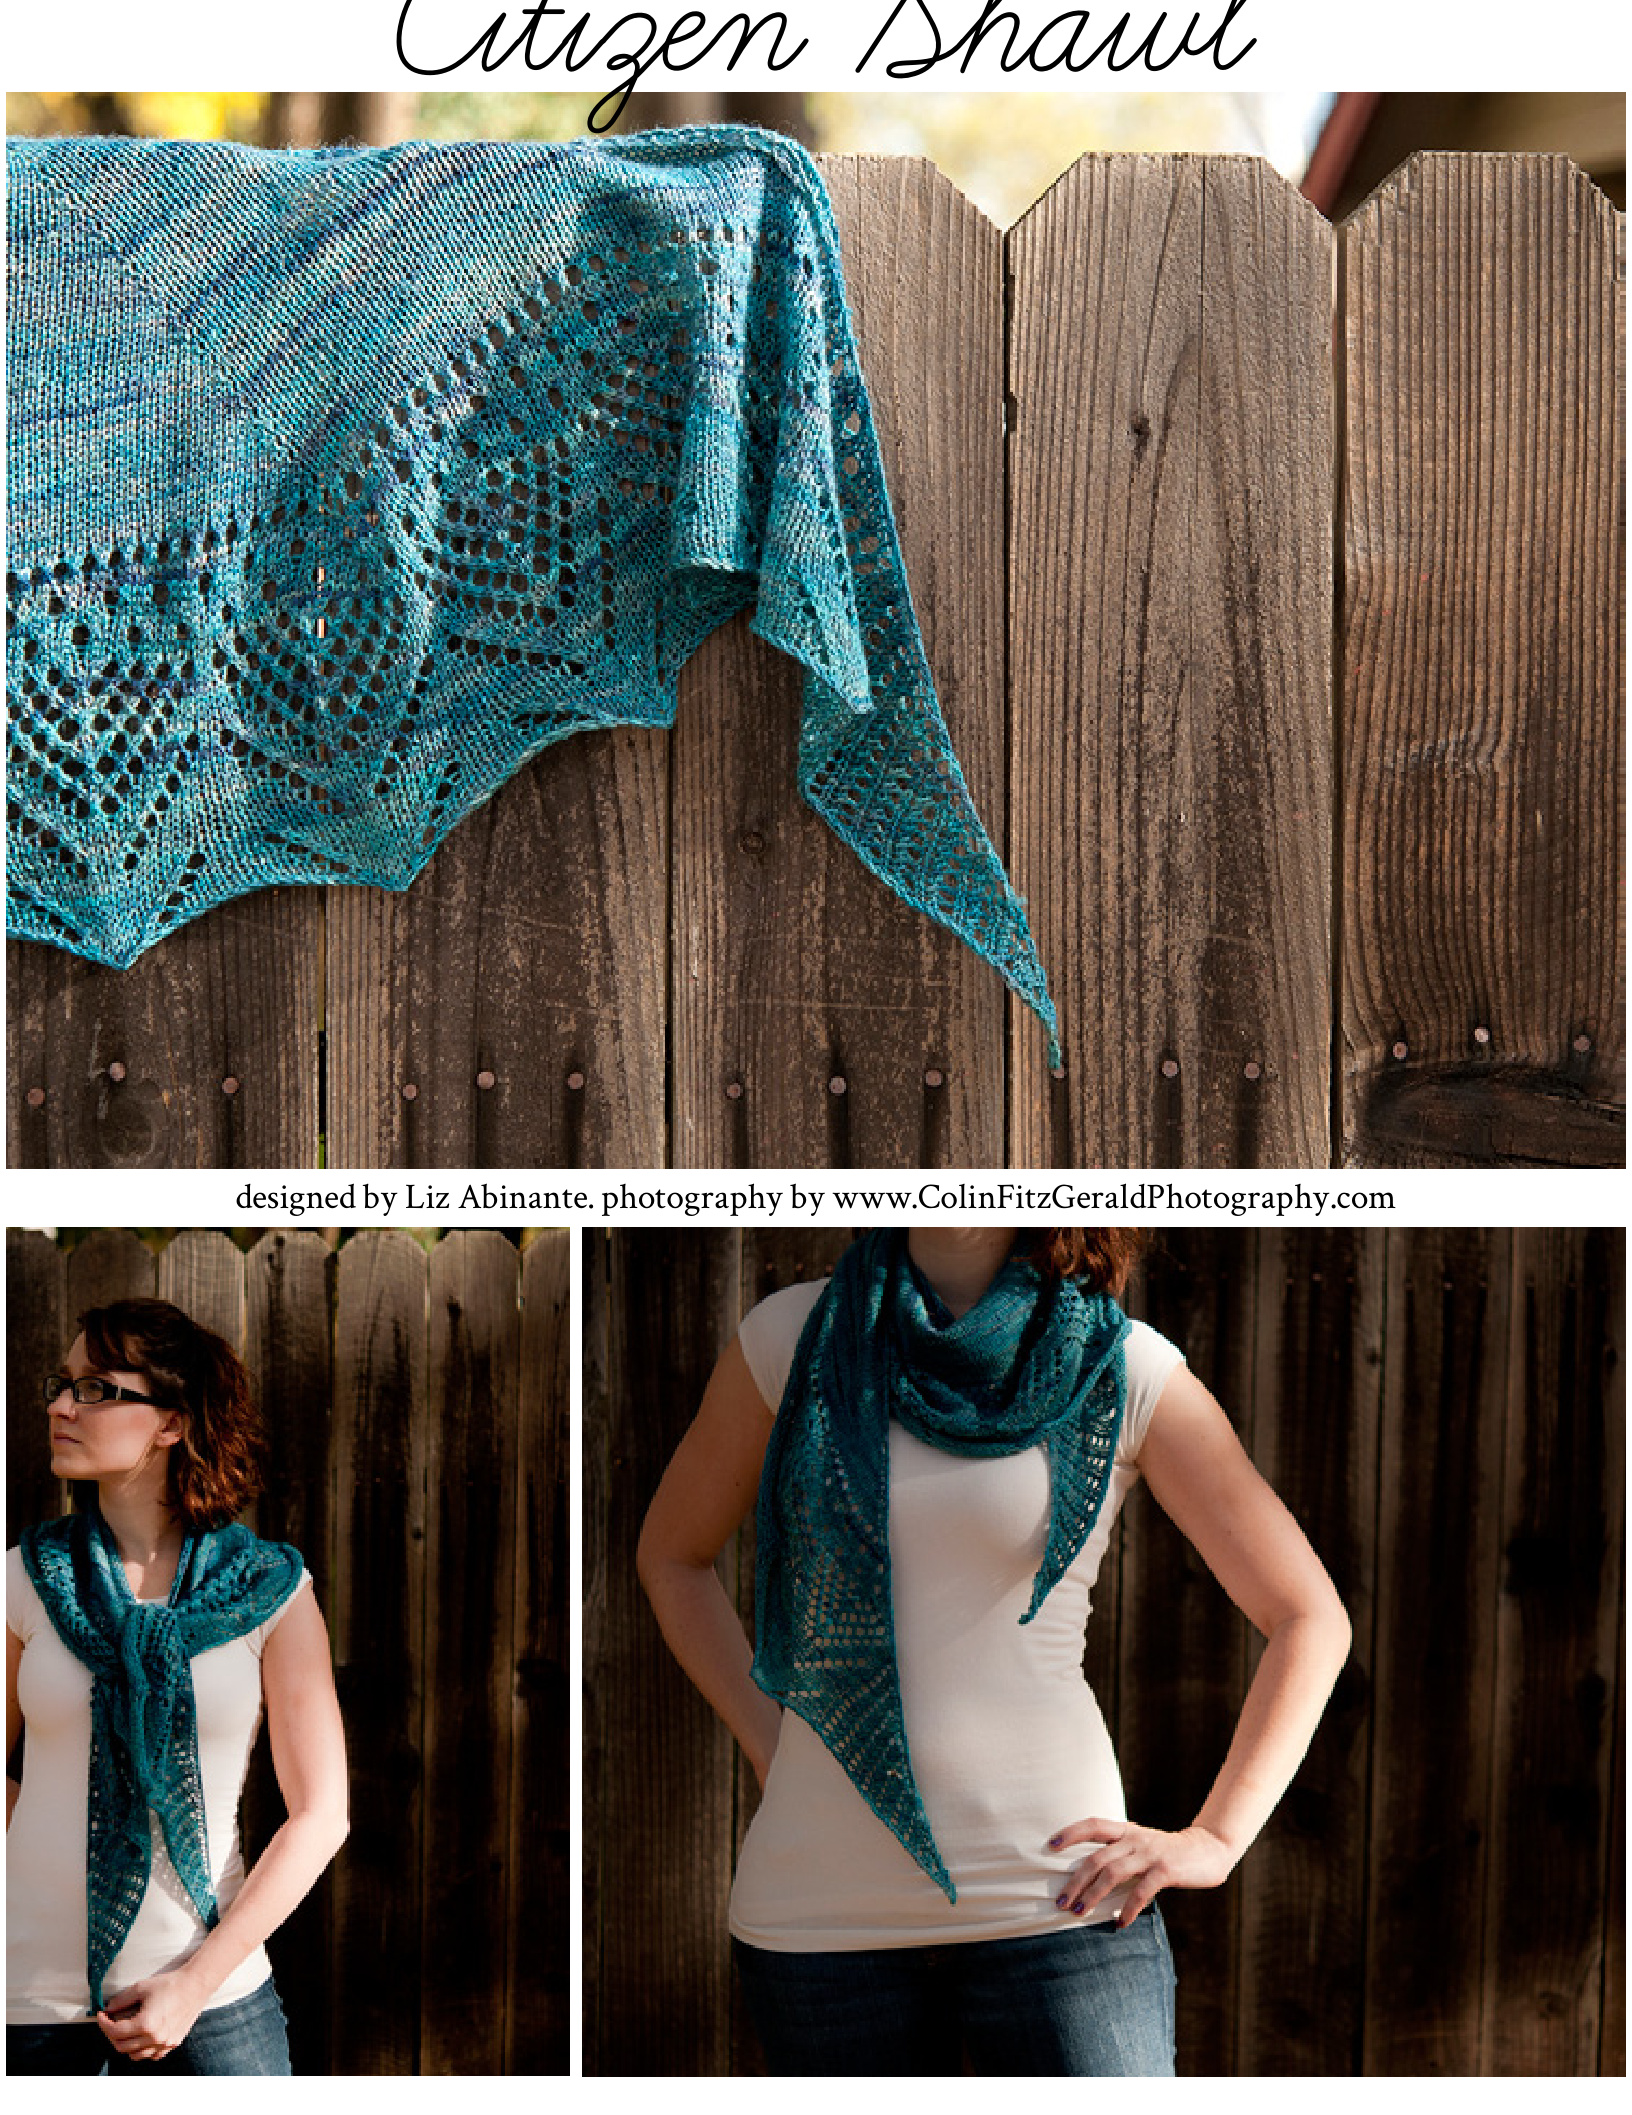
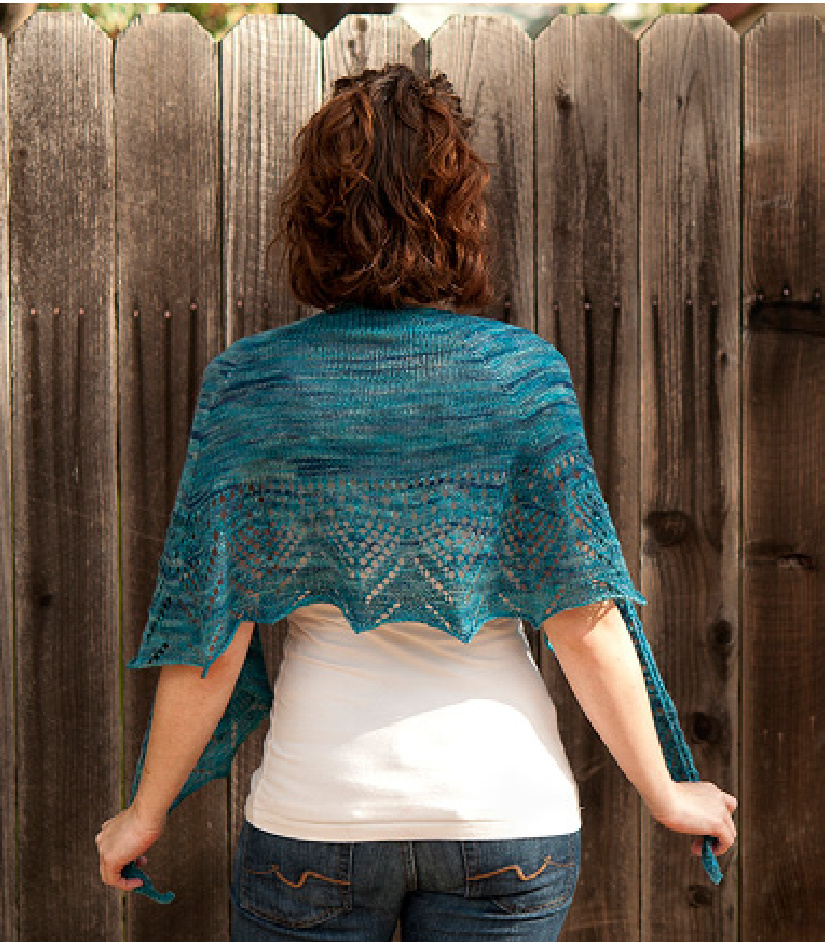
[ feministy.com | liz.abinante@gmail.com ] contact [ version 4 | december 2010 ] pattern [ feministy | feministy fans group ] ravelry designed by Liz Abinante Citizen Shawl is a simple geometric lace shawl inspired by the sprawling manor from the film Citizen Kane. The shawl is a wide, thin shape, much like Traveling Woman, and can be customized to your liking. The original shawl was knit with 500 yards of fingering weight yarn, but may be adapted to use 400 yards of fingering weight yarn if you adjust the increases or omit several edge rows. As shown, the shawl can be blocked to have slightly pointed tips. You do not have to block pointed tips: it can be blocked to have a straight edge. The points are very slight, so it's really a preference thing. Depending on how loosely you choose to knit this shawl, your edge may roll. Because it can be blocked with a rounded edge, adding several rows of garter stitch at the end of the shawl will prevent it from rolling.
Yarn
Femme Fatale Fibers - Lilith Sock (500 yds, fingering weight) shown in Snow Globe. You will have less than 100 yards leftover. Ifyou substitute for a 400 yards skein, it probabh won't be enough. Skeins containing 440-460 yards should have enough to knit as written.
Needles
One US 6 (4.0mm) circular needle, your choice of length (I'd recommend 24" or longer).
Gauge
5 sts per inch, 7.5 sts per row. Stockinette stitch.
Finished Size
14.5 inches deep, 58 inch wingspan. In case you're wondering, I'm modeling the shawl. For scale: I'm 5'5"inches tall and about 120 lbs. I usually wear a women's XS or S. It was freshly blocked in the photos, but was measured two days after being blocked and photographed.
Instructions
All lace portions are charted and written. Please be sure to read through the instructions completely before knitting. The garter stitch border and the increases are charted along with the lace pattern and the written isntructions.
The stocking stitch portion of this shawl increases 4 stitches on right side rows and 2 stitches on wrong side rows. It has a garter stitch border and ends with a simple rounded edge. The make one increases may be substituted for yarn overs if you prefer a lacier look. There are three panels to the shawl, with the center panel being smaller than the two outer panels. After the stocking stitch body, you begin the lace chart. You increase 2 stitches on each right and wrong side at this point.
| Abbreviations | BO:bind off |
| k:knit | st:stitch |
| P: purl | sts:stitches |
| sl: slip | ndl:needle |
| tbl:through thebackloop | yo:yarn over |
| k2tog:knittwotogether | RS/WS:right side, wrong side |
| ssk:slip,slip,knittwoslippedstitches | pm: place marker |
| together | slm: slip marker |
| CO:caston | dbl dec: sl2, k1, pass slipped sts over tog |
lnstruuctions
Set Up
CO 3 sts. K 6 rows, do not turn to begin a new row. Pick up 5 sts, turn work and k 1 row. 8 sts total. I would recommend using two sets of markers (four markers total) in two different colors. The first color will be placed in row 1, and the second color will be placed in row 3. Some stitches are done before the markers, and others are done after. Using the two colors will help to differentiate. Row 1: (RS) k2, pm, yo, k1, m1, k2, m1, k1, yo, pm, k2 Row 2: k2, slm, yo, p to last m, yo, slm, k2 Row 3: k2, slm, yo, k2, m1, pm, k6, pm, m1, k2, yo, slm, k2 Row 4: k2, slm, yo, p to last 2 sts, yo, slm, k2 (sl middle 2 markers as you come to them) Row 5: k2, slm, yo, k to 2nd m, slm, m1, k to 3rd m, m1, slm, k to 4th m, yo, slm, k2 Row 6: k2, slm, yo, p to last 2 sts, yo, slm, k2 (sl middle 2 markers as you come to them) ited as follows: 2 border (m) 7 outer (m) 8 center (m) 7 outer (m) 2 border (26 total Row 7: k2, slm, yo, k to 2nd m, slm, m1, k to 3rd m, m1, slm, k to 4th m, yo, slm, k2 Row 8: k2, slm, yo, p to last 2 sts, yo, slm, k2 (sl middle 2 markers as you come to them) Repeat rows 7 and 8 until you have 212 stitches total (30 times), ending with a WS row. You should have 2 border stitches, 69 section stitches, 70 section stitches, 69 section stitches, and 2 border stitches. The next page lists total st counts and section counts for every increase repeat worked, including the eyelets (see below). :ide if you want to work the shawl with or without eyelets before proceeding. Without Eyelets See next page for row-by-row stitch counts Work 11 rows of increases in stockinette st (246 sts total).You should end ready to begin a RS row: Row 12 (WS): k2, slm, yo, pfb, pto next pm, pfb,slm, pto next m, pfb, slm, pto last m, slm, yo, k2. 251 sts total. Remove 2nd and 3rd markers on the last row worked. With Eyelets See next page for row-by-row stitch counts The shawl has 3 sets of eyelets before the lace charts. You will maintain increases throughout. Se next page for detailed stitch counts. Row 1: (Rs)k2, slm, yo,k1,[yo,k2tog]to 2nd m, slm, m1,lyo,k2tog]to3rd m, m1, slm,lyo,k2tog]to 1 st before 4th m, k1, yo, slm, k2 Row 2: k2, slm, yo, p to last 2 sts, yo, slm, k2 (sl middle 2 markers as you come to them) Row 3: k2, slm, yo, k to 2nd m, slm, m1, k to 3rd m, m1, slm,k to 4th m, yo, slm, k2 Row 4: k2, slm, yo, p to last 2 sts, yo, slm, k2 (sl middle 2 markers as you come to them) Row 5: k2, slm, yo, k1, lyo, k2tog,k2]to 1 st before 2nd m, k1, slm, m1, k1,[yo, k2tog, k2]to 1 st before 3rd m, k1, m1, slm, k1, [yo, k2tog, k2]to 1 st before 4th m, k1, slm, yo, k2 Rows 6-8: as rows 2-4 Row 9: k2,slm, yo,k4,[yo, k2tog,k2]to 1 stbefore 2nd m, k1,slm, m1,k1,[yo, k2tog,k2]to 1 st before 3rd m, k1, m1, slm, k1, [yo, k2tog, k2] to 4 sts before 4th m, k4, slm, yo, k2 Rows 10-11: as rows 2-3. Row 12: k2, slm, yo, pfb, pto next pm, pfb, remove m,pto next m, pfb, remove m,pto last m, slm, yo,k2. 251 sts total. Proceed to Lace Instructions (page 5).
Imcrease Stitch Counts
Counts are provided for each wrong side row after it has been worked. I have included rows 5 and 7 so that you may check your set up as well. I haven't included the border sts on this chart (there should always be 2 on each side).
| rs | Outer | Center | Outer | Total sts | |
| Row | 6 | 7 | 8 | 7 | 26 |
| Row | 8 | 9 | 10 | 9 | 32 |
| Row | 10 | 11 | 12 | 11 | 38 |
| Row | 12 | 13 | 14 | 13 | 44 |
| Row | 14 | 15 | 16 | 15 | 50 |
| Row Row | 16 | 17 | 18 | 17 | 56 |
| Row | 18 | 19 | 20 | 19 | 62 |
| Row | 20 | 21 | 22 24 | 21 | 68 |
| Row | 22 | 23 | 23 | 74 | |
| Row | 24 | 25 | 26 | 25 | 80 |
| Row | 26 | 27 | 28 | 27 | 86 |
| Row | 28 | 29 | 30 | 29 | 92 |
| 30 | 31 | 32 | 31 | 98 | |
| Row | 32 | 33 | 34 | 33 | 104 |
| Row | 34 | 35 | 36 | 35 | 110 |
| Row | 36 | 37 | 38 | 37 | 116 |
| Row | 38 | 39 | 40 | 39 | 122 |
| Row | 40 | 41 | 42 | 41 | 128 |
| Row | 42 | 43 | 44 | 43 | 134 |
| Row | 44 | 45 | 46 | 45 | 140 |
| Row | 46 | 47 | 48 | 47 | 146 |
| Row | 48 | 49 | 50 | 49 | 152 |
| Row | 50 | 51 | 52 | 51 | 158 |
| Row | 52 | 53 | 54 | 53 | 164 |
| Row | 54 | 55 | 56 | 55 | 170 |
| Row | 56 | 57 | 58 | 57 | 176 |
| Row | 58 | 59 | 60 | 59 | 182 |
| Row | 60 | 61 | 62 | 61 | 188 |
| Row | 62 | 63 | 64 | 63 | 194 |
| Row | 64 | 65 | 66 | 65 | 200 |
| Row | 66 | 67 | 68 | 67 | 206 |
| Row | 68 | 69 | 70 | 69 | 212 |
When working the eyelets, you still need to maintain the increases. I have included the section counts for thses 12 rows below. This will also help if you have decided to omit eyelets and work in stockinette instead.
| rs | Outer | Center | Outer | Total sts | |
| Row | 70 | 71 | 72 | 71 | 218 |
| Row | 72 | 73 | 74 | 73 | 224 |
| Row | 74 | 75 | 76 | 75 | 230 |
| Row | 76 | 77 | 78 | 77 | 236 |
| Row | 78 | 79 | 80 | 79 | 242 |
| Row | 80 | 81 | 82 | 81 | 248 |
Don't forget to remove the 2nd and 3rd markers on the lastrow!
Xace Instructions
[ feministy.com | liz.abinante@gmail.com ] contact[ version 4 | december 2010 ] pattern [ feministy | feministy fans group ] ravelry You should have 251 stitches total before beginning the lace charts. Wrong side rows are not charted. Work all WS rows as follows: k2, slm, yo, p to last m, yo, slm, k2
Lace Repeats
Knit chart A once. Knit chart B once. (To make your shawl larger, you can add additional repeats of chart B.) Bind off using p2tog bind off (or something similarly stretchy but firm). Optional: to prevent curling, you may choose to knit several rows of garter stitch. I would recommend 6+ rows. If you have 500 yards of fingering weight yarn, you should have enough for this.
Placing Markers
When you are placing the markers on the first row, you should work as follows: Row 1: k2, pm, yo, slm <work to end as indicated> slm, yo, pm, k2 You should already have two markers indicating the garter border. You are now adding two markers (one on each side of the shawl) to indicate where the shawl tip repeats fall. The yarn over increases are done inside of the markers, creating extra stitches for the outside edge repeats.
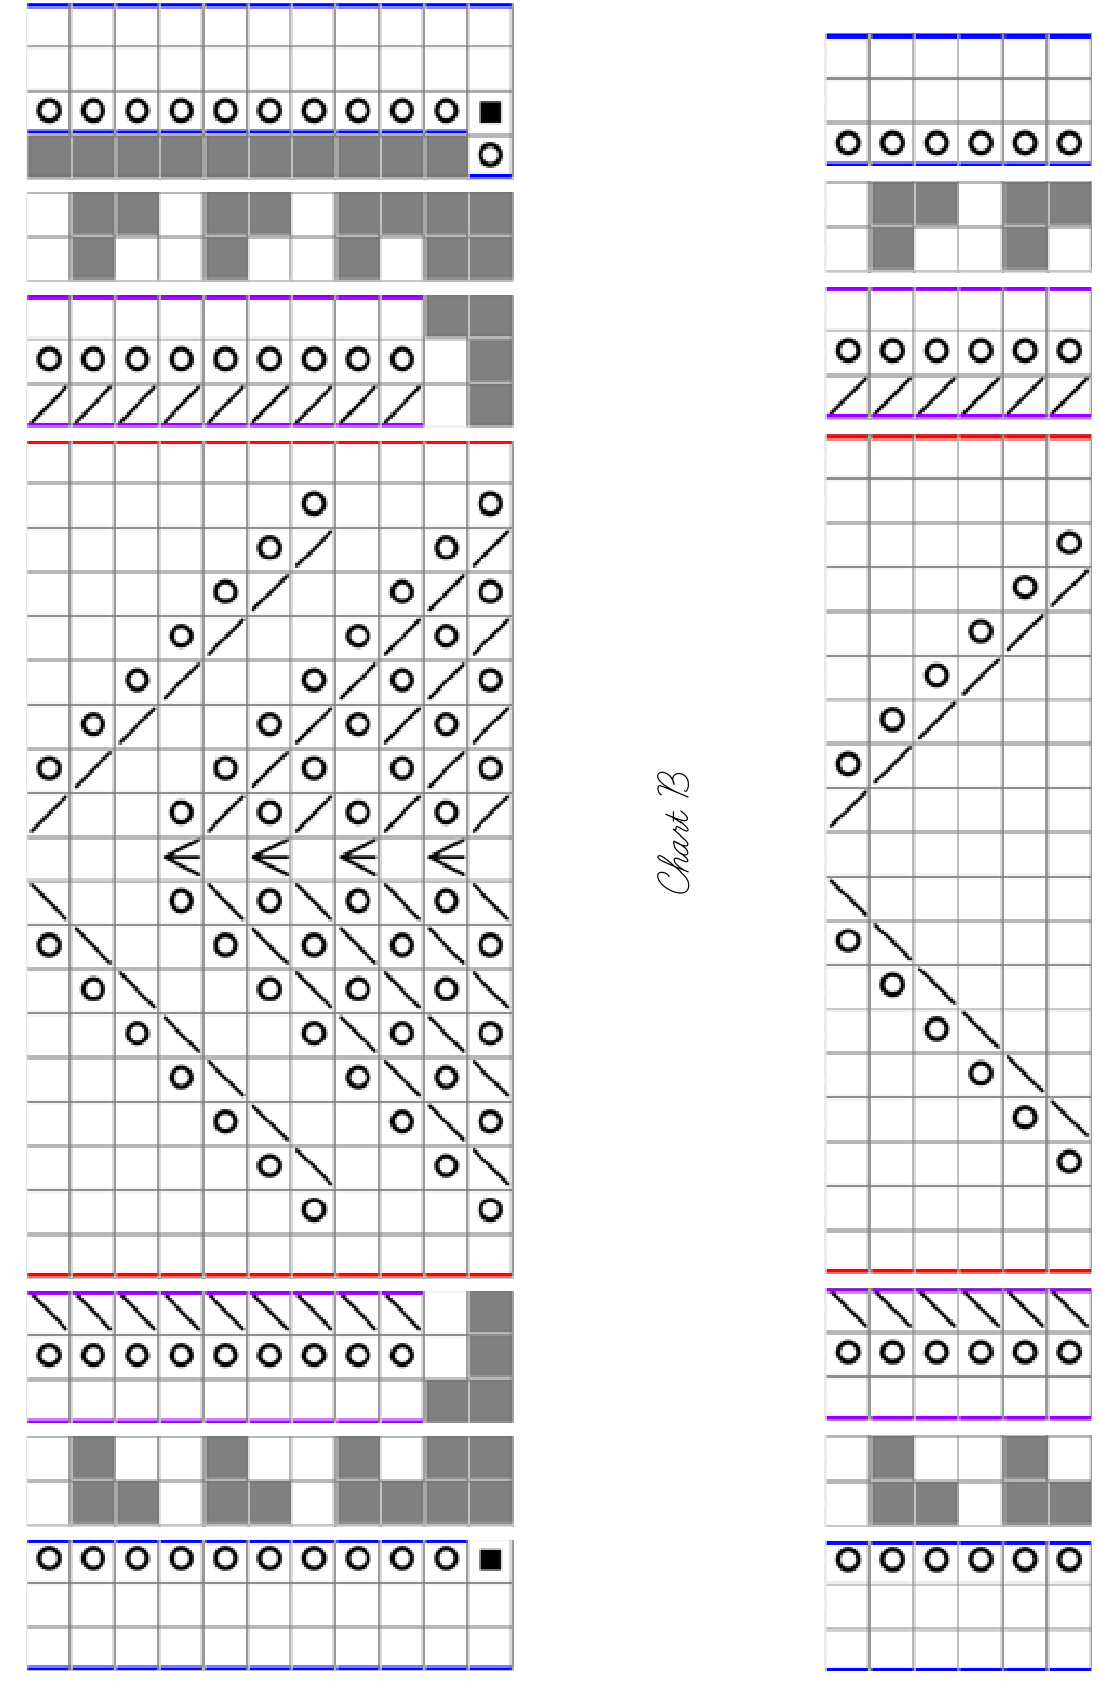
Working Charts
Outlined in blue is the garter border and the yarn over Outlined in purple are the stitches that should be done between the border and lace repeat markers Outlined in red is the main body lace repeat
Instructions
Charts A and B are worked as follows: Work blue sts, sl the 1st marker as you come to it (unless otherwise indicated in chart). Work any stitches not outlined. Repeat purple sts to 2nd marker. Repeat red sts to 3rd marker. Repeat purple sts until the number of sts not outlined remain before the 4th marker. Work any sts not outlined. Work blue sts, sl the 4th marker as you come to it (unless otherwise indicated in chart). Legend: place marker ■pm

NoStitch Placeholder-No stitch made. knit knit stitch yo Yarn Over


k2tog Knit two stitches together as one stitch

ssk another stitch asiftoknit.Insert left-hand needleinto front of these 2 stitches and knit them together CentralDoubleDec Slipfirstandsecondstitches together as if toknit.Knit 1 stitch. Pass twoslipped stitchesover the knit stitch.
Uritten Lace
Please consult page 5 for instructions on working the lace repeats.
Chart A
Row 1: k2, pm, yo, slm, [ k1, (yo, ssk) 4x, k1, (k2tog, yo) 4x, k1 Jto next m, slm, yo, pm, k2. Row 2 (and all wrong side rows): k2, slm, yo, p to last m, yo, slm, k2 Row 3: k2, slm, yo, k2,[ k2, (yo, ssk) 3x, yo, dbl dec, yo, (k2tog, yo) 3x, k1 Jto next m, slm, k2, yo, pm, k2. Row 5: k2, slm, yo, k1, [ k1, yo, ssk Jto 2nd marker [ k3, yo,ssk, yo, ssk, yo, ssk, k1, k2tog, yo, k2tog, yo, k2tog, yo, k3 Jto 3rd m, slm, I k2tog, yo, k1 Jto 1 st before 4th m, k1, yo, pm, k2. Row 7: k2, slm, yo, [ k1, yo, ssk ]to 2nd m, [ k4, yo, ssk, yo, ssk, yo, dbl dec, yo, k2tog, yo, k2tog, yo, k4 ]to 3rd m, [ k2tog, yo, k1 Jto 4th m, yo, slm, k2 Row 9: k2,slm, yo,k2,[k1, yo, ssk ]to 2nd m,[ k1, yo,ssk,k2, yo, ssk, yo, ssk, k1, k2tog, yo, k2tog, yo,k2, k2tog, yo, k1 ]to 3rd m, [ k2tog, yo, k1 Jto 2 sts before 4th m, k2, yo, slm, k2 Row 11: k2, sm, yo, k1,[ k1, yo, ssk Jto 2nd m, [ k2, yo, ssk, k2, yo, ssk, yo, dbl dec, yo, k2tog, yo, k2, k2tog, yo, k2]to 3rd m, [ k2tog, yo, k1 Jto 1 st before 4th m, k1, yo, slm, k2 Row 13: k2, slm, yo, [ k1, yo, ssk ]to 2nd m, [ k3, yo, ssk, k2, yo, ssk, k1, k2tog, yo, k2, k2tog, yo, k3 ]to 3rd m, [ k2tog, yo, k1 Jto 4th m, yo, slm, k2 Row 15: k2, slm, yo, k2,[ k1, yo, ssk Jto 2nd m,[ k4, yo, ssk,k2, yo, dbl dec, yo,k2, k2tog, yo, k4]to 3rd m, [ k2tog, yo, k1 Jto 2 sts before 4th m, k2, yo, slm, k2 Row 17: k2, slm, yo, k1,[ k1, yo, sk ]to 2nd m, [ k5, yo, ssk, k5, k2tog, yo, k5 ]to 3rd m, [ k2tog, yo, k1 Jto to 1 st before 4th m, k1, yo, slm, k2 Row 19: k2, slm, yo,[ k1, yo, ssk ]to 2nd m,[ k6, yo, ssk, k3, k2tog, yo, k6 Jto 3rd m,[ k2tog, yo, k1 Jto 4th m, yo, slm, k2 Row 21: k2, slm, yo, k2, [ k1, yo, ssk ]to 2nd m, [ k7, yo, ssk, k1, k2tog, yo, k7]to 3rd m, [ k2tog, yo, k1 ]to 2 sts before 4th m, k2, yo, slm, k2
Chart B
Row 1: k2, slm, yo, k1, [ k1, yo, ssk Jto 2nd m, [ k2, yo, sk, k11, k2tog, yo, k2 ]to 3rd m, [ k2tog, yo, k1 ]to 1 st before 4th m, k1, yo, slm, k2 Row 3: k2, slm, yo,[ k1, yo, ssk ]to 2nd m,[ k3, yo, ssk, k9, k2tog, yo, k3 Jto 3rd m, [ k2tog, yo, k1 Jto 4th m, yo, slm, k2 Row 5: slm, yo, k2,[ k1, yo, sk ]to 2nd m, [ k4, yo, ssk,k7,k2tog, yo,k4]to 3rd m,[ k2tog, yo,k1 ]to 2 sts before 4th m, k2, yo, slm, k2 Row 7: k2, slm, yo, k1, [ k1, yo,ssk Jto 2nd m,[ k5, yo, ssk, k5, k2tog, yo, k5]to 3rd m, [ k2tog, yo, k1 ]to 1 st before 4th m, k1, yo, slm, k2 Row 9: slm, yo,[ k1, yo, ssk ]to 2nd m, [ k6, yo, ssk, k3, k2tog, yo, k6 ]to 3rd m, [ k2tog, yo, k1 ]to 4th m, yo, slm, k2 Row 11: slm, yo,k2, [ k1, yo, ssk Jto 2nd m,[ k7, yo, sk, k1, k2tog, yo,k7]to 3rd m, [ k2tog, yo, k1 ]to 2 sts before 4th m,k2, yo, slm, k2


