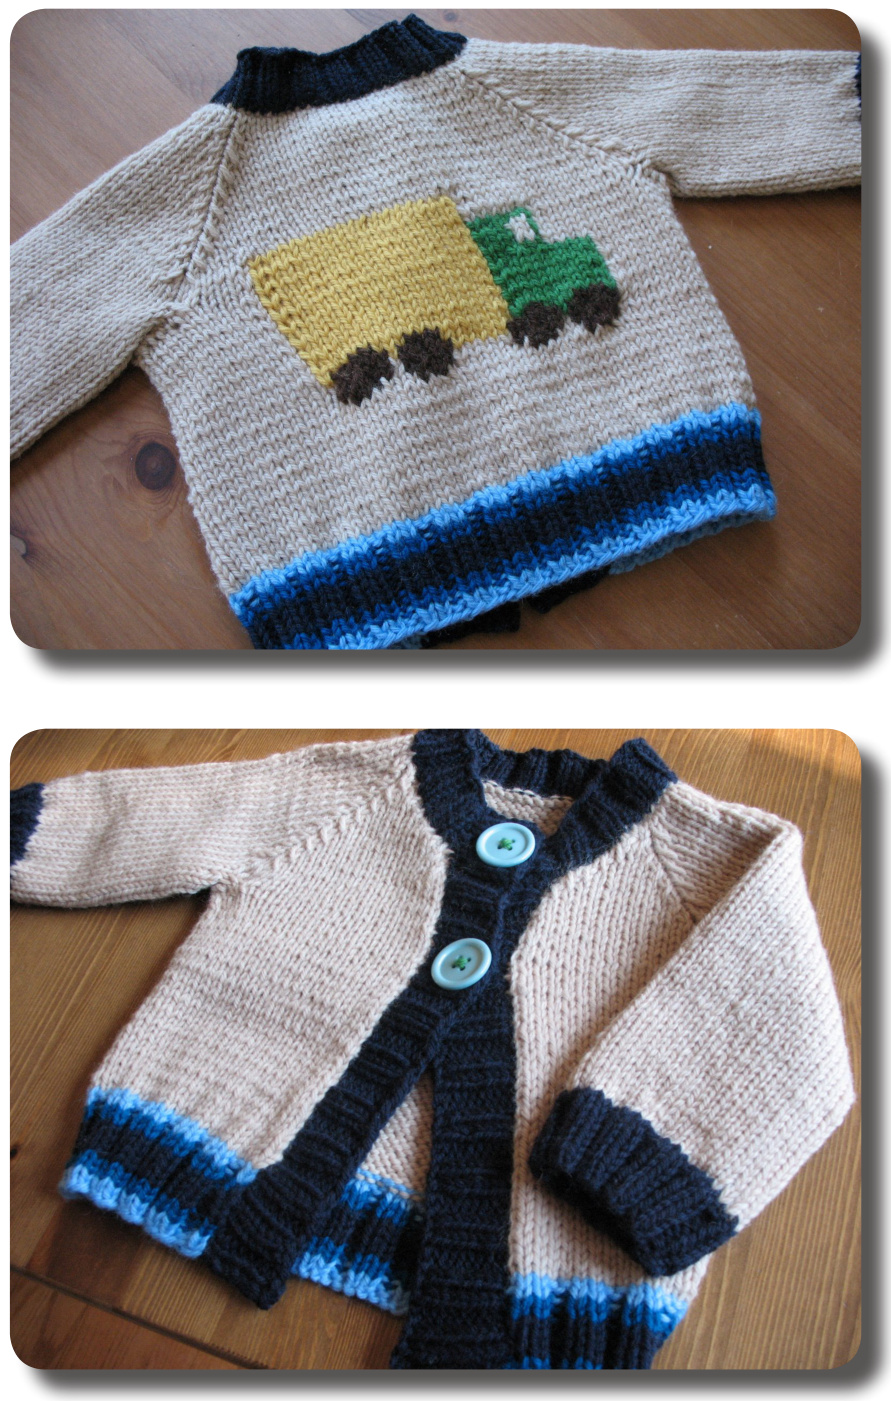
Keep on Truckin
A seamless long-sleeved baby cardigan featuring truck intarsia Uses worsted weight yarn.
Pattern Info:
SizeS: 0-3 (3-6, 6-12, 12-18, 18-24) months Finished Chest Circumference: 20 (21, 23, 24.5, 26.5) / 51 (53.5, 58.5, 62, 67.5) cm Gauge: 4.5 sts &7 ws = 1' in St st Yarn: 440 yds worsted weight yarn of color A (main color), 200 yds for color B (ribbing), & approx. 100 yds of each color used for truck, shown in 220 Woo/ by Cascade (100% Peruvian Highland Wool; 100 g=220 yds) Color A (cream): main color: 2 skeins Color B (navy): ribbing & button band: 1 skein Color C (light blue): stripe in ribbing: 1 skein Color D (bright blue): stripe in ribbing: 1 skein Color E (yellow): truck body: 1 skein Color F (green): truck cab: 1 skein Color G (brown): truck wheels: 1 skein
Needles and other supplies:
24" / 61 cm circular knitting needles & DPNs in size US 7 / 4.5 mm or size needed to obtain gauge 24" / 61 cm circular knitting needles & DPNs in size US 6 / 4 mm or 1 needle size smaller than used to obtain gauge 3 additional spare DPNs, ideally close to size US 7/ 4.5 mm Stitch markers Bobbins for intarsia (not necessary but helpful) 2 pieces of scrap yarn, around 20" / 51 cm in length Tapestry needle or crochet hook to weave in ends 2 buttons, % - %"
Pattern stitches:
Stockinette Stitch (St st): flat: k on RS rws, p on WS rws in the round: knit all rws 2x2 Rib: \*k2,p2; repeat from \* to end.
Techniques:
YO: yarn over (bring yarn to front of work) ssk: Slip the next 2 sts knitwise one at a time. Insert LN into front of both sts and k them together (1 st dec'd) k2tog: Knit next 2 sts together (1 st dec'd) Psso: slip st as if to purl (with yarn in back). K the next st. Insert LN into front of slipped st and lift it to pass it over the knitted st, and then drop it off the LN Psso-r: K1. Then insert LN into front of this knitted st and slip it back onto the LN. Insert the RN into the stitch to the left of the returned st as if to purl and pass it over the returned st and drop it off the RN. Slip the original st that is on the LN back to the RN.
Notes:
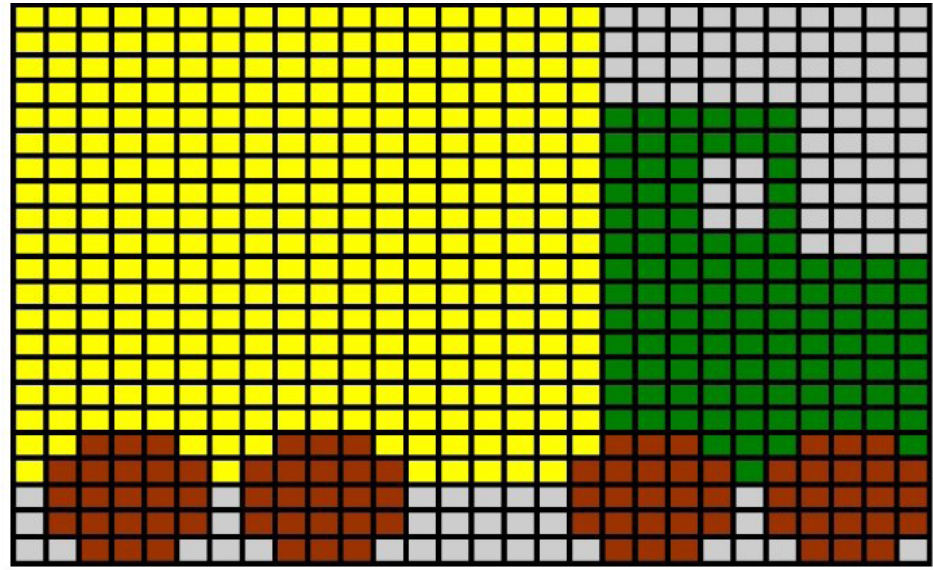
Keep on Truckin' has bottom-up raglan construction. It features a simple truck picture on the back using intarsia technique. When following the chart, you should use two balls of color A for each side of the sweater so you do not have to have the same ball of yarn 'traveling' from one side of the truck to the other. Once you are done working the truck picture you can go back to using one ball of color A. I also recommend this for the couple of rows you are working the tires (color G) of the truck. Use one bobbin for the 2 left side tires and a second bobbin for the 2 right side tires. I highly recommend reading reference books or online tutorials on intarsia first and how to prevent holes before you start on this project. I also recommend that you use a wool-based fiber for this project as cotton is not as forgiving when it comes to intarsia (at least in my experience!)
Abbreviations:
CO = cast on rw(s) = row(s) k = knit p=purl st(s) = stitch(es) BO = bind off St st = stockinette DPN = double pointed needle RN = right needle LN = left needle RS = right side of work WS = wrong side of work pm = place marker sm = slip marker dec'd = decreased inc'd = increased
Chart:
Pattern Instructions:
You will knit up the 2 sleeves of the sweater first
Sleeves (work for both):
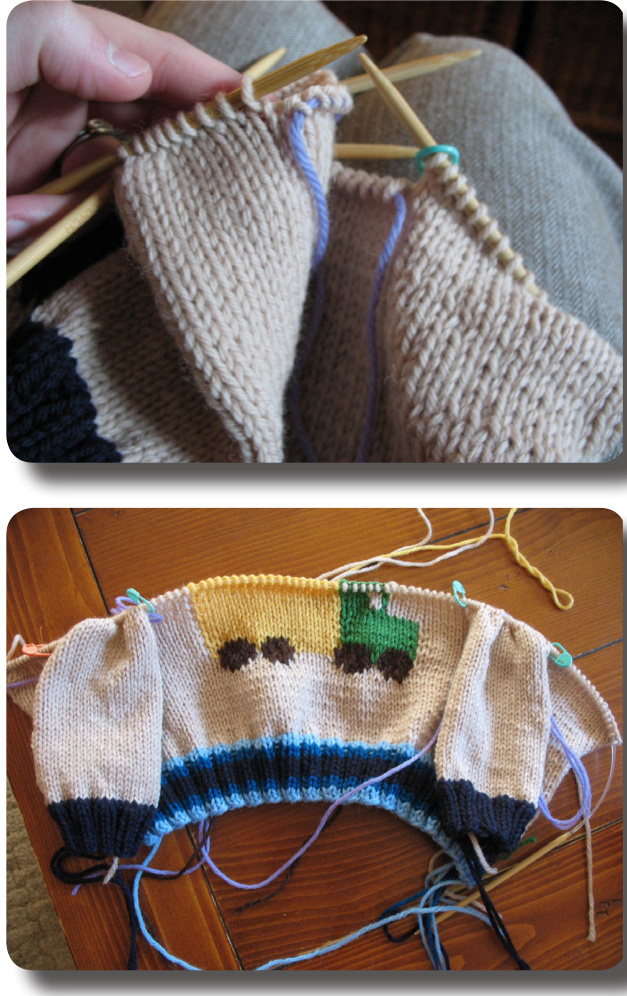
Using color B and smaller DPNs, CO 32 (36,40,44,48) sts for sleeve cuff, distributing the sts among 3 DPNs, pm, join for working in the rnd. Using a 4th DPN work in 2x2 Rib until cuff measures 1" / 2.5 cm Switch to color A and larger DPNs. Work in St st (in the round) until measures 6 (7, 7.5, 8, 8.5)" / 15 (18, 19, 20.5, 21.5) cm fromCOedge · Next rw: K across to last 3 sts ·Thread scrap yarn through tapestry needle. Using this tapestry needle, slip the next 3 sts onto scrap yarn, remove marker, slip the next 3 sts that are at the beg of the round onto the scrap yarn--you should have a total of 6 sts on the scrap yarn. Total sts on needles: 26 (30,34,38,42) Slip the remaining sts on any size DPNs (close to larger size) so it frees up the larger DPNs for the second sleeve.It doesn't matter what size because the sts just need to be “held" for now. Cut yarn and tie scrap yarn ends together in a bow- this will ensure no sts fll off scrap yarn Repeat all of the above steps for second sleeve (except for the second sleeve you can leave the “held" stitches on the larger DPNs Bottom Ribbing: Using color C and smaller24 / 61 cm cirular needle, C0 88 (92, 100, 108 16) sts. Wor in 2x2 Rib for 1.5" / 4 cm. To acheive the same striping pattern as in picture, follow this sequence: CO rw + rw 1 = color C, rws 2-3 = color D, rws 4-7 = color B, rws 8-9 = color D, rws 10-11 = color C) Body:iht colrand ar"/mcie ): 228sts,642,56,6ts pm, k to end (these two markers represent the side “seams") Work in St st (flat) until measures 3.5 (4.5, 5, 5.5, 6) / 9 (11.5, 13, 14, 15) cm from CO edge, ending on a WS rw ·First picture row: k to marker, k 9 (10, 12, 14, 16) sts, begin picture at bottom right of graph, then k to end of rw Continue in St st, working picture as set in graph, until body measures 6 (7, 7.5, 8, 8.5)" / 15, 18, 19, 20.5, 21.5) cm from CO edge, ending on a WS row (note: depending on the size you're doing, the picture may not be done at this point)
Attaching Sleeves:
ad tapestry needle w/ piece of scrap yarn Next row (RS): k to 3 sts before first marke Sleeve Set-Up: Using tapestry needle, slip these 3 sts as if to purl onto scrap yarn, remove marker, slip next 3 sts as if to purl ontoscrap yarn Pick up one of the sleeves (doesn't matter which one) and holding it in front of the sweater, match the underarm sts (on scrap yarn) to underarm sts of the body. Your right hand is holding the main yarn and body of sweater and your left hand is holding the needle that the sleeve sts are on · PM on RN, insert RN into first st on the sleeve needle (this first st is the first st to the left of the underarm sts on scrap yarn), k the rest of the sleeve sts onto sweater body needle, pm k across back sts, continuing truck picture (if not complete yet), to 3 sts before second marker Repeat "Sleeve Set-Up" steps as instructed above, then k to the end of the row Stitch Count = each front: 18 (19,21,23,25), each sleeve: 26 (30,34,38,42), back: 40 (42,46,50,54) You now have both sleeves connected to the body and a total of 4 stitch markers (2 at each side of each sleeve) Next rw (WS): p to end Work in St st for 2 more rws
Raglan Decreases:
Rw 1 (RS): \*k to within 2 sts of marker, psso, sm, psso-r, repeat from \* 3 times, k to end Rw 2 (WS): p to end, slipping markers as you reach them Repeat above 2 rows: 1 (2, 3, 4, 6) more times Stitch Count = each front: 16 (16,17,18,18), each sleeve: 22(24,26,28,28), back: 36 (36,38,40,40)
Neck shaping:
Rw 1 (RS): k1, ssk, \*k to within 2 sts of marker, psso, sm, psso-r, repeat from \* 3 times, k to last 3 sts, k2tog, k1 Rw 2 (WS): p to end, slipping markers as you reach them Repeat above 2 rws 6 more times for all sizes. BO all sts.
[Note for O-3 mo size: JUST for this size, on the last increase round you will not have enough sts on each front to do a k1 for the first and last stitch. On the last increase round, omit the k1 for the first and last st. So your last increase row will be: ssk, \*k to within 2 sts of marker, psso, sm, psso-r, repeat from \* 3 times, k to last 2 sts, k2tog.1 Stitch Count = each front: 2 (2,3,4,4) sts, each sleeve: 8 (10,12,14,14) sts, back: 22 (22,24,26,26) sts
Neck Ribbing:
Using color B and smaller 24" / 61 cm circular needles and starting at right neck edge, pick up and k 7 sts along curved neck front, then pick up and k all sts along right front, right sleeve, back neck, left sleeve, left front, then the 7 sts along the curved left neck front, making sure total number of sts picked up is divisible by 4. Work in 2x2 Rib until measures .75" / 2 cm. BO in pattern.
www. thebrownstitch. com
Button Bands:
Right-side button band:
Using color B and smaller 24" / 61 cm circular needles and starting at bottom of right side, pick up and k 3 sts every 4 rows Total number should be divisible by 4—-make note of this number Work in 2x2 Rib for 3 rws. Before beginning 4th row, mark with safety pins or removable markers where you want to put top 2 buttonholes. Top hole should be 3 sts in from the end. Second hole should be about 2.5" / 6.5 cm down from first hole Rw 4: \*work to marker, remove it, YO, K2tog, repeat from \* twice Work in 2x2 Rib for 3 rws. BO in pattern.
Left-side button band:
Using color B and smaller 24" / 61 cm circular needles and starting at top left-side, pick up and k the same number of sts as you did for the right side. Work in 2x2 rib for 7 rws. BO in pattern.
Finishing:
Weave in all ends. Take each set of 6 sts that are on scrap yarn at the underarm and put them on smaller DPNs. Use the grafting technique to seam up these underarm sts. To avoid holes, you may also want to pick up a stitch to the left and right of each side. To see a tutorial for using the grafting technique, check one out here: http://knitty.com/ISSUEsummer04/FEATtheresaSum04.html. Block and attach buttons. If you have any questions about this pattern I'd love to hear from you! thebrownstitch@gmail.com Images and pattern @ 2010 Elizabeth Smith. All rights reserved. It should not be duplicated or distributed without permission from the designer. Contact designer regarding commercial use of this pattern.


