Baby Mary-Jane Sweater Shoes
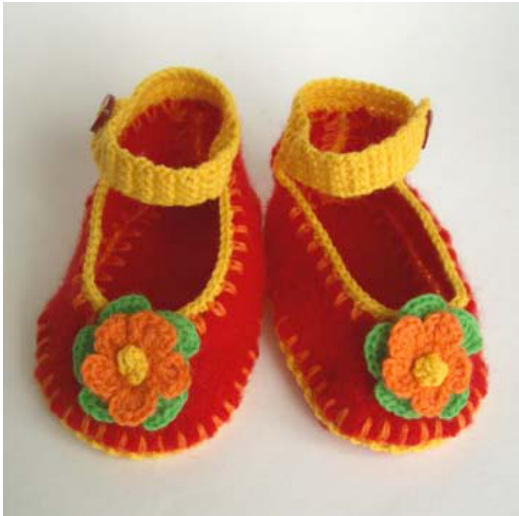
Size: 6-12 Months (approx. 4-1/4"/10.5cm sole length)
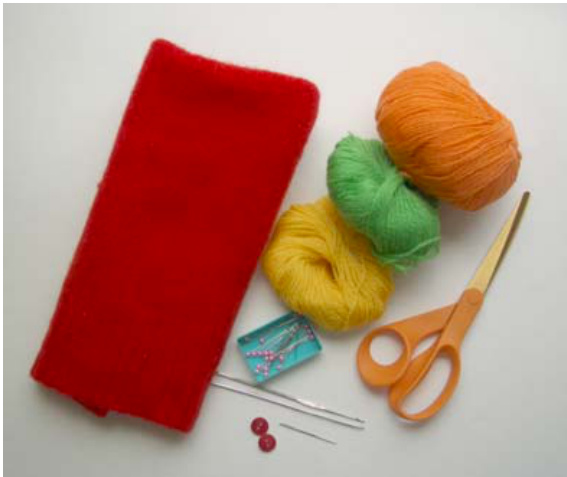
Materials:
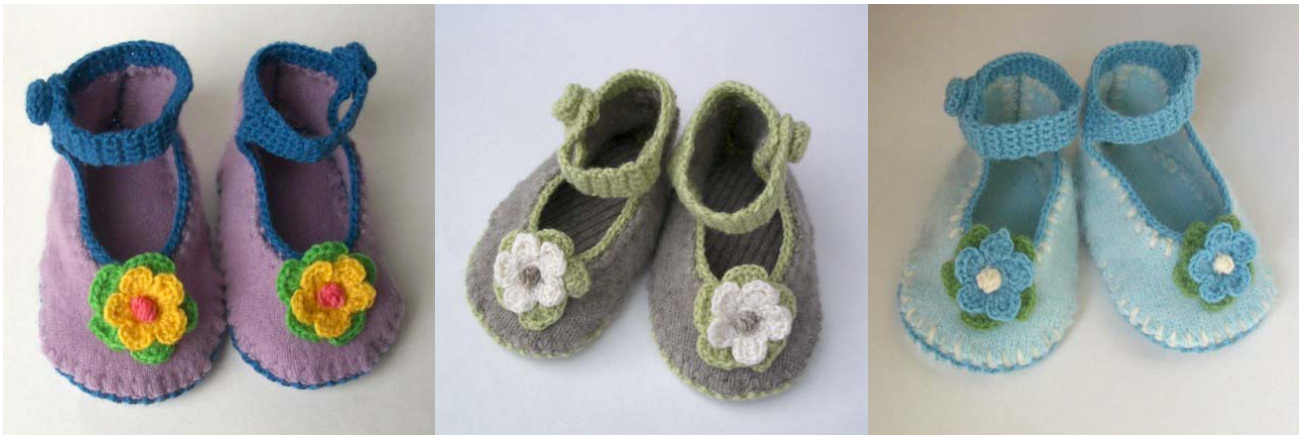
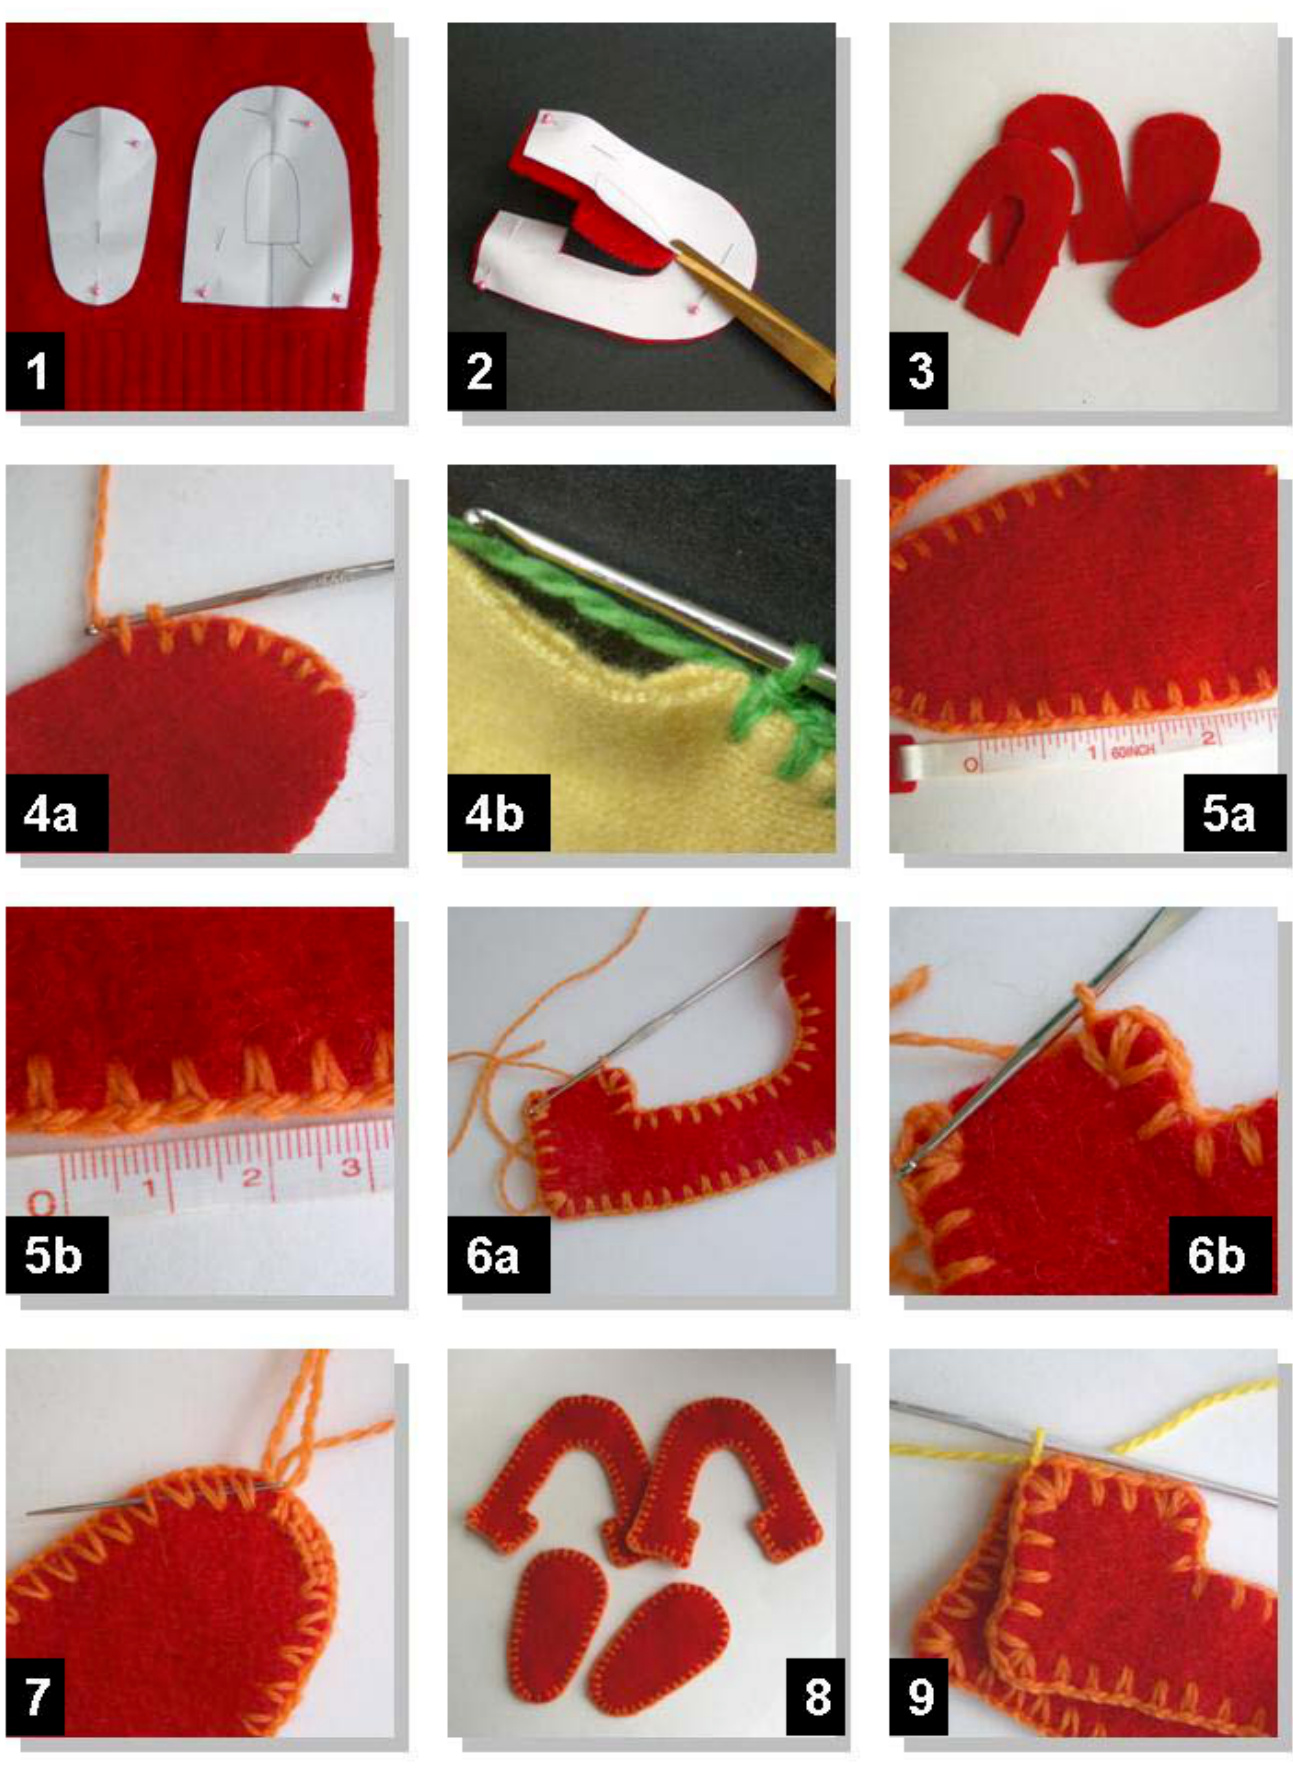
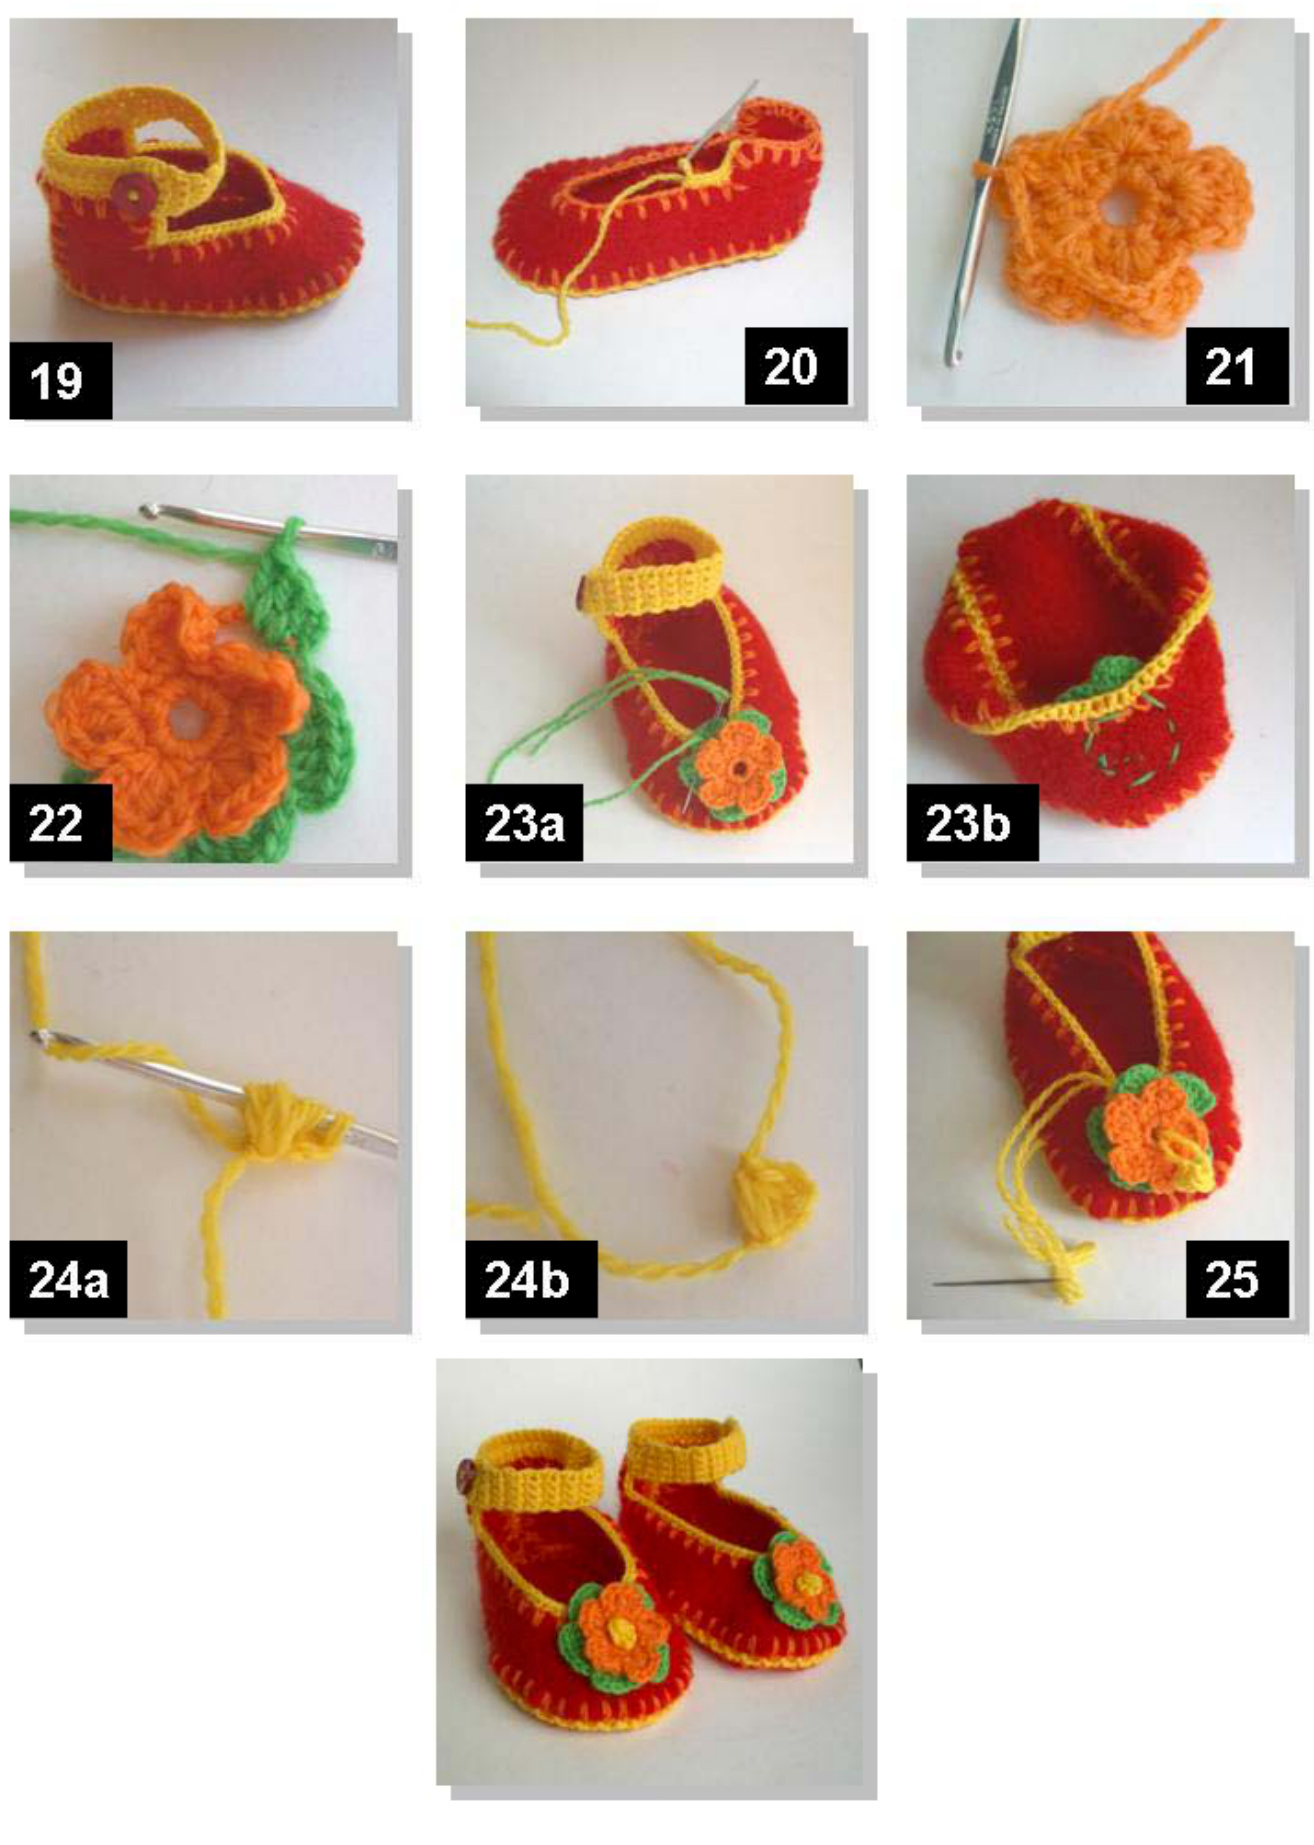
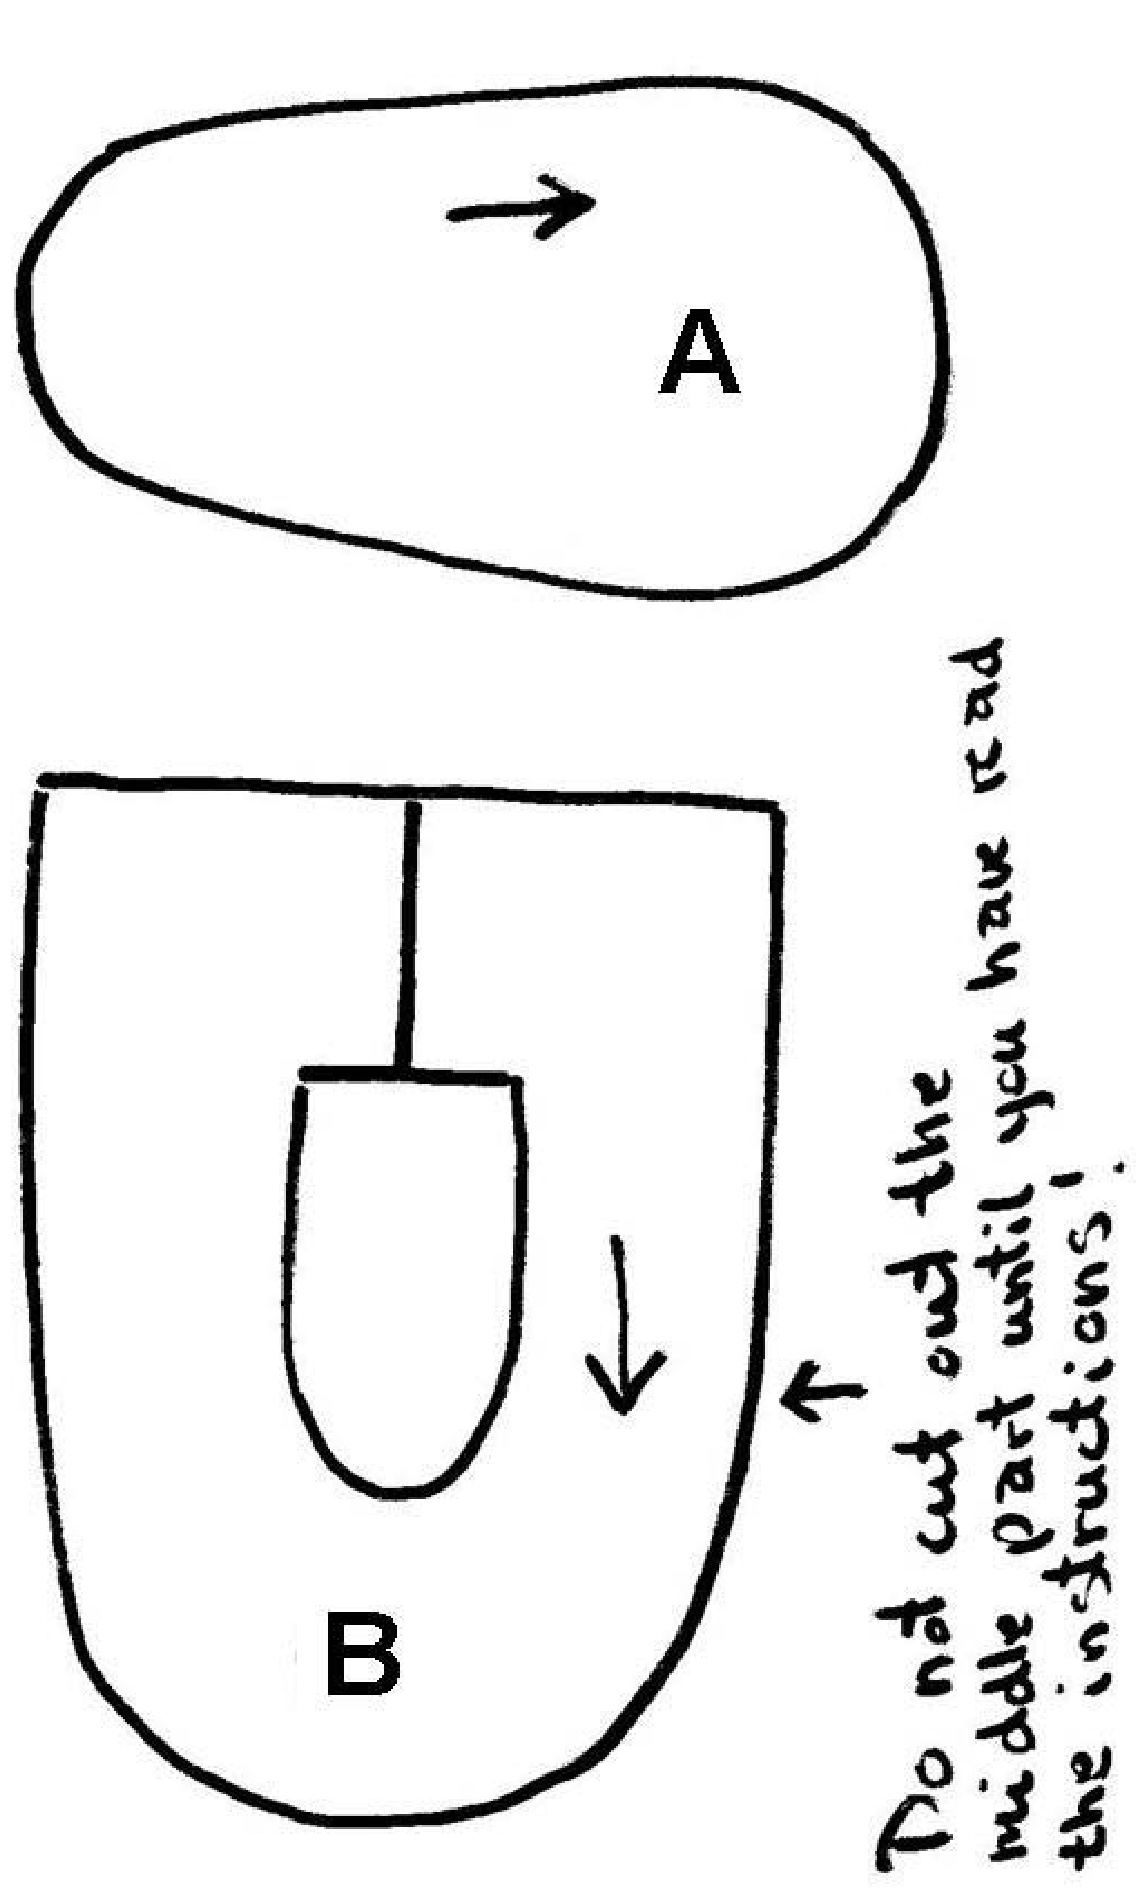
Part of a plain knit felted/shrunk sweater, approx. 1/8" (3mm) thick(use doublelayer material if needed to achieve thickness) Fingering wool yarn in two complimentary colors (Color 1, Color 2), plus green for the flower decoration 2 small buttons, or push buttons Steel crochet hooks 1.75mm and 2.5mm (Us 7 and 0) (UK 21/2 and 00) Tapestry needle Scissors Pins If you're planning on felting/shrinking a sweater for this project - see notes on page 3. Abbreviations US UK Hdc Htr Half double (treble) crochet Dc Tr Double (treble) crochet Yoh Yoh Yarn over hook Trace pattern pieces (A,B) onto wax paper, freezer paper, regular paper or tissue paper, then cut out pieces. Cut Two of pattern piece B - do not cut out the middle opening. Pin pieces onto a single layer of knit fabric as shown (Photo 1). Cut 2 each of A and B. Cut through paper template to cut out opening for B (Photos 2/3). It is important that the pieces are cut on a single layer, otherwise the pieces will not be the same size when cutting in thick Woolknit. If using a thin knit material, pin pieces onto a double layer of knit fabric before cutting. 1. With Color 1, and smaller hook, crochet as follows: attach yarn to piece with a sl st, \*1 SC, Ch 1\*, repeat around all pieces. (Photo 4a) (Photo 4b shows working in double layer of knit material) Work 3 \*1 SC, Ch 1\* in ea. corner (Photo 6a/6b). Join with Sl st to first SC, break offyarn. The space between ea. SC should be approx. 1/4" (5mm). (Photos 5a-inches/5b-centimeters) The spacebetweenea.SCis notas important askeepingspacingeven all around each piece. Secure and cut threads when done. (Photos7/8) 2. Joining. Change to larger hook and Color 2. Starting at the top back of part B (heel), attach the two back pieces with a Sl st in top SC loops (loop=space created by Ch st), (Photo 9), Ch 1 and continue working in loops between SCs, \*sl st in next loop on the left, Ch 1, sl st next loop on the right, Ch 1\*. Repeat from \* to \* until bottom of heel, do not cut thread. (Photo 10/11) Note: If thenumber of loops oneachsideis uneven, sl st twice in one,or more, loop(s) to make things even - do the same thing when joining A to B. 3. Fold A and B to determine center front and back and mark with pins. (Photo 12) Pin together pieces - pinning on piece B (Photo 13a/13b). 4. Holding the work with B facing you, continue joining A to B with \*sl st, Ch 1\* in first loop on A, then \*sl st, Ch 1\* in next loop on B. (Photo 14). Repeat from \* to \* all around A. Join with Sl st in first sl st on A. Break off yarn. (Photo 15a/15b) 5. Ankle strap. Right shoe: Starting on the right top of back heel piece, attach Color 2 with Sl st in corner loop, Ch 1. Continue with 2 SC in each loop all around the top edge of the shoe. Join with Sl st in first SC, Ch 1. Note: Depending on the space between loops, 2 SC in each may be to much, use \*2 sC in next loop, 1 SC in next loop\* instead. ##Continue with 3 more rows of SC across back heel piece. (Photo 16). Ch 1, and make 4 SC down the side of these rows. \*Ch 1, turn, 4 SC\*. (Photo 17) Continue from \* to \* until strap measures approx. 3" (7.5cm), or for about 22 rows. 6.Button hole (omit this step if using push buttons). Ch 6, SC in last SC on previous row (loop created), Ch 1, turn, 9 SC around loop, Sl st in last SC of previous row. Break off yarn. (Photo 7. Secure all loose threads and cut. Attach button securely to back heel piece. ## (Photo 19) 8.Left shoe: Starting on the left side of back heel piece (Photo 20), join Color 2 with Sl st to corner loop. Continue with 2 SC in each loop all around top edge of shoe as for right shoe. Join with sl st in first sl st, Ch 1, turn, repeat from ## to ## above. 9. Flower decoration. In Color 1, Ch 6, join loop with sl st in first Ch. Ch 1, 11 SC around loop, join with sl st in first SC. Flower petals: \*Ch 3. In same SC make 4 Dc, 1 Hdc, skip 1 SC and sl st in 2nd SC\*. Repeat from \* to \* four more times (five petals total). Ch 3, turn to back of work sl st in 3rd Dc, \*Ch 5, sl st in 3rd Dc of next petal\*, repeat from \* to \* four more times. (Photo 21) Break off thread. Leaves: Join green yarn with Sl st in first loop at back of flower. In same loop, \*Ch 3, 4 Dc, 1 Hdc, sl st in next loop\*. Repeat from \* to \* four more times. (Photo 22) Break off thread at about 16" (40cm) - this will be used to attach the flower to the shoe. 10. Fasten any loose threads on all parts and cut, EXCEPT the green thread on flower. 11. Place flower on front of shoe and secure in place by stitching through leaves with the green thread. (Photo 23a/23b) 12. With Color 2, make a chain approx. 9"(23cm) from beginning of yarn, Ch 3, yoh, \*sl st in 1st ch, yoh\* two more times, pull yarn through all loops, Ch 1, cut yarn approx. 9"(23cm) from needle, pull yarn through loop.(Photo 24a/24b) Pull both yarn ends through tapestry needle and pull through the middle of flower, fasten securely on reverse (Photo 25).
Notes:
There's no need to stitch/secure the felted knit material - it may look "scary", but will not come apart. When washed it will become slightly "tighter" as the wool thread willfirm and meld into the knit. Sometimes pieces of the knit material may protrude through the loops between SCs - it will not affect the integrity of the shoe, nor will it fray or unravel. If desired, tuck the material through to the inside of the shoe with a hook, and secure with sewing thread for a“cleaner” look. Buttons MUST BE FASTENED SECURELY as they are a potential choking hazard should they come loose. Secure thread with 2-3 knots before attaching button, pull thread through button holes at least 3 times, finish by securing thread with 3, or more, knots. Adjust sizes by adjusting the size of the printout (85% for a smaller shoe, 110% for a larger shoe, etc.). Measure the length of Part A for desired size. Use these measurements as a guide: 0-3M:3-1/3"(8.5cm) 3-6M: 3-2/3"(9cm) 6-9M: 4"(10cm) 9-12M: 4-1/3"(11cm) 12-18M:4-2/3"(12cm) 18-24M: 5"(13cm) \*The size of this pattern\* If you plan on intentionally felting/shrinking a sweater for this project, make sure the inside label of the sweater does not say "superwash". Superwash wool will not felt/shrink. Choose a sweater with at least 80% wool content (Merino, cashmere, alpaca, angora - or any mix of those). Plain knit sweaters work best - no patterns, cables or ribbing. How to felt/shrink a sweater: Place the sweater with 1-2 pairs of jeans in the washing machine on light regular cycle (30-40c) , incl. spin (usually about 6 minutes). Check the sweater - if it doesn't seem to have felted enough - repeat. Then place in dryer, again with the jeans, to get rid of any lint. It is the agitation of the jeans that felts the sweater, not the temperature of the water or the dryer. Caution: Lint fibers from the sweater may get into the agitator of your washing machine (it will damage the washing machine!), it is best to place the sweater inside a mesh sweater bag, or inside a pillow case, to avoid this.