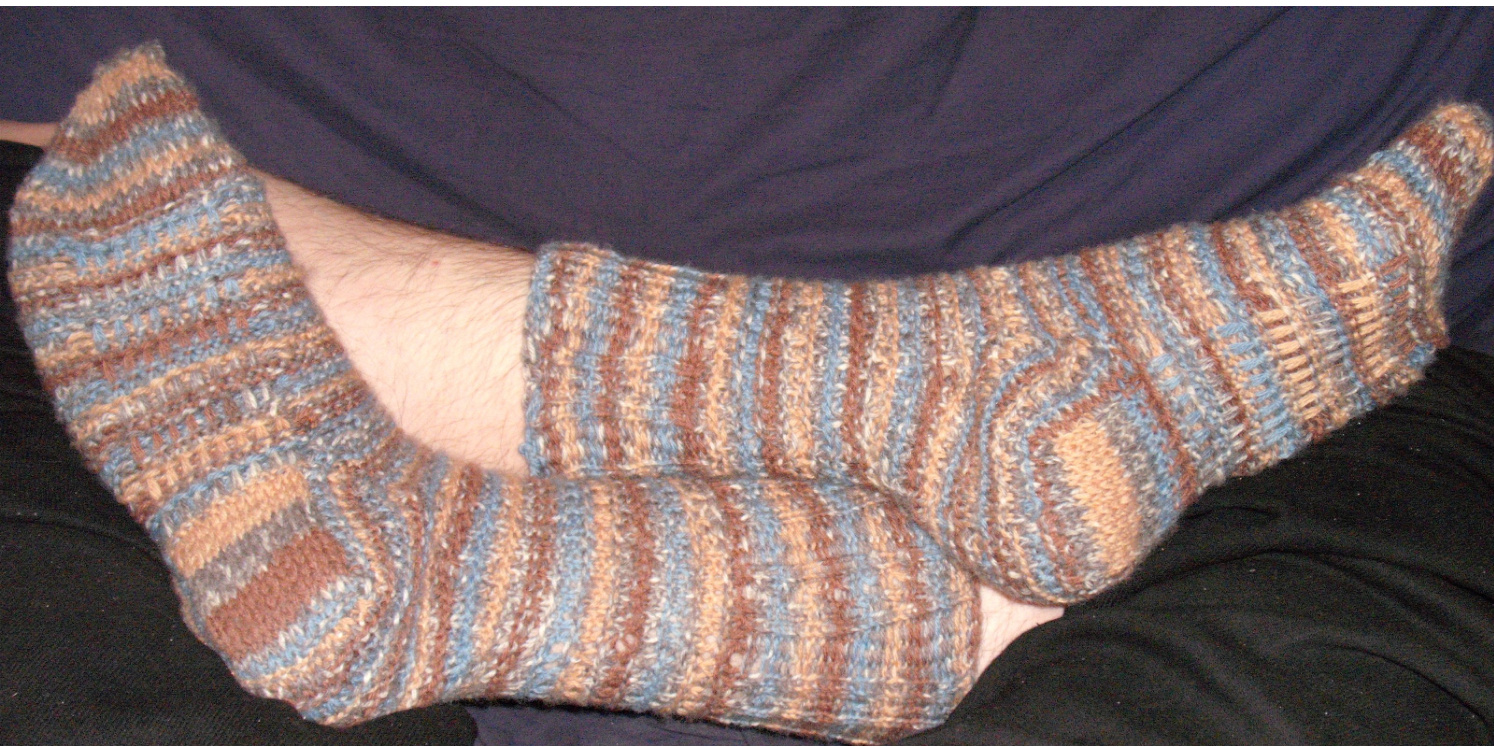
Shadow..Check Socks
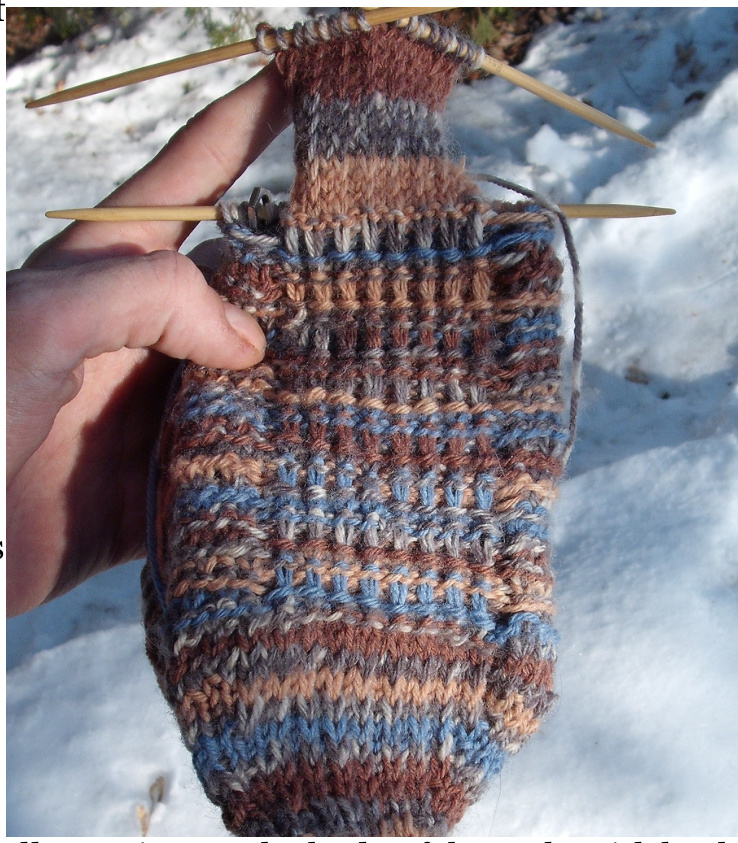
These socks came about from an interest in Barbara Walker's shadow check pattern, a slipstitch pattern that gathers the fabric tightly, giving it a soft, thick texture with a lot of deth. I'd wanted to knit this one for a while, having swatched it months ago. In the back of my mind, I expected it to be ideal as the sole for a pair of socks, so had noted it down and decided to use it someday. My original intent was to simply use shadow check for the soles and knit the rest of the sock in stockingette. However, I realised while planning that trying to knit that pattern would result in the stockingette rapidly growing longer than the shadow check. To fix that, I knit the body of the socks ina garter stitch / seed stitch combination that I refer to as seed rib. Itgives them density and stretch, resulting in a very heavy pair of socks that nearly resemble slippers. Finally, a slight apology and word of warning: the density of these socks translates directly to increased yarn use. A pair of socks this size takes me about 15om of yarn in stockingette. These, on the other hand, took twice as much, which also translates into double the number of stitches for the same size.
Requirements
300m sport weight yarn 3.5mm double-pointed needles 3.5mm straight needles A crochet hook
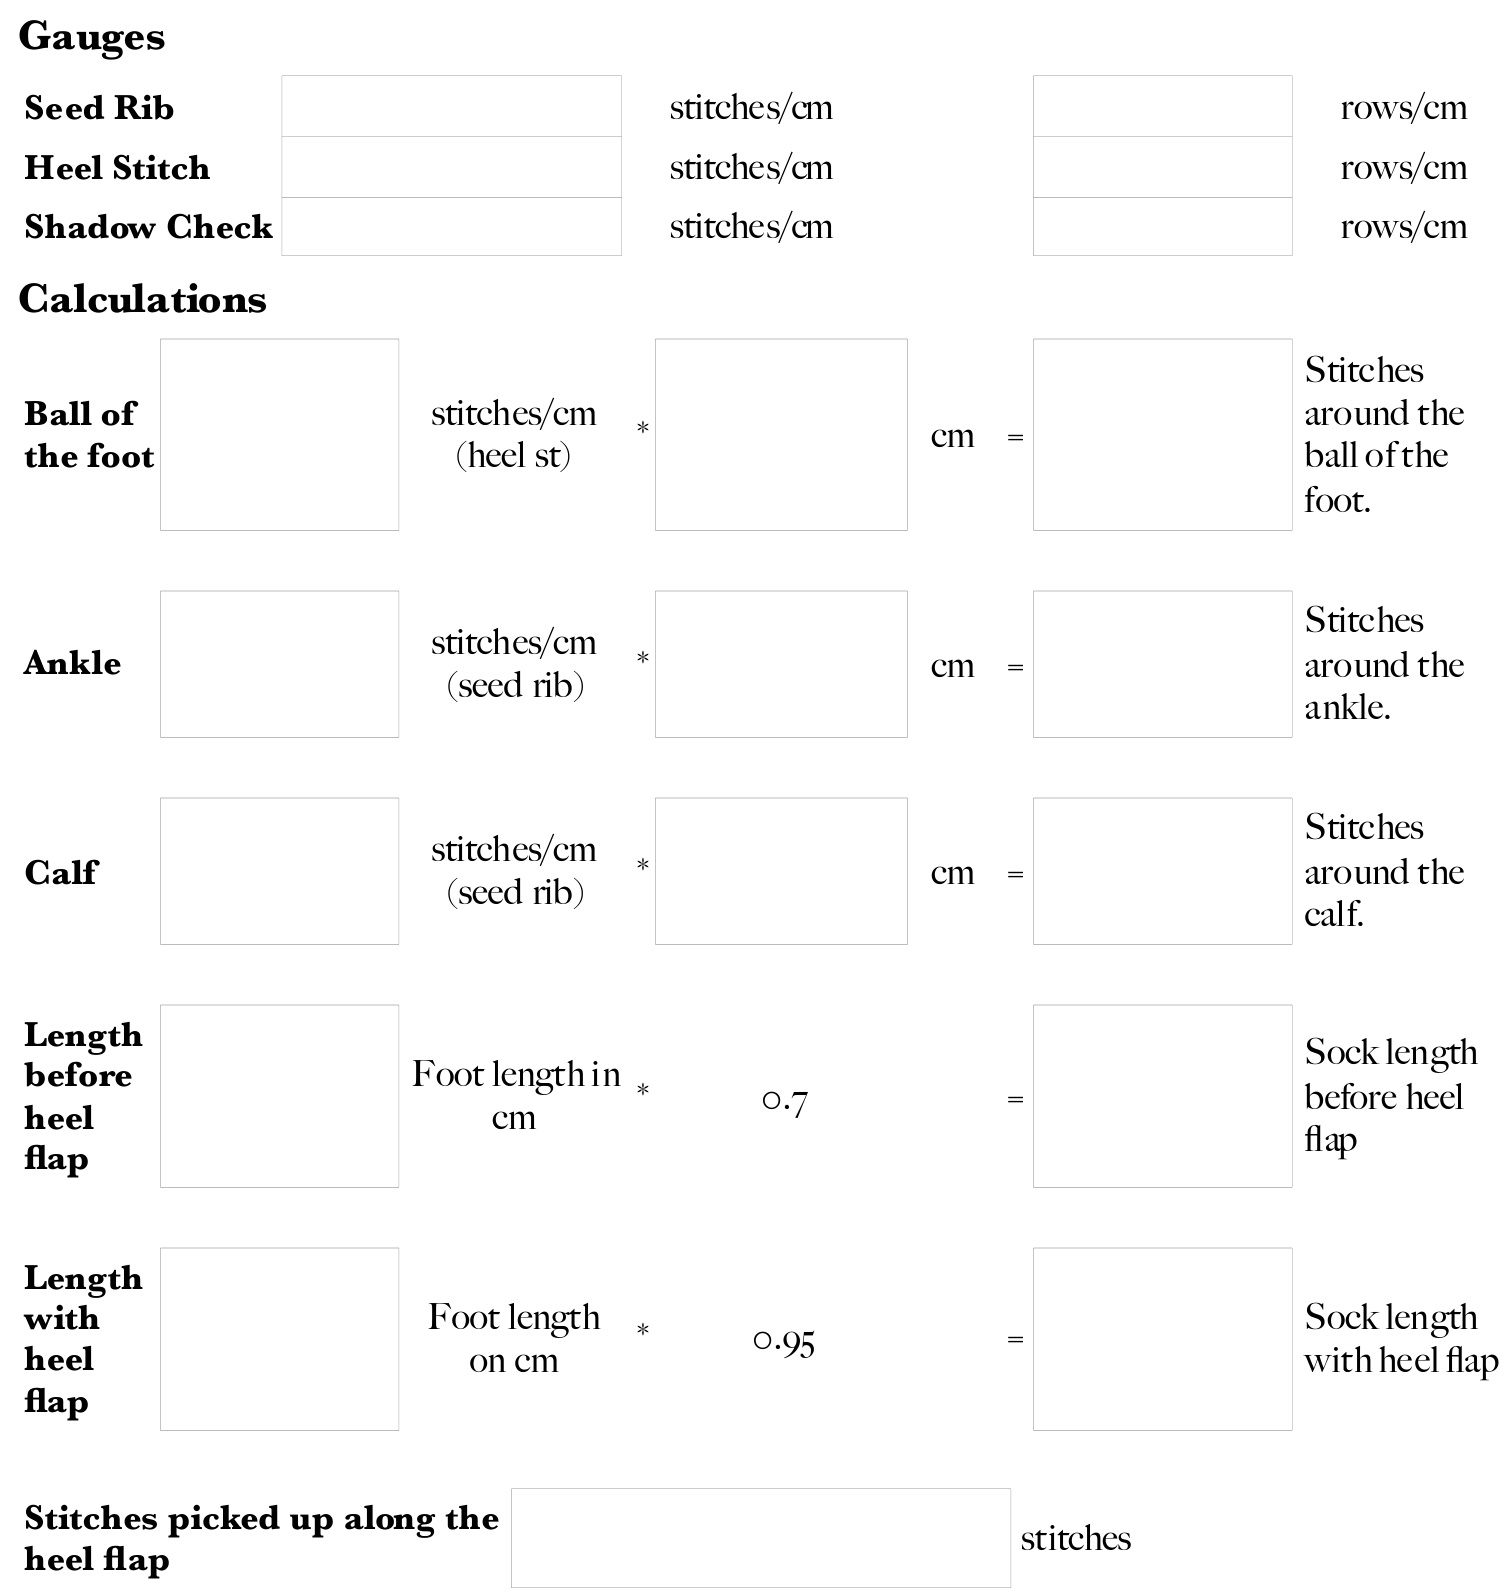
Measurements
You will need to know: $\blacktriangleright$ The circumference ofthe ball of the foot. $\blacktriangleright$ The length ofthe foot. $\blacktriangleright$ The circumference ofthe ankle. $\blacktriangleright$ The circumference ofthe middle calf. $\blacktriangleright$ Your gauge in circular heel stitch. Your gauge in seed rib. For know gauge, soit's simple to measure directly on the sock itself.
Instructions
Casting On
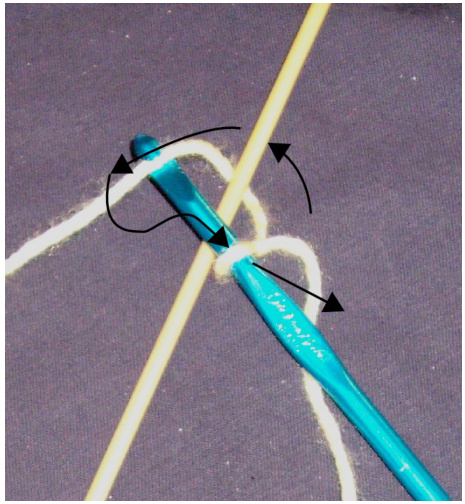
With scrap yarn, preferably cotton or acrylic, (as these two materials do not felt to themselves, making undoing the chain simpler,) crochet a provisional cast on of eight stitches. The way that I find easiest is to tie a slip knot around the crochet hook, then place the yarn behind the knitting needle. Pull one loop through the loop already on the crochet hook, making a loop around the knitting needle in the process. Repeat, placing the yarn behind the crochet hook and crocheting one stitch until you have eight stitches around the Crochet a few more stitches, so that one end of your cast on has a chain of crocheted stitches coming off of it. Pull the scrap yarn through the final loop, making a loose knot. This end is the one from which you will undo the cast on after a few rows of knitting.
llustration 2: A chain of crochet stitches around a knitting needle. With your working yarn, knit four rows of stockingette: 1. Knit the row. 2. Purl the row. 3. Knit the row. 4. Purl the row. The result should be a crochet chain, four rows of stockingette and eight live stitches on the needle. Next, untie the knot at the end of your crochet chain and, lightly tugging on the tail of yarn, undo the chain. As you undo the chain, stitches of working yarn should be freed. Pick these up with a seco nd double-pointed needle, undoing the entire chain. You should now have a needle at the top and the bottom of your work, each with eight stitches on it. This means that the cast on is completed and it's time to get set up for knitting the sock in the round.
Knitting the Toe
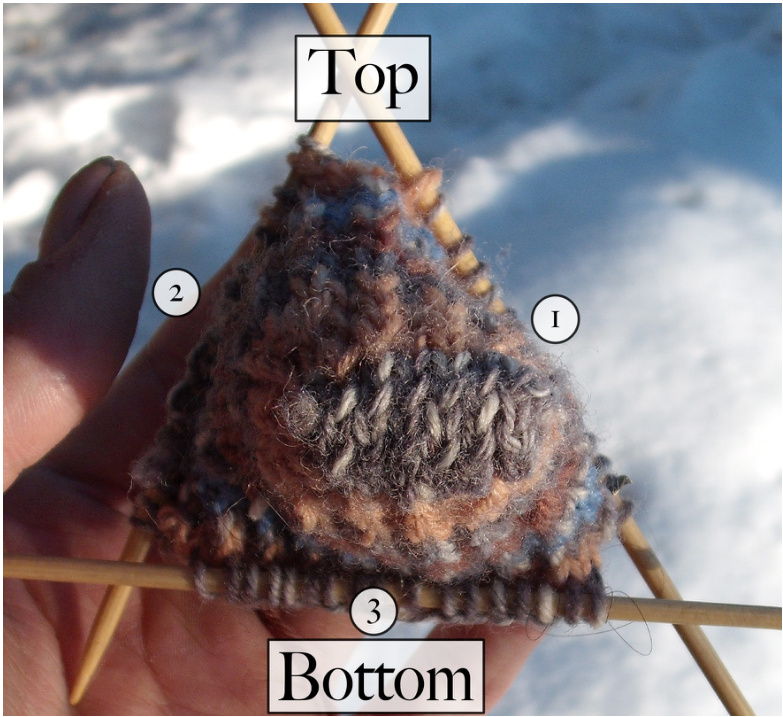
Divide the stitches on the two needles so that there are four stitches on each of four needles. The yarn will be on the first stitch of one needle. This is needle 1 and the first needle ofthe top of the sock. The top and bottom are evenly divided over needles 1 and 2 and 3 and 4, respectively. In keeping with the overall density and texture of the rest of the sock, the toe is knit using heel stitch. This is a little fussy, as the slip stitches for heel stitch have to be done in between the toe increases.
Heel Stitch Toe
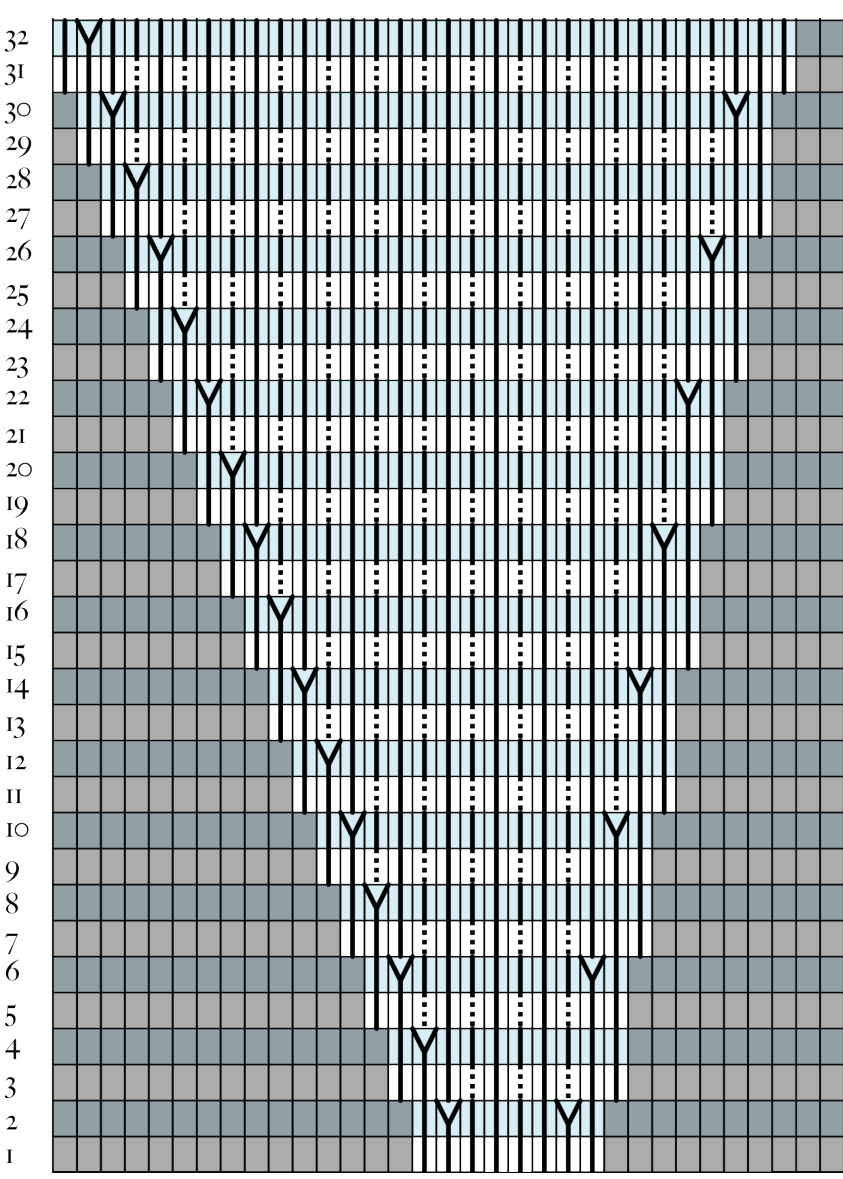
This pattern is the Heel Stitch Toe chart, written out. As per the illustration, the llustration 3: Numbering for the knitting needles around the toe of the sock.

top is needles 1 and 2, the bottom is needles 3 and 4. Stitches between $\{{\mathrm{braces}}\}$ are repeated the number of times indicated. Stitch counts are in brackets and indicate the number of stitches on both the top and the bottom. Knit this pattern until you have enough stitches around to go snugly around the ball of the foot. End on an even-numbered round. 1. Knit the entire round. 2. Top: k1, kfb, k4, kfb, k1 (10) Bottom: k1, kfb, k4,kfb, k1 3. Top: k2, {s1 wyib, k1}(3 times), k2 Bottom: k2, (k1, s1 wyib}(3 times), k2 4. Top: k8, kfb, k1 (11) Bottom: k1, kfb, k8 5. Top: k2, {s1 wyib, k1}(4 times), k1 Bottom: k1, (k1, s1 wyib}(4 times), k2 6. Top: k1, kfb, k7, kfb, k1 (13) Bottom: k1, kfb, k7, kfb, k1 7. Top: k3, {s1 wyib, k1}(4 times), k2 Bottom: k2, {(k1, s1 wyib}(4 times), k3 8. Top: k11,kfb, k1 (14) Bottom: k1, kfb, k11 9. Top: k3, (s1 wyib, k1}(5 times), k1 Bottom: k1, {k1, s1 wyib)}(5 times), k3 10. Top: k1, kfb, k10, kfb, k1 (16) Bottom: k1, kfb, k10, kfb, k1 11. Top: k2, {s1 wyib, k1}(6 times), k2 Bottom: k2, (k1, s1 wyib)(6 times), k2 12. Top: k14, kfb, k1 (17) Bottom: k1, kfb, k14 13. Top: k2, {s1 wyib, k1}(7times), k1 Bottom: k1, (k1, s1 wyib}(7 times), k2 14. Top: k1, kfb, k13, kfb, k1 (19) Bottom: k1, kfb, k13, kfb, k1 15. Top: k3, (s1 wyib, k1}(7 times), k2 Bottom: k2, (k1, s1 wyib}(7 times), k3 16. Top: k17, kfb,k1 (20) Bottom: k1, kfb, k17 17. Top:k3, [s1 wyib, k1}(8 times), k1 Bottom: k1, (k1, s1 wyib}(8 times), k3 18.Top: k1, kfb, k16, kfb, k1 (22) Bottom: k1, kfb, k16, kfb, k1 19. Top: k2, (s1 wyib, k1}(9 times), k2 Bottom: k2, (k1, s1 wyib}(9 times), k2 20.Top: k20, kfb, k1 (23) Bottom: k1, kfb, k20 21. Top:k2, (s1 wyib, k1)(10 times), k1 Bottom: k1, (k1, s1 wyib)(10 times), k2 22.Top: k1, kfb, k19, kfb, k (25) Bottom: k1, kfb, k19, kfb, k1 23. Top: k2, (s1 wyib, k1}(10 times), k2 Bottom: k2, (k1, s1 wyib}(10 times), k2 24. Top: k23, kfb, k1 (26) Bottom: k1,kfb,k23 25. Iop: K3, (s1 wyib, K1§(11 times), K1 Bottom: k1, {k1, s1 wyib}(11 times), k1 26.Top: k1, kfb, k22, kfb, k1 (28) Bottom: k1, kfb, k22, kfb, k1 27. Top: k2, {s1 wyib, k1}(12 times), k2 Bottom: k2, (k1, s1 wyib)(12 times), k2 28.Top: k26, kfb, k1 (29) Bottom: k1, kfb, k26 29. Top: k2, {s1 wyib, k1}(13 times), k1 Bottom: k1, {(k1, s1 wyib}(13 times), k2 30.Top: k1, kfb, k25, kfb, k1 (31) Bottom: k1, kfb, k25, kfb, k1 31. Top: k3, {s1 wyib, k1}(13 times), k2 Bottom: k2, {k1, s1 wyib}(13 times), k3 32.Top: k29, kfb, k1 (32) Bottom: k1, kfb, k29
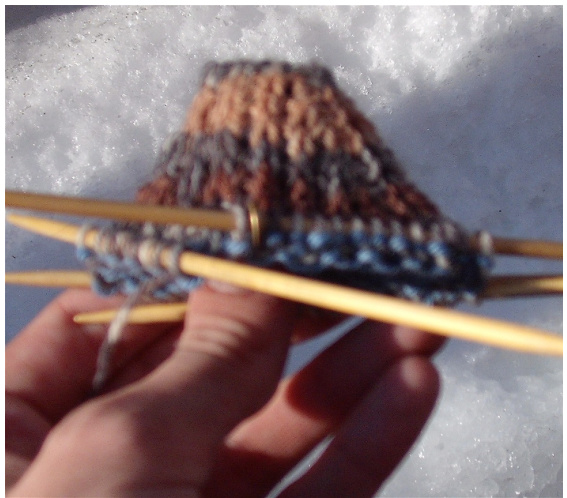
llustration 4: Heel Stitch Toe. The raised stitches are the slipped stitches, the lowered stitches are the knit stitches.
Knitting the Body of the Sock
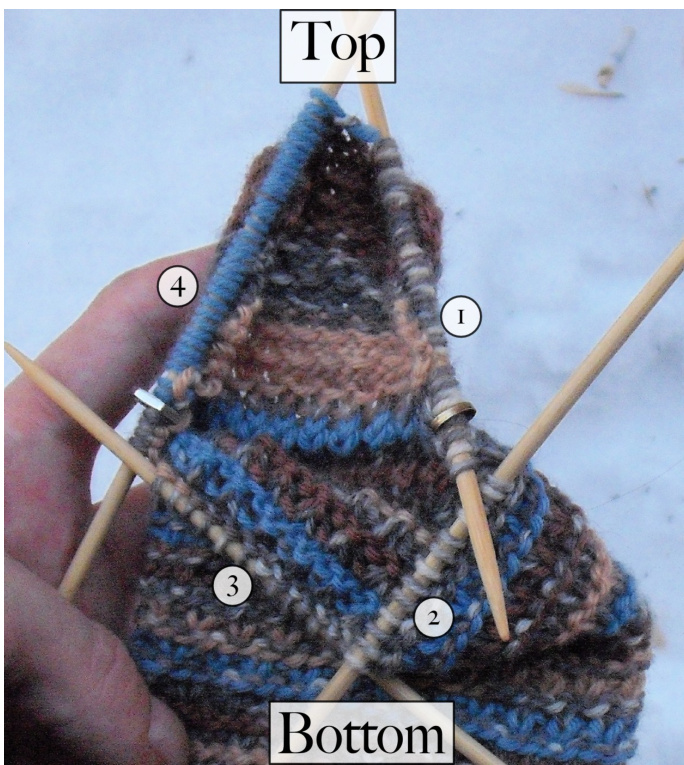
First, you'll need to divide the stitches again, this time onto three needles. Count the stitches on needles 3 and 4 and divide it by three, rounding down. This is the number of stitches that should be moved from the sole to the sides and top of the sock. For the rest of the pattern, these will be referred to as “side stitches". For example, I have 25 stitches on needles 3 and 4 combined:
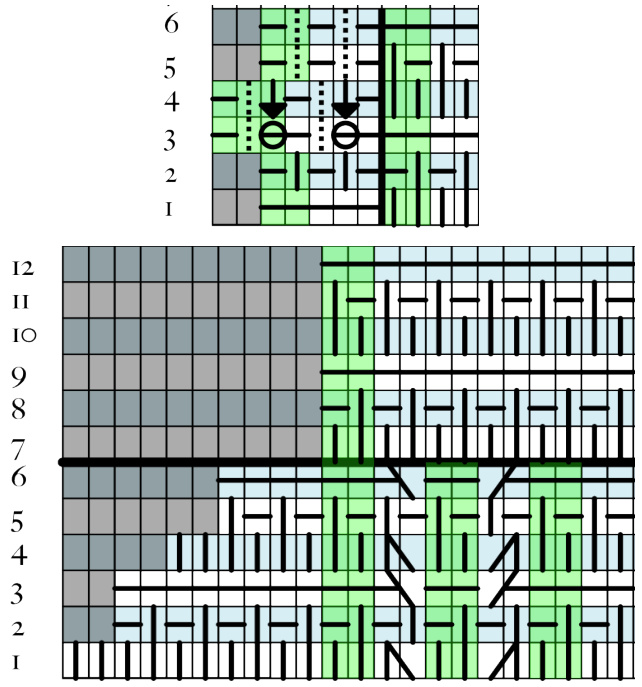
So I want to move eight stitches, or four from each side. First, transfer all the stitches from needle 4 to needle 3. Needle 3 will knit the sole ofthe sock, needles 1 and 2 will knit the top. Next, place a 11 $$ \frac{25}{3}{=}8\frac{1}{3}{\approx}8 $$ Illustration 5: Num bering for the needles while knitting the body of the sock. half of the side stitches from needle 3 to needle 1. Place a marker at the end of needle 2 and transfer the other half of the stitches from needle 3 to needle 2. If you are moving an odd number of stitches, move the extra stitch to the needle that has fewer toe increases (needle 1 for a right sock, needle 2 for a left.) Count the stitches on needle 3 again. If there is an odd number of stitches, perfect. If, on the other hand, it's even, transfer one more stitch. If you transferred an odd number before, place this extra stitch on the opposite needle from the odd stitch. Otherwise, place it on the needle with fewer toe increases, as above. The pattern for the body of the sock is 6 rounds long. Stitches in $\{{\mathrm{braces}}\}$ arerepeated, either to the end of needle 3 (for bottom stitches) or until the end of needle 2 (for top). The side stitches are knit in pattern for the top. 1. Top: $\{{\mathrm{Knit~}}1\}$ Bottom: {Purl 1} 2. Top: {k1, p1} Bottom: p1, (k1, p1} 3. Top: {p1} Bottom: p1, {yop, s1 wyib, purl 1} Here,the yarn should wrap over the slipped stitch, making one stitch crossed over the other. 4. Top: {k1} Bottom: p1, {drop the yo from the previous row, si wyib, p1} Dropping the yarn over looks like it should leave a very loose stitch around the slipped stitch. However, purling the next stitch adjusts its tension, bringing it tighter once more. 5. Top:{p1, k1}Bottom: p1, {s1 wyib, p1} 6. Top: (p1} Bottom: p1, {s1 wyib, p1}
Knitting a Gusseted Heel
Continue knitting the 6 rounds of pattern for the body until it measures $70\%$ of the length of the foot. For me, each pattern repeat is less than a centimetre long, so you can expect this to be rather a lot of knitting. My foot is 22cm long, so I calculate that as follows: $$ 22\,c m*0.7{=}15.39 $$ Finish on round 6 of the body pattern, having just knit the bottom ofthe sock. For the next while, needles 1 and 2 will not be used, so do what you will with the stitches on them, be it transferring them to a holder, placing them on a spare needle or scrap of yarn or simply leaving them on the two double-pointed needles. The heel is knit flat and the yarn is currently placed so that the next row is the wrong side, so, to complete the shadow check pattern, knit the row, which will finish the sole with a row of purl stitches. Then, with straight needles ofthe same size as your double-pointed needles, knit the following 2-row pattern:
Heel Stitch
1. (right side) k1, {s1, k1} 2. Purl the row This is heel stitch again. However, since there are no increases or decreases at play, it's 16 times simpler than it was at the toe. Knit this until the heel is $95\%$ of the length of the foot (i.e. 4-6 rows below the foot length).
Turning the Heel
Next, knit row 1 of the heel stitch pattern, stopping 2 stitches before the end ofthe row. Turn the sock and knit row 2, stopping 2 stitches before the end of the row. Knit row 1 again, stopping 4 stitches before the end of the row, then row 2, stopping 4 stitches before the end of the row.
lustration 6: The body ofthe sock, with heel flap. Continue like this, losing two more stitches each row, until you have either 9 or 7 stitches left live and have just completed a purl row (row 2). Next, knit row 1 again, knitting the last live stitch together with the first saved stitch and knitting the se cond saved stitch. Turn your work and knit row 2, purling the last live stitch together with the first saved stitch and purling the second saved stitch. Repeat those two steps until all the stitches are live again. Congratulations. You're halfway done the heel.
Picking Up from the Heel Flap
You should have just completed a purl row so, to get your yarn in position to knit in the round, knit across the heel one more time, this time using two double-pointed needles, one holding each half of the heel. Begin picking up stitches along the side of the heel flap with the second double-pointed needle used to knit the heel. If you look at the selvedge, you should have a raised row of slipped stitches below a slightly-curled row of knit stitches. You'll want to pick up one stitch per row along the heel, so insert a needle in the hole beneath the two strands of the knit stitch, insert your double-pointed needl into the hole under neath it and knit one stitch. Repeat this for every row ofthe heel, as well as picking up two stitches from the first stitch on the top of the sock in order to ensure that there's not a hole between the heel and the top of the sock. Note the number of stitches you picked up, place a marker at the end of the needle and knit the side stitches onto it. This keeps you from working the decreases across a gap between needles. Knit across the top ofthe sock, transferring stitches onto two double-pointed needles if needs be. With the second double-pointed needle,pick up the same number of stitches along the heel flap as you did on the other side, leaving a marker before the picked-up stitches. Finally, transfer the picked-up stitches and the side stitches to the other nee dle on the back of the sock. Time for the final change in needle numbering. As before, the needles are numbered in clockwise order. The two across the top of the foot are needles 2 and 3. The two making up the heel are 1 and 4. That's it. The heel has been turned, the stitches have been picked up. All that's left is to decrease the heel gusset until the sock is the same size as it was at the ball ofthe foot.
Gusseting
Compared to everything you've been through so far, this bit is easy. Knit each round using the seed rib pattern. To determine where in the pattern to start count the number of stitches on needle 1. If it's even, start the pattern on round 1, if it's odd, start on round 4. Two stitches before the marker on needle 1, llustration 7: Numbering for the needles over the heel, ankle and calfof the sock.
stop. If you are on aknit round, k2rog. If you are on a purl round, p2Tog. If you are on a seed round, do not decrease. Continue knitting seed rib until you get to the marker on needle 4. If you are on a knit round, ssk. If you are on a purl round, s1, P1, pso. If you are on a seed round, do not decrease. Continue knitting this pattern until you have the same number of stitches as you did for the ball of the foot.
Seed Rib
1. Knit the round 2. k1, p1, repeat 3. Purl the round 4. Knit the round 5. p1, k1, repeat 6. Purl the round
Ankle
If the ankle is to be smaller than the ball of the foot, continue knitting seed rib for three rounds. Once you have done that, work decreases as follows: If you are on a seed round, do not decrease. If you are on a knit round, knit the first stitch of needle 1, ssk, knit to the last three stitches on needle 4, K2roG, K1. If you are on a purl round, purl one stitch, s1, P1, Psso, purl to the last three stitches on needle 4, P2ToG, P1. Decrease in this way until you have the right number of stitches for the ankle.
Calf
Knit four repeats of the seed rib pattern. Count your stitches. If they are not divisible by 6, increase via KFBs in the knit rounds as you knit rounds 1-5 of a fifth repeat. Otherwise, knit those rounds without increase.
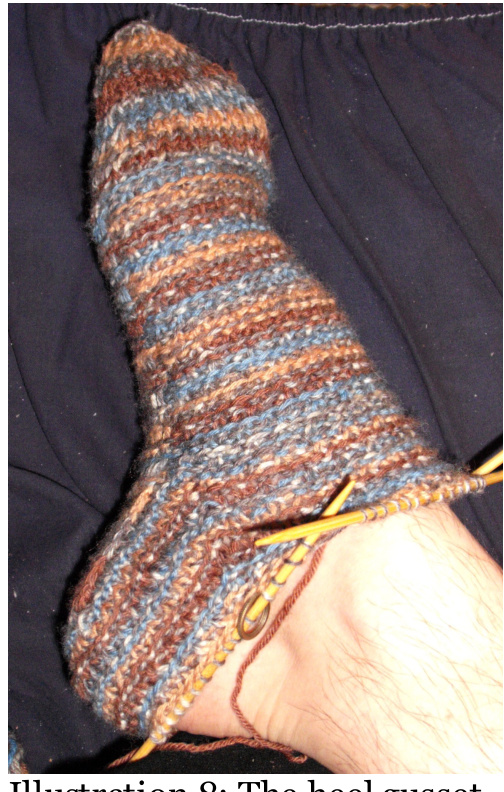
Illustration 8: The heel gusset, That done, it's time to begin ribing. The pattern for the rib laiiway Kin. is another Barbara Walker one: embedded moss stitch ribbing, with a single amendment. Itll be worked over 6 stitches, rather than 7, to ensure that its repeat length matches that of the seed rib.
Embedded Moss Stitch Ribbing
Repeat these 6 stitches around the entire circumference of the sock. 1. p2,k2, p1, k1 2. p2,k2, p1,k1 3. p2,k1, p1, k2 4. p2, k1, p2, k2 This gives a rib that is a 2-stitch purl gutter between columns of knit stitches, with a twocolumn moss stitch pattern between them. Knit this ribbing until the sock is as long as you want it, knit two rounds in p2, K4 ribbing, then cast off very loosely with the following patter n: P2, K4.
Notes
Left Sock
For the left sock, reverse top and bottom on the toe, that way the majority of the increases are occurring on the left-hand side. Heel, ankle and calfare knit in the same way as for the right sock.
Worsted Weight Yarn
As the pattern functions in centimetres rather than stitches and rows, it can be knit just as easily in worsted weight yarn, if you want an incredibly heavy and warm pair of socks.
Knit Stitch Toe
If you would prefer a less dense or a less fussy toe, on round 3 and every successive oddnumbered round, rather than the K1, s1 pattern, simply knit the round.
Variant Ankle and Calf
Rather than knitting them in seed rib, another option is to knit the gusset, ankle and calf of the sock in garter stitch.
Garter Stitch
1. Knit the round 2. Purl the round In this case, when you're two stitches before the first marker on a knit round, k2roG. On a purl round, p2rog. When you reach the second marker on a knit round, ssk. On a purl round, s1, P1, Psso. If you are decreasing at the heel for the ankle, do so as you would for seed rib, but on every other pattern repeat. So, knit two rounds with decreases, two rounds without, two rounds with, etc. After the decreases, knit 14 repeats of the pattern. Mistake-stitch ribbing or K1, P1 rib are likely to look better than embedded moss stitch ribbing on this variant.
Variant Ribbings
If you want a simpler ribbing along the calf rather than using embedded moss stitch ribbing , simply P1, K1 around the sock. Alternately, ensure that you have a number ofstitches one less than a multiple of 4 and knit the following pattern:
Mistake-Stitch Ribbing
1. {k2, p2}(repeat to 3 stitches before the end of the round), k2, p1 2. p1, k2, {p2, k2}(repeat to the end of the round}
Increasing the Calf
If you wish to increase for the calf, do so in the ribbing: at the start of a repeat of a ribbing pattern, PFB the second stitch of the first column of purl stitches. Knit in pattern until the last repeat and again PFB the second stitches of a P2 column. Knit an entire vertical repeat ofthe pattern, remembering that the first repeat now starts with a p3 and has a P3 in the last repeat, and increase again, this time on the second and second-last columns of purl stitches. Continue like this, increasing in the first and last columns to have 2 purl stitches rather than 3, then knitting an entire vertical repeat of the pattern, until the calfis as large around as you want it to be. For the last two rows and casting off you should purl any purled stitches and knit the four pattern stitches.
Charting
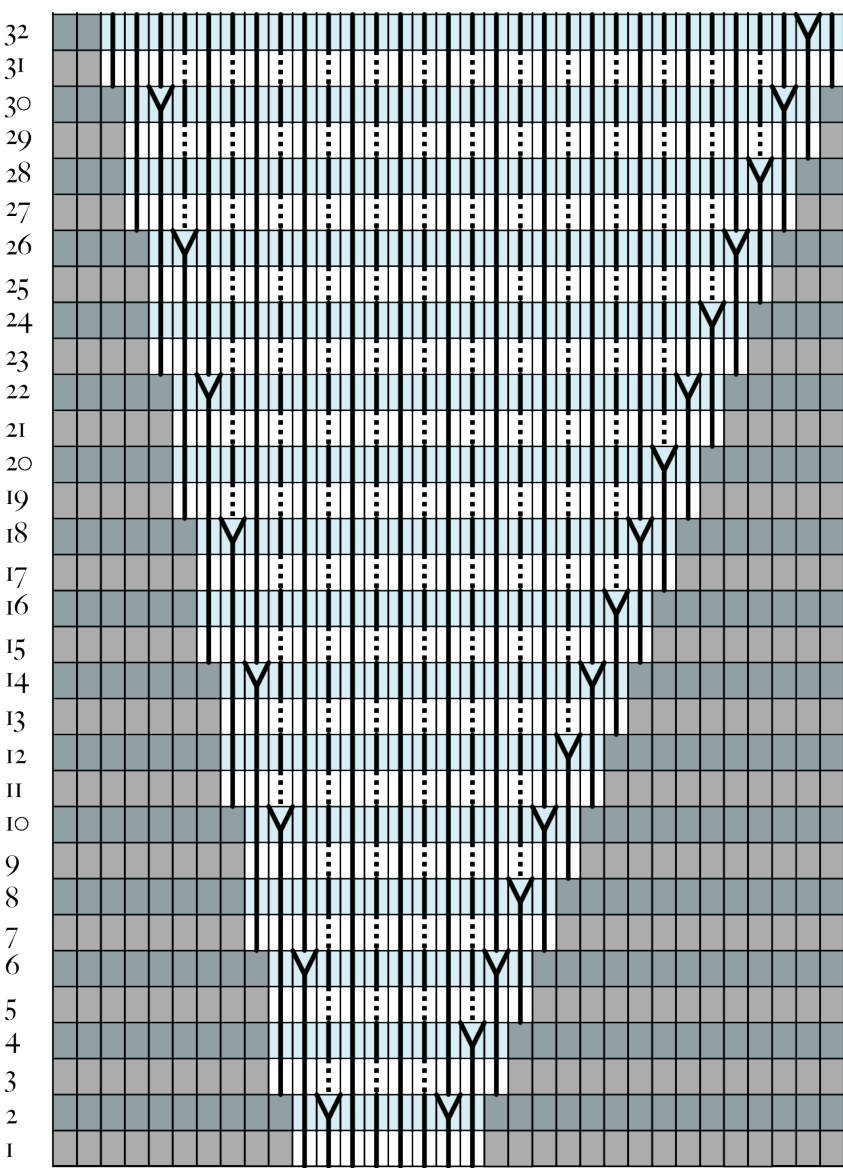
The Heel Stitch Toe chart should be followed only until the sock is large enough around to fit snugly around the ball of the foot. In the Body chart, stitches in green are repeated until the end of that half of the sock (top halfis the right side, bottom halfis the left. The thick vertical bar separates the pattern for the top half from the pattern for the bottom. In the seed rib chart, the stitches in green are repeated, the first two until the markers, the third to the end of the sock. The half of the chart below the thick horizontal bar ilustrates the decreases at the gusset, while the half of the chart above the bar illustrates seed rib as an all-over pattern. The embedded mostitch ribbing and mistake-stitch ribbing charts are tobe repeated around the sock.
Charts
Heel Stitch Toe
Top
Body
Embedded Moss Stitch Ribbing
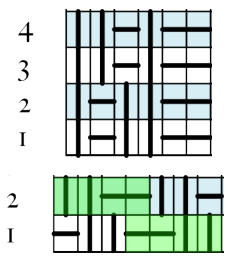
Mistake-Stitch Ribbing
Legend and Glossary
k Knit one stitch. p Purl one stitch s wyiblp oe with yarn inback Plae th yaras ftoknit. Slipnstih purlwise. yop Yan over (purlwise): Place theyarmasiftoknit. When thenextstithis purled, this creates one stitch with a hole beneath it. drop Drop a stitch: Remove the stitch from the left needle and leave it between the needles. Usually done with stitches created in a previous row. Y ko Knit front and back Knit one stitch. Without removing the stitch from the needle, insert the right needle through the back loop ofthe stitch on the left needle and knit a second stitch, sliding the stitch offofthe left needle. kztog Knit two together Inserthe right needle knitwise through the frst two stitches on the left needle. Wrap the yarn around it and knit them as a single Stitch. ssk Slip slip knit: Slip two stitches knitwise withyarn in back. Insert the left needle through the front lops of these stitches, wrap the yarn around the right needle and knit these two stitches. 十 pfb Purl front and back: Purl one stitch. Without removing the stitch from the needle, insert the right needle through the back loop ofthe stitch on the left needle (from left to right) and purl a second stitch, sliding the stitchofof the left needle. ptog Purl two together Iert the righ nedle purlwisethrough the frst tw stitches on the left-hand needle. Purl both stitches as a single stitch. sl, pl, Slip one, purl one, pass slipped stitch over Slip one stitch purlwise with psso yarn in front. Purl the second stitch. Lift the slipped stitch over the purled stitch.


